
Create a placeholder
You can work with placeholders in two ways: using our Add-In that was introduced in
Getting started
guide or manually. We use standard Mail Merge functionality of MS Word. It means that every placeholder is
essentially a Mail Merge field. You can use DocProcessor Add-In to easily create a placeholder in one click.
However, you can still open and edit placeholder in a usual MS Word way.
Working with placeholders using Add-In
DocProcessor Add-In is an MS Word template document with macros and buttons. Its features are included inside
and you can see them when you open it for editing. However, it is also possible to install this Add-In globally
in MS Word so that all Add-In features would be available all the time.
Working with placeholders manually
It can be useful for you to know how to work with placeholders manually, especially when you need to edit
them.
Remember, you must always edit the value of the placeholder using «Edit field» option, don’t try
to change it by simply retyping, because in this case, only visual value would be changed and actual merge
field value left the same (such a mistake can make you confused, so be careful).
Expressions and advanced features
Placeholders in DOCX documents support FreeMarker template engine. It means you can use special expressions and
functions inside placeholder, for example, for formatting and calculations. The effect of these
expressions is not limited to placeholder itself, because they can be combined with other placeholders and
even change the whole final document look. This gives you a very powerful template possibility, for example,
to repeat part of the document several times or hide it depending on some conditions. You can build a very
flexible template in one single file that can produce a large set of different documents with little work.
To better understand how to create expressions you should have at least basic knowledge of FreeMarker.
Actually, it is a quite simple tool if you don’t dive into advanced features that it has. It usually used for
generating HTML-pages, but it is not limited to them and you mustn’t be familiar with this technology.
FreeMarker can template any text file and office document is actually a file that contains text the same way
as HTML-page does. We recommend you to use following links to learn FreeMarker (you can simply don’t think
about HTML in this tutorials, see it as a simple text with no meaning):
- Overall info
- FreeMarker at glance
- Quick CheetSheet
- Built-ins
- Full reference
FreeMarker has advanced features that go beyond the scope of office document templates. To guide what you should
use in your templates below are a list of corresponding functionality with explanations and examples.
You can use this information in conjunction with official FreeMarker documentation and sometimes it would
be necessary for you to read it for more fine level details. We’ve also prepared a set of
ready to use examples which will help you to get started creating your own templates.
You can simply get one of the examples and modify it or copy its elements into your own templates.
Using Expressions:
Every FreeMarker expression has a common rule that it must be enclosed in ${}
brackets. For example, you will see a lot of examples in FreeMarker documentation that follows this format.
However, there is no need to type them every time when you create placeholders, because of our MS Word Add-In
adds them automatically. It means that you can take an example of the FreeMarker expression from the
documentation or other source and use it as is just without brackets.
Common expressions:
- If the field doesn’t exist, then put default value:
${City!"New York"} - Set default value if the field has no content:
${City?has_content(City, "New York")} - Concatenation of strings:
${Field1 + "," + Field2} - Change value based on condition:
${(Approved=="Yes")?then(Approved, "Declined")} - Make letters uppercased:
${Field1?upper_case} - Type only first 5 characters:
${Field1[0..4]} - Math operations:
${Field1?number + 200}
Using if-conditions:
You can show a part of the document on condition. There are special elements in FreeMarker which are called
directives. Directives add you a possibility to change document structure. They are different from simple
placeholders because they can span several lines. To define directive you need two elements:
the first for directive start and the second for the directive end.
Directives have following general form:
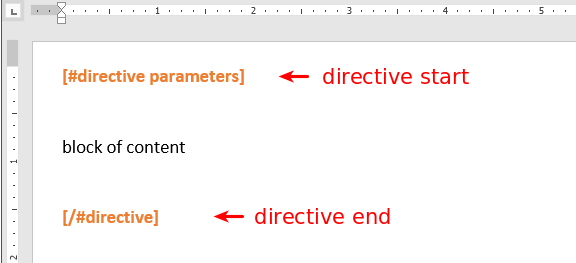
Notice square brackets here. In FreeMarker every directive has a special format: its name is prefixed
with # (hash) symbol and it has brackets. For example, you will see a lot of examples in FreeMarker
documentation which is like:
[#if] ... [/#if]
or
<#if> ... </#if>
Actually, you don’t need to worry about this format, because our MS Word Add-In adds them automatically.
You need to know about this only to understand how you can take any example of the FreeMarker expression
from the documentation or other source and use it as is just without brackets and # (hash) symbol.
Let’s continue with directive. The parameters is a list of values. It can be a field from your data,
but also a result of an expression.
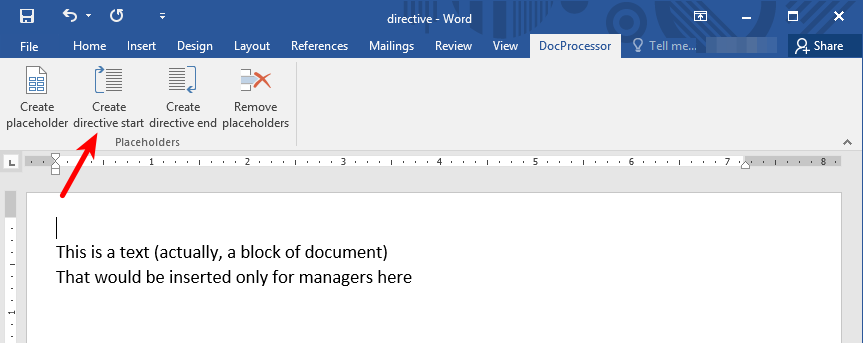
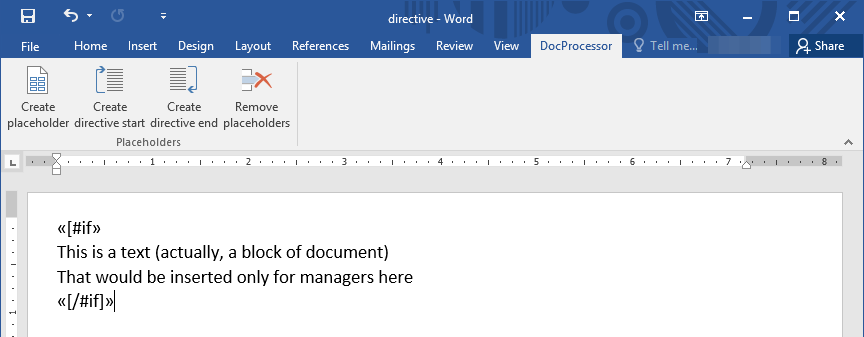
To better understand how all these works let’s see an example. We will define a condition and use an
#if directive for this.
- Imagine a block of text that must be shown only when a document is for a manager. Click on the
‘Create directive start’ button:
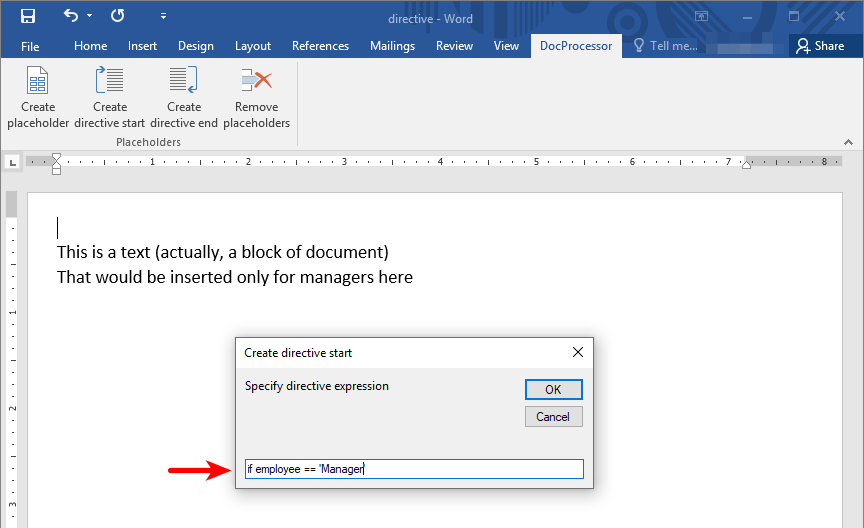
- In the shown dialog write directive value as follows:
Here we can see that directive takes a result of an expression as a parameter:
employee == 'Manager'This is a comparison expression which can result in ‘true’ or ‘false’ value. True makes a block of
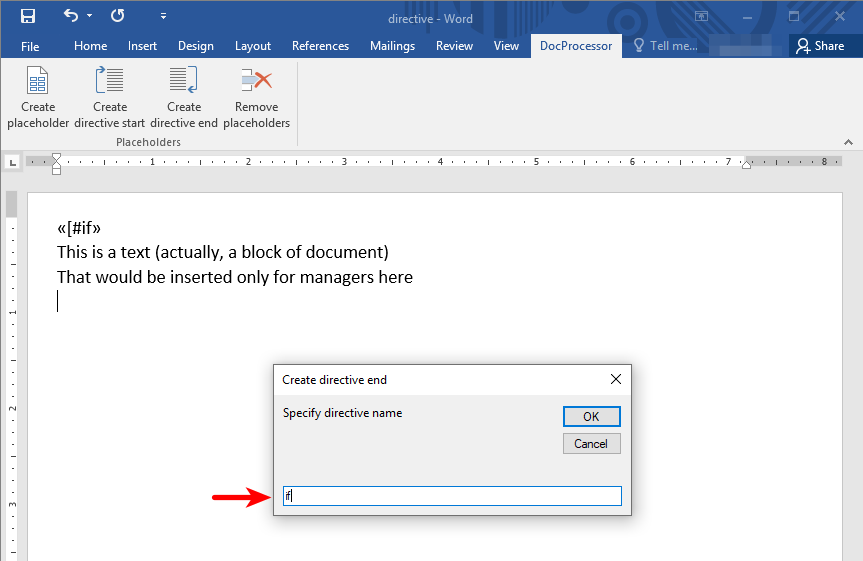
content to be shown and false will hide it. - After this you must define where directive ends and click on the ‘Create directive end’ button. In this
case you need simply write directive name: - In the end your directive must look like this:
You can see more examples of #if directive usage in the FreeMarker documentation:
https://freemarker.apache.org/docs/ref_directive_if.html#ref.directive.if
Using lists
You can repeat a part of the document several times. You can even make every repetition to have its own values.
This way you can show a list of items in a document, for example, a list of payments:
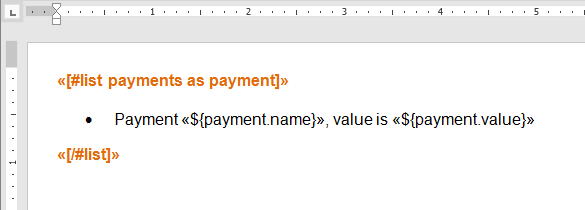
This example shows a generation of a simple list, but actually, you can repeat a large block which can contain
not only text but even images.
You can see more examples of #list directive usage in the FreeMarker documentation:
https://freemarker.apache.org/docs/ref_directive_list.html#ref_list_simple
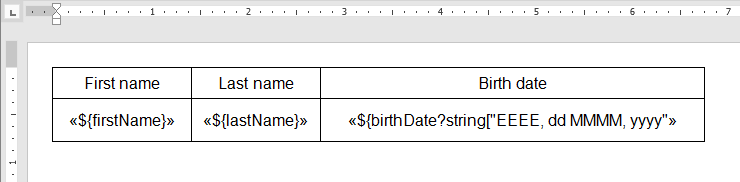
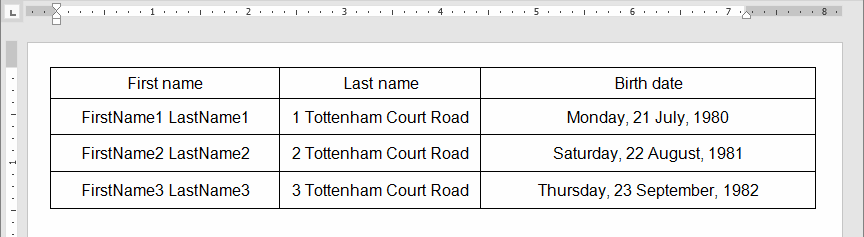
Using tables
You can populate a table with data. All you need is to define only one table-row with placeholders and
after generation, you will achieve a full table with all rows generated.
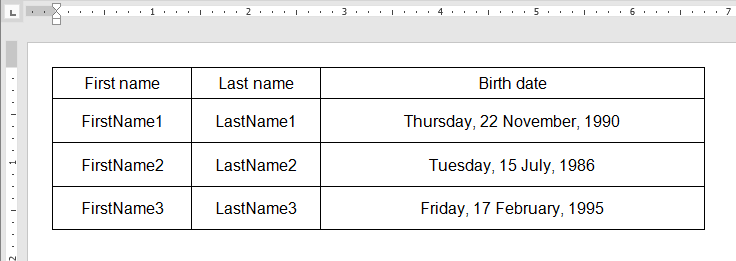
For example, this:
Can produce a table:
You can also use expressions in placeholders inside the table as well. For example, if you have two separate
fields ‘FirstName’ and ‘LastName’, you can show both values in one single table column.
For example, this:

Can produce a table:
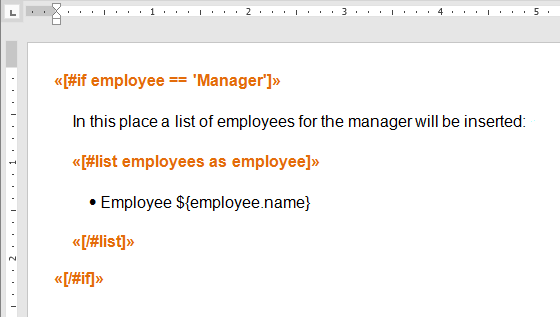
Nesting directives
Sometimes, there could be cases when you need to combine multiple directives. For example, you can have
already a condition to show a part of the document, but you also have a list of items inside this part.
This can be easily achieved by nesting #list directive inside #if directive.
For example:
Additional functions
There are an extended set of functions that were added in DocProcessor (they are absent in plain FreeMarker
version and you won’t find a documentation about them on their site).
They provide some helpful features specific to document templates and data:
util.money.inWords(money, currency, language, amount) — convert money amount from number
to text representation.
For example:
        ${util.money.inWords(100.75, "USD", "ENG", "TEXT")} = 'one hundred dollars and seventy-five cents'
        ${util.money.inWords_EN(1200.35)} = 'one thousand two hundred dollars and thirty-five cents'
lang.number(number) — convert string to a number. If the value is null, empty or incorrect
then 0 will be returned.
For example:
        ${lang.number("125.75")} = 125.75
        ${lang.number("abc")} = 0
        ${l.n("100.0.")} = 0
lang.bool(boolean) — convert string to a boolean. If the value is null, empty or incorrect then
false will be returned.
For example:
        ${lang.bool("true")} = true
        ${lang.bool("yes")} = true
        ${l.b("abc")} = false
Home > Microsoft Word > How to Insert a Placeholder in Word? 2 Different Types
(Note: This guide on how to insert a placeholder in Word is suitable for all MS Word versions including Office 365)
Microsoft Word has a variety of applications and it offers a variety of features that greatly facilitates creating, formatting, storing, and sharing documents.
Especially when you create scientific or academic content in Word, there might be a lot of places where you have to provide references to the author or the original text. But, you might not know what to refer to yet. In such cases, you can just enter a temporary text and come back for it later on.
In such a case, you can use placeholder text in the desired location to add citations or other hints which will help the author and user understand the context a little better.
In this article, you will learn what a placeholder is and how to insert a placeholder in Word.
You’ll Learn:
- What is a Placeholder?
- How to Insert a Placeholder in Word?
- Insert a Citation Placeholder
- Delete or Modify the Placeholder
- How to Insert an Image Placeholder in Word?
- Delete the Placeholder Image
- Insert a Citation Placeholder

Related Reads:
How to Insert Watermark in Word? 3 Easy Ways
How to Count Words in Word? And Know Additional Details
How to Split a Page in Word? 4 Easy Methods
What is a Placeholder?
Even though the word “placeholder” comes across as a new term, we have been seeing it for a long time.

From the above image, you can see two text boxes: First Name and Last Name. In the first text box, you can see the text “First Name”. This is called the Placeholder text.
When you fill in your details in a forum or any survey form, you can see the placeholder text. They help offer visual cues and additional information to the user when typing the text. And as soon as you click and start typing the text, the placeholder disappears.
Technically, a placeholder text is a sample or buffer text which appears or holds its place in a textbox until the relevant text is entered. The placeholder text can take alphabets, numbers, or special characters.
How to Insert a Placeholder in Word?
Let us see how to insert a placeholder in Word documents with the help of a real-time example.
Imagine you are working on a scientific paper. You have done your research and almost completed writing your paper. There will be places where you have to add citations that provide you with additional information about the source material and the author.
Once you create the placeholder, you can come back and alter the text at a later time.

Consider the above example where you have content for 3 papers to be published. You have to add citations from which you have taken the information. Here, we have added the hint to cite inside square brackets [citation].
Depending on the user, the text enclosed within square brackets varies. When the user wants to use this template, they have to enter the desired text in the place of the specified placeholder.
Insert a Citation Placeholder
About the above example, you can add the text placeholder in place of the specified text.
- To insert a placeholder in Word, first, open the Word document.
- Place the cursor in the destination where you want to insert the placeholder text.
- Navigate to References. Under the Citations & Bibliography section, click on the dropdown from Insert Citation and select Add New Placeholder.

- This opens the Placeholder Name dialog box. In the textbox, enter any text which will serve as the tag for the placeholder text. Since we want to insert the placeholder text to replace the “citation”, let us enter “Citation” in the text box.
- Click OK.

Note: In Word, the placeholder tag is a single word and cannot have a space between two words. If you want to add more than one word, it is advisable to use an underscore(_) or hyphen(-).
- This inserts the placeholder where the cursor is placed.
- Now, you can click on the dropdown from the placeholder to edit the citation.

- Once you have added the placeholder, it gets stored in the Citations & Bibliography section. You can click on the Insert Citation dropdown and select the placeholder whenever needed.

Delete or Modify the Placeholder
After inserting a placeholder in Word, you can modify the placeholder depending on your requirements. And if you feel the presence of the placeholder you inserted is a bit unnecessary, you can easily delete them.
- To modify a placeholder, click on the dropdown menu that appears when you select the placeholder text. From the dropdown, you can edit the citation and the source.

- To delete a placeholder, click on the dropdown from the placeholder text and select Convert citation to static text. This converts the placeholder to normal text.
Suggested Reads:
How to Double Space in Word? 4 Easy Ways
How to Wrap Text in Word? 6 Wrap Text Options Explained
How to Recover a Word Document ? 4 Proven Ways
How to Insert an Image Placeholder in Word?
When adding images, there might be cases where you will have to insert a placeholder image until there comes a need to insert a more relevant image.
In such cases, you can use the image placeholder to hold the place just like the text placeholder.
- To insert an image placeholder, first, enable the Developer tab. To enable the Developer tab in the Ribbon menu, navigate to File. Click on Options to open the Word Options dialog box. Under the Customize Ribbon category, check the checkbox for Developer and click OK.

Let us now get to inserting the image placeholder.
- Open the Word document and place the cursor in the place where you want to insert the image.
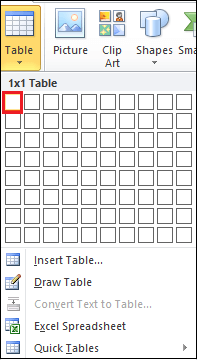
- Now, insert a cell. Navigate to Insert. Click on the dropdown from Table and select 1×1 table.

- This inserts the table in the Word document.
- Click and use the anchor points to resize the cell to the size of the image you want to insert.
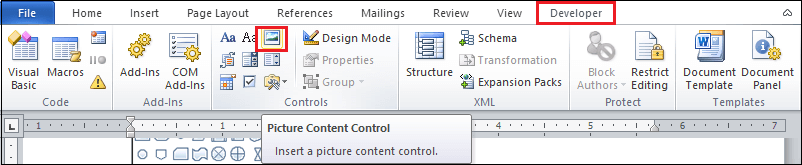
- Then, navigate to the Developer tab. Under the Controls section, click on Picture Content Control.

- This inserts the image placeholder in the cell. Stretch the placeholder template to fit the cell using the anchor points.

- To insert an image, click on the icon in the middle of the placeholder template. Choose the method you want to insert the image. In this case, let us insert the image from our local drive.

- This opens the Insert Picture dialog box. Navigate to the file location, select the image, and click Insert.
- This inserts the placeholder in the cell.

- To change the image, click on the Change Picture button. This in turn opens the Insert Pictures dialog box. You can choose the image of your choice and insert them in place of the placeholder image.

Delete the Placeholder Image
- To delete the placeholder image, right-click on the image and select Remove Content Control.

- Then, select the image and press the Delete button.
- Finally, remove the cell by clicking on the four-sided button in the top-left corner of the cell and again pressing the Delete button.
Also Read:
How to Convert Speech to Text in Word? A step-by-Step Guide
How to Add Columns in Microsoft Word? All You Need to Know
How to Find and Replace in Word? 7 Simple Methods
Frequently Asked Questions
How to modify the placeholder after inserting them in Word?
To modify the placeholder, click on the dropdown from the placeholder text. Click on Edit Citation or Edit Source to change the placeholder text or the citation.
Where can I find the Developer tab in Word?
In Microsoft applications, the Developer tab is not enabled by default. To enable the Developer tab in the Ribbon, navigate to File>Options>Customize Ribbon and check the checkbox for Developer. Click OK.
How to insert a placeholder in Word?
Open the Word document. Place the cursor in the desired place, and navigate to the References tab. Under the Citations & Bibliography section, click on the dropdown from Insert Citation and click on Add a New Placeholder. Add the placeholder tag in the textbox and click OK.
Closing Thoughts
Inserting placeholders in your documents helps in indicating citations or any text you wanted to modify. These placeholders are not like normal text and stand out from the static text. Once inserted, you can use the same placeholder from the Citations repository.
In this article, we saw how to insert a placeholder in Word. You can insert the placeholder as text or an image. Choose the method that suits your needs.
For more high-quality guides on MS Word or Excel, please visit our free resources section.
SimonSezIT has been effectively teaching Excel for 15 years. We have a very comprehensive set of courses with in-depth training modules covering all major business software.
You can access all these 140+ courses for a low monthly fee. Please visit our courses section for more information about our offers.

Simon Calder

Chris “Simon” Calder was working as a Project Manager in IT for one of Los Angeles’ most prestigious cultural institutions, LACMA.He taught himself to use Microsoft Project from a giant textbook and hated every moment of it. Online learning was in its infancy then, but he spotted an opportunity and made an online MS Project course — the rest, as they say, is history!
Placeholder is also called as dummy text or filler text. It is a character, word, or string of characters that temporarily holds the place to the final data.
Example: In the below screenshot, Email or phone is a placeholder.
Create a Placeholder in the Word
Method 1: Using References Tab on the Ribbon
Follow the below steps to create a Placeholder in the Word document —
Step 1: Open the new or an existing Word document.
Step 2: Place cursor in the document where you want to insert a Placeholder.
Step 3: Go to the References tab on the Ribbon and click on the Insert Citation drop-down menu in the Citations & Bibliography section.

Step 4: Click on the Add New Placeholder option from the drop-down menu.

Note: In this method, we add a citation placeholder in the Word document.
Step 5: A small Placeholder Name dialog box will appear on the screen. Enter the Placeholder that you want to insert and click on the OK button to insert a citation placeholder.
The screenshot below shows that Placeholder is inserted to the Word document.

Method 2: Insert an image placeholder in Word document
Follow the below steps to insert an image placeholder in Word document —
Note 1: Make sure the Developer Tab is visible on the Ribbon.
Note 2: If the Developer Tab in not visible on the Ribbon, then go to File -> Options -> Customize Ribbon -> Tick on the Developer checkbox in the Main tabs section and click on the OK button at the bottom of the screen.
Step 1: Open the Word document.
Step 2: Place cursor in the document where you want to insert an image placeholder.
Step 3: Go to the Insert tab on the Ribbon and click on the Table option in the Tables group.

Step 4: An Insert Table dialog box will apper on the screen. Select a single row and column (1 Table) from the Table dialog box.
Step 5: Adjust the length and width of the table based on your requirement.
Step 6: Place the cursor inside the Table, click on the Developer tab on the Ribbon, and click on the Picture Content Control option in the Controls section.
Step 7: A Picture Content Control (image Placeholder) is added inside the table. Resize the Picture Content based on your requirement.

Step 8: To insert the image in placeholder, click on the center of the image icon. Browse the image that you want to insert and click on the Insert button at the bottom of the screen.
The screenshot below shows that the selected image is inserted in the placeholder.
Change a Placeholder Picture
To change the placeholder image, click on the image to select the image and click on the Change Picture icon, as shown in the below screenshot.

This tutorial shows how to insert placeholder text in Microsoft Word without copying and pasting it from another source. Placeholder text, which is also called random text, filler text, or dummy text, fills space in a document for formatting or layout purposes.
First, we’re going to look at how to create three types of placeholder text: random text, the classic “quick brown fox,” and Lorem ipsum. Then, we’re going to customize the number of paragraphs and sentences generated as placeholder text.
Quick Links:
- How to Insert Placeholder Text
- How to Customize the Length of Placeholder Text
This tutorial is available as a YouTube video showing all the steps in real time.
Watch more than 100 other writing-related software tutorials on my YouTube channel.
The images below are from Word for Microsoft 365. These steps also apply to Word 2021, Word 2019, Word 2016, Word 2013, and Word 2010. However, your interface may look slightly different in those earlier versions of the software.
- Place your cursor at the start of a new line.
Important Note: Placeholder text cannot be inserted into an existing paragraph. However, it can be placed in another element, such as an empty table cell, column, or text box.
- Type one of the three placeholder options, =rand(), =rand.old(), or =lorem(), and then press the Enter key on your keyboard. Each option is explained below.
=rand() This option inserts coherent English text.

=rand.old() This option inserts the sentence “The quick brown fox jumps over the lazy dog.” (There is currently a glitch where the second and subsequent paragraphs are missing a space between sentences.)

=lorem() This option inserts placeholder text known as Lorem ipsum, which is a corrupted form of Latin. Lorem ipsum is commonly used in the publishing industry for design, formatting, and layout purposes.

What If Your Placeholder Text Doesn’t Appear?
The three placeholder methods described above only work if your software is set to “Replace text as you type.” This option is normally turned on by default.
However, if your placeholder text is not appearing, you can check to see if your text is set to replace text as you type:
- Select the File tab.
- Select the Options tab in the Backstage view.
- Select the Proofing tab in the Word Options dialog box.
- Select the AutoCorrect Options button.
- Ensure that Replace text as your type is checked in the AutoCorrect dialog box.
- Select the OK button to close the AutoCorrect dialog box.
- Select the OK button to close the Word Options dialog box.
How to Customize the Length of Placeholder Text
You can customize the length of the placeholder text inserted in your document by including the number of paragraphs and sentences inside the parentheses.
For example, if you want five paragraphs of four sentences each, type:
=rand(5,4)
=rand.old(5,4)
=lorem(5,4)
You can also indicate just the number of paragraphs by placing one number in the parentheses:
=rand(5)
=rand.old(5)
=lorem(5)
Related Resources
How to Change the Font, Font Size, and Font Color in Microsoft Word
How to Change the Default Font in Microsoft Word
How to Create Drop Caps in Microsoft Word
Updated January 19, 2022

Introduction
Insert a placeholder to an MS Word document when, while working on the document, you would not have the citations at your fingertips.
Problem
Yet if you stop to make a search for the citations you may lose your rhythm and momentum.
Solution
So it makes sense to keep going full-steam ahead and to insert a placeholder at those spots where you’d like to add a full citation later on.
That way you’ll kill two birds with a single stone: you won’t lose your concentration while working on the document, but you won’t forget where exactly you originally wanted to insert the citations either. When the document you’re working on is 500 or 1,500 pages long, that’s a lifesaver.
MS Word allows you to do precisely that by inserting placeholders and then going back and editing those placeholders anytime you like.
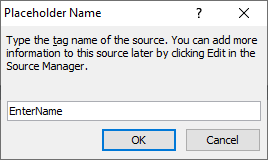
(1) Insert your cursor where you’d like to insert the placeholder. Then, click the Insert Citation button on the Reference tab and select the Add New Placeholder drop-down menu option.

That will display the Placeholder Name dialog box:

(2) Type in any name you like (no spaces) and then click OK to insert the placeholder into the text:

(3) Repeat steps 1 and 2 as many times as you like.
(4) When it’s time to enter the full descriptive details for your placeholders, click Manage Sources on the ribbon to display the Source Manager dialog box:
(Click to enlarge the image)

(5) Select Article1 and then click Edit to display the Edit Source dialog box.
(6) Select “Journal Article” (or Book, etc.) from the Type of Source drop-down menu and enter all the appropriate information into the respective fields:
(Click to enlarge the image)

(7) Click OK when done to return to the Source Manager dialog box.
(8) Click Close to replace the dummy placeholder with a real bibliography reference and close the Source Manager dialog box:

(9) Repeat steps 5-8 as many times as necessary.
TIP: An alternative way to edit the placeholders is to click the downward drop-down menu arrow next to the placeholder frame, and select Edit Source from the drop-down menu to display the Edit Source dialog box:

(10) LAST STEP: place your cursor wherever you like and insert your bibliography by selecting Bibliography > Insert Bibliography from the ribbon. Your bibliography will look something like this:

Conclusion
Insert a placeholder for your citations to keep your writing momentum forward. You can always go back and insert the real citations afterward without sacrificing your productivity.
MORE INFO
| What is “Compatibility Mode” in MS Word? |
| How to Use the “Paste All” Word Function |
| Comparison of MS Word with LibreOffice Writer |
| How To Remove Personal Information From Your Word Documents |
| MS Word Useful Table Design Features |
| How to Create PowerPoint Presentation Automatically from a MS Word Outline |
| How to Create and Insert Boilerplate Autotext to MS Word Documents |
| How to Export Paragraph Styles from one MS Word Document to Another Using the Organizer Tool |
| MS Word Power Shortcut Keys |
| What is “Compatibility Mode” in MS Word? |
| How to Insert a Proper Page Break for Changing Page Orientation in MS Word |
| Create a Heading Browser and Navigate Your MS Word Document Easily by Using Styles |
| How to Create a List of Tables in MS Word |
| How to use the Odd-Page and Even-Page Breaks in MS Word |
| How to Create Dynamically Updated Running Headers and Footers in MS Word |
| How and Why to Convert a MS Word Document from Compatibility Mode to Normal Mode |
| How to Print Pages of a MS Word Document in Reverse Order |
| How to Create and Use Autotext Building Blocks in a MS Word 2010 Document |