WordArt is a quick way to make text stand out with special effects. You begin by picking a WordArt style from the WordArt gallery on the Insert tab, and then customize the text as you wish.
Try it!
-
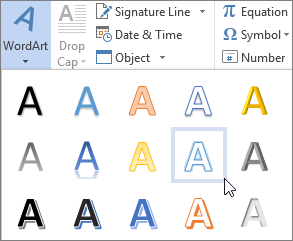
Click Insert > WordArt, and pick the WordArt style you want.
In the WordArt gallery, the letter A represents the different designs that are applied to all text you type.
Note: The WordArt icon is located in the Text group, and it may appear different depending on the program you’re using and the size of your screen. Look for one of these icons:
-
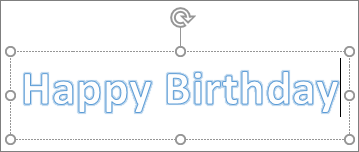
The placeholder text «Your text here» appears, with the text highlighted.
Enter your own text to replace the placeholder text.
Tips:
-
You can enter entire sentences, and even paragraphs, as WordArt. (You may have to change the font size for longer text.) And in Word, you can also convert existing text to WordArt in Word.
-
You can include symbols as WordArt text. Click the location for the symbol, and on the Insert tab, click Symbol, and pick the symbol you want.
Do more things with WordArt
Select a heading below to open it and see the detailed instructions.
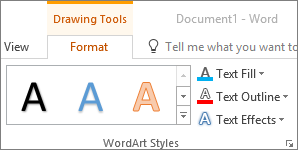
You might have tried using shape styles to change the shape of WordArt and then were puzzled that the text didn’t change. Use the text options in the WordArt Styles group instead. Shape styles and effects apply to the box and background surrounding your WordArt, not to the WordArt text. So, to add effects to your WordArt, such as shadows, rotation, curves, and fill and outline colors, you use the options in the WordArt Styles group, including Text Fill, Text Outline, and Text Effects.
Note: Depending on your screen size, you might only see the icons for WordArt Styles.

-
Select the WordArt text or letters to change.
The Drawing Tools Format tab appears.
-
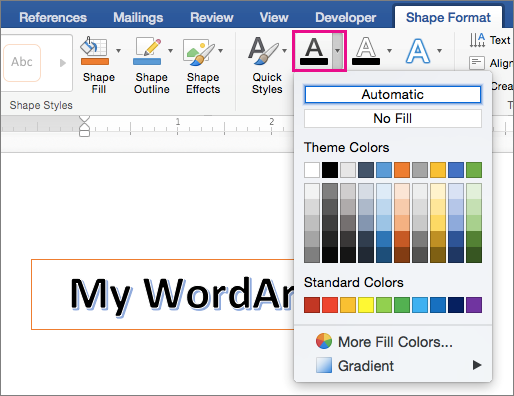
On the Drawing Tools Format tab, click Text Fill or Text Outline, and pick the color you want.
-
Click outside of your text box to see the effect.
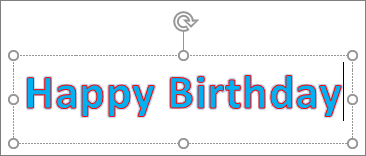
In this example, a light blue text fill and a red text outline were applied.
You can curve text around a circular object.
90 seconds
-
Select the WordArt text or letters to change.
The Drawing Tools Format tab appears.
-
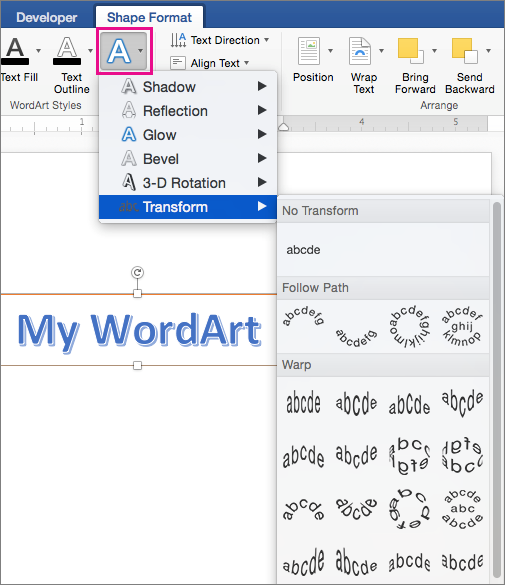
To create a curved effect, on the Drawing Tools Format tab, click Text Effects >Transform and pick the one you want.
Important: The Text Effects
menu is not the same as the Shape Effects
menu. If you don’t see Transform at the bottom of the menu, make sure you’ve clicked the Text Effects menu.
In this example, the first curved transform effect is selected.
-
Click outside of your text box to see the effect.
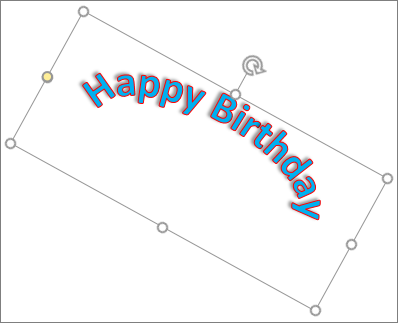
Use the Text Effects menu to create other effects, such as shadow, reflection, glow, bevels, and 3-D rotation. This example shows WordArt with a curved transform effect and a shadow applied.
-
To rotate WordArt text to any angle, select it, and then drag the circular rotation handle at the top of the box.
-
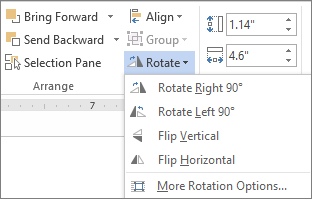
To flip WordArt or rotate it 90 degrees, click the Drawing Tools Format tab, click Rotate in the Arrange group, and then select an option.
To change the font size or style of your WordArt text:
-
Select the WordArt text or letters to change.
-
On the Home tab, select options in the Font group, such as font style, font size, or underline.
-
In your Word document, select the text to convert to WordArt.
-
On the Insert tab, click WordArt, and then pick the WordArt you want.
Double-click the WordArt that you want to remove, and then press Delete.
Insert WordArt
-
Click where you want to insert decorative text in a document.
-
On the Insert tab, in the Text group, click WordArt.
-
Click any WordArt style, and start to type.
Do more things with WordArt
Select a heading below to open it and see the detailed instructions.
-
Click anywhere in the WordArt text that you want to change.
-
Under Drawing Tools, on the Format tab, click any option.
For example, you can change the direction of the WordArt text by clicking Text Direction in the Text group and choosing a new direction for the text.
Double-click the WordArt that you want to remove, and then press Delete.
Add WordArt
Excel
-
On the Insert tab, in the Text group, click WordArt, and then click the WordArt style that you want.
-
Enter your text.
-
You can add a fill or effect to a shape or text box as well as the text in the WordArt.
-
If you have a chart in your 2007 Office release document, you can replace the chart title with WordArt to give the title additional emphasis.
-
Outlook
-
On the Insert tab, in the Text group, click WordArt, and then click the WordArt style that you want.
-
Type your text in the Text box.
You can add a fill or effect to a shape or text box as well as the text in the WordArt.
PowerPoint
-
On the Insert tab, in the Text group, click WordArt, and then click the WordArt style that you want.
-
Enter your text.
-
You can add a fill or effect to a shape or text box as well as the text in the WordArt.
-
If you have a chart in your 2007 Office release document, you can replace the chart title with WordArt to give the title additional emphasis.
-
Publisher
-
On the Objectstoolbar, click Insert WordArt
.
-
In the WordArt Gallery, click the WordArt that you want, and then click OK.
-
Type your text in the Text box.
If you want to change the text in the WordArt, double-click the WordArt that you want to change, and then type the new text in the Text box.
Word
-
On the Insert tab, in the Text group, click WordArt, and then click the WordArt style that you want.
-
Type your text in the Text box.
You can add a fill or effect to a shape or text boxas well as the text in the WordArt.
Do more things with WordArt
Select a heading below to open it and see the detailed instructions.
Excel
Do one or more of the following:
-
To change the text, select it, and then make the changes that you want.
-
To change the font, see Change the font or font size in Excel or Change the color of text in a worksheet.
-
To add an effect to WordArt, see Add or delete a fill, outline, or effect for text or WordArt.
-
To rotate the WordArt, see Rotate or flip a picture, shape, text box, or WordArt in Excel 2007.
-
To resize the WordArt, see Change the size of a picture, shape, text box, or WordArt.
-
To align the WordArt, see Align or arrange a picture, shape, text box, or WordArt.
-
To move the WordArt, see Move a picture, shape, text box, or WordArt.
For more information about selecting WordArt, see Select a shape or other object.
Outlook
Do one or more of the following:
-
To change the text, select it, and then make the changes that you want.
-
To change the font, see Change the size or formatting of text.
-
To add an effect to WordArt, see Add or delete a fill, outline, or effect for text or WordArt.
-
To rotate the WordArt, see Rotate or flip a picture, shape, text box, or WordArt in Outlook 2007.
-
To resize the WordArt, see Change the size of a picture, shape, text box, or WordArt.
-
To align the WordArt, see Align or arrange a picture, shape, text box, or WordArt.
-
To move the WordArt, see Move a picture, shape, text box, or WordArt.
For more information about selecting WordArt, see Select a shape or other object.
PowerPoint
Do one or more of the following:
-
To change the text, select it, and then make the changes that you want.
-
To add an effect to WordArt, see Add or delete a fill, outline, or effect for text or WordArt.
-
To rotate the WordArt, see Rotate or flip a picture, shape, text box, or WordArt in PowerPoint 2007.
-
To resize the WordArt, see Change the size of a picture, shape, text box, or WordArt.
-
To align the WordArt, see Align or arrange a picture, shape, text box, or WordArt.
-
To move the WordArt, see Move a picture, shape, text box, or WordArt.
For more information about selecting WordArt, see Select a shape or other object.
Publisher
Do one or more of the following:
-
To change the text, select it, and then make the changes that you want.
-
To change the font, see Change the font size or Change the color of text.
-
To add an effect to WordArt, see Add or delete a fill, outline, or effect for text or WordArt.
-
To resize the WordArt, see Change the size of a picture, shape, text box, or WordArt.
-
To align the WordArt, see Align or arrange a picture, shape, text box, or WordArt.
-
To move the WordArt, see Move a picture, shape, text box, or WordArt.
For more information about selecting WordArt, see Select a shape or other object.
Word
Do one or more of the following:
-
To change the text, select it, and then make the changes that you want.
-
To change the font, see Change the font size.
-
To add an effect to WordArt, see Add or delete a fill, outline, or effect for text or WordArt.
-
To rotate the WordArt, see Rotate or flip a picture, shape, or WordArt.
-
To resize the WordArt, see Change the size of a picture, shape, text box, or WordArt.
-
To align the WordArt, see Align or arrange a picture, shape, text box, or WordArt.
-
To move the WordArt, see Move a picture, shape, text box, or WordArt.
For more information about selecting WordArt, see Select a shape or other object.
Excel
When you remove the WordArt style from your text, the text remains and changes to plain text.
-
Select the WordArt text that you want to remove the WordArt style from.
-
Under Drawing Tools, on the Format tab, in the WordArt Styles group, click the More button
, and then click Clear WordArt.
To remove the WordArt style from part of your text, select the text that you want to remove the WordArt style from, and then follow the steps above.
PowerPoint
When you remove the WordArt style from your text, the text remains and changes to plain text.
-
Select the WordArt text that you want to remove the WordArt style from.
-
Under Drawing Tools, on the Format tab, in the WordArt Styles group, click the More button
, and then click Clear WordArt.
To remove the WordArt style from part of your text, select the text that you want to remove the WordArt style from, and then follow the steps above.
Do the following for all programs listed in the Applies To at the top of the article.
-
Double-click the WordArt that you want to remove to select it, and then press Delete.
-
In Office for Mac 2016 or later, select the Insert tab on the Ribbon.
or
In Office for Mac 2011, select Insert on the toolbar.
-
Select WordArt, and pick the WordArt style you want.
In the WordArt gallery, the letter A represents the different designs that are applied to all text you type.
-
Enter your text.
Tip: You can also include symbols as WordArt text. To do so, click the location in your document for the symbol, and on the Insert tab, click Advanced Symbol, and pick the symbol you want.
Do more things with WordArt
Select a heading below to open it and see the detailed instructions.
To create curved or circular WordArt text, you add a Transform text effect.
-
Select the WordArt.
When you do that, the Shape Format tab appears.
-
Click Text Effects > Transform and pick the effect you want.
To change the color of the WordArt text, you change the Text Fill.
-
Select the WordArt text or letters to change.
When you do that, the Shape Format tab appears.
-
Click Text Fill, and pick the color you want.
Tip: To change the outline of the WordArt text, on the Shape Format tab, click Text Outline.
-
Select the text to convert to WordArt.
-
On the Insert tab, click WordArt, and then pick the WordArt style you want.
In Microsoft 365 for the web you can see WordArt that’s already in your document, presentation, or worksheet, but to add more WordArt you need to open or edit the doc in the desktop version of Word, PowerPoint, or Excel.
In Microsoft 365 for the web, you can use the Font features on the Home tab to change the font color and size, and apply bolding, italics, or underlines to your text.
If you don’t have the desktop version of Word or PowerPoint, you can try it or buy it in the latest version of Office now.
Word — высокофункциональный текстовый редактор, который постоянно растет и развивается. Здесь можно писать не только тексты, но и реализовывать иные задачи, к примеру, добавлять фотографии, таблицы, снимки экрана, графику и прочее. Все это находится во вкладке “Вставка”.
В данной статье мы поговорим о таком элементе, как WordArt. Многие пренебрегают его возможностями, хотя он позволяет эффектно украсить документ интересными дополнениями. Более того, это хороший вариант приятно провести время.
- Что такое WordArt и как получить доступ к нему в Microsoft Word
- Как начать использовать WordArt в текстовом редакторе
- Доступные функции для настройки WordArt
- Адаптируйте WordArt к документу Word
Что такое WordArt и как получить доступ к нему в Microsoft Word
Думаю, всем известно, что это коллекция текстовых стилей, которые позволяют создавать оригинальные яркие текста, используя отраженный текст, тени; можно работать с символами, цифрами или словами. Можно добавлять специальные контуры и текстуры, изгибать, вращать или деформировать тени. Все это помогает интересно преподнести текст или презентацию. В общем сложности WordArt содержит до 15 различных стилей, поэтому, проявив немного изобретательности, можно создать оригинальный, интересный текст.
Для тех, кто решил воспользоваться им в первый раз или просто желает освежить в памяти его возможности, для начала выполняем следующее:
- запускаем Word;
- переходим во вкладку “Вставить” и находим надпись “Вставить WordArt”.
Как начать использовать WordArt в текстовом редакторе
После того, как вы нажмете на “Вставить WordArt”, вы увидите 15 образцов в виде буквы “А”. Это позволяет определиться с типом оформления, который подходит под наши потребности.
Работая с WordArt, стоит учитывать, что это не просто текст, а работа с изображением. После того, как вы выбрали нужный образец, появится ряд новых параметров. Выбираем вкладку, где мы будем осуществлять настройку. Появится текст с выбранным стилем, который мы можем вращать, растягивать, изменять размер и т.д.
Доступные функции для настройки WordArt
Существует обширный список функций, которые позволяет настраивать текст в соответствии с нашими задачами. Рассмотрим каждую из них, чтобы вы имели представление как это работает:
- Рамки и обивка.
Перемещаясь по представленным стилям, мы увидим все цвета, которые можно использовать в работе по оформлению текста.
- Площадь поверхность сверла (соединяющаяся со сверлильной головкой) более увеличенная, что позволяет существенно увеличить надежность и точность крепления;
- хорошо держат заточку;
- высокая вязкость;
- ударопрочность (держат высокие нагрузки, не боятся вибраций);
- используется сплав из карбида вольфрама, что обеспечивает чрезвычайную прочность;
- Заливка и контур фигуры.
Выбрав значение Shape Fill, появляется возможность придать необходимый тон для заднего фона текста. Здесь мы также можем добавлять градиенты, менять текстуру;
- Эффекты формы.
В данном вкладке можно добавить к тексту такие эффекты, как затемнение, освещение, сглаживание, скос или даже 3D отображение;
- Заливка, контур и текстовые эффекты.
Перейдя в раздел “Стили WordArt”, можно изменить первоначальный стиль, поменять заливку текста, настроить контур или добавить эффекты;
Адаптируйте WordArt к документу Word
Может показаться, что процесс адаптации текст из WordArt в Word довольно сложный, но на самом деле это не так, вот некоторые полезные функции:
Как мы видим, можно разместить форму, созданную в WordArt на переднем плане или за исходным текстом. Можно изменить размеры, подогнав по страницу. Все это находится в разделе “Организовать”. Если вы проявите немного смекалки и усидчивости, то сможете создать интересный и продающий текст без особых трудностей.
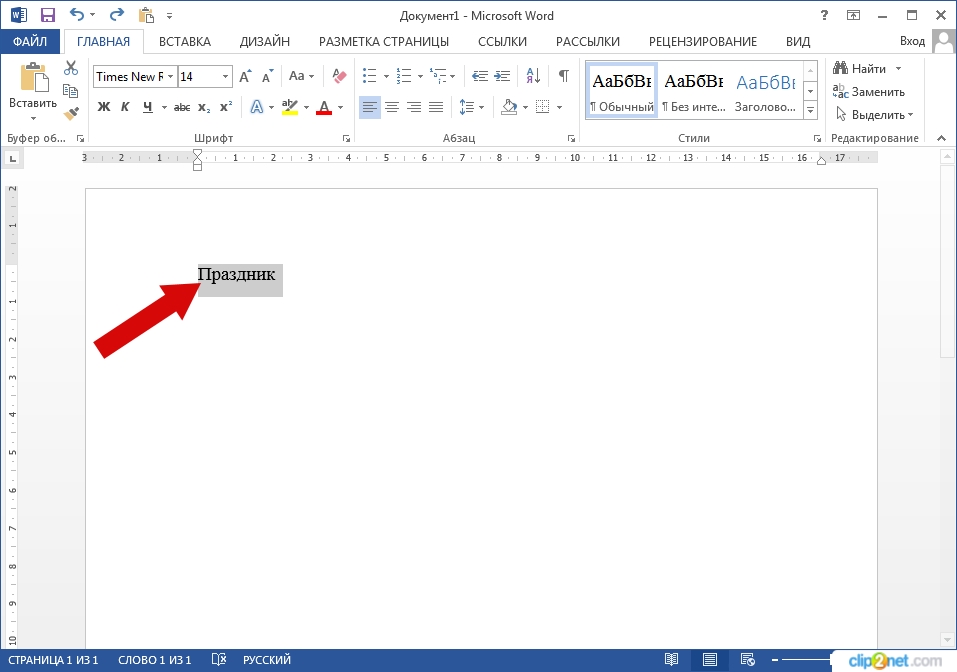
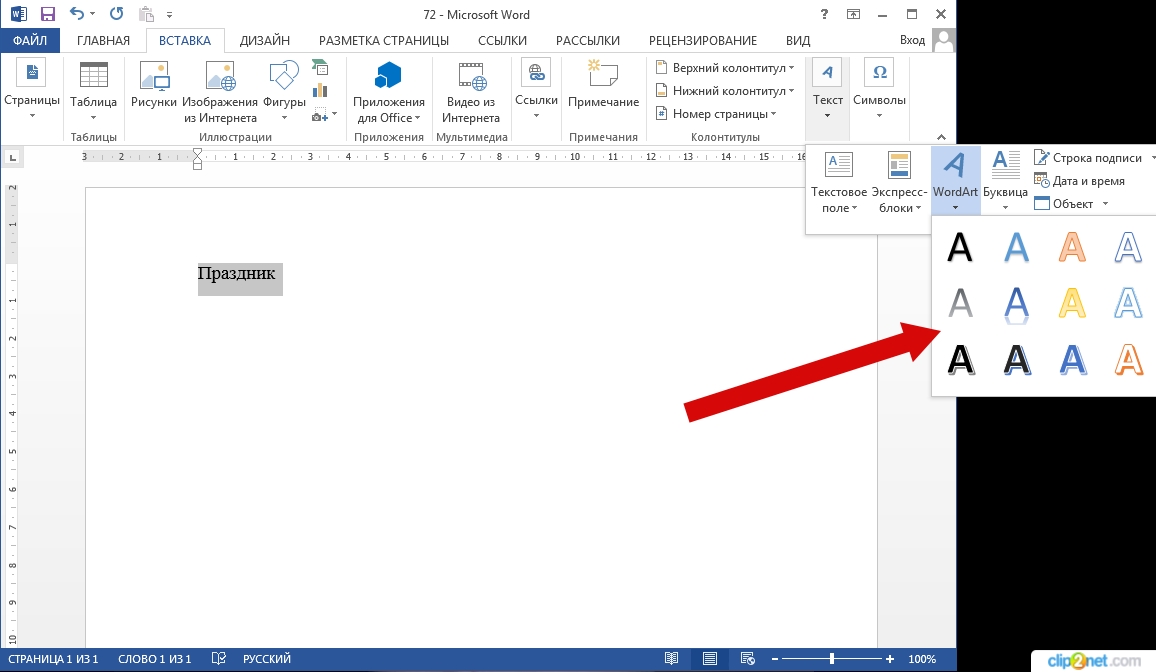
В этом руководстве я покажу Вам, как создать WordArt заголовок в Microsoft Word 2013. Для этого прописываем текст заголовка и выделяем его.
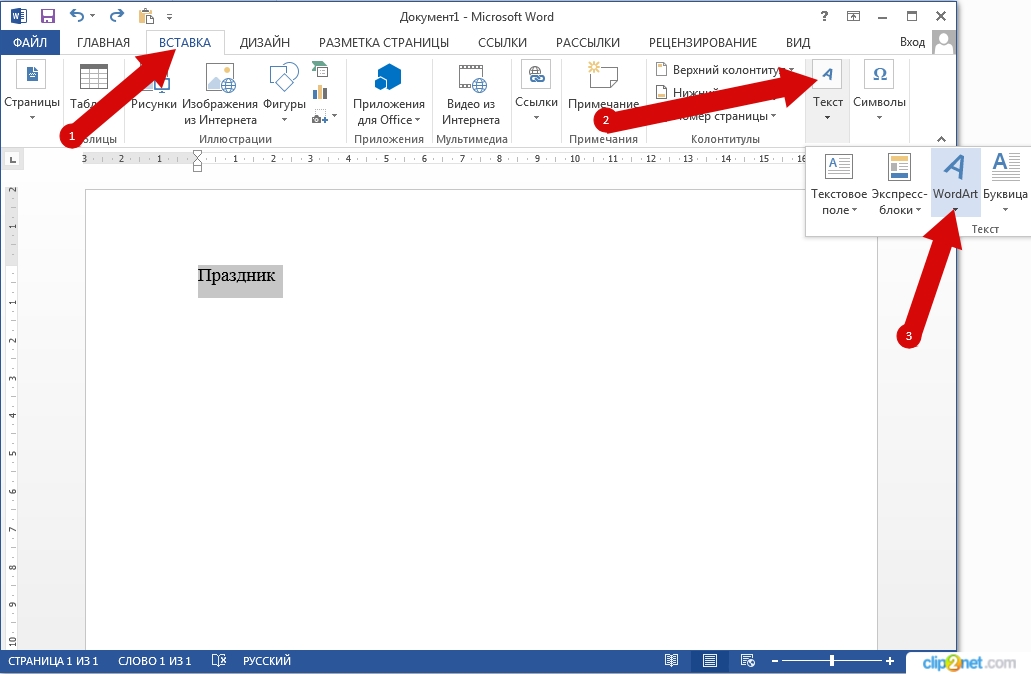
Затем в разделе «Вставка» жмем кнопку «Текст» и в открывшемся окошке щелкаем кнопку «WordArt».
В открывшемся окошке выбираем вид надписи и кликаем по ней.
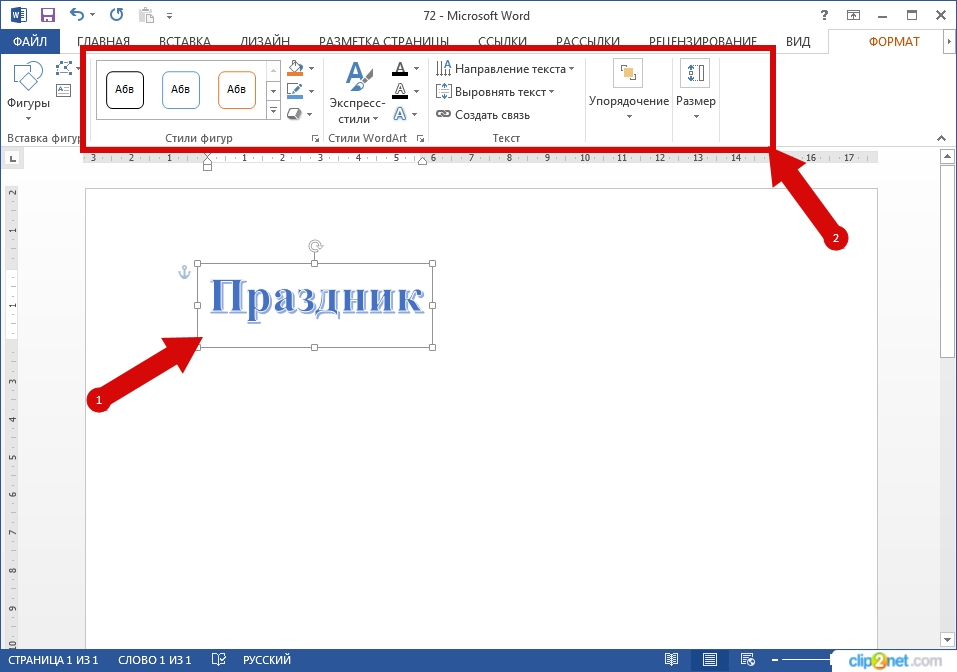
Заголовок оформлен. Теперь при помощи средств рисования создаем необходимый вид заголовка.
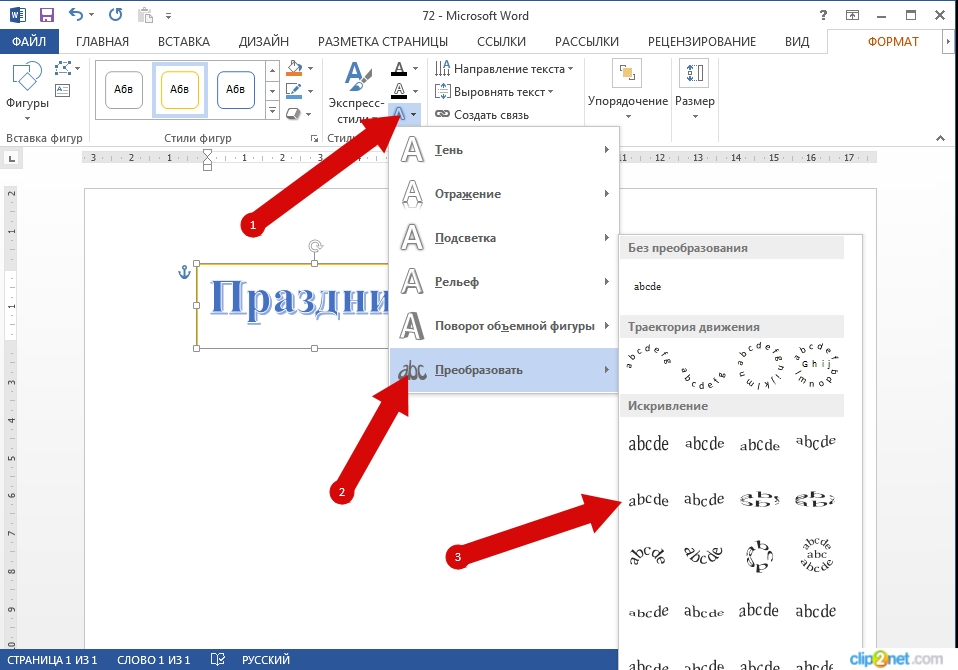
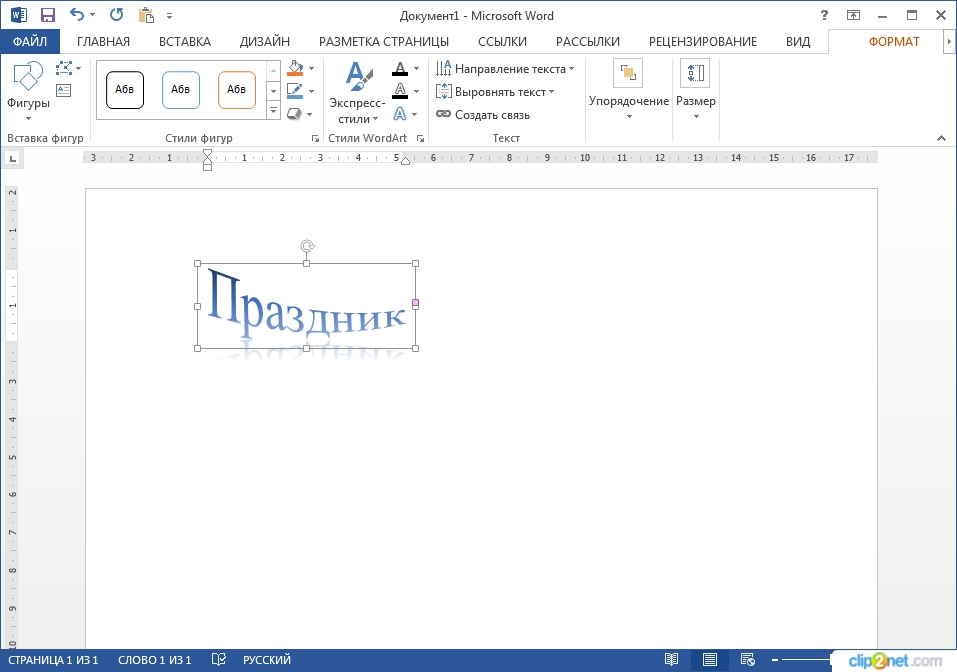
Для создания изогнутого текста заголовка жмем кнопку «Текстовые эффекты», затем щелкаем на графу «Преобразовать» и в новом окошке выбираем искривление и направление текста.
Заголовок готов! Если информация помогла Вам – жмите Спасибо!
Что такое буквица в Ворде, что такое SmartArt и WordArt
Сегодня рассмотрим, что такое буквица в Ворде. Покажем на практике процесс поиска буквицы в Ворде и ее установки в текст. Поговорим об использовании функции SmartArt и WordArt. Данные инструменты Ворда будут нужны для форматирования текста.
Буквица в Ворде, что это такое и зачем она нужна
Здравствуйте, друзья! При работе с текстами в Ворде, мы привыкли писать обычными буквами и шрифтами. Ничего не меняем, делаем текст по стандартному значению. Но иногда возникает вопрос форматирования текста по тем или иным причинам. К примеру, нужно установить буквицу в тексте.
Итак, что такое буквица в Ворде? Это заглавная буква, которая вставляется вначале абзаца в документе Word. Другими словами ее называют прописной буквой.
Для чего нужна буквица в тексте? Она бывает необходима при написании различных книг, пособий, документов, статей и других текстовых материалов. Все зависит от того, какие используются требования в оформлении текста.
Далее установим буквицу в тексте и воспользуемся другими функциями Worda.
Буквица в Ворде, где находится и как пользоваться
Где находится буквица в Ворде? Чтобы найти буквицу, рассмотрим, для примера, Ворд 2007. Для этого открываете программу с готовым текстом. Далее переходите в раздел «Вставка» и нажимаете на «Буквица» (скрин 1).
Пользоваться буквицей в Ворде просто. После нажатия вышеуказанной кнопки, выбираете варианты буквицы – «В тексте» или «На поле». После выбора первого способа, буквица установится перед текстом (скрин 2).
Как видите, вы сможете легко установить буквицу. Если нажмете внизу «Параметры буквицы», сможете поменять ее шрифт и размер.
WordArt в Ворде, что это такое
В Майкрософт Ворд есть инструмент, который называется WordArt. Что это такое? С помощью ВордАрт вы сможете добавлять различные стили для вашего текста. Также эта функция помогает оформлять тексты различными эффектами, например, тенью или отражением.
Вместе с тем, она позволяет создать яркие тексты, которые можно использовать для ваших статей или книг.
Где находится WordArt в Ворде, как пользоваться
Функция WordArt находится в Ворде через раздел «Вставка», далее «WordArt» (скрин 3).
Чтобы использовать данную функцию, кликните по ней левой кнопкой мыши и выберите стили для текста (скрин 4).
В качестве примера, нажмем на второй стиль (скрин 5).
Вы увидите поле, в котором можете ввести текст, например, «Привет Мир!». После чего нажимаете «OK» и появится текст с новым стилем (скрин 6).
Появившейся текст можете отредактировать, если кликнуть по нему левой кнопкой мыши. Вверху будет доступна панель для редактирования. Выберите нужную функцию и сохраняете изменения с текстом.
SmartArt в Ворде, что это такое и где применяется
Итак, SmartArt в Ворде – это стили различных эффектов, которые применяются для фигур, линий и к графическим элементам. Другими словами вставляется рисунок, для визуального представления информации.
Пользователи могут выбрать разные эффекты: список, матрицу, процесс, цикл, иерархию, связь, пирамиду и другое. С помощью эффектов вы сможете изменить вид разных фигур и не только.
Как работать со SmartArt в Ворде
Чтобы работать со СмартАрт, откроем Ворд. Далее переходите в раздел «Вставка» и выбираете «SmartArt» (скрин 7).
Нажимаем на выбранный эффект, далее кнопку «OK».
Появится шаблон стиля, который можно отредактировать, например, написать текст на схеме. Вместе с тем, вы можете выбрать и другие стили в СмартАрт, о которых говорили выше.
Буквица в Ворде, WordArt, SmartArt – где находятся в разных версиях программы
Как установить и где находятся буквица в Ворде, ВордАрт и СмартАрт в разных версиях Ворда? Данные функции находятся аналогичным образом, как в Ворде 2007. У современной программы Ворд разный дизайн, но в целом, эти инструменты устанавливаются по похожему принципу.
Заключение
В статье мы рассматривали, что такое буквица в Ворде и как ее установить в текст. Также использовали другие инструменты, которыми можно изменять текст и не только. Используйте перечисленные функции в статье, чтобы улучшить вашу текстовую информацию.
Как создать WordArt заголовок в Microsoft Word 2013
В этом руководстве я покажу Вам, как создать WordArt заголовок в Microsoft Word 2013. Для этого прописываем текст заголовка и выделяем его.
Затем в разделе «Вставка» жмем кнопку «Текст» и в открывшемся окошке щелкаем кнопку «WordArt».
В открывшемся окошке выбираем вид надписи и кликаем по ней.
Заголовок оформлен. Теперь при помощи средств рисования создаем необходимый вид заголовка.
Для создания изогнутого текста заголовка жмем кнопку «Текстовые эффекты», затем щелкаем на графу «Преобразовать» и в новом окошке выбираем искривление и направление текста.
Заголовок готов! Если информация помогла Вам – жмите Спасибо!
Вставка текста WordArt
В этом курсе:
- Вставка таблицы
Статья - Вставка изображений
Статья - Вставка значков
Статья - Вставка текста WordArt
Статья - Вставка подложки
Статья - Отображение линейки
Статья - Поворот рисунка или фигуры
Статья - Обтекание текста вокруг рисунка
Статья
Добавление объекта WordArt
Совет. Видео не на вашем языке? Попробуйте выбрать Скрытые субтитры .
Перейти к вставке > WordArt
Выберите нужный стиль WordArt.
Примечание: Чтобы преобразовать существующий текст в объект WordArt, выделите его, а затем на вкладке Вставка нажмите кнопку WordArt.
Изменение цвета
Вы можете выбрать текст WordArt, который нужно изменить.
На ленте «Формат фигуры» или «Средства рисования » Формат»выберите «Заливка текста» или «Контуртекста» и выберите нужный цвет.
Щелкните или нажмите за пределами текстового окна, чтобы увидеть эффект.
Выбор текстового эффекта
Вы можете выбрать текст WordArt, который нужно изменить.
Перейдите в формат фигуры или средства рисования > текстовые эффекты > преобразования.
Выберите нужный эффект.
Щелкните за пределами текстового поля, чтобы увидеть результат.
Узнайте, как изогнуть текст вокруг круга.
Подробнее о формировании текста WordArt см. в тексте «Кривая» вокруг круга или другой фигуры.
Поворот
Вы выберите wordArt и перетащите круглый поворот в верхней части окна.
Чтобы отразить или повернуть wordArt на 90 градусов, выберите «Формат фигуры» или «Средства рисования> повернуть,а затем выберите один из вариантов.
Вы можете выбрать текст WordArt, который нужно изменить.
Перейдите на home и выберите такие параметры, как на стиль шрифта, размер шрифта или подчеркнутая.
Дважды щелкните объект WordArt, который нужно удалить, затем нажмите клавишу DELETE.
Щелкните место, куда вы хотите вставить wordArt, или коснитесь его.
На вкладке «> WordArt»
Выберите стиль WordArt и начните ввести его.
Примечание: Чтобы преобразовать существующий текст в объект WordArt, выделите его, а затем на вкладке Вставка нажмите кнопку WordArt.
Вы выберите текст WordArt, который вы хотите изменить.
Перейдите в > форматирование и выберите любой параметр.
Дважды щелкните объект WordArt, который нужно удалить, затем нажмите клавишу DELETE.
На вкладке «> WordArt»
Выберите нужный стиль WordArt.
Примечание: Чтобы преобразовать существующий текст в объект WordArt, выделите его, а затем на вкладке Вставка нажмите кнопку WordArt.
Выделите текст WordArt.
Перейдите в > «>» и выберите нужный эффект.
Подробнее о формировании текста WordArt см. в тексте «Кривая» вокруг круга или другой фигуры.
Вы можете выбрать текст WordArt, который нужно изменить.
После этого появится вкладка Формат фигуры.
Перейдите в > заливки фигуры и выберите нужный цвет.
Чтобы изменить контур текста WordArt, перейдите к формату фигуры > контура текста и выберите цвет.
На панели инструментов выберите «Вставить».
Нажмите кнопку WordArt и выберите нужный стиль WordArt.
Примечание: Чтобы преобразовать существующий текст в объект WordArt, выделите его, а затем на вкладке Вставка нажмите кнопку WordArt.
Выделите текст WordArt.
После этого появится вкладка Формат фигуры.
Перейдите > «Формат > текстовые >» и выберите нужный эффект.
Вы можете выбрать текст WordArt, который нужно изменить.
После этого появится вкладка Формат фигуры.
Перейдите в > заливки фигуры и выберите нужный цвет.
Чтобы изменить контур текста WordArt, перейдите к формату фигуры > контура текста и выберите цвет.
В Word в Интернете есть wordArt, который уже есть в вашем документе, но чтобы добавить другие, необходимо открыть или изменить документ в настольной версии Word.
С помощью функций «Шрифт» на вкладке «Главная» можно изменить цвет и размер шрифта, а также применить к тексту полужирное на применении к тексту полужирного на применении к ней полужирного налиния или подчеркивается.
Download Article
Download Article
Most people who use Microsoft Word for designing creative printouts know about the WordArt feature and it’s many features. If you don’t know about it yet, follow the directions in this article to help you achieve these same techniques to make your printouts look spectacular.
Steps
-
1
Open your Microsoft Word document, with whatever method you prefer to open the program with.
-
2
Decide in which document, you’d like to start adding/using the WordArt feature in. You can either start a new document, or open an existing document, depending on where you would like to add the WordArt to.
Advertisement
-
3
Locate the place that you’d like to insert your first WordArt piece of text on your page.
- Type the previous text.
- You can either continue on that line (rarely used), or press enter to start a new line.
-
4
Open your menu toolbar. For quick access if this toolbar isn’t available, press and release Alt on your keyboard.
-
5
Click the «Insert» option from this toolbar.
-
6
Click the «Picture» button.This should open a drop-down list.
-
7
Click the «WordArt» option from the drop-down that results. This should open a new window, along with adding a toolbar to the display window, that you can later move into a position on the screen near all the toolbars at the top of the screen. For now, you’ll be concentrated on the dialog box that Microsoft Word brought up when you clicked the option to Insert a new piece of WordArt.
-
8
Click to select the WordArt style that looks the best to you.
-
9
Click the «OK» button. This will open a new dialog box that will help you type the text you want to be inserted to become a piece of WordArt.
-
10
Type your text using proper formatting (such as correct capitalization, grammar, etc.). The text «Your text here» is automatically selected, which means as soon as you start typing, the former pre-filled text will be removed in place for the text you will type.
-
11
Select alternate formatting (bold, italic, font size, font type) from the buttons above the box you type your stuff in.
-
12
Learn how to move your WordArt text. This can be achieved for most viewers by clicking to select and either centering the text like most centering of any other text, or, for some versions (2007 and up) by right-clicking and dragging the text to a new location.
-
13
Learn how to color your WordArt text. Use the same styles to color other text, as you would for this WordArt text. Just be sure the WordArt piece has been selected, before you begin to select your color. If you do end up selecting your color, you’ll be selecting a font color for any additional text near the insertion «I» point on the screen.
- Learn how to copy the piece of WordArt to an alternate location, if you’d like. Use the Copy and Paste technique to copy and paste the item from one area to another, through the use of Windows clipboard (which is where all copy and pasted items are temporarily stored).
Advertisement
Add New Question
-
Question
What is Microsoft Word insert?
Microsoft Word «insert» is used to insert any element or object into a document.
Ask a Question
200 characters left
Include your email address to get a message when this question is answered.
Submit
Advertisement
Video
-
The steps in this article are based on the 2003 version of Microsoft Word.
-
You can also select the text in the original page. You then can select the style, and it will pre-fill the words for you into the boxes.
Show More Tips
Thanks for submitting a tip for review!
Advertisement
Things You’ll Need
- Microsoft Word program
- computer mouse and keyboard
About This Article
Thanks to all authors for creating a page that has been read 115,428 times.
Reader Success Stories
-
«What helped me was the ‘Create Word Art’ video was graphic/demonstrative. It put ‘here/now’ words and directions…» more
Is this article up to date?
WordArt is a gallery of text styles that you can add to your publications to create decorative effects, such as shadowed or mirrored (reflected) text. You can use WordArt to add special text effects to your document.You can modify or add to the text in an existing WordArt object whenever you want.
Contents
- 1 What is considered WordArt?
- 2 What is WordArt simple definition?
- 3 Where is WordArt in Word?
- 4 How do I make WordArt?
- 5 How do you make rainbow WordArt?
- 6 When was the WordArt created?
- 7 What is WordArt use of WordArt?
- 8 Why is WordArt important?
- 9 What is WordArt feature?
- 10 How do you edit Word Art?
- 11 Is word art free?
- 12 How do you make word art a shape?
- 13 How do you make bubble letters on Word?
- 14 How do you make a colorful Word?
- 15 What is a root word for art?
- 16 Who discovered word art?
- 17 How do you use word art?
- 18 What is WordArt and ClipArt?
- 19 What is WordArt in which type of school work would you use it?
- 20 What is WordArt in power point?
What is considered WordArt?
1. WordArt is a program that allows you to treat text as a graphic. You can use the program to add special effects and flourishes to text, and then insert the text in your document. It is useful for creating special text elements such as logos, mastheads, or titles.
What is WordArt simple definition?
Word art or text art is a form of art that includes text, forming words or phrases, as its main component; it is a combination of language and visual imagery.
Where is WordArt in Word?
Click the Insert Tab; Go to Text group; Then you will see the WordArt button.
How do I make WordArt?
Follow along below to make your word art in just a couple of steps.
- Upload your data. Go to MonkeyLearn’s word art generator, then paste your text or upload a text file.
- Click ‘Generate Cloud’ After clicking ‘Generate Cloud’, your word art will appear in just a few seconds.
- Customize your word art.
- Download your word art.
How do you make rainbow WordArt?
To get the rainbow effect, do the following:
- Select the font you want changed.
- Using the other mouse button, choose Font from menu.
- Click the Text Effects button at the bottom of the window.
- Choose Text Fill.
- Choose Gradient Fill.
- Now you need to fiddle with Gradient Stops and Colour to get the effect you want.
When was the WordArt created?
Etymology. The term “art” is related to the Latin word “ars” meaning, art, skill, or craft. The first known use of the word comes from 13th-century manuscripts. However, the word art and its many variants (artem, eart, etc.) have probably existed since the founding of Rome.
What is WordArt use of WordArt?
WordArt is a gallery of text styles that you can add to your publications to create decorative effects, such as shadowed or mirrored (reflected) text. You can use WordArt to add special text effects to your document.You can modify or add to the text in an existing WordArt object whenever you want.
Why is WordArt important?
WordArt helps in dealing with text by providing different styles to the letters and their typographic arrangement.It can modify the look of the text by bending, skewing or stretching the shape. It can help in enhancing the look and feel of the text used in the Microsoft Office applications, especially in Word.
What is WordArt feature?
WordArt is a text modifying feature in Microsoft Word, a popular word processing program. It includes effects such as shadows, outlines, colors, gradients, and 3D effects that can be added to a word or phrase. WordArt can also bend, stretch, skew, or otherwise modify the shape of the text.
How do you edit Word Art?
You can easily change the spelling or words of the WordArt you have created.
- Double click the WordArt image.
- From the Format command tab, in the Text group, click Edit Text… The Edit WordArt Text dialog box appears.
- In the Text text box, make your changes.
- Click OK.
Is word art free?
WordArt offers a freemium model but you’ll need to upgrade to the paid version of the word cloud generator if you want to download high-quality word art, which might be useful if you are planning to print your word cloud.
How do you make word art a shape?
Create curved or circular WordArt
- Go to Insert > WordArt.
- Pick the WordArt style you want.
- Type your text.
- Select the WordArt.
- Go to Shape Format > Text Effects > Transform and pick the effect you want.
How do you make bubble letters on Word?
Type the text to turn into bubble letters. Highlight the text. Click the “Home” tab. Pull down the font menu and click a bubble-like font.
How do you make a colorful Word?
You can change the color of text in your Word document.
- Select the text that you want to change.
- On the Home tab, in the Font group, choose the arrow next to Font Color, and then select a color. You can also use the formatting options on the Mini toolbar to quickly format text.
What is a root word for art?
The root word-art comes from Latin –Artem ‘skill’ that usually refers to the quality or expressions of what is beautiful or of great significance. For instance, the word artefact refers to an object of cultural interest made by a human being because: Arte: By skill. Factum: To make.
Who discovered word art?
Ralf Borlinghaus, the originator of Word Art, claims it is an art form in which word and art, Logos and aesthetics, knowledge and perception, enter into a symbiotic relationship with one another.
How do you use word art?
Add WordArt
- On the Insert tab, in the Text group, click WordArt, and then click the WordArt style that you want.
- Enter your text. You can add a fill or effect to a shape or text box as well as the text in the WordArt.
What is WordArt and ClipArt?
Clip art is set of images provided by Microsoft office , which can be used in the document . Word art is stylish text styles provided by Microsoft office. Answer: ClipArt is animated pictures and WordArt is like animated words.
What is WordArt in which type of school work would you use it?
(See Figure 1.) Change your text, as desired. Click on OK. Your WordArt object is updated.
What is WordArt in power point?
WordArt is a special feature that allows the users to give special effects to the text such as curved text, 3D text, color gradiants, and more. To insert a WordArt you just need to click at Insert > WordArt.You can WordArt in any PowerPoint slide where you need to make nice text effects.







 menu is not the same as the Shape Effects
  menu. If you don’t see Transform at the bottom of the menu, make sure you’ve clicked the Text Effects menu.


 .
. , and then click Clear WordArt.

