
«I am running Microsoft 365 on my Windows 10 computer. I need to insert PNG images into my document, but after I try to insert the pictures it is showing a box with a red x mark and the message «This image cannot currently be displayed.»
Many users experience an odd issue with their Word document regarding a picture or an object is not showing up in Word. Whenever you open the Microsoft Word file, you can see white spaces or rectangles instead of the images that you have inserted earlier. This is a common issue in MS Word 2007 and 2010. Though the problem can also occur in the later versions of Microsoft Word.
Many MS Office users complained that they can’t insert pictures in a Word document. In a Word document, when I select insert, then picture, and select picture from my folder, it fails to insert. It only shows me a blank outline of the image but can’t insert the picture in Word.
Moreover, it can also happen with a Word file that contains an object or graphic image. If this is the case, let us understand why such an error is caused and how to fix the Word Document not showing pictures issue with a few easy methods.
Table of Contents
Why does Word say “This image cannot currently be displayed”?
How do I Fix this “Image Cannot Currently be Displayed” Error?
- Use the «In line with text» wrapping style option
- Change the view of the MS Word Application
- Enable the Show drawings and text boxes on-screen option
- Enable Print drawings created in Word option
- Disable Use of draft quality
- Disable Picture Placeholders
- Change the problematic Video driver settings
Why does Word say “This image cannot currently be displayed”?
“The images that cannot be displayed currently”
The main reason behind the issue “This image cannot currently be displayed” in Word is using the “wrapping style” option instead of the «In Line with text» Option with the pictures in the Word document.
a) Word Wrapping Style
Generally, Text Wrapping is used to manage well the text surrounding the image. However, in some cases using the “Wrapping style” option with your image might make Microsoft Word not show the images. Using the inline option might fix the error. Along with the Word Wrapping style, the following are a few other reasons that can also cause Word not to show images.
b) Picture Placeholder is Enabled
In some cases even after selecting the inline with text option, your image might not show up in the Word document. It might be because the Picture Placeholder option is enabled. Generally, the Picture placeholder is used when the Word document has numerous images or items.
In conditions where word files have a lot of images can be hard to process for a low-spec computer. If you enable the Picture Placeholder option, it will cease all the images to display. Yet images will be in the same position, they just won’t be displayed. This is the best way to reduce the load on the computer. Disabling the picture placeholder might fix your error. In the following sections, you find the instructions on how to change the settings.
c) Other Settings
Following are a few other settings that can be a reason behind the missing photos in the Word file:
- Word document view is set to Draft view or Outline View.
- If you Show drawings and text boxes on-screen preference in the Options menu is disabled.
- When Print drawings are created in Word choice is deactivated.
- If you have enabled the Use draft quality option.
d) Glitches in Windows Video Driver
Finally, your images on the Word document might not show up content or pictures due to any glitches Windows video driver. However, this is highly rare and there is no possibility of this happening.
In the following section, you will find every little detail on how to fix the error.
How do I Fix this “Image Cannot Currently be Displayed” Error?
Try the below-explained troubleshoots to solve your Word document not showing pictures problem. The following steps are according to Word in Office 365. The steps will be slightly different for Word 2007 and 2010 but the results will be the same. The difference in Word 2007 is that there is no File option, instead, you have to use the Microsoft Office button.
1. Use the «In line with text» wrapping style option
- Click on the inserted image
- Switch to the Right-click on the image
- Click on Wrap Text
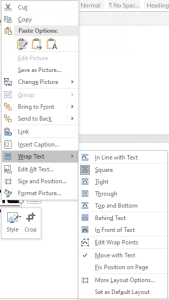
- Select In line with Text option
2. Change the view of the MS Word Application
If you are using Draft or Outline view, then select one of the following views:
- Print Layout
- Full-Screen Reading
- Web Layout
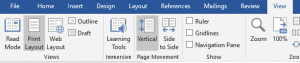
In MS Word 2016 or Office 365 just go to View and select on Print Layout.
For Word 2010: Click File, and then click Print.
3. Enable the Show drawings and text boxes on-screen option
- Go to File and select Options
- Click on the Advanced tab
- Scroll down to see Show document content
- Enable Show drawings and text boxes on-screen option
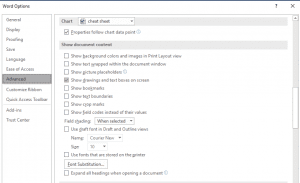
- Hit OK
- If you are using Word 2007, click on the Microsoft Office Button and click Word Options. As in Word 2007, instead of File, there is a Microsoft Office button.
4. Enable Print drawings created in Word option
- Hit the File tab and go to Options
- Jump to Display
- In Printing options, enable Print drawings created in Word option
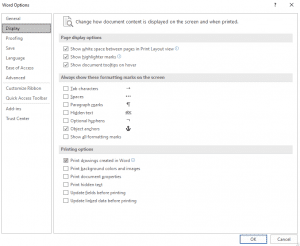
- Apply changes
5. Disable Use draft quality
- Hit the File tab and go to Options
- Jump to Display
- In Printing options
- Uncheck Use the draft quality option
- Opt OK
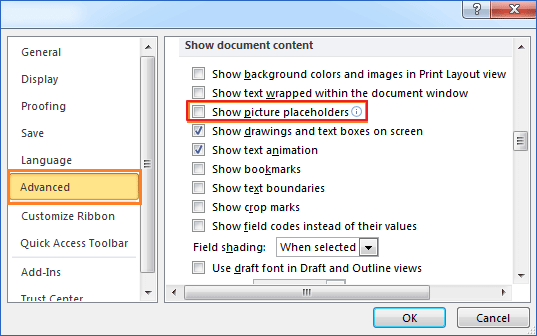
6. Disable Picture Placeholders
- Go to File and select Options
- Click on the Advanced tab
- Scroll down to see Show document content
- Uncheck Show Picture Placeholders Preference

- Hit OK
7. Change the problematic Video driver settings
For Windows 10:
- Go to Desktop and right-click
- Select Graphics Properties and then in the next window select Video
- Change your Windows video driver color quality settings and screen resolution.
- Try updating the video driver as well if a new update is available
If none of the above fixations help you, then there might be a possibility that your word file is damaged and as a result of that, it is not showing some content. In such situations, you have to adapt to a Word repair tool to fix the error. To do so, try to repair your DOC file / DOCX file using the Remo Word Repair utility. The Remo Repair Word is capable of solving any issues related to the Word document, regardless of the reason behind the corruption.
The best possible way to avoid any kind of error on Word doc is by creating multiple copies as a backup. However, you should know for a fact that even those copies are exposed to issues. Hence, it is strongly suggested to have Remo Repair on your Hands to fix any word-related issues.
Изображение или объект не могут отображаться в документе Word 2010 или Word 2007
Office 365 ProPlus переименован в Майкрософт 365 корпоративные приложения. Для получения дополнительной информации об этом изменении прочитайте этот блог.
Симптомы
При открываемом Microsoft Office Word 2010 или Word 2007 с изображением или объектом изображение или объект могут не отображаться. Эта проблема может возникнуть в документе, который содержит изображение, графическое изображение, объект AutoShape или другой объект.
Эта проблема также может возникать в более поздних версиях Word.
Причина
Эта проблема возникает, если вы используете параметр Стиля упаковки, кроме параметра In с текстовым параметром с изображением или объектом. И одно из следующих условий верно:
- Вы просматриваете документ Word в представлении Draft или в представлении Outline.
- На экране отключены рисунки и текстовые поля show.
- Рисунки печати, созданные в варианте Word, отключены.
- Включена опция качества «Использование черновика».
Если вы используете параметр In с текстовым параметром с изображением или объектом, эта проблема может возникнуть при включении параметра Placeholders Picture.
Эта проблема также может возникнуть, если у вас возникли проблемы с драйвером видео.
Обходной путь
Вы используете параметр Типа упаковки, кроме параметра «В соответствии с текстом»
Если вы используете параметр Стиля упаковки, кроме параметра In с текстовым параметром, используйте один из следующих обходных способов.
Использование параметра «В соответствии с текстом» Параметр упаковки
Чтобы изменить параметр Wrapping style для изображения или объекта в соответствии с текстом, выполните следующие действия, соответствующие вашей версии Word.
Word 2007
- Щелкните изображение или объект.
- На вкладке Format щелкните Текстовую упаковку в группе Аранжировка.
- Нажмите кнопку В соответствии с текстом.
Word 2010
- Щелкните изображение или объект.
- На вкладке Format щелкните Текстовую упаковку в группе Аранжировка.
- Нажмите кнопку В соответствии с текстом.
При использовании параметра In с текстом изображение или объект будут отображаться в любом представлении.
Если вы хотите использовать параметр Типа упаковки, кроме параметра In с текстовым параметром, используйте один из следующих обходных способов.
Изменение представления
Эта проблема может возникнуть, если вы просматриваете документ в представлении Draft или в представлении Outline. Чтобы решить эту проблему, просмотреть документ в одном из следующих представлений:
- Разметка страницы
- Режим чтения
- Веб-документ
- Распечатать Предварительный просмотр для Word 2007. Для
Word 2010: Нажмите файл и нажмите кнопку Печать.
Документы Word 2010 и Word 2007 состоят из отдельных слоев текста и рисования. При использовании параметра Стиля упаковки, помимо параметра In с текстовым вариантом с изображением или объектом, изображение или объект вставляется в слой рисования. Word 2010 и Word 2007 не отображают слой рисования при просмотре документа в представлении Draft или в представлении Outline. Слой рисования отображается в Word 2010 и в документе Word 2007 при использовании любого из представлений, указанных в этом обходе.
Включаем параметр «Показать рисунки и текстовые поля на экране»
При включке рисунков и текстовых полей Show на экране можно просмотреть изображение или объект в представлении Макет печати или в представлении веб-макета. Чтобы включить рисунки шоу и текстовые поля на экране, выполните следующие действия, как это необходимо для версии Word.
Word 2007
- Нажмите кнопку Microsoft Office, затем выберите пункт Параметры Word.
- Нажмите кнопку Дополнительно.
- В статье Показать содержимое документа щелкните, чтобы выбрать рисунки шоу и текстовые поля на экране флажка.
- Нажмите кнопку ОК.
Word 2010
- Последовательно выберите пункты Файл и Параметры.
- Нажмите кнопку Дополнительно.
- В статье Показать содержимое документа щелкните, чтобы выбрать рисунки шоу и текстовые поля на экране флажка.
- Нажмите кнопку ОК.
Включив параметр «Печать рисунков, созданных в Word».
При включив рисунки печати, созданные в варианте Word, можно просмотреть изображение или объект в предварительной версии печати. И вы можете распечатать изображение или объект. Чтобы включить рисунки печати, созданные в варианте Word, выполните следующие действия, соответствующие вашей версии Word.
Word 2007
- Нажмите кнопку Microsoft Office, затем выберите пункт Параметры Word.
- Нажмите кнопку Отображение.
- В статье Параметры печати щелкните, чтобы выбрать рисунки печати, созданные в поле Word.
- Нажмите кнопку ОК.
Word 2010
- Последовательно выберите пункты Файл и Параметры.
- Нажмите кнопку Отображение.
- В статье Параметры печати щелкните, чтобы выбрать рисунки **Print, созданные в поле Word **
- Нажмите кнопку ОК.
Отключение параметра «Использование качества черновика»
При отключении параметра Качества «Использование черновика» можно просмотреть изображение или объект в предварительном просмотре печати. И вы можете распечатать изображение или объект. Чтобы отключить параметр Качество использования черновика, выполните следующие действия, соответствующие вашей версии Word.
Word 2007
- Нажмите кнопку Microsoft Office, затем выберите пункт Параметры Word.
- Нажмите кнопку Дополнительно.
- В статье Печать щелкните, чтобы очистить окно качества «Использование черновика».
- Нажмите кнопку ОК.
Word 2010
- Последовательно выберите пункты Файл и Параметры.
- Нажмите кнопку Дополнительно.
- В статье Печать щелкните, чтобы очистить окно качества «Использование черновика».
- Нажмите кнопку ОК.
Вы используете параметр «В соответствии с текстом» Вариант стиля упаковки
Отключение параметра «Местообладатели изображения»
При выключении параметра Placeholders picture можно просмотреть изображение или объект во всех представлениях. Чтобы отключить параметр Picture Placeholders, выполните следующие действия, как это необходимо для вашей версии Word.
Word 2007
- Нажмите кнопку Microsoft Office, затем выберите пункт Параметры Word.
- Нажмите кнопку Дополнительно.
- В статье Отображение контента документа щелкните, чтобы очистить поле «Местообладатели изображения».
- Нажмите кнопку ОК.
Word 2010
- Последовательно выберите пункты Файл и Параметры.
- Нажмите кнопку Дополнительно.
- В статье Показать содержимое документа щелкните, чтобы очистить поле «Показать местообладатели изображения».
- Нажмите кнопку ОК.
Параметр Placeholders picture не влияет на изображения или объекты при использовании параметра стиля упаковки, кроме параметра In с текстовым параметром. Параметр Placeholders picture влияет на изображения и объекты при использовании параметра In с текстом во всех представлениях, кроме представления чтения на полном экране.
У вас возникли проблемы с драйвером видео
Если вы часто испытываете эту проблему, у вас могут возникнуть проблемы с настройками драйвера видео или с Windows параметров Display Properties. Если предыдущие обходные пути не устраняют проблему, попробуйте следующие обходные пути.
Изменение параметра качества цвета или разрешения экрана текущего драйвера видео
Чтобы изменить параметр качества цвета, следуйте этим шагам, соответствующим вашей ситуации.
Windows XP
- Нажмите кнопку Начните, нажмите кнопку Выполнить, введите desk.cpl, а затем нажмите кнопку ОК.
- Щелкните вкладку Параметры.
- Если параметр качества цвета заданной до самого высокого (32 бита), измените этот параметр на Средний (16 бит) и нажмите кнопку ОК.
Если вы все еще испытываете проблему, измените разрешение экрана. Для этого выполните следующие действия:
- Нажмите кнопку Начните, нажмите кнопку Выполнить, введите desk.cpl, а затем нажмите кнопку ОК.
- Щелкните вкладку Параметры.
- В разрешении Экрана переместите ползунок влево, а затем нажмите кнопку ОК.
Windows Vista
- Нажмите кнопку Начните, нажмите кнопку Выполнить, введите desk.cpl, а затем нажмите кнопку ОК.
- Если параметр Colors заданной до самого высокого (32 бита), измените этот параметр на Средний (16 бит) и нажмите кнопку ОК.
Если вы все еще испытываете проблему, измените разрешение экрана. Для этого выполните следующие действия:
- Нажмите кнопку Начните, нажмите кнопку Выполнить, введите desk.cpl, а затем нажмите кнопку ОК.
- В соответствии с разрешением переместите ползунок влево, а затем нажмите кнопку ОК.
Windows 7
- Нажмите кнопку Начните, нажмите кнопку Выполнить, введите desk.cpl, а затем нажмите кнопку ОК.
- Щелкните вкладку Advanced Параметры.
- Нажмите кнопку Монитор.
- Если параметр Colors заданной для highest (32 бита), измените этот параметр на Средний (16 бит) и нажмите кнопку ОК.
Если вы все еще испытываете проблему, измените разрешение экрана. Для этого выполните следующие действия:
- Нажмите кнопку Начните, нажмите кнопку Выполнить, введите desk.cpl, а затем нажмите кнопку ОК.
- В соответствии со статьей Разрешение щелкните стрелку и попробуйте другое разрешение, а затем нажмите кнопку ОК.
Изменение параметра ускорения оборудования
Windows XP
- Нажмите кнопку Начните, нажмите кнопку Выполнить, введите desk.cpl, а затем нажмите кнопку ОК.
- На вкладке Параметры нажмите кнопку Advanced.
- Щелкните вкладку Устранение неполадок.
- Переместите ползунок влево, чтобы уменьшить ускорение оборудования, а затем нажмите кнопку ОК два раза.
- Если вас спрашивают, хотите ли вы перезапустить компьютер, нажмите кнопку Да.
Windows Vista и Windows 7
- Нажмите кнопку Начните, нажмите кнопку Выполнить, введите desk.cpl, а затем нажмите кнопку ОК.
- Выберите пункт Дополнительные параметры.
- Щелкните устранение неполадок.
- Если драйвер отображения допускает изменения, нажмите кнопку Изменить Параметры. Переместите ползунок влево, чтобы уменьшить ускорение оборудования, а затем нажмите кнопку ОК два раза.
- Если вас спрашивают, хотите ли вы перезапустить компьютер, нажмите кнопку Да.
Получение обновленной видеокарты
Если описанные в этом разделе обходные пути помогают устранить эту проблему, обратитесь к производителю компьютеров с обновленными драйверами видео. Если вы уже обновили свою видеокарту, обратитесь к производителю видеокарты.
Блог did5.ru
Про АйТи и около айтишные темы
Не отображаются формулы и картинки в MS Word
В документах MS Word (.doc, .docx) не отображаются формулы и картинки, вместо них пустая рамка.
Открыл файл на другом ПК, все формулы отображаются. Значит дело в настройках офиса на конкретном компьютере.
Решение
1. Запустить MS Office 2007/2010 и открыть «Параметры Word»
2. В параметрах переходим в пункт «Дополнительно»
3. Снять галку «Показывать пустые рамки рисунков»

Формулы и картинки должны сразу отобразиться в документе, если нет, то откройте его заново
Нашли опечатку в тексте? Пожалуйста, выделите ее и нажмите Ctrl+Enter! Спасибо!
Хотите поблагодарить автора за эту заметку? Вы можете это сделать!
Рисунки не отображаются в Word
В документе Word отображаются лишь некоторые рисунки. Вместо других рисунков отображаются квадраты, размер которых нельзя изменить. Я пробовал разделять документ, но рисунки все равно не отображаются.
Сообщение о нарушении
Попробуйте выполнить указанные ниже действия.
1. Если активен режим черновика, переключитесь в режим «Разметка страницы». Для этого перейдите на вкладку Вид и нажмите кнопку Разметка страницы. В режиме черновика не отображаются объекты с любыми параметрами обтекания текстом, кроме «В тексте».
2. Измените параметры отображения. Для этого выполните действия, описанные ниже.
a. Нажмите кнопку Office, затем Параметры Word и перейдите в меню Дополнительно.
b. Прокрутите окно вниз до раздела Показывать содержимое документа.
c. Установите флажок Показывать рисунки и надписи. Затем снимите флажок Показывать пустые рамки рисунков.
d. Нажмите кнопку ОК.
3. Попробуйте снизить уровень аппаратного ускорения. Для этого выполните действия, описанные ниже.
a. Нажмите кнопку Пуск, введите в поле Начать поиск строку Панель управления и нажмите клавишу ВВОД.
b. Выберите пункт Оформление и персонализация.
c. Выберите пункт Экран.
d. Выберите команду Параметры дисплея.
e. Нажмите кнопку Дополнительно.
f. Перейдите на вкладку Диагностика.
g. Нажмите кнопку Изменить параметры.
Примечание . Если кнопка Изменить параметры неактивна, имеющаяся видеокарта не позволяет изменять параметры аппаратного ускорения.
Возможно, потребуется обратиться на веб-сайт изготовителя видеокарты, чтобы узнать,
- Remove From My Forums
-
Вопрос
-
Saved document
as .docx. 3/4 of document shows inserted jpg images. Bottom half shows blank
space where images used to be. I can click and a quick something flashes where
the image should be. Picture tools — format shows there is an image as it shows
the height and width when I click in the area but goes away when I click out of
the area. Bottom 1/3 of Word 2016 document shows spaces where images used to be
but now not displayed. I made sure the placeholders option was not
checked in Advanced under Options. Any ideas greatly appreciated.<o:p></o:p>
Ответы
-
Found the answer. I was in Web Layout mode and when I changed to Read or Print layout, all the images appeared.
-
Помечено в качестве ответа
6 января 2016 г. 14:18
-
Помечено в качестве ответа
Asked by: Bernadine Simonis
Score: 5/5
(52 votes)
Click the Microsoft Office Button, and then click Word Options. Click Advanced. Under Display document content, click to clear the Picture Placeholders check box. Click OK.
How do you fix images not showing up when you paste it in Microsoft Word?
Let’s try the following suggestions, please:
- Open Office Word.
- Click on File > Options.
- Under Display tab, check the box for Print drawings created in Word.
- Under Advanced tab, look for Show document content. Uncheck the Show picture placeholders box and check the Show drawings and text boxes on screen box.
Why are my pictures not showing up on Microsoft Word 365?
1. Go to File > Options > Advanced > Show document content, check the box of Show background colors and images in Print Layout view, and uncheck the box of Show picture placeholders. 2. Run Word in the safe mode to have a check.
Which view in MS Word can’t display graphics?
On the View tab of the Ribbon or on the status bar, choose Print Layout view. Wrapped graphics don’t display in Draft view. Go to Office Button | Word Options | Advanced: Show document content and make sure that “Show drawings and text boxes on screen” is checked and that “Show picture placeholders” is not checked.
Why is word not letting me insert a picture?
If you can’t select Pictures from the Insert tab on the ribbon, your message is probably in plain text format. In Word, click on But it wont let me move pictures. Navigate to the location of the image file, select it, then select “Insert.” The image will now be inserted.
31 related questions found
Why are images not displaying in Word?
Microsoft Word – Pictures Not Showing. If you are using Word and you see white rectangles instead of images in your documents, you might have “Show picture placeholders” set. Scroll down, and then under “Show document content” uncheck “Show picture placeholders”. Click OK.
How do I unhide a picture in Word?
Open Microsoft Word. Go to File > Options > Advanced Tab. In the Advanced tab, enable the Show picture placeholders check box under the Show document content group. Click OK on the dialog to save the setting and come back to your document.
How do I fix a picture in Word?
Select a picture. Select the Layout Options icon. To bring your picture in front of the text and set it so it stays at a certain spot on the page, select In Front of Text (under With Text Wrapping), and then select Fix position on page.
Why is my text not showing in Word?
If all your text appeas/disappears when you click on the «Show/Hide» button, the suggests you have applied the hidden text attribute to all of your document. Either you did this by selecting the whole document, <CTL><A>, and applying the hidden text attribut, <CTL><H>.
How do I reset Microsoft Word to default settings?
Unfortunately, there is no button in Word to reset the program to its default settings. However, you can rename Word’s global template to see if that fixes its problems. If Word continues to have issues or it runs very slow, another option is to delete Word’s registry key.
Where is show picture placeholders in Word?
To turn on picture placeholders, follow these steps:
- Display the Word Options dialog box. …
- Click Advanced at the left side of the dialog box.
- Scroll down to the Show Document Content section. …
- Click to turn on the Show Picture Placeholders check box.
- Click on OK.
How do I add a tooltip in Word?
Adding a ScreenTip
- Press Ctrl+K. Word displays the Insert Hyperlink dialog box. …
- Click on the ScreenTip button. …
- In the ScreenTip Text box, enter the text you want to use for your ScreenTip.
- Click on OK to close the dialog box.
- Set any other hyperlink values, as desired.
- When completed, click on OK.
How do I fix pictures not displaying?
How do I fix a broken image icon in Chrome?
- Check if the Show all images option is selected. …
- Try a different browser. …
- Switch on JavaScript. …
- Switch off your extensions. …
- Check your antivirus. …
- Clear Google Chrome’s Cache. …
- Reset the Browser. …
- Use Google’s DNS.
How do I enable shapes in Word?
(Word for the web doesn’t support shapes.) To add a shape, select Insert on the ribbon, select Shapes, and then choose a shape. After you add a shape, you can move it and resize it; add text, bullets, or numbering; and you can change the fill color or outline.
Where is the Protect option in Microsoft Word 2010?
1From the File tab menu, choose Info.
Click the Protect Document button to open the Protect Document menu. You have several choices, including Mark As Final, Encrypt with Password, and Restrict Editing.
How do you make a picture transparent in Word 2016?
Make part of a picture transparent
- Select the picture, and go to Picture Format > Color or Picture Tools > Format > Color.
- Select Set Transparent Color.
- When the pointer changes, select the color you want to make transparent.
Where is layout options in Word?
The layout options and compatibility options in Word 2007 and later versions are found near the bottom of the Word Options dialog box > Advanced category. This illustration shows the options found in Word 2013, 2016, 2019, and Word for Microsoft 365.
How can I freely move a picture in Word?
Double-click the picture to add it to your Word document. Back on Word’s editing screen, right-click the image that you just added and select Wrap Text > In Front of Text from the menu. Your picture is now freely movable. Drag and drop it anywhere you want in your document.
How do I view hidden pictures?
Go to the folder you want to search by tapping the folder’s location (e.g., Internal storage) and then tapping the folder, then search for images that have been hidden. Hidden files, including pictures, will appear transparent when compared to other non-hidden files.
How do I find hidden shapes in Word?
Follow these steps:
- Display the Word Options dialog box. …
- Click Advanced at the left side of the dialog box.
- Scroll through the options until you can see the Show Document Content section. …
- Make sure the Show Picture Placeholders check box is cleared.
How do I find hidden links in Word?
Office 365 — Word — how to find and highlight all hyperlinks in documents
- Press Alt + F9 to display the fields.
- Ctrl + F to open the search box.
- Search: ^d hyperlink.
- In main doc – find all.
- Check «Highlight all items found …»
- Click on the Find All button.
- Close the dialog.
Where is the Office button in Word?
The Office button is found in the top-left corner of Excel, Word, and other Office 2007 program windows and looks like the picture. When the Office button is clicked, many of the same options you’d see in the file menu, such as New, Open, Save, Print, etc., can be found.
Why are my images not showing up in my PowerPoint?
Make sure you have the latest Office Updates installed. Try going to File > Save As and save your file to a different location. Close PowerPoint and reopen the file to see if your pictures display properly. … For example, you may be prompted to install a graphics filter to view the picture or clip.
What is gutter margin?
A gutter margin adds extra space to the side margin, top margin, or inside margins of a document that you plan to bind. A gutter margin helps ensure that text isn’t obscured by the binding. … In the Gutter box, enter a width for the gutter margin. In the Gutter position box, click Left or Top.
Click File, and then click Options.Click Advanced.Under Show document content, click to select the Show drawings and text boxes on screen check box. Click OK.
How do I fix a picture in Word 2013?
Open Layout Options Select a picture. Select the Layout Options icon. To bring your picture in front of the text and set it so it stays at a certain spot on the page, select In Front of Text (under With Text Wrapping), and then select Fix position on page
How do you enable a picture in Word?
Insert pictures
How do I get a picture to show in a document?
About This Article
Why are my pictures not showing up on Microsoft Word 365?
Insert pictures
Why are my pictures not showing up on Microsoft Word Mac?
Go to File x26gt; Options x26gt; Advanced x26gt; Show document contentx26gt;check the box of Show background colors and images in Print Layout view and check the box of Show drawings and text boxes on screen and uncheck the box of Show picture placeholders. 2. Run Word in the safe mode to have a check.
How do I permanently fix a picture in Word?
Select a picture. Select the Layout Options icon. To bring your picture in front of the text and set it so it stays at a certain spot on the page, select In Front of Text (under With Text Wrapping), and then select Fix position on page
Can you fix a picture in Word?
Click the picture to reveal the Format tab.Press the Corrections option to reveal the dropdown. This will reveal to you how to edit image text in word. Apply the required correction to complete the process in full.
How do you fix a picture on a page?
To position an image relative to a page, select the image and from the menu bar below it, select Fix position on page. To open the Image options sidebar, select the overflow menu (three dot), followed by All image options.
Why is my Word not showing images?
Why does Word say This image cannot currently be displayed? The main reason behind the issue This image cannot currently be displayed in Word is using the wrapping style option instead of the In Line with text Option with the pictures in the Word document.
Why can’t I click on a picture in Word?
It sounds like the problem is that the Picture Placeholders setting has been turned on. You can control this setting in this manner: Display the Word Options dialog box. (In Word 2007 click the Office button and choose Word Options.
How do you enable objects in Word?
Insert an object in Word or Outlook
How do you put a picture in a document?
Insert pictures
Can’t insert a picture into a Word document?
How to Insert and Crop Pictures in Word
How do I get the whole picture to show in word?
How to Fill the Page With a Picture on Microsoft Word
Why can’t I see pictures in Microsoft Word?
Click File, and then click Options.Click Advanced.Under Show document content, click to select the Show drawings and text boxes on screen check box. Click OK.
How do I insert a picture in Word 365?
Insert pictures
Why is pictures not showing on Word on Mac?
You may click the View tab and check the result. If you are in Draft or Outline view, try to change to Print Layout view and see if you can see images. Besides, click Word menux26gt;Preferencesx26gt;Viewx26gt;Show in Document, make sure Drawings is checked. Go to Preferencesx26gt;Print, make sure Drawing objects is checked.
Why is Microsoft Word not showing pictures?
Click the Microsoft Office Button, and then click Word Options. Click Advanced. Under Show document content, click to select the Show drawings and text boxes on screen check box. Click OK.
How do I import a picture into Word on a Mac?
On the Insert menu, select Photo, then click Picture from File.Select the image file you want and click Insert
How do I lock an image in place in Word?
Click on the Picture Position tab. Under both the Horizontal and Vertical selections, select Absolute Position, and pick Page from the drop-down menu at the right. Also, click on the checkbox that says Lock anchor. Now, your pictures wont move around the page.
How do I stop a picture from moving in Word?
2. Fix Position on Page
Oct 27, 2021
Can you lock a shape in Word?
Select a shape. On the Format menu, click Protection.Select the shape attributes that you want to lock, or clear the check boxes for the attributes you want to unlock, and then click OK
Can you edit a picture in Word?
Microsoft Office has enhanced photo editing features to help when adding pictures in your documents. You can adjust the picture brightness or contrast, remove the background, use artist affects, add a border, rotate, crop or resize a picture.
How do you lock pictures in place in Word?
Click on the Picture Position tab. Under both the Horizontal and Vertical selections, select Absolute Position, and pick Page from the drop-down menu at the right. Also, click on the checkbox that says Lock anchor. Now, your pictures wont move around the page.
 Please Note:
This article is written for users of the following Microsoft Word versions: 2007, 2010, 2013, and 2016. If you are using an earlier version (Word 2003 or earlier), this tip may not work for you. For a version of this tip written specifically for earlier versions of Word, click here: Making Pictures Show in Word.
![]()
Written by Allen Wyatt (last updated April 29, 2020)
This tip applies to Word 2007, 2010, 2013, and 2016
Have you ever placed a picture in your Word document, only to have the picture not be visible when you are later working in the document? This seems to be a common occurrence, and there are several reasons for this.
Word uses a «layered» approach to documents. Each document has several different layers. You are probably most familiar with the text layer, in which your text actually resides. There are two other layers, as well. First is the header/footer layer, which contains both the header and footer information that appears on every page in your final document. The other layer is the drawing layer, which contains graphic objects.
In reality, text can appear in all three layers of your document. For instance, headers and footers are composed primarily of text—text obviously appears in the text layer, and text boxes can appear in the graphics layer.
Similarly, graphics can appear on all three layers. People don’t normally place graphics on the header/footer layer, but they can. Graphics are much more common on both the text layer and the graphics layer. If you place an inline graphic in your document, it is on the text layer; if you place a floating graphic in your document, then it is on the graphics layer.
What does this discussion about layers have to do with whether pictures show up in Word? There are a number of ways to view your document, each accessible from the ribbon tools or by clicking on one of the View buttons that may be visible on the status bar, just below your document. Most people do their writing and editing in Draft or Print Layout views. If you are using Draft view, Word displays only the contents of the text layer of your document. Thus, any pictures residing in the header/footer layer or, more commonly, on the drawing layer are not visible. In order to see the pictures on these other layers, you need to switch to Print Layout view. Of course, some pictures are visible when working on your document in Draft view. Why? Because some pictures—inline pictures—are stored on the text layer, and this is the layer being displayed.
You can switch a drawing from the drawing layer to the text layer (or vice versa) by changing whether it is floating or inline. The easiest way to do this is to right-click on the picture to display a Context menu. The Text Wrapping option (Word 2007) or the Wrap Text option (Word 2010, 2013, and 2016) provide different options, including In Line with Text.
Note that you can switch a drawing to the text layer (make it In Line with Text) only if it is a picture that you placed in your document. If it is a graphic object that you created with the Shapes tool on the Insert tab of the ribbon, you cannot do this; the In Line with Text option is not available. Graphic objects such as these can only reside on the drawing layer. This is why Word switches to Print Layout view whenever you choose to insert drawing objects in your document—it knows that these are only visible in Print Layout view.
Despite the foregoing explanation, there are other settings in Word that can affect the visibility of graphics in a document. If you cannot see a drawing that you believe should be visible, you may want to check these:
- Display the Word Options dialog box. (In Word 2007 click the Office button and then click Word Options. In Word 2010 and later versions display the File tab of the ribbon and then click Options.)
- Click Advanced at the left side of the screen.
- Scroll through the advanced options until you see the Show Document Content section. (See Figure 1.)
- Note the Show Picture Placeholders check box. This check box controls whether Word displays any drawings, regardless of the layer on which they reside. If selected, then Word shows a «placeholder» for the graphic, but not the graphic itself. Set this check box according to your desires.
- Note the Show Drawings and Text Boxes On Screen check box. This check box controls whether drawings are displayed or not when using Print Layout and Web Layout views; set it according to your desires.
- When done, click OK to close the dialog box.
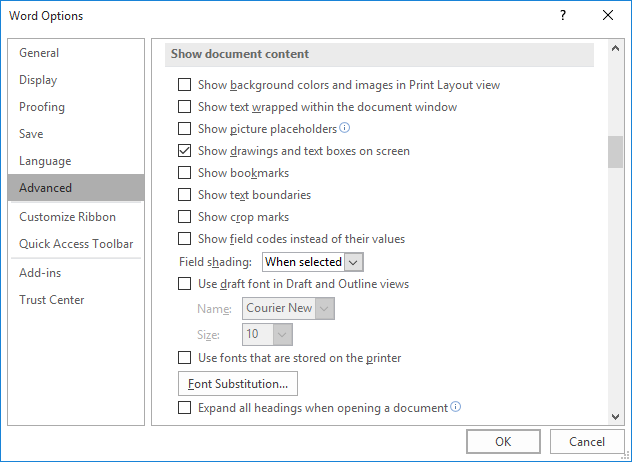
Figure 1. The advanced options of the Word Options dialog box.
Another thing to remember is that Word treats different types of graphics differently when displaying them. For instance, if you are placing an EPS graphic in your document, and the graphic was not saved with a «preview,» then Word won’t display it, but will instead display a gray box that shows where the graphic will print. This type of behavior illustrates that graphic filters can affect what you see in a document.
WordTips is your source for cost-effective Microsoft Word training.
(Microsoft Word is the most popular word processing software in the world.)
This tip (5964) applies to Microsoft Word 2007, 2010, 2013, and 2016. You can find a version of this tip for the older menu interface of Word here: Making Pictures Show in Word.
Author Bio
With more than 50 non-fiction books and numerous magazine articles to his credit, Allen Wyatt is an internationally recognized author. He is president of Sharon Parq Associates, a computer and publishing services company. Learn more about Allen…
MORE FROM ALLEN
How Excel Treats Disk Files
Workbooks are loaded from disk files, but workbooks aren’t the only type of files that Excel can load. This tip provides …
Discover More
Determining the Number of Paragraphs in a Document
When using a macro to process a document in some way, you often need to know the number of paragraphs in the document. …
Discover More
Debugging a Macro
Part of writing macros is to make sure they work as you expect. This involves a process known as debugging. Here’s how …
Discover More
Updated on October 28, 2022

 MS Word is the most friendly text editor application which makes it possible to create, store or convey documents with specific information. One can include various objects such as text, hyperlinks, clip arts, charts, OEL objects, images, video, and a lot more in a Word file. However, images or any objects present in the Word file may not display due to a number of reasons.
Generally, Word document does show images or other elements when you are using the “Wrapping style” option instead of the “In line with text” option. So, first, check which option you are using and modify if the “Wrapping style” option is enabled as follows:
- Click on the respective image or element
- On the Format tab, select Text Wrapping in the “Arrange group”
- Click the In line with text option in the drop-down list
Other than this issue, pictures are not visible in Word documents when the “Show drawings and text boxes on-screen” or “Print drawings created in Word” option is disabled or the “Use draft quality option” is enabled in it. In a few events, while accessing the document file in the “Draft or Online view” view option, you may not find images placed in a particular location. So, try to enable or disable respective options in the Word file as specified previously and fix the problems.
However, even large size of Word file, virus attacks, improper termination of MS Word tool, or conflicts between objects embedded in Word document may cause this kind of trouble. In case, if Word file is corrupted because of these factors and displays images partially, then don’t worry!! Make use of accurate Word file repair application to fix Word document that does not show images on Windows computer.
How to Repair Word Document Not Showing Pictures?
Yodot DOC Repair is well-organized software which used to repair Word document (DOC and DOCX) that does not display images in Microsoft Office Word application. This tool thoroughly scans partial Word file and troubleshoot any type of its issues in simple steps. You can also
fix Word object corrupt no longer available error caused due to conflicts between various objects of Word document such as images, text, tables, videos, charts, hyperlinks, OLE objects and many more elements.
Steps to Fix Word File That is Not Showing Images Issue:
- Download Yodot DOC Repair program on Windows computer
- Run the utility and follow on-screen guidelines
- From the first screen, select corrupt Word document by using the Browse button.
- After selection, to initiate the repair procedure click on the Repair button.
- Then, this application scans damaged Word files, which can be observed in the progress bar.
- After completion, you can View a Word document with its file description.
- In the end, Save the fixed Word file to your desired location on the Windows system .
Tips to Avoid Getting Word Document Does Not Show Images Issue:
- Don’t terminate MS Office Word application all of sudden while accessing any Word document.
- Backup significant Word files on multiple external storage devices.
- Install and maintain a good antivirus program to remove harmful viruses from Windows PC.
| Workable Solutions | Step-by-step Troubleshooting |
|---|---|
| Fix 1. Show hidden images in a Word | Click «File» > «Options» in Word. Click «Advanced» on the left pane, uncheck «Show picture placeholders»…Full steps |
| Fix 2. View hidden texts in Word | Click «File» > «Options» in Word 2013/2010 (for Word 2007, click Office button > «Word Options»)…Full steps |
| Fix 3. Recover hidden Word/photos | Unhide a Word Document in File Explorer. Or recover hidden Word with data recovery software…Full steps |
Q: Pictures not showing in Word, how to find hidden images in Word document?
«I have a four-page Word document with several images inserted. When I opened it this morning to see only white rectangles instead of pictures in the Word. Why are my pictures not showing up in the Word document? Are they hidden? How to show hidden images in a Word?»
Images or texts not showing in a Word document happens from time to time because they are hidden intentionally or unintentionally. This article shows you a detailed guide on how to show hidden images and texts in a Word document. What’s more, If you want to recover hidden Word documents and photos on Windows PC and laptop, you can use an ultimate EaseUS Data Recovery Wizard tool to help you make it effortlessly.
How to Find Hidden Images/Pictures in Word
When you can’t see a picture or image in a Word document, you can try the tips below to find hidden pictures or images.
Step 1: Open your Microsoft Office Word > «Word Options» in Word 2007. (Click «File» > «Options» in Word 2016/2013/2010.)
Step 2: Click «Advanced» on the left pane, uncheck «Show picture placeholders» under Show document content. Then you should be able to see your hidden images or pictures in Word document again.
How to hide images in a Word document?
Sometimes you need to insert pictures in Word to supplement the text message. On the contrary, sometimes, when you just want to scroll and read text quickly, they can become an additional obstacle. In this case, you can hide pictures in your Word document with the «Show picture placeholders» feature. using the same steps above.
How to View Hidden Text in Word Document
If you’ve hidden some text lines in a Word document, or some content was set to hide in Word, is it possible to show the hidden text content? How? You’ll find two options for showing hidden text in Word 2016/2013/2010/2007. (If you are using an older version of Word, please find more solutions from Microsoft Office support team or Google.)
Method 1. Show Hidden Text in Word 2016
The first way is to view the hidden text from Print settings.
Step 1. Open the Word document in Word 2016 in which you have hidden text.
Step 2. Go to «Print» settings and select «Page Setup».
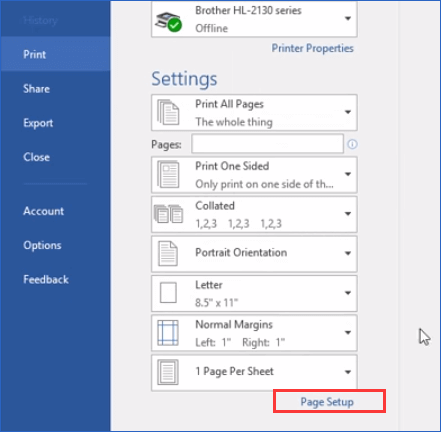
Step 3. Go to «Paper» settings, click «Print Options…».
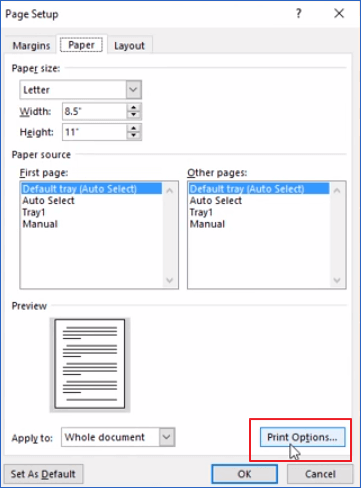
Step 4. In Display, check «Print hidden text» and click «OK» to save changes.
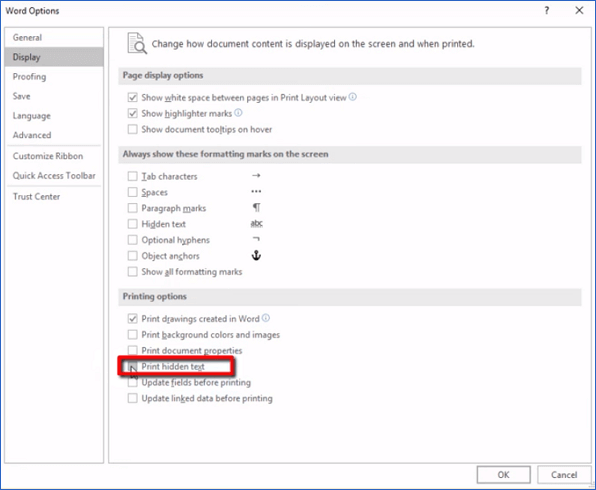
By doing so, those hidden texts will only show up in the Print preview window. But still hidden in Word document. If you want to unhide text in Word 2016, follow the below tips.
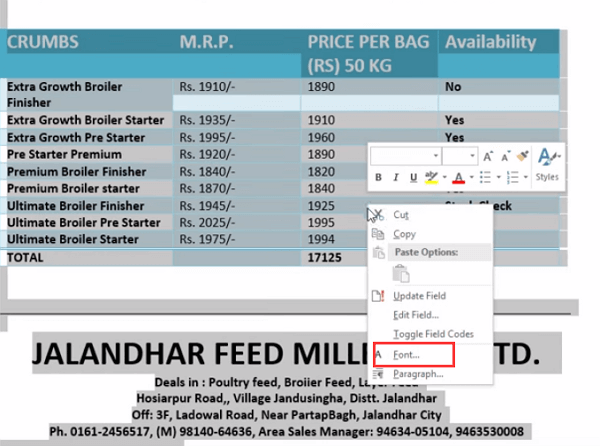
Step 1. Press Ctrl + A to select all content in Word document.
Step 2. Right-click on content and select «Font…».
Step 3. Click the «Hidden» box twice, uncheck it and click «OK» to save changes.
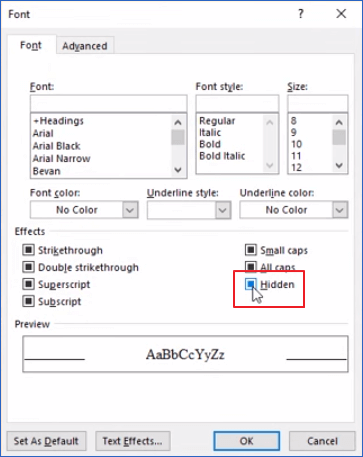
Now you can see all hidden content displaying in your Word document again.
Method 2. Display Hidden Text in Word 2013/2010/2007
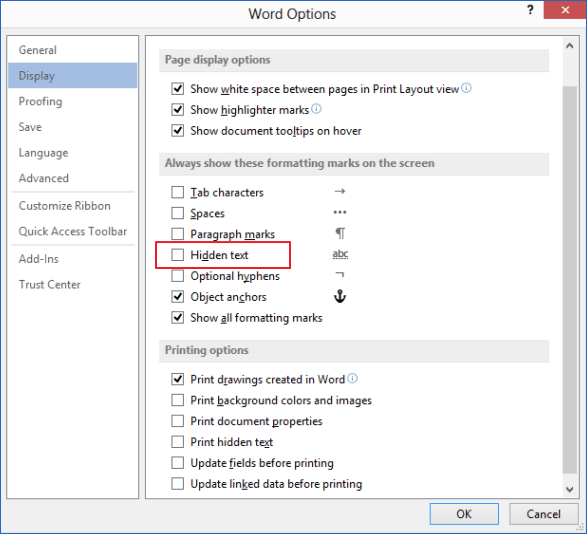
Step 1. Click «File» > «Options» in Word 2013/2010. For Word 2007, click Office button > «Word Options».
Step 2. Click «Display» at the left pane. Check and uncheck the Hidden text box, leaving it empty.
Step 3. Click «OK» to save all changes.
How to Recover Hidden Word Document/Photos in Windows 10/8/7
In this part, we’ll provide you with two reliable methods for recover hidden Word documents in Windows computer or external storage devices. Let’s see how to do it now.
Method 1. Unhide a Word Document in File Explorer
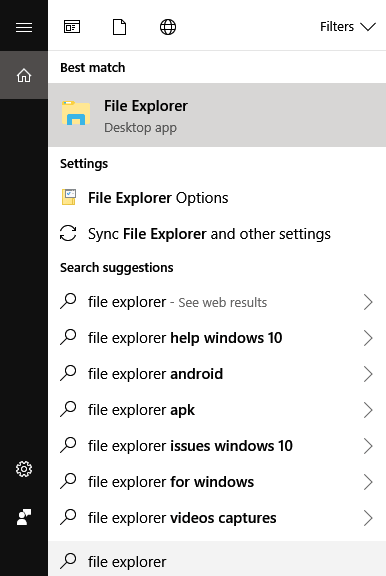
For Windows 10/8/8.1 users:
Step 1. Type file explorer in the Search box and select «File Explorer».
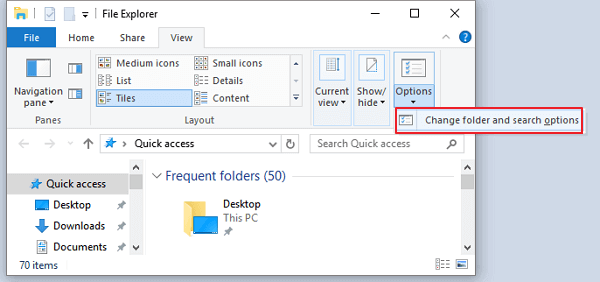
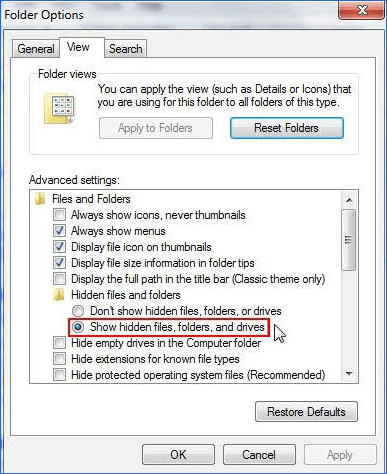
Step 2. Select «View» > «Options» > «Change folder and search options».
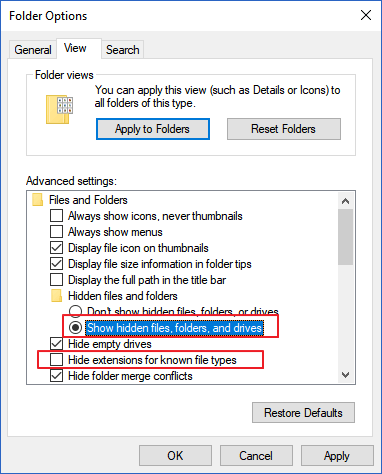
Step 3. In «Folder Options», select «Show hidden files, folders, and drives» under Hidden files and folders. Also, uncheck Hide extensions for known file types. Click «Apply» to save all changes.
For Windows 7 users:
Step 1. Open Windows Explorer by clicking «Start» > «Computer».
Step 2. Click «Tools» > «Folder Options» > «View».
Step 3. Under the View tab, select «Show hidden files, folders, and drives» below Hidden Files and Folders. Uncheck Hidden extensions for known file types and apply the changes. By doing so, you see all file extensions, and it will help you quickly locate the hidden Word documents or pictures.
Method 2. Recover Hidden Word Documents and Photos with Data Recovery Software
If you can’t view hidden Word documents, pictures, audios, videos, or other files in File Explorer, there is still a great chance to restore hidden files by using professional file recovery software — EaseUS Data Recovery Wizard. This competent and user-friendly data recovery program allows you to fully scan computer or storage devices, finding all existing, lost, formatted, and hidden files with two scanning modes — Quick Scan and Deep Scan.
In addition to restoring normally deleted files, EaseUS file recovery software also enables you to recover permanently deleted files in HDD, SSD, USB flash drive, SD card, pen drive, external hard drive, etc. Download and install it on your PC, then follow the guidelines below to restore your hidden Word document or pictures within three steps.
Step 1. Select the virus infected drive to scan
Run EaseUS virus file recovery software on your Windows PC. Select the disk attacked by the virus to scan for lost or hidden files. Note that:
- If it’s an HDD where files were hidden or deleted by virus, it’s better to install the software on a different volume or an external USB drive to avoid data overwriting.
- If the infected device is an external hard drive, flash drive or memory card, it doesn’t matter to install the software on the local drive of the computer.

Step 2. Check all scanned results
EaseUS Data Recovery Wizard will immediately start a scan process to find your deleted or hidden files on the virus infected hard drive. To quickly locate the wanted files, you can use the Filter or type grouping feature to display only the pictures, videos, documents, emails, etc.

Step 3. Preview and recover deleted/hidden files
When the process finishes, you can preview the scanned files. Select the files you want and click the «Recover» button. You should save restored files to another secure location on your computer or storage device, not where they were lost.
