
Word for Microsoft 365 Word 2021 Word 2019 Word 2016 Word 2013 Word 2010 Word 2007 More…Less
Make pictures, charts, or other objects align on the page, or with each other, by using “snap to” commands.
Snap to options only work in Print Layout.
Turn on the snap-to options
-
Select a chart, picture, or object in the document.
-
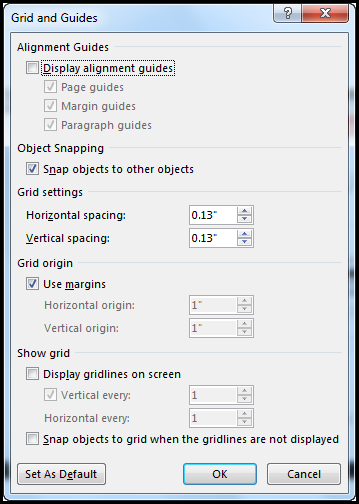
On the right end of the ribbon, select Format > Align > Grid Settings.

The Grid and Guides dialog box appears.
-
Turn on one or both of these options:
Option
Description
Snap objects to grid when the gridlines are not displayed
Positions an object to the closest intersection of the grid even when the grid is not visible.
Snap objects to other objects
Make an object align with other objects as you’re dragging it onscreen.
Turn off the snap-to options
-
Click a chart, picture, or object in the document.
-
On the right end of the ribbon, select Format > Align > Grid Settings.
The Grid and Guides dialog box appears.
-
To turn off the Snap objects to grid when the gridlines are not displayed or Snap objects to other objects settings, clear the respective box.
Adjust the size of the grid
You can change the distance between gridlines shown on the page by adjusting horizontal and vertical spacing.
-
Select a chart, picture, or object in the document.
-
On the right end of the ribbon, select Format > Align > Grid Settings.
-
Under Grid Settings, change the measurement in the Horizontal spacing or Vertical spacing box.
You can type a measurement in the box or use the up or down arrow on the right side of the box.
Tips about the grid and guides
-
To temporarily override the snap-to options, hold down ALT while you drag the chart, picture, or object.
-
If you want the current settings in the Grid and Guides dialog box to be the default settings for all documents, click Set As Default.
-
By default, shapes and other objects will snap to the nearest intersection of gridlines only if the grid is visible. Change that by checking the Snap objects to grid when the gridlines are not displayed box.
Need more help?
How do I make a picture grid in Word?
Using SmartArt
- With a Word Document open, click on the ‘Insert’ tap in the ribbon and click on ‘SmartArt. ‘
- A dropdown will appear, click ‘ Picture . ‘ Choose the layout you’d like to use. …
- Add your photos to the template. Your photos will automatically size to fit within the template making a picture collage .
How do I make a grid of pictures?
Steps to build a photo grid :
- Open TurboCollage and set your collage to use Grid pattern.
- Set the number of rows and columns as per your requirement. For the above example, we will use 1 rows and 6 columns.
- Add pictures to your Photo Grid .
- If you want to fit pictures inside their frames, set «Fit Pictures » to “Inside».
How do you make a grid on Microsoft Word?
To show the gridlines , in Excel, PowerPoint, or Word , click the View tab, and then check the Gridlines box. To hide the gridlines , clear the Gridlines check box.
How can I make a photo collage in Word?
Group shapes, pictures , or objects
- Press and hold CTRL while you select the shapes, pictures , or objects that you want to group . The Wrap Text option for each object must be other than In line with Text. …
- Go to Drawing Tools or Picture Tools, on the Format tab, in the Arrange group , select Group . , and then select Group .
How do I group pictures together in Word?
Group shapes, pictures , or objects
- Press and hold CTRL while you select the shapes, pictures , or objects that you want to group . The Wrap Text option for each object must be other than In line with Text. …
- Go to Drawing Tools or Picture Tools, on the Format tab, in the Arrange group , select Group . , and then select Group .
How do I GRID a picture on my phone?
Drag the image and/or each corner then tap Done. Samsung Android : Open the photo in the gallery > Transform > Ratio > 1:1. Drag the image and/or each corner then tap the tick icon.
How do you make a grid picture on Instagram?
How it works
- Load a photo from your camera roll into the pic splitting app.
- Crop the square section you want to use in your Instagram feed.
- Upload the files from bottom right to top left so that they appear in the correct order on your Instagram profile to create the mosaic effect.
How do you make a grid?
To draw the grid :
To draw this grid , put your ruler at the top of the paper, and make a small mark at every inch. Place the ruler at the bottom of the paper and do the same thing. Then use the ruler to make a straight line connecting each dot at the bottom with its partner at the top.
How do you make a collage on Microsoft Word?
.cxrEAd,.uKh9yc{display:block;opacity:0;transform:scale(0);transition-property:border-width,opacity,transform}.uKh9yc{border:10px solid transparent;margin:0 auto}.gy6Qzb{-webkit-transition:max-height 0.3s;overflow:hidden}.V1sL5c{overflow:visible}.S8PBwe{max-height:0;visibility:hidden}.vp45yf{pointer-events:none;position:absolute !important;right:0;color:#70757a;top:50%;margin-top:-12px}.FXMOpb .vp45yf{margin-top:-14px;transform:rotate(180deg);transform:rotate(180deg)}.mWyH1d{position:relative}.aI1xUe{box-sizing:border-box;border:1px solid #ebebeb;border-radius:2px;height:100%;min-width:270px;width:100%;padding-bottom:16px;white-space:break-spaces}.aI1xUe .g{padding-bottom:0}.wDYxhc{clear:both}.cUnQKe .wDYxhc{clear:none}html .kp-blk .xpdclose .LKPcQc,html .kp-blk .xpdopen .viOShc{padding-top:0}.garHBe{color:#222;font-size:20px;line-height:1.3;position:relative}.garHBe a{color:#222}.xpdopen .Hhmu2e{overflow:inherit}.xpdclose .a84NUc:not(:empty),.xpdopen .CQKTwc:not(:empty){border-top:solid 1px #ddd;border-radius:0}.SHa8ve{display:none}.xpdclose .TOfaBb.SHa8ve,.xpdopen .LL5J7d.SHa8ve{display:block}.rKR6H{padding-top:0.1px}.xpdclose .oHglmf,.xpdopen .xzPb7d{padding-bottom:16px}.xpdclose .kp-header .oHglmf,.xpdopen .kp-header .xzPb7d{padding-bottom:0}.fm06If .xpdclose .oHglmf,.fm06If .xpdopen .xzPb7d,.c2xzTb .xpdclose .oHglmf,.c2xzTb .xpdopen .xzPb7d{padding-bottom:0}.HSryR .xpdclose .oHglmf,.HSryR .xpdopen .xzPb7d{padding-bottom:0}.Wnoohf .xpdopen .yp1CPe,.OJXvsb .xpdclose .siXlze{padding-bottom:16px}.Wnoohf .xpdopen .yp1CPe .xpdbox g-more-link{top:28px}.Wnoohf .xpdclose .wDYxhc.xsZWvb,.Wnoohf .xpdopen .wDYxhc.EfDVh{padding-bottom:0}.OJXvsb .xpdclose .wDYxhc.siXlze{padding-bottom:16px}.c2xzTb .iq-content-first .oHglmf,.c2xzTb .iq-content-first .xzPb7d{padding-top:0;padding-bottom:16px}#rhs .kp-blk .xpdclose .LKPcQc,#rhs .kp-blk .xpdopen .viOShc{padding-top:0}#rhs .Wnoohf .xpdopen .yp1CPe,#rhs .OJXvsb .xpdclose .siXlze{padding-bottom:15px}#rhs .Wnoohf .xpdclose .wDYxhc.xsZWvb,#rhs .Wnoohf .xpdopen .wDYxhc.EfDVh{padding-bottom:0}#rhs .Wnoohf .xpdclose .wDYxhc.xsZWvb.ecRggb,#rhs .Wnoohf .xpdopen .wDYxhc.EfDVh.ecRggb,#rhs .kp-blk .ecRggb{padding-bottom:15px}.A4O3hd{box-shadow:none !important}.ecRggb{background-color:#fff;box-shadow:none;border:1px solid #dfe1e5;border-radius:8px;margin:0 0 16px 0}.L2AgXb{padding-bottom:20px;}.UAMSo{width:100%;font-family:arial,sans-serif;}.mnOsef{background-color:#f0f6fd;box-sizing:border-box;color:#000;display:block;font-size:12px;line-height:16px;padding:7px 16px;width:100%;}.Mukzub{background-color:#f0f6fd;color:#1a0dab;cursor:pointer;display:inline;font-size:16px;line-height:22px;margin-left:4px}.iMCzjd{background-color:#f0f6fd;box-sizing:border-box;display:block;padding:12px 16px;width:100%}.iMCzjd .s{display:inline;font-size:16px;line-height:22px;margin:4px 0}.iMCzjd .s:before{content:»… «}.iMCzjd .s:after{content:» …»}.qvSLpc{border-radius:8px;overflow:hidden}.qvSLpc.dnEV5c{border-bottom-left-radius:0;border-bottom-right-radius:0}.jRFvfe{border-radius:0 0 8px 8px;overflow:hidden}.Do1FMc{position:absolute;top:0;left:0;right:0;bottom:0;display:flex;justify-content:center;align-items:center;color:rgba(255,255,255,.8)}.aavBce{cursor:pointer}.vfO4k{position:relative;background-color:#000;border-radius:2px 2px 0 0;}.fi3CNb{position:absolute;top:50%;bottom:0;left:0;right:0;background:linear-gradient(0deg, rgba(0, 0, 0, .54), rgba(0, 0, 0, .27) 30%, rgba(0, 0, 0, 0))}.kAoFgd{flex-grow:1;height:49px;padding:0 16px 0 0}.ClE1Nc{text-align:center;padding-top:22px}.yp0ec{font-family:arial,sans-serif-medium,sans-serif;font-weight:500;font-size:12px;text-shadow:0px 1px 2px rgba(0, 0, 0, .36)}.JtyPib{font-family:arial,sans-serif-medium,sans-serif;font-weight:500;color:#fff;background-color:#4285f4;padding:8px 16px;font-size:12px;line-height:16px}.MnwSrc img{width:100%}g-img{display:block}.rISBZc{display:block;border:0}.XrJj2d .rISBZc{object-fit:cover}g-img{height:100%}.Xvesr{cursor:pointer;position:fixed;z-index:9002}.ynlwjd,.dtCYCd{bottom:0;left:0;position:fixed;right:0;text-align:center;top:0;z-index:9000}.dtCYCd{cursor:pointer}.AU64fe{cursor:default;min-height:10px;min-width:10px;padding:0;position:relative;text-align:left;z-index:9001;vertical-align:middle}g-loading-icon.Xfh32{bottom:0;left:0;margin:auto;position:fixed;right:0;top:0}.qzMpzb{background-color:rgba(0,0,0,0.8)}.PqB12b{background-color:rgba(0,0,0,0.54)}.gjDNhb{background-color:rgba(0,0,0,0.0)}.NapCJb{background-color:rgba(26,26,26,1.0)}.oLLmo{background-color:rgba(245,245,245,0.85)}.fkbZ7b{opacity:0;transition:opacity 250ms}.xUZ4Hc .VFlF2c,.xUZ4Hc .AU64fe{height:100%;width:100%}.Xvesr{height:24px;opacity:.78;right:32px;top:32px;width:24px;background:url(data:image/png;base64,iVBORw0KGgoAAAANSUhEUgAAADQAAAAzCAYAAADYfStTAAAABmJLR0QA/wD/AP+gvaeTAAAACXBIWXMAAAsTAAALEwEAmpwYAAAAB3RJTUUH3wsGBgcnk8E1iQAAAQBJREFUaN7tmrkShCAQRFkj/hr2rydzExIJlnOGpoUqykCs6acIc+AcexORICKBQmcadKcewGH+68wGwUKVdF6F5yMSVNISR+khvlS3NkSoYU1IUNO0IEBN17ASSs32Cih1m5ZQZrYsDJnPBk2Dy/5XDcPLV9SZAmD2vBlC4LySEUGwfmOPMGQnuFkgPEyLUAuYj1EAFrPr4573/ouevLgrO3wypgVqD5hKKDWYy532sim3elE4yzb6xnpcH2rnlCp8oArwqEJwqiQJVRqLKtFIlQqmStZTlVOoCl5UJUmqojFVWX+HWKVGY/EkCVI0mbTE3jew9+GlbDDH8bLTANsPN64ny8hqeE0AAAAASUVORK5CYII=) no-repeat;background-size:24px 24px}.Xvesr.BV6uAb{left:32px;right:auto}.oLLmo .Xvesr{background:url(data:image/png;base64,iVBORw0KGgoAAAANSUhEUgAAADQAAAAzAgMAAAClE8PAAAAABGdBTUEAALGPC/xhBQAAAAlQTFRFVVVVVVVVVVVVMVQQFQAAAAJ0Uk5TAH+2KaGVAAAAqElEQVQoU32SsRVDIQhFr0UcwmnMBn8Op7HKBDYyZQpRfCliocLhCsIDXc+5vSCNY5VKnsdqnWzVjWSdZN2tbBXaBsvcG7h7gwvZoHsddMIPd66QDazzVNEGV6IyA1tBUWCyu3jaCAzKDAyyvQ8GyT6BQbPAoFhgkC/s19JIeUUzaHatTKrWH+lvtRPSJe2gdlc7L1PRiek0ddKiAlWIqkeVpapTRf5ZX+r5VzHujtLrAAAAAElFTkSuQmCC) no-repeat;background-size:24px 24px}.Xvesr:hover{opacity:1}.GoIRO{background-color:#4285f4;color:#fff;font-family:arial,sans-serif-medium,sans-serif;font-size:12px;font-weight:500;line-height:16px;padding:8px 16px;transition:opacity 0.5s;}.jTSIHb{display:flex;flex-direction:column-reverse;flex-grow:1;font-size:14px;padding:12px 16px 12px 16px}.jTSIHb a,.jTSIHb a:visited{color:#fff}.pE7Yzc{align-items:stretch;display:flex;height:100%;justify-content:center;width:100%;}.tBZiXd{display:flex;flex-direction:column}.CTkDab{display:none}.XdBtEc{font-size:16px;margin:4px 0;line-height:22px}.XdBtEc:before{content:'»… ‘;}.XdBtEc:after{content:’ …»‘;}.w90itc{background-color:#f0f6fd;color:#70757a;cursor:pointer;font-size:16px;line-height:22px;margin-left:16px;white-space:nowrap}a:hover h3.LC20lb{text-decoration:underline}.LC20lb{display:inline-block;line-height:1.3;margin-bottom:3px;}.c2xzTb .LC20lb{margin-bottom:0}.DKV0Md{padding-top:4px;padding-top:4px;}.MMgsKf{padding-top:2px}.VjDLd .TieM1d .tjvcx,.IVvPP .tjvcx,.kno-kp .tjvcx,.VjDLd .kp-wholepage-osrp .tjvcx,#rhs .ss6qqb .tjvcx{display:inline-block;height:19px;overflow-y:hidden}.qzEoUe{color:#202124;white-space:-webkit-nowrap}.dyjrff{color:#5f6368}.B6fmyf{position:absolute;top:0;height:0;visibility:hidden;white-space:nowrap}.eFM0qc{display:inline-block;padding-bottom:1px;padding-top:1px;padding-left:2px;visibility:visible}.LAWljd{padding:0 2px 0 4px}.jkSuke{max-width:420px}.JWLUAe{fill:#70757a}
How do I group all objects in Word?
Grouping objects
- Hold the Shift (or Ctrl) key and click the objects you want to group .
- Click the Group command on the Format tab, then select Group .
- The selected objects will now be grouped. There will be a single box with sizing handles around the entire group so you can move or resize all of the objects at the same time.
Why can I not group pictures in Word?
The Group button is unavailable
Only one shape or picture is selected. Make sure you have multiple shapes or pictures selected. If your selection includes a table, worksheet, or GIF image, the Group button will not be available.
Using SmartArt
- With a Word Document open, click on the ‘Insert’ tap in the ribbon and click on ‘SmartArt. ‘
- A dropdown will appear, click ‘Picture. ‘ Choose the layout you’d like to use.
- Add your photos to the template. Your photos will automatically size to fit within the template making a picture collage.
Contents
- 1 Does Microsoft have a collage maker?
- 2 How do I make a picture grid in Word?
- 3 How do I make a photo collage on Windows?
- 4 How do I put multiple pictures into one in Word?
- 5 How do you layout multiple pictures in Word?
- 6 How do I make a collage on my computer?
- 7 How can I make a collage of pictures on my computer?
- 8 How do I make a desktop collage?
- 9 How do I make a photo grid?
- 10 How can I merge two photos together?
- 11 How do I make a wallpaper collage on my laptop?
- 12 How do you make a collage on Microsoft PowerPoint?
- 13 How do I insert multiple pictures into paint?
- 14 What program can I use to make a collage of pictures?
- 15 Where can I make a collage?
- 16 Why can’t I select multiple images in Word?
- 17 Can I group pictures in Word?
- 18 How do you combine pictures and text in Word?
- 19 Can you format all pictures in Word at once?
- 20 How do I make a collage on my laptop Windows 7?
Does Microsoft have a collage maker?
Get Collage Maker – Photo Editor & Photo Collage – Microsoft Store.
How do I make a picture grid in Word?
Snap charts, pictures, and objects to a grid to align them in…
- Select a chart, picture, or object in the document.
- On the right end of the ribbon, select Format > Align > Grid Settings. The Grid and Guides dialog box appears.
- Turn on one or both of these options: Option. Description.
How do I make a photo collage on Windows?
How can I use windows photo gallery to create a collage.
- Select the photos you’d like to include in your collage.
- Click Create tab and select Auto Collage option and select one of five collage sizes. Photo Gallery will then automatically create a collage with those images.
- Save the collage.
How do I put multiple pictures into one in Word?
Inserting Multiple Graphics in a Document
- Place the insertion point at the place in the document where you want the graphics inserted.
- Display the Insert tab of the ribbon.
- Click the Picture tool.
- Use the controls in the dialog box to locate the folder that contains the images.
- Press Ctrl+A.
- Click Insert.
How do you layout multiple pictures in Word?
To move several pictures as one, group them. Hold down the Ctrl key and select each picture. Right-click the multiple-picture selection, choose Group from the contextual submenu and then choose Group again.
How do I make a collage on my computer?
A collage is a group of photos combined into one photo.
- On your computer, go to photos.google.com.
- Sign in to your Google Account.
- In the left menu, click Utilities.
- Under “Create new”, click Animation or Collage.
- Choose the photos you want to include.
- At the top, click Create.
How can I make a collage of pictures on my computer?
Windows 10 Editing Guide
- Press the + ‘Plus’ icon which will display the toolbar menu.
- In the Tool menu, press the Photos icon and select pictures from the dialogue box.
- Press Open, and the photo will be added to the canvas.
- Repeat for every photo you want to add to your collage.
How do I make a desktop collage?
To create a collage for your desktop background, simply save the photos you want to use, open up a presentation or photo editing program, upload and position your photos into a collage, save your work as a PNG or JPEG and then apply it to your home screen.
How do I make a photo grid?
How to Make a Photo Grid Collage?
- Open Fotor and click the “Make a Collage” button.
- Click “Classic Collage” and select the photo grid template you like.
- Upload your images, drag and drop your photos into collage cells.
- You can also modify the backgrounds, borders and add effects, stickers and texts.
How can I merge two photos together?
Open the Photo Gallery and locate the folder that contains photos you want to combine. Hold CTRL key to select multiple images and then click on the Photo Gallery’s Create tab. Select the Photo Fuse feature and proceed to designate the area of the photo you want to replace.
How do I make a wallpaper collage on my laptop?
How To: Laptop Wallpaper Collage
- STEP 1: FIND YOUR FAVORITE IMAGES. Find pictures for your collage!
- STEP 2: MAKE IMAGE BACKGROUND TRANSPARENT. Upload your images to https://www.remove.bg/ and re-download them with transparent backgrounds.
- STEP 3: PUT IMAGES INTO YOUR COLLAGE.
- STEP 4: CREATE YOUR WALLPAPER.
How do you make a collage on Microsoft PowerPoint?
Create & insert a Photo Collage in PowerPoint
- Open the PPT presentation.
- Select the slide where you want to show the collage.
- Go to Insert tab.
- Click on the Pictures button.
- Select all the pictures and insert them in your slide.
- Go to Picture Format tab.
- Click on Picture Layout button.
- Select a layout.
How do I insert multiple pictures into paint?
How to insert multiple Images in Paint
- Launch Paint, and go to File > Open (CTRL+O).
- Select the image you want to insert on top of another image.
- Now you would see the image has imported to Paint.
- Click Select > Select all (CTRL+A).
- Click Copy (CTRL+C).
- Next, go to File > Open (CTRL+O).
What program can I use to make a collage of pictures?
The 15 best collage maker tools in 2021
- Kapwing Collage Maker.
- MOLDIV.
- Photo Joiner. Photo Joiner has an intuitive interface.
- Ribbet. Flash-based collage maker Ribbet is simple and fun.
- Adobe Spark. Spark distills Adobe goodness into a super-simple interface.
- Canva Collage Templates.
- BeFunky.
- piZap.
Where can I make a collage?
With Canva’s free online collage maker, creating a masterpiece of memories is as simple as a few clicks. Create beautifully designed collages by dropping your images into our designer-made templates and instantly downloading them onto any device.
Why can’t I select multiple images in Word?
By default, Word inserts pictures In Line with Text in the document.Therefore, Word will not allow selecting multiple pictures in your document when they are In Line with Text. Therefore, you must change the layout of the pictures to With Text Wrapping. This will allow you to select multiple pictures at the same time.
Can I group pictures in Word?
Press and hold CTRL and select shapes, pictures, or other objects to group.Go to Picture Format or Picture Tools Format > Group > Group.
How do you combine pictures and text in Word?
Press and hold Ctrl while you click the shapes, pictures, or other objects to group. 2. Then right click and select Group. By doing this, we can group shapes, pictures, or other objects at the same time as though they were a single shape or object.
Can you format all pictures in Word at once?
Step 1: Open the Word document that contains your images. Step 2: Right-click on the first image and select Size and Position. Step 3: In the Layout box that opens, click on the Size tab. Then, uncheck the box next to Lock aspect ratio.
How do I make a collage on my laptop Windows 7?
How to Make a Photo Collage Using Windows
- Add pictures to the background by clicking the “Insert” tab at the top and then selecting “Picture.” Select “From File” to locate the desired photo on your hard drive.
- Resize photographs by right-clicking on the photo.
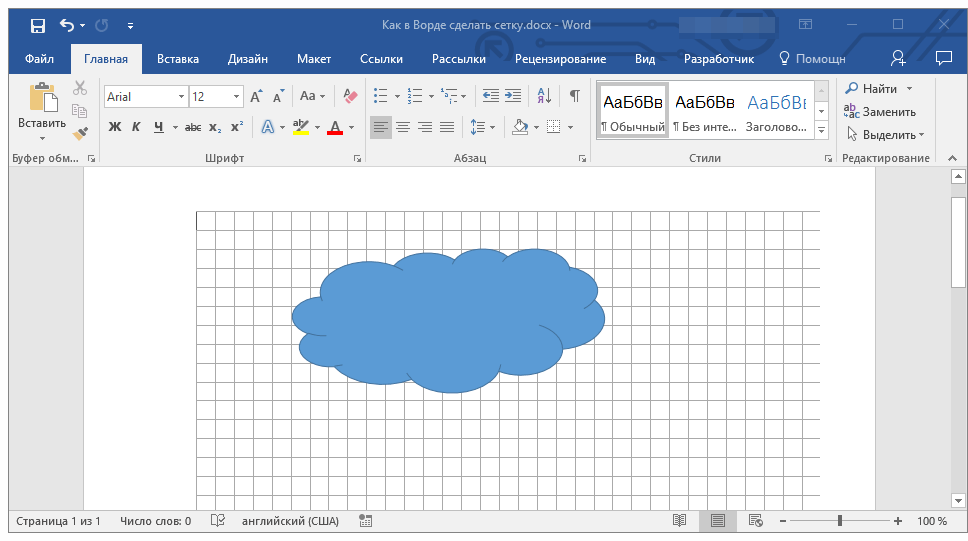
В Microsoft Word можно добавлять и изменять рисунки, иллюстрации, фигуры и прочие графические элементы. Все их можно редактировать с помощью большого набора встроенных инструментов, а для более точной работы в программе предусмотрена возможность добавления специальной сетки.
Эта сетка является вспомогательным средством, она не выводится на печать и помогает более детально производить ряд манипуляций над добавленными элементами. Именно о том, как добавить и настроить эту сетку в Ворде и пойдет речь ниже.
Добавление сетки стандартных размеров
1. Откройте документ, в котором нужно добавить сетку.

2. Перейдите во вкладку “Вид” и в группе “Показать” установите галочку напротив пункта “Сетка”.
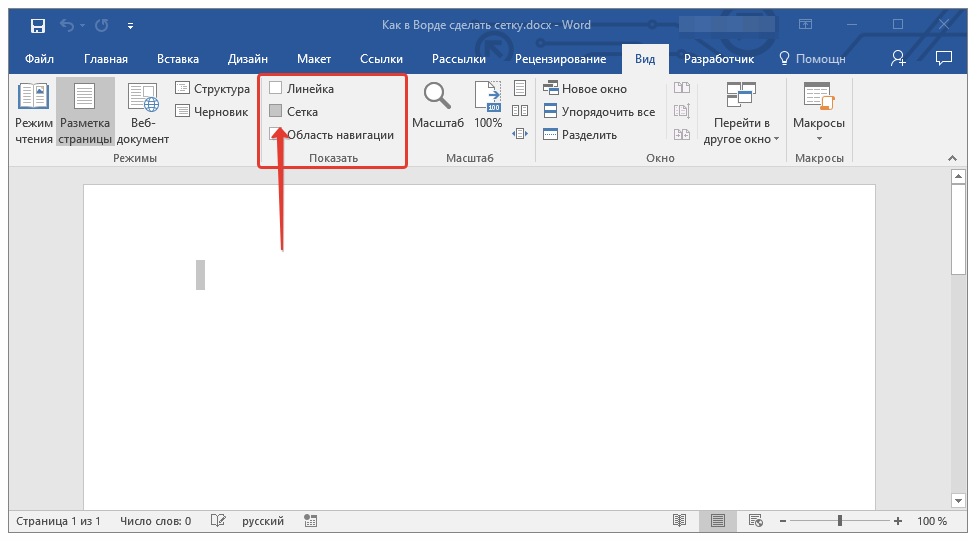
3. Сетка стандартных размеров будет добавлена на страницу.
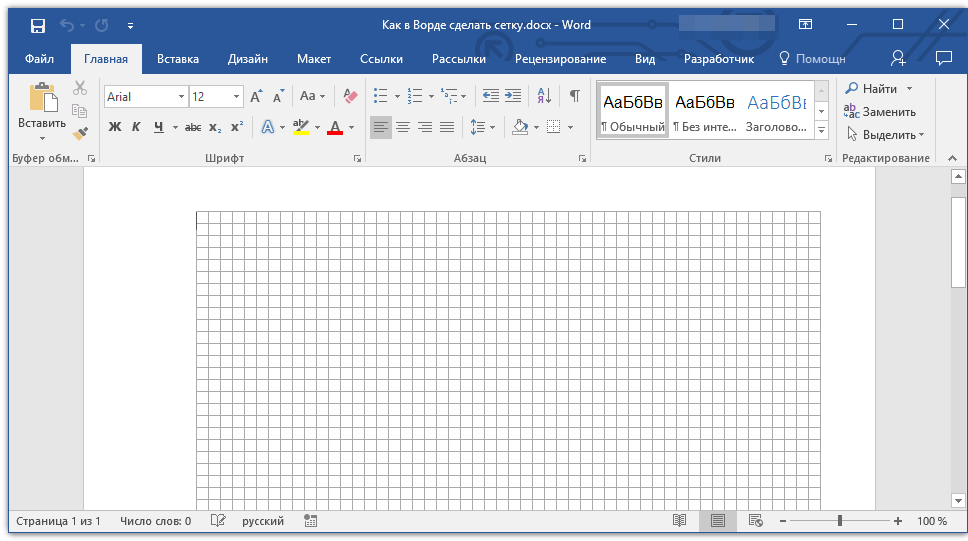
Примечание: Добавленная сетка не выходит за пределы полей, как и текст на странице. Для изменения размеров сетки, точнее, области, которую она занимает на странице, необходимо изменить размеры полей.
Урок: Изменение полей в Word
Изменение стандартных размеров сетки
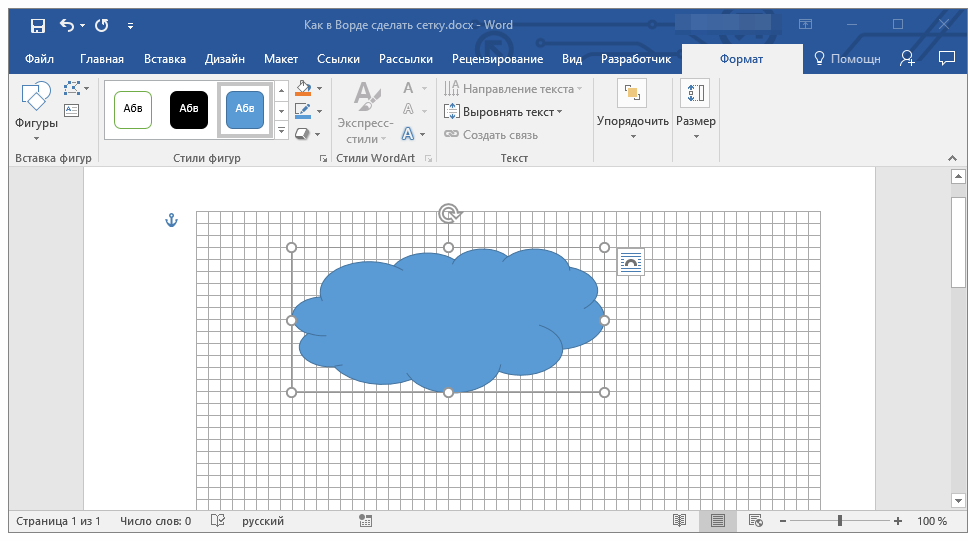
Изменить стандартные размеры сетки, точнее, клеток в ней, можно только в том случае, если на странице уже имеется какой-нибудь элемент, например, рисунок или фигура.
Урок: Как в Ворде сгруппировать фигуры
1. Кликните по добавленному объекту дважды, чтобы открылась вкладка “Формат”.

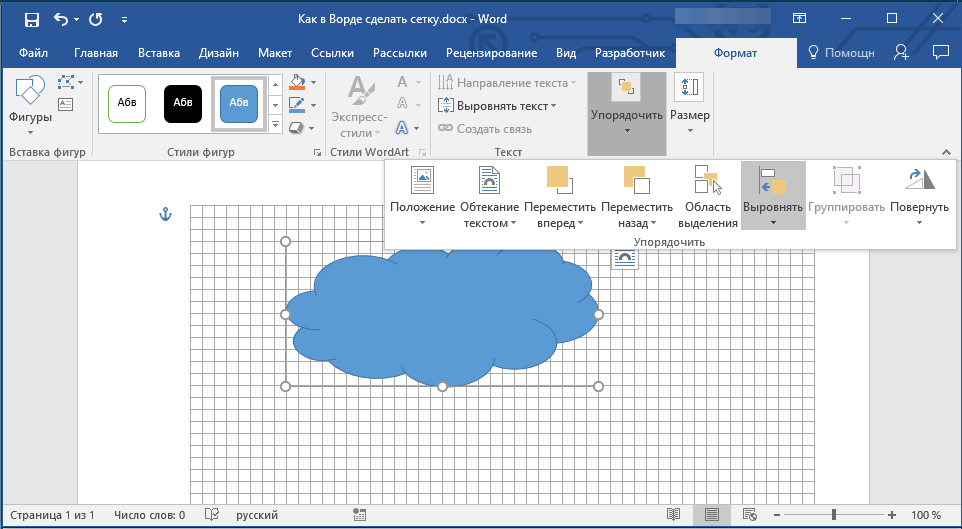
2. В группе “Упорядочить” нажмите кнопку “Выровнять”.
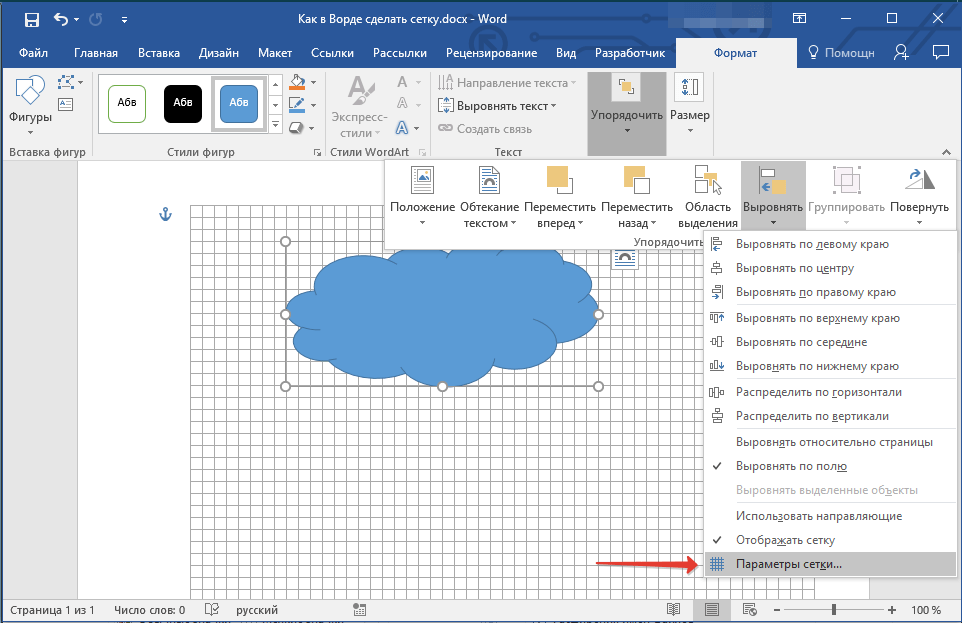
3. В выпадающем меню кнопки выберите последний пункт “Параметры сетки”.
4. Внесите необходимые изменения в открывшемся диалоговом окне, задав размеры сетки по вертикали и горизонтали в разделе “Шаг сетки”.
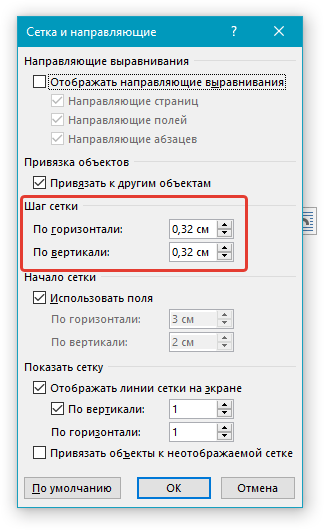
5. Нажмите “ОК” для принятия изменения и закрытия диалогового окна.
6. Стандартные размеры сетки будут изменены.
Урок: Как в Word убрать сетку
Вот, собственно, и все, теперь вы знаете, как сделать сетку в Ворде и как изменить ее стандартные размеры. Теперь работа с графическими файлами, фигурами и прочими элементами будет протекать значительно проще и удобнее.
Еще статьи по данной теме:
Помогла ли Вам статья?
Gridlines are straight lines, which may be horizontal, vertical or a combination of both. Word uses gridlines for specific purposes, such as for:
- Defining borders of cells in tables
- Defining major and minor axes in charts
- Aligning pictures and text
Using grids to define the borders of cells in tables makes the document more readable. Using grids in Word you can easily locate and enter data within individual cells in business documents.
Charts are easier to read and interpret if they show the major and minor axes as grids together with boundary lines. Grids help to position elements such as images and text on a page.
Microsoft Word supports printable gridlines.
Although gridlines look good on the document and serve a useful purpose, printing them may be an issue—Word does not always print gridlines—unless you specifically set it up for printing them.
Here, we will guide you so that you can print gridlines easily under different circumstances.
- Printing Gridlines in Table
- Printing the Axes in the chart
- Printing Gridlines in text and for Image Alignment.
Lets get started.
Method #1: Printing gridlines in Tables
Step #1: Open the Word document containing a table
Open the Word document, and navigate to the table. Depending on the border settings, gridlines on the table may or may not be visible. Hovering the mouse pointer on the table will cause two icons to become visible in the top left corner and bottom right corner of the table.

Step #2: Change the Border settings
Right-click on the icon in the top left corner, and two menus will open.

Click on the small triangle next to the border icon in the top menu. This will open the border menu.

Step #3: Make Borders visible
Click on All Borders to make all the gridlines visible.
Note: If you do not want all borders or all gridlines to be visible, selectively choose the type of border you require from the Border menu.
You can change the thickness, type, and color of the borderlines by clicking on Borders and Shading and setting the parameters in the new menu that opens.
If you select View Gridlines, you can see the borders in the document, but they will not print.
With all borders visible, your table will look like this.

Step #4: Print the gridlines (Borders)
Click on the File tab in the top menu bar. The file menu opens. Click on the Print tab on the left side. The print preview displays all gridlines and you can print them by clicking on the Print icon.

Method #2: Printing the Axes in Charts
Step #1: Open the Document with Chart
Open the Word document and navigate to the chart. Depending on the Gridline settings, major and minor axes on the chart may or may not be visible. Clicking anywhere inside the chart area will open four icons on the right side.

Step #2: Turn Gridlines on
Click on the second Icon from the top. The Chart Elements menu will open. Click on Gridlines, and the axes on the chart will become visible.

Step #3: Add More Gridlines
Hover the mouse pointer over Gridlines and click on the small triangle on the right side. This will open another menu allowing you to add more axes as necessary and display them as additional gridlines.

Step #4: Format the Gridlines
Once you are satisfied with the additional axes, click on More Options to open the menu Format Major Gridlines. Make necessary changes like line type, color, transparency, width, etc., and close the menu by clicking on the close icon at the top right.

This is how the chart will look like with the gridlines visible.

Step #5: Print the Chart with Gridlines (Axes)
Click on the File tab in the top menu bar. The file menu opens. Click on the Print tab on the left side. The print preview displays all gridlines (axes) and you can print them by clicking on the Print icon.

Method #3: Printing Gridlines for Text and Image Alignment
Step #1: Open the Word document containing an image
Open the Word document, and navigate to the page with the image.

Step #2: Turn Gridlines on
Click on View tab on the top menu bar and click on Gridlines to turn it on. A grid should now cover the page.

You can use this grid to align your text and image, but you cannot print it. However, you can use an alternate method to print the grid along with the page. For this, you must turn the grid into an image first.
Windows 10 offers a nifty tool called Snip & Sketch, which allows taking snapshots of a portion of the screen using the key combination Win+Shift+S.
You can save the snapshot as an image. Read on for more.
Step #3: Capture the Gridlines into the Clipboard
With the gridlines turned on, proceed to an empty page on your document.
Press the keys Win+Shift+S together and the mouse cursor will change into a cross.
Position the cross in the top left corner of the grid and while holding the left mouse button down, drag the cross to the right bottom corner.
Release the mouse button.
This action will capture the grid as an image and save it into the clipboard. A notification will appear at the bottom of the window and disappear.

Step #4: Move Clipboard Image into Snip & Sketch
Click the Windows Notifications (top right-hand corner) and select Snip saved to clipboard from the notifications displayed. This will open the app Snip & Sketch with the image of the grid inside.

Step #5: Save the Grid Image as a file.
Click on Save as and save the grid image as a PNG file at a suitable location with a suitable name (example grid.png). Close Snip & Sketch.

Step #6: Insert Grid into a Page in Word
Follow this step onwards if you want to insert the grid image in any single page in your Word document. If you want to insert it in all the pages, proceed from Step #9.
Return to your Word document and navigate to the page with an image.

Click on the Insert tab on the top menu bar. The ribbon changes to display the Insert options. Click on Pictures and select the saved Grid image.
The image will cover the page contents.

Step #7: Make Page Content Visible
Click on the icon on the top right side of the grid. Layout Options will appear. Select the Behind Text option. Click on X in the Layout Options menu to close it.

The page with the grid image inserted will now look like this. Click on the grid image to select it and position or size it as necessary. Click outside the image to exit the selection.

Step #8: Print the Page with Gridline Image
Click on the File tab in the top menu bar. The file menu opens. Click on the Print tab on the left side. The print preview displays all gridlines and you can print them by clicking on the Print icon.

Step #9: Insert Grid into all Pages in Word
If you want to insert the grid image in all pages in the Word document, you must insert it as a watermark. Open your document at any page. Click on the Design tab on the top menu bar. The ribbon changes into the Design menu. Click on Watermark to open the Watermark menu.

Choose Custom Watermark and a Printed Watermark menu opens to allow image selection.

Click on Picture watermark and then on Select Picture. Choose to work offline and select the grid.png file you had saved earlier. Turn off Washout before clicking on Apply. Click on Cancel to exit the menu. Word will apply the grid image as a watermark on all pages. However, you will not be able to resize or move the watermark.

Step #10: Print all Pages with Gridline image as Watermark
Click on the File tab in the top menu bar. The file menu opens. Click on the Print tab on the left side. The print preview displays all gridlines and you can print them by clicking on the Print icon.

Conclusion
Gridlines are an effective way of making information in a Word document more presentable and easier to use. The three methods outlined above allow you to print your document together with gridlines under different circumstances.
Select a chart, picture, or object in the document. On the right end of the ribbon, select Format > Align > Grid Settings. The Grid and Guides dialog box appears. Positions an object to the closest intersection of the grid even when the grid is not visible.
How can I put a grid on top of a picture?
To add grid to photo on Android, you can try Drawing Grid Maker. After opening a picture on it, you need to set the number of rows and columns, the color of the grid, and the line width. And if you’re an iPhone user, the best tool is Grid # – Add grid on image.
How do I put a grid over a picture in Windows 10?
Click the View tab. Select the Gridlines option to add a grid to the canvas as shown below. Users can open images by clicking File > Open. The grid overlay will remain intact on the image.
How do I turn off snap in Excel?
Turn off the snap-to options
- Click the shape or other object, and then on the Shape Format tab, in the Arrange group, click Align.
- To turn off these options, click Snap to Grid or Snap to Shape. The gray highlighting indicating the option is selected turns off.
How do I create a table in Paint?
Uploading a table
- Step 1) Create your table. First of all, create the table that you want in Microsoft Word.
- Step 2) Copy your table to the clipboard. Now, double-click to select your table. …
- Step 3) Open your table in MS Paint. Open your Start Menu. …
- Step 4) Save your finished image. …
- Step 5) Load the image to your abstract.
How do you make a dot on Word?
Click Design > Page Color in the ribbon, and then select “Fill Effects” in the drop-down menu. Click “Pattern” to see the various patterns you can apply as a background for your document. To create the dot grid effect, select either “Dotted Grid” or “Large Grid” in the second row.
What is the default page size for a Word document?
Normally, the default format would be “letter” which is the standard size for a page (8.5 x 11 inches). This size is easy to work with and print since it fits into any printer or copier.
How do you insert a graph into a picture in Word?
Turn on the snap-to options
Select a chart, picture, or object in the document. On the right end of the ribbon, select Format > Align > Grid Settings. The Grid and Guides dialog box appears. Positions an object to the closest intersection of the grid even when the grid is not visible.
How do I make a picture smaller in squares?
ImageSplitter
- Upload your image. Select an image on your computer and press upload.
- Choose the size of your grid. Choose how many rows and columns you want to split your image into.
- Click on “Split” and Download your sliced image. …
- Automatically post them to Instagram.
How do I add a line in Apple notes?
How to add lines and grids to a new page in Notes for iOS and iPadOS
- On a new blank page, tap the encircled three dots in the top-right corner.
- Tap the option for Lines & Grids.
- Tap the background you want to add to the document.
- The selected lines or grids will be added to the page.
How do I add gridlines to a photo?
To add grid to photo on Android, you can try Drawing Grid Maker. After opening a picture on it, you need to set the number of rows and columns, the color of the grid, and the line width. And if you’re an iPhone user, the best tool is Grid # – Add grid on image.
How do I put a grid over a picture on my computer?
How to Put a Drawing Grid on a Digital Photo
- Step 1: Save your reference photo with a new name. …
- Step 2: Crop and resize the reference photo if necessary. …
- Step 3: Adjust your rulers. …
- Step 4: Add a new layer to the photo. …
- Step 5: Begin drawing the grid. …
- Step 6: Number the grid. …
- Step 7: Make a printable drawing grid.
How do I move a shape in Excel?
Moving Drawing Objects
- Using the mouse, point to the shape you want to move and click on it. Excel places small squares or circles called handles around the shape.
- Using the mouse, point to the object. The mouse pointer should turn into a four-headed arrow.
- Click and hold down the mouse button. …
- Release the mouse button.
How do you scroll in Excel without jumping cells?
To use the arrow keys to move between cells, you must turn SCROLL LOCK off. To do that, press the Scroll Lock key (labeled as ScrLk) on your keyboard. If your keyboard doesn’t include this key, you can turn off SCROLL LOCK by using the On-Screen Keyboard.
How do I add a grid to a photo?
To add grid to photo on Android, you can try Drawing Grid Maker. After opening a picture on it, you need to set the number of rows and columns, the color of the grid, and the line width. And if you’re an iPhone user, the best tool is Grid # – Add grid on image.
How do I put a grid over a picture in Word?
Select a chart, picture, or object in the document. On the right end of the ribbon, select Format > Align > Grid Settings. The Grid and Guides dialog box appears. Positions an object to the closest intersection of the grid even when the grid is not visible.
How do I draw a graph in Word?
On the Insert tab, in the Illustrations group, click Chart. In the Insert Chart dialog box, click the arrows to scroll through the chart types. Select the type of chart that you want and then click OK. When you rest the mouse pointer over any chart type, a ScreenTip displays its name.
Can you print graph paper from Word?
You can now print your own graph paper or use the layout within Microsoft Word itself for interesting instructional projects or even play a game of Battleships. When you need them, they are also useful for brainstorming and mind mapping.
How would you delete a page break?
- Select Home > Show/Hide . This will display non-printing characters—paragraph markers, section breaks, page breaks, etc. —that you may want to see while you’re working on your document.
- Double-click the page break so that it’s selected, and then press Delete.
How do I make an A1 poster in Word?
Click File —> New —> More Blank Page Sizes —> Custom —> Create New Page Size. Give your page a name (A1 poster), suggested page size is A1 (84.1cm x 59.4cm). These measurements are for landscape, reverse the measurements for portrait. Set the margins to 0.5cm, and click “OK”.
What is the size of a page in Word?
Normally, the default format would be “letter” which is the standard size for a page (8.5 x 11 inches). This size is easy to work with and print since it fits into any printer or copier.
How to Grid a Picture Using Word
 Please Note:
This article is written for users of the following Microsoft Word versions: 2007, 2010, 2013, 2016, 2019, and Word in Microsoft 365. If you are using an earlier version (Word 2003 or earlier), this tip may not work for you. For a version of this tip written specifically for earlier versions of Word, click here: Using the Drawing Grid.
![]()
Written by Allen Wyatt (last updated October 12, 2022)
This tip applies to Word 2007, 2010, 2013, 2016, 2019, and Word in Microsoft 365
When you are working with Word’s drawing tools, you might find it difficult to align objects. Fortunately, there is a drawing feature that you can use to assist you in doing this. You can use the drawing grid to provide a temporary, nonprinting straight edge. In this way you can easily align other objects in your drawing.
Follow these steps to make sure the drawing grid is turned on:
- Display the Page Layout tab (or the Layout tab if you are using Word 2016 or a later version) of the ribbon.
- Within the Arrange group, click the Align drop-down list. Word displays a list of available commands.
- Choose Grid Settings. Word displays the Drawing Grid dialog box (if you are using Word 2007 or Word 2010) or the Grid and Guides dialog box (if you are using Word 2013 or a later version.) (See Figure 1.)
- Use the controls in the dialog box to set the specifics of the grid. You can use the controls to specify the horizontal and vertical spacing used in the grid. You should also make sure the Snap Objects to Grid When the Gridlines Are Not Displayed option is selected.
- Make sure the Display Gridlines on Screen check box is selected. (You can turn the gridlines on and off later by using the View tab of the ribbon, in the Show group.)
- Click on OK.
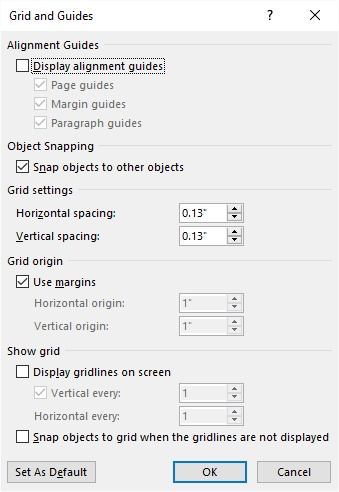
Figure 1. The Grid and Guides dialog box.
WordTips is your source for cost-effective Microsoft Word training.
(Microsoft Word is the most popular word processing software in the world.)
This tip (5947) applies to Microsoft Word 2007, 2010, 2013, 2016, 2019, and Word in Microsoft 365. You can find a version of this tip for the older menu interface of Word here: Using the Drawing Grid.
Author Bio
With more than 50 non-fiction books and numerous magazine articles to his credit, Allen Wyatt is an internationally recognized author. He is president of Sharon Parq Associates, a computer and publishing services company. Learn more about Allen…
MORE FROM ALLEN
Deleting Footnotes and Endnotes
Deleting either footnotes or endnotes is a simple process. Just select the reference mark and delete it. Assuming you are …
Discover More
Using Seek In a Macro
When processing non-document text files in a macro, you have a wide range of commands available for your use. One of …
Discover More
Forcing Stubborn Recalculation
Have you ever recalculated a worksheet, only to notice that not everything calculated as it should? Here’s a way you can …
Discover More
More WordTips (ribbon)
Rotating Fractions in a Text Box
Rotating graphics in Word is not always straight-forward, but it can be done. This tip examines a special need to …
Discover More
Dragging and Dropping Pictures in a Document
Do you like to add pictures to your document just by dragging and dropping? What are you to do if it appears the …
Discover More
Inserting Multiple Graphics in a Document
Word allows you to easily place graphics in a document. Placing one or two graphics is easy, but placing many graphics in …
Discover More
Turn on the snap-to options
- Select a chart, picture, or object in the document.
- On the right end of the ribbon, select Format > Align > Grid Settings. The Grid and Guides dialog box appears.
- Turn on one or both of these options: Option. Description. Snap objects to grid when the gridlines are not displayed.
Which is the best grid app for drawing?
4) Adobe Photoshop Sketch This app is available for Android as well as iOS. Features: Supports integration with Behance. Built-in the graph and grids for easy drawing.
How do you make a grid on SketchBook?
To get a grid, the only way to get it into SketchBook is to import a grid from your photo gallery.. a….How do you make a grid on word?
- On the Drawing toolbar, click Draw.
- Click Grid.
- Check Display Gridlines.
How do I add a grid in Autodesk?
Help
- On the Status Bar, right-click on grid display Find and select Grid Settings.
- In the Drafting Settings dialog box, Snap and Grid tab, click Grid On.
- Under Snap Type, make sure Grid Snap and Rectangular Snap are selected.
- In the Grid X Spacing box, enter the horizontal grid spacing in units.
Can you animate with SketchBook?
SketchBook for Desktop and SketchBook Motion are the only versions of SketchBook with animation tools. SketchBook for Desktop has FlipBook animation tools, such as keyframes and a timeline, to bring your images to life.
Do you need an Apple pencil for procreate pocket?
Procreate Pocket ($4.99 on App Store) is the iPhone rendition of the popular Procreate drawing app for iPad. While the iPhone obviously lacks support for the Apple Pencil, it does feature 3D Touch, which allows for built-in pressure-sensitive painting with either your finger or a compatible stylus.
Can you animate with Ibispaint?
Click the animation box and then under the click animation click download gif and then it will get you to another tab and hold down onto your image and then click save image box and then your first animation is done! …
Is FireAlpaca or Medibang better?
I actually really enjoy both programs, but I’d much prefer Medibang over Firealpaca. It feels more, complete, in a way. It doesn’t happen much in Medibang, so thats great! But I also enjoy Firealpaca, since it was my first real art program, and I make most GIFs on there too.
How many MB is FireAlpaca?
100 MB
Is FireAlpaca on IPAD?
It is completely free to use app available to use on Android and iOS platforms. With the help of this app, all the illustrators, graphics designers, or artists can create a variety of drawings, sketches, and paintings. The app offers more than five different pens tips with adjustable opacity, size, and color.
So I can’t seem to be able to adequately align images in Word (tried 2007 and 2013).
I added the images and made all of them be arranged in Wrap Text as In Front of Text.
Selected all of them and tried aligning them to the middle, to the top.. aligning to page, aligning selected objects.. Nothing worked. I even tried setting it as Absolute Position but it still would’t work as expected. Here is a picture to better illustrate the scenario.

Can someone help me in this?
![]()
DavidPostill♦
150k77 gold badges348 silver badges386 bronze badges
asked Mar 9, 2017 at 17:51
![]()
4
You may need to enable Object Snapping
- Go to the
Layouttab and theArrangegroup - Click
AlignthenGrid Settings

From there, it should have an checkbox for an option that says «Snap Objects to other objects»

Check that box and see if that helps!
answered Mar 9, 2017 at 19:00
![]()
2
I’m late to the party, and I’m not sure if this is what you’re looking for, but I was able to resize and realign images freely and manually in Word using the following options:
- Right click image
- Select Size and Position
- Select Text wrapping tab
- Choose «Square»
- Go to Position tab
- For vertical or horizontal, select «relative position» and change the drop box to «page»
Granted I don’t know if these options will differ for your version of Word or your OS. Hope this is helpful, but if not, I wish you luck.
answered Apr 26, 2019 at 7:15
![]()
1
It’s easy to align photos just do by the instructions as follows :
First select the photo you wanted, right click on it
Next click on text wrapping and select either square or tight
At last you can arrange how ever you want and also you want to repeat the process for number of photos.
![]()
bummi
1,6934 gold badges16 silver badges28 bronze badges
answered Oct 31, 2017 at 13:58
![]()
0