
Excel для Microsoft 365 Word для Microsoft 365 Outlook для Microsoft 365 PowerPoint для Microsoft 365 Классический клиент Project Online Excel для Microsoft 365 для Mac Word для Microsoft 365 для Mac PowerPoint для Microsoft 365 для Mac Excel 2021 Word 2021 Outlook 2021 PowerPoint 2021 Project профессиональный 2021 Project стандартный 2021 Excel 2021 для Mac Word 2021 для Mac PowerPoint 2021 для Mac Excel 2019 Word 2019 Outlook 2019 PowerPoint 2019 Project профессиональный 2019 Project стандартный 2019 Excel 2019 для Mac Word 2019 для Mac PowerPoint 2019 для Mac Excel 2016 Word 2016 Outlook 2016 PowerPoint 2016 Project профессиональный 2016 Project стандартный 2016 Excel 2016 для Mac Word 2016 для Mac PowerPoint 2016 для Mac Excel 2013 Word 2013 Outlook 2013 PowerPoint 2013 Project профессиональный 2013 Project стандартный 2013 Excel 2010 Word 2010 Outlook 2010 PowerPoint 2010 Excel для Mac 2011 Word для Mac 2011 PowerPoint для Mac 2011 Еще…Меньше

Добавление эффекта к рисунку
-
Выберите рисунок, для которого вы хотите добавить или изменить эффект.
Примечание: Чтобы добавить один и тот же эффект в несколько рисунков, щелкните первый рисунок и затем, нажав и удерживая клавишу CTRL, щелкните другие рисунки. Если вы используете Word, необходимо скопировать рисунки на полотно, если их там еще нет. Откройте вкладку Вставка, щелкните значок Фигуры и выберите пункт Новое полотно. (После добавления или изменения эффекта необходимо вернуть рисунки обратно в исходное место в документе.)
-
На панели Работа с рисунками на вкладке Формат в группе Стили рисунков щелкните Эффекты для рисунка.
-
Наведите указатель мыши на один из параметров Эффекты для рисунка, чтобы отобразить меню различных способов применения каждого эффекта. При наведении указателя мыши на один из эффектов в меню, он отображается как рисунок для предварительного просмотра в документе.

Примечания:
-
Чтобы настроить добавляемый эффект, нажмите кнопку Параметры в нижней части меню каждого эффекта. Например, в меню Тень щелкните Параметры тени для выполнения пользовательских настроек для эффекта тени.
-
Если вкладка Работа с рисунками или Формат не отображается, дважды щелкните рисунок, чтобы убедиться, что он выбран. Если рядом с именем файла в верхней части окна программы отображаются слова [Режим совместимости], сохраните документ в формате DOCX или XLSX (вместо прежнего формата файла DOC или XLS) и попробуйте еще раз.
-
Удаление эффекта из рисунка
Для каждой категории эффектов рисунка <параметр>в верхней части меню. Выберите этот параметр, чтобы отключить эффект, который вам не нужен.
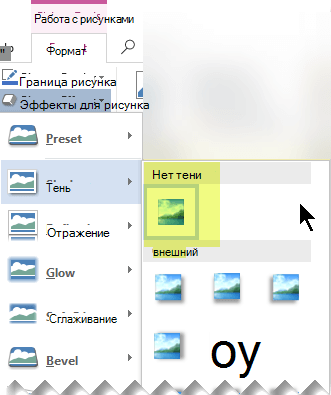
Например, чтобы удалить тень, на указателе на пункт Эффекты для рисунка > Тень > Нет тени.
-
Выберите рисунок, для которого нужно удалить эффект.
-
В группе Средства работы срисунками на вкладке Формат в группе Стили рисунков выберите Эффекты для рисунков.
-
Выберите категорию Эффекты для рисунка, которую вы хотите удалить. В меню первым вариантом является Без <эффектов>(например, Без тени или Без отражения). Выберите этот параметр, чтобы удалить из рисунка такие эффекты.
Важно:
Office 2010 больше не поддерживается. Перейдите на Microsoft 365, чтобы работать удаленно с любого устройства и продолжать получать поддержку.
Повысить статус
-
Щелкните рисунок, для которого вы хотите добавить или изменить эффект.
Примечание: Чтобы добавить один и тот же эффект в несколько рисунков, щелкните первый рисунок и затем, нажав и удерживая клавишу CTRL, щелкните другие рисунки. При использовании Word нужно скопировать рисунки на полотно, если их там еще нет. Откройте вкладку Вставка, щелкните значок Фигуры и выберите пункт Новое полотно. (После добавления или изменения эффекта необходимо вернуть рисунки обратно в исходное место в документе.)
-
На панели Работа с рисунками на вкладке Формат в группе Стили рисунков щелкните Эффекты для рисунка.
Если вкладка Работа с рисунками или Формат не отображается, дважды щелкните рисунок, чтобы убедиться, что он выбран. Если рядом с именем файла в верхней части окна программы отображаются слова [Режим совместимости], сохраните документ в формате DOCX или XLSX (вместо прежнего формата файла DOC или XLS) и попробуйте еще раз.
-
Выполните одно или несколько из указанных ниже действий.
-
Чтобы добавить или изменить встроенную комбинацию эффектов, наведите указатель на пункт Заготовка и затем щелкните нужный эффект.
Для настройки встроенного эффекта щелкните Параметры объема и измените необходимые параметры.
-
Чтобы добавить или изменить тень, наведите указатель на пункт Тень и затем щелкните нужную тень.
Для настройки тени щелкните Варианты тени и измените необходимые параметры.
-
Чтобы добавить или изменить отражение, наведите указатель на пункт Отражение и затем щелкните нужный вариант отражения.
Для настройки отражения щелкните Параметры отражения и измените необходимые параметры.
-
Чтобы добавить или изменить свечение, наведите указатель на пункт Свечение и затем щелкните нужный вариант свечения.
Для настройки цветов свечения выберите команду Другие цвета свечения, а затем выберите необходимый цвет. Для изменения цвета, который не входит в цвета темы, выберите команду Дополнительные цвета, а затем выберите необходимый цвет на вкладке Стандартная или создайте собственный цвет на вкладке Спектр. Пользовательские цвета и цвета на вкладке Стандартная не обновляются при последующем изменении тема документа.
Для настройки вариантов свечения щелкните Параметры свечения и измените необходимые параметры.
-
Для добавления или изменения сглаживания щелкните Сглаживание, а затем выберите нужную степень сглаживания.
Для настройки сглаживания щелкните Параметры сглаживания и измените необходимые параметры.
-
Чтобы добавить или изменить рельеф, наведите указатель на пункт Рельеф и затем щелкните нужный рельеф.
Для настройки рельефа щелкните Параметры объема и измените необходимые параметры.
-
Чтобы добавить или изменить поворот объемной фигуры, наведите указатель на пункт Поворот объемной фигуры и затем щелкните нужный вариант поворота.
Для настройки поворота выберите команду Параметры поворота объемной фигуры и измените необходимые параметры.
Примечания:
-
Для получения дополнительных сведений о параметрах в этих
в верхней части диалогового окна Формат рисунка.
-
-
Удаление эффекта из рисунка
Для каждой категории эффектов рисунка <параметр>в верхней части меню. Выберите этот параметр, чтобы отключить эффект, который вам не нужен.
Например, чтобы удалить тень, на указателе на пункт Эффекты для рисунка > Тень > Нет тени.
-
Выберите рисунок, для которого нужно удалить эффект.
-
В группе Средства работы срисунками на вкладке Формат в группе Стили рисунков выберите Эффекты для рисунков.
-
Выберите категорию Эффекты для рисунка, которую вы хотите удалить. В меню первым вариантом является Без <эффектов>(например, Без тени или Без отражения). Выберите этот параметр, чтобы удалить из рисунка такие эффекты.
Выполните любое из описанных ниже действий.
Быстрое применение стиля
-
Щелкните рисунок и откройте вкладку Формат рисунка.
-
Нажмите кнопку Быстрыестили и выберите нужный стиль.
Добавление или изменение тени, отражения, свечения, краев, обволоки или поворота с трех градусов
-
Щелкните рисунок и откройте вкладку Формат рисунка.
-
Щелкните Эффектыдля рисунка , наведите указатель мыши на тип эффекта и выберите нужный эффект.
-
Чтобы настроить эффект, нажмите кнопку Параметры в нижней части меню эффекта.
Дополнительные сведения
Вставка рисунков
Важно:
Microsoft Office для Mac 2011 больше не поддерживается. Перейдите на Microsoft 365, чтобы работать удаленно с любого устройства и продолжать получать поддержку.
Обновить
Выполните любое из описанных ниже действий.
Применение и изменение стиля
-
Щелкните рисунок и откройте вкладку Формат рисунка.
-
В разделе Стили рисунков выберите нужный стиль.
Чтобы просмотреть другие стили, наведите курсор на интересующий вас элемент и щелкните
.
Добавление и изменение тени, отражения, свечения, багетной рамки или объемного вращения
-
Щелкните рисунок и откройте вкладку Формат рисунка.
-
В разделе Стили рисунков нажмите кнопку Эффекты, наведите указатель на тип эффекта и выберите нужный вариант.
-
Для тонкой настройки эффекта в разделе Стили рисунков нажмите кнопку Эффекты, наведите указатель на тип эффекта и выберите пункт Параметры [название эффекта].
Дополнительные материалы
Изменение цвета, прозрачности или перекрашивание рисунка
Удаление фона рисунка
См. также
Редактирование рисунков в приложении «Фотографии» в Windows 10
Нужна дополнительная помощь?

Add an effect to a picture
-
Select the picture for which you want to add or change an effect.
Note: To add the same effect to multiple pictures, click the first picture, and then press and hold CTRL while you click the other pictures. If you are using Word, you must copy the pictures to a drawing canvas if they are not already there. Click Insert > Shapes > New Drawing Canvas. (After adding or changing the effect, you can copy them back to the original location in your document.)
-
Under Picture Tools, on the Format tab, in the Picture Styles group, click Picture Effects.
-
Rest your pointer on one of the Picture Effects options to see a menu of different ways to apply each effect. When you rest your pointer on one of the menu effects, the effect appears as a preview on the picture in your document.
Notes:
-
To customize the effect you’re adding, click the Options selection at the bottom of each effect menu. For example, if you’ve opened the Shadow menu, click Shadow Options to make custom adjustments to the shadow effect.
-
If you do not see the Picture Tools or Format tabs, double-click the picture to make sure that you selected it. If you see [Compatibility Mode] next to the file name at the top of the program window, try saving your document into a format such as *.docx or *.xlsx instead of an earlier file format such as *.doc or *.xls, and then try again.
-
Remove an effect from a picture
Each category of picture effect has a No <Effect Name> option at the top of its menu. Select that option to turn off an effect that you don’t want.
For example, to remove a shadow, point to Picture Effects > Shadow > No Shadow.
-
Select the picture for which you remove an effect.
-
Under Picture Tools, on the Format tab, in the Picture Styles group, select Picture Effects.
-
Select the Picture Effects category that you want to remove. In the menu that appears, the first option is No <Effect Name> (such as No Shadow or No Reflection). Select that option to remove that kind of effect from the picture.

Important:
Office 2010 is no longer supported. Upgrade to Microsoft 365 to work anywhere from any device and continue to receive support.
Upgrade now
-
Click the picture for which you want to add or change an effect.
Note: To add the same effect to multiple pictures, click the first picture, and then press and hold CTRL while you click the other pictures. If you are using Word, you must copy the pictures to a drawing canvas if they are not already there. Click Insert > Shapes > New Drawing Canvas. (After adding or changing the effect, you can copy them back to the original location in your document.)
-
Under Picture Tools, on the Format tab, in the Picture Styles group, click Picture Effects.
If you do not see the Picture Tools or Format tabs, double-click the picture to make sure that you selected it. If you see [Compatibility Mode] next to the file name at the top of the program window, try saving your document into a format such as *.docx or *.xlsx instead of an earlier file format such as *.doc or *.xls, and then try again.
-
Do one or more of the following:
-
To add or change a built-in combination of effects, point to Preset, and then click the effect that you want.
To customize the built-in effect, click 3-D Options, and then adjust the options that you want.
-
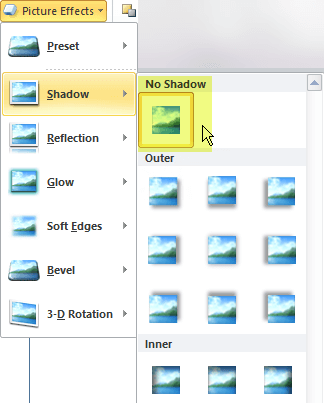
To add or change a shadow, point to Shadow, and then click the shadow that you want.
To customize the shadow, click Shadow Options, and then adjust the options that you want.
-
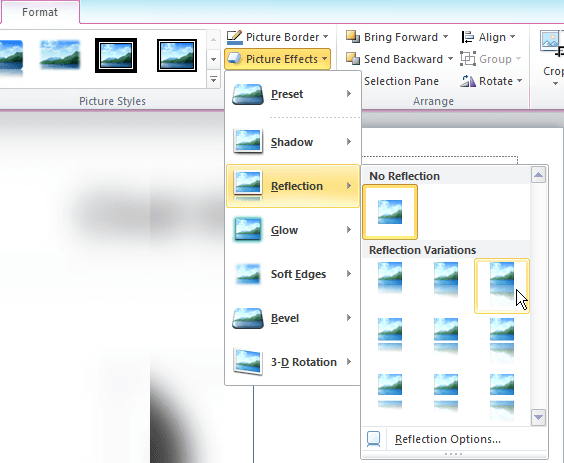
To add or change a reflection, point to Reflection, and then click the reflection variation that you want.
To customize the reflection, click Reflection Options, and then adjust the options that you want.
-
To add or change a glow, point to Glow, and then click the glow variation that you want.
To customize the glow colors, click More Glow Colors, and then choose the color that you want. To change to a color that is not in the theme colors, click More Colors, and then either click the color that you want on the Standard tab, or mix your own color on the Custom tab. Custom colors and colors on the Standard tab do not update if you later change the document theme.
To customize the glow variation, click Glow Options, and then adjust the options that you want.
-
To add or change a soft edge, point to Soft Edges, and then click the size of the soft edge that you want.
To customize the soft edges, click Soft Edges Options, and then adjust the options that you want.
-
To add or change an edge, point to Bevel, and then click the bevel that you want.
To customize the bevel, click 3-D Options, and then adjust the options that you want.
-
To add or change a 3-D rotation, point to 3-D Rotation, and then click the rotation that you want.
To customize the rotation, click 3-D Rotation Options, and then adjust the options that you want.
Notes:
-
For additional information about the options in these panes, click Help
at the top of the Format Picture dialog box.
-
-
 at the top of the Format Picture dialog box.
Remove an effect from a picture
Each category of picture effect has a No <Effect Name> option at the top of its menu. Select that option to turn off an effect that you don’t want.
For example, to remove a shadow, point to Picture Effects > Shadow > No Shadow.
-
Select the picture for which you remove an effect.
-
Under Picture Tools, on the Format tab, in the Picture Styles group, select Picture Effects.
-
Select the Picture Effects category that you want to remove. In the menu that appears, the first option is No <Effect Name> (such as No Shadow or No Reflection). Select that option to remove that kind of effect from the picture.
Do any of the following:
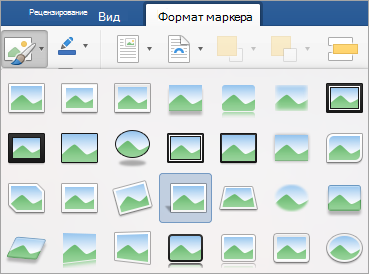
Quickly apply a style
-
Click the picture, and then click the Format Picture tab.
-
Click Quick Styles, and then click the style that you want.

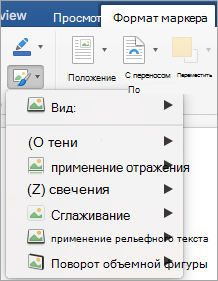
Add or change a shadow, reflection, glow, edges, bevel, or 3-D rotation
-
Click the picture, and then click the Format Picture tab.
-
Click Picture Effects, point to a type of effect, and then click the effect that you want.
-
To fine-tune the effect, click Options at the bottom of any effect menu.
See also
Insert pictures
Important:
Office for Mac 2011 is no longer supported. Upgrade to Microsoft 365 to work anywhere from any device and continue to receive support.
Upgrade now
Do any of the following:
Apply or change a style
-
Click the picture, and then click the Format Picture tab.
-
Under Picture Styles, click the style that you want.
To see more styles, point to a style, and then click
.
 .
.Add or change a shadow, reflection, glow, bevel, or 3-D rotation
-
Click the picture, and then click the Format Picture tab.
-
Under Picture Styles, click Effects, point to a type of effect, and then click the effect that you want.
-
To fine tune the effect, under Picture Styles, click Effects, point to a type of effect, and then click [effect name] Options.
See also
Change the color, transparency, or recolor a picture
Remove the background of a picture
See Also
Edit pictures with the Photos app in Windows 10

Microsoft Word includes several image editing tools that allow you to make changes to images in your documents. Here’s how to use them.
You don’t need expensive photo editing software like Photoshop to edit photos and other images for Microsoft Word documents. Although the Microsoft Office Picture Manager has been retired, there are still plenty of built-in tools to edit images in Word.
Microsoft Word allows you to format colors and brightness, add borders, crop image sizes, add special effects, and more, so here’s how to do it. While the instructions may vary, these instructions should work for Word 2016 and higher, including Microsoft 365 (formerly O365) and Online.
There are a few ways to crop an image in Microsoft Word. Start by inserting the image into your Word document (Insert > Pictures) and selecting the image.

To begin formatting your selected image, click Format > Crop (or Format > Crop > Crop). You can also enter the image cropping mode by right-clicking the image and selecting Crop.
This will change the outline around your image from resizing to cropping.

Move the crop outline tools around your image to reduce the image area to its final size. Grayed-out areas will be removed from the final image once the crop edit has been confirmed.
Once you’re happy, click once outside of the image or press Enter on your keyboard.

Formatting Image Colors
Word allows you to format the colors used in your image without exporting it to a photo editor first. You can customize the image sharpness, brightness, saturation, tone, and contrast levels, either manually or using one of several preset filters.
To access the image formatting tools, right-click on your image and press Format Picture at the bottom.

This will bring up the Format Picture menu on the right-hand side. Click the Picture icon (furthest right) to access the image color editing tools.
Under Picture Corrections, move the sliders for each category to sharpen or soften an image or increase or decrease the brightness and contrast levels. You can also click Presets for each category, selecting one of the thumbnails to apply those changes to your image instead.

Under Picture Color, you can change the tone and saturation levels for your selected image. Move the sliders for each option left or right to increase or decrease each level.
Click Presets to set these levels using one of the provided preset options.

If you’re unhappy with any of the color changes you’ve made, click the Reset button underneath each category to return your image to its original state.
Adding Special Effects to Images
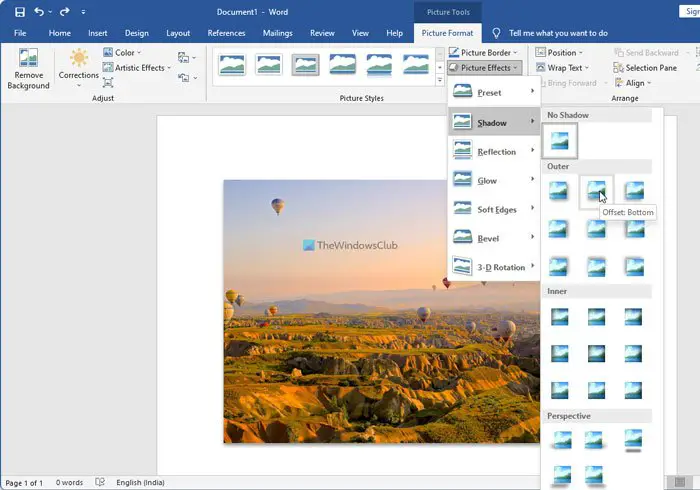
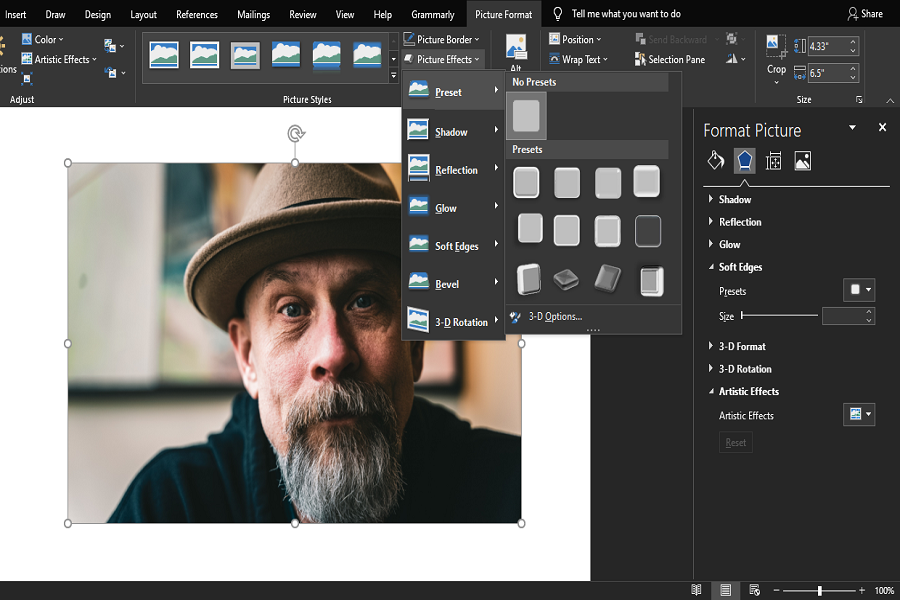
Microsoft Word also includes several special effects that can be easily applied to images. These include image shadow, glow and reflection, soft edges, and a 3D bevel effect.
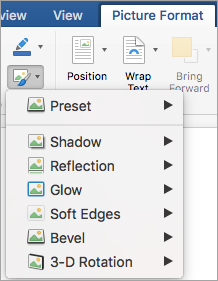
To add these special effects, enter the Format Picture menu (right-click > Format Picture) and click the Effects icon (second from the left). Click on each sub-category to access each setting.
To add a shadow to your image, click Shadow and move the sliders to set transparency, size, angle, color, etc. You can also click Preset to preview and add a Word-defined drop shadow instead.

Click Reflection and follow the same instructions to add a custom or preset image reflection to your image. Do the same to Glow to add an image glow and Soft Edges to soften the edges around your image.
To add a 3D bevel effect to your image, click 3-D Format. Select the effect you want for both the top and bottom sections of your image by clicking Top Bevel and Bottom Bevel, selecting one of the pre-defined options.
You can also customize the depth, contour, material effect, and lighting levels for your 3D bevel effect using the drop-down menus and option boxes.

You can also add one of several preset artistic effects to your image. These combine several effects into one to change your image design.
To do this, click the Artistic Effects sub-category, then click the Artistic Effects icon. Select one of the preset options using your mouse to apply it to your image.

Compressing Images in Microsoft Word
Adding images to a Word document can vastly increase its size. By compressing the images, you can reduce the file size of your document as a whole.
To format a single picture, click Format > Compress Images and ensure that the Apply only to this picture checkbox is enabled. If you want to compress all of your attached images, click to uncheck this checkbox.
Compressing images will reduce the quality on a sliding scale from HD quality (330 pixels per inch) to basic email quality (96 pixels per inch).
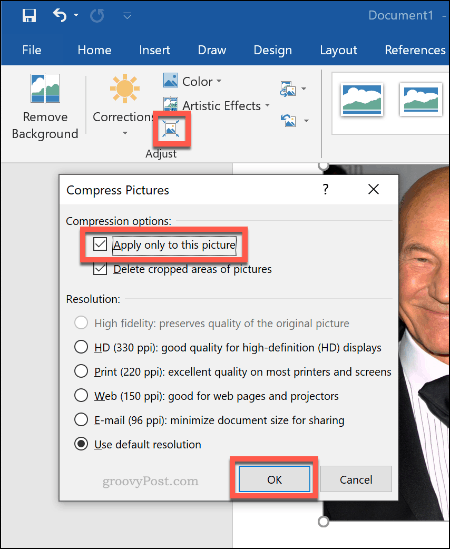
The higher the quality, the bigger the Word file, so choose your preferred quality, then click OK to compress your images.
Basic Image Editing Made Easy
These editing tools make it easy to make basic changes to images in Microsoft Word. You can also resize images in Windows 10 without needing an image editor too.
If you need to make bigger changes to your images, you can try some of these free Photoshop alternatives instead.
![]()
Содержание
- сайт уроков по программам word, excel, access и power point.
- Рубрики
- Добавление эффекта к рисунку
- Удаление эффекта из рисунка
- Удаление эффекта из рисунка
- Дополнительные сведения
Чтобы гармоничнее интегрировать изображения в документ, в программе Microsoft Word предусмотрены специальные стили отображения рисунков, которые можно применить к любому изображению. Стили отличаются друг от друга формой, толщиной, цветом рамки, наличием или отсутствием отражения и многими другими параметрами.
Разработчики программы Microsoft Word подготовили для пользователей набор экспресс-стилей для того, чтобы они могли использовать уже готовые стилевые решения. Чтобы применить к изображению какой-либо стиль, достаточно выполнить ряд простых действий:
- нужно щелкнуть мышью по изображению, чтобы появилась дополнительная группа Работа с рисунками (Picture Tools);
- перейти на вкладку Формат (Format) и в группе элементов управления Стили рисунка (Picture Styles) выбрать нужный стиль.
Чтобы посмотреть, как будет выглядеть тот или иной стиль изображения, достаточно навести на него мышь.
После этого стиль изображения изменится (рис. 7.10). Однако вариантов экспресс-стилей предлагается пользователю не так уж много. Давайте научимся самостоятельно применять к изображениям различные эффекты и изменять границы рисунков.

Рис. 7.10. Пример применения стилей к изображениям
Чтобы изменить цвет и форму границы рисунка, достаточно нажать кнопку Границы рисунка (Picture Border) группы элементов управления Стили рисунка (Picture Styles) вкладки Формат (Format). После этого откроется контекстное меню, в котором можно выбрать цвет, толщину и внешний вид границы рисунка. Для применения того или иного вида границы достаточно просто щелкнуть мышью по нужному атрибуту.
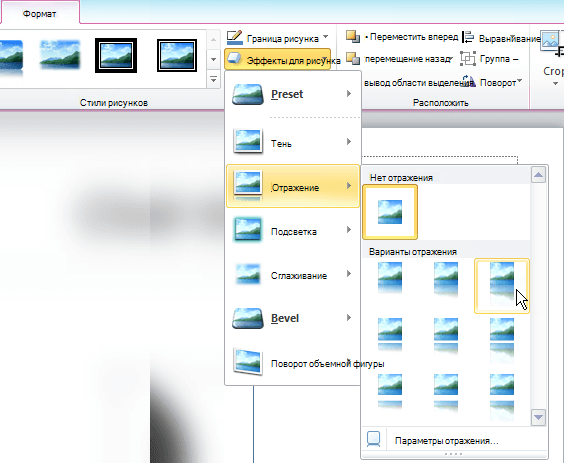
Для применения к изображению различных эффектов нужно воспользоваться кнопкой Эффекты для рисунка (Picture Effects) группы элементов управления Стили рисунка (Picture Styles) вкладки Формат (Format). После нажатия кнопки Эффекты для рисунка (Picture Effects) откроется контекстное меню, содержащее различные эффекты.
Всего существует семь различных групп эффектов.
- Заготовка (Preset). Представляет собой уже готовые шаблоны эффектов тени и формы.
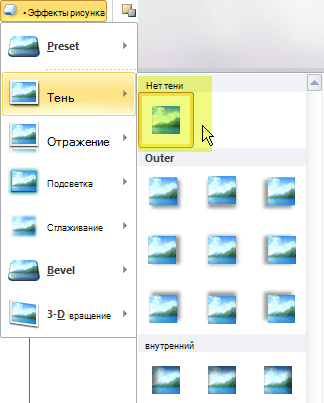
- Тень (Shadow). Различные варианты длины, направления и интенсивности теней.
- Отражение (Reflection). Добавляет к изображению различные эффекты отражения.
- Свечение (Glow). Добавляет к изображению различные по интенсивности и цвету свечения контура.
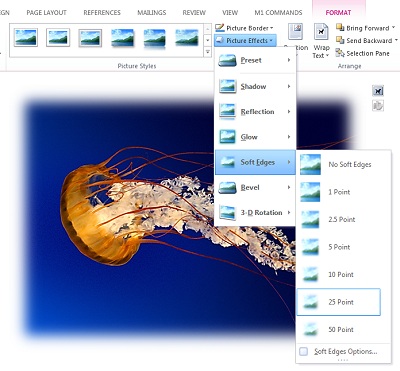
- Сглаживание (Soft Edges). Сглаживает пикселы изображения.
- Рельеф (Bevel). Добавляет изображению псевдотрехмерность за счет рельефности.
- Поворот объемной фигуры (3-D Rotation). Изменяет форму изображения на псевдообъемную фигуру.
Для предварительного просмотра какого-либо эффекта достаточно просто навести на него указатель мыши. Для применения какого-либо эффекта к изображению необходимо щелкнуть по эффекту в контекстном меню мышью. Различные эффекты могут быть применены к одному изображению одновременно.
сайт уроков по программам word, excel, access и power point.
Рубрики
В программе Microsoft Word на вкладке “Работа с рисунками / Формат” есть стили рисунков.
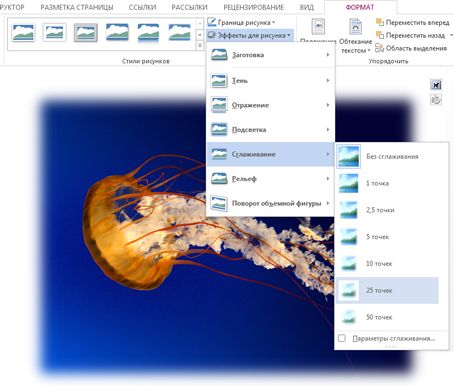
К примеру, стиль “прямоугольник с размытыми краями”, который удобно применять к картинкам в инструкциях, чтобы текст был читаемым, без отвлечения на соседние элементы.
Проблема стиля в том, что элементы расположенные с краю достаточно близко, тоже размываются, поэтому хотелось бы сделать размытие меньше.
Поэтому для редактирования стиля, примененного к картинке, нажимаем на кнопку (стрелочку) “Формат фигуры”.
Переходим на закладку “Свечение и сглаживание” и уменьшаем размер сглаживания до 3пт.
Изменяя настройки на закладках, можно изменяя стандартные стили, создать свой стиль.
Чтобы сделать рисунок более привлекательным, можно добавить такие эффекты, как тени, свечения, отражения, сглаживания, рельеф и поворот объемной фигуры.

Добавление эффекта к рисунку
Выберите рисунок, для которого вы хотите добавить или изменить эффект.
Примечание: Чтобы добавить один и тот же эффект в несколько рисунков, щелкните первый рисунок и затем, нажав и удерживая клавишу CTRL, щелкните другие рисунки. Если вы используете Word, скопируйте рисунки на полотно, если это еще не сделано. Откройте вкладку Вставка, щелкните значок Фигуры и выберите пункт Новое полотно. (После добавления или изменения эффекта необходимо вернуть рисунки обратно в исходное место в документе.)
На панели Работа с рисунками на вкладке Формат в группе Стили рисунков щелкните Эффекты для рисунка.
Наведите указатель мыши на один из параметров Эффекты для рисунка, чтобы отобразить меню различных способов применения каждого эффекта. При наведении указателя мыши на один из эффектов в меню, он отображается как рисунок для предварительного просмотра в документе.
Чтобы настроить добавляемый эффект, нажмите кнопку Параметры в нижней части меню каждого эффекта. Например, в меню Тень щелкните Параметры тени для выполнения пользовательских настроек для эффекта тени.
Если вкладка Работа с рисунками или Формат не отображается, дважды щелкните рисунок, чтобы убедиться, что он выбран. Если рядом с именем файла в верхней части окна программы отображаются слова [Режим совместимости], сохраните документ в формате DOCX или XLSX (вместо прежнего формата файла DOC или XLS) и попробуйте еще раз.
Удаление эффекта из рисунка
Для каждой категории эффекта рисунка в верхней части его меню отсутствует параметр . Выберите этот параметр, чтобы отключить ненужный эффект.
Например, чтобы удалить тень, наведите указатель мыши на пункт эффекты рисунка > тень > Нет тени.
Выберите рисунок, для которого вы хотите удалить эффект.
В разделе Работа с рисункамина вкладке Формат в группе Стили рисунков нажмите кнопку эффекты для рисунка.
Выберите категорию эффектов для рисунков , которую вы хотите удалить. В появившемся меню первый вариант не <>имя эффекта (например, без тени или отражения). Выберите этот параметр, чтобы удалить этот тип эффекта из рисунка.
Чтобы сделать рисунок более привлекательным, можно добавить такие эффекты, как тени, свечения, отражения, сглаживания, рельеф и поворот объемной фигуры.
Щелкните рисунок, для которого вы хотите добавить или изменить эффект.
Примечание: Чтобы добавить один и тот же эффект в несколько рисунков, щелкните первый рисунок и затем, нажав и удерживая клавишу CTRL, щелкните другие рисунки. При использовании Word нужно скопировать рисунки на полотно, если их там еще нет. Откройте вкладку Вставка, щелкните значок Фигуры и выберите пункт Новое полотно. (После добавления или изменения эффекта необходимо вернуть рисунки обратно в исходное место в документе.)
На панели Работа с рисунками на вкладке Формат в группе Стили рисунков щелкните Эффекты для рисунка.
Если вкладка Работа с рисунками или Формат не отображается, дважды щелкните рисунок, чтобы убедиться, что он выбран. Если рядом с именем файла в верхней части окна программы отображаются слова [Режим совместимости], сохраните документ в формате DOCX или XLSX (вместо прежнего формата файла DOC или XLS) и попробуйте еще раз.
Выполните одно или несколько из указанных ниже действий.
Чтобы добавить или изменить встроенную комбинацию эффектов, наведите указатель на пункт Заготовка и затем щелкните нужный эффект.
Для настройки встроенного эффекта щелкните Параметры объема и измените необходимые параметры.
Чтобы добавить или изменить тень, наведите указатель на пункт Тень и затем щелкните нужную тень.
Для настройки тени щелкните Варианты тени и измените необходимые параметры.
Чтобы добавить или изменить отражение, наведите указатель на пункт Отражение и затем щелкните нужный вариант отражения.
Для настройки отражения щелкните Параметры отражения и измените необходимые параметры.
Чтобы добавить или изменить свечение, наведите указатель на пункт Свечение и затем щелкните нужный вариант свечения.
Для настройки цветов свечения выберите команду Другие цвета свечения, а затем выберите необходимый цвет. Для изменения цвета, который не входит в цвета темы, выберите команду Дополнительные цвета, а затем выберите необходимый цвет на вкладке Стандартная или создайте собственный цвет на вкладке Спектр. Пользовательские цвета и цвета на вкладке Стандартная не обновляются при последующем изменении тема документа.
Для настройки вариантов свечения щелкните Параметры свечения и измените необходимые параметры.
Для добавления или изменения сглаживания щелкните Сглаживание, а затем выберите нужную степень сглаживания.
Для настройки сглаживания щелкните Параметры сглаживания и измените необходимые параметры.
Чтобы добавить или изменить рельеф, наведите указатель на пункт Рельеф и затем щелкните нужный рельеф.
Для настройки рельефа щелкните Параметры объема и измените необходимые параметры.
Чтобы добавить или изменить поворот объемной фигуры, наведите указатель на пункт Поворот объемной фигуры и затем щелкните нужный вариант поворота.
Для настройки поворота выберите команду Параметры поворота объемной фигуры и измените необходимые параметры.
Чтобы получить дополнительные сведения о параметрах, описанных в этих областях, нажмите кнопку справка  в верхней части диалогового окна ” Формат рисунка “.
Удаление эффекта из рисунка
Для каждой категории эффекта рисунка в верхней части его меню отсутствует параметр . Выберите этот параметр, чтобы отключить ненужный эффект.
Например, чтобы удалить тень, наведите указатель мыши на пункт эффекты рисунка > тень > Нет тени.
Выберите рисунок, для которого вы хотите удалить эффект.
В разделе Работа с рисункамина вкладке Формат в группе Стили рисунков нажмите кнопку эффекты для рисунка.
Выберите категорию эффектов для рисунков , которую вы хотите удалить. В появившемся меню первый вариант не <>имя эффекта (например, без тени или отражения). Выберите этот параметр, чтобы удалить этот тип эффекта из рисунка.
Выполните любое из описанных ниже действий.
Быстрое применение стиля
Щелкните рисунок и откройте вкладку Формат рисунка.
Щелкните Экспресс-стилии выберите нужный стиль.
Добавление и изменение тени, отражения, свечения, краев, рельефа или объемного поворота
Щелкните рисунок и откройте вкладку Формат рисунка.
Нажмите кнопку эффекты для рисунка, наведите указатель на тип эффекта и выберите нужный эффект.
Чтобы настроить эффект, нажмите кнопку Параметры в нижней части меню “эффекты”.
Дополнительные сведения
Выполните любое из описанных ниже действий.
Применение и изменение стиля
Щелкните рисунок и откройте вкладку Формат рисунка.
В разделе Стили рисунков выберите нужный стиль.

Чтобы посмотреть другие стили, наведите указатель мыши на нужный стиль и щелкните  .
.
Добавление и изменение тени, отражения, свечения, багетной рамки или объемного вращения
Щелкните рисунок и откройте вкладку Формат рисунка.
В разделе Стили рисунков нажмите кнопку Эффекты, наведите указатель на тип эффекта и выберите нужный вариант.
Для тонкой настройки эффекта в разделе Стили рисунков нажмите кнопку Эффекты, наведите указатель на тип эффекта и выберите пункт Параметры [название эффекта].
Чтобы гармоничнее интегрировать изображения в документ, в программе Microsoft Word предусмотрены специальные стили отображения рисунков, которые можно применить к любому изображению. Стили отличаются друг от друга формой, толщиной, цветом рамки, наличием или отсутствием отражения и многими другими параметрами.
Разработчики программы Microsoft Word подготовили для пользователей набор экспресс-стилей для того, чтобы они могли использовать уже готовые стилевые решения. Чтобы применить к изображению какой-либо стиль, достаточно выполнить ряд простых действий:
- нужно щелкнуть мышью по изображению, чтобы появилась дополнительная группа Работа с рисунками (Picture Tools);
- перейти на вкладку Формат (Format) и в группе элементов управления Стили рисунка (Picture Styles) выбрать нужный стиль.
Чтобы посмотреть, как будет выглядеть тот или иной стиль изображения, достаточно навести на него мышь.
После этого стиль изображения изменится (рис. 7.10). Однако вариантов экспресс-стилей предлагается пользователю не так уж много. Давайте научимся самостоятельно применять к изображениям различные эффекты и изменять границы рисунков.

Рис. 7.10. Пример применения стилей к изображениям
Чтобы изменить цвет и форму границы рисунка, достаточно нажать кнопку Границы рисунка (Picture Border) группы элементов управления Стили рисунка (Picture Styles) вкладки Формат (Format). После этого откроется контекстное меню, в котором можно выбрать цвет, толщину и внешний вид границы рисунка. Для применения того или иного вида границы достаточно просто щелкнуть мышью по нужному атрибуту.
Для применения к изображению различных эффектов нужно воспользоваться кнопкой Эффекты для рисунка (Picture Effects) группы элементов управления Стили рисунка (Picture Styles) вкладки Формат (Format). После нажатия кнопки Эффекты для рисунка (Picture Effects) откроется контекстное меню, содержащее различные эффекты.
Всего существует семь различных групп эффектов.
- Заготовка (Preset). Представляет собой уже готовые шаблоны эффектов тени и формы.
- Тень (Shadow). Различные варианты длины, направления и интенсивности теней.
- Отражение (Reflection). Добавляет к изображению различные эффекты отражения.
- Свечение (Glow). Добавляет к изображению различные по интенсивности и цвету свечения контура.
- Сглаживание (Soft Edges). Сглаживает пикселы изображения.
- Рельеф (Bevel). Добавляет изображению псевдотрехмерность за счет рельефности.
- Поворот объемной фигуры (3-D Rotation). Изменяет форму изображения на псевдообъемную фигуру.
Для предварительного просмотра какого-либо эффекта достаточно просто навести на него указатель мыши. Для применения какого-либо эффекта к изображению необходимо щелкнуть по эффекту в контекстном меню мышью. Различные эффекты могут быть применены к одному изображению одновременно.
Microsoft Word bears some amazing image editing feats that can light some creative fires. Of course, it can’t beat giants like Photoshop, but if someone isn’t inclined much to spend a hefty amount and climb the steep learning curve, I advise switching to Microsoft Word for basic image editing. Today, we see how to use Microsoft Word picture editing tools to correct and improve your pictures.
Microsoft Word Picture editing Tools
To edit an image, you need to open it first. For that, open Microsoft Word on your computer and switch to the Insert tab. Here you can find an option called Pictures. Click on it and select the This Device or Online Pictures option.

If you select the former option, you can open an image from your computer, whereas the latter option lets you fetch an image from an online source.
Once the image is opened in Word, you can find a new tab named Picture Format.
You need to find all the following options in this tab.
Remove Background
As the name suggests, the option will let you selectively remove portions of a picture based on color patterns. In other words, you can remove the background of your image using Word.
For that, click the Remove Background option and select the portion you want to remove.
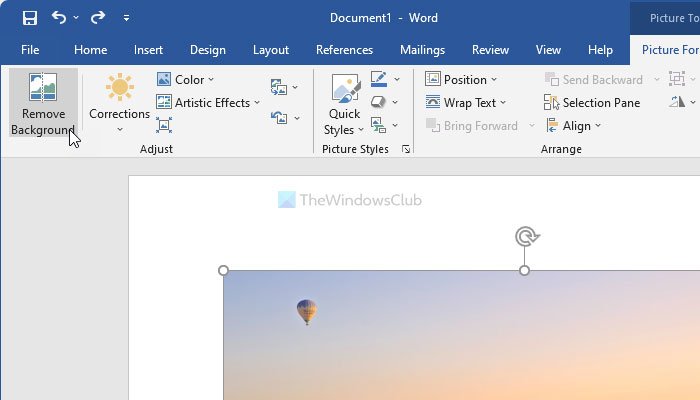
Next, click the Keep Changes button.
Corrections

Adjacent to the ‘Remove Background’ option you can find ‘Corrections’. Hit the drop-down and select the option that suits your picture best. You can sharpen, soften, and adjust the brightness of the image for better on-screen presentation.
Color
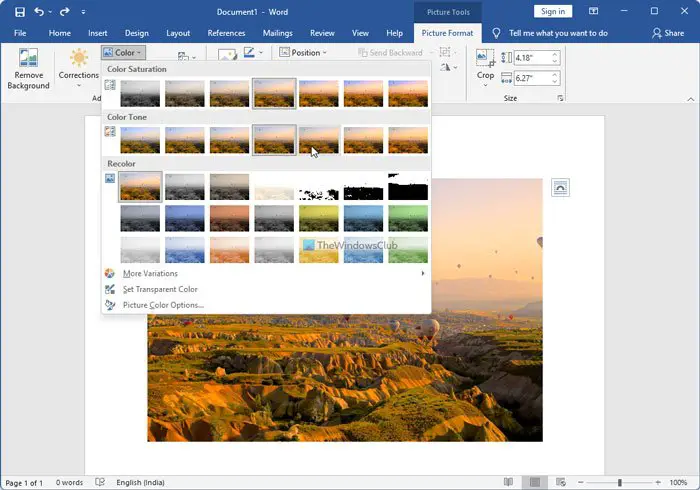
You can apply different color effects to make your image/picture look more compelling. Options available are sepia tone, grayscale, and many more. For that, you need to expand the Color option and choose an effect you want to apply.
Artistic Effects
The command located in the ‘Adjust’ group provides 23 special effects, such as pencil sketch, blurring, charcoal sketch, paint strokes, and others making the picture appear to have been made from various mediums.

Compress Pictures
Users can manually resize images or pictures in the Word document using the Compress feature. When you press the option a dialog box appears displaying the following Compression options:
- Apply only to this picture: Select whether you want to compress or modify selected pictures or all the pictures in the document.
- Delete cropped areas of pictures: Removes the areas of images that you have cropped out. Cropped areas once removed cannot be retrieved.

Reset Picture
Click this button to set the image color, brightness, contrast back and other adjust tools.
Picture Border/Effects/Layout
Picture Border, Picture Effects, and Picture Layout – these three options let you customize your picture in a different way. Other than the Artistic Effects, you can use the Picture Effects option to set an effect to your picture’s border. On the other hand, the first option helps you set border color, and the third option allows you to convert your image into a shape.
Crop

It is possible to crop an image in Word. The best part about this cropping tool is that you can crop the image and turn it into a shape, or by aspect ratio, etc. For that, click on the Crop option and select the type as per your requirements.
How can I edit a picture in Word?
Editing a picture in Word is not that tough as long as you understand the basic options. To edit a picture in Word, you need to follow the entire article so that you can open and add various effects as per your desire. Most of the essential options are included in the latest version of Word, and you can use them on your Windows 11/10/8/7 computer.
How do I freely edit a picture in Word?
Word doesn’t hold you from using any option included in it. In other words, you can insert an image and start using any given option whenever needed. For your information, you can remove background, correct colors, add image effects, change position, crop image, etc., with the help of Word.
Were you already using them or was this new for you?
Want to edit an image in Microsoft Word? The program provides a variety of tools to let you customize the image as you want. Find out how!
Microsoft Word includes various tools for editing images, starting from cropping an image to making it transparent. This eliminates the need to use third-party applications for basic image touch-ups before adding to a Microsoft Word document.
In this article, you will learn how to edit an image in Microsoft Word using the tools at your disposal. Let’s explore how to make images transparent, blur some part of it, adjust brightness/contrast, add alt text, change picture borders, define layout, and much more.
1. Changing Image Transparency in Microsoft Word
For an image to be used as a text background, it needs to be transparent. In recent versions of Microsoft Word, methods to make images transparent have changed, so following these steps will help you achieve that:
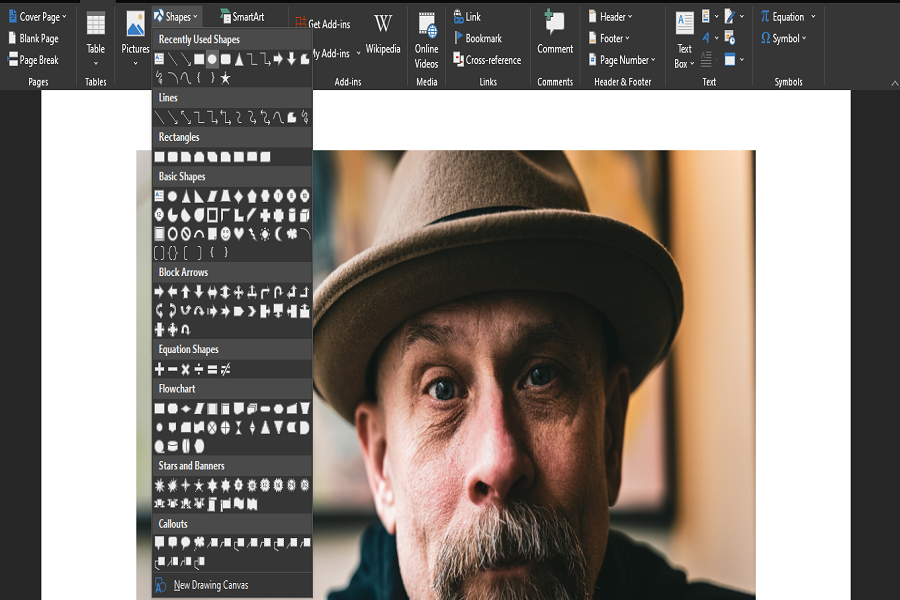
- Navigate to Shapes in the Insert tab.

- Pick a shape and draw it to fit the image size you intend to make transparent.
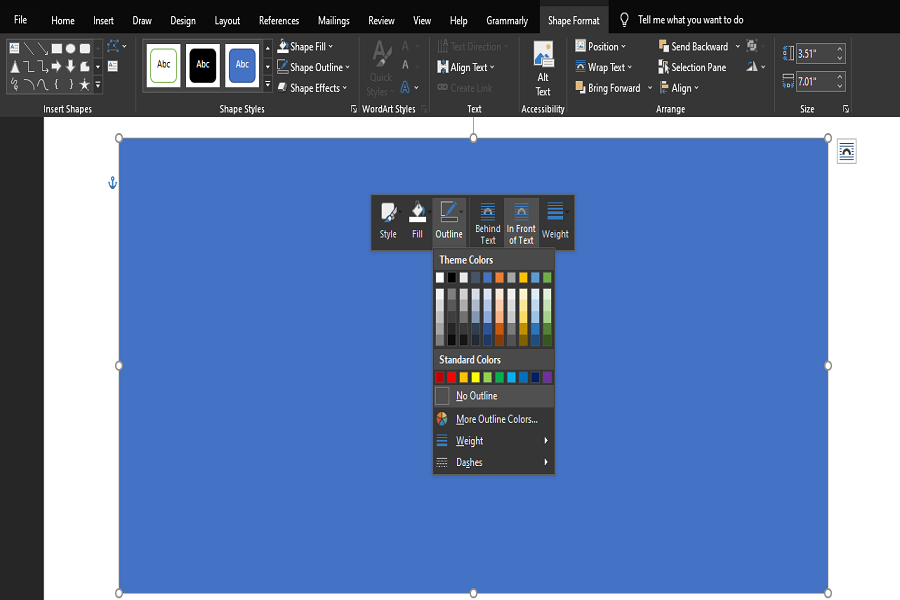
- Then, right-click the shape and select No Outline in the Outline menu.
- Then, right-click again and click the Format Shape in the menu.
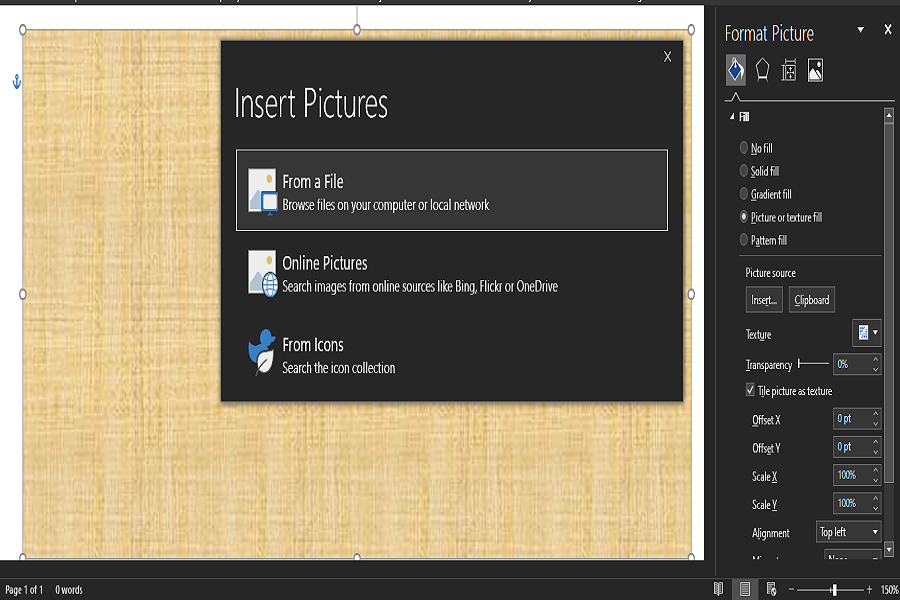
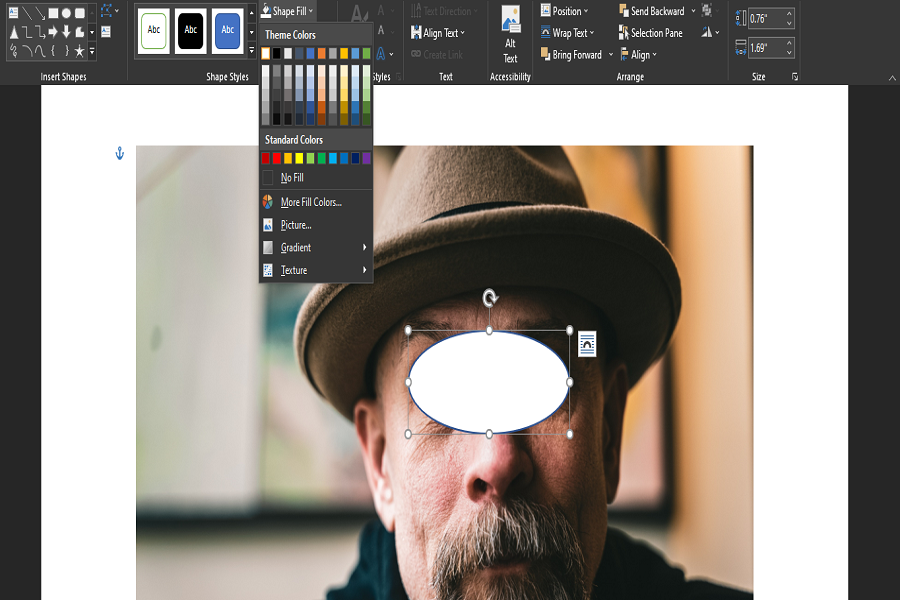
- In the Fill option on the right-sidebar, click Picture or texture fill.
- Then click on the Insert button under Picture source to add an image you want to make transparent.
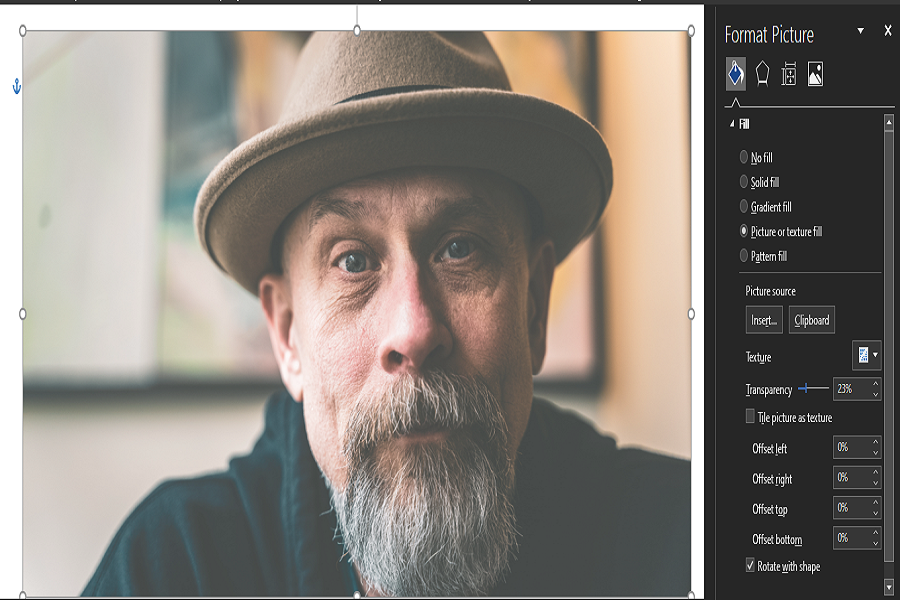
- Use the Transparency slider to adjust the image transparency between -100% and 100% as required.

2. Adding Blur Effect to Images in Microsoft Word
Microsoft Word doesn’t have a dedicated feature for blurring images. You can be creative with the image softening and texture effects to hide or blur specific parts of an image. Here’s what you can do:
- Add an image that you want to blur.
- Navigate to Shapes.
- Select a shape and draw it over the part of the image you want to blur.
- Now, change the shape’s color to White.
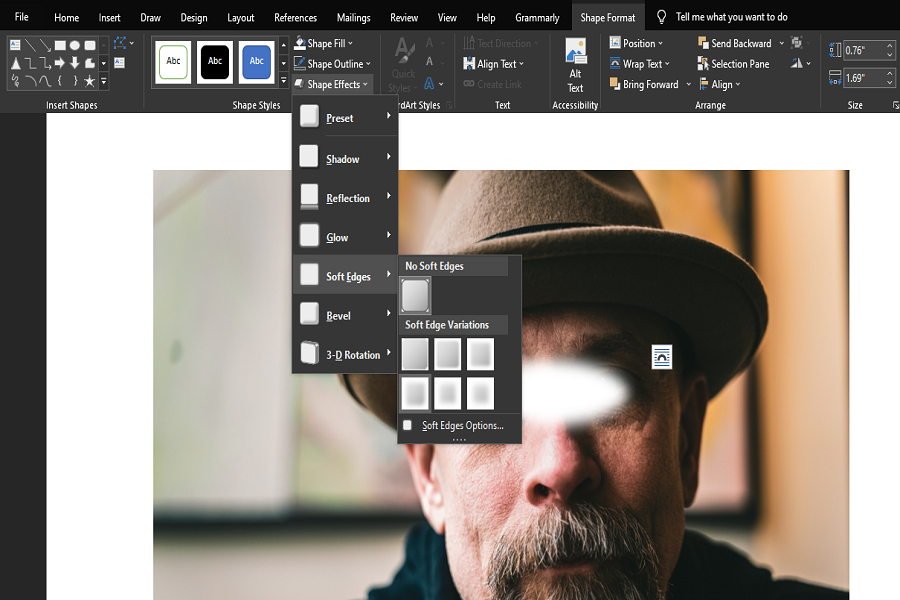
- Navigate to Shape Effects dropdown menu.
- Go to the Soft Edges effect to apply it to the shape to get the blur effect.
- With Soft Edge Variations, you can select the desired blur intensity.
3. Removing Picture Background in Microsoft Word
Microsoft Word allows you to remove the image background as well. All you have to do is add your image to the document, select the added image and click the Remove Background option in the upper left corner.
![]()
As a result, background areas will automatically be marked to be removed, but it would be pretty random. To remove the desired area, you must select it manually. By clicking on the Mark Areas to Keep tool, you can select the image section that you want to keep and remove the rest.
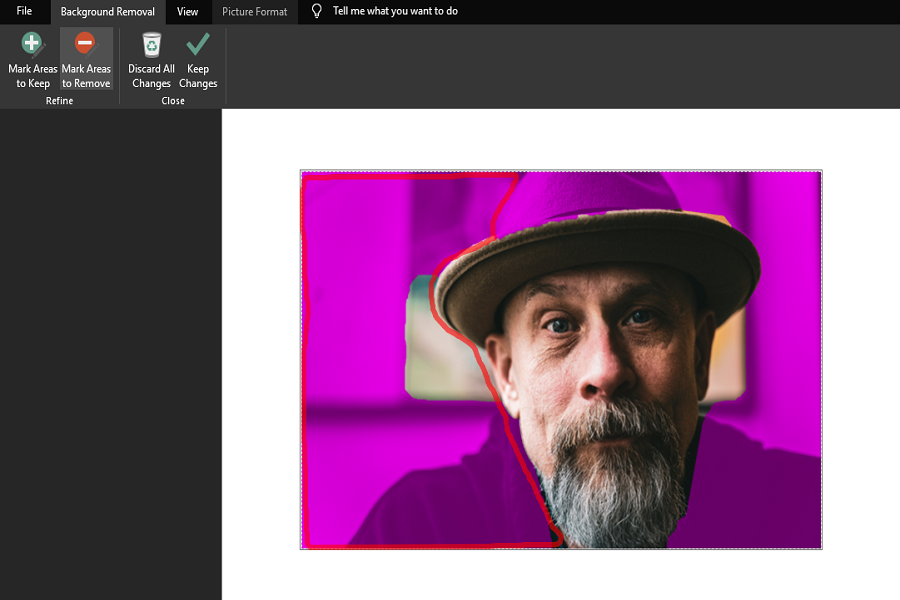
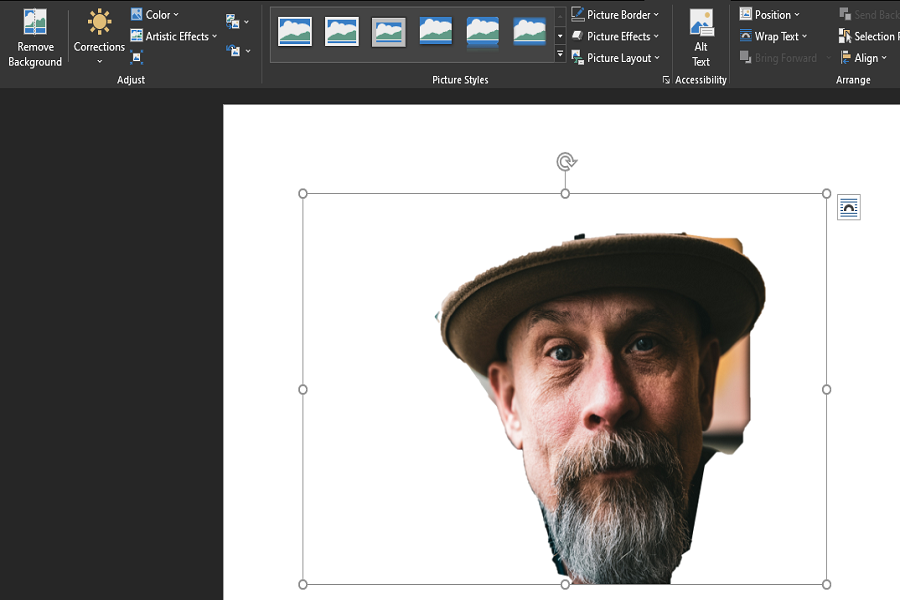
When you are satisfied with your selection, click on Keep Changes. Only the selected part will be retained, and the rest will be removed. Remember that this method explains how to remove a background from an image, not how to change the background color.
4. Changing Image Brightness, Contrast, and Sharpness in Microsoft Word
There are presets available in the Microsoft Word image editor that allows you to change a picture’s brightness, contrast, and sharpness. To utilize these presets, follow these steps:
- Click the Corrections dropdown menu to open the Brightness/Contrast and Sharpen/Soften preset menus.
- To preview the changes, move the mouse cursor over each preset.
- Apply the presets to your image by clicking on them.
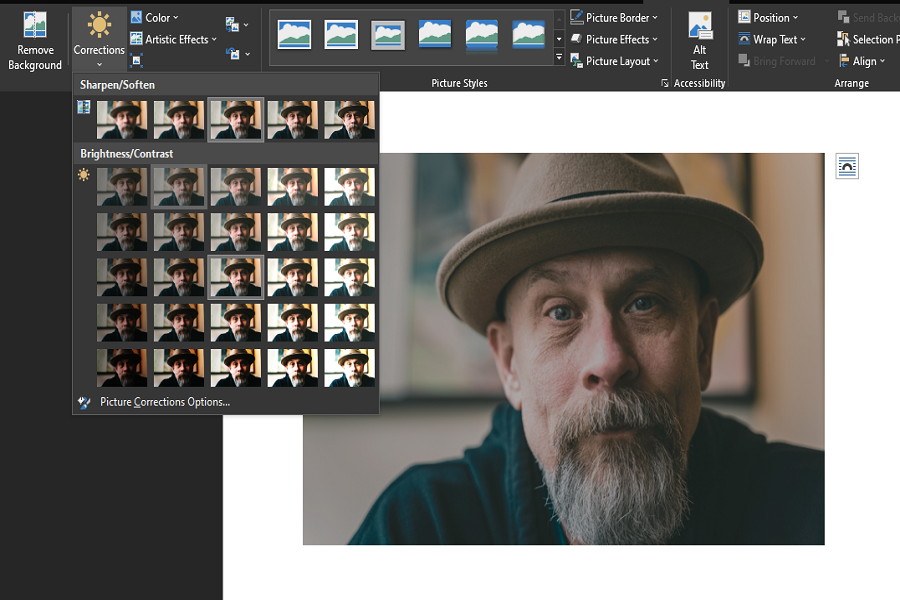
The editor also provides options to do these changes manually in a separate menu. To do that, click on the Corrections button and navigate to Picture Correction Options…
Doing so will open a Format Picture menu with the Picture Corrections option to use presets, change sharpness, brightness, and contrast manually. In addition, you can add color to images or crop them to make them appear more streamlined.
5. Adding Special Effects and Picture Styles to Images in Microsoft Word
When necessary, you can also apply special artistic effects and picture effects to images in Microsoft Word to give them a new, elegant appearance.
To add Artistic Effects, click on the Artistic Effects dropdown menu and hover your mouse cursor over each effect to preview. Click on the desired effect to apply on the image.
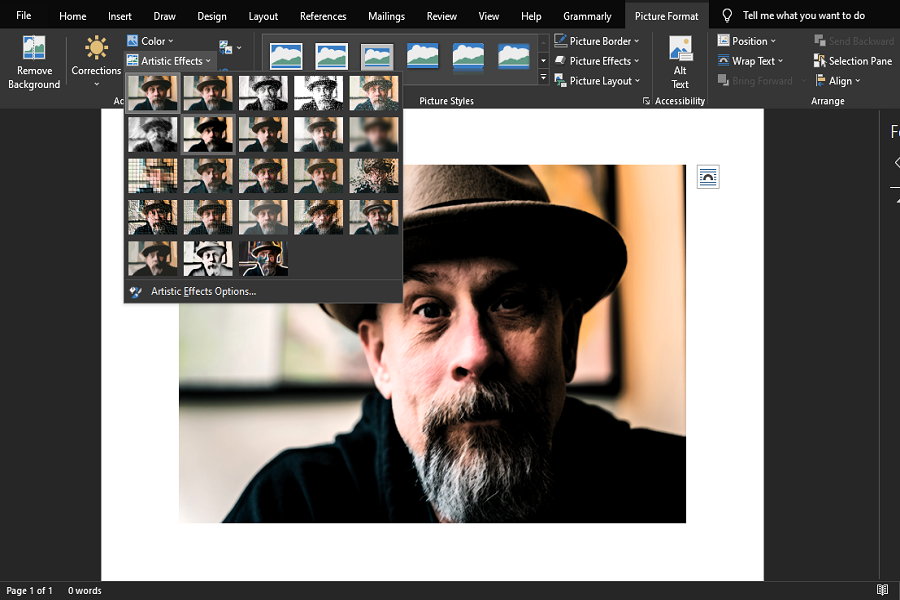
Other than these, you can access more of these effects with presets by clicking the Picture Effects menu. Picture styles are built-in frames that you can use to make your work more creative—useful when designing Presentations.
Follow the below steps to add Picture Effects:
- Select image in Microsoft Word.
- Click on the Picture Effects dropdown menu located in the middle of the Format toolbar.
- To view the preview of your favorite style or preset, hover over it.
- To apply any style, simply click on it.
6. Adding Picture Border and Picture Layout to Images in Microsoft Word
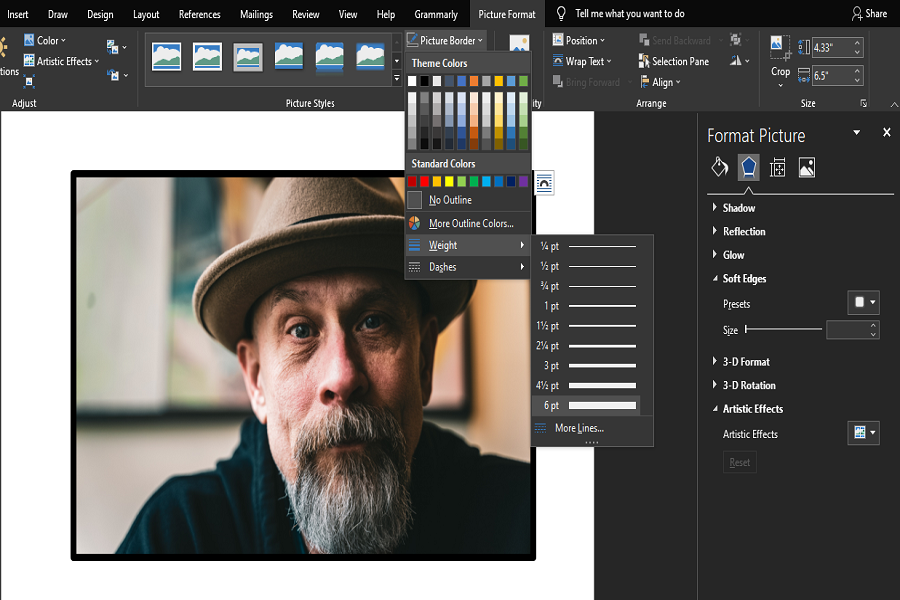
Adding borders to an image is another useful image editing feature available in Microsoft Word. In case you haven’t used it before, here’s how you can use it:
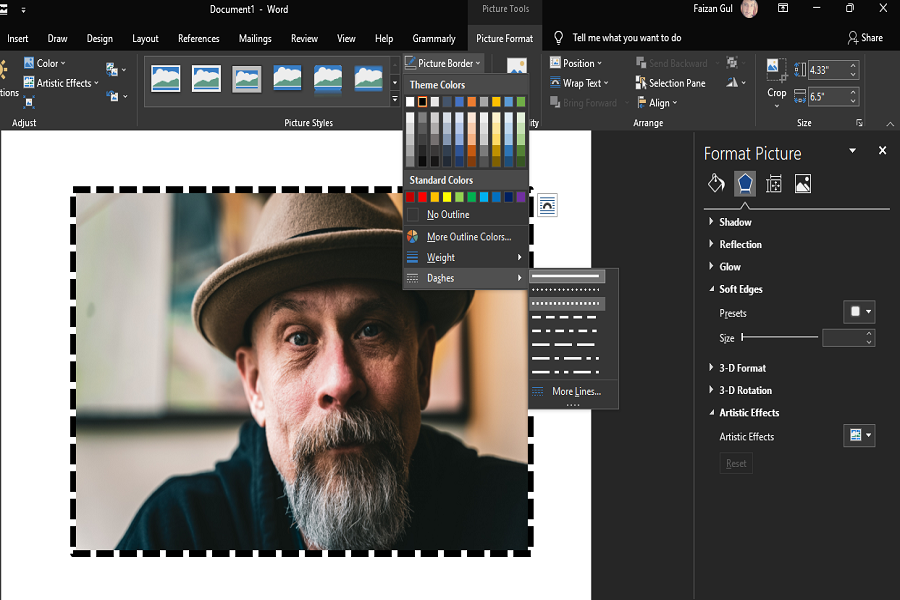
- Click on the Picture Border dropdown menu located just above Picture Effects after selecting your image.
- Choose the border color of your choice.
- To select the border thickness, use the Weight option.
- Change border style in the Dashes option.
- To customize border style, navigate to Dashes > More Lines.
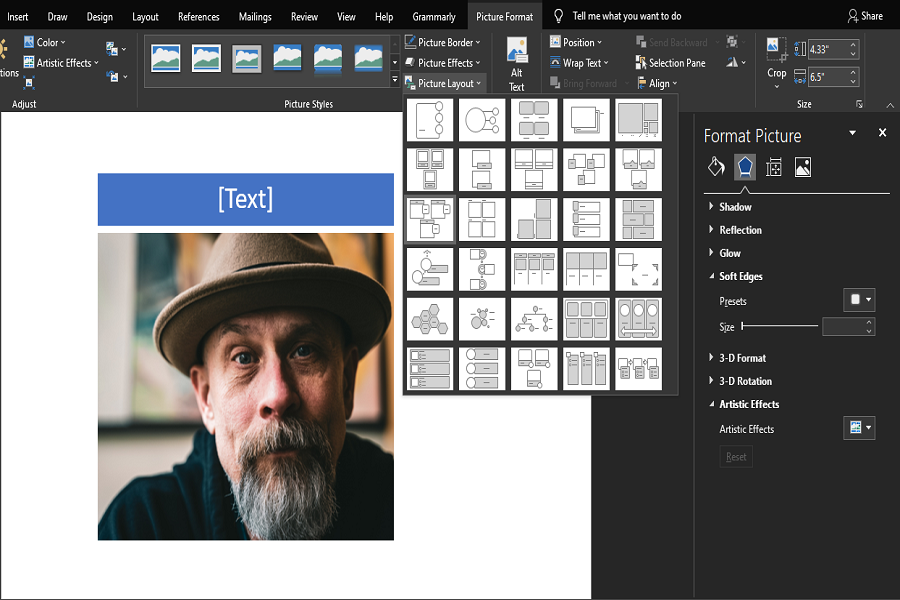
The Picture Layout tool in Microsoft Word helps create captions and descriptions for images. In Microsoft Word, you can add textual information to your images by choosing preset designs.
To do that, follow these steps:
- Select your image and click on the Picture Layout dropdown menu below Picture Effects.
- Select the desired layout from the menu.
- Once selected, you can edit text and set the layout’s frame colors, among other things.
7. Adding Alt Text to Images in Microsoft Word
The alt text describes the image if the file to which it has been rendered does not load on time. It explains what the image is all about.
In just a few easy steps, you can add Alt Text to any image in Microsoft Word:
- Double-click the image to open Word’s picture editing tools
- Click the Alt Text option.
- Write a description in the text box.

Microsoft Word can also generate an automatic description for you. For that, click Generate a description for me.
8. How to Resize an Image in Microsoft Word
Microsoft Word offers a dedicated resizing feature that allows you to resize any image to meet a particular format or size requirement. Follow the below steps to resize an image in Microsoft Word:
- Right-click on the image and click the Size and Position option.
- In the Size tab, you can manually enter the Height and Width values to resize the image.
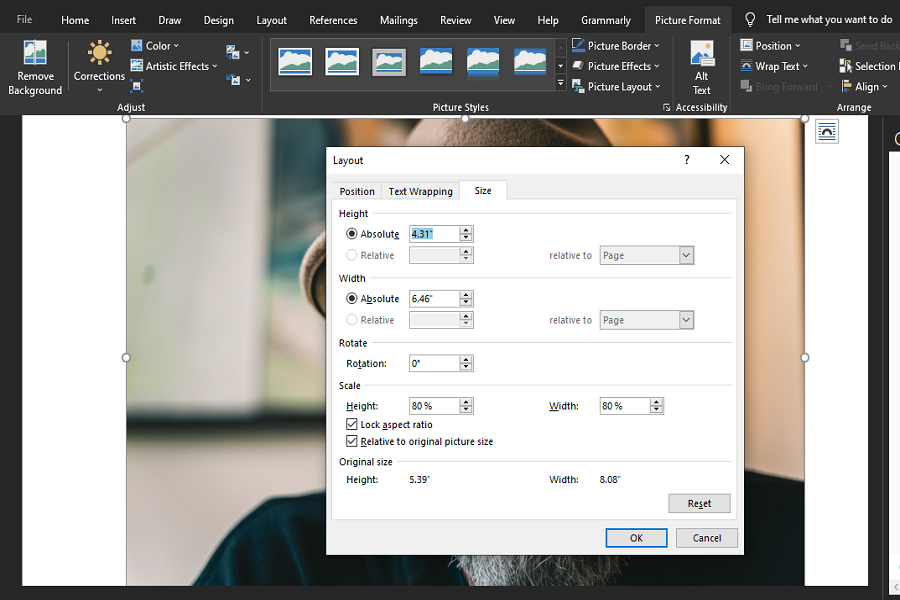
Keep the Lock aspect ratio button checked if you want the width to change relative to height. If you have already thought of specific height and width values, don’t forget to uncheck this box.
When resizing images with the aspect ratio not locked, you risk stretching the image or dragging it unusually, so be cautious when doing that.
Enhance Your Images in Microsoft Word
You can now make basic image edits in Microsoft Word. However, if you want to create professional edits, you’ll probably have to use design software since Microsoft Word’s editing functionality is pretty limited.
When you add or delete text in a Microsoft Word document, do your images lose their position? You can prevent your images from moving by restricting editing options, adding images as watermarks, and fixing image positions on the page.
 Most people assume that Microsoft Word is for, well, words.
But, pictures tell a story (we hear they are worth many times that of a single word) and, more importantly, enhance text. Think of a greeting card without a picture on the front or a magazine article without photographic images. Blech.
Good news is, pictures in Microsoft Word are low effort, high reward. The tools are easy and the effects are very impressive.
Add a Photo
The most important thing to realize is that Microsoft Word is going to help you position that picture in relation to your text. So, before you even think “picture,” think “where.” Put your cursor in the paragraph that talks about the picture.
To grab a picture, click the Insert ribbon and select Picture. You’ll see a dialog box that will allow you to pick a picture from your hard drive, thumb drive, or your digital camera’s memory card.
Now that picture is “anchored” to the text you selected. As you add or delete more text, the picture will stay close to that paragraph.
Make Some Improvements
Nobody takes perfect pictures all the time. That’s really okay because, in Microsoft Word, you can select that picture and spend a little time on the Picture Tools, Format ribbon.
Try Recolor first, changing a color photo into black and white, sepia, or “Washout.” At Founder’s Technology Group, we love the impact of Washout. You use that and send a picture to the back, you can type right over the image. Bang! You’ve got a designer look in seconds.
Brightness and Contrast are more subtle but very, very useful. You can get those people out of dark corners or tone down a snow scene to where people actually have noses and cheeks.
Add the Finishing Touches
Picture Styles are great for adding just the right border. When you bring a picture into your document, it will have a hard edge. Maybe you want a soft, fuzzy blur or a thick black frame.
Grab that picture with your cursor and click the options in Picture Styles to see what happens. Not only will you find the right effect, you’ll get over that initial giddiness that comes with playing… people tend to go a little nuts with all the effects and it takes a few minutes to get past that and settle down to what does and doesn’t work.
Yes, we have played with photos of family members, made them purple with some funky contrast and brightness choices… and we laughed… and we used the Undo feature to get back to what was working before we went a little crazy. Don’t forget Undo!