
Select objects, shapes, pictures or text boxes, to change or move them. Sizing handles indicate that a shape or object has been selected.
Click or tap the object to select it. If that doesn’t select it, go to Home > Select and do one of the following:
-
To select all of the text in the document, choose Select All.
-
To select objects that are hidden, stacked, or behind text, choose Select Objects. To select an object, click or tap when your pointer becomes a selection arrow
 as it moves over an object. To select multiple objects, press and hold Ctrl while you click or tap the objects that you want.
 -
To select text with similar formatting, choose Select All Text with Similar Formatting.
-
To open the task pane where you can select, multi-select, show, hide, or change the order of objects, choose Selection Pane, and then select the options that you want.
 as it moves over an object. To select multiple objects, press and hold Ctrl while you click or tap the objects that you want.

Tips for selecting shapes and objects
|
To do this |
Do the following |
|---|---|
|
Select multiple objects. |
Press and hold Shift or Ctrl while you select the objects. |
|
Select an object that is under other objects and cycle forward through the stack of objects. |
Select the top object, and then press Tab. |
|
Select an object that is under other objects and cycle backward through the stack of objects. |
Select the top object, and then press Shift+Tab. |
|
Select objects that are part of a group. |
Select the group, and then do one of the following:
|
|
Cancel the selection of one object at a time. |
Press and hold Shift or Ctrl while you click or tap each object. |
See Also
Group or ungroup shapes, pictures, or other objects
Select objects, shapes, pictures or text boxes, to change or move them. Sizing handles indicate that a shape or object has been selected.
Using the Selection Pane
If you can’t select an object or there many objects to select, use the Selection pane.
-
Select one of the objects you want to manage.
-
Go to Shape Format or Picture Format> Arrange
> Selection Pane.
-
The Selection Pane opens with all your objects listed, and you can do any of the following:
-
Drag an item up or down in the list to change the order. If you have objects that cover each other, this will bring an object to the front, or put it behind another object.
-
Choose to show or hide objects from the Selection Pane. To hide an object, select the eye icon in the Selection Pane indicating that the object is Showing
. The icon changes to a simple icon indicating that the object is Hidden from view. To show the object once again, select the Hidden icon , and the object reappears. -
Group or ungroup objects listed in the Selection Pane. If you select multiple objects by using Command + Click, you can then group them or ungroup them by selecting Format Shape or Format Picture > Arrange
> Group Objects.
-
 > Selection Pane.
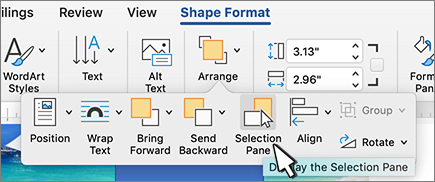
 . The icon changes to a simple icon indicating that the object is Hidden
  from view. To show the object once again, select the Hidden icon
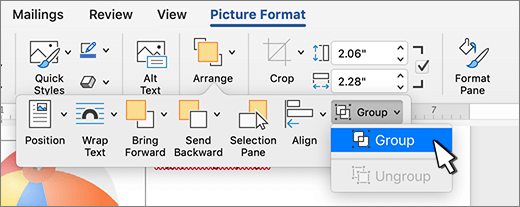
Even though Microsoft Word gives you plenty of ways to format, align, and manipulate text, there may be a time when it’s not enough. By using text boxes in Word, you have the flexibility to place text where you want, put it inside a shape, or customize it to make it pop.
Content
- How to Insert a Text Box in Word
- How to Resize, Rotate, or Move a Text Box
- How to Customize the Text Box Appearance
- How to Connect Text Boxes in Word
- Frequently Asked Questions
You can insert a premade text box that includes formatting and a style or start from scratch by drawing your own.
Insert a Built-In Text Box
Using a premade text box, you can get a jump start on the formatting or apply a bit of flare without any extra work. Currently, this feature is only available in Word on Windows, not Mac.
- Head to the “Insert” tab and open the “Text Box” drop-down box. You’ll see options below “Built-in” at the top. If you hover your cursor over one, you can see a brief description.

- Choose the premade text box you want to use, and you’ll see it pop onto the page.

- Click inside the box, which selects the sample text, then type your own.

You can customize the built-in text box, just like one you draw yourself, which is described below.
Draw a Text Box
If you want a complete blank canvas for your text box, you can draw one the size you need and insert your text. Additionally, this is the only option for inserting a text box in Word on Mac at this time.
- Go to the “Insert” tab and open the “Text Box” drop-down box. On Windows, select “Draw Text Box.”

- On Mac, select either “Draw Text Box” or “Draw Vertical Text Box.” The latter places the text sideways in the box as shown below.

- When your cursor changes to a crosshair symbol, drag to draw the text box the size you want. You can still resize the text box later if needed.

- Once you have your box, just type your text inside of it.

Note: you can also add text boxes in Google Docs.
How to Resize, Rotate, or Move a Text Box
You aren’t stuck with the size, angle, or location of your new text box. You can easily resize, rotate, or move a text box in Word a few different ways.
Resize a Text Box
- To quickly resize a text box, drag a corner or edge.

- You can also go to the “Shape Format” tab to change the size. Use the Size section of the ribbon to enter the dimensions in the “Height” and “Width” boxes.

- If you want to size your box according to the text within it, right-click the text box and pick “Format Shape.” When the sidebar opens, go to the “Layout & Properties” tab and check the box for “Resize shape to fit text.”

Rotate a Text Box
- To freely rotate the box, drag the circular arrow at the top to the right or left.

- To rotate it right or left 90 degrees, go to the “Shape Format” tab. Pick an option from the “Rotate” drop-down menu in the “Arrange” section of the ribbon.

- For an exact angle, right-click and choose “More Layout Options.” Open the Size tab, enter the angle in the “Rotation” box, and click “OK.”

Move a Text Box
To move a text box, drag it to your desired location.
Because a text box works like an object, any other text in your document won’t move out of the way for a text box. However, you can use the Wrap Text and Position features to adjust this if needed.

- Go to the “Shape Format” tab, then use the “Wrap Text” drop-down box in the “Arrange” section of the ribbon to choose a wrapping option. For instance, you can place the box in line with the text.

- You can also use the “Position” drop-down box to the left of “Wrap Text” to place the box in a specific spot within the text. For example, you can place it on the top left with text wrapping around it.

Tip: learn how you can create and customize tables in Word.
How to Customize the Text Box Appearance
Along with resizing, rotating, or moving a text box, you may want to change its appearance. You can customize the shape of the text box, apply a background color, or give it a border.
- Select the text box and head to the “Shape Format” tab, then use the following sections of the ribbon to customize the box and text:
- Insert Shapes: open the “Edit Shape” drop-down menu, move to “Change Shape,” and select a new shape in the pop-out menu.

- Shape Styles: pick a preformatted design in the Shapes Styles box or choose a fill, apply a border, or add a shadow.

- WordArt Styles and Text: use these two sections to adjust the appearance of the text. Apply a design, fill, outline, or effect. You can also change the direction or align the text. For the font style and size, use the options in the “Font” section of the “Home” tab.

- For additional options, right-click the text box and select “Format Shape,” then you can adjust both the box and text settings in the sidebar. Some options match those in the ribbon while others are different. For instance, you can adjust the transparency of the box or text.

Try this: create an organized document with a table of contents and add page numbers in Word.
How to Connect Text Boxes in Word
One super-handy feature of text boxes in Word is that you can link them together. This allows you to start typing in one box and have the text carry over to the next box. It’s ideal for a list of tips, brief instructions, or short stories you want to include with your content.
To link text boxes, the box you want to connect to the previous one must be empty. If you already have your boxes filled with text, you can either remove the text from the subsequent boxes or add new boxes and remove the existing ones.
- Insert a text box as described earlier, then add a second text box, but be sure to leave it empty.

- Select the first text box, go to the “Shape Format” tab, and pick “Create Link” in the Text section of the ribbon.

- When your cursor changes to a paint can icon, click inside the second text box. This creates a link between the two. If you want a third or fourth text box linked, follow the same process by linking the second box to the third, third to the fourth, and so on.
- As you add text to the first box, the text that won’t fit then fills the second text box. If you have more text boxes, they will continue to fall into them.

- If you resize the text boxes, the amount of text in each one adjusts to accommodate it. When you resize one text box, you’ll see the linked box automatically resize as well.

- Should you decide later you don’t want the boxes linked, you can break the link. Select the first text box, go to the “Shape Format” tab, and click “Break Link.” Follow the same process to remove any additional text box connections.

Frequently Asked Questions
Can I add a hyperlink to a text box in Word?
You can add a link to a text box or specific text within it, just like any other object or text in a Word document.
To link the box, select it. To link specific text within the box, select it instead. Right-click, pick “Link” or “Hyperlink,” then choose an existing file or web page, place in the document, new document, or email address. On the right, select the item or add the URL and click “OK.”
How do I stop text from wrapping inside of a text box?
By default, the text inside of a text box wraps to the next line when it reaches the edge of the shape. But you can change this if you would like.
Right-click the text box and pick “Format Shape.” When the sidebar opens, select the “Layout & Properties” tab and uncheck the box for “Wrap text in shape.”
Can I temporarily hide text boxes in Word?
As you work on the other content in your document, you may want to hide a text box or two to focus on other things.
Select a text box, go to the “Shape Format” tab, and click “Selection Pane” in the “Arrange” section. When the sidebar opens, click the eye icon to the right of a text box to hide it. For all text boxes, click “Hide All” at the top. To unhide the text boxes, select the eye with a line through it to the right or pick “Show All” at the top.
Image credit: Pixabay. All screenshots by Sandy Writtenhouse.

Sandy Writtenhouse
With her BS in Information Technology, Sandy worked for many years in the IT industry as a Project Manager, Department Manager, and PMO Lead. She wanted to help others learn how technology can enrich business and personal lives and has shared her suggestions and how-tos across thousands of articles.
Subscribe to our newsletter!
Our latest tutorials delivered straight to your inbox
![]()
Download Article
![]()
Download Article
- Using Windows
- Using a Mac
|
You know when you try to fill out forms in Word on the provided lines, but the text you type makes the lines move and ruins the formatting? There is a way to get rid of that. This wikiHow will teach you how to insert fillable fields on Word on PC or Mac. You’ll need to have Word set up on your computer before you can start.
-
1
Open Word. You can find this program on your Start Menu.
-
2
Open a document. You can either open a new document, create a new document from a template, or open an old document.
Advertisement
-
3
Click Options and Customize Ribbon in the File menu. You’ll find this along the top of your program window.
-
4
Check the “Developer” box in the Customize Ribbon panel.
-
5
Click Ok.
-
6
Click the icons next to Design Mode in the Developer tab. These look like “Aa”, check boxes, and tables.
- The first “Aa” icon on the right side of the panel says “Rich Text Content Control” when you hover over it. This inserts an empty field into the document that can be filled with images, videos, text, and more.
- The second “Aa” icon says “Plain Text Content Control”. This will insert a blank fillable field into your document that the user can fill with only text.
- The “Combo Box Content Control” icon is next to the check box icon, and this will insert a drop-down menu into your document. The Properties button will open options for you to add more items to the drop-down menu.
- The “Date-Picker” icon looks like a calendar and will insert an empty box that will launch a calendar so your form user can pick a specific date. The Properties button will open options for you to choose the box format and display.
- The check box icon adds a check box to your document.
-
7
Click Restrict Editing in the Developer tab. This will pull out a panel from the right of your program window.
-
8
Check the box next to “Editing Restrictions”. This will lock the document so no one can alter the text not in text boxes.
-
9
Click Yes, Start Enforcing Protection. A box will pop up asking for a password. You can enter a password if you want to allow other people with that password to be able to edit your document.


Advertisement
-
1
Open Word. You can find this program in your Applications folder.
-
2
Open a document. You can either open a new document, create a new document from a template, or open an old document.
-
3
Click the Preferences tab under Word at the top of your screen. You’ll see this next to the Apple icon
. A new window will pop up.
-
4
Click View under the “Authoring and Proofing Tools” header.
-
5
Check the “Show developer tab” box under “Ribbon”.
-
6
Click Ok.
-
7
Click “Text Box”, “Check Box”, or “Combo Box” in the Developer tab. This will insert a blank fillable field into your document.
- The Combo Box option creates something like a drop-down menu. Click the Options icon next to the Combo Box icon to access options to turn your combo box into a drop-down menu.
- The Check Box creates checkable boxes.
- The Text box adds fillable fields that control how text appears on a form. For example, instead of a document line with Name:_______ where the user can make a mess of the lines, you can use these fillable text fields to control where the text goes and how it appears. You can click the Options icon to open an options box where you can choose the input type. For example, you have a text box, but are looking for a date, you can pick Date under the “Type” heading for this.
-
8
Click Protect Form. This will prevent you from making any edits to your fields, but will activate them so they are usable.
- If you want to password protect your document, you can go to the Review tab and click Protect Document.


Advertisement
Ask a Question
200 characters left
Include your email address to get a message when this question is answered.
Submit
Advertisement
Thanks for submitting a tip for review!
About This Article
Article SummaryX
1. Open Word.
2. Click Preferences.
3. Click View.
4. Check Show developer tab.
5. Select to add a text box, check box, or combo box.
6. Click Protect.
Did this summary help you?
Thanks to all authors for creating a page that has been read 107,940 times.
Is this article up to date?
Microsoft Word 2010 enables you to create customized forms, such as surveys or employment applications. A drop-down box is ideal when you need a form element to restrict selection to a list of possible choices. As an example, a drop-down box in an application form might only give the applicant the option of selecting from available positions, rather than risking a generic description. Creating this drop-down box requires access to the Developer tab, which is disabled by default.
Step 1
Click «File,» «Options» and then «Customize Ribbon.»
Step 2
Check «Developer» from the right list and then «OK» to enable the Developer tab.
Step 3
Click wherever in the document you want the drop-down list to appear.
Step 4
Click the «Developer» tab and then the «Drop-Down List Content Control» button from the Controls group. This button looks like a list with scroll arrows on the right side.
Step 5
Click the «Control Properties» button from the Controls group. This button looks like a hand pointing to a list.
Step 6
Click «Choose an Item» from the Drop-Down List Properties section and then «Modify» if you want to change the default display name. This display name should provide instructions, such as «Choose a Job Position,» rather than providing an actual choice.
Step 7
Click «Add,» type a descriptive first choice and press «Enter» to add the choice. Repeat for each choice you want to add.
Step 8
Click a choice and then «Move Up» or «Move Down» if you need to change its position in the list.
Step 9
Click «OK» to complete the drop-down box.
References
Writer Bio
C. Taylor embarked on a professional writing career in 2009 and frequently writes about technology, science, business, finance, martial arts and the great outdoors. He writes for both online and offline publications, including the Journal of Asian Martial Arts, Samsung, Radio Shack, Motley Fool, Chron, Synonym and more. He received a Master of Science degree in wildlife biology from Clemson University and a Bachelor of Arts in biological sciences at College of Charleston. He also holds minors in statistics, physics and visual arts.
Image Credit
Stockbyte/Stockbyte/Getty Images

To add a drop-down list to a Word document, go to Options > Customize Ribbon and enable the Developer tab. Open the Developer tab and click the «Drop-Down List Content Control» button to insert a drop-down button. You can customize the drop-down box by clicking «Properties.»
A drop-down list in a Microsoft Word document lets people select from a predefined items list. Adding this drop-down list is fairly easy, and we’ll show you how to do it.
First, Enable the Developer Menu
The option to add a drop-down list is located in Word’s Developer menu. This menu is hidden by default, so you’ll have to enable it before you can add a list.
Start by opening Word on your Windows or Mac computer. At the lower left of the window, select “Options.” If you already have a document open, select the File menu to reveal the “Options” command.

In the “Word Options” window that opens, on the left sidebar, select “Customize Ribbon.”
In the “Customize Ribbon” pane on the right side of the screen, scroll down the list and enable the “Developer” option.
Click “OK” at the bottom of the window to close it.
After adding the Developer menu, you’re now ready to add a drop-down list to your Word document. To start, either open an existing Word document or create a new document.
RELATED: How to Create a Fillable Form With Microsoft Word
In your document, place your insertion point where you want to add the drop-down list.
Next, select the “Developer” menu.
On the “Developer” menu, in the “Controls” group, click the “Drop-Down List Content Control” icon (It looks like an actual drop-down icon.).
You now have a drop-down list in your document.
Configure Your New Drop-Down List
This drop-down list is not configured and is currently empty. To configure it and add items to it, click the drop-down list to select it. Return to the Developer menu and, in the “Controls” group, click “Properties.”
Word will open the “Content Control Properties” window. Start by entering a title for your list. This will appear at the top of your drop-down list.
Note: Note: Word automatically fills in the “Tag” field to match the Title field. The tag for a content control object is used mostly by other programs to identify content control data in a document’s XML structure. So, unless you’re building some document automation and specifically need to set the tag, just ignore it.
Use the “Color” option to select a color scheme for your drop-down list.
If you want to prevent people from editing your drop-down list, activate the “Content control cannot be deleted” option. Note, though, that unless you lock your document, anyone can go and disable this option.
You’ll now add items to your drop-down list. To add your first item, under the “Drop-Down List Properties” section on the current window, click the “Add” button.
On the “Add Choice” window, type a new item name into the “Display Name” field. The “Value” field automatically fills itself with the data from the first field, so you don’t have to worry about it.
Then, click “OK” to add your item. Repeat this process for each item that you want to add to your drop-down list.
After you have some items added, you can change their order. To change an item’s position in the list, select that item, and then click either “Move Up” or “Move Down” on the right.
Finally, click “OK” to save your changes.
Your drop-down list will now display your added items. Click it to test it for yourself.
Delete a Drop-Down List from Microsoft Word
To remove this drop-down list from your document, select the list. Then, from the “Controls” section at the top, click “Properties.” Disable the “Content control cannot be deleted” option, and then click “OK” at the bottom.
Right-click the drop-down list in your document and select “Remove Content Control.” The list will now be removed.
And that’s how you give people predefined options to select from in your Word documents!
Did you know that you can add checkboxes to your Word documents, too? This is yet another way to let people select items in your documents.
RELATED: How to Add Check Boxes to Word Documents
READ NEXT
- › How to Create a Fillable Form With Microsoft Word
- › How to Create and Customize a Drop-Down List in Google Docs
- › How to Create a Basic Survey in Microsoft Word
- › This New Google TV Streaming Device Costs Just $20
- › BLUETTI Slashed Hundreds off Its Best Power Stations for Easter Sale
- › HoloLens Now Has Windows 11 and Incredible 3D Ink Features
- › How to Adjust and Change Discord Fonts
- › Google Chrome Is Getting Faster