

Spreadsheet_Excel_Writer
This package is Spreadsheet_Excel_Writer and has been migrated from svn.php.net.
Please report all new issues via the PEAR bug tracker.
If this package is marked as unmaintained and you have fixes, please submit your pull requests and start discussion on the pear-qa mailing list.
Installation
Pear
To test, run
To build, simply
To install from scratch
$ pear install package.xml
To upgrade
$ pear upgrade -f package.xml
Composer
This package comes with support for Composer.
To install from Composer
$ composer require pear/spreadsheet_excel_writer
To install the latest development version
$ composer require pear/spreadsheet_excel_writer:dev-master
Features
- writing Excel (.XLS) spreadsheets
- support: strings (with formatting for text and cells), formulas, images (BMP)
Limitations
Library support only 2 types of format for writing XLS, also known as Binary Interchange File Format (BIFF):
- BIFF5 (Excel 5.0 — Excel 95)
- BIFF8 (Excel 98 — Excel 2003)
Some important limitations:
| Limit | BIFF5 | BIFF8 |
|---|---|---|
| Maximum number of rows | 16384 | 65535 |
| Maximum number of columns | 255 | 255 |
| Maximum data size of a record | 2080 bytes | 8224 bytes |
| Unicode support | CodePage based character encoding | UTF-16LE |
Explanation of formats and specifications you can find here (section «Useful references»)
Correct output only guaranteed with mbstring.func_overload = 0 otherwise, you should use workround mb_internal_encoding('latin1');
Usage
Basic usage
use Spreadsheet_Excel_Writer;


$filePath = __DIR__ . '/output/out.xls';
$xls = new Spreadsheet_Excel_Writer($filePath);

// 8 = BIFF8
$xls->setVersion(8);

$sheet = $xls->addWorksheet('info');

// only available with BIFF8
$sheet->setInputEncoding('UTF-8');

$headers = [
    'id',
    'name',
    'email',
    'code',
    'address'
];

$row = $col = 0;
foreach ($headers as $header) {
    $sheet->write($row, $col, $header);
    $col++;
}

for ($id = 1; $id < 100; $id++) {
    $data = [
        'id' => $id,
        'name' => 'Name Surname',
        'email' => 'mail@gmail.com',
        'password' => 'cfcd208495d565ef66e7dff9f98764da',
        'address' => '00000 North Tantau Avenue. Cupertino, CA 12345. (000) 1234567'
    ];
    $sheet->writeRow($id, 0, $data);
}

$xls->close();
Format usage
$xls = new Spreadsheet_Excel_Writer();

$titleFormat = $xls->addFormat();
$titleFormat->setFontFamily('Helvetica');
$titleFormat->setBold();
$titleFormat->setSize(10);
$titleFormat->setColor('orange');
$titleFormat->setBorder(1);
$titleFormat->setBottom(2);
$titleFormat->setBottomColor(44);
$titleFormat->setAlign('center');

$sheet = $xls->addWorksheet('info');

$sheet->write(0, 0, 'Text 123', $titleFormat);
Header usage (Sending HTTP header for download dialog)
$xls = new Spreadsheet_Excel_Writer();
$xls->send('excel_'.date("Y-m-d__H:i:s").'.xls');
Performance
Platform:
Intel(R) Core(TM) i5-4670 CPU @ 3.40GHz
PHP 7.4
Test case:
Write xls (BIFF8 format, UTF-8), by 5 cells (1x number, 4x string without format/styles, average line length = 120 char) in each row
Estimated performance:
| Number of rows | Time (seconds) | Peak memory usage (MB) |
|---|---|---|
| 10000 | 0.2 | 4 |
| 20000 | 0.4 | 4 |
| 30000 | 0.6 | 6 |
| 40000 | 0.8 | 6 |
| 50000 | 1.0 | 8 |
| 65534 | 1.2 | 8 |
Alternative solutions
- PHPOffice/PhpSpreadsheet
File formats supported: https://phpspreadsheet.readthedocs.io/en/latest/ - box/spout
File formats supported: https://opensource.box.com/spout/
PHP | Spreadsheet_Excel_Writer | Introduction
Improve Article
Save Article
Like Article
Improve Article
Save Article
Like Article
Introduction: Spreadsheet_Excel_Writer is a library written in PHP which helps to read from and write to different types of spreadsheet file formats with the help of given set of classes.
Advantages:
- Easy and effective comparisons.
- Powerful analysis of large amounts of data.
- Splitting out large (or not so large) amounts of information in the form of a spreadsheet, which is easy to manipulate with a fairly ubiquitous spreadsheet program such as Excel (or OpenOffice).
Installation (Composer):
composer require pear/spreadsheet_excel_writer
Usage:
<?php
$workbook = new Spreadsheet_Excel_Writer();
$workbook->send('gfg1.xls');
$worksheet =& $workbook->addWorksheet('1st Worksheet');
$worksheet->write(0, 0, 'Website');
$worksheet->write(0, 1, 'Address');
$worksheet->write(1, 0, 'GeeksforGeeks');
$workbook->close();
?>
Output: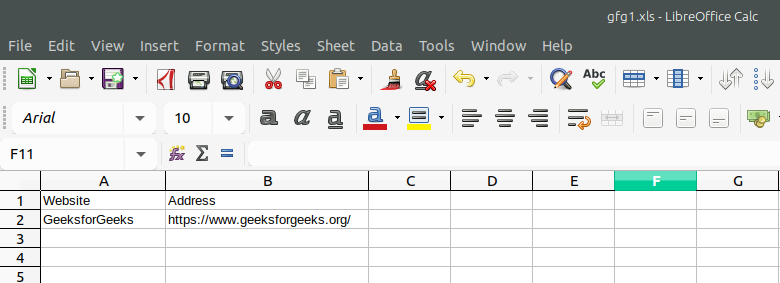
Reference: https://pear.php.net/manual/en/package.fileformats.spreadsheet-excel-writer.intro.php
Like Article
Save Article
Top Level :: File Formats
Package Information: Spreadsheet_Excel_Writer
| » Summary | » License |
|---|---|
| Package for generating Excel spreadsheets | LGPL |
| » Current Release | » Bug Summary |
0.9.4 (beta) was released on 2017-05-24 by sanmai (Changelog)
Easy InstallNot sure? Get more info. pear install Spreadsheet_Excel_Writer Pyrus InstallTry PEAR2’s installer, Pyrus. php pyrus.phar install pear/Spreadsheet_Excel_Writer |
Report a new bug to Spreadsheet_Excel_Writer |
| » Description | |
| Spreadsheet_Excel_Writer was born as a porting of the Spreadsheet::WriteExcel Perl module to PHP. It allows writing of Excel spreadsheets without the need for COM objects. It supports formulas, images (BMP) and all kinds of formatting for text and cells. It currently supports the BIFF5 format (Excel 5.0), so functionality appeared in the latest Excel versions is not yet available. |
|
| » Maintainers | » More Information |
|
|
Dependencies for Spreadsheet_Excel_Writer
- PHP 5.3.3
- PEAR Installer 1.4.0b1
- OLE 1.0.0RC2
К сожалению разработчики прекратили поддержку и разработку проекта, но PHPExcel все равно остается популярной библиотекой которая выполняет свои задачи, последняя версия нормально работает на PHP 7.
Проект на GitHub.
1
Создание документа
require_once __DIR__ . '/PHPExcel-1.8/Classes/PHPExcel.php';
require_once __DIR__ . '/PHPExcel-1.8/Classes/PHPExcel/Writer/Excel2007.php';

$xls = new PHPExcel();
PHP
Если нужно открыть существующий файл:
require_once __DIR__ . '/PHPExcel-1.8/Classes/PHPExcel.php';
require_once __DIR__ . '/PHPExcel-1.8/Classes/PHPExcel/Writer/Excel2007.php';
require_once __DIR__ . '/PHPExcel-1.8/Classes/PHPExcel/IOFactory.php';

$xls = PHPExcel_IOFactory::load(__DIR__ . '/file.xlsx');
PHP
Установка сводки документа:
$xls->getProperties()->setTitle("Название");
$xls->getProperties()->setSubject("Тема");
$xls->getProperties()->setCreator("Автор");
$xls->getProperties()->setManager("Руководитель");
$xls->getProperties()->setCompany("Организация");
$xls->getProperties()->setCategory("Группа");
$xls->getProperties()->setKeywords("Ключевые слова");
$xls->getProperties()->setDescription("Примечания");
$xls->getProperties()->setLastModifiedBy("Автор изменений");
$xls->getProperties()->setCreated("25.03.2019");
PHP
Защита книги паролем:
$xls->getActiveSheet()->getProtection()->setSheet(true);
$xls->getActiveSheet()->getProtection()->setSort(true);
$xls->getActiveSheet()->getProtection()->setInsertRows(true);
$xls->getActiveSheet()->getProtection()->setFormatCells(true);
$xls->getActiveSheet()->getProtection()->setPassword('123456');
PHP
Создаем новый лист, далее работаем с ним через переменную $sheet.
$xls->setActiveSheetIndex(0);
$sheet = $xls->getActiveSheet();
$sheet->setTitle('Название листа');
PHP
Параметры печати
// Формат
$sheet->getPageSetup()->SetPaperSize(PHPExcel_Worksheet_PageSetup::PAPERSIZE_A4);

// Ориентация
// ORIENTATION_PORTRAIT — книжная
// ORIENTATION_LANDSCAPE — альбомная
$sheet->getPageSetup()->setOrientation(PHPExcel_Worksheet_PageSetup::ORIENTATION_PORTRAIT);

// Поля
$sheet->getPageMargins()->setTop(1);
$sheet->getPageMargins()->setRight(0.75);
$sheet->getPageMargins()->setLeft(0.75);
$sheet->getPageMargins()->setBottom(1);

// Верхний колонтитул
$sheet->getHeaderFooter()->setOddHeader("Название листа");

// Нижний колонтитул
$sheet->getHeaderFooter()->setOddFooter('&L&B Название листа &R Страница &P из &N');
PHP
Запись в ячейку и ее формат
$sheet->setCellValue("A1", "Значение");PHP
Формат ячеек определяется автоматически, иногда это вызывает проблемы. Например, значения 1., 10.0, 0.1 выведутся как 1, 10, 0,1. Чтобы это исправить нужно использовать метод setCellValueExplicit() в место setCellValue().
$sheet->setCellValueExplicit("A1", '1.', PHPExcel_Cell_DataType::TYPE_STRING);
$sheet->setCellValueExplicit("A2", '10.0', PHPExcel_Cell_DataType::TYPE_STRING);
$sheet->setCellValueExplicit("A3", '0.1', PHPExcel_Cell_DataType::TYPE_STRING);
PHP
2
Размеры ячеек
Ширина столбцов
// Ширина столбца A
$sheet->getColumnDimension("A")->setWidth(100);

// Авто ширина колонки по содержимому
$sheet->getColumnDimensionByColumn("A")->setAutoSize(true);
PHP
Высота строк
// Высота 1-й строки
$sheet->getRowDimension("1")->setRowHeight(50);
PHP
Вставленный в ячейку длинный текст будет выходить за ее пределы, переносы rn работать не будут.
$sheet->setCellValue("A1", "Excel — программа rn для работы с электронными таблицами");PHP

Метод setWrapText(true) включает переносы строк и авто высоту.
$sheet->setCellValue("A1", "Excel — программа rn для работы с электронными таблицами");
$sheet->getStyle("A1")->getAlignment()->setWrapText(true);
PHP
.png)
3
Объединение ячеек
// Объединение ячеек в колонке
$sheet->mergeCells("A1:A6");
$sheet->setCellValue("A1", "A1:A6");

// Объединение ячеек в строке
$sheet->mergeCells("C2:I2");
$sheet->setCellValue("C2", "C2:I2");

// Объединение ячеек по диапазону
$sheet->mergeCells("C4:I6");
$sheet->setCellValue("C4", "C4:I6");
PHP
.png)
4
Стили текста
// Шрифт Times New Roman
$sheet->getStyle('A1')->getFont()->setName('Times New Roman');

// Размер шрифта 18
$sheet->getStyle("A2")->getFont()->setSize(18);

// Цвет шрифта
$sheet->getStyle("A3")->getFont()->getColor()->setRGB('ff0000');

// Жирный
$sheet->getStyle("A4")->getFont()->setBold(true);

// Курсив
$sheet->getStyle("A5")->getFont()->setItalic(true);

// Подчеркнутый текст
$sheet->getStyle("A6")->getFont()->setUnderline(true);

// Зачеркнутый текст
$sheet->getStyle("A7")->getFont()->setStrikethrough(true);
PHP

Также можно задать сразу несколько стилей для ячейки, массивом:
$style = array(
	'font' => array(
		'name'      => 'Times New Roman',
		'size'      => 18,
		'color'     => array('rgb' => 'FF0000'),
		'bold'      => true,
		'italic'    => true,
		'underline' => true,
		'strike'    => true,
	)
);

$sheet->getStyle('A1')->applyFromArray($style);
PHP
Установить стили шрифта для всего документа:
$sheet->getDefaultStyle()->getFont()->setName('Times New Roman');
$sheet->getDefaultStyle()->getFont()->setSize(18);
PHP
Или:
$style = array(
	'font' => array(
		'name' => 'Times New Roman',
		'size' => 18,
	)
);

$sheet->getDefaultStyle()->applyFromArray($style);
PHP
5
Выравнивание в ячейке
По горизонтали:
// По левому краю
$sheet->getStyle("A1")->getAlignment()->setHorizontal(PHPExcel_Style_Alignment::HORIZONTAL_LEFT);

// По центру
$sheet->getStyle("A1")->getAlignment()->setHorizontal(PHPExcel_Style_Alignment::HORIZONTAL_CENTER);

// По правому краю
$sheet->getStyle("A1")->getAlignment()->setHorizontal(PHPExcel_Style_Alignment::HORIZONTAL_RIGHT);
PHP
По вертикали:
// Сверху
$sheet->getStyle("A1")->getAlignment()->setVertical(PHPExcel_Style_Alignment::VERTICAL_TOP);

// По центру
$sheet->getStyle("A1")->getAlignment()->setVertical(PHPExcel_Style_Alignment::VERTICAL_CENTER);

// Снизу
$sheet->getStyle("A1")->getAlignment()->setVertical(PHPExcel_Style_Alignment::VERTICAL_BOTTOM);
PHP
6
Фон ячейки
Стили фона устанавливаются массивом значений, type – определяет стиль заливки, далее в зависимости от выбранного стиля задаются его настройки в параметрах color, startcolor, endcolor, rotation.
PHPExcel_Style_Fill::FILL_SOLID
$bg = array(
	'fill' => array(
		'type' => PHPExcel_Style_Fill::FILL_SOLID,
		'color' => array('rgb' => '01B050')
	)
);
$sheet->getStyle("B2")->applyFromArray($bg);
PHP

PHPExcel_Style_Fill::FILL_GRADIENT_LINEAR
$bg = array(
	'fill' => array(
		'type' => PHPExcel_Style_Fill::FILL_GRADIENT_LINEAR,
		'startcolor' => array('rgb' => '01B050'),
		'endcolor' => array('rgb' => 'f1ee3b'),
		'rotation' => 90
	)
);
$sheet->getStyle("B2")->applyFromArray($bg);
PHP

PHPExcel_Style_Fill::FILL_GRADIENT_PATH
$bg = array(
	'fill' => array(
		'type' => PHPExcel_Style_Fill::FILL_GRADIENT_PATH,
		'startcolor' => array('rgb' => '01B050'),
		'endcolor' => array('rgb' => 'f1ee3b'),
	)
);
$sheet->getStyle("B2")->applyFromArray($bg);
PHP

PHPExcel_Style_Fill::FILL_PATTERN_DARKDOWN
$bg = array(
	'fill' => array(
		'type' => PHPExcel_Style_Fill::FILL_PATTERN_DARKDOWN,
		'startcolor' => array('rgb' => '01B050'),
		'endcolor' => array('rgb' => 'f1ee3b'),
	)
);
$sheet->getStyle("B2")->applyFromArray($bg);
PHP

PHPExcel_Style_Fill::FILL_PATTERN_DARKGRAY
$bg = array(
	'fill' => array(
		'type' => PHPExcel_Style_Fill::FILL_PATTERN_DARKGRAY,
		'startcolor' => array('rgb' => '01B050'),
		'endcolor' => array('rgb' => 'f1ee3b'),
	)
);
$sheet->getStyle("B2")->applyFromArray($bg);
PHP

PHPExcel_Style_Fill::FILL_PATTERN_DARKGRID
$bg = array(
	'fill' => array(
		'type' => PHPExcel_Style_Fill::FILL_PATTERN_DARKGRID,
		'startcolor' => array('rgb' => '01B050'),
		'endcolor' => array('rgb' => 'f1ee3b'),
	)
);
$sheet->getStyle("B2")->applyFromArray($bg);
PHP

PHPExcel_Style_Fill::FILL_PATTERN_DARKHORIZONTAL
$bg = array(
	'fill' => array(
		'type' => PHPExcel_Style_Fill::FILL_PATTERN_DARKHORIZONTAL,
		'startcolor' => array('rgb' => '01B050'),
		'endcolor' => array('rgb' => 'f1ee3b'),
	)
);
$sheet->getStyle("B2")->applyFromArray($bg);
PHP

PHPExcel_Style_Fill::FILL_PATTERN_DARKTRELLIS
$bg = array(
	'fill' => array(
		'type' => PHPExcel_Style_Fill::FILL_PATTERN_DARKTRELLIS,
		'startcolor' => array('rgb' => '01B050'),
		'endcolor' => array('rgb' => 'f1ee3b'),
	)
);
$sheet->getStyle("B2")->applyFromArray($bg);
PHP

PHPExcel_Style_Fill::FILL_PATTERN_DARKUP
$bg = array(
	'fill' => array(
		'type' => PHPExcel_Style_Fill::FILL_PATTERN_DARKUP,
		'startcolor' => array('rgb' => '01B050'),
		'endcolor' => array('rgb' => 'f1ee3b'),
	)
);
$sheet->getStyle("B2")->applyFromArray($bg);
PHP

PHPExcel_Style_Fill::FILL_PATTERN_DARKVERTICAL
$bg = array(
	'fill' => array(
		'type' => PHPExcel_Style_Fill::FILL_PATTERN_DARKVERTICAL,
		'startcolor' => array('rgb' => '01B050'),
		'endcolor' => array('rgb' => 'f1ee3b'),
	)
);
$sheet->getStyle("B2")->applyFromArray($bg);
PHP

PHPExcel_Style_Fill::FILL_PATTERN_GRAY0625
$bg = array(
	'fill' => array(
		'type' => PHPExcel_Style_Fill::FILL_PATTERN_GRAY0625,
		'startcolor' => array('rgb' => '01B050'),
		'endcolor' => array('rgb' => 'f1ee3b'),
	)
);
$sheet->getStyle("B2")->applyFromArray($bg);
PHP

PHPExcel_Style_Fill::FILL_PATTERN_GRAY125
$bg = array(
	'fill' => array(
		'type' => PHPExcel_Style_Fill::FILL_PATTERN_GRAY125,
		'startcolor' => array('rgb' => '01B050'),
		'endcolor' => array('rgb' => 'f1ee3b'),
	)
);
$sheet->getStyle("B2")->applyFromArray($bg);
PHP

PHPExcel_Style_Fill::FILL_PATTERN_LIGHTDOWN
$bg = array(
	'fill' => array(
		'type' => PHPExcel_Style_Fill::FILL_PATTERN_LIGHTDOWN,
		'startcolor' => array('rgb' => '01B050'),
		'endcolor' => array('rgb' => 'f1ee3b'),
	)
);
$sheet->getStyle("B2")->applyFromArray($bg);
PHP

PHPExcel_Style_Fill::FILL_PATTERN_LIGHTGRAY
$bg = array(
	'fill' => array(
		'type' => PHPExcel_Style_Fill::FILL_PATTERN_LIGHTGRAY,
		'startcolor' => array('rgb' => '01B050'),
		'endcolor' => array('rgb' => 'f1ee3b'),
	)
);
$sheet->getStyle("B2")->applyFromArray($bg);
PHP

PHPExcel_Style_Fill::FILL_PATTERN_LIGHTGRID
$bg = array(
	'fill' => array(
		'type' => PHPExcel_Style_Fill::FILL_PATTERN_LIGHTGRID,
		'startcolor' => array('rgb' => '01B050'),
		'endcolor' => array('rgb' => 'f1ee3b'),
	)
);
$sheet->getStyle("B2")->applyFromArray($bg);
PHP

PHPExcel_Style_Fill::FILL_PATTERN_LIGHTHORIZONTAL
$bg = array(
	'fill' => array(
		'type' => PHPExcel_Style_Fill::FILL_PATTERN_LIGHTHORIZONTAL,
		'startcolor' => array('rgb' => '01B050'),
		'endcolor' => array('rgb' => 'f1ee3b'),
	)
);
$sheet->getStyle("B2")->applyFromArray($bg);
PHP

PHPExcel_Style_Fill::FILL_PATTERN_LIGHTTRELLIS
$bg = array(
	'fill' => array(
		'type' => PHPExcel_Style_Fill::FILL_PATTERN_LIGHTTRELLIS,
		'startcolor' => array('rgb' => '01B050'),
		'endcolor' => array('rgb' => 'f1ee3b'),
	)
);
$sheet->getStyle("B2")->applyFromArray($bg);
PHP

PHPExcel_Style_Fill::FILL_PATTERN_LIGHTUP
$bg = array(
	'fill' => array(
		'type' => PHPExcel_Style_Fill::FILL_PATTERN_LIGHTUP,
		'startcolor' => array('rgb' => '01B050'),
		'endcolor' => array('rgb' => 'f1ee3b'),
	)
);
$sheet->getStyle("B2")->applyFromArray($bg);
PHP

PHPExcel_Style_Fill::FILL_PATTERN_LIGHTVERTICAL
$bg = array(
	'fill' => array(
		'type' => PHPExcel_Style_Fill::FILL_PATTERN_LIGHTVERTICAL,
		'startcolor' => array('rgb' => '01B050'),
		'endcolor' => array('rgb' => 'f1ee3b'),
	)
);
$sheet->getStyle("B2")->applyFromArray($bg);
PHP

PHPExcel_Style_Fill::FILL_PATTERN_MEDIUMGRAY
$bg = array(
	'fill' => array(
		'type' => PHPExcel_Style_Fill::FILL_PATTERN_MEDIUMGRAY,
		'startcolor' => array('rgb' => '01B050'),
		'endcolor' => array('rgb' => 'f1ee3b'),
	)
);
$sheet->getStyle("B2")->applyFromArray($bg);
PHP

7
Границы
Стили линий задаются костантами:
| Вид | Константа |
|---|---|
| PHPExcel_Style_Border::BORDER_NONE | |
 |
PHPExcel_Style_Border::BORDER_THIN |
 |
PHPExcel_Style_Border::BORDER_MEDIUM |
 |
PHPExcel_Style_Border::BORDER_THICK |
 |
PHPExcel_Style_Border::BORDER_DOUBLE |
 |
PHPExcel_Style_Border::BORDER_HAIR |
 |
PHPExcel_Style_Border::BORDER_DOTTED |
 |
PHPExcel_Style_Border::BORDER_DASHED |
 |
PHPExcel_Style_Border::BORDER_DASHDOT |
 |
PHPExcel_Style_Border::BORDER_DASHDOTDOT |
 |
PHPExcel_Style_Border::BORDER_MEDIUMDASHDOT |
 |
PHPExcel_Style_Border::BORDER_MEDIUMDASHDOTDOT |
 |
PHPExcel_Style_Border::BORDER_MEDIUMDASHED |
 |
PHPExcel_Style_Border::BORDER_SLANTDASHDOT |
Внешняя рамка у ячеек
$border = array(
	'borders'=>array(
		'outline' => array(
			'style' => PHPExcel_Style_Border::BORDER_THIN,
			'color' => array('rgb' => '000000')
		),
	)
);

$sheet->getStyle("B2:J5")->applyFromArray($border);
PHP

Внутриния рамка у ячеек
$border = array(
	'borders'=>array(
		'inside' => array(
			'style' => PHPExcel_Style_Border::BORDER_THIN,
			'color' => array('rgb' => '000000')
		),
	)
);

$sheet->getStyle("B2:J5")->applyFromArray($border);
PHP

Таблица
$border = array(
	'borders'=>array(
		'allborders' => array(
			'style' => PHPExcel_Style_Border::BORDER_THIN,
			'color' => array('rgb' => '000000')
		)
	)
);

$sheet->getStyle("B2:J5")->applyFromArray($border);
PHP

Таблица с жирной рамкой
$border = array(
	'borders'=>array(
		'outline' => array(
			'style' => PHPExcel_Style_Border::BORDER_THICK,
			'color' => array('rgb' => '000000')
		),
		'allborders' => array(
			'style' => PHPExcel_Style_Border::BORDER_THIN,
			'color' => array('rgb' => '000000')
		)
	)
);

$sheet->getStyle("B2:J5")->applyFromArray($border);
PHP

Отдельные линии
            case '':
			case 'bottom':
			case 'diagonal':
			case 'horizontal':
			case '':
			case 'left':
			case '':
			case 'right':
			case 'top':
			case 'vertical':
Сверху:
$border = array(
	'borders'=>array(
		'top' => array(
			'style' => PHPExcel_Style_Border::BORDER_THIN,
			'color' => array('rgb' => '000000')
		)
	)
);
$sheet->getStyle("B2")->applyFromArray($border);
PHP
Снизу:
$border = array(
	'borders'=>array(
		'bottom' => array(
			'style' => PHPExcel_Style_Border::BORDER_THIN,
			'color' => array('rgb' => '000000')
		)
	)
);
$sheet->getStyle("B4")->applyFromArray($border);
PHP
Слева:
$border = array(
	'borders'=>array(
		'left' => array(
			'style' => PHPExcel_Style_Border::BORDER_THIN,
			'color' => array('rgb' => '000000')
		)
	)
);
$sheet->getStyle("B6")->applyFromArray($border);
PHP
Справа:
$border = array(
	'borders'=>array(
		'right' => array(
			'style' => PHPExcel_Style_Border::BORDER_THIN,
			'color' => array('rgb' => '000000')
		)
	)
);
$sheet->getStyle("B8")->applyFromArray($border);
PHP

8
Изображения
$objDrawing = new PHPExcel_Worksheet_Drawing();
$objDrawing->setResizeProportional(false);
$objDrawing->setName('Название картинки');
$objDrawing->setDescription('Описание картинки');
$objDrawing->setPath(__DIR__ . '/logo.png');
$objDrawing->setCoordinates('B2');
$objDrawing->setOffsetX(10);
$objDrawing->setOffsetY(10);
$objDrawing->setWidth(163);
$objDrawing->setHeight(50);
$objDrawing->setWorksheet($sheet);
PHP

9
$sheet->setCellValue("A1", "Ссылка на example.com");
$sheet->getCell("A1")->getHyperlink()->setUrl("http://example.com");
$sheet->getCell("A1")->getHyperlink()->setTooltip('Подсказка');

// У текста нужно сделать синий цвет и подчеркивание
$sheet->getStyle("A1")->applyFromArray(
	array(
		'font' => array(
			'color' => array(
				'rgb' => '0000FF'
			),
			'underline' => 'single'
		)
	)
);
PHP

10
Формулы
Русские названия функций не поддерживаются, придется использовать латинские аналоги.
$sheet->setCellValue("A3", "=SUM(A1:A2)");PHP
| СУММ | SUM | Cуммирование значений в ячейках |
| ЕСЛИ | IF | Условие |
| ПРОСМОТР | LOOKUP | Поиск по значению |
| ВПР | VLOOKUP | Поиск значения по диапазону |
| ПОИСКПОЗ | MATCH | Поиск положенияв диапазоне ячеек |
| ВЫБОР | CHOOSE | Выбор одного значения из списка |
| ДАТА | DATE | Возвращает порядковый номер определенной даты |
| ДНИ | DAYS | Возвращает число дней между двумя датами |
| НАЙТИ, НАЙТИБ | FIND, FINDB | Поиск вхождения одной строки в другую |
| ИНДЕКС | INDEX | Возвращает значение или ссылку на него из таблицы или диапазона |
11
Сохранение
XLSX
Отдача на скачивание:
header("Expires: Mon, 1 Apr 1974 05:00:00 GMT");
header("Last-Modified: " . gmdate("D,d M YH:i:s") . " GMT");
header("Cache-Control: no-cache, must-revalidate");
header("Pragma: no-cache");
header("Content-type: application/vnd.openxmlformats-officedocument.spreadsheetml.sheet");
header("Content-Disposition: attachment; filename=file.xlsx");

$objWriter = new PHPExcel_Writer_Excel2007($xls);
$objWriter->save('php://output');
exit();
PHP
Если возникает ошибка – «Uncaught exception 'PHPExcel_Writer_Exception' with message 'Could not close zip file php://output.'», то следует сделать скачивание через временный файл:
header("Expires: Mon, 1 Apr 1974 05:00:00 GMT");
header("Last-Modified: " . gmdate("D,d M YH:i:s") . " GMT");
header("Cache-Control: no-cache, must-revalidate");
header("Pragma: no-cache");
header("Content-type: application/vnd.openxmlformats-officedocument.spreadsheetml.sheet");
header("Content-Disposition: attachment; filename=file.xlsx");

$file_path = __DIR__ . "/xlsx.tmp";
$objWriter = new PHPExcel_Writer_Excel2007($xls);
$objWriter->save($file_path);
readfile($file_path);
unlink($file_path);
exit();
PHP
Сохранение в файл:
$objWriter = new PHPExcel_Writer_Excel2007($xls);
$objWriter->save(__DIR__ . '/file.xlsx');
PHP
XLS (Excel 97-2004)
Отдача на скачивание:
header("Expires: Mon, 1 Apr 1974 05:00:00 GMT");
header("Last-Modified: " . gmdate("D,d M YH:i:s") . " GMT");
header("Cache-Control: no-cache, must-revalidate");
header("Pragma: no-cache");
header("Content-type: application/vnd.ms-excel");
header("Content-Disposition: attachment; filename=file.xls");

$objWriter = new PHPExcel_Writer_Excel5($xls);
$objWriter->save('php://output');
exit();
PHP
Сохранение в файл:
$objWriter = new PHPExcel_Writer_Excel5($xls);
$objWriter->save(__DIR__ . '/file.xls');
PHP
In the last article Getting Started with PEAR, you got the PEAR Package Manager up and running. Now, it’s time to put PEAR to good use with PEAR::Spreadsheet_Excel_Writer, a library for generating Excel spreadsheets.
Here’s what we’ll cover today:
- Introducing PEAR::Spreadsheet_Excel_Writer
- Finding your way around: introducing the API
- Adding Cell Formatting: eye candy matters
- Adding Excel Functions: C1 + D1 = 2!
Be aware that I’m assuming you have a rudimentary knowledge of Excel, but nothing too serious. You don’t even have to own a copy — all the examples here work equally well with OpenOffice Calc.
Introducing PEAR::Spreadsheet_Excel_Writer
Let’s face it — although you and I may be preoccupied with XML markup, tabbed browsing, editors like Emacs and VI, and minimizing the use of system resources, the rest of the computer-using world is happily chugging away with the likes of Microsoft Office. And although they may be moderately impressed by the amazing things you can do with an HTML table, when it comes to dealing with numbers, Excel is pretty much a standard.
More to the point, Excel is widely used by those dealing with finance and money. In other words, the Accounts department that’s failed to pay your bill on time is probably using it. Make the accountants’ lives easier, and they might return the favour…
Wouldn’t it be great if you could provide your customers access to downloadable numerical data in the form of an Excel spreadsheet? The good news is that you can, with PEAR::Spreadsheet_Excel_Writer.
«Impossible!» you cry. «Excel uses some proprietary Microsoft file format. This can’t be done!»
Yes, it can. Spreadsheet_Excel_Writer generates the «real thing», complete with Excel functions, formatting and all. No, we’re not talking generating comma separated files here, or using the COM extension (or any other extension, for that matter). This is written in pure PHP and will work just as well from a UNIX-based Web server as it does from a Windows-based server — and there’s no need to bug your hosting provider. In short, PEAR::Spreadsheet_Excel_Writer, with additional magic from PEAR::OLE, «understands» Microsofts Excel file formats.
Let’s take a moment to tip our hats to Xavier Noguer, who’s done an amazing job in bringing all this to PHP, with help from Mika Tuupola for Spreadsheet_Excel_Writer.
Now, without further ado, and armed with full knowledge of PEAR’s package manager, which you installed successfully last month (right?), let’s start by downloading the libraries. Open up your command prompt and type:
$ pear install OLE

$ pear install Spreadsheet_Excel_Writer
That’s it. We’re ready for action!
Important Note! I used PEAR::OLE version 0.5 and PEAR::Spreadsheet_Excel_Writer version 0.7 for the examples in this article. Be warned that things may change with future releases.
Finding your Way Around
To kick things off, let’s generate a very simple spreadsheet.
<?php

// Include PEAR::Spreadsheet_Excel_Writer

require_once "Spreadsheet/Excel/Writer.php";

// Create an instance

$xls =& new Spreadsheet_Excel_Writer();

// Send HTTP headers to tell the browser what's coming

$xls->send("test.xls");

// Add a worksheet to the file, returning an object to add data to

$sheet =& $xls->addWorksheet('Binary Count');

// Write some numbers

for ( $i=0;$i<11;$i++ ) {

  // Use PHP's decbin() function to convert integer to binary

  $sheet->write($i,0,decbin($i));

}

// Finish the spreadsheet, dumping it to the browser

$xls->close();

?>
Filename: example_1.php
Point your browser to the script and, assuming it knows about Excel (or OpenOffice Calc), up pops a spreadsheet, containing the numbers 0 to 10 as binary.
Storing Files
The spreadsheet is dynamically rendered in this case — nothing is stored on the server. If you want to generate a file instead, you can cut out the processing required to generate a sheet that hasn’t changed simply by passing the constructor a legal path and filename, and avoiding sending the HTTP headers, like so:
<?php
// Has a spreadsheet been created?
if ( !file_exists('sheets/binary.xls') ) {
// Include PEAR::Spreadsheet_Excel_Writer
require_once "Spreadsheet/Excel/Writer.php";
// Create an instance, passing the filename to create
$xls =& new Spreadsheet_Excel_Writer('sheets/binary.xls');
// Add a worksheet to the file, returning an object to add data to
$sheet =& $xls->addWorksheet('Binary Count');
// Write some numbers
for ( $i=0;$i<11;$i++ ) {
// Use PHP's decbin() function to convert integer to binary
$sheet->write($i,0,decbin($i));
}
// Finish the spreadsheet, dumping it to the browser
$xls->close();
}
?>
Your spreadsheet is ready for download here.
Filename: example_2.php
If you’re using a UNIX-based system, remember to modify the permissions of the directory in which you’re storing the spreadsheet, so PHP can write to it.
API Overview
OK, we’re done with the basics. To get the most out of PEAR::Spreadsheet_Excel_Writer, you need to know a little bit more about the API, though. The API documentation that is available on the PEAR Website is out of date right now (it’s grown a lot, it seems, since that version of the documentation was generated). Thankfully, the authors have, for the most part, added inline documentation to the code, so you can make your own API docs by downloading phpDocumentor and pointing it at a directory that contains all the
Spreadsheet_Excel_Writer source code. If you need help getting started with phpDocumentor (and will excuse the sales pitch), it’s discussed in Volume 2: Applications of The PHP Anthology.
The main class that you’ll always begin work with, Spreadsheet_Excel_Writer, represents the point of access to all other classes in the library. It provides two important factory methods (which are actually defined in the parent class Spreadsheet_Excel_Writer_Workbook:
addWorksheet()– returns an instance of Spreadsheet_Excel_Writer_Worksheet. A large part of the work is done with instances of this class (as above), allowing you to write to the cells of a single sheet (an Excel spreadsheet is a Workbook containing one or more Worksheets).addFormat()– returns an instance of Spreadsheet_Excel_Writer_Format, which is used to add the visual formatting of cells in a Worksheet.
The library contains three other classes of which you should be aware, although you may not find yourself having to work with them directly:
- Spreadsheet_Excel_Writer_Validator makes it possible to add cell validation rules. Right now, there’s basically no documentation for this class. It seems to be experimental code, so I’ll be avoiding it here. Basically, it appears to provide the ability to perform basic validation on data entered into an Excel cell by an end user. More complex rules, such as validating against a list of cells, can be implemented by extending the class. The Spreadsheet_Excel_Writer_Workbook class provides the method
addValidator()to create an instance of the validation while the Spreadsheet_Excel_Writer_Worksheet allows validators to be assigned to cells with thesetValidation()method. - Spreadsheet_Excel_Writer_Parser, which is a parser for Excel spreadsheet functions that allows you to check whether a function is valid Excel syntax. This may help you trap errors when adding functions to the spreadsheet within PHP.
- Finally, Spreadsheet_Excel_Writer_BIFFwriter is used to generate the Binary File Format for storing Excel files. If you’re interested in Excel hacking, it may be interesting to study what it’s doing but, otherwise, the library hides you from this class completely, so you don’t need to worry about it.
Zero Index Confusion
One method of note, which we saw in the above example, is the Spreadsheet_Excel_Writer_Worksheet::write() method, which you’ll be using a lot to add data to cells. It can be slightly confusing if you’re used to the way cells are addressed in Excel.
The first argument to write() is the row number. The first row number, at the top of the spreadsheet, is 0 (zero) in PEAR::Spreadsheet_Excel_Writer, not 1, as it is in Excel.
The second argument is the column number. Now, columns in Excel are identified with letters of the alphabet, not numbers, so you’ll just have to get used to translating between the two. The letter F is 6th in the alphabet, so the second argument is… 5 (of course!) — the leftmost column is 0 (zero) in PEAR::Spreadsheet_Excel_Writer, so you need to subtract one to get the column number.
The third argument to write() is the data to put into the cell; there’s an optional forth argument, used to apply visual formatting to the cell.
There are many more methods in the Spreadsheet_Excel_Writer_Worksheet class, such as for freezing and thawing parts of the sheet, and formatting the sheet, as a whole, for printing. I’ll touch on some of these in later examples but you’ll have to explore the majority for yourself.
Adding Cell Formatting
So, how about making the spreadsheet look pretty? We can accomplish this with PEAR::Spreadsheet_Excel_Writer using the addFormat() function to fetch an object of type Spreadsheet_Excel_Writer_Format. We apply the formatting to this object using the (large number of) methods it provides, then pass it the write() method of Spreadsheet_Excel_Writer_Worksheet to assign the formatting to a particular cell we’ve added.
For the sake of a «real world» example, let’s say I want to give users of my online shop, phpPetstore.com, the ability to download a «receipt» for the items they just bought as a Workbook containing a single Worksheet.
I begin my worksheet with the usual stuff:
<?php

require_once "Spreadsheet/Excel/Writer.php";

// Create workbook

$xls =& new Spreadsheet_Excel_Writer();

// Create worksheet

$cart =& $xls->addWorksheet('phpPetstore');
Next (blessed with the knowledge that I’ll only be using four columns), I’ll add a title to the sheet, merging some cells in which to place it. Here, you get your first taste of how formatting is done:
// Some text to use as a title for the worksheet
$titleText = 'phpPetstore: Receipt from ' . date('dS M Y');
// Create a format object
$titleFormat =& $xls->addFormat();
// Set the font family - Helvetica works for OpenOffice calc too...
$titleFormat->setFontFamily('Helvetica');
// Set the text to bold
$titleFormat->setBold();
// Set the text size
$titleFormat->setSize('13');
// Set the text color
$titleFormat->setColor('navy');
// Set the bottom border width to "thick"
$titleFormat->setBottom(2);
// Set the color of the bottom border
$titleFormat->setBottomColor('navy');
// Set the alignment to the special merge value
$titleFormat->setAlign('merge');
// Add the title to the top left cell of the worksheet,
// passing it the title string and the format object
$cart->write(0,0,$titleText,$titleFormat);
// Add three empty cells to merge with
$cart->write(0,1,'',$titleFormat);
$cart->write(0,2,'',$titleFormat);
$cart->write(0,3,'',$titleFormat);
// The row height
$cart->setRow(0,30);
// Set the column width for the first 4 columns
$cart->setColumn(0,3,15);
Notice first that I got the formatting object by calling addFormat() via the $xls object that represents the entire spreadsheet. I then apply some specific formatting to the object (method names like setBold() speak for themselves — see the API docs for a full list of formatting methods).
Once I’m done formatting, I call write() on the Worksheet object $cart to add to a cell, passing the formatting object as the forth argument.
One unusual thing I’ve done here is to merge four cells. By calling setAlign(‘merge’) on the formatting object (normally you’d use something like ‘left’, ‘right’ or ‘center’), I’ve told Spreadsheet_Excel_Writer that it should merge all cells that have this formatting applied to them. This is why I created three empty cells and applied the formatting to them.
Using setRow() allows me to modify the height of the row, making it bigger than the default Excel row height. This method has further optional formatting arguments that allow you, for example, to apply a format object to an entire row. Likewise, for setColumn(), I can set the column width and optionally apply further formatting. The difference is that setRow() applies to a single row only, while setColumn() is applied to a range of columns.
So far, so good. Now, I need some data to add to the sheet. To avoid complicating the example (by involving a database), I’ll use an indexed array of associative arrays, which we can pretend is the result of an SQL select:
$items = array (

  array( 'description'=>'Parrot'  ,'price'=>34.0,  'quantity'=>1),

  array( 'description'=>'Snake'  ,'price'=>16.5,  'quantity'=>2),

  array( 'description'=>'Mouse'  ,'price'=>1.25,  'quantity'=>10),

);
The «columns in the database» are the keys of the second order arrays; ‘description’, ‘price’ and ‘quantity’, so the next thing we need to do is to add the column headings along with an additional ‘Total’ heading that I’ll use later on:
// Set up some formatting
$colHeadingFormat =& $xls->addFormat();
$colHeadingFormat->setBold();
$colHeadingFormat->setFontFamily('Helvetica');
$colHeadingFormat->setBold();
$colHeadingFormat->setSize('10');
$colHeadingFormat->setAlign('center');
// An array with the data for the column headings
$colNames = array('Item','Price($)','Quantity','Total');
// Add all the column headings with a single call
// leaving a blank row to look nicer
$cart->writeRow(2,0,$colNames,$colHeadingFormat);
You’ve already seen the formatting. What you haven’t seen before is the writeRow() method. This essentially does the same thing as write(), but allows you to insert an array of data, from left to right, beginning at the specified row and column number. It makes a handy short cut to reduce lines of code.
One further thing I want to do is to make sure the column headings will always be visible as we scroll through the list of items. In Excel, this is possible by «freezing» a «pane» — selecting a block of cells that will «hover» while a user scrolls through the data, allowing them to see the column headings (in this case) that tell them what the data represents. The same is possible with PEAR::Spreadsheet_Excel_Writer:
// The cell group to freeze
// 1st Argument - vertical split position
// 2st Argument - horizontal split position (0 = no horizontal split)
// 3st Argument - topmost visible row below the vertical split
// 4th Argument - leftmost visible column after the horizontal split
$freeze = array(3,0,4,0);
// Freeze those cells!
$cart->freezePanes($freeze);
Note that «freezing» was applied directly via the Worksheet object $cart, rather than via a formatting object, because it applied to a collection of cells. Formatting, on the other hand, is applied to individual cells.
Finally, I loop through the items in the cart, adding the data to the sheet:
// Pseudo data

$items = array (

  array( 'description'=>'Parrot'  ,'price'=>34.0,  'quantity'=>1),

  array( 'description'=>'Snake'  ,'price'=>16.5,  'quantity'=>2),

  array( 'description'=>'Mouse'  ,'price'=>1.25,  'quantity'=>10),

);

// Use this to keep track of the current row number

$currentRow = 4;

// Loop through the data, adding it to the sheet

foreach ( $items as $item ) {

    // Write each item to the sheet

  $cart->writeRow($currentRow,0,$item);

  $currentRow++;

}
There’s nothing particularly new here, except that you’ll find it becomes important to keep track of row and column numbers as you loop through data, because these are needed to insert the data into the correct place.
That’s basically it. If you’re new to OOP in PHP, this may, at first glance, be a little intimidating, but you’ll notice that all the methods are well named to the point where you can usually guess their purpose just by looking at them. The notion of fetching one object from another may be new, but when you think about it, it makes sense that you create a Worksheet object by calling the addWorksheetSheet() method of the Workbook object and that you add formatting objects to a cell at the point where you write() to the Worksheet.
Adding Excel Functions
Now, you’re able to make a spreadsheet that looks nice but, as any Excel Pro can tell you, simply displaying raw data isn’t very useful. Life gets really interesting when you start using Excel’s functions (and perhaps you own) to perform calculations on the raw data and turn it into something more interesting.
Now I’m not an Excel master (and this is not about to turn into an Excel tutorial) but it is clear that my shopping cart receipt needs to be cleverer, so I need to add some calculations based on the data I’ve already added. For each row, I want to display the «total item cost» — the raw data contains the unit price on the item and the number of items purchased:
"total item cost" = "unit price" * "number of items purchased"In terms of Excel, to calculate the total for the item on the fifth row, the formula might be:
[Cell D5] =PRODUCT(B5:C5)To accomplish this with PEAR::Spreadsheet_Excel_Writer, I need to modify slightly the code that loops through the data:
// Use this to keep track of the current row number

$currentRow = 4;

// Loop through the data, adding it to the sheet

foreach ( $items as $item ) {

    // Write each item to the sheet

  $cart->writeRow($currentRow,0,$item);

  // Remember Excel starts counting rows from #1!

  $excelRow = $currentRow + 1;

  // Create a PHP string containing the formula

  $formula = '=PRODUCT(B' . $excelRow . ':C' . $excelRow .')';

  // Add the formula to the row

  $cart->writeFormula($currentRow,3,$formula);

  $currentRow++;

}
Adding the formula itself is pretty easy — we simply use the writeFormula() method. But most important (and confusing) is what I mentioned earlier — Excel begins to count rows from 1, while PEAR::Spreadsheet_Excel_Writer begins at 0 (zero), so, when creating functions, I need to remember this or I’ll be referring to the wrong cells. This is why I created the variable $excelRow, which is the $currentRow plus one. You may think this a design flaw on behalf of the authors, but remember: in PHP, like most programming languages, indexed arrays begin with a zero index. Trying to bump them forward by one just to play nice with Excel would likely have lead to many bugs and maintenance headaches. If it really annoys you, knock up some functions to translate between the two.
So, now my sheet displays the item totals on each row. But what about totaling the totals, so the customers can see the figure that will appear on their credit card bill? For this, it’s simply a matter of adding all the item totals together and displaying the result in another cell.
In Excel terms, I need to use the SUM() function to add item totals, which appear in column D:
[Grand Total Cell] =SUM(D5:D7)To fit this into the spreadsheet, after the loop has finished, I add the following:
// The first row as Excel knows it - $currentRow was 4 at the start

$startingExcelRow = 5;

// The final row as Excel

// (which is the same as the currentRow once the loop ends)

$finalExcelRow = $currentRow;

// Excel formal to sum all the item totals to get the grand total

$gTFormula = '=SUM(D'.$startingExcelRow.':D'.$finalExcelRow.')';

// Some more formatting for the grand total cells

$gTFormat =& $xls->addFormat();

$gTFormat->setFontFamily('Helvetica');

$gTFormat->setBold();

$gTFormat->setTop(1); // Top border

$gTFormat->setBottom(1); // Bottom border

// Add some text plus formatting

$cart->write($currentRow,2,'Grand Total:',$gTFormat);

// Add the grand total formula along with the format

$cart->writeFormula($currentRow,3,$gTFormula,$gTFormat);
Again it gets even more exciting, but keeping track of the Excel row numbers is mostly a case of remembering to add one to whichever variable has been tracking the PEAR::Spreadsheet_Excel_Writer row numbers. Notice also that I can apply formatting to the output produced by the formula.
Finally, I finish of my shopping cart receipt by sending the spreadsheet straight to the browser:
// Send the Spreadsheet to the browser
$xls->send("phpPetstore.xls");
$xls->close();
?>
Filename: phpPetstore.phpThat's it. The spreadsheet is ready to download. The finished code is available here.
Wrap Up
As you've seen, PEAR::Spreadsheet_Excel_Writer offers pretty much everything you need to build a useful spreadsheet, including formatting and functions. And, because you're tapping into Excel's functionality as well, you've got a lot of power at your disposal.
The API is tidy and, once you get used to it, easy to work with. The classes are also well structured, so scaling what I've done here up to a workbook that contains numerous, interrelated sheets is relatively easily accomplished. Be aware, though, that as you've seen here, you can end up with some pretty lengthy scripts if you're not careful, particularly as formatting has to be defined in fine detail. If you have a need to do some serious work with PEAR::Spreadsheet_Excel_Writer it's worth considering the opportunities for building in re-use early. You may find there's a particular cell format that keeps cropping up all over, and could be better placed in a class and re-used. If you're building a workbook containing many similar worksheets (e.g. Sales figures broken down with a worksheet for each region), writing classes to act as a template (design pattern hint) that generates the sheets may save a lot of effort.
Overall, PEAR::Spreadsheet_Excel_Writer is great addition to your PHP toolbox you're your users are bugging you because they can't get the "view" they want on the data you deliver to them with HTML, Spreadsheet_Excel_Writer provides a handy alternative to implementing a never-ending list of new features. What's more, it creates a "wow" factor with which you can impress a potential client -- particularly if the client in question uses Excel as their daily bread and butter.
The subject of PHP and Excel becomes even more interesting when you consider Jedox's Worksheet Server, a tool for reading (here we were just writing) Excel spreadsheets, and generating PHP applications from them. But that's a story for another time...