
by Vincy. Last modified on April 8th, 2023.
Database backup and restore is the most important part of maintaining software. Taking automatic periodical backup is a must for any project.
In case of unknown security flaws which may collapse your system. In such an unfortunate situation, it will be the holy grail to save you if you have a backup.
It is not only enough to take a backup by exporting your database. Also, we need to experiment with importing backups to ensure the restoration.
Backup files can be in any format. Many of the database clients support SQL, Excel or CSV format files to import external data.
We will create our own PHP database client only for importing Excel data into a database.
Restoring Excel backup into a database via programming will save us time. Let us study how to implement a quick restore by importing bulk data from Excel files. You may visit my earlier export data in CSV format if you want an export example.
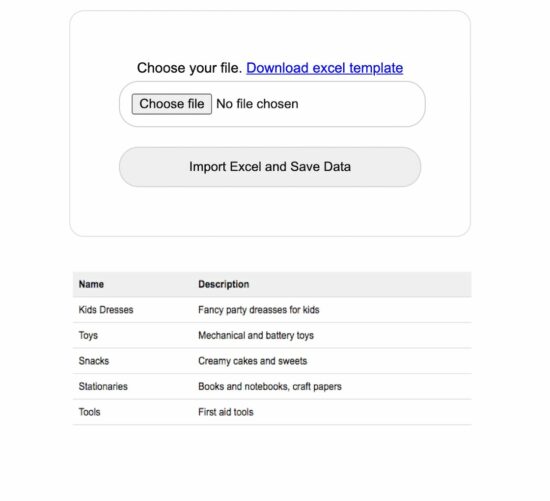
This screenshot shows the output by displaying the list of imported rows from the database.
What is inside?
- About this Excel import example
- File Structure
- Database script
- Creating UI to upload import template
- Parse Excel data using PHPSpreadsheet
- Output: Excel import and data listing
About this Excel import example
This example allows users to choose the import template via HTML form input. A sample Excel template is added with this downloadable resource.
With a valid file, the HTML form submitted will call PHP to process Excel parsing.
In PHP, the PHPSpreadsheet library is used to read the Excel file data and convert it into an array.
The code will execute the database insert row by row by iterating the array data.
File Structure
See the Excel import example’s file structure shown below. The vendor folder has the PHPSpreadsheet library and its dependencies.
I have given a sample import template with these files to experiment with the import operation.
The schema.sql has the script to create the target database. You can find the SQL script in the next section.

Database script
Import the following SQL script and create a database environment. Also, configure your database details in DataSource.php to make this example work.
--
-- Database: `import_excel`
--

-- --------------------------------------------------------

--
-- Table structure for table `tbl_info`
--

CREATE TABLE `tbl_info` (
  `id` int(11) NOT NULL,
  `name` varchar(50) NOT NULL,
  `description` varchar(50) NOT NULL,
  `date` timestamp NOT NULL DEFAULT CURRENT_TIMESTAMP ON UPDATE CURRENT_TIMESTAMP
);

--
-- Indexes for table `tbl_info`
--
ALTER TABLE `tbl_info`
  ADD PRIMARY KEY (`id`);

--
-- AUTO_INCREMENT for table `tbl_info`
--
ALTER TABLE `tbl_info`
  MODIFY `id` int(11) NOT NULL AUTO_INCREMENT;;
Creating UI to upload import template
This HTML form with the file upload option is used to choose the Excel source. On submitting this form, the Excel file will be sent to the PHP to parse the data source. This file upload option will only allow the Excel files to choose using the accept attribute.
This code also contains the response HTML for displaying the message returned from PHP. This message is shown based on the type of response sent from PHP after Excel import.
<h2>Import Excel File into MySQL Database using PHP</h2>

	<div class="outer-container">
		<div class="row">
			<form class="form-horizontal" action="" method="post"
				name="frmExcelImport" id="frmExcelImport"
				enctype="multipart/form-data" onsubmit="return validateFile()">
				<div Class="input-row">
					<label>Choose your file. <a href="Template/import-template.xlsx"
						download>Download excel template</a></label>
					<div>
						<input type="file" name="file" id="file" class="file"
							accept=".xls,.xlsx">
					</div>
					<div class="import">
						<button type="submit" id="submit" name="import" class="btn-submit">Import
							Excel and Save Data</button>
					</div>
				</div>
			</form>
		</div>
	</div>
	<div id="response"
		class="<?php if(!empty($type)) { echo $type . " display-block"; } ?>"><?php if(!empty($message)) { echo $message; } ?></div>
<?php
$sqlSelect = "SELECT * FROM tbl_info";
$result = $db->select($sqlSelect);
if (! empty($result)) {
    ?>

    <table class='tutorial-table'>
		<thead>
			<tr>
				<th>Name</th>
				<th>Description</th>
			</tr>
		</thead>
<?php
    foreach ($result as $row) { // ($row = mysqli_fetch_array($result))
        ?>
        <tbody>
			<tr>
				<td><?php  echo $row['name']; ?></td>
				<td><?php  echo $row['description']; ?></td>
			</tr>
<?php
    }
    ?>
        </tbody>
	</table>
<?php
}
?>
Parse Excel data using PHPSpreadsheet
In this PHP code, I specified the array of allowed file types for the file-type validation in PHP. I validated the uploaded file type along with the array allowed type.
If a match is found, the code will execute other logic. Otherwise, it will return the error message to the user.
With successful validation, excel file parsing read and convert the data into an array. Each array index has an array of row data. After reading the non-empty row data, I ran the database insert and showed the response.
<?php
use PhppotDataSource;
use PhpOfficePhpSpreadsheetReaderXlsx;

require_once 'DataSource.php';
$db = new DataSource();
$conn = $db->getConnection();
require_once ('vendor/autoload.php');

if (isset($_POST["import"])) {

    $allowedFileType = [
        'application/vnd.ms-excel',
        'text/xls',
        'text/xlsx',
        'application/vnd.openxmlformats-officedocument.spreadsheetml.sheet'
    ];

    if (in_array($_FILES["file"]["type"], $allowedFileType)) {

        $targetPath = 'uploads/' . $_FILES['file']['name'];
        move_uploaded_file($_FILES['file']['tmp_name'], $targetPath);

        $Reader = new PhpOfficePhpSpreadsheetReaderXlsx();

        $spreadSheet = $Reader->load($targetPath);
        $excelSheet = $spreadSheet->getActiveSheet();
        $spreadSheetAry = $excelSheet->toArray();
        $sheetCount = count($spreadSheetAry);

        for ($i = 1; $i <= $sheetCount; $i ++) {
            $name = "";
            if (isset($spreadSheetAry[$i][0])) {
                $name = mysqli_real_escape_string($conn, $spreadSheetAry[$i][0]);
            }
            $description = "";
            if (isset($spreadSheetAry[$i][1])) {
                $description = mysqli_real_escape_string($conn, $spreadSheetAry[$i][1]);
            }

            if (! empty($name) || ! empty($description)) {
                $query = "insert into tbl_info(name,description) values(?,?)";
                $paramType = "ss";
                $paramArray = array(
                    $name,
                    $description
                );
                $insertId = $db->insert($query, $paramType, $paramArray);
                // $query = "insert into tbl_info(name,description) values('" . $name . "','" . $description . "')";
                // $result = mysqli_query($conn, $query);

                if (! empty($insertId)) {
                    $type = "success";
                    $message = "Excel Data Imported into the Database";
                } else {
                    $type = "error";
                    $message = "Problem in Importing Excel Data";
                }
            }
        }
    } else {
        $type = "error";
        $message = "Invalid File Type. Upload Excel File.";
    }
}
?>
Note: Download the PHPSpreadsheet and include it in the vendor directory.
Download
↑ Back to Top
Welcome to a tutorial on how to import an Excel Spreadsheet into a MySQL database with PHP. So you have a project that requires reading some data from a spreadsheet and save them into the database? Sadly, PHP cannot read Excel files natively.
In order to import Excel files into the database:
- We have to use a third-party library that can read Excel files. PHPSpreadsheet is a good recommendation, and we can get it easily using Composer –
composer require phpoffice/phpspreadsheet - Create the database table, and Excel file to import.
- Use PHPSpreadsheet to read the Excel spreadsheet, extract the data, and insert them into the database.
Just how exactly is this done? Let us walk through an example in this guide – Read on!
ⓘ I have included a zip file with all the example source code at the start of this tutorial, so you don’t have to copy-paste everything… Or if you just want to dive straight in.
TLDR – QUICK SLIDES

Fullscreen Mode – Click Here
TABLE OF CONTENTS
DOWNLOAD & NOTES

First, here is the download link to the source code as promised.
QUICK NOTES
- A copy of PHPSpreadsheet is not included in the zip file. Please download the latest version by yourself.
- Create a test database and import
2a-dummy.sql. - Change the database settings in
3-import.phpto your own, then launch it in the browser.
If you spot a bug, feel free to comment below. I try to answer short questions too, but it is one person versus the entire world… If you need answers urgently, please check out my list of websites to get help with programming.
EXAMPLE CODE DOWNLOAD
Click here to download the source code, I have released it under the MIT license, so feel free to build on top of it or use it in your own project.
 All right, let us now get into an example of importing an Excel file into the database.
STEP 1) INSTALL PHPSPREADSHEET
There are no native functions in PHP to read Excel files. So we need to download and use a third-party library called PHPSpreadsheet – Here’s how to get it.
- The easiest way is to use an application manager called Composer – Something like Git, quite a useful one for pulling libraries automatically. A small hassle to download and install, but a one-time effort nonetheless.
- After installing Composer, open the command prompt and navigate to your project folder –
cd HTTP/FOLDER/. - Run
composer require phpoffice/phpspreadsheet.
That’s all. Composer will automatically pull the latest version into the vendor/ folder.
STEP 2) DUMMY DATABASE TABLE & EXCEL FILE
2A) DUMMY USERS TABLE
2a-dummy.sql
CREATE TABLE `users` (
  `id` bigint(20) NOT NULL,
  `name` varchar(255) NOT NULL,
  `email` varchar(255) NOT NULL
) ENGINE=InnoDB DEFAULT CHARSET=utf8mb4;

ALTER TABLE `users`
  ADD PRIMARY KEY (`id`),
  ADD UNIQUE KEY `email` (`email`);

ALTER TABLE `users`
  MODIFY `id` bigint(20) NOT NULL AUTO_INCREMENT;
For this example, we will use a very simple users table with only 3 fields.
| Field | Description |
| id | Primary key, auto-increment. |
| name | The user’s name. |
| The user’s email address. |
2B) DUMMY EXCEL FILE
2b-dummy.xlsx
| Name | |
| John Doe | john@doe.com |
| Jane Doe | jane@doe.com |
| Josh Doe | josh@doe.com |
| Joy Doe | joy@doe.com |
| Janus Doe | janus@doe.com |
| Jay Doe | jay@doe.com |
| June Doe | june@doe.com |
| Julius Doe | julius@doe.com |
| Jess Doe | jess@doe.com |
| Jack Doe | jack@doe.com |
Next, we have some dummy users in an Excel file that need to be imported into the above table.
STEP 3) PHP IMPORT SCRIPT
3-import.php
<?php
// (A) CONNECT TO DATABASE - CHANGE SETTINGS TO YOUR OWN!
$dbhost = "localhost";
$dbname = "test";
$dbchar = "utf8mb4";
$dbuser = "root";
$dbpass = "";
$pdo = new PDO(
  "mysql:host=$dbhost;charset=$dbchar;dbname=$dbname",
  $dbuser, $dbpass, [
  PDO::ATTR_ERRMODE => PDO::ERRMODE_EXCEPTION,
  PDO::ATTR_DEFAULT_FETCH_MODE => PDO::FETCH_ASSOC
]);

// (B) PHPSPREADSHEET TO LOAD EXCEL FILE
require "vendor/autoload.php";
$reader = new PhpOfficePhpSpreadsheetReaderXlsx();
$spreadsheet = $reader->load("2b-dummy.xlsx");
$worksheet = $spreadsheet->getActiveSheet();

// (C) READ DATA + IMPORT
$sql = "INSERT INTO `users` (`name`, `email`) VALUES (?,?)";
foreach ($worksheet->getRowIterator() as $row) {
  // (C1) FETCH DATA FROM WORKSHEET
  $cellIterator = $row->getCellIterator();
  $cellIterator->setIterateOnlyExistingCells(false);
  $data = [];
  foreach ($cellIterator as $cell) { $data[] = $cell->getValue(); }

  // (C2) INSERT INTO DATABASE
  print_r($data);
  try {
    $stmt = $pdo->prepare($sql);
    $stmt->execute($data);
    echo "OK - USER ID - {$pdo->lastInsertId()}<br>";
  } catch (Exception $ex) { echo $ex->getMessage() . "<br>"; }
  $stmt = null;
}

// (D) CLOSE DATABASE CONNECTION
if ($stmt !== null) { $stmt = null; }
if ($pdo !== null) { $pdo = null; }
Yep, this one looks a little intimidating at first but is actually very straightforward.
- Connect to the database. Remember to change the settings to your own.
- Load the PHPSpreadsheet library, and use it to open the dummy Excel spreadsheet.
- Read the cells of the spreadsheet, and import them into the database.
- The end. Close the database connection.
SPREADSHEETS WITH FORMULA
Take note that PHPSpreadSheet will not evaluate the cell formula. Do your own “convert formulas to values” in Excel, and save it as a different spreadsheet before importing.
DATE & TIME CELLS
This is yet another gotcha… Basically, convert the date/time cell into a string or text first.
LINKS & REFERENCES
- Need to do the opposite of exporting into Excel files? – Here’s how.
- Check out the PHPSpreadsheet GitHub Page here.
- Also, the official documentation.
YOUTUBE TUTORIAL
INFOGRAPHIC CHEAT SHEET

THE END

Thank you for reading, and we have come to the end of this guide. I hope that it has helped you with your project, and if you want to share anything with this guide, please feel free to comment below. Good luck and happy coding!
In this article, you will learn how to import Excel data into the MySQL database using the PHPExcel library. PHPExcel is a library written in pure PHP and provides a set of classes that allow you to write to and read from different spreadsheet file formats.
The web applications may contain data in various formats or they may have to collect data from various sources. It is not necessary that all the gathered data be compatible for storage on the server. Most large-scale websites use server-side code to dynamically display different data when needed. A database stores information more efficiently and can handle volumes of information that would be unmanageable in a spreadsheet. Spreadsheets have record limitations, whereas a database does not. So, we need to store this data in a database for future use. Here, we are using the PHPExcel library to import a CSV file into a PHP database. You can easily implement this by following these steps.
These are the steps to import Excel data to MySQL using PHPExcel-
Install PHPExcel with Composer
First, we need to install the PHPExcel library to read excel data. You can either download this from Github or install it using Composer. If your system does not have composer installed, then first download the latest composer version from its official website-
https://getcomposer.org/download/
You can check a successful installation using the following command on cmd—
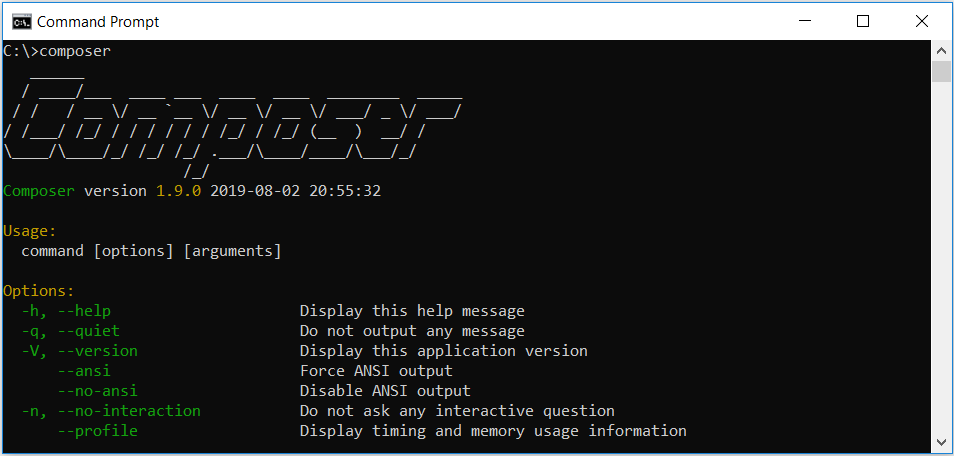
Now, go to your project directory on the command prompt and run the following command to install the PHPExcel library.
E:wampwwwexceltomysql>composer require phpoffice/phpexcelAfter this, you will notice that Composer has downloaded all libraries under the ‘vendor‘ directory of your project root. Here is the file structure of this project-

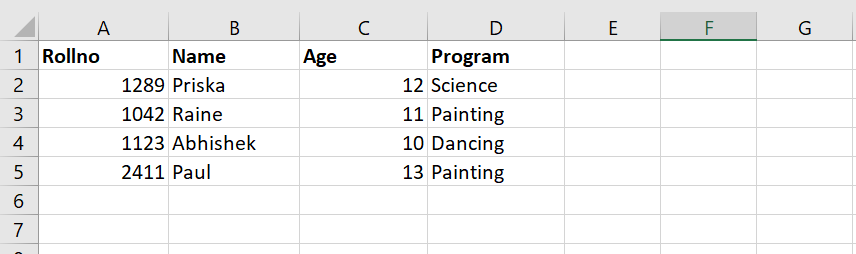
Excel File
Suppose we have the following excel file containing school program participants data-
Database Script (db.php)
Here, we have written the database connection code. Make sure to replace ‘hostname‘, ‘username‘, ‘password‘ and ‘database‘ with your database credentials and name.
<?php
	$hostname = "localhost";
	$db = "school";
	$password = "";
	$user = "root";
	$mysqli = new mysqli($hostname, $user, $password, $db);
?>
If we want to store or import Excel data into the MySQL database, we need a database table. So, we have a MySQL database ‘school‘ and in it we have to create a ‘participants‘ table with the given columns.
CREATE TABLE IF NOT EXISTS `participants` (
  `Id` int(11) NOT NULL AUTO_INCREMENT,
  `rollno` int(11) NOT NULL,
  `name` varchar(100) NOT NULL,
  `age` int(11) NOT NULL,
  `program` varchar(100) NOT NULL,
  PRIMARY KEY (`Id`)
) ENGINE=MyISAM AUTO_INCREMENT=5 DEFAULT CHARSET=latin1;
Create Upload File Template
To create a file uploader, we have created a simple HTML file upload form ‘index.php‘. If a form contains any file type input field, then we have to add an attribute ‘encrypt‘ with a value of ‘multipart/form-data‘.
<!DOCTYPE html>
<html>
<head>
	<title>PHP import Excel data</title>
	<link rel="stylesheet" type="text/css" href="https://maxcdn.bootstrapcdn.com/bootstrap/3.3.7/css/bootstrap.min.css">
</head>
<body>
<div class="container">
	<h1>Upload Excel File</h1>
	<form method="POST" action="uploadexcel.php" enctype="multipart/form-data">
		<div class="form-group">
			<label>Choose File</label>
			<input type="file" name="uploadFile" class="form-control" />
		</div>
		<div class="form-group">
			<button type="submit" name="submit" class="btn btn-success">Upload</button>
		</div>
	</form>
</div>
</body>
</html>
Parse Excel and Insert into Database (uploadexcel.php)
In this PHP code, we have validated the uploaded file type and then included the PHPExcel library files and database configuration file (db.php). We have validated the execution of each logical code. It returns an error message on failure. Further, PHPExcel parses the excel file, reads the data, and stores it in an array. We have looped over this array to insert data into the database and show the response to the web browser.
<?php
if(isset($_POST['submit'])) {
if(isset($_FILES['uploadFile']['name']) && $_FILES['uploadFile']['name'] != "") {
$allowedExtensions = array("xls","xlsx");
$ext = pathinfo($_FILES['uploadFile']['name'], PATHINFO_EXTENSION);
if(in_array($ext, $allowedExtensions)) {
// Uploaded file
$file = "uploads/".$_FILES['uploadFile']['name'];
$isUploaded = copy($_FILES['uploadFile']['tmp_name'], $file);
// check uploaded file
if($isUploaded) {
// Include PHPExcel files and database configuration file
include("db.php");
require_once __DIR__ . '/vendor/autoload.php';
include(__DIR__ .'/vendor/phpoffice/phpexcel/Classes/PHPExcel/IOFactory.php');
try {
// load uploaded file
$objPHPExcel = PHPExcel_IOFactory::load($file);
} catch (Exception $e) {
die('Error loading file "' . pathinfo($file, PATHINFO_BASENAME). '": ' . $e->getMessage());
}
// Specify the excel sheet index
$sheet = $objPHPExcel->getSheet(0);
$total_rows = $sheet->getHighestRow();
$highestColumn = $sheet->getHighestColumn();
$highestColumnIndex = PHPExcel_Cell::columnIndexFromString($highestColumn);
// loop over the rows
for ($row = 1; $row <= $total_rows; ++ $row) {
for ($col = 0; $col < $highestColumnIndex; ++ $col) {
$cell = $sheet->getCellByColumnAndRow($col, $row);
$val = $cell->getValue();
$records[$row][$col] = $val;
}
}
$html="<table border='1'>";
$html.="<tr><th>Roll No</th>";
$html.="<th>Name</th><th>Age</th>";
$html.="<th>Program</th></tr>";
foreach($records as $row){
// HTML content to render on webpage
$html.="<tr>";
$rollno = isset($row[0]) ? $row[0] : '';
$name = isset($row[1]) ? $row[1] : '';
$age = isset($row[2]) ? $row[2] : '';
$program = isset($row[3]) ? $row[3] : '';
$html.="<td>".$rollno."</td>";
$html.="<td>".$name."</td>";
$html.="<td>".$age."</td>";
$html.="<td>".$program."</td>";
$html.="</tr>";
// Insert into database
$query = "INSERT INTO participants (rollno,name,age,program)
values('".$rollno."','".$name."','".$age."','".$program."')";
$mysqli->query($query);
}
$html.="</table>";
echo $html;
echo "<br/>Data inserted in Database";
unlink($file);
} else {
echo '<span class="msg">File not uploaded!</span>';
}
} else {
echo '<span class="msg">Please upload excel sheet.</span>';
}
} else {
echo '<span class="msg">Please upload excel file.</span>';
}
}
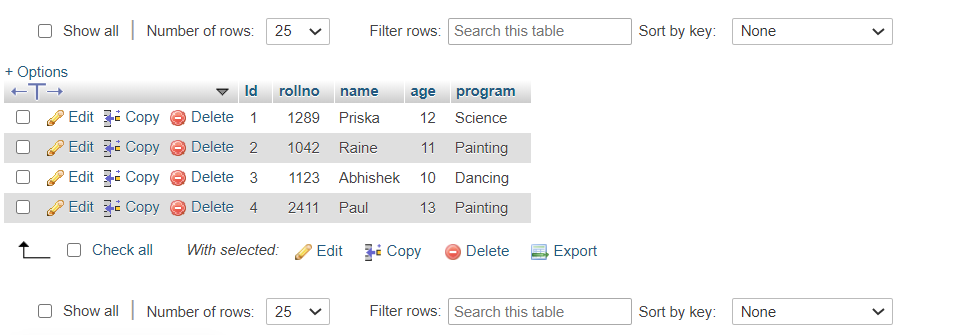
?>On successful execution, the data will be inserted in the database as in the given screenshot-
Related Articles
PHP capitalize first letter
Age calculator in PHP
PHP Display PDF file from Database
Remove empty values from array PHP
Remove duplicates from array PHP
Floor function in PHP
Convert stdclass object to array PHP
How to read CSV file in PHP and store in MySQL
Generating word documents with PHP
PHP SplFileObject Examples
How to Upload a File in PHP
Simple PHP email form
Password reset system in PHP
HTTP authentication with PHP
PHP file cache library
PHP get current directory url
How to prevent CSRF attack in PHP
Forgot Password Script PHP mysqli database
PHP Contact Form with Google reCAPTCHA
HTML Form Validation in PHP
PHP sanitize input for MySQL
Simple pagination in PHP with MySQL
Store Emoji character in MySQL using PHP
Подпишитесь на мой канал на YouTube, где я регулярно публикую новые видео.
![]()
Подписаться

Подписавшись по E-mail, Вы будете получать уведомления о новых статьях.
![]()
Подписаться
Добавляйтесь ко мне в друзья ВКонтакте! Отзывы о сайте и обо мне оставляйте в моей группе.
![]()
Мой аккаунт
Моя группа
Какая тема Вас интересует больше?
Основы Laravel

Пройдя курс, Вы узнаете:
— Как установить и настроить Laravel
— Всю необходимую базу по Laravel
— Как создавать несложные сайты на Laravel
Общая продолжительность курса 4.5 часа, плюс множество упражнений и поддержка!
Чтобы получить Видеокурс,
заполните форму
Как создать профессиональный Интернет-магазин

После семинара:
— Вы будете знать, как создать Интернет-магазин.
— Вы получите бесплатный подарок с подробным описанием каждого шага.
— Вы сможете уже приступить к созданию Интернет-магазина.
Ты никогда не решишь проблему, если будешь думать так же, как те, кто ее создал.
Альберт Эйнштейн

Доброго времени суток! В прошлой статье я рассказывал Вам о библиотеке PHPSpreadsheet. Там мы рассмотрели пример
записи данных в Excel файл. В данной же статье мы прочитаем с Вами Excel файл и загрузим строки из него в базу данных MySQL.
Зачем это может понадобиться? Одной из самых часто встречающихся задач при работе с интернет-магазинами является загрузка
больших прайс-листов в базу данных. Делать это вручную, очевидно, не хочется, да и не стоит, так как увеличивается шанс
ошибиться при вводе однотипных данных. А скрипт, который я покажу Вам далее справится с этой задачей достаточно просто —
в конечном счете все будет упираться в структуру Вашего Excel файла.
Устанавливаем библиотеку PHPSpreadsheet:
C:/> composer require phpoffice/phpspreadsheet
Функция, которая загружает данные в базу:
<?php
use PhpOfficePhpSpreadsheetSpreadsheet;
use PhpOfficePhpSpreadsheetSharedDate as PHPSpreadsheetDate;
/**
* @param Spreadsheet $spreadsheet - Excel-книга с данными
* @param PDO $pdo - PDO-подключение к базе данных
* @param bool $limit_execution - ограничивает количество строк экспортируемых в базу (для тестирования)
* @throws PhpOfficePhpSpreadsheetException
*/
function excel2db(Spreadsheet $spreadsheet, PDO $pdo, $limit_execution = true)
{
// получает названия листов книги в виде массива
$sheetNames = $spreadsheet->getSheetNames();
// возвращает количество листов в книге
$sheetsCount = $spreadsheet->getSheetCount();
// проходимся по каждому листу
for ($c = 0; $c < $sheetsCount; $c++)
{
// ссылка на лист
$sheet = $spreadsheet->getSheet($c);
// последняя строка в листе
$highestRow = $sheet->getHighestRow('A');
print "Количество строк в книге #$sheetNames[$c] составляет $highestRow" . PHP_EOL;
// SQL-запрос на вставку данных в базу
$sql = "INSERT INTO products (
category, subcategory, name, price, producer, quantity, produced_at
)
VALUES (:category, :subcategory, :name, :price, :producer, :quantity, :produced_at)";
// подготовленное SQL-выражение
$stmt = $pdo->prepare($sql);
// проходимся по каждой строке в листе
// счетчик начинается с 2-ой строки, так как первая строка - это заголовок
for ($i = 2; $i < $highestRow + 1; $i++)
{
// для тестирования - заполняет только 30 строк, чтобы посмотреть, что все в порядке
if($limit_execution) {
if($i == 30) break;
}
// получаем значения из ячеек столбцов
$category = $sheet->getCell('A' . $i)->getValue();
$subcategory = $sheet->getCell('B' . $i)->getValue();
$name = $sheet->getCell('C' . $i)->getValue();
$price = $sheet->getCell('D' . $i)->getValue();
$producer = $sheet->getCell('E' . $i)->getValue();
$quantity = $sheet->getCell('G' . $i)->getValue();
// преобразуем дату из формата Excel в формат PHP
$produced_at = PHPSpreadsheetDate::excelToDateTimeObject($sheet->getCell('F' . $i)->getValue());
$produced_at = $produced_at->format('Y-m-d');
$stmt->bindParam(':category', $category);
$stmt->bindParam(':subcategory', $subcategory);
$stmt->bindParam(':name', $name);
$stmt->bindParam(':price', $price);
$stmt->bindParam(':producer', $producer);
$stmt->bindParam(':quantity', $quantity);
$stmt->bindParam(':produced_at', $produced_at);
$res = $stmt->execute();
// если запрос на вставку выполнился успешно, выводим в консоль сообщение
if($res) {
print "Строка #$i из листа $sheetNames[$c] помещена в базу" . PHP_EOL;
}
}
}
}
Файл, в котором будет вызываться функция:
<?php
require __DIR__ . '/../vendor/autoload.php';
use PhpOfficePhpSpreadsheetReaderXlsx;
$host = '127.0.0.1';
$db = 'products_db';
$user = 'user1';
$pass = 'userpass';
$charset = 'utf8';
$dsn = "mysql:host=$host;dbname=$db;charset=$charset";
$opts= [
PDO::ATTR_ERRMODE => PDO::ERRMODE_EXCEPTION,
PDO::ATTR_DEFAULT_FETCH_MODE => PDO::FETCH_ASSOC,
PDO::ATTR_EMULATE_PREPARES => false,
];
// подключение к базе
$pdo = new PDO($dsn, $user, $pass, $opts);
// класс, который читает файл прайса
$reader = new Xlsx();
// получаем Excel-книгу
$spreadsheet = $reader->load('products_db_01012020.xlsx');
// замеряем время работы скрипта
$startTime = microtime(true);
// запускаем экспорт данных
excel2db($spreadsheet, $pdo, false);
$elapsedTime = round(microtime(true) - $startTime, 4);
print "Скрипт выполнился за: $elapsedTime с.";
Таким образом, после запуска данного скрипта через некоторое время (от ~15 минут при 10 тыс. строк) вы получите
содержимое Вашего прайса в базе данных. Конечно это демонстрационный скрипт: в нем нет обработки исключений и возможных
ошибок, а также окончательная версия Вашего скрипта может существенно отличаться от приведенной здесь. Это зависит от
объема и сложности конкретного прайс-листа.
-

Создано 08.06.2021 08:53:55
-
Михаил Русаков

Копирование материалов разрешается только с указанием автора (Михаил Русаков) и индексируемой прямой ссылкой на сайт (http://myrusakov.ru)!
Добавляйтесь ко мне в друзья ВКонтакте: http://vk.com/myrusakov.
Если Вы хотите дать оценку мне и моей работе, то напишите её в моей группе: http://vk.com/rusakovmy.
Если Вы не хотите пропустить новые материалы на сайте,
то Вы можете подписаться на обновления: Подписаться на обновления
Если у Вас остались какие-либо вопросы, либо у Вас есть желание высказаться по поводу этой статьи, то Вы можете оставить свой комментарий внизу страницы.
Если Вам понравился сайт, то разместите ссылку на него (у себя на сайте, на форуме, в контакте):
-
Кнопка:
Она выглядит вот так:
-
Текстовая ссылка:
Она выглядит вот так: Как создать свой сайт
- BB-код ссылки для форумов (например, можете поставить её в подписи):

Lets say,
i want to import/upload excel file to mysql from PHP
My HTML is like below
<form enctype="multipart/form-data" method="post" role="form">
    <div class="form-group">
        <label for="exampleInputFile">File Upload</label>
        <input type="file" name="file" id="file" size="150">
        <p class="help-block">Only Excel/CSV File Import.</p>
    </div>
    <button type="submit" class="btn btn-default" name="Import" value="Import">Upload</button>
</form>
PHP code is like below
<?php
if(isset($_POST["Import"]))
{
    //First we need to make a connection with the database
    $host='localhost'; // Host Name.
    $db_user= 'root'; //User Name
    $db_password= '';
    $db= 'product_record'; // Database Name.
    $conn=mysql_connect($host,$db_user,$db_password) or die (mysql_error());
    mysql_select_db($db) or die (mysql_error());
    echo $filename=$_FILES["file"]["tmp_name"];
    if($_FILES["file"]["size"] > 0)
    {
        $file = fopen($filename, "r");
        //$sql_data = "SELECT * FROM prod_list_1 ";
        while (($emapData = fgetcsv($file, 10000, ",")) !== FALSE)
        {
            //print_r($emapData);
            //exit();
            $sql = "INSERT into prod_list_1(p_bench,p_name,p_price,p_reason) values ('$emapData[0]','$emapData[1]','$emapData[2]','$emapData[3]')";
            mysql_query($sql);
        }
        fclose($file);
        echo 'CSV File has been successfully Imported';
        header('Location: index.php');
    }
    else
        echo 'Invalid File:Please Upload CSV File';
}
?>
Excel file is like below

I want to import only the 2nd row values into my table. Please help me how can i solve it or give me any resource. I was able to upload the excel file but it is not correctly formatted. i want to upload 4 column in mysql’s 4 column but it is uploading all 4 column in mysql’s 1 column. am i missing something ?