

![]()
PHPWord is a library written in pure PHP that provides a set of classes to write to and read from different document file formats. The current version of PHPWord supports Microsoft Office Open XML (OOXML or OpenXML), OASIS Open Document Format for Office Applications (OpenDocument or ODF), Rich Text Format (RTF), HTML, and PDF.
PHPWord is an open source project licensed under the terms of LGPL version 3. PHPWord is aimed to be a high quality software product by incorporating continuous integration and unit testing. You can learn more about PHPWord by reading the Developers’ Documentation.
If you have any questions, please ask on StackOverFlow
Read more about PHPWord:
- Features
- Requirements
- Installation
- Getting started
- Contributing
- Developers’ Documentation
Features
With PHPWord, you can create OOXML, ODF, or RTF documents dynamically using your PHP scripts. Below are some of the things that you can do with PHPWord library:
- Set document properties, e.g. title, subject, and creator.
- Create document sections with different settings, e.g. portrait/landscape, page size, and page numbering
- Create header and footer for each sections
- Set default font type, font size, and paragraph style
- Use UTF-8 and East Asia fonts/characters
- Define custom font styles (e.g. bold, italic, color) and paragraph styles (e.g. centered, multicolumns, spacing) either as named style or inline in text
- Insert paragraphs, either as a simple text or complex one (a text run) that contains other elements
- Insert titles (headers) and table of contents
- Insert text breaks and page breaks
- Insert and format images, either local, remote, or as page watermarks
- Insert binary OLE Objects such as Excel or Visio
- Insert and format table with customized properties for each rows (e.g. repeat as header row) and cells (e.g. background color, rowspan, colspan)
- Insert list items as bulleted, numbered, or multilevel
- Insert hyperlinks
- Insert footnotes and endnotes
- Insert drawing shapes (arc, curve, line, polyline, rect, oval)
- Insert charts (pie, doughnut, bar, line, area, scatter, radar)
- Insert form fields (textinput, checkbox, and dropdown)
- Create document from templates
- Use XSL 1.0 style sheets to transform headers, main document part, and footers of an OOXML template
- … and many more features on progress
Requirements
PHPWord requires the following:
- PHP 7.1+
- XML Parser extension
- Laminas Escaper component
- Zip extension (optional, used to write OOXML and ODF)
- GD extension (optional, used to add images)
- XMLWriter extension (optional, used to write OOXML and ODF)
- XSL extension (optional, used to apply XSL style sheet to template )
- dompdf library (optional, used to write PDF)
Installation
PHPWord is installed via Composer.
To add a dependency to PHPWord in your project, either
Run the following to use the latest stable version
composer require phpoffice/phpword
or if you want the latest unreleased version
composer require phpoffice/phpword:dev-master
Getting started
The following is a basic usage example of the PHPWord library.
<?php
require_once 'bootstrap.php';

// Creating the new document...
$phpWord = new PhpOfficePhpWordPhpWord();

/* Note: any element you append to a document must reside inside of a Section. */

// Adding an empty Section to the document...
$section = $phpWord->addSection();
// Adding Text element to the Section having font styled by default...
$section->addText(
    '"Learn from yesterday, live for today, hope for tomorrow. '
        . 'The important thing is not to stop questioning." '
        . '(Albert Einstein)'
);

/*
 * Note: it's possible to customize font style of the Text element you add in three ways:
 * - inline;
 * - using named font style (new font style object will be implicitly created);
 * - using explicitly created font style object.
 */

// Adding Text element with font customized inline...
$section->addText(
    '"Great achievement is usually born of great sacrifice, '
        . 'and is never the result of selfishness." '
        . '(Napoleon Hill)',
    array('name' => 'Tahoma', 'size' => 10)
);

// Adding Text element with font customized using named font style...
$fontStyleName = 'oneUserDefinedStyle';
$phpWord->addFontStyle(
    $fontStyleName,
    array('name' => 'Tahoma', 'size' => 10, 'color' => '1B2232', 'bold' => true)
);
$section->addText(
    '"The greatest accomplishment is not in never falling, '
        . 'but in rising again after you fall." '
        . '(Vince Lombardi)',
    $fontStyleName
);

// Adding Text element with font customized using explicitly created font style object...
$fontStyle = new PhpOfficePhpWordStyleFont();
$fontStyle->setBold(true);
$fontStyle->setName('Tahoma');
$fontStyle->setSize(13);
$myTextElement = $section->addText('"Believe you can and you're halfway there." (Theodor Roosevelt)');
$myTextElement->setFontStyle($fontStyle);

// Saving the document as OOXML file...
$objWriter = PhpOfficePhpWordIOFactory::createWriter($phpWord, 'Word2007');
$objWriter->save('helloWorld.docx');

// Saving the document as ODF file...
$objWriter = PhpOfficePhpWordIOFactory::createWriter($phpWord, 'ODText');
$objWriter->save('helloWorld.odt');

// Saving the document as HTML file...
$objWriter = PhpOfficePhpWordIOFactory::createWriter($phpWord, 'HTML');
$objWriter->save('helloWorld.html');

/* Note: we skip RTF, because it's not XML-based and requires a different example. */
/* Note: we skip PDF, because "HTML-to-PDF" approach is used to create PDF documents. */
More examples are provided in the samples folder. For an easy access to those samples launch php -S localhost:8000 in the samples directory then browse to http://localhost:8000 to view the samples.
You can also read the Developers’ Documentation for more detail.
Contributing
We welcome everyone to contribute to PHPWord. Below are some of the things that you can do to contribute.
- Read our contributing guide.
- Fork us and request a pull to the master branch.
- Submit bug reports or feature requests to GitHub.
- Follow @PHPWord and @PHPOffice on Twitter.

От автора: не так давно на нашем сайте были опубликованы уроки по работе с таблицами Microsoft Excel средствами языка PHP, которые вызвали значительный интерес у нашей аудитории и поэтому, сегодня я решил показать Вам, как создавать документы Microsoft Word ,формата .docx, используя мощнейшую библиотеку PHPWord.


Актуальную версию библиотеки PHPWord, вы найдете на сервисе GitHub.

Бесплатный курс по PHP программированию
Освойте курс и узнайте, как создать веб-приложение на PHP с полного нуля
Получить курс сейчас!
На данной странице, приведено краткое описание и инструкция по установке библиотеки. Но данная инструкция очень ограничена и не описывает всех возможностей библиотеки, поэтому, официальную PHPWord документацию, для разработчиков, Вы найдете по ссылке.

Установка PHPWord
Установка PHPWord, может быть выполнена двумя способами. Первый способ – ручной, при котором Вы скачиваете архив с последней актуальной версией PHPWord, далее, выполняете распаковку, копируете файлы в собственный проект и подключаете на соответствующих страницах. То есть достаточно стандартный способ. И второй – так сказать, автоматический способ установки, используя инструмент Composer, который мы будем использовать в данном уроке.
Кстати, Вы, наверное, заметили, что в своих уроках, для установки различных библиотек, я призываю Вас использовать Composer. Так как для простых проектов, в ручную, вполне можно скачивать необходимые элементы, но если мы работаем над более сложным скриптом, то порой затруднительно скачать все необходимые элементы и правильно их установить.
Итак, открываем командную строку и переходим в каталог нашего проекта, используя команду “CD имя папки”.

Далее, используя конструкцию “composer require”, указываем от какой библиотеки “зависит” наш проект и выполняем инструкцию.
|
composer require phpoffice/phpword |

После того как Composer, завершил скачивание и установку библиотеки, необходимо подключить файл autoload.php, который расположен в папке vendor, к Вашему проекту.
|
require ‘vendor/autoload.php’; |
Далее, создаем объект главного класса библиотеки.
|
$phpWord = new PhpOfficePhpWordPhpWord(); |
Обратите внимание, что PHPWord, в своей структуре, использует пространства имен, поэтому для доступа к классу, необходимо использовать полное квалификационное имя, если мы работаем в глобальном пространстве имен. На этом установка библиотеки завершена.
Создание документа MS Word
Теперь, мы можем сформировать свой первый документ MS Word средствами языка PHP. Для этого, первым делом определим шрифт, используя метод setDefaultFontName(имя шрифта), который будет использоваться, по умолчанию, для отображения текстовых данных.
|
$phpWord—>setDefaultFontName(‘Times New Roman’); |
Затем зададим, размер шрифта, при помощи метода setDefaultFontSize(размер шрифта).
|
$phpWord—>setDefaultFontSize(14) |
Перед добавлением текстовых данных, необходимо определить параметры всего документа в целом. Для получения объекта параметров документа, используем метод getDocInfo().
|
$properties = $phpWord—>getDocInfo(); |
Используя полученный объект, зададим основные параметры документа.
|
$properties—>setCreator(‘Name’); $properties—>setCompany(‘Company’); $properties—>setTitle(‘Title’); $properties—>setDescription(‘Description’); $properties—>setCategory(‘My category’); $properties—>setLastModifiedBy(‘My name’); $properties—>setCreated(mktime(0, 0, 0, 3, 12, 2015)); $properties—>setModified(mktime(0, 0, 0, 3, 14, 2015)); $properties—>setSubject(‘My subject’); $properties—>setKeywords(‘my, key, word’); |
При этом использовались следующие методы (каждый метод устанавливает определенный глобальный параметр документа):
setCreator() – автор документа;
setCompany() – организация автора документа;
setTitle() – заголовок документа;
setDescription() – краткое описание документа;
setCategory() – категория документа;
setLastModifiedBy() – автор последнего редактирования документа;
setCreated() – дата создания документа;
setModified() – дата редактирования документа;
setSubject() – тема документа;
setKeywords() – ключевые слова документа.
Собственно, теперь мы можем добавить необходимые текстовые данные в будущий документ MS Word, но перед этим мы должны определиться с понятием раздела, которое используется библиотекой PHPWord, для работы с документом.
Итак, раздел или секция – это специальная область прямоугольной формы, внутри которой размещаются элементы документа, такие как текст, изображения, списки, таблицы и т.д. А значит, перед добавлением информации в будущий документ, необходимо создать раздел, что мы собственно и выполним, используя метод addSection(массив стилей).
|
$sectionStyle = array( ‘orientation’ => ‘landscape’, ‘marginTop’ => PhpOfficePhpWordSharedConverter::pixelToTwip(10), ‘marginLeft’ => 600, ‘marginRight’ => 600, ‘colsNum’ => 1, ‘pageNumberingStart’ => 1, ‘borderBottomSize’=>100, ‘borderBottomColor’=>‘C0C0C0’ ); $section = $phpWord—>addSection($sectionStyle); |
Данный метод, в качестве результата работы возвращает объект созданного раздела, который мы сохраним в переменную. При вызове метода, в качестве первого параметра, можно передать массив настроек, которые будут использоваться для создания раздела (каждая настройка представляет собой отдельную ячейку массива). В примере Выше, я использовал следующие настройки:
orientation — расположение раздела, в виде альбомного листа (значение по умолчанию portrait);
marginTop – верхний отступ;
marginLeft – отступ от левого края;
marginRight – отступ от правого края;
colsNum – количество колонок, в которых будут отображаться данные;
pageNumberingStart – страница, с которой будет начата нумерация страниц;
borderBottomSize – размер нижней рамки;
Бесплатный курс по PHP программированию
Освойте курс и узнайте, как создать веб-приложение на PHP с полного нуля
Получить курс сейчас!
borderBottomColor – цвет нижней рамки.
Полный список настроек приведен в разделе “Styles”, официальной документации PHPWord.

При, этом у Вас, скорее всего, возник вопрос, в каких единицах измерения проставляются значения размеров и отступов? В качестве единиц измерений используются типографические твипы.
Твип (англ. twip) — типографская единица измерения, равная одной двадцатой пункта, или 1/1440 дюйма, или 1/567 сантиметра (приближённо).
Конечно, разработчикам не совсем удобно использовать данную единицу измерения, для определения размеров, поэтому библиотека PHPWord, содержит в своем составе, специальный класс конвертер, основных известных единиц в твипы. К примеру, для конвертации “пискселей в твипы”, необходимо использовать следующий метод pixelToTwip() , который переведет значение в пикселях, передаваемое в качестве первого параметра в твипы.
|
PhpOfficePhpWordSharedConverter::pixelToTwip(10) |
Для добавления текста, в будущий документ, необходимо использовать метод addText($text, [$fontStyle], [$paragraphStyle]). В качестве параметров, при вызове данного метода, необходимо передать следующее:
$text – текст, который необходимо отобразить на странице документа. При этом текст не должен содержать тегов HTML, поэтому, как правило, его обрабатывают функцией htmlspecialchars().
$fontStyle – массив с настройками шрифта, который будет использоваться для отображения текста. Полный список доступных настроек, Вы найдете на странице “Styles” в разделе “Font”, официальной документации.
$paragraphStyle – массив с настройками параграфа, или абзаца, в котором будет отображен текст. Полный список доступных настроек, Вы найдете на странице “Styles” в разделе “ Paragraph”, официальной документации.
Теперь, используем рассмотренный Выше метод и добавим текст, в будущий документ.
|
$text = «PHPWord is a library written in pure PHP that provides a set of classes to write to and read from different document file formats.»; $fontStyle = array(‘name’=>‘Arial’, ‘size’=>36, ‘color’=>‘075776’, ‘bold’=>TRUE, ‘italic’=>TRUE); $parStyle = array(‘align’=>‘right’,‘spaceBefore’=>10); $section—>addText(htmlspecialchars($text), $fontStyle,$parStyle); |
Настройки шрифта, использованные в примере:
name – имя шрифта;
size – размер шрифта;
color – цвет шрифта;
bold – если, true, будет использован жирный шрифт;
italic — если, true, будет использован курсив.
Настройки параграфа из примера:
align – выравнивание текста в параграфе, в нашем случае по правому краю;
spaceBefore – расстояние до параграфа.
Теперь давайте, непосредственно, создадим документ MS Word.
|
$objWriter = PhpOfficePhpWordIOFactory::createWriter($phpWord,‘Word2007’); $objWriter—>save(‘doc.docx’); |
Для создания документа, необходимо создать объект специального класса Word2007, используя статический метод createWriter(), класса IOFactory. Класс IOFactory – реализует шаблон проектирования Factory, и необходим для создания объектов других классов, имена которых мы передаем в качестве, второго параметра при вызове метода createWriter(). Далее вызывая метод save() и передавая в качестве первого параметра, имя будущего файла, мы формируем документ MS Word.
Как Вы видите, документ успешно создан. Если, не нужно создавать файл, а сформированный документ, необходимо отдать пользователю на скачивание, то при вызове метода save(), в качестве первого параметра, необходимо передать строку «php://output». При этом, так же, необходимо указать определенный набор заголовков.
|
header(«Content-Description: File Transfer»); header(‘Content-Disposition: attachment; filename=»first.docx»‘); header(‘Content-Type: application/vnd.openxmlformats-officedocument.wordprocessingml.document’); header(‘Content-Transfer-Encoding: binary’); header(‘Cache-Control: must-revalidate, post-check=0, pre-check=0’); header(‘Expires: 0’); $objWriter = PhpOfficePhpWordIOFactory::createWriter($phpWord, ‘Word2007’); $objWriter—>save(«php://output»); |
Добавление списков
Для формирования списков, в будущем документе, необходимо использовать метод addListItem($text, [$depth], [$fontStyle], [$listStyle], [$paragraphStyle]), который за каждый свой вызов, формирует элемент списка. Параметры, которые необходимо передать при вызове метода:
$text – текст, элемента списка;
$depth – глубина вложенности. Если создается одноуровневый список, то данный параметр равен 0.
$fontStyle – массив настроек шрифта, по аналогии с добавлением простого текста.
$listStyle – массив настроек списка.
$paragraphStyle – массив настроек параграфа, по аналогии с добавлением текста.
Массив настроек списка $listStyle, поддерживает настройку – listType, то есть, тип списка, к примеру, нумерованный или же нет. В качестве значений, доступны специальные константы класса PhpOfficePhpWordStyleListItem:
TYPE_SQUARE_FILLED FILLED – не нумерованный список. В виде маркеров используются квадраты.
TYPE_BULLET_FILLED – не нумерованный список (значение по умолчанию). В виде маркеров используются точки.
TYPE_BULLET_EMPTY FILLED – не нумерованный список. В виде маркеров используются не закрашенные окружности.
TYPE_NUMBER – нумерованный список.
TYPE_NUMBER_NESTED – многоуровневый нумерованный список.
TYPE_ALPHANUM – нумерованный список, с использованием букв, в качестве маркеров.
Таким образом, следующий код, добавит одноуровневый нумерованный список в документ.
|
$fontStyle = array(‘name’ => ‘Times New Roman’, ‘size’ => 16,‘color’ => ‘075776’,‘italic’=>true); $listStyle = array(‘listType’=>PhpOfficePhpWordStyleListItem::TYPE_BULLET_EMPTY); $section—>addListItem(‘Элемент 1’,0,$fontStyle,$listStyle); $section—>addListItem(‘Элемент 2’,0,$fontStyle,$listStyle); $section—>addListItem(‘Элемент 3’,0,$fontStyle,$listStyle); $section—>addListItem(‘Элемент 4’,0,$fontStyle,$listStyle); $section—>addListItem(‘Элемент 5’,0,$fontStyle,$listStyle); |

Добавление изображений
Для добавления изображений, необходимо использовать метод addImage($path,[$imgStyle]). При вызове данного метода, в качестве первого параметра, передается путь к изображению, которое необходимо добавить в документ. В качестве второго, необязательного параметра, можно передать массив с настройками отображения изображения. Полный список настроек изображения, Вы найдете на странице “Styles”, в разделе “ Image”.

Соответственно, давайте добавим изображение в создаваемый документ.
|
$section—>addImage(‘picture.jpg’, array( ‘width’ => 100, ‘height’ => 100, )); |
При этом, в качестве настроек, я определил ширину и высоту добавляемого изображения.

На этом данный урок я буду завершать. Как Вы видите, библиотека PHPWord, обладает огромнейшим функционалом и позволяет формировать документы MS Word различной сложности. Если она Вас заинтересовала, то изучайте более подробно официальную документацию, потому как мы с Вами рассмотрели только некоторые ее возможности. Всего Вам доброго и удачного кодирования!!!
Бесплатный курс по PHP программированию
Освойте курс и узнайте, как создать веб-приложение на PHP с полного нуля
Получить курс сейчас!

Разработка веб-приложения на PHP
Скачайте видеокурс и узнайте, как создать веб-приложение на PHP
Скачать
Creating Microsoft Word documents in PHP can be a challenge. Word offers a multitude of options and settings and while creating a document in PHP you want do take advantage of those options to achieve a satisfying result. Perhaps you need to dynamically create documents for a client and the client will only know the capabilities of Mircosoft Word, but not the limitations of PHP libraries. This can result in an unsatisfied client.
In this article we will take a closer look at PHPWord and three different ways to create Word documents with it: basic easy templating, the creation of Word documents from scratch, and (going a little crazy there) the combination of both by merging existing templates with dynamically created documents. Hopefully, after reading through the text, you will have an idea of how to implement the perfect Word creator for your needs.
PHPWord is a part of the PHPOffice library which enables to read and write documents in different file formats from PHP. Supported formats are HTML, ODText, PDF, RTF and Word2007, which we will concentrate on. PHPWord is open source and currently available in version 0.14 on GitHub. Not every feature of Microsoft Word is implemented in PHPWord (yet), but the available features are numerous. Some of them will be presented or at least mentioned below using example code. For the examples to work, you of course need to include PHPWord into your project. So let’s dive in.
Basic and easy templating
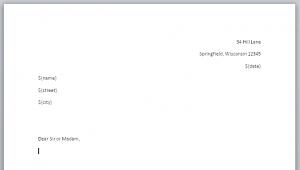
Fig. 1: Basic Template created in Microsoft Word
PHPWord provides the possibility for easy to use templating. If you need to create simple documents in a static layout in which, for example, only the addressee changes, this will be your fastest way to go.
In fig. 1 you can see a template named Template.docx that was created in Microsoft Word. As you can see the date and address are made up out of placeholder strings in the form of ${placeholder}.
The PHP code you need do fill this template dynamically with your desired data is as follows:
$templateProcessor = new PhpOfficePhpWordTemplateProcessor('Template.docx');

$templateProcessor->setValue('date', date("d-m-Y"));
$templateProcessor->setValue('name', 'John Doe');
$templateProcessor->setValue(
    ['city', 'street'],
    ['Sunnydale, 54321 Wisconsin', '123 International Lane']);

$templateProcessor->saveAs('MyWordFile.docx');
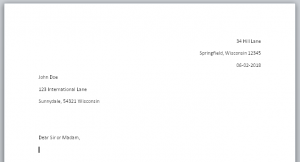
Fig. 2: Template with replaced placeholders
Let’s take a closer look. You load your template into a new TemplateProcessor by calling the class and giving it the path to your template as the parameter. Now you can replace your placeholder strings with values. Note that the setValue command needs the placeholder name as first parameter, without the dollar sign and curly brackets used to mark them in the template.
After replacing all placeholders, you save the modified template and you are done. The result will come close to fig. 2.
The template processor can do more than to only set values, but it is rather limited. It is, for example, not possible to put multiple paragraphs into one of those placeholders. They only hold single line strings. If you want to take a closer look at the TemplateProcessor, check out the according docs.
The main advantage of this method is the freedom to create your templates in Microsoft Word. You are free to take full advantage of the settings Word offers and you are not limited by PHP. But if you need to insert multiple paragraphs or more complex structures like tables, this won’t be the way for you. So let’s take a look at the next method, let’s build documents completly in PHPWord.
Create a word document from scratch
To generate a Word document you need to create a PhpWord object which you then fill with the contents:
$phpWord = new PhpWord();
To create your Word file from this object you need to save it using the Word2007 Writer:
$objWriter = IOFactory::createWriter($phpWord, 'Word2007');
$objWriter->save('MyDocument.docx');
It’s no use saving an empty document, though, so let’s put some content in there.
PHPWord has two basic objects: containers and elements. Unsurprisingly, containers can hold elements as well as other containers. Some examples for containers are headers, footers, textruns (which represent paragraphs), tables, rows and cells. Elements are texts, links, images, checkboxes and more. Most containers and elements can receive style declarations which we will not cover here. Please read the docs for further information on styling.
The basic container that holds all the others is the section which has to be added directly to thePhpWord object we just created. So if you only want to produce a simple text document all you have to do is add some text to the section. Basically you need the following code:
$phpWord = new PhpOfficePhpWordPhpWord();
$section = $phpWord->addSection();
$section->addText('Hello World');

$objWriter = PhpOfficePhpWordIOFactory::createWriter($phpWord, 'Word2007');
$objWriter->save('MyDocument.docx');
And there you have your first document! Granted, it’s a blank page with „Hello World!“ as content. So let’s spice it up a bit and create header, footer and a body containing a table (check out the PHPWord Samples for the complete table example and others).
$phpWord = new PhpOfficePhpWordPhpWord();
$section = $phpWord->addSection();

$header = $section->addHeader();
$header->addText('This is my fabulous header!');

$footer = $section->addFooter();
$footer->addText('Footer text goes here.');

$textrun = $section->addTextRun();
$textrun->addText('Some text. ');
$textrun->addText('And more Text in this Paragraph.');

$textrun = $section->addTextRun();
$textrun->addText('New Paragraph! ', ['bold' => true]);
$textrun->addText('With text...', ['italic' => true]);

$rows = 10;
$cols = 5;
$section->addText('Basic table', ['size' => 16, 'bold' => true]);

$table = $section->addTable();
for ($row = 1; $row <= 8; $row++) { $table->addRow();
    for ($cell = 1; $cell <= 5; $cell++) { $table->addCell(1750)->addText("Row {$row}, Cell {$cell}");
    }
}

$objWriter = PhpOfficePhpWordIOFactory::createWriter($phpWord, 'Word2007');
$objWriter->save('MyDocument.docx');
Step by step: Let’s take a closer look at this
First we create our PhpWord object and add a section to it. Then we add a header to the section and add some text. The footer follows accordingly. Those two objects will then be displayed on every page of your document (as expected). But PHPWord of course provides more options for headers and footers. You can create a special header for the first page, you can add tables for more precise text positioning, your footer can show page numbers etc.
Next we add some text. As you can see in the example we add two textruns which in turn get added some text. These text parts could be styled individually as you can see in the second paragraph. The first text part („New Paragraph!“) is bold, while the next („With text…“) is italic. If you add text to the section directly PHPWord will create a textrun for you, so the text will be in a new paragraph. However, this paragraph will be in the given style and you can not emphazise parts of it through styling. You can see this in the example in the code line $section->addText('Basic table', ['size' => 16, 'bold' => true]);
Furthermore we add a table to the section. A table obviously needs some rows and cells. As we only want a basic table to show how it’s done we use a loop for adding eight rows to our table. Again in a loop we add five cells (1750 twips wide) to each row displaying the row and cell count as text.
Finally, we save the PhpWord object using the Word2007 writer. This is the resulting document MyDocument.docx (fig. 3)
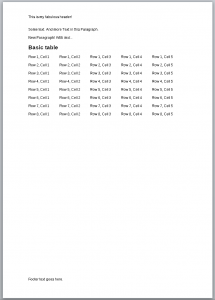
Fig. 3: A table with eight rows and five cells
As you can see, PHPWord is straight forward. You always start with a new PhpWord object and add a section. This section holds all the elements of your document, be it a header, footer or other elements you want displayed in the document body.
It’s up to you, how complex it gets. PHPWord provides possibilities for lists, charts, watermarks, images, interactive elements like input fields and checkboxes and much more. Check out the docs and look through the samples in the GitHub repository.
The advantage of this approach is the ability to dynamically create very complex documents only using PHP. You are completely free to style and arrange your content and all is handled in your code. The disadvantage is that managing all the detailed settings (like margins of pictures, logos, page margins, text styles and so on) of a Word document in PHPWord can lead to messy code if you don’t pay close attention from the start. Especially if you want to create your documents in different styles for different clients.
It may be more desirable for you to concentrate only on creating your content in PHP, while keeping template files in your clients designs on your server. This can be achieved with merging …
Go crazy and merge pre-existing templates with created files!
Imagine you need to create documents, that contain complex content and need to be in the corporate design of your different recipients or customers. Ideally you can create the document content dynamically in PHP using PHPWord and merge this content into existing corporate design templates stored on your server. This way, if the corporate design of your customers changes, you only need to replace the template, while your content generation remains untouched.
Strictly speaking this method has nothing to do with PHPWord, but combining the benefits of the previously introduced methods of templating and content creation seems the logical next step.
Let’s take a general look at how the merging can be done taking advantage of the XML structures of Word documents. A .docx file can be unpacked like a .zip archive with an archive tool like 7zip. If you unpack a .docx file you will see the following base structure:
- /_rels
- /docProps
- /word
|- /_rels
|- /theme
|- document.xml
|- fontTable.xml
|- numbering.xml
|- settings.xml
|- styles.xml
|- stylesWithEffects.xml
|- webSettings.xml
- [Content_Types].xml
There might be additional files, for example a header1.xml or a footer1.xml, or additional folders, but for our example we concentrate on the base files in the /word folder.
All your documents content can be found in the document.xml. If you take a look you’ll see something like that:
                Some text.


                And more Text in this Paragraph.


            ...

        ...

            ...
You see a XML structure with the root node beeing w:document. It contains a w:body that in turn contains all the paragraphs w:p.
In your templates you need to mark the place were the content should be merged into. You can do this by putting a placeholder variable in there, e. g. $CONTENT$. Now you can use an XPath parser, like PHPs own DOMXPath class, to locate this placeholder. As text in a Word file is always stored in a w:p element, you only need to find the w:p tag containing your placeholder. The XPath to query for the placeholder is something like
//w:p[contains(translate(normalize-space(), " ", „“),’$CONTENT$’)]
In the XML of your dynamically created document all your content can be found in via the Xpath //w:document/w:body/*[not(self::w:sectPr)].
So let’s merge the content of our Table example from the last chapter into a nice template with a header, footer and watermark in the background (fig. 4).

Fig. 4: A template with header, footer, and watermark
This template is named MergeTemplate.docx. You can see that it only contains the $CONTENT$-marker. The code you need to merge the contents from MyDocument.docx (meaning the two paragraphs and the table) into this template is as follows:
$templateFile  = "MergeTemplate.docx";
$generatedFile = "MyDocument.docx";
$targetFile    = "MergeResult.docx";

// copy template to target
copy($templateFile, $targetFile);

// open target
$targetZip = new ZipArchive();
$targetZip->open($targetFile);
$targetDocument = $targetZip->etFromName('word/document.xml');
$targetDom      = new DOMDocument();
$targetDom->loadXML($targetDocument);
$targetXPath = new DOMXPath($targetDom);
$targetXPath->registerNamespace("w", "http://schemas.openxmlformats.org/wordprocessingml/2006/main");

// open source
$sourceZip = new ZipArchive();
$sourceZip->open($generatedFile);
$sourceDocument = $sourceZip->getFromName('word/document.xml');
$sourceDom      = new DOMDocument();
$sourceDom->loadXML($sourceDocument);
$sourceXPath = new DOMXPath($sourceDom);
$sourceXPath->registerNamespace("w", "http://schemas.openxmlformats.org/wordprocessingml/2006/main");

/** @var DOMNode $replacementMarkerNode node containing the replacement marker $CONTENT$ */
$replacementMarkerNode = $targetXPath->query('//w:p[contains(translate(normalize-space(), " ", ""),"$CONTENT$")]')[0];

// insert source nodes before the replacement marker
$sourceNodes = $sourceXPath->query('//w:document/w:body/*[not(self::w:sectPr)]');

foreach ($sourceNodes as $sourceNode) {
    $imported = $replacementMarkerNode->ownerDocument->importNode($sourceNode, true);
    $inserted = $replacementMarkerNode->parentNode->insertBefore($imported, $replacementMarkerNode);
}

// remove $replacementMarkerNode from the target DOM
$replacementMarkerNode->parentNode->removeChild($replacementMarkerNode);

// save target
$targetZip->addFromString('word/document.xml', $targetDom->saveXML());
$targetZip->close();
First you create the target file by copying the template file to the name MergeResult.docx. You can skip this step if you don’t need to keep your template file. Next you open your template and the source for the content with ZipArchive or another library of your liking. To find the DomNode containing your $CONTENT$-placeholder, you use the XPath query introduced earlier.
To fetch the contents from MyDocument.docx you want to get all nodes in the document body that are not section properties (sectPr – those contain for example style informations). Then you take your $CONTENT$-node as reference and insert the found contens before it. Lastly you have to delete your marker node and save the XML.
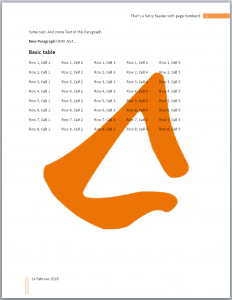
Fig. 5: Dynamically created contet in a Word-created template
And finally our dynamically created content is merged into our nice template.
There are some stepping stones, though, depending on how complex your merge project gets. We won’t go into the specifics here, because the XML of Word documents is a whole article of its own, but let’s list some of them:
- Styles and settings in Word documents are referenced by IDs. Of course those differ in your template and your generated Word. So when merging the two you need to use the correct IDs to reference styles and settings to text.
- Word breaks its text strings up for version control purposes. So make sure your placeholder variable in the templates is not broken up before attempting to replace it.
- In the /word/document.xml of your template you’ll find the section properties to your placeholder section. Copy those to every section of your generated content.
- Remember to copy the styling files from your generated Word to the final merge result.
- If your generated document contains pictures or other external content, remember to copy those files into your target Word document and make sure the IDs are still correct.
- Word is very complex in styling lists. So if your content contains styled lists, it’s easier to tell PHPWord to do the styling and copy the corresponding files rather than trying to have the styling defined in the template files and linking it to your lists.
Obviously the devil is in the details. There may be some more difficulties while merging depending on your use case, but this article only wants to give you the general idea of how it can be done. The basic merging example here doesn’t touch on styled text or media. Dive into the XML structure of Word documents to make sure you understand how your merged document has to be put together.
Final thoughts
It is worth mentioning that at the moment of writing this article PHPWord is still in version 0.14. so you may encounter functionality in Word that is not yet implemented in the library. Additionally, the GitHub repository was without a maintainer for a while so there are some pending pull request. But a new maintainer has been found so work on this library continues.
But: PHPWord is a powerful tool to create Word documents and hopefully one of the described methods will help you generate your perfect Word documents.
unsplash-logoKelly Sikkema
Первое с чего нужно начать, это создать .docx документ на своем ПК, например template.docx
Для примера я взял куски из договора на создание сайта

Подготавливаем шаблон word документа
Открываем word файл и начинаем его шаблонизировать путем замены текста на переменные синтаксиса типа ${data}
У нас будут следующие переменные, которые мы будем подставлять в документ:
${num_dogovor} — номер догвоора
${city} — город
${date} — текущая дата
${name} — ФИО
${company} — Название Организации ООО
${summa} — Сумма
${summa_str} — Сумма, прописью
${summa_nalog} — Налог, 6% от суммы
${summa_nalog_str} — Налог, 6% от суммы (прописью)
${ur_address} — Юр. адрес
${post_address} — Почтовый адрес
${company_ogrn} — ОГРН
${company_okpo} — ОКПО
${company_kpp} — КПП
${company_inn} — ИНН организации
${company_bank} — Название банка
${company_ks} — кор. счет
${company_rs} — р. счет
${direktor} — ФИО директора
Далее скачиваем библиотеку PhpWord
//Подключаем библиотеку
require $_SERVER["DOCUMENT_ROOT"].'/lib/phpword/autoload.php';

//создаем класс
$phpWord = new  PhpOfficePhpWordPhpWord();
$_doc = new PhpOfficePhpWordTemplateProcessor('template.docx');
Синтаксис для замены переменных
$_doc->setValue('num_dogovor', $number_document);
Подготовим пару переменных
//запихиваем сумму в переменную, что бы далее с ней поработать
$summa = 25550;

// делаем красивый формат
$summa_format = number_format($summa, 2, ',', ' ');

// вычислим налог от суммы (6%) и так же определим в отдельную переменную красивый формат суммы
$summa_nalog = $summa * 6 / 100;
$summa_nalog_format = number_format($summa_nalog, 2, ',', ' ');
Подставляем, заменяем переменные в word документ
$_doc->setValue('num_dogovor', $number_document);
$_doc->setValue('city', "г. Сочи");
$_doc->setValue('name', "Масков Илон Гениальнович");
$_doc->setValue('date', date("d.m.Y"));
$_doc->setValue('company', "ООО НЕ ПРОХОДИТЕ МИМО");
$_doc->setValue('summa', $summa_format);
$_doc->setValue('summa_str', num2str($summa));
$_doc->setValue('summa_nalog', $summa_nalog);
$_doc->setValue('summa_nalog_str', num2str($summa_nalog));
$_doc->setValue('company_ogrn', "ОГРН компании");
$_doc->setValue('company_inn', "ИНН компании");
$_doc->setValue('company_kpp', "КПП компании");
$_doc->setValue('company_bank', "Какое то название банка");
$_doc->setValue('company_bik', "бик банка");
$_doc->setValue('company_ks', "12342352456235");
$_doc->setValue('company_rs', "66666666666");
$_doc->setValue('ur_address', "Юридический адрес, какой-нибудь");
$_doc->setValue('post_address', "Фактический адрес");
$_doc->setValue('direktor', "Альберт Енштейн");
$_doc->setValue('company_okpo', "4444444");
Сохраняем сгенерированный word файл на сервер
$img_Dir_Str = "/files/";
$img_Dir = $_SERVER['DOCUMENT_ROOT']."/". $img_Dir_Str;
@mkdir($img_Dir, 0777);
$file = str_replace("/","-", "Договор №".date("d-m-Y")).".docx";

$_doc->saveAs($img_Dir.$file);
Обратите внимание на строку: $_doc->setValue('summa_str', num2str($summa)); и $_doc->setValue('summa_nalog_str', num2str($summa_nalog));
В ней мы используем функцию перевода числа в прописной вид
Функция перевода числа в прописной вид
function num2str($num) {
	$nul='ноль';
	$ten=array(
		array('','один','два','три','четыре','пять','шесть','семь', 'восемь','девять'),
		array('','одна','две','три','четыре','пять','шесть','семь', 'восемь','девять'),
	);
	$a20=array('десять','одиннадцать','двенадцать','тринадцать','четырнадцать' ,'пятнадцать','шестнадцать','семнадцать','восемнадцать','девятнадцать');
	$tens=array(2=>'двадцать','тридцать','сорок','пятьдесят','шестьдесят','семьдесят' ,'восемьдесят','девяносто');
	$hundred=array('','сто','двести','триста','четыреста','пятьсот','шестьсот', 'семьсот','восемьсот','девятьсот');
	$unit=array( // Units
		array('коп.' ,'коп.' ,'коп.',	 1),
		array('рубль'   ,'рубля'   ,'рублей'    ,0),
		array('тысяча'  ,'тысячи'  ,'тысяч'     ,1),
		array('миллион' ,'миллиона','миллионов' ,0),
		array('миллиард','милиарда','миллиардов',0),
	);
	//
	list($rub,$kop) = explode('.',sprintf("%015.2f", floatval($num)));
	$out = array();
	if (intval($rub)>0) {
		foreach(str_split($rub,3) as $uk=>$v) { // by 3 symbols
			if (!intval($v)) continue;
			$uk = sizeof($unit)-$uk-1; // unit key
			$gender = $unit[$uk][3];
			list($i1,$i2,$i3) = array_map('intval',str_split($v,1));
			// mega-logic
			$out[] = $hundred[$i1]; # 1xx-9xx
			if ($i2>1) $out[]= $tens[$i2].' '.$ten[$gender][$i3]; # 20-99
			else $out[]= $i2>0 ? $a20[$i3] : $ten[$gender][$i3]; # 10-19 | 1-9
			// units without rub & kop
			if ($uk>1) $out[]= morph($v,$unit[$uk][0],$unit[$uk][1],$unit[$uk][2]);
		} //foreach
	}
	else $out[] = $nul;
	$out[] = morph(intval($rub), $unit[1][0],$unit[1][1],$unit[1][2]); // rub
	$out[] = $kop.' '.morph($kop,$unit[0][0],$unit[0][1],$unit[0][2]); // kop
	return trim(preg_replace('/ {2,}/', ' ', join(' ',$out)));
}

/**
 * Склоняем словоформу
 * @ author runcore
 */
function morph($n, $f1, $f2, $f5) {
	$n = abs(intval($n)) % 100;
	if ($n>10 && $n<20) return $f5;
	$n = $n % 10;
	if ($n>1 && $n<5) return $f2;
	if ($n==1) return $f1;
	return $f5;
}
Статья подготовлена для Вас сайтом kisameev.ru
Перевел: Кисамеев Дмитрий
Урок создан: 3 октября 2021 г.
Статью просмотрели: 8571
Понравилось: 17
На момент написания данной статьи релиз PHPWord датируется 8 июля 2011 года. Да еще бета версия. Конечно старовата, но с другой стороны, если класс хорошо выполняет поставленную задачу, то почему бы и нет?!
К делу: скачиваем, подключаем обычным инклюдом и вперед.
Создаем экземпляр класса:
$PHPWord = new PHPWord();
Необязательно, но можем добавить, что по-умолчанию используем шрифт Arial размером 14 пунктов.
$PHPWord->setDefaultFontName(‘Arial’);
$PHPWord->setDefaultFontSize(14);
Добавляем новый раздел в документ:
$section = $PHPWord->createSection([array $sectionStyle]);
По-умолчанию этот метод создает страницу A4 книжной ориентации. Поля: по 2,5 см верхнее, левое и правое и 2 см нижнее.
Массив $sectionStyle может содержать:
$sectionStyle = array(
‘orientation’ => ‘landscape’, // альбомная ориентация страницы
‘marginTop’ => ‘0’, // по-умолчанию равен 1418* и соответствует 2,5 см отступа сверху
‘marginLeft’ => ‘0’, // по-умолчанию равен 1418* и соответствует 2,5 см отступа слева
‘marginRight’ => ‘0’, // по-умолчанию равен 1418* и соответствует 2,5 см отступа справа
‘marginBottom’ => ‘0’, // по-умолчанию равен 1134* и соответствует 2 см отступа снизу
‘pageSizeW’ => ‘8419’, // по-умолчанию равен 11906* и соответствует 210 мм по ширине
‘pageSizeH’ => ‘11906’, // по-умолчанию равен 16838* и соответствует 297 мм по высоте
‘borderColor’=>’999999’, // Цвет ненужного бордюра
‘borderSize’=>’100’, // Ширина ненужного бордюра*
);
* В качестве единиц измерения тут используются типографские твипы. Для справки: 1 твип равен 1/567 см.
Текст
У нас есть пустая страница. Для начала добавим обычную текстовую строку. Для этого существует метод addText() и два синтаксиса:
$section->addText(string $text[, array $textStyle]);
// или
$section->addText(string $text[, string $fontStyleName[, string $paragraphStyleName]]);
На практике выглядит это так:
$section->addText(‘Создание сайтов — Лаборатории WEB’);
Тут стоит сделать замечание: автор PHPWord решил, что все, кто будет пользоваться его классом будут работать в кодировке отличной от UTF-8. Если просматривать код PHPWord, то там везде, как через мясорубку, все текстовые переменные проходят через utf8_encode(). Вот в моем случае это сыграло не на руку, потому что я как раз-то работаю с UTF-8.
Что делать, если вы тоже работаете с UTF-8? Варианта как минимум два:
- перед тем как отдать строки в PHPWord измените их кодировку на не UTF-8 с помощью iconv();
- прошерстите PHPWord и удалите все utf8_encode() оттуда.
Мной был выбран второй вариант.
Двигаемся дальше… Наведем «красоту» в тексте.
Первый вариант — это объявление всякой «красоты» непосредственно в методе addText().
$section->addText(‘Разработка сайтов — Лаборатория WEB’, array(
‘name’ => ‘Tahoma’,
‘color’ => ‘990000’,
‘bold’ => true,
‘italic’ => true,
‘size’ => 16,
));
Второй вариант — объединение набора «красот» в стиль.
$PHPWord->addFontStyle(‘fStyle’, array(
‘name’ => ‘Tahoma’,
‘color’ => ‘990000’,
‘bold’ => true,
‘italic’ => true,
‘size’ => 16,
));
$section->addText(‘Изготовление сайтов — Лаборатория WEB’, ‘fStyle’);
Сейчас был задан стиль для шрифта, но можно задать стиль и для параграфа:
$PHPWord->addParagraphStyle(‘pStyle’, array(
‘align’ => ‘center’,
‘spaceBefore’ => 100, // отступ сверху
‘spaceAfter’ => 100, // отступ снизу
‘spacing’ => 100, // межстрочный интервал
));
И использовать эти стили как совместно, так и по-отдельности:
$section->addText(‘Поддержка сайтов — Лаборатория WEB’, ‘fStyle’, ‘pStyle’);
// или
$section->addText(‘Продвижение сайтов — Лаборатория WEB’, null, ‘pStyle’);
Если вам нужно объединить в одном параграфе несколько текстовых блоков с разным форматированием, то для этого существует метод createTextRun():
$textrun = $section->createTextRun(‘pStyle’);
$textrun->addText(‘Жирный’, array(
‘bold’ => true
));
$textrun->addText(‘Курсив’, array(
‘italic’ => true
));
$textrun->addText(‘Красный’, array(
‘color’=>’990000’
));
С текстом, вроде, все ясно. Перенос курсора на следующую строку:
$section->addTextBreak([int $number]); // В скобках указывается количество строк на которое нужно перейти. По-умолчанию $number = 1
Изображения
Изображения вставляются также просто, как и текст. Для этого используется метод addImage():
$section->addImage(string $srcLocalImage[, array $imageStyle]);
Массив $imageStyle может содержать:
$imageStyle = array(
‘width’ => ‘200’, // в пикселях
‘height’ => ‘200’, // в пикселях
‘align’ => ‘center’, // left || right || center
)
На практике это выглядит так:
$section->addImage(‘path-to-image.png’, $imageStyle);
Ссылки
Метод для добавления ссылки addLink():
$section->addLink(string $url, [string $text[, string $linkFontStyle[, string $paragraphStyle]]]);
Наведение «красоты» для ссылки:
$PHPWord->addLinkStyle(‘lStyle’, array(
‘name’ => ‘Tahoma’,
‘color’ => ‘990000’,
‘bold’ => true,
‘italic’ => true,
‘size’ => 16,
));
На практике это выглядит:
$section->addLink(‘http://www.w-lab.ru’, ‘Лаборатория WEB’, ‘lStyle’, ‘pStyle’);
Таблицы
С таблицами немного сложнее. Для добавления таблицы на страницу используем метод addTable(). Как и в случае с текстом, для таблиц существует два синтаксиса. Первый выглядит так:
$table = $section->addTable([array $tableStyle]);
Массив $tableStyle может содержать:
$tableStyle = array(
‘cellMarginTop’ => 0, // отступ от ячейки сверху *
‘cellMarginRight’ => 0, // отступ от ячейки справа *
‘cellMarginBottom’ => 0, // отступ от ячейки снизу *
‘cellMarginLeft’ => 0, // отступ от ячейки слева *
);
* в твипах.
cellMarginTop, cellMarginRight, cellMarginBottom, cellMarginLeft можно заменить одним cellMargin.
Второй синтаксис:
$table = $section->addTable([string $tableStyleName]);
Для того, чтобы назначить $tableStyleName, вызовем метод addTableStyle():
$PHPWord->addTableStyle(string $styleName, array $tableStyle[, array $firstRowTableStyle]);
Как можно понять из названия, массив $firstRowTableStyle отвечает за стили первой строки таблицы.
На практике:
$word->addTableStyle(‘tStyle’, array(
‘borderSize’ => 6,
‘borderColor’ => ‘999999’,
‘cellMarginTop’ => 40,
‘cellMarginRight’ => 20,
‘cellMarginBottom’ => 40,
‘cellMarginLeft’ => 20,
), array(
‘borderSize’ => 12,
‘borderColor’ => ‘000000’,
‘cellMargin’ => 80,
));
$table = $section->addTable(‘tStyle’);
Тут мы назначили для ячеек всей таблицы ширину границы 6, цвет серый, с отступами 40 20 40 20. А для ячеек первой строки ширину границы 12, черного цвета с отступами 80 со всех сторон.
Теперь в таблицу нужно добавить строку. Для этого существует метод addRow():
$table->addRow([int $rowHeight]); // $rowHeight — высота строки в твипах
И методом addCell() добавляем ячейку:
$cell = $table->addCell(int $cellWidth[, array $cellStyle]);
Здесь $cellWidth — ширина ячейки в твипах, а массив $cellStyle может содержать:
$cellStyle = array(
‘valign’ => ‘center’, // top || bottom || center || both
‘textDirection’ => PHPWord_Style_Cell:TEXT_DIR_BTLR, // PHPWord_Style_Cell:TEXT_DIR_BTLR || PHPWord_Style_Cell:TEXT_DIR_TBRL
‘bgColor’ => ‘fafafa’,
‘borderTopSize’ => 6,
‘borderRightSize’ => 6,
‘borderBottomSize’ => 6,
‘borderLeftSize’ => 6,
‘borderSize’ => 6, // вместо borderTopSize, borderRightSize, borderBottomSize, borderLeftSize
‘borderTopColor’ => ‘999999’,
‘borderRightColor’ => ‘999999’,
‘borderBottomColor’ => ‘999999’,
‘borderLeftColor’ => ‘999999’,
‘borderColor’ => ‘999999’, // вместо borderTopColor, borderRightColor, borderBottomColor, borderLeftColor
);
Последнее, что нужно сделать — это добавить содержимое в новую ячейку (добавим текст). Сделать это можно двумя способами:
$cell = $table->addCell();
$cell->addText(‘Создание Langing Page — Лаборатория WEB’);
// или
$table->addCell()->addText(‘Разработка Langing Page — Лаборатория WEB’);
Списки
Добавление на страницу нумерованных и ненумерованных списков осуществляется методом addListItem():
$section->addListItem(string $text[, int $depth[, string $textStyle[, array $listStyle[, string $paragraphStyle]]]]);
Здесь $depth — глубина (вложенность) списка от 1 до 9, а массив $listType может состоять из:
$listType = array(
‘listType’ => PHPWord_Style_ListItem:TYPE_NUMBER, // одноуровневый нумерованный список
);
Также параметр ‘listType’ может принимать следующие значения:
- PHPWord_Style_ListItem:TYPE_NUMBER_NESTED — многоуровневый нумерованный список;
- PHPWord_Style_ListItem:TYPE_BULLET_FILLED — ненумерованный список с маркерами в виде закрашенных кругов;
- PHPWord_Style_ListItem:TYPE_BULLET_EMPTY — ненумерованный список с маркерами в виде незакрашенных кругов;
- PHPWord_Style_ListItem:TYPE_SQUARE_FILLED — ненумерованный список с маркерами в виде закрашенных квадратов.
Колонтитулы
При работе с колонтитулами нужно помнить, что они привязываются к разделу и выглядят одинаково на всех страницах, относящихся к одному и тому же разделу.
Создадим верхний и нижний колонтитулы и добавим в них содержимое:
$header = $section->createHeader();
$header->addText(‘Лаборатория WEB’);$footer = $section->createFooter();
$footer->addPreserveText(‘Страница {PAGE} из {NUMPAGES}’, array(
‘italic’ => true,
),
array(
‘align’ => ‘right’,
));
Метод addPreserveText() существует специально для добавления номеров страниц.
Разное
$section->addPageBreak(); // Разрыв страницы
Метаданные:
$meta = $PHPWord->getProperties();
$meta->setTitle(‘Название’);
$meta->setSubject(‘Тема’);
$meta->setCreator(‘Автор’);
$meta->setCompany(‘Учреждение’);
$meta->setDescription(‘Заметки’);
$meta->setCategory(‘Группа’);
$meta->setLastModifiedBy(‘Автор изменений’);
$meta->setKeywords(‘Ключевые слова’);
$meta->setCreated(time()); // Дата и время создания документа
$meta->setModified(time()); //Дата и время последнего изменения документа
Сохранение файлов
В файл на жесткий:
$writer = PHPWord_IOFactory::createWriter($PHPWord, ‘Word2007’);
$writer->save(‘document.docx’);
Вывод вопроса на скачивание:
header(«Content-Type: application/msword»);
header(«Content-Transfer-Encoding: binary»);
header(‘Content-Disposition: attachment;filename=»document.docx»‘);
header(‘Cache-Control: max-age=0’);
$writer = PHPWord_IOFactory::createWriter($PHPWord, ‘Word2007’);
$writer->save(‘php://output’);