
PhpSpreadsheet
![]()

PhpSpreadsheet is a library written in pure PHP and offers a set of classes that
allow you to read and write various spreadsheet file formats such as Excel and LibreOffice Calc.
PHP Version Support
LTS: Support for PHP versions will only be maintained for a period of six months beyond the
end of life of that PHP version.
Currently the required PHP minimum version is PHP 7.4, and we will support that version until 28th June 2023.
See the composer.json for other requirements.
Installation
Use composer to install PhpSpreadsheet into your project:
composer require phpoffice/phpspreadsheet
If you are building your installation on a development machine that is on a different PHP version to the server where it will be deployed, or if your PHP CLI version is not the same as your run-time such as php-fpm or Apache’s mod_php, then you might want to add the following to your composer.json before installing:
{
    "require": {
        "phpoffice/phpspreadsheet": "^1.28"
    },
    "config": {
        "platform": {
            "php": "7.4"
        }
    }
}
and then run
to ensure that the correct dependencies are retrieved to match your deployment environment.
See CLI vs Application run-time for more details.
Additional Installation Options
If you want to write to PDF, or to include Charts when you write to HTML or PDF, then you will need to install additional libraries:
For PDF Generation, you can install any of the following, and then configure PhpSpreadsheet to indicate which library you are going to use:
- mpdf/mpdf
- dompdf/dompdf
- tecnickcom/tcpdf
and configure PhpSpreadsheet using:
// Dompdf, Mpdf or Tcpdf (as appropriate)
$className = PhpOfficePhpSpreadsheetWriterPdfDompdf::class;
IOFactory::registerWriter('Pdf', $className);
or the appropriate PDF Writer wrapper for the library that you have chosen to install.
Chart Export
For Chart export, we support following packages, which you will also need to install yourself using composer require
- jpgraph/jpgraph (this package was abandoned at version 4.0.
You can manually download the latest version that supports PHP 8 and above from jpgraph.net) - mitoteam/jpgraph (fork with php 8.1 support)
and then configure PhpSpreadsheet using:
// to use jpgraph/jpgraph
Settings::setChartRenderer(PhpOfficePhpSpreadsheetChartRendererJpGraph::class);
//or
// to use mitoteam/jpgraph
Settings::setChartRenderer(PhpOfficePhpSpreadsheetChartRendererMtJpGraphRenderer::class);
One or the other of these libraries is necessary if you want to generate HTML or PDF files that include charts; or to render a Chart to an Image format from within your code.
They are not necessary to define charts for writing to Xlsx files.
Other file formats don’t support writing Charts.
Documentation
Read more about it, including install instructions, in the official documentation. Or check out the API documentation.
Please ask your support questions on StackOverflow, or have a quick chat on Gitter.
Patreon
I am now running a Patreon to support the work that I do on PhpSpreadsheet.
Supporters will receive access to articles about working with PhpSpreadsheet, and how to use some of its more advanced features.
Posts already available to Patreon supporters:
- The Dating Game
- A look at how MS Excel (and PhpSpreadsheet) handle date and time values.
- Looping the Loop
- Advice on Iterating through the rows and cells in a worksheet.
And for Patrons at levels actively using PhpSpreadsheet:
- Behind the Mask
- A look at Number Format Masks.
The Next Article (currently Work in Progress):
- Formula for Success
- How to debug formulae that don’t produce the expected result.
My aim is to post at least one article each month, taking a detailed look at some feature of MS Excel and how to use that feature in PhpSpreadsheet, or on how to perform different activities in PhpSpreadsheet.
Planned posts for the future include topics like:
- Tables
- Structured References
- AutoFiltering
- Array Formulae
- Conditional Formatting
- Data Validation
- Value Binders
- Images
- Charts
After a period of six months exclusive to Patreon supporters, articles will be incorporated into the public documentation for the library.
PHPExcel vs PhpSpreadsheet ?
PhpSpreadsheet is the next version of PHPExcel. It breaks compatibility to dramatically improve the code base quality (namespaces, PSR compliance, use of latest PHP language features, etc.).
Because all efforts have shifted to PhpSpreadsheet, PHPExcel will no longer be maintained. All contributions for PHPExcel, patches and new features, should target PhpSpreadsheet master branch.
Do you need to migrate? There is an automated tool for that.
License
PhpSpreadsheet is licensed under MIT.
На смену PHPExcel пришла мощная библиотека PhpSpreadsheet от тех же разработчиков.
Документация: https://phpspreadsheet.readthedocs.io/en/latest/
API: https://phpoffice.github.io/PhpSpreadsheet/
Создание exсel файла
use PhpOfficePhpSpreadsheetSpreadsheet;
use PhpOfficePhpSpreadsheetWriterXlsx;

$spreadsheet = new Spreadsheet();
$sheet = $spreadsheet->getActiveSheet();
$sheet->setTitle('Worksheet 1');
$sheet->setCellValue('A1', 'Hello World !');

// Writer можно создать так:
$writer = IOFactory::createWriter($spreadsheet, 'Xlsx');
//$writer = new Xlsx($spreadsheet);

$writer->save($path . '/export/worksheet__' . date('Ymd_h:i:s') . '.xlsx');

$spreadsheet->disconnectWorksheets();
Запись данных в exсel с помощью итератора
Более информативный пример со стилями документа, строк, ячеек по условию.
use PhpOfficePhpSpreadsheetIOFactory;
use PhpOfficePhpSpreadsheetSpreadsheet;
use PhpOfficePhpSpreadsheetStyleColor;
use PhpOfficePhpSpreadsheetStyleConditionalFormattingWizard;
use PhpOfficePhpSpreadsheetStyleFill;
use PhpOfficePhpSpreadsheetStyleStyle;

try {
  $path = $path = realpath(__DIR__);

  // Способ #1. Стили для шапки
  $headerStyles = [
    'font'=>[
      'color'=>[
        'rgb' => '000'
      ],
      'bold' => true,
      'size' => 13
    ],
    'fill'=>[
        'fillType' => Fill::FILL_SOLID,
        'startColor' => [
          'rgb' => Color::COLOR_CYAN
        ]
    ],
  ];

  // Способ #2. Стили для данных
  $redStyle = new Style(false, true);
  $redStyle->getFill()
    ->setFillType(Fill::FILL_SOLID)
    ->getStartColor()->setARGB(Color::COLOR_RED);

  // Создание документа, листа и "писателя"
  $spreadsheet = new Spreadsheet();
  $sheet = $spreadsheet->getActiveSheet();
  // Название листа
  $sheet->setTitle('Worksheet 1');
  $writer = IOFactory::createWriter($spreadsheet, 'Xlsx');

  // Стили документа по умолчанию
  $spreadsheet->getDefaultStyle()
    ->getFont()
    ->setName('Arial')
    ->setSize(12);

  // Дополнительные стили
  // ...

  // Выравнивание по центру в строке
  //$spreadsheet->getActiveSheet()->getStyle('A1')->getAlignment()->setHorizontal(Alignment::HORIZONTAL_CENTER);

  // Установка стилей для шапки
  $spreadsheet->getActiveSheet()->getStyle('A1:F1')->applyFromArray($headerStyles);

  // Шапка
  $headerItems = [
    'First Name',
    'Last Name',
    'Email',
    'Gender',
    'Age',
    'Class'
  ];

  // Добавление шапки
  $sheet->fromArray($headerItems); // A1 start

  // Данные из файла для примера (чаще всего из базы данных)
  $file = file_get_contents('student-data.json');
  $studentData = json_decode($file,true);

  // Расчёт крайней правой точки листа
  $extremeCellValue = $sheet
    ->getCellByColumnAndRow(
        count($headerItems), count($studentData) + 1
    )
    ->getCoordinate();

  // Форматирование ячеки по условию (если студенту меньше 18 лет)
  $conditionalStyles = [];
  $wizardFactory = new Wizard("A1:$extremeCellValue");
  $textWizard = $wizardFactory->newRule(Wizard::CELL_VALUE);

  $textWizard->lessThan(18)
    ->setStyle($redStyle);
  $conditionalStyles[] = $textWizard->getConditional();

  $spreadsheet->getActiveSheet()
    ->getStyle($textWizard->getCellRange())
    ->setConditionalStyles($conditionalStyles);

  // Данные вставлять со 2-й строки
  $row = 2;
  foreach ($studentData as $student):
    unset($student['id']); // Исключаем id из данных (если необходимо)
    $sheet->fromArray($student, null, 'A'.$row); // A2 start
    $row++;
  endforeach;

  // Сохранение файла
  $writer->save($path . '/export/students_list__' . date('Ymd_h:i:s') . '.xlsx');
} catch (Exception $e) {
  $error = date('Y/m/d H:i:s') . ': ' . $e->getMessage() . PHP_EOL;
  error_log($error, 3, $path . '/runtime/app.log');
  die($e->getMessage() . PHP_EOL);
}
Чтение данных из файла exсel
use PhpOfficePhpSpreadsheetIOFactory;

$reader = IOFactory::createReader('Xlsx');
$spreadsheet = $reader->load('students_list.xlsx');
// Только чтение данных
$reader->setReadDataOnly(true);

// Количество листов
$sheetsCount = $spreadsheet->getSheetCount();
// Данные в виде массива
$data = $spreadsheet->getActiveSheet()->toArray();

foreach ($data as $item):
  var_dump($item);
endforeach;
About
In this code snippet, we’ll learn how to read and write excel files in PHP.
We will use the PHPSpreadsheet library to read/write Excel files and we’ll learn how to read cells, find a specific string in a row or column, write to cells, set cell styling and formatting(like setting the border, background color, etc) and we’ll see how to insert images.
Let’s see how to do it in the example below.
Installing PHPSpreadsheet:
Install PHPSpreadsheet using Composer by opening your project directory in cmd and running this:
composer require phpoffice/phpspreadsheet
If you don’t know what Composer is or how to use it check out this post I made.
Note:
You might have to enable the gd PHP extension for this to work. I first got this error:
Problem 1
– Root composer.json requires phpoffice/phpspreadsheet ^1.18 -> satisfiable by phpoffice/phpspreadsheet[1.18.0].
– phpoffice/phpspreadsheet 1.18.0 requires ext-gd * -> it is missing from your system. Install or enable PHP’s gd extension.
FIX: If you are using XAMPP like I am open up your php.ini file and add this: extension=gd to the bottom of it. Then save the file and restart the Apache webserver and try to install the package again.
Reading Excel Files Code:
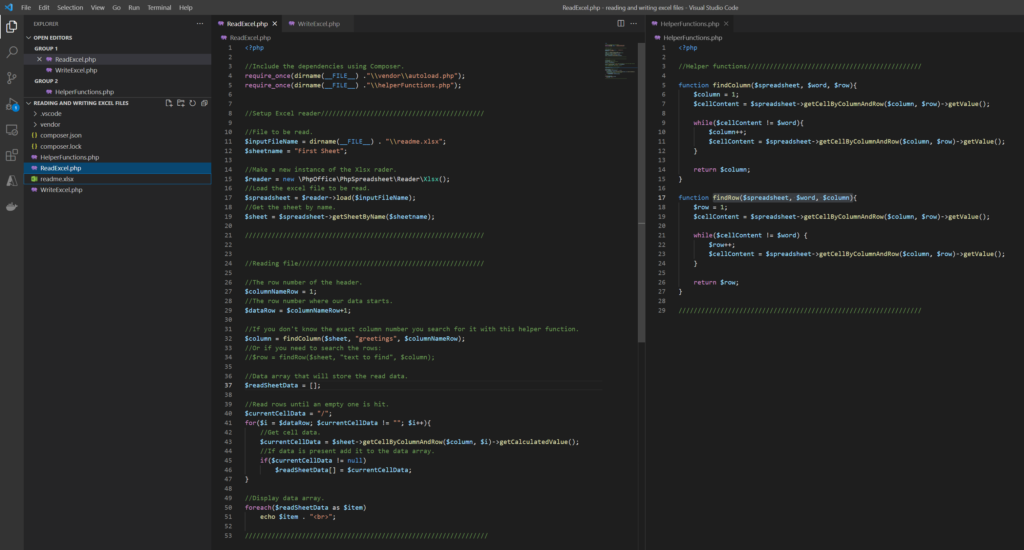
ReadExcel.php
<?php

//Include the dependencies using Composer.
require_once(dirname(__FILE__) ."\vendor\autoload.php");
require_once(dirname(__FILE__) ."\helperFunctions.php");


//Setup Excel reader///////////////////////////////////////////

//File to be read.
$inputFileName = dirname(__FILE__) . "\readme.xlsx";
$sheetname = "First Sheet";

//Make a new instance of the Xlsx rader.
$reader = new PhpOfficePhpSpreadsheetReaderXlsx();
//Load the excel file to be read.
$spreadsheet = $reader->load($inputFileName);
//Get the sheet by name.
$sheet = $spreadsheet->getSheetByName($sheetname);

///////////////////////////////////////////////////////////////


//Reading file/////////////////////////////////////////////////

//The row number of the header.
$columnNameRow = 1;
//The row number where our data starts.
$dataRow = $columnNameRow+1;

//If you don't know the exact column number you search for it with this helper function.
$column = findColumn($sheet, "greetings", $columnNameRow);
//Or if you need to search the rows:
//$row = findRow($sheet, "text to find", $column);

//Data array that will store the read data.
$readSheetData = [];

//Read rows until an empty one is hit.
$currentCellData = "/";
for($i = $dataRow; $currentCellData != ""; $i++){
    //Get cell data.
    $currentCellData = $sheet->getCellByColumnAndRow($column, $i)->getCalculatedValue();
    //If data is present add it to the data array.
    if($currentCellData != null)
        $readSheetData[] = $currentCellData;
}

//Display data array.
foreach($readSheetData as $item)
    echo $item . "<br>";

////////////////////////////////////////////////////////////////
HelperFunctions.php
<?php

//Helper functions//////////////////////////////////////////////

function findColumn($spreadsheet, $word, $row){
    $column = 1;
    $cellContent = $spreadsheet->getCellByColumnAndRow($column, $row)->getValue();

    while($cellContent != $word){
        $column++;
        $cellContent = $spreadsheet->getCellByColumnAndRow($column, $row)->getValue();
    }

    return $column;
}

function findRow($spreadsheet, $word, $column){
    $row = 1;
    $cellContent = $spreadsheet->getCellByColumnAndRow($column, $row)->getValue();

    while($cellContent != $word) {
        $row++;
        $cellContent = $spreadsheet->getCellByColumnAndRow($column, $row)->getValue();
    }

    return $row;
}

////////////////////////////////////////////////////////////////
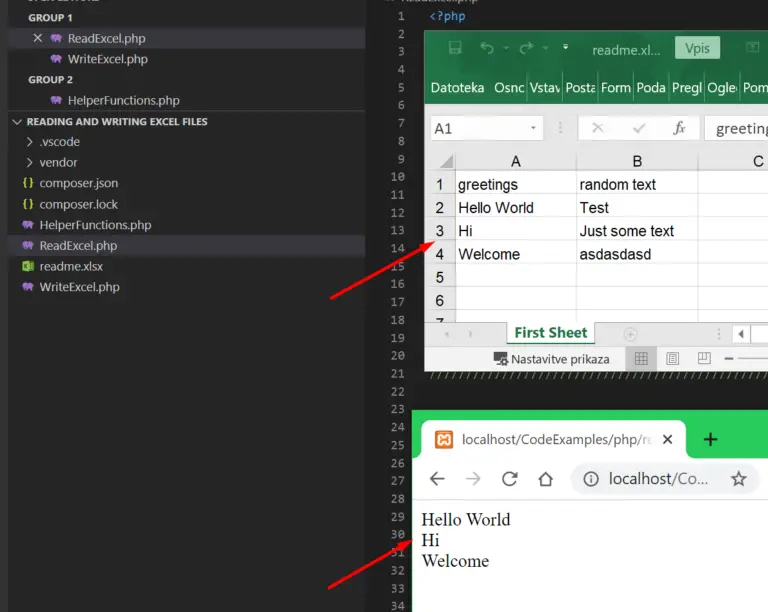
Resulting Output:
Writing Excel Files Code:
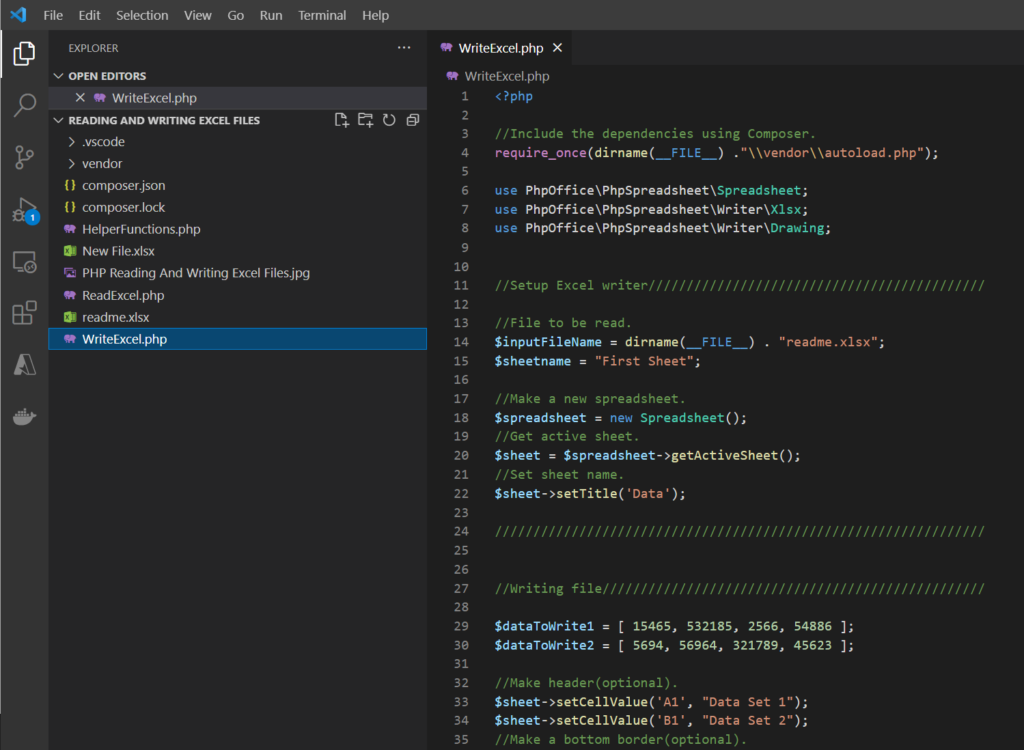
WriteExcel.php
<?php

//Include the dependencies using Composer.
require_once(dirname(__FILE__) ."\vendor\autoload.php");

use PhpOfficePhpSpreadsheetSpreadsheet;
use PhpOfficePhpSpreadsheetWriterXlsx;
use PhpOfficePhpSpreadsheetWriterDrawing;


//Setup Excel writer////////////////////////////////////////////

//File to be read.
$inputFileName = dirname(__FILE__) . "readme.xlsx";
$sheetname = "First Sheet";

//Make a new spreadsheet.
$spreadsheet = new Spreadsheet();
//Get active sheet.
$sheet = $spreadsheet->getActiveSheet();
//Set sheet name.
$sheet->setTitle('Data');

////////////////////////////////////////////////////////////////


//Writing file//////////////////////////////////////////////////

$dataToWrite1 = [ 15465, 532185, 2566, 54886 ];
$dataToWrite2 = [ 5694, 56964, 321789, 45623 ];

//Make header(optional).
$sheet->setCellValue('A1', "Data Set 1");
$sheet->setCellValue('B1', "Data Set 2");
//Make a bottom border(optional).
$sheet->getStyle('A1:B1')->getBorders()->getBottom()->setBorderStyle(PhpOfficePhpSpreadsheetStyleBorder::BORDER_THIN);
//Set header background color(optional).
$sheet->getStyle('A1:B1')->getFill()->setFillType(PhpOfficePhpSpreadsheetStyleFill::FILL_SOLID)->getStartColor()->setRGB('d2d3d1');
//Set text bold.
$sheet->getStyle("A1:B1")->getFont()->setBold(true);
//Set auto resize(optional).
$sheet->getColumnDimension('A')->setAutoSize(true);

//For more styling/formatting info. check out the official documentation: https://phpspreadsheet.readthedocs.io/en/latest/

//Write data 1.
$i = 2;
foreach($dataToWrite1 as $item){
    //Write value into cell.
    $sheet->setCellValue('A'.$i, $item);
    //Set cell alignment(optional).
    $sheet->getStyle('A'.$i)->getAlignment()->setHorizontal(PhpOfficePhpSpreadsheetStyleAlignment::HORIZONTAL_CENTER);

    $i++;
}

//Write data 2.
$i = 2;
foreach($dataToWrite2 as $item){
    //Write value into cell.
    $sheet->setCellValue('B'.$i, $item);
    //Set cell alignment(optional).
    $sheet->getStyle('B'.$i)->getAlignment()->setHorizontal(PhpOfficePhpSpreadsheetStyleAlignment::HORIZONTAL_CENTER);

    $i++;
}

//Adding an image.

//Create drawing.
$objDrawing = new PhpOfficePhpSpreadsheetWorksheetMemoryDrawing();


//Get image path.
$imgPathName = dirname(__FILE__) . "\PHP Reading And Writing Excel Files.jpg";

//Create gdImage from image.
$gdImage = imagecreatefromjpeg($imgPathName);
//Set gdImage as a property to drawing.
$objDrawing->setImageResource($gdImage);

//Set drawing properties.
$objDrawing->setName('Thumbnail');
$objDrawing->setDescription('PHP Reading And Writing Excel Files');
//Set file type.
$objDrawing->setRenderingFunction(PhpOfficePhpSpreadsheetWorksheetMemoryDrawing::RENDERING_JPEG);
$objDrawing->setMimeType(PhpOfficePhpSpreadsheetWorksheetMemoryDrawing::MIMETYPE_DEFAULT);

//Set position.
$objDrawing->setCoordinates('D1');
//Set position offset.
$objDrawing->setOffsetX(50);
$objDrawing->setOffsetY(50);
//Set width and height.
$objDrawing->setWidth(400);
$objDrawing->setHeight(100);

$objDrawing->setWorksheet($sheet);

//Write excel file.
$savePath = dirname(__FILE__);

$writer = new Xlsx($spreadsheet);
$writer->save($savePath . "\New File.xlsx");

////////////////////////////////////////////////////////////////
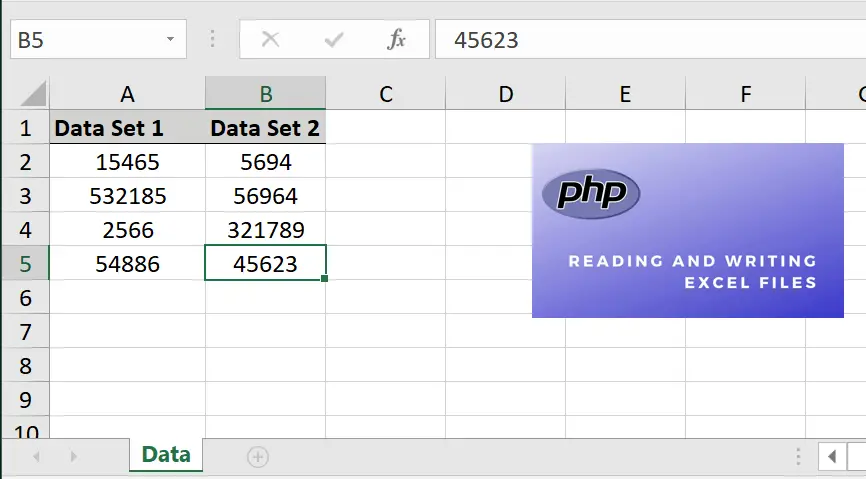
Resulting Output:
Related Posts:
 report this ad
Leave a Reply
Welcome to a quick tutorial and example on how to create Excel spreadsheets with PHP. Need to generate a report in an Excel Spreadsheet? Yes, we can actually do that quite easily.
In order to generate Excel files in PHP, we need to use a third-party library. PHPSpreadsheet is a good recommendation, and the easy way to get it is to use Composer – composer require phpoffice/phpspreadsheet. Thereafter, a code snippet to generate an Excel Spreadsheet:
require "vendor/autoload.php";use PhpOfficePhpSpreadsheetSpreadsheet;use PhpOfficePhpSpreadsheetWriterXlsx;$spreadsheet = new Spreadsheet();$sheet = $spreadsheet->getActiveSheet();$sheet->setCellValue("A1", "Hello World!");$writer = new Xlsx($spreadsheet);$writer->save("demo.xlsx");
That covers the essentials, but let us walk through a few more examples in this guide – Read on!
ⓘ I have included a zip file with all the source code at the start of this tutorial, so you don’t have to copy-paste everything… Or if you just want to dive straight in.
TLDR – QUICK SLIDES

Fullscreen Mode – Click Here
TABLE OF CONTENTS
DOWNLOAD & NOTES

First, here is the download link to the example source code as promised.
QUICK NOTES
- A copy of PHPSpreadsheet is not included in the zip file. Please download the latest version from their official website.
If you spot a bug, feel free to comment below. I try to answer short questions too, but it is one person versus the entire world… If you need answers urgently, please check out my list of websites to get help with programming.
EXAMPLE CODE DOWNLOAD
Click here to download the source code, I have released it under the MIT license, so feel free to build on top of it or use it in your own project.
CREATING XLSX SPREADSHEETS IN PHP

All right, let us now get into the example of creating an Excel spreadsheet in PHP.
STEP 1) DOWNLOAD PHPSPREADSHEET
- PHP cannot generate Excel files natively, we need to use a third-party library called PHPSpreadsheet.
- One of the easier ways to get PHPSpreadsheet is to use a package manager called Composer. A hassle to download and install that, but it’s a one-time effort… Plus, Composer does offer a ton of other packages.
- Once Composer is installed – Fire up the command line, navigate to your project folder, and run
composer require phpoffice/phpspreadsheet. Composer will automatically download the latest version into thevendor/folder. - Check out the Official PHPSpreadsheet documentation for more.
STEP 2) PHP SIMPLE SPREADSHEET
2-create-spreadsheet.php
<?php
// (A) LOAD PHPSPREADSHEET
require "vendor/autoload.php";
use PhpOfficePhpSpreadsheetSpreadsheet;
use PhpOfficePhpSpreadsheetWriterXlsx;

// (B) CREATE A NEW SPREADSHEET
$spreadsheet = new Spreadsheet();

// (C) GET WORKSHEET
$sheet = $spreadsheet->getActiveSheet();
$sheet->setTitle("Basic");
$sheet->setCellValue("A1", "Hello World!");
$sheet->setCellValue("A2", "Goodbye World!");

// (D) ADD NEW WORKSHEET + YOU CAN ALSO USE FORMULAS!
$spreadsheet->createSheet();
$sheet = $spreadsheet->getSheet(1);
$sheet->setTitle("Formula");
$sheet->setCellValue("A1", "5");
$sheet->setCellValue("A2", "6");
$sheet->setCellValue("A3", "=SUM(A1:A2)");

// (E) OUTPUT
$writer = new Xlsx($spreadsheet);

// (E1) SAVE TO A FILE ON THE SERVER
$writer->save("demoA.xlsx");
echo "OK!";

/* (E2) OR FORCE DOWNLOAD
header("Content-Type: application/vnd.openxmlformats-officedocument.spreadsheetml.sheet");
header("Content-Disposition: attachment;filename="demoA.xlsx"");
header("Cache-Control: max-age=0");
header("Expires: Fri, 11 Nov 2011 11:11:11 GMT");
header("Last-Modified: " . gmdate("D, d M Y H:i:s") . " GMT");
header("Cache-Control: cache, must-revalidate");
header("Pragma: public");
$writer->save("php://output");
*/
Yep, the basic usage shouldn’t be too difficult to understand –
- (A) Load and use the PHPSpreadsheet library.
- (B) Create a new spreadsheet.
- (C & D) Add your worksheets and populate the cells.
- (E) Save or output the spreadsheet.
EXTRA) ARRAY TO SPREADSHEET
3-array-spreadsheet.php
<?php
// (A) LOAD PHPSPREADSHEET
require "vendor/autoload.php";
use PhpOfficePhpSpreadsheetSpreadsheet;
use PhpOfficePhpSpreadsheetWriterXlsx;

// (B) CREATE A NEW SPREADSHEET
$spreadsheet = new Spreadsheet();

// (C) GET WORKSHEET
$sheet = $spreadsheet->getActiveSheet();
$sheet->setTitle("Arr");

// (D) DATA ARRAY TO WORKSHEET
$data = [
  ["Name", "Email", "Tel"],
  ["Jon Doe", "jon@doe.com", "123456"],
  ["Joe Doe", "joe@doe.com", "234567"],
  ["Joy Doe", "joy@doe.com", "345678"],
];
$cRow = 0; $cCol = 0;
foreach ($data as $row) {
  $cRow ++; // NEXT ROW
  $cCol = 65; // RESET COLUMN "A"
  foreach ($row as $cell) {
    $sheet->setCellValue(chr($cCol) . $cRow, $cell);
    $cCol++;
  }
}

// (E) OUTPUT
$writer = new Xlsx($spreadsheet);
$writer->save("demoB.xlsx");
echo "OK!";
As for writing an array to a Spreadsheet, this is really subjective to how the array is formatted. This is just a quick example of how a 2-dimension array can be “converted” into an Excel Spreadsheet.
ALTERNATIVE) CSV FILES
4-csv.php
<?php
// (A) DATA TO WRITE
$data = [
  ["Apple", "Orange", "Pear"],
  ["Grape", "Durian", "Papaya"]
];

// (B) WRITE TO CSV FILE
$file = fopen("fruits.csv", "w");
foreach ($data as $line) { fputcsv($file, $line); }
fclose($file);
echo "OK";
If all of the above is too much, a quick alternative is to generate CSV files instead. It is a lot easier, with just 3 “main functions” to know:
fopen(FILE, MODE)to create a new CSV file.fputcsv(FILE, LINE)to put a line into the CSV file. Take note of thatLINEis an array.fclose(FILE)to properly close and write the CSV file.
But of course, CSV is pure data – No formulas, no setting of cell colors, no column dimensions, and all the funky stuff.
LINKS & REFERENCES
- Here is a massive list of commonly used Excel formula that you might find useful.
- Display Excel As HTML In PHP – Code Boxx
- PHPSpreadsheet Quickstart Tutorial – Code Boxx
- Export Data From MYSQL To Excel In PHP – Code Boxx
TUTORIAL VIDEO
INFOGRAPHIC CHEAT SHEET

THE END

Thank you for reading, and we have come to the end of this short tutorial. I hope this has helped you to create Excel files in PHP for your project, and if you have anything to share with this guide, please feel free to comment below. Good luck and happy coding!
Getting Started With PhpSpreadsheet
Installation
Install Dependencies
If you are running PHP 7.2 on Ubuntu, you will need to run the following commands to install the required package dependencies:
sudo apt-get install php7.2-gd php7.2-mbstring php7.2-zip -y
If you are running PHP 7.4 on Ubuntu, you will need to run the following commands to install the required package dependencies:
sudo apt-get install php7.4-gd php7.4-mbstring php7.4-zip -y
Install The Package
Run the following command to install the spreadsheet package.
composer require phpoffice/phpspreadsheet
Hello World Example
The following example will create an Excel spreadsheet with the first row of cells having «Hello» and «World».
<?php

require_once(__DIR__ . '/vendor/autoload.php');


$spreadsheet = new PhpOfficePhpSpreadsheetSpreadsheet();
$spreadsheet->getProperties();
$sheet = $spreadsheet->getActiveSheet();
$sheet->setCellValue('A1', 'Hello');
$sheet->setCellValue('B1', 'World');

$writer = new PhpOfficePhpSpreadsheetWriterXlsx($spreadsheet);
$writer->save('HelloWorld.xlsx');
Why Have A Writer?
The reason there is a «writer» is because the package is for creating spreadsheets and is not specific to Excel. Thus if you want to produce a CSV file you could just change the last two lines to:
$writer = new PhpOfficePhpSpreadsheetWriterCsv($spreadsheet);
$writer->save('HelloWorld.csv');
The «writer» is like a «driver» that takes what you programmed in the «spreadsheet» and is responsible for creating the file in the relevant format.
This is a good idea in principle as it creates a separation of concerns and allows you to easily create whatever file type you wish with very little changes to your code (in theory).
However, this can lead you to an «invalid state». E.g. if you create a spreadsheet that performs calculations, that will not get «saved out» to a CSV. That format can literally only save the values in it.
Looping Through Cell Indexes.
The examples for using this tool tend to show cell index values like A1, and B3.
However, cell indexes can be accessed using an array format like [1,1] instead, which can be a lot more useful from a programmatic perspective. E.g. you just want the next cell to the right/left, and don’t want to worry about which letter that correlates to.
<?php

require_once(__DIR__ . '/vendor/autoload.php');

$spreadsheet = new PhpOfficePhpSpreadsheetSpreadsheet();
$spreadsheet->getProperties();
$sheet = $spreadsheet->getActiveSheet();

$sheet->getCellByColumnAndRow(1, 1)->setValue('header column 1');
$sheet->getCellByColumnAndRow(2, 1)->setValue('header column 2');
$sheet->getCellByColumnAndRow(1, 2)->setValue('second row value 1');
$sheet->getCellByColumnAndRow(2, 2)->setValue('second row value 2');

$writer = new PhpOfficePhpSpreadsheetWriterXlsx($spreadsheet);
$writer->save('HelloWorld.xlsx');
Just remember that these indexes start at 1, not 0, and its column first, not row.
References
- PHP Spreadsheet — Official Docs
- PHP Spreadsheet — Official Docs — File Formats
Last updated: 23rd February 2022
First published: 19th February 2020