
It is a best practice, to protect the Macro (VBA Code) from other users to edit or view. In this article, we explain to create a simple macro and protect the same “VBA Project” using a password in Excel from other users.
Implementation:
Follow the below steps to protect your excel macro with a password:
Step 1: Open an excel file, to create a simple “hello world” macro.
Step 2: Press Alt + F11 – to open Visual Basic Editor.
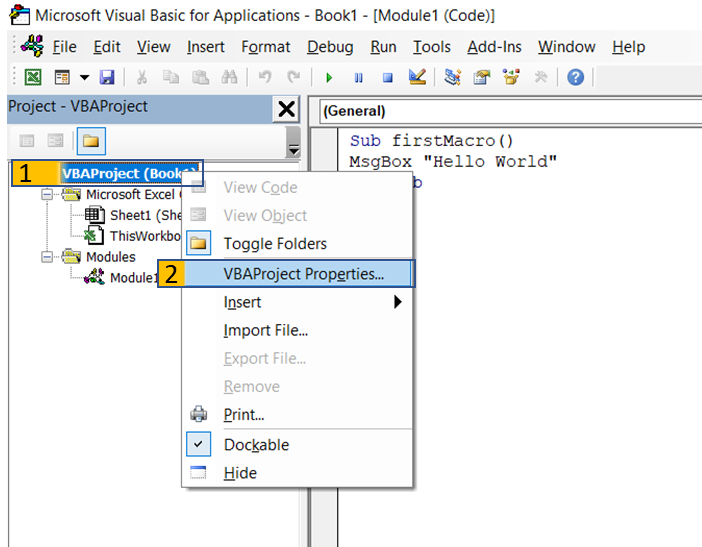
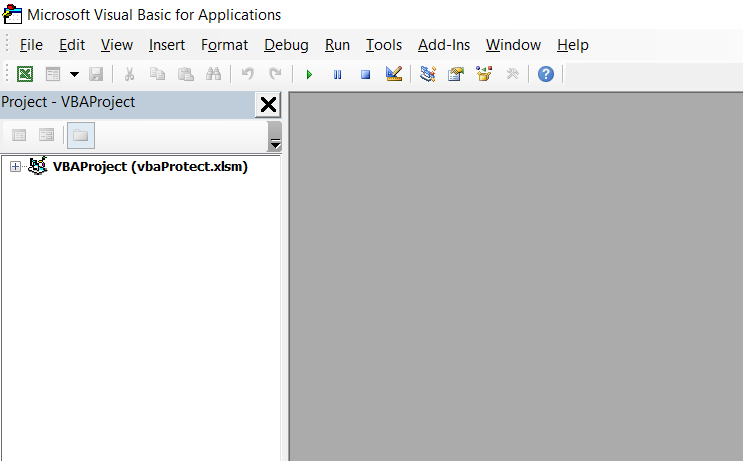
Step 3: Click Insert >> Module, which will add a new module as in Img1.
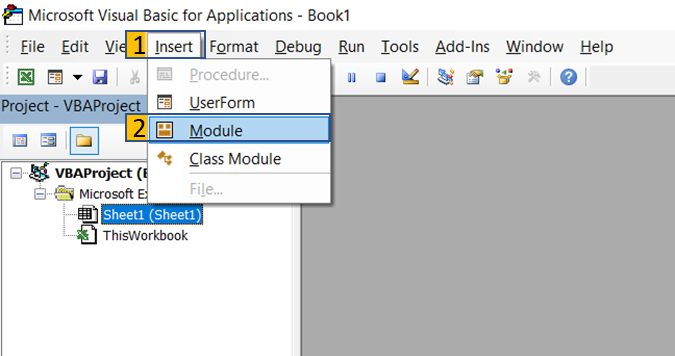
Img 1
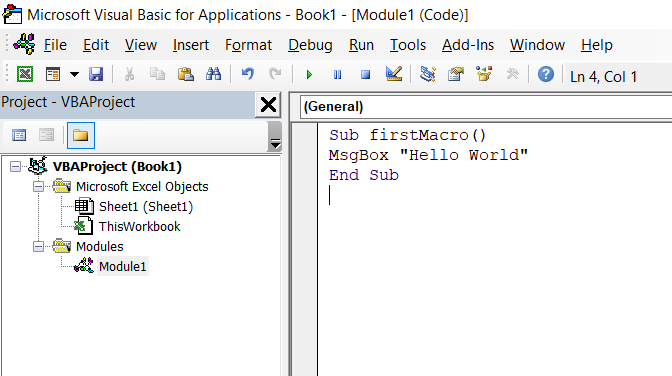
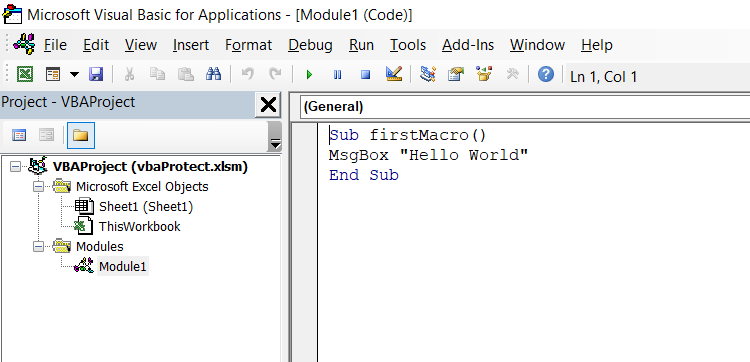
Step 4: Type the below code in “code window”.
Sub firstMacro()
MsgBox "Hello World"
End Sub
Step 5: Right-click “VBAProject (Book1)” and then click “VBAProject Properties”.
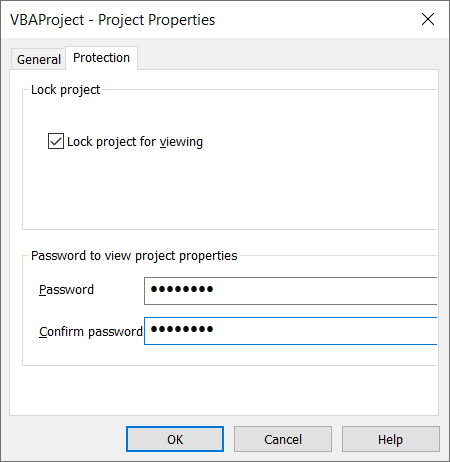
Step 6: GoTo Protection Tab >> Check “Lock project for viewing” and type your password in both Password and Confirm password input text boxes. Press “OK”
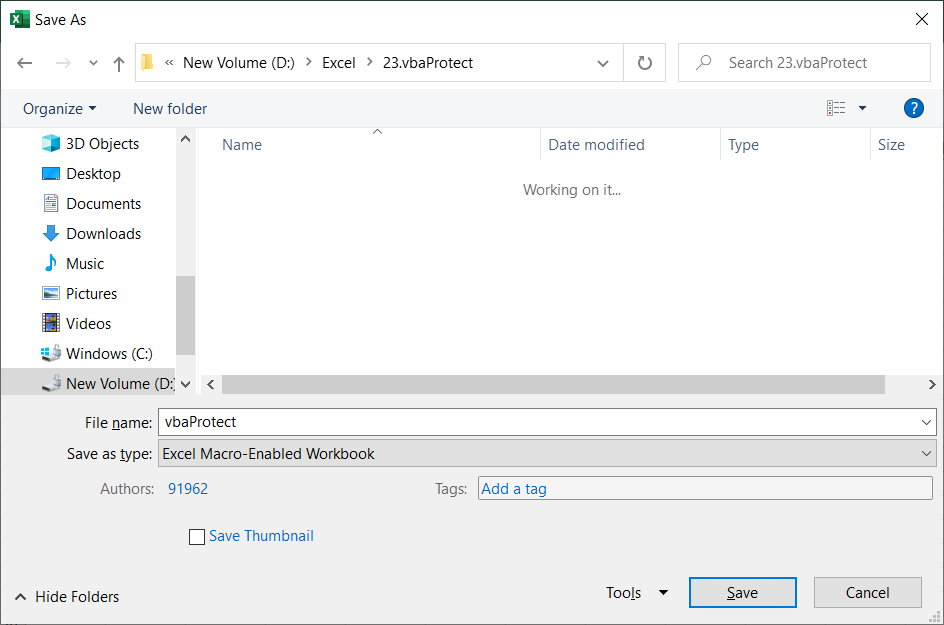
Step 7: Save your Excel workbook as Excel Macro-Enabled Workbook (*.xlsm) and close
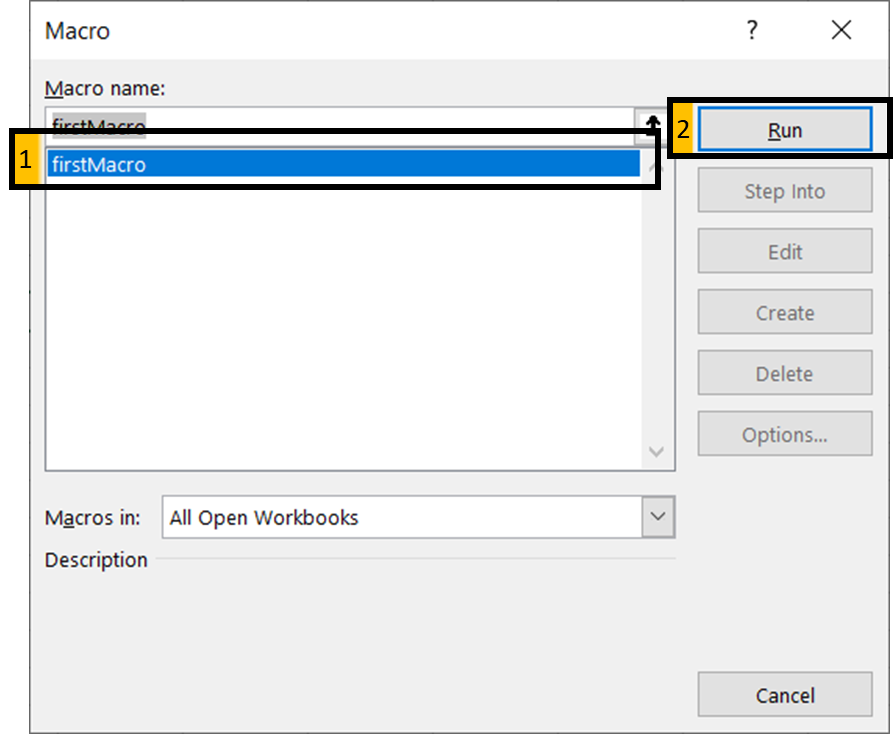
Step 8: Now reopen your excel file. Press Alt+F8 – to open the Macro dialog box. Select the macro “firstMacro” and click “RUN”.
Step 9: Our macro will pop up below the message box. Close or press OK to hide the message box

Step 10: Press Alt + F11 – to open Visual Basic Editor. Now user cannot see any information in the VBA.
Step 11: Double click “VBAProject (vbaProtect.xlsm)”, It will ask the user to enter a password.
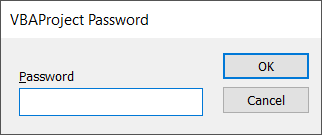
Step 12: Type your password and press “OK”. Now user can see all the excel objects and Macro.
At this point we have successfully created a macro in VBA and protected it with a password.
Get our FREE VBA eBook of the 30 most useful Excel VBA macros.
Automate Excel so that you can save time and stop doing the jobs a trained monkey could do.
Claim your free eBook

Password protecting an Excel file achieves two main objectives (1) prevents unauthorized access to the Excel file (2) prevents unauthorized modification of the Excel file.
File-level protection is not the same as worksheet protection or workbook protection. Worksheet protection controls what a user can or cannot do on a worksheet, such as inserting rows or typing into cells. Workbook protection prevents users from adding, deleting, moving, hiding or unhiding worksheets.
File-level protection allows for two passwords: (1) to open the file (2) to modify the file.
Save an Excel file with protection
'Save file with password required to open
ThisWorkbook.SaveAs Password:="fileOpenPassword"

'Save file to allow access, but requires password to modify
ThisWorkbook.SaveAs  writeResPassword:="modifyFilePassword"

'Save file with password required to open and modify the file
ThisWorkbook.SaveAs  Password:="fileOpenPassword", _
writeResPassword:="modifyFilePassword"
If the file already exists a confirmation message will be displayed. For the VBA code to operate seamlessly, you will want to turn Display Alerts off before executing the code, then turning it back on after the file has been saved.
'Save file and suppress the save as warning message
Application.DisplayAlerts = False

ThisWorkbook.SaveAs Password:="fileOpenPassword", _
writeResPassword:="modifyFilePassword"

Application.DisplayAlerts = True
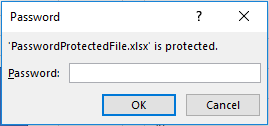
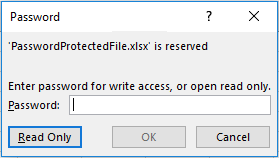
Opening a password protected Excel file
When opening a password protected Excel file manually, the password prompts are displayed:
File Open Password
File Modify Password
Using VBA it is possible to open these files and provide the password so that the prompt does not appear.
'Open password protected file
Workbooks.Open Filename:="C:UsersmarksDocumentsPasswordProtectedFile.xlsm", _
Password:="fileOpenPassword", writeResPassword:="fileModifyPassword"
The Password and writeResPassword statements should be included or excluded depending on the file being opened.
If an incorrect password is provided the following error message will show.
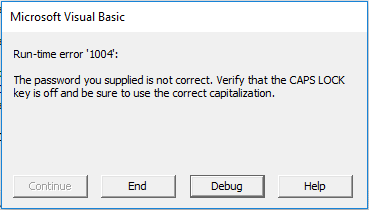
The code below will catch the error and provide a custom message.
'Catch an incorrect password
On Error Resume Next
Workbooks.Open Filename:="C:UsersmarksDocumentsPasswordProtecedFile.xlsm", _
Password:="fileOpenPassword", writeResPassword:="fileModifyPassword"

If Err.Number <> 0 Then
    MsgBox "The Password Provided is incorrect"
    Exit Sub
End If

On Error GoTo 0
Other related VBA code snippets
The following VBA Code Snippets will be useful for applying this post in a wider context.
- Protect and unprotect workbooks
- Protect and unprotect worksheets

About the author
Hey, I’m Mark, and I run Excel Off The Grid.
My parents tell me that at the age of 7 I declared I was going to become a qualified accountant. I was either psychic or had no imagination, as that is exactly what happened. However, it wasn’t until I was 35 that my journey really began.
In 2015, I started a new job, for which I was regularly working after 10pm. As a result, I rarely saw my children during the week. So, I started searching for the secrets to automating Excel. I discovered that by building a small number of simple tools, I could combine them together in different ways to automate nearly all my regular tasks. This meant I could work less hours (and I got pay raises!). Today, I teach these techniques to other professionals in our training program so they too can spend less time at work (and more time with their children and doing the things they love).
Do you need help adapting this post to your needs?
I’m guessing the examples in this post don’t exactly match your situation. We all use Excel differently, so it’s impossible to write a post that will meet everybody’s needs. By taking the time to understand the techniques and principles in this post (and elsewhere on this site), you should be able to adapt it to your needs.
But, if you’re still struggling you should:
- Read other blogs, or watch YouTube videos on the same topic. You will benefit much more by discovering your own solutions.
- Ask the ‘Excel Ninja’ in your office. It’s amazing what things other people know.
- Ask a question in a forum like Mr Excel, or the Microsoft Answers Community. Remember, the people on these forums are generally giving their time for free. So take care to craft your question, make sure it’s clear and concise. List all the things you’ve tried, and provide screenshots, code segments and example workbooks.
- Use Excel Rescue, who are my consultancy partner. They help by providing solutions to smaller Excel problems.
What next?
Don’t go yet, there is plenty more to learn on Excel Off The Grid. Check out the latest posts:
To protect a workbook, you need to use VBA’s PROTECT method. By using this method, you can use a password, or even you can activate workbook protection without a password. But there’s one thing that you need to take care of the password that you use is a CASE-SENSITIVE.
Workbook.Protect "Password"- Specify the workbook that you want to protect.
- Type and dot and select the protect method from the list or you can type “Protect”.
- Enter the password that you want to set.
- Run the code to protect the workbook.
In this tutorial, we will learn this method in different ways and we will also learn to unprotect a workbook.
Helpful Links: Run a Macro – Macro Recorder – Visual Basic Editor – Personal Macro Workbook
Protect a Workbook with Password
Below is the code that you need to use to protect a workbook with a password. In this code, you have the workbook name first and the protection method with the password.
Workbooks("Book1").Protect "test123"And when I run this code, it locks the “Book1” workbook.

Protect a Workbook without a Password
And if you want to protect a workbook without a password you need to skip the “Password” argument, just like the following code.
Workbooks("Book1").ProtectIf you are trying to protect a workbook without a password that is already protected with a password Excel will show a dialogue box to enter that password.
Unprotect a Workbook with a Password
In the same way, you can use the unprotect method to unprotect the workbook and the code for this would be like something below.
Workbooks("Book1").Unprotect "test123"There’s one thing that you need to take care of that if you are trying to unprotect a workbook that is w
Unprotect a Workbook without a Password
And if a workbook is protected without a password you can use the same method without specifying the password argument.
Protect All the Open Workbooks
In the code below, we have FOR EACH loop to loop through all the open workbooks and protect each workbook one by one using the same protect method.
'variable to use as a workbook
Dim wb As Workbook

'loop through all the open workbooks
For Each wb In Application.Workbooks

  'condition to check workbook name
  If wb.Name <> "PERSONAL.XLSB" Then

    'protect every workbook with a password
     wb.Protect "test123"

  End If

Next wb

End Sub
As I use the personal macro workbook, I have used an IF THEN ELSE statement to skip if the workbook name is “personal.xlsb”. Make sure to take care of that as well.
Protect a Closed Workbook
You can also protect and unprotect a workbook that is closed and saved on a location. Look at the following code where I have used the location of my desktop to use the file “test.xlsx”.
Sub vba_protect_workbook()
'declare varibale to use for the workbook
Dim wb As Workbook
'open the workbook that you want to protect
Set wb = Workbooks.Open("C:UsersDellDesktoptest.xlsx")
'turn off the screen-updating to _
done everything in the backend
Application.ScreenUpdating = False
'protect the workbook
wb.Protect
'close the workbook after protecting
wb.Close SaveChanges = True 'turn off the screen-updating
Application.ScreenUpdating = True
End Sub
The above code used Workbook.Open the method to open the workbook that you want to protect and then disable the screen updating to work in the backend.
Protect All the Closed Workbooks from a Folder
The following code loops through all the workbooks that are there in the folder that you specified as the path. And then open each workbook, protect it, and close it one by one.
Sub vba_protect_all_the_workbooks()

'declare variables
    Dim wb As Workbook
    Dim myPath As String
    Dim myFile As String
    Dim myExtension As String
    Dim FldrPicker As FileDialog

'optimize macro
    Application.ScreenUpdating = False
    Application.EnableEvents = False
    Application.Calculation = xlCalculationManual

'specify the folder where workbooks are saved
    myPath = "C:UsersDellDesktopfolder"

'jump to reset setting if there's an error
    On Error GoTo ResetSettings

'target file fxtension (must include wildcard "*")
    myExtension = "*.xls*"

'target path
    myFile = Dir(myPath & myExtension)

'Loop through each Excel file in folder
    Do While myFile <> ""

        'Set variable equal to opened workbook
            Set wb = Workbooks.Open(Filename:=myPath & myFile)

        'protect workbook
            wb.Protect

        'Save and Close Workbook
            wb.Close SaveChanges:=True

        'Get next file name
            myFile = Dir

    Loop

'Message Box when task is completed
  MsgBox "Done!"

'reset setting that were change for optimization
ResetSettings:
    Application.EnableEvents = True
    Application.Calculation = xlCalculationAutomatic
    Application.ScreenUpdating = True

End Sub
More on VBA Workbooks
VBA Save Workbook | VBA Close Workbook | VBA Delete Workbook | VBA ThisWorkbook | VBA Rename Workbook | VBA Activate Workbook | VBA Combine Workbook | VBA Check IF a Workbook is Open | VBA Open Workbook | VBA Check IF an Excel Workbook Exists in a Folder| VBA Create New Workbook (Excel File)
- VBA Workbook
I agree with @Richard Morgan … what you are doing should be working, so more information may be needed.
Microsoft has some suggestions on options to protect your Excel 2003 worksheets.
Here is a little more info …
From help files (Protect Method):
expression.Protect(Password, Structure, Windows)
expression Required. An expression that returns a Workbook object.
Password Optional Variant. A string that specifies a case-sensitive password for the worksheet or workbook. If this argument is omitted, you can unprotect the worksheet or workbook without using a password. Otherwise, you must specify the password to unprotect the worksheet or workbook. If you forget the password, you cannot unprotect the worksheet or workbook. It’s a good idea to keep a list of your passwords and their corresponding document names in a safe place.
Structure Optional Variant. True to protect the structure of the workbook (the relative position of the sheets). The default value is False.
Windows Optional Variant. True to protect the workbook windows. If this argument is omitted, the windows aren’t protected.
ActiveWorkbook.Protect Password:="password", Structure:=True, Windows:=True
If you want to work at the worksheet level, I used something similar years ago when I needed to protect/unprotect:
Sub ProtectSheet()
    ActiveSheet.Protect "password", True, True
End Sub

Sub UnProtectSheet()
    ActiveSheet.Unprotect "password"
End Sub

Sub protectAll()
    Dim myCount
    Dim i
    myCount = Application.Sheets.Count
    Sheets(1).Select
    For i = 1 To myCount
        ActiveSheet.Protect "password", true, true
        If i = myCount Then
            End
        End If
        ActiveSheet.Next.Select
    Next i
End Sub
Excel VBA Protecting Sheet
We can protect the Excel sheet using VBA code which does not allow the user to make any changes to the worksheet data. All they can do is just read the report. For this, we have a built-in VBA method called “Protect.”
Like we protect our worksheets in Excel; similarly, we can use VBA to protect our worksheets. There are two methods to protect the sheet using a .protect statement. One is with a password, and another is without a password. The syntax to protect a worksheet is as follows Worksheets().Protect Password.
We usually share the end report with the user or reader. When we share the end report with the user, we wish the user would not make any modifications or manipulate the end report. It is all about trust in such a scenario.
Table of contents
- Excel VBA Protecting Sheet
- Syntax
- How to Protect Sheet using VBA Code?
- Step 1: Select Sheet which needs to be protected
- Step 2: Define Worksheet Variable
- Step 3: Give Worksheet Reference
- Step 4: Select Protect Method
- Step 5: Enter Password
- Step 6: Run the Code
- Recommended Articles
Syntax
The protecting sheet involves various parameters to supply. It is unlike Unprotecting the sheet. Let us look at the syntax of the Protect method with a password.

Don’t get intimidated by looking at the syntax. Instead, have a look at the explanation of each argument below.
- Worksheet Name: First, we must mention which worksheet we will protect.
- Password: We need to enter the password we are using to protect. If we ignore this parameter, Excel will lock the sheet without a password. While unprotecting it, it will unprotect without asking for any password.
- Note: Remember the password you are giving, because if you forget, you must go through various hard ways.
- Drawing Object: If you wish to protect objects in the worksheet, you can pass the argument as TRUE or else FALSE. The default value is TRUE.
- Contents: To protect the contents of the worksheet, set the parameter as TRUE or else FALSE. The default value is FALSE. So, it will protect only locked cells. And the default value is TRUE.
- Scenarios: If there are any what-if analysis in excelWhat-If Analysis in Excel is a tool for creating various models, scenarios, and data tables. It enables one to examine how a change in values influences the outcomes in the sheet. The three components of What-If analysis are Scenario Manager, Goal Seek in Excel, and Data Table in Excel.read more scenarios, we can also protect them. To protect TRUE or else FALSE. The default value is TRUE.
- User Interface Only: If you want to protect the user interface other than Macro, it should be TRUE. If this argument is omitted, it will protect Macros and the user interface. If you set the argument to TRUE, it will only protect the user interface. The default value is FALSE.
- Allow Formatting Cells: If you want to allow the user to format the cell, then you can set the parameter to TRUE or else FALSE. The default value is FALSE.
- Allow Formatting Columns: If you want to allow the user to format any column in the protected sheet, then you can set the parameter to TRUE or else FALSE. The default value is FALSE.
- Allow Formatting Rows: If you want to allow the user to format any row in the protected sheet, then you can set the parameter to TRUE or else FALSE. The default value is FALSE.
- Allow Insert Columns in VBA: If you wish to allow the user to insert new columns, then you need to set this to TRUE. The default value is FALSE.
- Allow Insert Rows: If you wish to allow the user to insert new rowsTo insert rows we use worksheet method with the insert command to insert a row, we also provide a row reference where we want to insert another row similar to the columns.read more, you must set this to TRUE. The default value is FALSE.
- Allow Insert Hyperlinks: If you wish to allow the user to insert hyperlinks, then you need to set this to TRUE. The default value is FALSE.
- Allow Deleting Columns: If you wish to allow the user to delete columns in VBAIn VBA, deleting columns is simple. To select the column, we must first use the COLUMNS property, and then construct the syntax for the column delete method in VBA as follows: Columns (Column Reference). Deleteread more, then you need to set this to TRUE. The default value is FALSE.
- Allow Deleting Rows: If you wish to allow the user to delete rows, you need to set this to TRUE. The default value is FALSE.
- Allow Sorting: If you wish to allow the user to sort the data, you need to set this to TRUE. The default value is FALSE.
- Allow Filtering: If you wish to allow the user to filter the data, then you need to set this to TRUE. The default value is FALSE.
- Allow Using Pivot Tables: If you wish to allow the user to use pivot tablesA Pivot Table is an Excel tool that allows you to extract data in a preferred format (dashboard/reports) from large data sets contained within a worksheet. It can summarize, sort, group, and reorganize data, as well as execute other complex calculations on it.read more, then you need to set this to TRUE. The default value is FALSE.
How to Protect Sheet using VBA Code?
You can download this VBA Protect Sheet Excel Template here – VBA Protect Sheet Excel Template
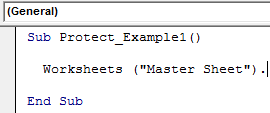
Step 1: Select the Sheet which needs to be protected
The first step is to decide which sheet we need to protect using a password to protect the sheet. Next, we need to call the sheet by name using the VBA Worksheet Object.
For example, assume you want to protect the “Master Sheet” sheet, then you need to mention the worksheet name below.
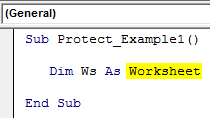
Step 2: Define Worksheet Variable
After mentioning the worksheet name, put a dot, but we don’t see any IntelliSense list to work with. So, it makes the job difficult. To access the IntelliSense list, define the variable as a worksheet.
Code:
Sub Protect_Example1()

  Dim Ws As Worksheet

End Sub
Step 3: Give Worksheet Reference
Now, set the worksheet reference to the variable as Worksheets(“Master Sheet”).
Code:
Sub Protect_Example1()

   Dim Ws As Worksheet

   Set Ws = Worksheets("Master Sheet")

End Sub
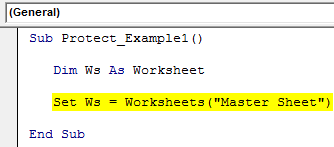
Now, the variable “Ws” holds the reference of the worksheet named “Master Sheet.” By using this variable, we can access the IntelliSense list.
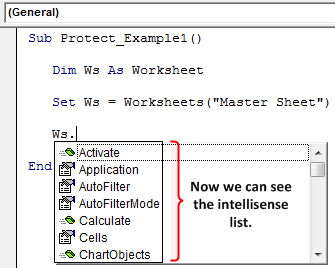
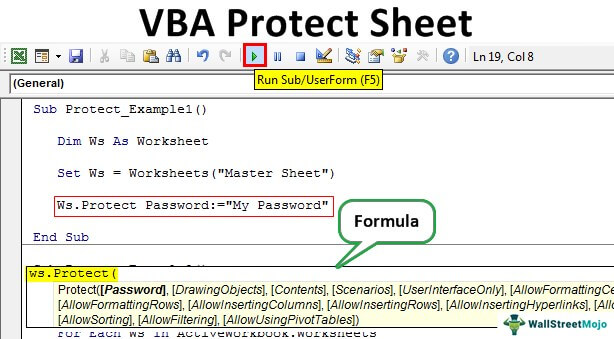
Step 4: Select Protect Method
Select the “Protect” method from the IntelliSense list.
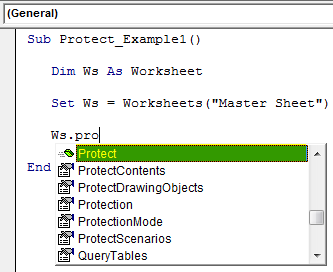
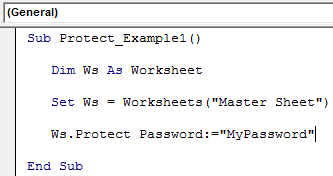
Step 5: Enter Password
Specify the password in double-quotes.
Code:
Sub Protect_Example1()

   Dim Ws As Worksheet

   Set Ws = Worksheets("Master Sheet")

   Ws.Protect Password:="MyPassword"

End Sub
Step 6: Run the Code
Run the code manually or use the shortcut key F5. Then, it will protect the sheet named “Master Sheet.”
When the sheet is protected, if we want to modify it, it shows an error message, as shown below.

We need to use loops if you wish to protect more than one sheet. Below is the example code to protect the sheet.
Sub Protect_Example2()

  Dim Ws As Worksheet

  For Each Ws In ActiveWorkbook.Worksheets
  Ws.Protect Password:="My Passw0rd"
  Next Ws

End Sub
Note: Use other parameters to experiment.
Recommended Articles
This article is a guide to VBA Protect Sheets. Here, we learn how to use Protect methods in VBA to protect or lock an Excel sheet using a password, along with a practical example and a downloadable template. Below you can find some useful Excel VBA articles: –
- VBA Do Loop
- Rename Sheet in VBA
- Activate a Sheet with VBA Code
- Use WorksheetFunction in VBA