
Содержание
- Способ 1. Удаление строки в Pandas по ее индексу
- Способ 2. Удаление строки в Pandas по ее содержанию
- Способ 3. Удаление строки в Pandas по условию
- Таблица
- Работа со строками
- Работа со столбцами
- Работа со строками и столбцами
- Отбор данных по условию
- Как удалить все строки, в столбце которой содержится определенное слово/фраза?
- 1 ответ 1
- Удаление строк, содержащих пустые ячейки, из DataFrame панд
- Pythonic + Pandorable: df[df[‘col’].astype(bool)]
- Быстрее, чем ты думаешь
- Удалить из таблицы
- Примечания и предостережения
- Compression
- ptrepack
- Caveats
- DataTypes
Pandas представляет нам отличные инструменты для обработки данных, в том числе для удаления той информации, которая нам не нужна. В этой статье мы рассмотрим различные способы удаления строк из Dataframe Pandas.

import pandas as pd
city_data = <
‘Город’:[‘Москва’, ‘Казань’, ‘Владивосток’, ‘Санкт-Петербург’, ‘Калининград’],
‘Дата основания’:[‘1147’, ‘1005’, ‘1860’, ‘1703’, ‘1255’],
‘Площадь’:[‘2511’, ‘516’, ‘331’, ‘1439’, ‘223’],
‘Население’:[‘11,9’, ‘1,2’, ‘0,6’, ‘4,9’, ‘0,4’],
‘Погода’:[‘8’, ‘8’, ’17’, ‘9’, ’12’] >
city_df = pd.DataFrame(city_data)
city_df
В Pandas для удаления строк, а также столбцов используется метод drop. Его синтаксис следующий (обратите внимание, что необязательно использовать все параметры, можно только те, которые необходимы нам):
drop(labels=None, axis=0, index=None, columns=None, level=None, inplace=False, errors=’raise’), где:
- labels – номера или названия столбцов для удаления
- axis – значение 0, если вы хотите удалить строки, либо 1, если планируете удалять столбцы
- index – определяет, какие строки надо удалить
- columns – определяет, какие столбцы надо удалить
- inplace – изменяет оригинальный Dataframe, если параметр равен True
- errors – игнорируются ошибки, если параметр задан как ignore
Способ 1. Удаление строки в Pandas по ее индексу
Для каждой строки в Dataframe Pandas присваивает индекс, обычно это число. В нашем учебном Dataframe, к примеру, у Москвы индекс 0, а у Калининграда 4. Давайте уберем запись с Владивостоком:
city_df.drop(labels = [4],axis = 0, inplace = True)
Способ 2. Удаление строки в Pandas по ее содержанию
Предположим, нам надо убрать строку с названием города «Казань», но мы не знаем его индекса и хотим ее удалить по названию. Для этого мы должны сначала изменить столбец с индексами и вместо цифровых значений задать данные из столбца «Город»:
Способ 3. Удаление строки в Pandas по условию
При помощи метода loc мы можем удалять строки по условию, к примеру мы хотим убрать из Dataframe те города, у которых площадь меньше 1 000 км2.
Так как мы будем применять математические условия, то сначала столбец «Площадь» мы должны перевести в формат int64:
city_df = city_df.loc[city_df[‘Площадь’] > 1000]
city_df
Спасибо за внимание. Дочитавшим до конца – традиционный бонус, наш ноутбук по этой статье.
Источник

Для начала подготовим Excel файл с примером, который будем использовать в качестве источника данных (всю обработку данных будем делать в Python, без сохранения в Excel, для ускорения работы). Файл должен содержать лист «Данные» с такой информацией:

import xlwings as xw
import pandas as pd
wb=xw.Book(‘Excel_Python-3.xlsx’)
data_excel = wb.sheets[‘Данные’]
data_pd = data_excel.range(‘A1:D7’).options(pd.DataFrame, header = 1, index = False).value
print (data_pd)
Итак, данные прочитаны, внесены в DataFrame data_pd, с которым мы будем работать в дальнейшем.
Таблица
data_pd.shape — функция показывается количество строк и количество столбцов в таблице. В нашем случае получим (6, 4), т.е. в нашей таблице 6 строк (заголовок не считается) и 4 столбца.
data_pd.info() — получаем общую сводку о таблицу, в т.ч. какие столбцы, их названия, тип данных в столбцах, количество не пустых элементов. При выполнении функции на обучающем примере мы получим:
RangeIndex: 6 entries, 0 to 5
Data columns (total 4 columns):
Фамилия 6 non-null object
Имя 6 non-null object
Возраст 6 non-null float64
Доход 6 non-null float64
dtypes: float64(2), object(2)
memory usage: 320.0+ bytes
Работа со строками
data_pd = data_pd.append(<‘Фамилия’:’Егоров’, ‘Имя’:’Михаил’, ‘Возраст’:’37’,’Доход’:’40000′>, ignore_index=True) — Функция Append добавляет строку в таблицу. В качестве первого аргумента в фигурных скобках мы указываем те данные, что хотим добавить в формате ‘Название столбца’ : ‘Значение’, вторым аргументом мы говорим о том, что нам не важно в какое место таблицы добавится строка (по умолчанию в конец таблицы).
data_pd.drop([0, 1], axis=0, inplace=True) — Функция Drop удаляет строки. Первым параметром в квадратных скобках мы указываем номера строк, которые хотим удалить (нумерация строк начинается в Pandas с 0), вторым аргументом указываем что хотим удалить строку (axis=0) или столбец (axis=1), последним аргументом говорим о том, что измения должны быть произведены непосредственно в той таблице, с которой мы работаем (inplace=True), в противном случае (inplace=False) Pandas создаст копию таблицы, где удалит указанные строки, что может привести к путаницу и ошибкам.
data_pd.head(3) — Выводит указанное количество строк с начала таблицы, в данном случае 3.
data_pd[:3] — Функция аналогичная head, получаем указанное количество строк с начала таблицы.
data_pd[-3:] — Получаем указанное количество строк с конца таблицы.
Работа со столбцами
data_pd.columns — Выводит названия столбцов в таблице. В нашем случае при выполнении функции получим следующее: Index([‘Фамилия’, ‘Имя’, ‘Возраст’, ‘Доход’], dtype=’object’)
data_pd.dtypes — Выводит тип данных в столбцах. В нашем случае:
Фамилия object
Имя object
Возраст float64
Доход float64
dtype: object
data_pd[‘Пол’] =[‘Муж.’,’Муж.’,’Муж.’,’Муж.’,’Муж.’,’Муж.’] — Добавляем новый столбец. В левой части в квадратных скобках указываем название столбца, в правой части — что в этом столбце должно содержаться. Обратите внимание, что количество записей должно равняться количеству строк в таблице, иначе получите ошибку «Length of values does not match length of index».
data_pd.drop([‘Фамилия’], axis=1, inplace=True) — Функция Drop, как и говорилось ранее, удаляет столбец или строку. В данном случае в качестве первого параметра в квадратных скобках указываем название столбца, далее указываем что удаляем именно столбец (axis=1), и не забываем указать что измения должны быть произведены непосредственно в той таблице, с которой мы работаем (inplace=True).
data_pd[[‘Фамилия’, ‘Имя’]] — Получаем данные только по отдельным столбцам, а не по всей таблице в целом.
Работа со строками и столбцами
data_pd.loc[[0, 1], [‘Фамилия’, ‘Имя’]] — Функция loc позволяет получить данные только по конкретным строкам и столбцам. Первым агрументом указываем номера строк, которых хотим получить, вторым — названия столбцов.
data_pd.iloc[[0, 1], [0, 1]] — Функция iloc позволяет получить данные обращаясь и к строкам и к столбцам по номерам. Показанный пример вернет теже данные, что и вариант выше (обратите внимание, что номерация столбцов, как и строк, в Pandas начинается с 0).
Отбор данных по условию
data_pd[(data_pd[‘Доход’] >= 30000) & (data_pd[‘Фамилия’] == ‘Петров’)] — Отбираем данные по двум условиям. В первом говорим о том, что доход должен быть больше 30 000, а фамилия сотрудника должна быть Петров. Обратите внимание, что используется логическое условие И (&) — это значит, что данные будут получены, если выполнены оба условия. При использовании логического условия ИЛИ (|), будут отобраны те строки, в которых выполняется хоть одно из указанных условий.
На сегодня все. Есть вопросы — задавайте в комментариях ниже.
Источник
Как удалить все строки, в столбце которой содержится определенное слово/фраза?
Всем привет, только недавно начал пользоваться и учить python. Хочу понять, как мне удалить все строки, в которых содержится слово ‘реф’ в столбце ‘тип авто’. Удалить нужно до строки сортировки.

1 ответ 1
Вот хочу вам помочь, читаю ваш вопрос «Хочу понять, как мне удалить все строки, в которых содержится слово ‘реф’ в столбце ‘тип авто’ .» Покажите мне в вашем скрипте, где вы не то что работаете, а хотя-бы упоминаете столбец ‘тип авто’? Долго думал над фразой Удалить нужно до строки сортировки . И не мог понять, какая строка сортировки может быть в той таблице, из которой надо что-то удалять. Вам не жаловаться надо, «я только начинаю учить python, пожалейте меня» . Вам надо учиться точно и аккуратно описывать проблему, если хотите получить помощь.
Отвечаю только потому, что это ваш первый вопрос на форуме, а к новичкам надо относиться (на первых порах) лояльно, нежно и трепетно.
В общем, поскольку вам лень аккуратно писать свой вопрос — мне лень аккуратно писать на него ответ. Поэтому вот вам пример, как из датафрейма «удалить строки, в которых содержится слово ‘реф’ в столбце ‘тип авто’ «
В датафрейме находиться
Результат в обоих случаях, как и ожидалось, тождественен:
Ну, а до какой строчки вам надо вставлять код и прочие тюнингование под вашу задачу — оставляю на самостоятельную работу.
Источник
Удаление строк, содержащих пустые ячейки, из DataFrame панд
У меня есть pd.DataFrame, который был создан путем анализа некоторых таблиц Excel. Столбец которого содержит пустые ячейки. Например, ниже представлен вывод частоты этого столбца, 32320 записей имеют отсутствующие значения для Арендатора.
Я пытаюсь удалить строки, где отсутствует Tenant, однако опция isnull не распознает отсутствующие значения.
В столбце есть тип данных “Объект”. Что происходит в этом случае? Как я могу удалить записи, где отсутствует арендатор?
Pandas распознает значение как нулевое, если это объект np.nan , который будет печататься как NaN в DataFrame. Ваши пропущенные значения, вероятно, пустые строки, которые Pandas не распознает как нулевые. Чтобы это исправить, вы можете преобразовать пустые строки (или все, что находится в ваших пустых ячейках) в объекты np.nan используя replace() , а затем вызвать dropna() в вашем DataFrame, чтобы удалить строки с нулевыми арендаторами.
Чтобы продемонстрировать, мы создаем DataFrame с некоторыми случайными значениями и пустыми строками в столбце Tenants :
Теперь мы заменим все пустые строки в Tenants колонке с np.nan объектов, например, так:
Теперь мы можем отбросить нулевые значения:
value_counts опускает NaN по умолчанию, поэтому вы, скорее всего, имеете дело с “”.
Итак, вы можете просто отфильтровать их, например
Там, где в ячейке есть пробел, вы не можете его увидеть, используйте
заменить пробел на NaN, затем
Pythonic + Pandorable: df[df[‘col’].astype(bool)]
Пустые строки ложные, что означает, что вы можете фильтровать значения типа bool следующим образом:
Если ваша цель – удалить не только пустые строки, но и строки, содержащие только пробелы, заранее используйте str.strip :
Быстрее, чем ты думаешь
.astype – это векторизованная операция, это быстрее, чем все представленные варианты. По крайней мере, из моих тестов. YMMV.
Вот сравнение времени, я добавил некоторые другие методы, которые я мог придумать.

Код для сравнения, для справки:
Вы можете использовать этот вариант:
Это приведет к выходу (** – выделение только требуемых строк):
Итак, чтобы отбросить все, что не имеет значения “образование”, используйте следующий код:
Источник
Удалить из таблицы
where . In deleting rows, it is important to understand the PyTables deletes rows by erasing the rows, then moving the following data. Thus deleting can potentially be a very expensive operation depending on the orientation of your data. To get optimal performance, it’s worthwhile to have the dimension you are deleting be the first of the indexables .» onmousemove=»i18n(this)»>Вы можете выборочно удалить из таблицы, указав where . При удалении строк важно понимать, что PyTables удаляет строки, стирая строки, а затем перемещая следующие данные. Таким образом, удаление потенциально может быть очень дорогостоящей операцией в зависимости от ориентации ваших данных. Для достижения оптимальной производительности целесообразно, чтобы удаляемое измерение было первым из indexables .
indexables . Here’s a simple use case. You store panel-type data, with dates in the major_axis and ids in the minor_axis . The data is then interleaved like this:» onmousemove=»i18n(this)»>Данные упорядочены (на диске) с точки зрения indexables элементов . Вот простой вариант использования. Вы храните данные панельного типа с датами на major_axis и идентификаторами на minor_axis . Затем данные чередуются следующим образом:
major_axis will be fairly quick, as one chunk is removed, then the following data moved. On the other hand a delete operation on the minor_axis will be very expensive. In this case it would almost certainly be faster to rewrite the table using a where that selects all but the missing data.» onmousemove=»i18n(this)»>Должно быть ясно, что операция удаления на major_axis будет довольно быстрой, так как один фрагмент удаляется, а затем перемещаются следующие данные. С другой стороны, операция удаления на minor_axis будет очень дорогостоящей. В этом случае почти наверняка будет быстрее переписать таблицу, используя, where выбираются все данные, кроме отсутствующих.
Обратите внимание, что HDF5 НЕ ВОССТАНАВЛИВАЕТ ПРОСТРАНСТВО в файлах h5 автоматически. Таким образом, многократное удаление (или удаление узлов) и повторное добавление БУДЕТ СТАНОВИТСЯ УВЕЛИЧИТЬ РАЗМЕР ФАЙЛА .
Чтобы перепаковать и очистить файл, используйте ptrepack .
Примечания и предостережения
Compression
PyTables allows the stored data to be compressed. This applies to all kinds of stores, not just tables. Two parameters are used to control compression: complevel and complib .» onmousemove=»i18n(this)»> PyTables позволяет сжимать хранимые данные. Это относится ко всем видам магазинов, а не только к столам. Для управления сжатием используются два параметра: complevel и complib .
complevel specifies if and how hard data is to be compressed. complevel=0 and complevel=None disables compression and 0 enables compression.» onmousemove=»i18n(this)»> complevel указывает, должны ли и как жесткие данные должны быть сжаты. complevel=0 и complevel=None отключает сжатие, а 0 включает сжатие.
complib specifies which compression library to use. If nothing is specified the default library zlib is used. A compression library usually optimizes for either good compression rates or speed and the results will depend on the type of data. Which type of compression to choose depends on your specific needs and data. The list of supported compression libraries:» onmousemove=»i18n(this)»> complib указывает, какую библиотеку сжатия использовать. Если ничего не указано, используется библиотека по умолчанию zlib . Библиотека сжатия обычно оптимизирует либо хорошую степень сжатия, либо скорость, и результаты будут зависеть от типа данных. Какой тип сжатия выбрать, зависит от ваших конкретных потребностей и данных. Список поддерживаемых библиотек сжатия:
zlib : библиотека сжатия по умолчанию. Классический с точки зрения сжатия, обеспечивает хорошие показатели сжатия, но несколько медленный.
lzo : быстрое сжатие и декомпрессия.
bzip2 : Хорошая степень сжатия.
blosc : быстрое сжатие и декомпрессия.
Поддержка альтернативных компрессоров blosc:
blosc ‘ onmousemove=»i18n(this)»>blosc: blosclz Это компрессор по умолчанию для blosc
blosc:lz4 : Компактный, очень популярный и быстрый компрессор.
blosc:lz4hc : модифицированная версия LZ4, обеспечивает лучшую степень сжатия за счет скорости.
blosc: snappy : Популярный компрессор, используемый во многих местах.
blosc: zlib : классика; несколько медленнее, чем предыдущие, но с лучшей степенью сжатия.
blosc: zstd : Чрезвычайно хорошо сбалансированный кодек; он обеспечивает лучшую степень сжатия среди вышеперечисленных и при достаточно высокой скорости.
complib is defined as something other than the listed libraries a ValueError exception is issued.» onmousemove=»i18n(this)»>Если complib определен как нечто иное, чем перечисленные библиотеки, выдается исключение ValueError .
complib option is missing on your platform, compression defaults to zlib without further ado.» onmousemove=»i18n(this)»>Если библиотека, указанная с complib параметра Complib, отсутствует на вашей платформе, без лишних слов по умолчанию используется zlib .
Включить сжатие для всех объектов в файле:
Или сжатие «на лету» (это относится только к таблицам)в магазинах,где сжатие не включено:
ptrepack
PyTables offers better write performance when tables are compressed after they are written, as opposed to turning on compression at the very beginning. You can use the supplied PyTables utility ptrepack . In addition, ptrepack can change compression levels after the fact.» onmousemove=»i18n(this)»> PyTables обеспечивает лучшую производительность записи, когда таблицы сжимаются после того, как они были записаны, в отличие от включения сжатия в самом начале. Вы можете использовать прилагаемую PyTables утилиту ptrepack . Кроме того, ptrepack может изменять уровни сжатия постфактум.
ptrepack in.h5 out.h5 will repack the file to allow you to reuse previously deleted space. Alternatively, one can simply remove the file and write again, or use the copy method.» onmousemove=»i18n(this)»>Кроме того ptrepack in.h5 out.h5 будет упакуйте файл , чтобы повторно использовать ранее удалялась пространство. В качестве альтернативы можно просто удалить файл и записать снова или использовать метод copy .
Caveats
HDFStore is not-threadsafe for writing. The underlying PyTables only supports concurrent reads (via threading or processes). If you need reading and writing at the same time, you need to serialize these operations in a single thread in a single process. You will corrupt your data otherwise. See the (GH2397) for more information.’ onmousemove=»i18n(this)»> HDFStore не является потокобезопасным для записи . Основополагающий PyTables поддерживает только одновременно считывает ( с помощью резьбы или процессов). Если вам нужно читать и писать одновременно , вам необходимо сериализовать эти операции в одном потоке в одном процессе. В противном случае вы испортите свои данные. См. ( GH2397 ) для получения дополнительной информации.
fsync() before releasing write locks. For convenience you can use store.flush(fsync=True) to do this for you.’ onmousemove=»i18n(this)»>Если вы используете блокировки для управления доступом на запись между несколькими процессами, вы можете использовать fsync() перед снятием блокировки записи. Для удобства вы можете использовать store.flush(fsync=True) чтобы сделать это за вас.
table is created columns (DataFrame) are fixed; only exactly the same columns can be appended» onmousemove=»i18n(this)»>После создания table столбцы (DataFrame) фиксируются; могут быть добавлены только точно такие же столбцы
pytz.timezone(‘US/Eastern’) ) are not necessarily equal across timezone versions. So if data is localized to a specific timezone in the HDFStore using one version of a timezone library and that data is updated with another version, the data will be converted to UTC since these timezones are not considered equal. Either use the same version of timezone library or use tz_convert with the updated timezone definition.» onmousemove=»i18n(this)»>Имейте в pytz.timezone(‘US/Eastern’) что часовые пояса (например, pytz.timezone (‘US / Eastern’) ) не обязательно равны между версиями часовых поясов. Таким образом, если данные локализованы для определенного часового пояса в HDFStore с использованием одной версии библиотеки часовых поясов и эти данные обновляются другой версией, данные будут преобразованы в UTC, поскольку эти часовые пояса не считаются равными. Либо используйте ту же версию библиотеки часовых tz_convert либо используйте tz_convert с обновленным определением часового пояса.
PyTables will show a NaturalNameWarning if a column name cannot be used as an attribute selector. Natural identifiers contain only letters, numbers, and underscores, and may not begin with a number. Other identifiers cannot be used in a where clause and are generally a bad idea.» onmousemove=»i18n(this)»> PyTables покажет NaturalNameWarning , если имя столбца не может использоваться в качестве селектора атрибута. Естественные идентификаторы содержат только буквы, цифры и символы подчеркивания и не могут начинаться с цифры. Другие идентификаторы не могут использоваться в предложении where и, как правило, являются плохой идеей.
DataTypes
HDFStore will map an object dtype to the PyTables underlying dtype. This means the following types are known to work:» onmousemove=»i18n(this)»> HDFStore будет отображать объект DTYPE к PyTables , лежащих в основе DTYPE. Это означает, что, как известно, работают следующие типы:
Представляет отсутствующие значения
float64, float32, float16 » onmousemove=»i18n(this)»>плавающие: float64, float32, float16
int64, int32, int8, uint64,uint32, uint8 » onmousemove=»i18n(this)»>целое число: int64, int32, int8, uint64,uint32, uint8
Источник
В этом уроке рассмотрим основные моменты при работе с пакетом Pandas, который позволяет работать с Excel данными, как с двухмерными таблицами. Мы изучим как работать с самой таблицей, как массивом данных, с отдельными столбцами и строками, а также научимся делать отборы по условиям.
Для начала подготовим Excel файл с примером, который будем использовать в качестве источника данных (всю обработку данных будем делать в Python, без сохранения в Excel, для ускорения работы). Файл должен содержать лист «Данные» с такой информацией:
Сохраните файл с названием «Excel_Python-3.xlsx». Теперь запускаем Spyder, создаем новый скрипт и туда вносим следующий код, который позволит нам прочитать данные из вышеуказанного Excel файла в DataFrame, который мы будем использовать сегодня в примерах. Скрипт сохраняем в ту же папку, куда сохранили Excel файл.
import xlwings as xw
import pandas as pdwb=xw.Book(‘Excel_Python-3.xlsx’)
data_excel = wb.sheets[‘Данные’]
data_pd = data_excel.range(‘A1:D7’).options(pd.DataFrame, header = 1, index = False).value
print (data_pd)
Итак, данные прочитаны, внесены в DataFrame data_pd, с которым мы будем работать в дальнейшем.
Таблица
data_pd.shape — функция показывается количество строк и количество столбцов в таблице. В нашем случае получим (6, 4), т.е. в нашей таблице 6 строк (заголовок не считается) и 4 столбца.
data_pd.info() — получаем общую сводку о таблицу, в т.ч. какие столбцы, их названия, тип данных в столбцах, количество не пустых элементов. При выполнении функции на обучающем примере мы получим:
<class ‘pandas.core.frame.DataFrame’>
RangeIndex: 6 entries, 0 to 5
Data columns (total 4 columns):
Фамилия 6 non-null object
Имя 6 non-null object
Возраст 6 non-null float64
Доход 6 non-null float64
dtypes: float64(2), object(2)
memory usage: 320.0+ bytes
Работа со строками
data_pd = data_pd.append({‘Фамилия’:’Егоров’, ‘Имя’:’Михаил’, ‘Возраст’:’37’,’Доход’:’40000′}, ignore_index=True) — Функция Append добавляет строку в таблицу. В качестве первого аргумента в фигурных скобках мы указываем те данные, что хотим добавить в формате ‘Название столбца’ : ‘Значение’, вторым аргументом мы говорим о том, что нам не важно в какое место таблицы добавится строка (по умолчанию в конец таблицы).
data_pd.drop([0, 1], axis=0, inplace=True) — Функция Drop удаляет строки. Первым параметром в квадратных скобках мы указываем номера строк, которые хотим удалить (нумерация строк начинается в Pandas с 0), вторым аргументом указываем что хотим удалить строку (axis=0) или столбец (axis=1), последним аргументом говорим о том, что измения должны быть произведены непосредственно в той таблице, с которой мы работаем (inplace=True), в противном случае (inplace=False) Pandas создаст копию таблицы, где удалит указанные строки, что может привести к путаницу и ошибкам.
data_pd.head(3) — Выводит указанное количество строк с начала таблицы, в данном случае 3.
data_pd[:3] — Функция аналогичная head, получаем указанное количество строк с начала таблицы.
data_pd[-3:] — Получаем указанное количество строк с конца таблицы.
Работа со столбцами
data_pd.columns — Выводит названия столбцов в таблице. В нашем случае при выполнении функции получим следующее: Index([‘Фамилия’, ‘Имя’, ‘Возраст’, ‘Доход’], dtype=’object’)
data_pd.dtypes — Выводит тип данных в столбцах. В нашем случае:
Фамилия object
Имя object
Возраст float64
Доход float64
dtype: object
data_pd[‘Пол’] =[‘Муж.’,’Муж.’,’Муж.’,’Муж.’,’Муж.’,’Муж.’] — Добавляем новый столбец. В левой части в квадратных скобках указываем название столбца, в правой части — что в этом столбце должно содержаться. Обратите внимание, что количество записей должно равняться количеству строк в таблице, иначе получите ошибку «Length of values does not match length of index».
data_pd.drop([‘Фамилия’], axis=1, inplace=True) — Функция Drop, как и говорилось ранее, удаляет столбец или строку. В данном случае в качестве первого параметра в квадратных скобках указываем название столбца, далее указываем что удаляем именно столбец (axis=1), и не забываем указать что измения должны быть произведены непосредственно в той таблице, с которой мы работаем (inplace=True).
data_pd[[‘Фамилия’, ‘Имя’]] — Получаем данные только по отдельным столбцам, а не по всей таблице в целом.
Работа со строками и столбцами
data_pd.loc[[0, 1], [‘Фамилия’, ‘Имя’]] — Функция loc позволяет получить данные только по конкретным строкам и столбцам. Первым агрументом указываем номера строк, которых хотим получить, вторым — названия столбцов.
data_pd.iloc[[0, 1], [0, 1]] — Функция iloc позволяет получить данные обращаясь и к строкам и к столбцам по номерам. Показанный пример вернет теже данные, что и вариант выше (обратите внимание, что номерация столбцов, как и строк, в Pandas начинается с 0).
Отбор данных по условию
data_pd[(data_pd[‘Доход’] >= 30000) & (data_pd[‘Фамилия’] == ‘Петров’)] — Отбираем данные по двум условиям. В первом говорим о том, что доход должен быть больше 30 000, а фамилия сотрудника должна быть Петров. Обратите внимание, что используется логическое условие И (&) — это значит, что данные будут получены, если выполнены оба условия. При использовании логического условия ИЛИ (|), будут отобраны те строки, в которых выполняется хоть одно из указанных условий.
На сегодня все. Есть вопросы — задавайте в комментариях ниже.
How to remove the entire blank row from the existing Excel Sheet using Python?
I need a solution which DOES NOT :
Include reading the whole file and rewriting it without the deleted row.
IS THERE ANY DIRECT SOLUTION?
asked Jan 4, 2016 at 6:12
![]()
3
I achieved using Pandas package….
import pandas as pd

#Read from Excel
xl= pd.ExcelFile("test.xls")

#Parsing Excel Sheet to DataFrame
dfs = xl.parse(xl.sheet_names[0])

#Update DataFrame as per requirement
#(Here Removing the row from DataFrame having blank value in "Name" column)

dfs = dfs[dfs['Name'] != '']

#Updating the excel sheet with the updated DataFrame

dfs.to_excel("test.xls",sheet_name='Sheet1',index=False)
answered Jan 5, 2016 at 8:49
![]()
Jd16Jd16
3771 gold badge3 silver badges11 bronze badges
2
If using memory is not an issue you can achieve this using an extra dataframe.
import pandas as pd

#Read from Excel
xl= pd.ExcelFile("test.xls")

dfs = xl.parse(xl.sheet_names[0])
df1 = dfs[dfs['Sal'] == 1000]
df1 = df1[df1['Message']=="abc"]

ph_no = df1['Number']

print df1
answered Jan 6, 2016 at 5:48
![]()
Varsha Varsha
864 bronze badges
To delete an Excel row, say row 5, column does not matter so 1:
sh.Cells(5,1).EntireRow.Delete()
To delete a range of Excel rows, say row 5 to 20
sh.Range(sh.Cells(5,1),sh.Cells(20,1)).EntireRow.Delete()
![]()
user247702
23.5k15 gold badges111 silver badges157 bronze badges
answered Jan 27, 2017 at 15:17
![]()
At the start of every analysis, data needs to be cleaned, organised, and made tidy. For every Python Pandas DataFrame, there is almost always a need to delete rows and columns to get the right selection of data for your specific analysis or visualisation. The Pandas Drop function is key for removing rows and columns.
Table Of Contents
- Pandas Drop Cheatsheet
- Sample DataFrame
- Delete or Drop DataFrame Columns with Pandas Drop
- Delete columns by name
- Delete column with pandas drop and axis=1
- Delete column with pandas drop “columns” parameter
- Delete columns by column number or index
- Delete columns by name
- Delete DataFrame Rows with Pandas Drop
- Deleting rows using “drop” (best for small numbers of rows)
- Delete rows based on index value
- Delete rows based on row number
- Deleting rows based on a column value using a selection (iloc/loc)
- Deleting rows by truncating the DataFrame
- Deleting rows using “drop” (best for small numbers of rows)
- Dropping “inplace” or returning a new DataFrame
- Further Reading and Links
Pandas Drop Cheatsheet
Removing columns and rows from your DataFrame is not always as intuitive as it could be. It’s all about the “DataFrame drop” command. The drop function allows the removal of rows and columns from your DataFrame, and once you’ve used it a few times, you’ll have no issues.

Sample DataFrame
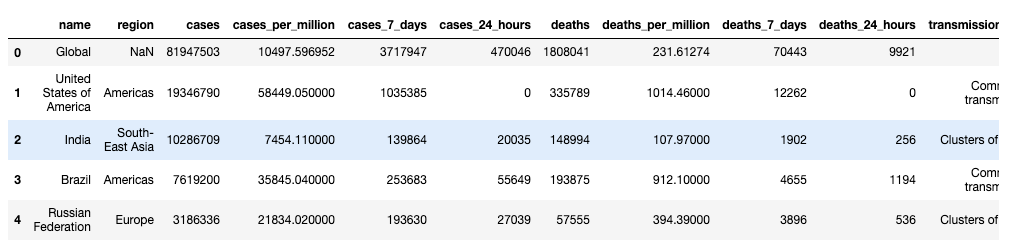
For this post, we’re using data from the WHO COVID tracker, downloaded as at the 1st January 2020 (data here). If you’d like to work with up-to-date data, please change the source URL for the read_csv function in the loading script to this one.
import pandas as pd

# Read a sample dataset (COVID data as at 1st Jan 2020)
data = pd.read_csv(
    "https://shanebucket.s3-eu-west-1.amazonaws.com/downloads/who-covid-2020-01-01.csv.zip"
)
# If you'd like to get up-to-date data, use URL: https://covid19.who.int/WHO-COVID-19-global-table-data.csv
# Rename the columns into something a little easier to work with.
data.columns = [
    "name",
    "region",
    "cases",
    "cases_per_million",
    "cases_7_days",
    "cases_24_hours",
    "deaths",
    "deaths_per_million",
    "deaths_7_days",
    "deaths_24_hours",
    "transmission_type"
]
data.head()
Delete or Drop DataFrame Columns with Pandas Drop
Delete columns by name
Deleting columns by name from DataFrames is easy to achieve using the drop command. There are two forms of the drop function syntax that you should be aware of, but they achieve the same result:
Delete column with pandas drop and axis=1
The default way to use “drop” to remove columns is to provide the column names to be deleted along with specifying the “axis” parameter to be 1.
# Delete a single column from the DataFrame
data = data.drop(labels="deathes", axis=1)

# Delete multiple columns from the DataFrame
# Here - we provide a list to the drop() function
data = data.drop(labels=["deaths", "deaths_per_million"], axis=1)

# Note that the "labels" parameter is by default the first, so
# the above lines can be written slightly more concisely:
data = data.drop("deaths", axis=1)
data = data.drop(["deaths", "deaths_per_million"], axis=1)
Delete column with pandas drop “columns” parameter
Potentially a more intuitive way to remove columns from DataFrames is to use the normal “drop” function with the “columns” parameter specifying a single column name or a list of columns.
# Delete a single named column from the DataFrame
data = data.drop(columns="cases")

# Delete multiple named columns from the DataFrame
data = data.drop(columns=["cases", "cases_per_million"])
Delete columns by column number or index
The drop function can be used to delete columns by number or position by retrieving the column name first for .drop. To get the column name, provide the column index to the Dataframe.columns object which is a list of all column names. The name is then passed to the drop function as above.
# Delete a column by column number
# Delete column number 4 (index number 3 in data.columns)
data = data.drop(columns=data.columns[3])
WARNING: This method can end up in multiple columns being deleted if the names of the columns are repeated (i.e. you have two columns with the same name as the one at index 3).
When you have repeating columns names, a safe method for column removal is to use the iloc selection methodology on the DataFrame. In this case, you are trying to “select all rows and all columns except the column number you’d like to delete”.
To remove columns using iloc, you need to create a list of the column indices that you’d like to keep, i.e. a list of all column numbers, minus the deleted ones.
To create this list, we can use a Python list comprehension that iterates through all possible column numbers (range(data.shape[1])) and then uses a filter to exclude the deleted column indexes (x not in [columns to delete]). The final deletion then uses an iloc selection to select all rows, but only the columns to keep (.iloc[:, [columns to keep]).
# Delete column numbers 1, 2 and 5 from the DataFrame
# Create a list of all column numbers to keep
columns_to_keep = [x for x in range(data.shape[1]) if x not in [1,2,5]]
# Delete columns by column number using iloc selection
data = data.iloc[:, columns_to_keep]
data.shape
--> (238, 8)
Delete DataFrame Rows with Pandas Drop
There are three different ways to delete rows from a Pandas Dataframe. Each method is useful depending on the number of rows you are deleting, and how you are identifying the rows that need to be removed.
Deleting rows using “drop” (best for small numbers of rows)
Delete rows based on index value
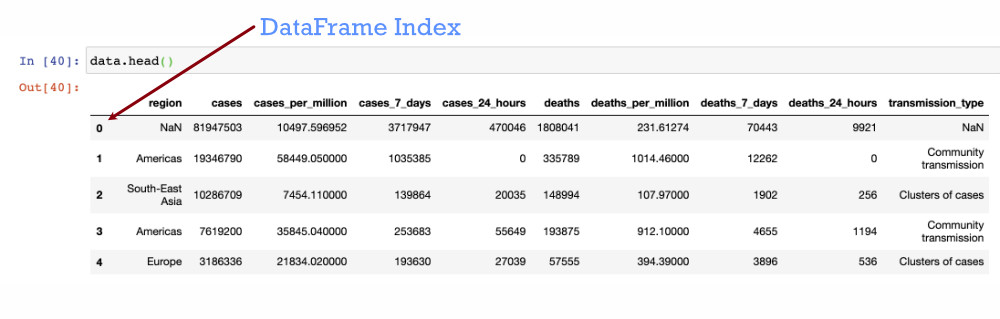
To delete rows from a DataFrame, the drop function references the rows based on their “index values“. Most typically, this is an integer value per row, that increments from zero when you first load data into Pandas. You can see the index when you run “data.head()” on the left hand side of the tabular view. You can access the index object directly using “data.index” and the values through “data.index.values”.
To drop a specific row from the data frame – specify its index value to the Pandas drop function.
# delete a single row by index value 0
data = data.drop(labels=0, axis=0)

# delete a few specified rows at index values 0, 15, 20.
# Note that the index values do not always align to row numbers.
data = data.drop(labels=[1,15,20], axis=0)

# delete a range of rows - index values 10-20
data = data.drop(labels=range(40, 45), axis=0)

# The labels parameter name can be omitted, and axis is 0 by default
# Shorter versions of the above:
data = data.drop(0)
data = data.drop([0, 15, 20])
data = data.drop(range(10,20))
It can be useful for selection and aggregation to have a more meaningful index. For our sample data, the “name” column would make a good index also, and make it easier to select country rows for deletion from the data.
# Set the index of the DataFrame to the country name
data_with_index = data.set_index("name")
data_with_index.head()
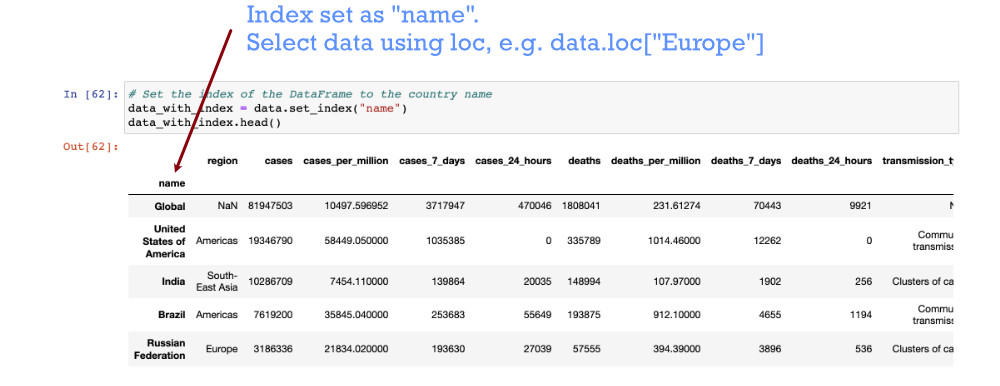
# With the index, we can drop the rows for a single country with its name
data_with_index = data_with_index.drop("Ireland")

# Drop rows for multiple countries:
data_with_index = data_with_index.drop(["France", "Canada", "Spain"])
Delete rows based on row number
At times, the DataFrame index may not be in ascending order. To delete a row based on it’s position in the DataFrame, i.e. “delete the second row”, we still use the index of the DataFrame, but select the row from the index directly as we delete. We can also use these index selections to delete multiple rows, or index from the bottom of the DataFrame using negative numbers. For example:
# Delete the 2nd row in the DataFrame (note indices starting from 0)
data = data.drop(data.index[1])

# Delete some chosen rows by row numbers - 2nd, 10th, 30th:
data = data.drop(data.index[[1, 9, 29]])

# Delete the first 5 rows
data = data.drop(data.index[range(5)])

# Delete the last row in the DataFrame
data = data.drop(data.index[-1])
Deleting rows based on a column value using a selection (iloc/loc)
The second most common requirement for deleting rows from a DataFrame is to delete rows in groups, defined by values on various columns. The best way to achieve this is through actually “selecting” the data that you would like to keep. The “drop” method is not as useful here, and instead, we are selecting data using the “loc” indexer and specifying the desired values in the column(s) we are using to select.
There is a full blog post on Pandas DataFrame iloc and loc selection on this blog, but a basic example is here:
# Check the initial shape of the DataFrame
data.shape
--> (238, 11)
# Delete rows where case numbers are zero
# This deletion is completed by "selecting" rows where case numbers are non zero
data = data.loc[data["cases"] != 0]
data.shape
--> (223, 11)
# Delete rows where there have been no cases in 24 hours AND no cases in 7 days
# Note that you must put each condition within parenthesis
data = data.loc[(data["deaths_7_days"] > 0) & (data["deaths_24_hours"] > 0)]
data.shape
--> (114, 11)
Note – if you get the Pandas error: ValueError: The truth value of a Series is ambiguous. Use a.empty, a.bool(), a.item(), a.any() or a.all(), then you have most likely left out the parenthesis “( )” around each condition of your loc selection.
Deleting rows by truncating the DataFrame
One final way to remove rows from the DataFrame is to use Python “slice” notation. Slice notation is well summarised in this StackOverflow post:
data[start:stop]  # items start through stop-1
data[start:]      # items start through the rest of the DataFrame
data[:stop]       # items from the beginning through stop-1
data[:]           # a copy of the whole DataFrame
The slice notation makes it easy to delete many rows from a DataFrame, while retaining the selected “slice”. For example:
# Start with a new dataset again
data.shape
--> (238, 11)
data = data[:100]   # Delete everything but the first 99 rows.
data.shape
--> (100, 11)
data = data[10:20]
data.shape
--> (10, 11)
Dropping “inplace” or returning a new DataFrame
The drop function can be used to directly alter a Pandas DataFrame that you are working with, or, alternatively, the return the result after columns or rows have been dropped. This behaviour is controlled with the “inplace” parameter. Using inplace=True can reduce the number of reassignment commands that you’ll need in your application or script. Note that if inplace is set as True, there is no return value from the drop function.
# Start by looking at our original data.
# DataFrame "shape" gives us a tuple with (number rows, number columns)

data.shape
--> (238, 11)

# We can delete a column using the drop command, with axis=1.
new_data = data.drop("name", axis=1)

# The new_data that is produced as only 10 columns ("name" is removed)
new_data.shape
--> (238, 10)

# The original data is left untouched at this point:
data.shape
--> (238, 11)

# Using "inplace", we can alter the original data in a single line:
data.drop("name", axis=1, inplace=True)
# Now "name" has been removed from the original data:
data.shape
--> (238, 10)
Further Reading and Links
As deleting columns and rows is one of the key operations for DataFrames, there’s a tonne of of excellent content out there on the drop function, that should explain any unusual requirement you may have. I’d be interested in any element of removing rows or columns not covered in the above tutorial – please let me know in the comments.
- My own blog post on selection through iloc and loc, which can be used for picking out the data that you need from a DataFrame.
- Official Pandas Documentation on the DataFrame Drop function.
- GeeksForGeeks tutorial on removing columns from DataFrames.
- HackersAndSlackers – Dropping Rows of Data using Pandas.

A Pandas dataframe is a two dimensional data structure which allows you to store data in rows and columns. It’s very useful when you’re analyzing data.
When you have a list of data records in a dataframe, you may need to drop a specific list of rows depending on the needs of your model and your goals when studying your analytics.
In this tutorial, you’ll learn how to drop a list of rows from a Pandas dataframe.
To learn how to drop columns, you can read here about How to Drop Columns in Pandas.
How to Drop a Row or Column in a Pandas Dataframe
To drop a row or column in a dataframe, you need to use the drop() method available in the dataframe. You can read more about the drop() method in the docs here.
Dataframe Axis
- Rows are denoted using
axis=0 - Columns are denoted using
axis=1
Dataframe Labels
- Rows are labelled using the index number starting with 0, by default.
- Columns are labelled using names.
Drop() Method Parameters
index— the list of rows to be deletedaxis=0— Marks the rows in the dataframe to be deletedinplace=True— Performs the drop operation in the same dataframe, rather than creating a new dataframe object during the delete operation.
Sample Pandas DataFrame
Our sample dataframe contains the columns product_name, Unit_Price, No_Of_Units, Available_Quantity, and Available_Since_Date columns. It also has rows with NaN values which are used to denote missing values.
import pandas as pd

data = {"product_name":["Keyboard","Mouse", "Monitor", "CPU","CPU", "Speakers",pd.NaT],
        "Unit_Price":[500,200, 5000.235, 10000.550, 10000.550, 250.50,None],
        "No_Of_Units":[5,5, 10, 20, 20, 8,pd.NaT],
        "Available_Quantity":[5,6,10,"Not Available","Not Available", pd.NaT,pd.NaT],
        "Available_Since_Date":['11/5/2021', '4/23/2021', '08/21/2021','09/18/2021','09/18/2021','01/05/2021',pd.NaT]
       }

df = pd.DataFrame(data)

df
The dataframe will look like this:
| product_name | Unit_Price | No_Of_Units | Available_Quantity | Available_Since_Date | |
|---|---|---|---|---|---|
| 0 | Keyboard | 500.000 | 5 | 5 | 11/5/2021 |
| 1 | Mouse | 200.000 | 5 | 6 | 4/23/2021 |
| 2 | Monitor | 5000.235 | 10 | 10 | 08/21/2021 |
| 3 | CPU | 10000.550 | 20 | Not Available | 09/18/2021 |
| 4 | CPU | 10000.550 | 20 | Not Available | 09/18/2021 |
| 5 | Speakers | 250.500 | 8 | NaT | 01/05/2021 |
| 6 | NaT | NaN | NaT | NaT | NaT |
And just like that we’ve created our sample dataframe.
After each drop operation, you’ll print the dataframe by using df which will print the dataframe in a regular HTML table format.
You can read here about how to Pretty Print a Dataframe to print the dataframe in different visual formats.
Next, you’ll learn how to drop a list of rows in different use cases.
You can delete a list of rows from Pandas by passing the list of indices to the drop() method.
df.drop([5,6], axis=0, inplace=True)

df
In this code,
[5,6]is the index of the rows you want to deleteaxis=0denotes that rows should be deleted from the dataframeinplace=Trueperforms the drop operation in the same dataframe
After dropping rows with the index 5 and 6, you’ll have the below data in the dataframe:
| product_name | Unit_Price | No_Of_Units | Available_Quantity | Available_Since_Date | |
|---|---|---|---|---|---|
| 0 | Keyboard | 500.000 | 5 | 5 | 11/5/2021 |
| 1 | Mouse | 200.000 | 5 | 6 | 4/23/2021 |
| 2 | Monitor | 5000.235 | 10 | 10 | 08/21/2021 |
| 3 | CPU | 10000.550 | 20 | Not Available | 09/18/2021 |
| 4 | CPU | 10000.550 | 20 | Not Available | 09/18/2021 |
This is how you can delete rows with a specific index.
Next, you’ll learn about dropping a range of indices.
How to Drop Rows by Index Range in Pandas
You can also drop a list of rows within a specific range.
A range is a set of values with a lower limit and an upper limit.
This may be useful in cases where you want to create a sample dataset exlcuding specific ranges of data.
You can create a range of rows in a dataframe by using the df.index() method. Then you can pass this range to the drop() method to drop the rows as shown below.
df.drop(df.index[2:4], inplace=True)

df
Here’s what this code is doing:
df.index[2:4]generates a range of rows from 2 to 4. The lower limit of the range is inclusive and the upper limit of the range is exclusive. This means that rows 2 and 3 will be deleted and row 4 will not be deleted.inplace=Trueperforms the drop operation in the same dataframe
After dropping rows within the range 2-4, you’ll have the below data in the dataframe:
| product_name | Unit_Price | No_Of_Units | Available_Quantity | Available_Since_Date | |
|---|---|---|---|---|---|
| 0 | Keyboard | 500.00 | 5 | 5 | 11/5/2021 |
| 1 | Mouse | 200.00 | 5 | 6 | 4/23/2021 |
| 4 | CPU | 10000.55 | 20 | Not Available | 09/18/2021 |
This is how you can drop the list of rows in the dataframe using its range.
How to Drop All Rows after an Index in Pandas
You can drop all rows after a specific index by using iloc[].
You can use iloc[] to select rows by using its position index. You can specify the start and end position separated by a :. For example, you’d use 2:3 to select rows from 2 to 3. If you want to select all the rows, you can just use : in iloc[].
This may be useful in cases where you want to split the dataset for training and testing purposes.
Use the below snippet to select rows from 0 to the index 2. This results in dropping the rows after the index 2.
df = df.iloc[:2]

df
In this code, :2 selects the rows until the index 2.
This is how you can drop all rows after a specific index.
After dropping rows after the index 2, you’ll have the below data in the dataframe:
| product_name | Unit_Price | No_Of_Units | Available_Quantity | Available_Since_Date | |
|---|---|---|---|---|---|
| 0 | Keyboard | 500.0 | 5 | 5 | 11/5/2021 |
| 1 | Mouse | 200.0 | 5 | 6 | 4/23/2021 |
This is how you can drop rows after a specific index.
Next, you’ll learn how to drop rows with conditions.
How to Drop Rows with Multiple Conditions in Pandas
You can drop rows in the dataframe based on specific conditions.
For example, you can drop rows where the column value is greater than X and less than Y.
This may be useful in cases where you want to create a dataset that ignores columns with specific values.
To drop rows based on certain conditions, select the index of the rows which pass the specific condition and pass that index to the drop() method.
df.drop(df[(df['Unit_Price'] >400) & (df['Unit_Price'] < 600)].index, inplace=True)

df
In this code,
(df['Unit_Price'] >400) & (df['Unit_Price'] < 600)is the condition to drop the rows.df[].indexselects the index of rows which passes the condition.inplace=Trueperforms the drop operation in the same dataframe rather than creating a new one.
After dropping the rows with the condition which has the unit_price greater than 400 and less than 600, you’ll have the below data in the dataframe:
| product_name | Unit_Price | No_Of_Units | Available_Quantity | Available_Since_Date | |
|---|---|---|---|---|---|
| 1 | Mouse | 200.0 | 5 | 6 | 4/23/2021 |
This is how you can drop rows in the dataframe using certain conditions.
Conclusion
To summarize, in this article you’ve learnt what the drop() method is in a Pandas dataframe. You’ve also seen how dataframe rows and columns are labelled. And finally you’ve learnt how to drop rows using indices, a range of indices, and based on conditions.
If you liked this article, feel free to share it.
You May Also Like
- How to Add a Column to a Dataframe in Pandas
- How to Rename a Column in Pandas
Learn to code for free. freeCodeCamp’s open source curriculum has helped more than 40,000 people get jobs as developers. Get started
Время чтения 4 мин.
Мы можем удалить одну или несколько строк из DataFrame в Python Pandas несколькими способами. Например, используя определенный индекс или список индексов, чтобы удалить несколько строк.
Содержание
- Как удалить строки в DataFrame
- Удаление нескольких строк в Pandas DataFrame
- Удаление строк на основе условия в столбце
- На основе нескольких условий в столбце
- На основе нескольких условий в разных столбцах
- Заключение
Чтобы удалить строки в Pandas DataFrame, используйте метод drop(). Pandas dataframe drop() — это встроенная функция, которая используется для удаления строк. Drop() удаляет строку на основе индекса, предоставленного этой функции.
Pandas DataFrame предоставляет функцию-член drop(), ее синтаксис следующий:
|
DataFrame.drop(labels=None, axis=0, index=None, columns=None, level=None, inplace=False, errors=‘raise’) |
- labels: одна метка или список. Метки индекса или столбца, которые необходимо удалить.
- axis : {0 или ‘индекс’, 1 или ‘столбцы’}, по умолчанию 0. Удалять метки из индекса (0 или «index») или столбцов (1 или «columns»).
- index: одна метка или список. Альтернатива указанию оси (labels, axis=0 эквивалентно index=labels).
- Новое в версии 0.21.0:
- columns: одна метка или список. Альтернатива указанию оси (labels, axis=1 эквивалентно columns=labels).
- level: int или имя уровня, необязательно. Для MultiIndex уровень, с которого будут удалены метки.
- inplace: bool, по умолчанию False. Если True, выполните операцию на месте и верните None.
- errors: {‘ignore’, ‘‘raise’}, по умолчанию ‘‘raise’. Если «’ignore», ошибка подавляется, и удаляются только существующие метки.
См. следующий пример кода.
|
1 2 3 4 5 6 7 8 9 10 11 12 13 14 15 16 17 18 19 |
# app.py import pandas as pd shows = [(‘The Witcher’, ‘Henry Cavil’, ‘Geralt’), (‘Stranger Things’, ‘Millie Brown’, ‘Eleven’), (‘BoJack Horseman’, ‘Will’, ‘BoJack’), (‘Adventures of Sabrina’, ‘Kiernan Shipka’, ‘Spellman’), (‘House of Cards’, ‘Kevin Spacey’, ‘Frank Underwood’)] df = pd.DataFrame(shows, columns=[‘Series’, ‘Name’, ‘Character Name’], index=[‘a’, ‘b’, ‘c’, ‘d’, ‘e’]) print(df) print(‘——————————‘) print(«After dropping ‘C indexed’ row») print(‘——————————‘) print(df.drop(‘c’)) |
В приведенном выше коде мы определили один фрейм данных, а затем распечатали этот фрейм данных, содержащий пять строк. Каждая строка имеет свой индекс, поэтому мы можем легко удалить конкретную строку, используя ее индекс.
В нашем коде я удалил индексированную строку «C». Итак, распечатайте фрейм данных.
Вывод:
|
python3 app.py Series Name Character Name a The Witcher Henry Cavil Geralt b Stranger Things Millie Brown Eleven c BoJack Horseman Will BoJack d Adventures of Sabrina Kiernan Shipka Spellman e House of Cards Kevin Spacey Frank Underwood ——————————————— After dropping ‘C indexed’ row ——————————————— Series Name Character Name a The Witcher Henry Cavil Geralt b Stranger Things Millie Brown Eleven d Adventures of Sabrina Kiernan Shipka Spellman e House of Cards Kevin Spacey Frank Underwood |
Удаление нескольких строк в Pandas DataFrame
Если мы передадим список индексов функции drop(), она удалит несколько строк.
См. следующий код.
|
1 2 3 4 5 6 7 8 9 10 11 12 13 14 15 16 17 18 19 |
# app.py import pandas as pd shows = [(‘The Witcher’, ‘Henry Cavil’, ‘Geralt’), (‘Stranger Things’, ‘Millie Brown’, ‘Eleven’), (‘BoJack Horseman’, ‘Will’, ‘BoJack’), (‘Adventures of Sabrina’, ‘Kiernan Shipka’, ‘Spellman’), (‘House of Cards’, ‘Kevin Spacey’, ‘Frank Underwood’)] df = pd.DataFrame(shows, columns=[‘Series’, ‘Name’, ‘Character Name’], index=[‘a’, ‘b’, ‘c’, ‘d’, ‘e’]) print(df) print(‘——————————‘) print(«After dropping ‘C indexed’ row») print(‘——————————‘) print(df.drop([‘c’, ‘d’, ‘e’])) |
Вывод:
|
python3 app.py Series Name Character Name a The Witcher Henry Cavil Geralt b Stranger Things Millie Brown Eleven c BoJack Horseman Will BoJack d Adventures of Sabrina Kiernan Shipka Spellman e House of Cards Kevin Spacey Frank Underwood ——————————————— After dropping ‘C indexed’ row ——————————————— Series Name Character Name a The Witcher Henry Cavil Geralt b Stranger Things Millie Brown Eleven |
Из вывода видно, что мы удалили три строки с индексами c, d и e.
Итак, это единственный способ удалить одну или несколько строк в фрейме данных Python pandas.
Удаление строк на основе условия в столбце
Как и в SQL, мы также можем удалить определенную строку в зависимости от условия.
См. следующий код.
|
1 2 3 4 5 6 7 8 9 10 11 12 13 14 15 16 17 18 19 20 21 |
# app.py import pandas as pd shows = [(‘The Witcher’, ‘Henry Cavil’, ‘Geralt’), (‘Stranger Things’, ‘Millie Brown’, ‘Eleven’), (‘BoJack Horseman’, ‘Will’, ‘BoJack’), (‘Adventures of Sabrina’, ‘Kiernan Shipka’, ‘Spellman’), (‘House of Cards’, ‘Kevin Spacey’, ‘Frank Underwood’)] df = pd.DataFrame(shows, columns=[‘Series’, ‘Name’, ‘Character Name’], index=[‘a’, ‘b’, ‘c’, ‘d’, ‘e’]) print(df) print(‘——————————‘) print(«After dropping ‘Spellman’ row») print(‘——————————‘) index = df[df[‘Character Name’] == ‘Spellman’].index df.drop(index, inplace=True) print(df) |
В приведенном выше коде мы получаем индекс на основе условия, которое представляет собой Character Name == ‘Spellman’.
|
index = df[df[‘Character Name’] == ‘Spellman’].index |
Это даст объект Index, содержащий индексные метки, для которых столбец «Character Name» имеет значение «Spellman». Итак, мы получаем индекс d.
|
Index([‘d’], dtype=‘object’) |
Теперь передайте это в dataframe.drop(), чтобы удалить эти строки, например,
|
df.drop(index, inplace=True) |
Он удалит все строки, для которых столбец «Character Name» имеет значение «Spellman».
Вывод:
|
python3 app.py Series Name Character Name a The Witcher Henry Cavil Geralt b Stranger Things Millie Brown Eleven c BoJack Horseman Will BoJack d Adventures of Sabrina Kiernan Shipka Spellman e House of Cards Kevin Spacey Frank Underwood ——————————————— After dropping ‘Spellman’ row ——————————————— Series Name Character Name a The Witcher Henry Cavil Geralt b Stranger Things Millie Brown Eleven c BoJack Horseman Will BoJack e House of Cards Kevin Spacey Frank Underwood |
На основе нескольких условий в столбце
Давайте удалим все строки, для которых столбец «Character Name» имеет значение «BoJack» или «‘Name» имеет значение «‘Will».
См. следующий код.
|
1 2 3 4 5 6 7 8 9 10 11 12 13 14 15 16 17 18 19 20 21 22 |
# app.py import pandas as pd shows = [(‘The Witcher’, ‘Henry Cavil’, ‘Geralt’), (‘Stranger Things’, ‘Millie Brown’, ‘Eleven’), (‘BoJack Horseman’, ‘Will’, ‘BoJack’), (‘Adventures of Sabrina’, ‘Kiernan Shipka’, ‘Spellman’), (‘House of Cards’, ‘Kevin Spacey’, ‘Frank Underwood’)] df = pd.DataFrame(shows, columns=[‘Series’, ‘Name’, ‘Character Name’], index=[‘a’, ‘b’, ‘c’, ‘d’, ‘e’]) print(df) print(‘——————————‘) print(«After dropping ‘BoJack’ row») print(‘——————————‘) indexNames = df[(df[‘Character Name’] == ‘BoJack’) |(df[‘Name’] == ‘Will’)].index df.drop(indexNames, inplace=True) print(df) |
Вывод:
|
python3 app.py Series Name Character Name a The Witcher Henry Cavil Geralt b Stranger Things Millie Brown Eleven c BoJack Horseman Will BoJack d Adventures of Sabrina Kiernan Shipka Spellman e House of Cards Kevin Spacey Frank Underwood ——————————————— After dropping ‘BoJack’ row ——————————————— Series Name Character Name a The Witcher Henry Cavil Geralt b Stranger Things Millie Brown Eleven d Adventures of Sabrina Kiernan Shipka Spellman e House of Cards Kevin Spacey Frank Underwood |
На основе нескольких условий в разных столбцах
Давайте удалим все строки, для которых в столбце «Character Name» указано «Eleven», а в «Series» — «Stranger Things».
См. следующий код.
|
1 2 3 4 5 6 7 8 9 10 11 12 13 14 15 16 17 18 19 20 21 22 |
# app.py import pandas as pd shows = [(‘The Witcher’, ‘Henry Cavil’, ‘Geralt’), (‘Stranger Things’, ‘Millie Brown’, ‘Eleven’), (‘BoJack Horseman’, ‘Will’, ‘BoJack’), (‘Adventures of Sabrina’, ‘Kiernan Shipka’, ‘Spellman’), (‘House of Cards’, ‘Kevin Spacey’, ‘Frank Underwood’)] df = pd.DataFrame(shows, columns=[‘Series’, ‘Name’, ‘Character Name’], index=[‘a’, ‘b’, ‘c’, ‘d’, ‘e’]) print(df) print(‘——————————‘) print(«After dropping ‘Eleven’ row») print(‘——————————‘) indexNames = df[(df[‘Character Name’] == ‘Eleven’) & (df[‘Series’] == ‘Stranger Things’)].index df.drop(indexNames, inplace=True) print(df) |
В приведенном выше случае нам нужно использовать & между несколькими условиями.
Если удовлетворяется условие, то удаляет строку; в противном случае — не удалит строку Pandas.
Вывод:
|
python3 app.py Series Name Character Name a The Witcher Henry Cavil Geralt b Stranger Things Millie Brown Eleven c BoJack Horseman Will BoJack d Adventures of Sabrina Kiernan Shipka Spellman e House of Cards Kevin Spacey Frank Underwood ——————————————— After dropping ‘BoJack’ row ——————————————— Series Name Character Name a The Witcher Henry Cavil Geralt c BoJack Horseman Will BoJack d Adventures of Sabrina Kiernan Shipka Spellman e House of Cards Kevin Spacey Frank Underwood |
Заключение

Функция Pandas dataframe drop() используется для удаления строк с помощью их индекса, или мы можем применить несколько условий. Какие бы условия ни выполнялись, мы получим их индекс и в конечном итоге удалим строку из фрейма данных.