
![]()
Download Article
![]()
Download Article
- Marking Your Entries
- Inserting the Index Page
- Editing Index Entries
- Video
- Q&A
- Tips
|
|
|
|
|
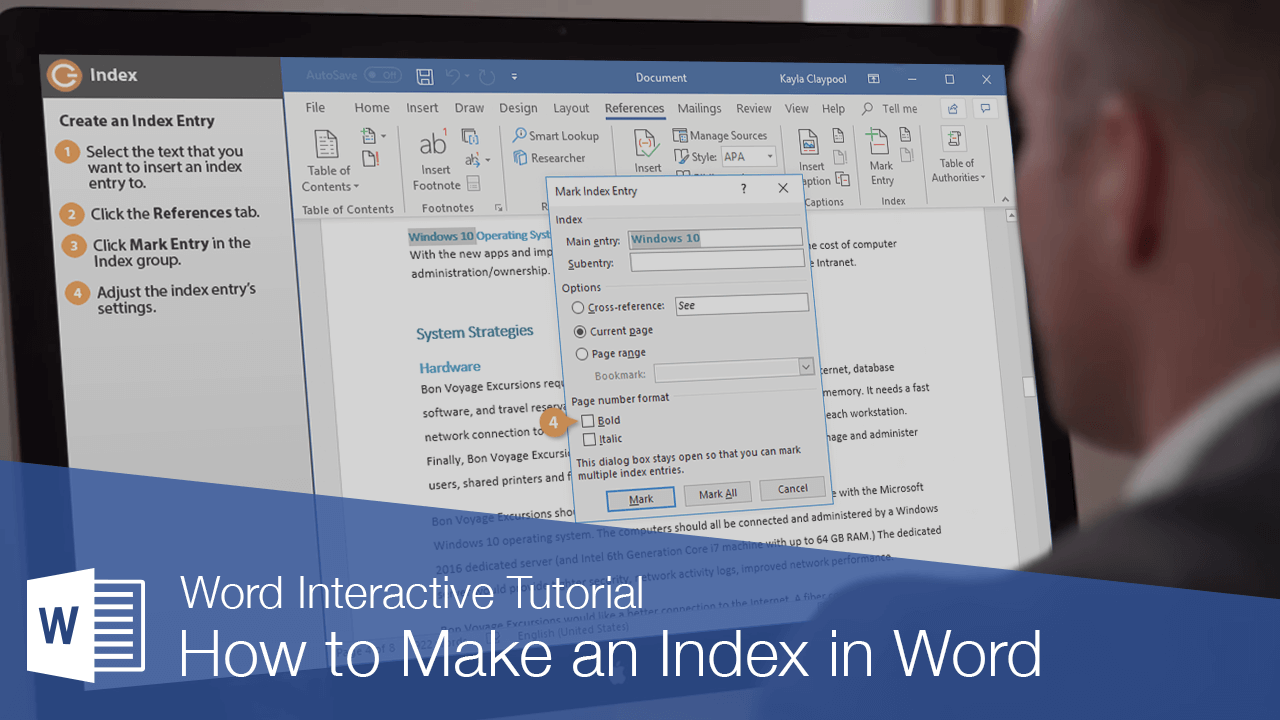
This wikiHow teaches you how to build an index page for your Microsoft Word document. Microsoft Word comes with a built-in indexing tool that can automatically create an index based on the entries you choose. All you’ll need to do is use the Mark Entry tool to mark each word or phrase you want to add to the index. Terms in your index can point to specific pages in the document or cross-reference to other indexed entries.
-

1
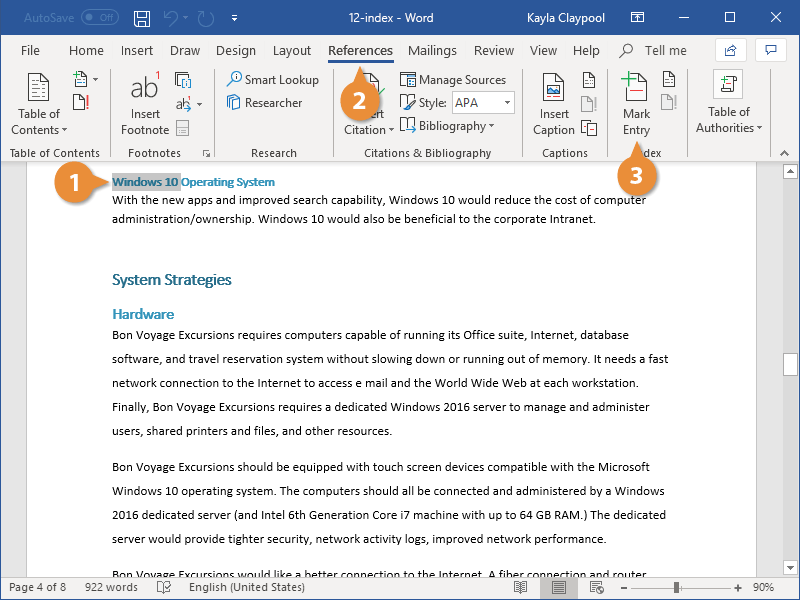
Open a Microsoft Word document. MS Word lets you add an index to any document regardless of its length, style, or subject matter. Before you can add an index to your document, you’ll need to go through each page to mark the terms you want to appear in the index.
-
2
Select a word or a group of words for your index. You can select a word or phrase by highlighting it with your mouse.
Advertisement
-
3
Click the References tab. It’s on the toolbar at the top of Word.
-
4
Click the Mark Entry button. Depending on your version of word, this icon will usually appear in a panel on the toolbar labeled «Index.» It’s the icon of a sheet of paper with a minus sign and a plus sign.[1]
-
5
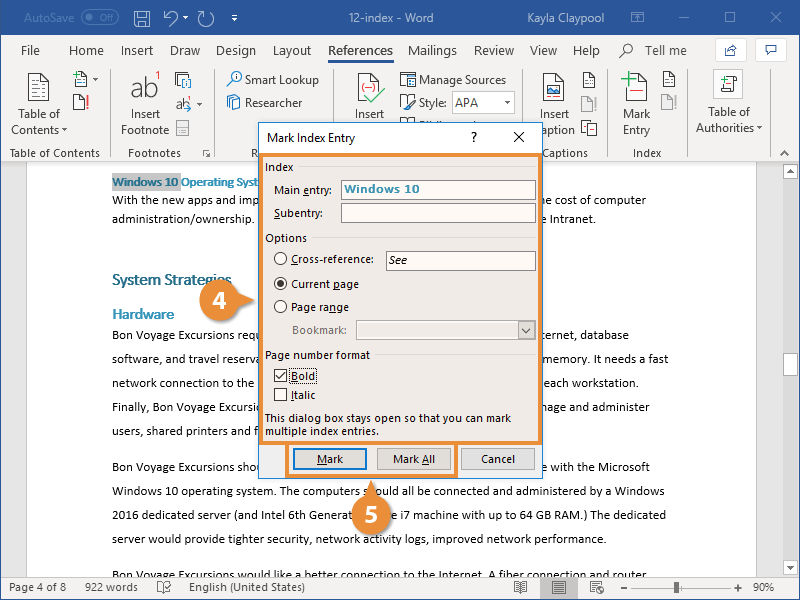
Change how the word or phrase appears in the index. You’ll see the word or phrase you selected in the «Main entry» field at the top of the window. As of now, this is how that word or phrase will appear in the index you’ll be creating. If you want to change the wording, capitalization, or other parameters, you can do so by editing the text in the «Main entry» box.
- If you want to adjust the font face, size, style, or color of this entry in your index, you can do so here. Just highlight the word or phrase in «Main entry,» right-click the highlighted area, and then select Font. Make any changes you want to the font and then click OK.
-
6
Add a subentry (optional). Think about main entries as being their own lines in your index. A subentry would appear below its main entry in the index. It might be helpful to go through your document and create main entries first, and then go back and add subentries.
- For example, if you selected the word surnames and plan to index all surnames in your document, you may want to add mark each surname in the document with the «Surnames» main entry, and then list the surname itself as the subentry.
- You could also add a third-level entry, which would appear below a subentry in the index. To do this, just type a colon after the subentry and then type the third-level entry.
-
7
Choose the location referenced in the index entry. When Word builds an index based on your marked entries, it will simply list the page number on the entry you selected by default. For example, if you highlighted the word «Surnames» on page 2, the index will list «page 2» as the location of the Surnames entry. This is because «Current page» is the default selection in the «Options» section.
- If you’d rather the selected entry reference a different entry (think of when you see «See also» in an index), select «Cross-reference,» and then type the name of the other entry next to «See.»
- If you want the entry to point to a range of pages rather than a single page, you’ll need to create a bookmark for that page range. If you have a bookmark, select «Page range,» and then select your bookmark from the drop-down menu.
-
8
Format the page numbers in your index. Under the «Page number format»‘ heading, choose whether to display the page numbers in Bold and/or Italics as needed.
-
9
Click Mark to save your new entry. This button will mark the highlighted term and add it to your index with its corresponding page number, range, or cross-reference.
- After marking an entry in the index, paragraph markers will turn on immediately, and you’ll see the selected word or phrase in your document surrounded in curly braces with special formatting, much like this:
{XE "entry"} - If it’s too confusing for you to see your document in this format, you can switch back to the standard view by clicking the Home tab and then clicking the paragraph symbol ¶ in the toolbar.
- If you want to mark all instances of the same word or phrase throughout your document, you can click the Mark all button at the bottom. This would add the page number for all instances of this word or phrase to its entry in the index.
- After marking an entry in the index, paragraph markers will turn on immediately, and you’ll see the selected word or phrase in your document surrounded in curly braces with special formatting, much like this:
-
10
Continue marking entries. The «Mark Index Entry» window stays open after you mark an entry, which makes it easy to move to the next entry you want to mark. To continue, highlight another term in your document, and then click the «Mark Index Entry» window to add it to the «Main entry» field. After customizing this entry to your liking, click Mark to save it and move to the next.
- After marking your main entries, go through and mark any subentries or third-level entries. It’s kind of awkward to do:
- Highlight the word or phrase you want to list as a subentry. Using our surname example, let’s say you created a main entry for Surnames and want to add the surname «Williams» to the list of surnames in the index. Start by highlighting the first instance of «Williams» in your document.
- Next, click the Mark Index Entry window. This adds «Williams» to the «Main entry» field (for now).
- Type or paste the subentry (Williams, in our example) into the subentry field.
- Replace the text in the «Main entry» field with the name of the main entry (Surnames, in our example).
- Edit any details and click Mark (or Mark all).
- After marking your main entries, go through and mark any subentries or third-level entries. It’s kind of awkward to do:


Advertisement
-
1
Click your mouse cursor where you want to place the index. In most cases, you’ll want to place your index at the end of the document—just scroll down and click the first empty line below your existing content.
-
2
Click the Insert tab. It’s at the top of Word.
-
3
Insert a Page Break so the index is on its own page (optional). You’ll usually want your index to appear on its own page at the end of the document. To ensure that this happens, click the Insert tab and select Page Break on the toolbar to add a new page for your index.
-
4
Click the References tab. It’s at the top of Word.
-
5
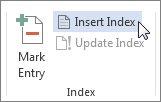
Click the Insert Index button. This button is located next to the Mark Entry button on the References toolbar. This opens a window titled «Index.»
-
6
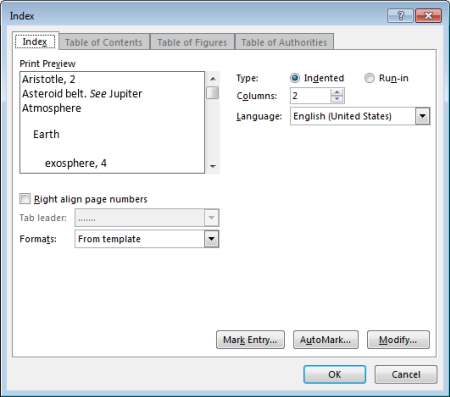
Select your index type. You can select Indented or Run-in at the top-right corner of the window. An indented index will be easier to navigate for readers, whereas a run-in index will take up much less space on the page.
- As you make changes to the index, you’ll always see a preview in the «Print Preview» box at the top-left corner of this window.
-
7
Choose the number of columns. Your index will appear in two columns by default, but you can select a different number by clicking the up or down arrows next to the «Columns» field.
- If you click the down arrow enough times, the value will change to «Auto,» which will automatically adjust the column numbers to best fit the amount of content in the index.
-
8
Select an index design from the «Formats» menu. This drop-down menu is below the Print Preview image. Select any of the designs from the drop-down menu to customize your index’s appearance.
- You can also create your own design by selecting From template and clicking the Modify button at the bottom-right. This lets you customize fonts, spacing, and style for all entries and subentries to create your own design format.
- If you want the page numbers to be aligned on the right instead of right after each entry, check the box next to «Right align page numbers.»
-
9
Click OK to save your index. This creates an index that contains all of the entries you’ve marked throughout your document. You can use this index to look up the pages where important terms and concepts are mentioned throughout your writing.


Advertisement
-
1
Click the Home tab. It’s at the top of Word. If you’ve found an error in the index, such as a misspelling or incorrect term, you can correct the errors by hand and then update the index using the Update Index tool.
-
2
Scroll to the error you want to correct. First, if you’re not in paragraph view, click the Home tab and then click the Paragraph icon ¶ to display them.[2]
Then, scroll to the «XE» entry for the entry you want to correct. Remember, all indexed references start with «XE» and are surrounded by those curly braces you saw earlier. -
3
Make your changes.
- Change the text inside the quotation marks: If the text is incorrect, correct it now by editing what’s inside of the quotes.
- Delete an entry: If you want to completely remove an entry from the index, select the entire index entry field (including the curly brackets) with your mouse, and then press your keyboard’s Delete key.
- You can click the Paragraph icon in the Home tab when you’re finished to turn off paragraph markers.
-
4
Scroll down and click your index. Now that you’ve made changes to the index, you’ll need to update it. Clicking the index selects it for updating.
-
5
Press the F9 key on the keyboard. Depending on your keyboard, you may have to press the Fn key as well to use the F9 key. This updates the index to reflect your changes.
- If that doesn’t work, click the References tab, and then click Update Index on the toolbar.


Advertisement
Add New Question
-
Question
How do I create an index which includes the pages that the words show up on?

Create the index. Click where you want to add the index. On the References tab, in the Index group, click Insert Index. In the Index dialog box, you can choose the format for text entries, page numbers, tabs, and leader characters. You can change the overall look of the index by choosing from the Formats dropdown menu.
-
Question
How many entries can I index?
You can create an index entry for an individual word, phrase, or symbol, for a topic, a special XE (Index Entry) field that includes the marked main entry.
-
Question
How do I set up an index page at the beginning of my document?
Position the insertion pointer where you want the index to appear. If you want the index to start on a new page, create a new page in Word. Click the References tab. In the Index group, click the Insert Index button. Click the OK button to insert the index into your document.
See more answers
Ask a Question
200 characters left
Include your email address to get a message when this question is answered.
Submit
Advertisement
Video
-
If you mark more entries in your document after inserting the index and they don’t appear automatically, click the index and press the F9 key on the keyboard.
-
Marking index entries will automatically turn on the Show all nonprinting characters option. You can turn this off anytime by clicking on the paragraph icon on the Home tab.
Thanks for submitting a tip for review!
Advertisement
About This Article
Article SummaryX
1. Click References.
2. Click Mark Entry.
3. Select a word for the index.
4. Click the «Mark Index Entry» box.
5. Format the page numbers.
6. Format the text.
7. Click Mark.
8. Click Mark All.
Did this summary help you?
Thanks to all authors for creating a page that has been read 424,443 times.
Is this article up to date?
Word for Microsoft 365 Word 2021 Word 2019 Word 2016 Word 2013 Word 2010 Word 2007 More…Less
An index lists the terms and topics that are discussed in a document, along with the pages that they appear on. To create an index, you mark the index entries by providing the name of the main entry and the cross-reference in your document, and then you build the index.
You can create an index entry for an individual word, phrase, or symbol, for a topic that spans a range of pages, or that refers to another entry, such as «Transportation. See Bicycles.» When you select text and mark it as an index entry, Word adds a special XE (Index Entry) field that includes the marked main entry and any cross-reference information that you choose to include.
After you mark all the index entries, you choose an index design and build the finished index. Word collects the index entries, sorts them alphabetically, references their page numbers, finds and removes duplicate entries from the same page, and displays the index in the document.
Mark the entries
These steps show you how to mark words or phrases for your index, but you can also Mark index entries for text that spans a range of pages.
-
Select the text you’d like to use as an index entry, or just click where you want to insert the entry.
-
On the References tab, in the Index group, click Mark Entry.
-
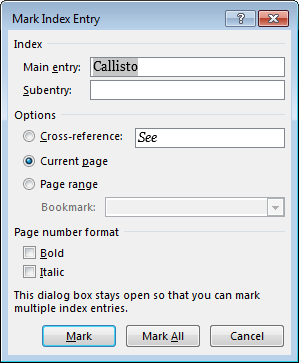
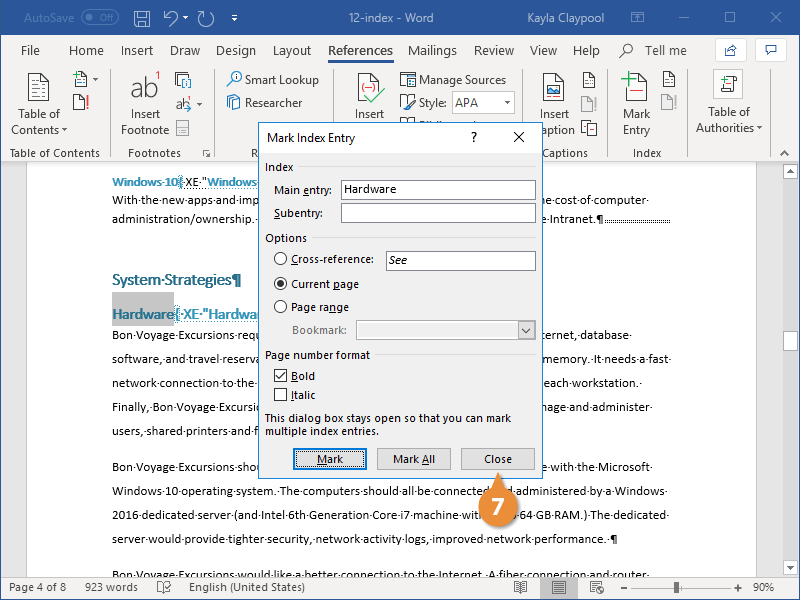
You can edit the text in the Mark Index Entry dialog box.
-
You can add a second-level in the Subentry box. If you need a third level, follow the subentry text with a colon.
-
To create a cross-reference to another entry, click Cross-reference under Options, and then type the text for the other entry in the box.
-
To format the page numbers that will appear in the index, select the Bold check box or Italic check box below Page number format.
-
-
Click Mark to mark the index entry. To mark this text everywhere it shows up in the document, click Mark All.
-
To mark additional index entries, select the text, click in the Mark Index Entry dialog box, and then repeat steps 3 and 4.

Create the index
After you mark the entries, you’re ready to insert the index into your document.
-
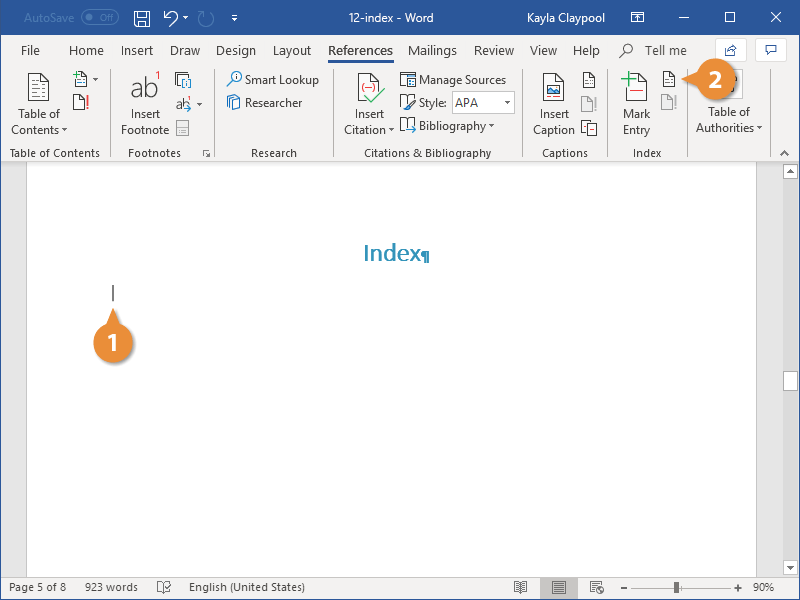
Click where you want to add the index.
-
On the References tab, in the Index group, click Insert Index.
-
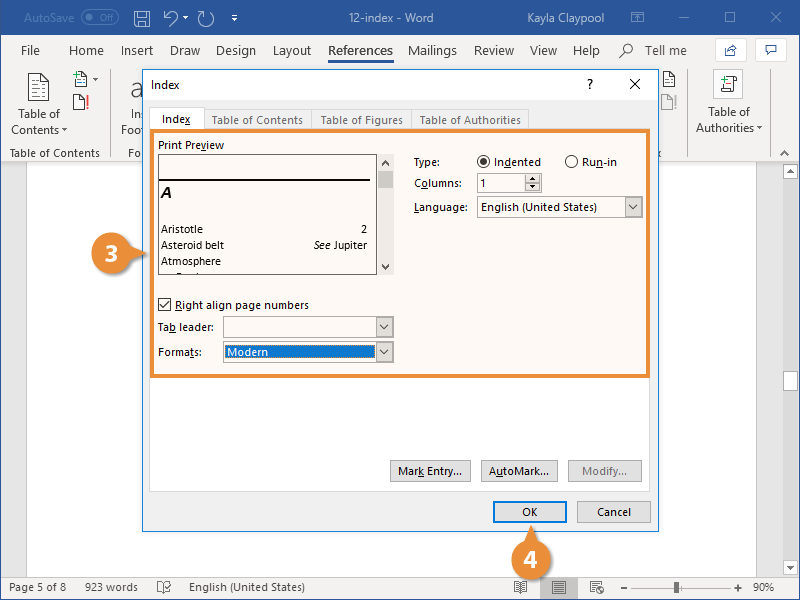
In the Index dialog box, you can choose the format for text entries, page numbers, tabs, and leader characters.
-
You can change the overall look of the index by choosing from the Formats dropdown menu. A preview is displayed in the window to the top left.
-
Click OK.
Edit or format an index entry and update the index
If you mark more entries after creating your index, you’ll need to update the index to see them.
-
If you don’t see the XE fields, click Show/Hide
in the Paragraph group on the Home tab. -
Find the XE field for the entry that you want to change, for example, { XE «Callisto» t «See Moons» }.
-
To edit or format an index entry, change the text inside the quotation marks.
-
To update the index, click the index, and then press F9. Or click Update Index in the Index group on the References tab.
 in the Paragraph group on the Home tab.
If you find an error in the index, locate the index entry that you want to change, make the change, and then update the index.
Delete an index entry and update the index
-
Select the entire index entry field, including the braces ({}), and then press DELETE.
If you don’t see the XE fields, click Show/Hide
in the Paragraph group on the Home tab. -
To update the index, click the index, and then press F9. Or click Update Index in the Index group on the References tab.
Need more help?
An index can usually be found at the end of a document, listing the key words and phrases in a document, along with the page numbers they appear on. There are two steps involved in creating an index: defining which words you want to appear in the index and then inserting the index.
Insert an Index Entry
- Select the text you want to include in the index.
- Click the References tab.
- Click the Mark Entry in the Index group.

- Adjust the index entry’s settings and choose an index entry option:
- Cross-reference: Adds a reference to another index entry, instead of listing the current page number.
- Current page: Lists the current page number for the selected index entry. This is the default option.
- Page range: Lists the range of pages that are included in the bookmark that you click in the Bookmark list. Before using this option, you’ll need to create a bookmark of the selected range.
- Click the Mark or Mark All button.
- Repeat the process for your other index entries.
- Click Close when you’re done.
The Mark Index Entry dialog box opens, where you can set up how the index entry works. The main entry field is filled with the selected text, and you can also add a subentry that will appear below the main entry.
Clicking Mark will create an index entry for the selected instance of the word. Clicking Mark All will instead create an index entry for every instance of the selected word throughout the document.
Once you mark an entry, formatting marks will be displayed so that you can see the hidden text that marks index entries. The window remains open, so you can continue to mark index entries throughout the document.
Index entries are invisible and will not be printed. However, you can see them when the paragraph marks are turned on.
Insert an Index
Once index entries have been marked, you’re ready to insert the index.
- Click in your document where you want to insert an index.
- Click the Insert Index button on the References tab.
- Customize the appearance and behavior of the index.
- Click OK.
Indexes usually appear at the end of a document and can take up a lot of space, so a blank page at the end is ideal.
The Index dialog box opens, where you can set up how the index will appear.
You can choose whether to right align page numbers and select a tab leader that appears between text and page numbers. You can also select whether to use a document’s formatting theme or select another one.
You can choose whether subentries will be indented below the main entry or shown run-in style in a paragraph below the main entry.
Any changes you make to the index appearance will be shown in the Print Preview.
The index is inserted, automatically filling itself out with all the index entries in the document.
Update an Index
When you insert an index, it automatically adds every index entry in the document. If you add or modify index entries after the index is created, you’ll need to update the index.
- Click anywhere in the index.
- Click the Update button.
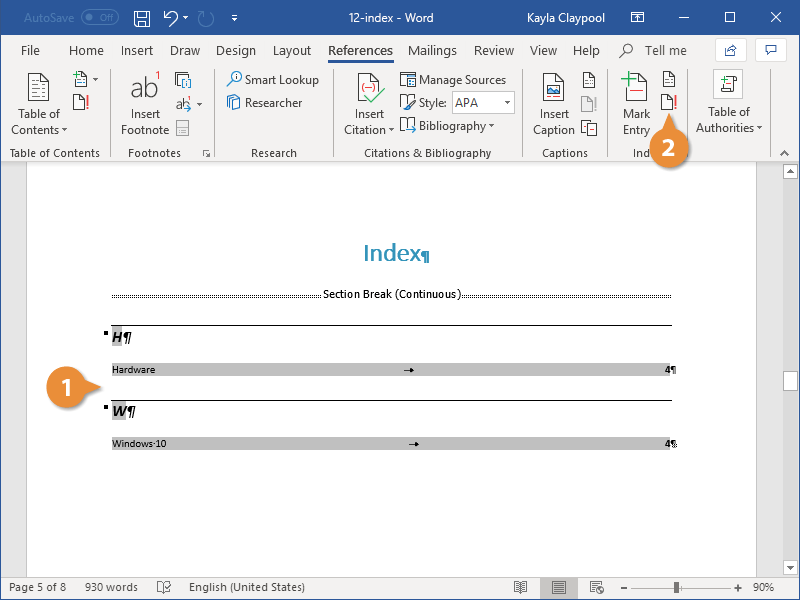
The index is updated, adding any newly created entries while updating the page numbers for any entries that may have moved.

FREE Quick Reference
Click to Download
Free to distribute with our compliments; we hope you will consider our paid training.
In this post, I’ll share how to build a dynamic Microsoft Word index (i.e. one you can update automatically without having to rebuild it) using 2 methods — the Mark and Index method and using a concordance file.
A Word Index (example shown below) provides a very useful reference for the reader.
Unlike a structured table of contents where the reader scans a general list of topics until they find a one of interest), a Word index allows the reader to search for a specific word or phrase, normally in alphabetical order and go straight to the relevant page (or pages).
How to create a table of contents in Word that updates itself
How to set up multilevel numbering that works perfectly first time

1. Creating a Word Index using Mark & Index
There are two steps for generating an index. Firstly, you must work through your document and ‘mark’ anything that you would like to include in the index. Then, you compile the index, using the marked entries.
Each time you mark an entry, an XE field code is inserted into the document, like this:
{ XE “index entry text” }
XE stands for Index Entry.
Word switches hidden formatting on as soon as you mark an entry so it doesn’t take long before your document starts to look messy. But don’t worry — when you print your document, field codes are not printed.

But don’t worry — when you print your document, the field codes are not printed.
As your Word index grows, It can sometimes be quite hard to locate and isolate a particular index entry to modify or remove it.
For this reason, many editors use a concordance file, which is a table in a separate document that lists everything to be indexed. This file can then be used to compile the index, leaving the original file squeaky clean and making maintenance easy.
(a) Marking a main entry
To mark an entry:
1. Highlight the text that should appear in the index.
2. In Word, select the References tab.
3. Click the Mark Entry icon in the Index group

The Mark Index Entry dialog box is displayed. The text that you highlighted is displayed in the Main Entry box. This is the text that will appear in the index. You can modify it if you wish.

It’s worth learning the keyboard shortcut for marking entries, as you will probably use it a lot when working with large documents. To display the Mark Index Entry dialog box, press
ALT + SHIFT + X
4. Click the Mark button to mark only this occurrence of the word or phrase
Click the Mark All button to flag every occurrence of the word or phrase within the document.
5. Rinse and repeat for each word or phrase you want to include in the index. To save time, you can leave the Mark Index Entry dialog box open – you don’t need to close it for every entry you select a new entry.
An XE field code is inserted into the document
{ XE “index entry text” }
The text within the quotation marks is what appears in the index. It does not have to be the same as the text in the document so you can edit it if you wish.
* Guidelines for marking index entries in Word *
- Spell out abbreviations, e.g. CPU (Central Processing Unit).
- Simplify words or phrases, e.g. change ‘legalities’ to ‘law’.
- Avoid multiple entries of the same keyword, e.g. installing, installations, install procedures. Instead, use one entry – “Install” and list the others as sub-entries (discussed shortly).
- Avoid starting an entry with a vague or ambiguous word, e.g. ‘using’ or ‘to’ or an adjective, e.g. use ‘contact’ rather than ‘multiple contacts’.
- Indexing is case sensitive
(b) Marking a subentry
Subentries are a powerful way of grouping similar items in an index. Let’s say we wanted to index various sub-entries around the main word Console:
- 3DS console
- Switch console
- Game Boy console
If the reader searches the index for Console, they can be redirected to the page(s) for the specific console they are interested in.
In this example, the Main Entry is Console and the 3 subentries are 3DS, Switch and Game Boy.
1. Find the word 3DS in the text and select it.
2. Press Alt+ Shift + X
3. Enter ‘Console‘ into the Main Entry and ‘3DS‘ into the Subentry. Entries will appear in the index exactly as you type them so take care not to misspell anything and be consistent with upper case and lower case.

4. Click the Mark or Mark
All buttons.
(c) Cross-referencing another indexed item
Cross-references are used to direct someone who is searching for one thing to another. For example, if someone searches for Music, the index could say See Audio, or if someone searches for Food, the index could point them towards Nutrition.
Index cross-references should not be confused with the standard Word cross-reference feature which can be found on the Insert menu.
To create an index cross-reference:
1. Select the text to be marked.
2. Press ALT + SHIFT + X
3. Confirm the text in the Main Entry box.
4. Select the Cross-Reference radio button.
5. After “See” type the synonymous text item.

(d) Compile the Word Index
Now that all the entries have been marked it is time to create the index itself.
1. Select the References tab.
2. Click the Insert Index icon in the Index group. The Index dialog is displayed.

3. Choose a Format from the drop-down list. Be aware that different formats select, deselect or change some of the other options in the dialog. The safest approach is to start at the bottom left and work upwards, then to the right.
4. Ensure that Right-align page numbers is selected.
5. Select a tab leader (the tab leader fills the gap between the end of the item and the page number — dots work best).
6. Choose whether to use Run-In or Indent (watch the preview).
7. Choose how many columns to display in the index.
8. Click OK
(e) Update the index (whenever needed)
1. MIn the document, mark any new text you wish to include in the index and remove any existing XE field codes that you no longer require.
2. Click anywhere on the index to show grey shading.

3. Press F9 to refresh the index.
Alternatively, right-click and choose Update Field from the context menu or click the Update Index button on the References ribbon).
How to create a table of contents in Word that updates itself
2. How to remove all field codes from a document
Ideally, a document should be finished before creating an index, but if significant changes have occurred you may want to clear any XE field codes throughout the document and start from scratch. Here’s a simple process to get that job done.
1. Press CTRL H to display the Replace dialog. Alternatively, click the Find & Select icon on the far-right side of the Home ribbon, then choose Replace.
2. In the Find box, type ^d (press SHIFT 6 to get ^).
3. Leave the Replace box empty.
4. Click Replace All (or Find then Replace to process one by one).
Using ^d will remove every field in the document, not just the XE field codes. It is a special character that finds braces (curly brackets) that enclose field codes.
To remove just the XE field codes, use ^d XE.

3. How to create a Word index using a concordance file
Many editors use a concordance file to generate an index for a document. A concordance file is a two-column table that is created in a separate document.
- The left column contains the entries to be marked in the document.
- The right column defines what appears in the index.
- If a text item is separated with a colon then the first part is the main entry and the second part is a sub entry (as pictured in the blue section below).
- Concordance entries are case sensitive, so if a word appears capitalised and not capitalised at various points through the document, create two entries, one for each case variation in the left-hand column, and a common variation in the right-hand column (as pictured in the yellow section below).
- The concordance also provides a good opportunity to handle singles, duplicates and other word variations. Place all the variations in the left column and a common entry for each in the right column (as pictured in the grey section below).

(a) Mark entries within a Word document using the pre-prepared concordance file
1. Select the References tab.
2. Click the Insert Index icon in the Index group.
3. Click the AutoMark.. button.

4. Locate and select the concordance file and click OK . All entries are now marked.
(b) Create the index
1. Select References | Insert Index again.
2. Set your index preferences as discussed in Step 2: Compiling the index (above).
3. Click OK.
(c) Update the concordance and/or index
1. Open the concordance file, make your changes and save the file.
2. Clear the current XE codes in the main document (as described previously).
3. Select References | Insert Index | Automark.
4. Click on the existing index to display the grey shading.
5. Press F9 to refresh the index.
Alternatively, right-click and choose Update Field from the context menu or click the Update Index button on the References ribbon).
4. Key Takeaways
- To create a back-of-book index, text entries should first be marked. The index is then built from the list of marked entries. The index tools are located in the Index group on the References ribbon.
- Entries may be marked once or every time they appear in the document.
- Marked entries have a field code, e.g. { XE «Text to appear in index» } inserted directly after them.
- Field codes are only visible while displaying hidden formatting. They are not printed.
- Press Alt + Shift + X to display the Mark Index Entry dialog box.
- The Mark Index Entry dialog can be left open allowing you to switch between it and the document to mark multiple entries.
- A main index entry may have a number of sub entries.
- An index entry may cross-reference another index entry, if it is a similar item.
- An index may also be created using a concordance file, which is accessed by clicking the AutoMark… button in the Mark Index Entry dialog box.
And that, my friend, is how you build an index page in Word.
How to set up multilevel numbering that works perfectly first time
I hope you found plenty of value in this post. I’d love to hear your biggest takeaway in the comments below together with any questions you may have.
Have a fantastic day.


About the author
Jason Morrell
Jason loves to simplify the hard stuff, cut the fluff and share what actually works. Things that make a difference. Things that slash hours from your daily work tasks. He runs a software training business in Queensland, Australia, lives on the Gold Coast with his wife and 4 kids and often talks about himself in the third person!
SHARE