
In more formal texts, such as theses and dissertations, it is common that page numbers only start with the introduction or background. In other words, the pages that include your title, abstract and table of contents are usually not numbered.
This step-to-step guide describes how to start numbering your pages on, for instance, page 3. Note that exactly where you begin numbering your pages depends on your specific text and which layout is required.
The guide is made for the latest version of MS Word, both for PC and Mac.
1. Start by clicking on ¶ to show the section break.

2. Put the cursor after the text on the page that should be the last page without a page number, for example, the table of contents.
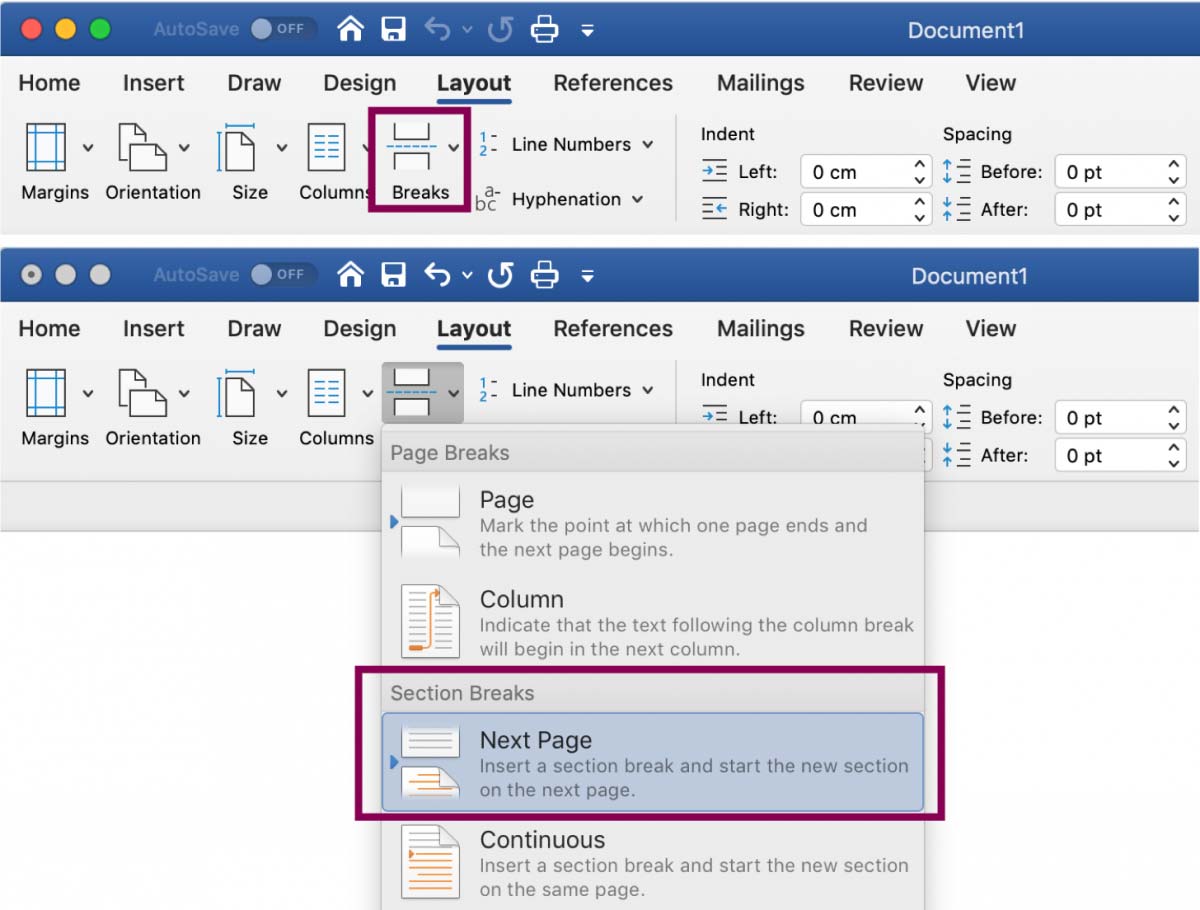
3. Click on the Layout tab. Select Breaks → Sections Breaks → Next Page.
4. Put the cursor on the page where the page numbering should start (that is, section two in the document).
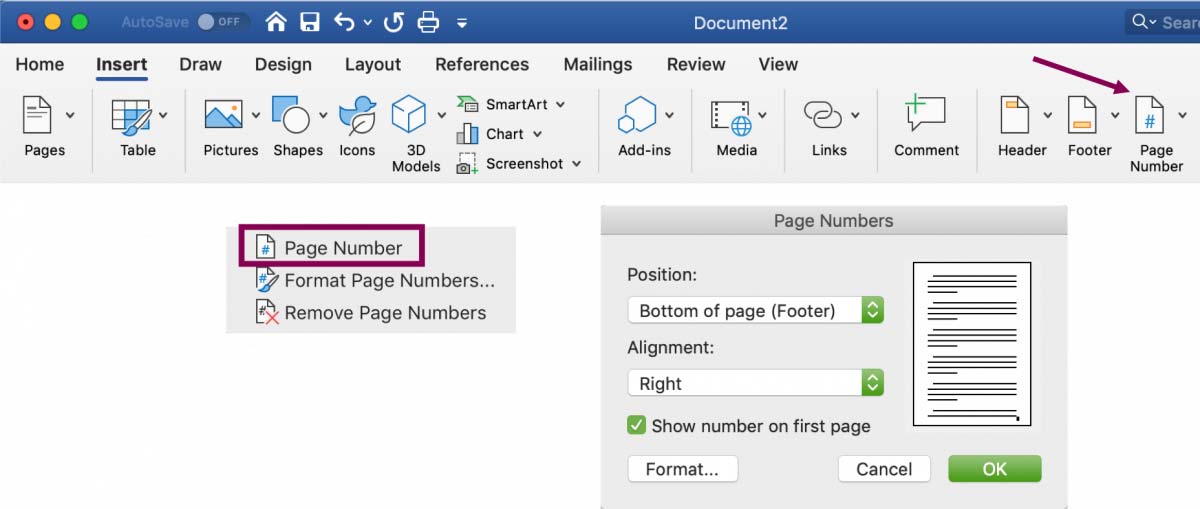
5. Click on the Insert tab and Page Number. Select position and style for pagination.
6. Click on the bottom of the page to activate the Header & Footer menu. Deactivate Link to Previous and check that Different First Page is unchecked.

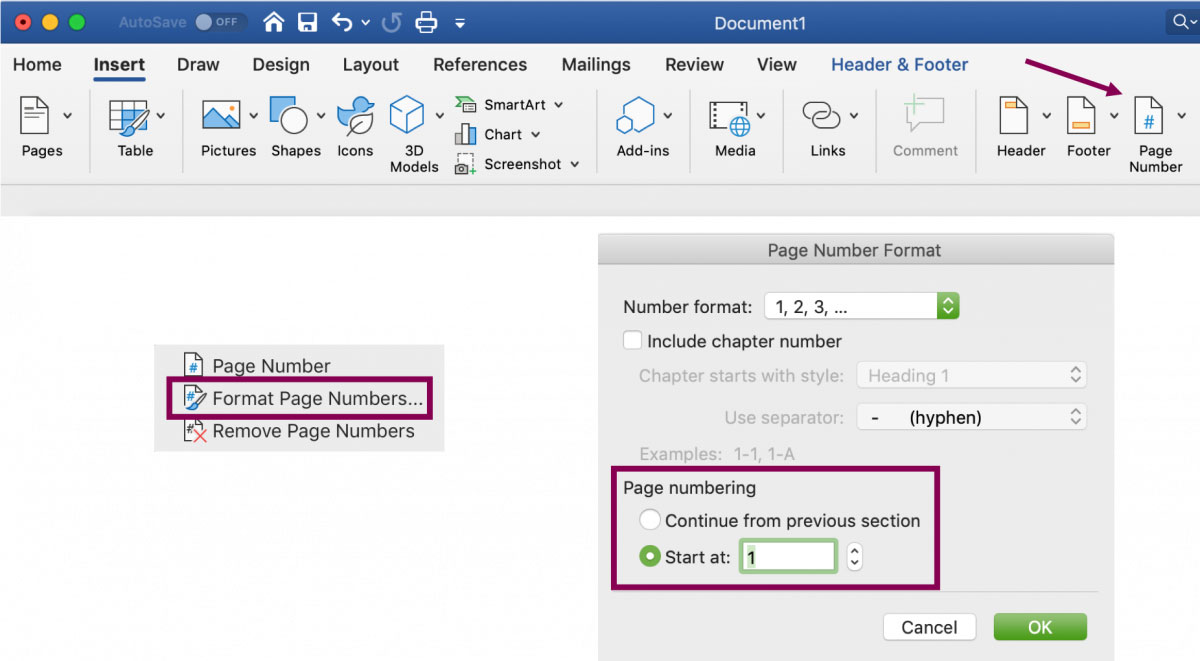
7. To ensure your pages begin with 1, go to the Insert tab → Page Number. Select Format Page Numbers… → Page numbering → Start at and add 1.
8. Manually delete the page numbers on the first pages of section 1 by double-clicking on them and then deleting them.
9. That’s it, you’re finished. Well done!
After creating a large Word document that contains multiple pages, you may need to shift pages around if they’re not in the correct order. You won’t find a “Move Page” button on Microsoft Word’s ribbon, but the application does give you the ability to reorder pages. Learning to display a document’s formatting symbols can help you do this quickly using your mouse or your finger if you have a touchscreen device.
Show Formatting Symbols
Step 1
Open a multipage document in Microsoft Word.
Step 2
Tap or click the ribbon’s «Home» tab.
Step 3
Tab or click the «Show/Hide» button in the Paragraph section to display the document’s formatting symbols. The symbols will help you identify page breaks.
Step 4
Scroll to the top of the page you’d like to move and then scroll down until you see the Page Break symbol. Remember what that symbol looks like. It contains the words «Page Break» and it can help you identify the bottom of any document page.
Reorder Using the Mouse
Step 1
Scroll back to the top of the page you want to move and click the first character on the page. Word positions the cursor at that location.
Step 2
Hold down your left mouse button and drag the cursor down to select all the text on the page including the Page Break symbol. Press «Ctrl-X» to cut the text from the page.
Step 3
Click the bottom of the page where you’d like to paste the text and press «Ctrl-V» to paste it into that location. Repeat this process for each page you’d like to move.
Reorder Using Your Finger
Step 1
Scroll to the top of the page you’d like to move and tap the page’s first character to select it. Word displays a handle on either side of the selection.
Step 2
Tap the right handle and drag your finger down to select everything on the page including the Page Break symbol.
Step 3
Press «Ctrl-X» to cut the text you selected from the page. Tap the bottom of the page where you wish to paste the text and press “Ctrl-V.” Word pastes the text into that location. Move additional pages using these steps.
References
Resources
Tips
- If you move a page to the bottom of the document, that page will contain a Page Break symbol that adds one extra blank page to the document. Select that symbol and delete it if you want to remove that extra page.
- Tap or click the “Show/Hide” button again to remove the document’s formatting symbols. This button is a toggle that shows the symbols when they’re not visible and hides them when they are.
- If you have two or more consecutive pages to move, save time by selecting all those pages at once, cutting them using “Ctrl-X” and performing a single paste operation in the new location where you want to move those pages.
Writer Bio
After majoring in physics, Kevin Lee began writing professionally in 1989 when, as a software developer, he also created technical articles for the Johnson Space Center. Today this urban Texas cowboy continues to crank out high-quality software as well as non-technical articles covering a multitude of diverse topics ranging from gaming to current affairs.
Image Credit
Jupiterimages/Goodshoot/Getty Images

Page Setup in Word: Overview
Page Setup in Word lets you change the structure and layout of pages in a Microsoft Word document. The “Page Setup” group on the “Page Layout” tab of the Ribbon contains buttons that let you make changes to the page setup of the document. In addition to these buttons, you can also click the “Page Setup” dialog box button in the lower right corner of the “Page Setup” group to open the “Page Setup” dialog box. Here you can change any aspect of the document setup you choose. This dialog box consists of three tabs: “Margins,” “Paper,” and “Layout.” Let’s examine the page setup options you can set in this dialog box.
On the “Margins” tab, you can set the margins for the document. Set the top, bottom, left, and right margins to the length or width you desire by either typing the measurement units into the boxes provided or by using the spinner arrows at the right end of each spinner box. You can also set the “Gutter” margin, which is the amount of wasted space allotted for binding, if you are printing a document that you wish to bind. You can also use the “Gutter position:” drop-down to select the side of the document where you want the gutter margin to appear.
In the “Orientation” section, select either a portrait or landscape page orientation for your document or document section. In the “Pages” section, select the method for printing multiple pages from the “Multiple pages:” drop-down.
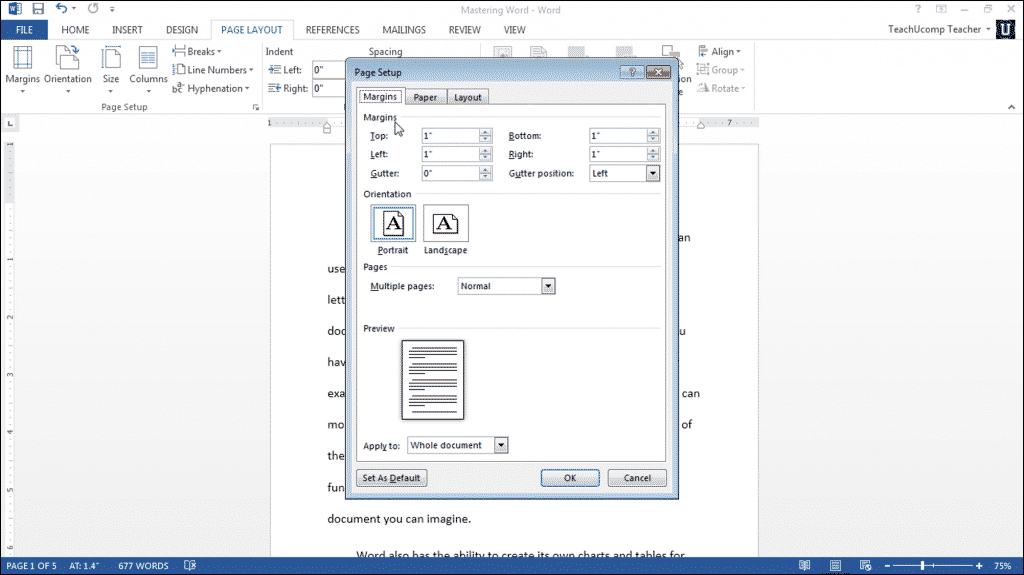
Page Setup in Word- Tutorial: A picture of the “Margins” tab within the “Page Setup” dialog box in Microsoft Word 2013.
On the “Paper” tab in the “Page Setup” dialog box, select the size of the paper onto which you will be printing this document. In the “Paper Source” section, set to which tray of your printer you will print the first page of your document if you have a multi-tray printer, and then make a tray choice for the subsequent pages.
On the “Layout” tab, set section break behavior in the “Section” area, if desired. You can also set some of the options for headers and footers in the “Headers and footers” section. This replicates the functionality shown in the “Headers & Footers” context tab. However, you can set your options here, if you prefer.
In the “Page” section, set the vertical alignment of the page using the drop-down available. This lets you change the vertical alignment of the text on the page to the center, top, or bottom of the page. You can also set line numbers and page borders here, if desired, by clicking either of the two buttons for those options at the bottom of the page and then making the settings you desire.
At the bottom of this dialog box, on all of the tabs, is the “Apply to” drop-down where you can choose which part of the document you want the page properties you just set to affect. You can apply your changes to the entire document, just the section that you are working on (if you used a section break), or everything in the document from this section forward. After you set your options for Page Setup in Word for your document, click “OK.”
Page Setup in Word: Instructions
- To set options for Page Setup in Word using the Ribbon, you can use the buttons within the “Page Setup” group on the “Page Layout” tab of the Ribbon.
- To set options for Page Setup in Word using a dialog box, click the “Page Setup” dialog box button in the lower right corner of the “Page Setup” group to open the “Page Setup” dialog box.
- To set the margins for the document, click the “Margins” tab in the “Page Setup” dialog box.
- Set the top, bottom, left, and right margins to the length or width you desire by either typing the measurement units into the boxes provided or by using the spinner arrows at the right end of each spinner box.
- You can also set the “Gutter” margin, which is the amount of wasted space allotted for binding, if you are printing a document that you wish to bind.
- You can also use the “Gutter position:” drop-down to select the side of the document where you want the gutter margin to appear.
- Select either a portrait or landscape page orientation for your document or document section in the “Orientation” section.
- Select the method for printing multiple pages from the “Multiple pages:” drop-down in the “Pages” section.
- To select the size of the paper onto which you will be printing this document, click the “Paper” tab in the “Page Setup” dialog box.
- Set to which tray of your printer you will print the first page of your document if you have a multi-tray printer, and then make a tray choice for the subsequent pages in the “Paper Source” section.
- To set section break behavior, click the “Layout” tab and make your selections in the “Section” area.
- You can also set some of the options for headers and footers in the “Headers and footers” section. This replicates the functionality shown in the “Headers & Footers” context tab. However, you can set your options here, if you prefer.
- To set the vertical alignment of the page, use the drop-down available in the “Page” section.
- To set line numbers and page borders in this same section, click either of the two buttons for those options at the bottom of the page and then making the settings you desire.
- To choose which part of the document you want the page properties you just set to affect, click the “Apply to” drop-down at the bottom of this dialog box.
- To set your options for Page Setup in Word for your document, click “OK.”
Page Setup in Word: Video Lesson
The following video lesson, titled “Using Page Setup,” shows you how to use Page Setup in Word. This video lesson on how to use Page Setup in Word is from our complete Microsoft Word training, titled “Mastering Word Made Easy v.2013-2007.”
Tagged under:
about, apply, applying, class, course, dialog box, help, how-to, instructions, layout, learn, lesson, margins, microsoft word, overview, page setup, Page Setup in Word, paper, self study, teach, training, tutorial, use, using, video, word, word 2010, Word 2013