
Perhaps one of the most important things you can learn in Microsoft Word is how to format your page with elements such as margins and page breaks. Formatting your pages makes them look more attractive and makes them easier to read. Plus, it’s easy to do with Word 2016.
Page Margins
Page margins are the white space around the top, bottom, left, and right of your document. Margins let Word know where to start placing text at the top of a document, when to move on to the next page at the bottom, where to start typing text on the left side, and where to stop and move to the next line on the right.
Changing or setting page margins in Word 2016 only requires a few simple steps. It really doesn’t take any time at all once you know where to go and what to do.
To change or set the page margins, click the Layout tab on the ribbon, then go to the Page Setup group.
Click the Margins button. It looks like this:

Normal margins are one inch margins at the top, bottom, left, and right.

To set your own margin, click Custom Margins at the bottom of the dropdown menu.
You will then see the Page Setup dialogue box.
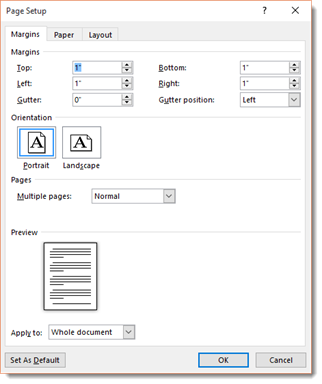
Enter the margin measurement in inches for the top, bottom, left, and right margins.
Click OK when you’re finished.
How to Change the Orientation of a Page
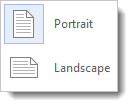
When we talk about page orientation, there are two different orientations: landscape and portrait. Landscape and portrait refer to how the document will be displayed on screen and printed. Choose Landscape and your document will be printed horizontally. This is the most common orientation. If you select Portrait, it will be printed from top to bottom (vertically). This is best for professional photos of several people. If your document contains several photos, you may want to choose Portrait.
To set the orientation, go to the Layout tab. Click the dropdown arrow below the Orientation button.
It looks like this:

You will be asked to select between Landscape and Portrait.
Change Page Size
Let’s learn how to adjust the page size of your Word document.
The default page size in Word is 8.5 x 11, the same as standard printing paper. However, for different types of documents, you may need to change the page size.
To change the paper size, go to the Layout tab. Click the downward arrow below the Size button.

Clicking on this will produce a drop down menu with different sizes that you can choose from.
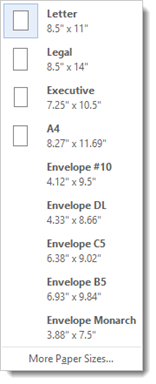
Choose the size of your final document. You can choose legal, A4, credit card size, etc.
Page Colors
Changing the page color is self-explanatory. To do so, click the Design tab and then the Page Color button.

Simply select a color from the menu.
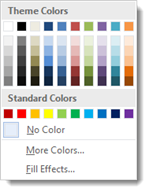
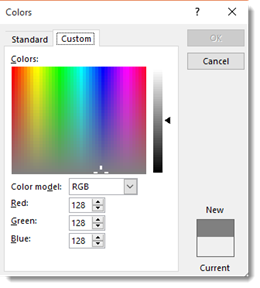
To create your own color, click «More Colors.»

Under the Standard tab, you can click on a color to select it, as shown above.
If you click the Custom tab, you can use the color picker by clicking your mouse anywhere on the color that you want, then use the slider to adjust the color to create the exact shade you want.
To add a gradient, texture, pattern, or picture, click «Fill Effects» in the Page Color dropdown menu.
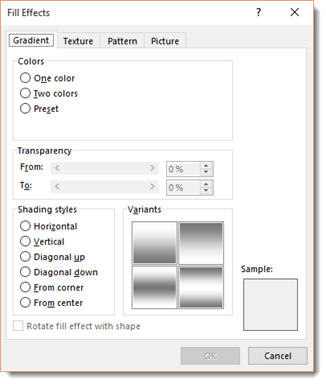
In the Fill Effects dialogue box, you can add a gradient, texture, pattern, or image to use as a background for your document.
Borders and Shading
Borders can be applied to an entire page, an entire document, or just certain sections of the document. A border can also be applied to paragraphs.
To put a border around a page or a paragraph, go to the Design tab and click the Page Borders button in the Page Background group. It looks like this:

When you click the Page Borders button, a new dialogue box opens.
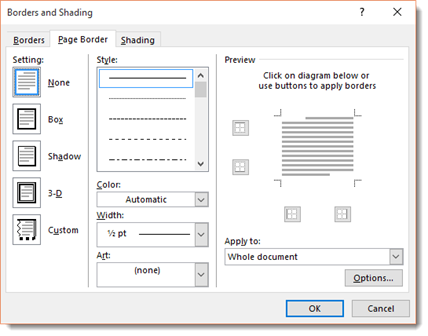
Use this window to define the attributes of your border. You can choose to remove a border by clicking the None box. Select a style, width, and color. You can even select some predefined artwork from the Art dropdown box.
Using the Apply To dropdown, you can choose whether to apply these settings to the entire document or just certain pages or sections.
Now take a look in the lower right hand corner of the window where it says «Options.» Click that for even more control over your border and shading options.
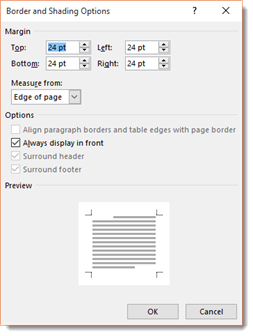
From here, you can choose the margins of your border, and whether or not to measure that from the edge of the page or the edge of the text. Click OK when you’re finished.
To add shading to a page, click Page Borders and then Shading from the Borders and Shading dialogue window. Select a color from the Fill dropdown menu, and a style. Click OK when finished.
Using and Formatting Multiple Columns
By default, a blank document contains one column. The text begins at the left margin and runs straight across the document to the right margin. However, if you’re creating a newsletter or brochure, you might want to add multiple columns
There are several benefits to using multiple columns. They can:
- Make your documents easier to read
- Make them visually interesting
- Make them look professional
- Allow you to use space more efficiently
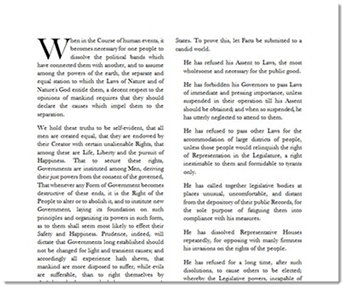
Below is an example of a document that was made more interesting simply by breaking the text up into columns.
Adding columns to a document is incredibly easy. Go to the Layout tab and click the Columns Button in the Page Setup group.
Select how many columns you want to use in your document.
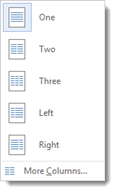
For precise control over the column width and spacing, click «More Columns….»
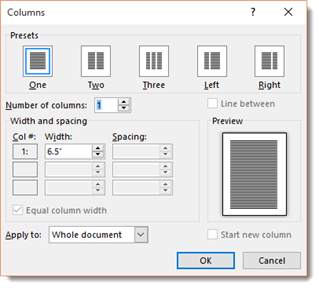
In the dialogue box pictured above, you can adjust the width of the column, as well as the amount of space between columns. You can also decide if you want the columns to apply to the whole document or from the current point in the document forward.
Click OK when finished.
Insert Headers and Footers (Including Page Numbers)
A header appears at the very top of a document. It typically includes the page number and title of the book.
A footer appears at the bottom of a page. It can also contain a page number.
If you want to insert header and footer information (page numbers, title, date, etc.) into your document, you first have to decide if you want headers or footers. Remember, headers go at the top of the page. Footers go at the bottom.
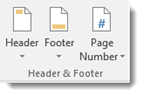
To insert headers or footers, go to the Ribbon and click on the Insert tab.
Go to the Header & Footer Group, the click on either Header or Footer.
We’re going to choose Header.
After you click on Header, choose a header style from the dropdown menu, as pictured below.

Once you select your style of header, it will take you back to your document where you can then insert the header information, including title, page number, date, etc.
The same steps are applied when you click on Footer.

If you simply want to insert page numbers, then click the Page Number button that is to the right of Footer button. A dropdown menu will appear which will allow you to choose where to place the page numbers.

Choose where you want to place the page numbers. You can also format and remove page numbers.
NOTE: If all you want to do is add page numbers, this is quicker and easier to do then going through the Header or Footer dialogue.
Create a Page Break
A page break is the point where one page ends and another begins.
To create a page break:
-
Go to the Insert tab.
-
In the Pages group, click the Page Break button. It looks like this:

Insert a Cover Page
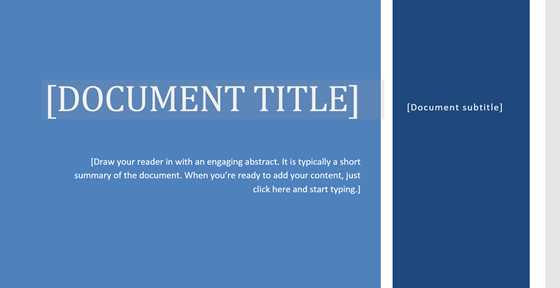
A cover page is inserted before the first page of your document. It contains information such as the name and author of the document. It can also contain image and other graphics to make the page more attractive. Cover pages are commonly used for longer documents, such as reports and books.
To insert a cover page, click the Insert tab on the Ribbon, then click the Cover Page button in the Pages group. It looks like this:

From the dropdown menu, choose a style for your cover page.
To edit the text on your cover page, hover your mouse over the placeholder text, then click to see the cursor.
Type the text that you want to appear.
If you want to remove the cover page, click the Cover Page button again and select «Remove Current Cover Page».
Insert a Blank Page
When creating longer documents, you may want to insert a blank page between sections or chapters.
To insert a blank page, click the Insert tab on the Ribbon.
Select Blank Page from the Page group. It looks like this:

The blank page will appear after the current page.
Templates
Templates are documents that are already designed for you.
When you use a template, all you have to do is replace the sample text and images with your own. They help you save oodles of time and keep your documents consistent. In Word 2016, you can even edit the templates or create your own and then use them again and again.
Changing the Default Document Template
Whenever you open a blank document in Word, you are opening a template—one in which the margins, font, and themes are already defined. This is called the default template. It’s not as fancy as some of the templates you see pictured when you go to File>New, but it’s still a template. You can edit this template in the same way you’d edit the fancier templates.
To make changes to the default template, let’s take a look at the Font group under the Home tab.
As you can see, the selected font is Calibri, size 11. This is the default font for Word 2016. But let’s say you’re a professional writer, and your editor is a stickler for old-school standards. That means he wants a fixed width font like Courier New, size 12, with double spacing. Since you write almost exclusively for this stodgy old editor, you don’t want to have to go in and change those values every time you open Word.
The solution is easy. Click the little arrow at the bottom right corner of the Font group to open the Font dialogue box. Click the Font tab.
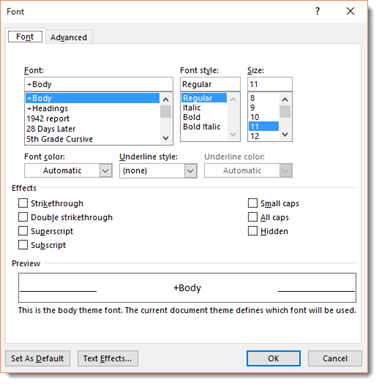
Choose the font and size you want, and then click the «Set As Default» button in the lower left hand corner of the window.
Another dialogue box will open, asking you if you’d like to set this font size and style as the default for this document, or all documents based on the Normal template.
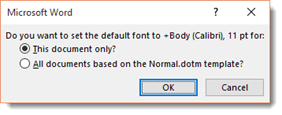
If you want to use 12pt Courier New every time you open a new document, select «All documents based on the Normal template?» You can change these values anytime you like.
To change the default paragraph values, you click the box with the arrow in the lower right hand corner of the Paragraph section of the ribbon. You can change default Margins in the Page Setup section, and so on.
Opening an Existing Template
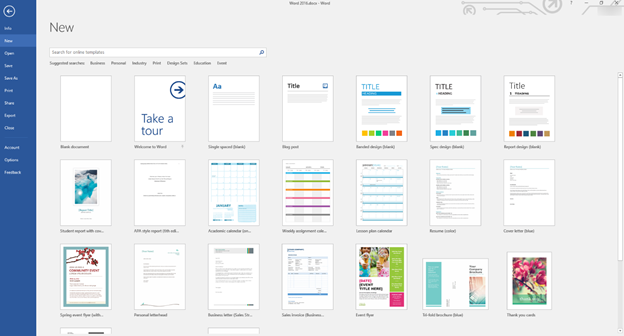
Microsoft provides a number of templates to make your work easier. They can help you create a budget, write professional letters, design flyers and for Microsoft and more. If you are connected to the Internet, you can browse through and download literally thousands of existing templates from Office.com…without ever leaving Word 2016.
If you already have Word 2016 open, you can view the templates by clicking the File tab, then going to New. You can then see the templates just as you did on the start screen.

As you can see, the blank document template appears first, followed by a tour of Word 2016. Next, you have a single spaced plain document. If you click on it to open it, Word shows you the features of this template:
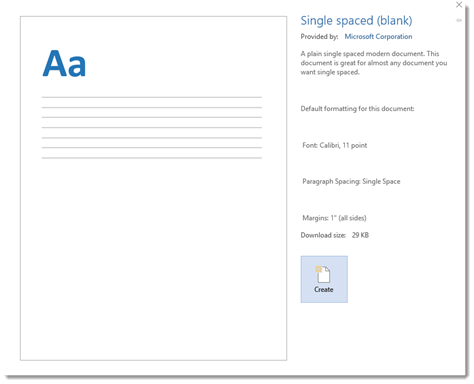
Click the Create button to create the template.
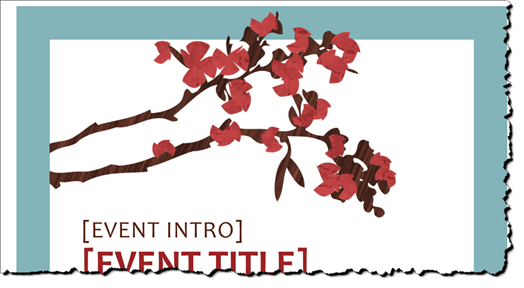
Now, let’s choose the Spring Event Flyer template, and open it up so we can show you an example of a Word template.
Again, Word gives us information about this template.
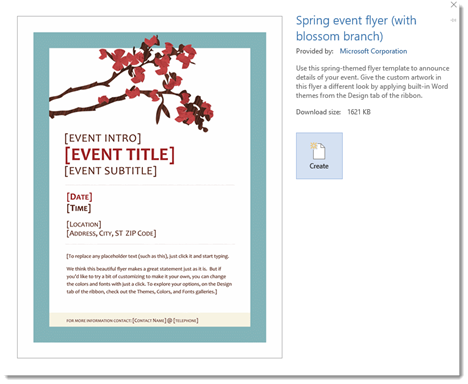
Click the Create button. Word will load the template for you.

Search for a Template
There are a lot of templates in Word. The thumbnails you see when you go to File>New are only a small sampling.
Word 2016 gives you a few ways to search for a template you want. Go to File>New. At the top of the screen, you’ll see this:
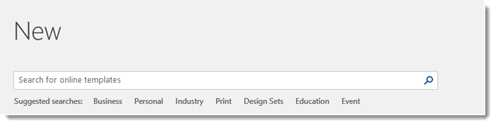
You can type in the kind of template you want. Let’s say we want a report.
Type in report.
Word then searches its online database for a report template, then shows you the results:
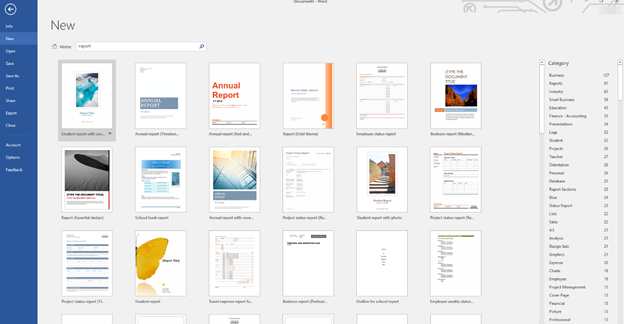
You can see all the results pictured on the screen. To the right, you’ll see the category pane where you can search for a report template by category. Simply click on a category to see its reports.
You can also search for a template by clicking on one of the suggested searches below the search box.
Create and Save a New Template
In addition to the thousands of templates available in Word 2016, you can create and use your own. To do so, simply create the document and when you are finished, then click File>Save As. Select the location you want to save the template to, then select «Word Template» or «Macro-Enabled Word Template» from the «Save as Type» drop down menu.
Change the attributes of the style to suit your preferences, then click OK.
Modifying a Template
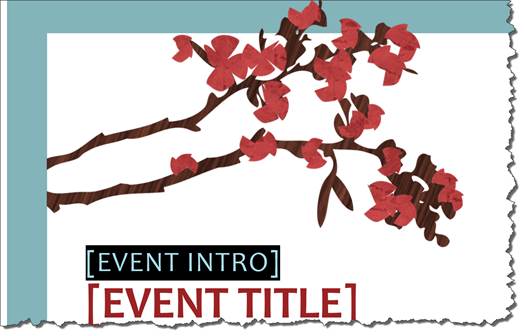
Let’s go back to our Spring Flyer Event template that we showed earlier:
Once you’ve opened a template, you can now make changes to it. You can change the font size, font color, etc. if you want, and you can also customize the text to make the template your own document.
To edit the text, click on the text that you want to edit. It then selects the text, as shown below.
Now simply type the text you want, as shown.
While the text is selected, you can also look in the Style gallery to see the style applied to it.

You can modify the style to change the formatting.
Click on any image in a template, and you’ll see a bounding box appear around it:
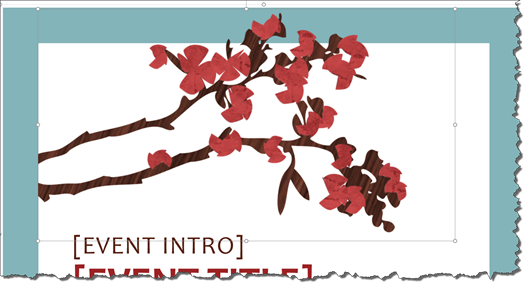
You can then cut or copy the image.
If you want to change the colors used in the template (such as the border colors), you can do that by changing the theme.
Working with Themes
Like templates and quick styles, themes are another way to achieve consistency in your documents. Themes can include font styles, color palettes, and special effects. What they do is give you a group of fonts, colors, and special effects that work well together and even complement each other. This can be illustrated by taking a closer look at some of the themes.
Themes are located under the Design tab.

We can change the theme from the template above by simply choosing a new theme from the Themes dropdown menu.

We can also choose a new color scheme by clicking the Color button on the far right side of the Document Formatting group and choosing a new one:

Let’s choose Yellow Orange.
That’s all it took to change the colors in our template:

Applying a Document Theme
So far, we’ve talked about modifying or changing a template’s theme. However, you can also apply a theme to your documents that you create.
Before we learn how to do that, it’s important to understand exactly what a theme is, so you know how it applies to your text. A theme consists of three things: Colors (of graphics and design elements, background color, text color, and hyperlinks), fonts (headings and body text), and graphical effects such as 3-D, shading, drop shadows, etc.
To apply a theme, select a theme from the Theme Gallery under the Design tab. You can mouseover any theme to preview what it will look like in your document, just like you did with styles. Simply click on a theme to apply it to a document.
Modify or Create a Theme
If you want to create a custom color theme (or a color scheme that you create instead of the ones Word has built in under the Color button), click the Color button under the Design tab, then select Customize Colors.
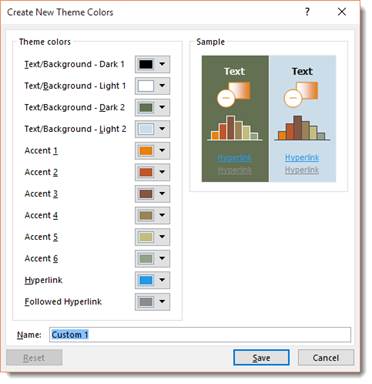
Choose the colors for the various elements, then enter a name for your new color theme. Click Save when you’re finished. This new theme will now appear with the other themes.
To create a custom font theme, click the Fonts button under the Design tab and choose Customize Fonts.
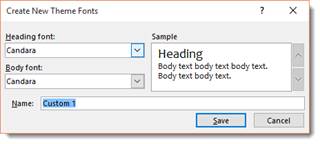
Click Save when you’re finished.
![]()
Download Article
Learn the basics of formatting a Microsoft Word document
![]()
Download Article
- Formatting the Layout
- Formatting Text
- Adding Pictures, Graphs, & Tables
- Using a Formatted Template
- Saving in Other Formats
- Q&A
|
|
|
|
|
Microsoft Word is the world’s most popular word processing app. Depending on what kind of legal, formal, or personal paper you’re writing, each has its own formatting guidelines. Fortunately, Microsoft Word makes it easy to format the layout, text, and other objects in your document. If you’re new to using Microsoft Word, don’t worry. You can be formatting your document like a pro in no time. This wikiHow guide will teach you simple ways to format a Word document on your PC or Mac computer.
Things You Should Know
- You can find most of the formatting tools you’ll need in the Ribbon menu at the top of your document.
- If you don’t want to do all the formatting from scratch, try using one of Word’s premade templates.
- Save your document in different file formats using the Save a Copy or Save As menu.
-

1
Explore the Word user interface. You can access most of Word’s formatting tools from the Menu Bar or the Ribbon at the top of the window. You can modify which tools are visible using the View menu.
- The Menu Bar is the area at the top of the screen where you will find File, Edit, View, and other important menu commands.
- The Ribbon is at the top of your workspace and contains icons, menus, and shortcuts to common tasks.
-
2
Align your document. Different types of documents call for different text alignments. You can choose whether to align your entire document to the left, right, or at the center on the Home tab by clicking the Alignment buttons in the «Paragraph» section.
- These are the buttons that look like a small version of a document, with small black lines arranged according to their button’s alignment function.
- You can also adjust alignment by selecting the text and objects you want to align, right-clicking the selection, and choosing Paragraph. Select your preferred alignment from the Alignment menu under the General header.
- You can either set the alignment for the whole document or just a selected piece of text.
Advertisement
-
3
Set the line spacing of your document. Need to change your document to single or double-space? You can adjust the spacing of your entire document, or for selected text.
- If you haven’t begun typing or adding content to your Word document, click the Home tab, click the «Line and Paragraph Spacing» icon (a row of lines with vertical arrows to the left of the lines pointing up and down, and select an option.
- If your document already has text or other content, press Ctrl + A (PC) or Cmd + A (Mac) to select everything in the document, right-click the selection, and choose Paragraph. You can then choose your desired spacing from the «Line Spacing» menu.
- For a single-spaced document, choose 1.0. For double-spacing, choose 2.0.
- Many professional documents, like college essays and cover letters, should be double-spaced.
-
4
Adjust the page orientation. If you need to write the document in a different orientation, click the Layout tab at the top of Word, select Orientation, and choose either Portrait or Landscape.
-
5
Change the size of the paper. If you need to print the document on a specific paper size, click the Layout tab, click Size, and then select your desired size from the drop-down list.
- This will change the virtual size of the document you’re writing as well as the actual size of the printout.
-
6
Adjust the headers and footers. A header contains details that will appear on every page of the paper, such as page numbers, your name, or the document title.
- To set the header of your document, double-click on the topmost part of the page, and the header field will appear. You can also click the Insert tab and select Header.
- Footers are just like headers. All text in the footer will appear at the bottom of each page of your document. To set the footer, double-click on the bottommost part of the page, and the footer field will appear. You can also use the Footer button on the Insert tab.
- You can also format your headers and footers by selecting the View tab and clicking Header and Footer on the list. This action will open the headers and footers on your page and allow you to edit them.
-
7
Insert page or section breaks with the Breaks menu. Go to the Layout tab in the and click Breaks if you want to start a new page or section in your document. You can choose from a variety of types of breaks, including Page, Column, and Section. This is a very useful tool if you need to format different sections of your document in different ways.[1]
- For example, you can use section or page breaks to help you format your page numbers so that the numbering restarts with each new section.
-
8
Adjust the margin size with the Margins tool. Click the Margins button in the Layout tab and select a margin from the pre-defined margin settings listed on the drop-down list.
- If you want to use your own margin measurements, click Custom Margins at the very bottom of the drop-down list to set your own.
-
9
Add columns to split your text vertically on the page. If you need to create a newspaper-like document, you can do so by adjusting the format of the document to columns. Click the Layout tab, select the Columns option, and choose the number and alignment of columns from the drop-down list.
- The Columns button looks like a rectangle with two vertical columns of blue lines on it.
- If you want to create one, two, or three columns, you can do so from the preset options. If you’d like to create more, you’ll need to choose More Columns from the bottom of the dropdown menu.
- Note that this column option is different from the columns you get when you insert items like tables on your document.
-
10
Add bullets and numbers to make lists. Highlight the text that you would like to be numbered or bulleted and click the Numbering or Bullets button on the Home tab of the Ribbon.
- These buttons can be found side by side on the Ribbon, near the alignment buttons. The Numbering button displays three small lines with numbers to the left of the lines and the Bullets button displays three small lines with bullet points to the left of the lines.
- There’s also a third button that allows you to create more elaborate multi-level list styles, which is useful for formatting outlines.
-
11
Experiment with document styles. All documents have standard built-in styles (for example, Normal, Title, Heading 1). The default style for text is Normal. The template that a document is based on (for example, Normal.dotx) determines which styles appear on the Ribbon and on the Styles tab. You can see the current style presets for your document in the Home tab of the Ribbon.
- Before you apply a style, you can see all of the available styles and preview how they will appear when applied.
- On the Home tab, click a style to apply it to selected text.
- Click the Styles Pane button (the arrow pointing down and to the right) to view and select from advanced Style options.
- By default, Word applies a paragraph style (for example, Heading 1) to the entire paragraph. To apply a paragraph style to part of a paragraph, select only the specific part that you wish to modify.
-
12
Reveal hidden formatting symbols if you’re having trouble. Word documents often contain hidden code that can cause frustrating problems when you’re trying to modify your formatting. For instance, an invisible extra paragraph mark or section break can create unwanted spaces between paragraphs or lines of text. To see formatting symbols that are normally hidden so you can delete or modify them, you can click the ¶ button in the Home tab, or try one of the following:[2]
- On Windows, open File, select Options, and click Display. Tick the box next to Show all formatting marks.
- In Word for Mac, open the Word menu, then Preferences, then View. Check the box next to All in the Show Non-Printing Characters section of the View menu.
-
13
Use the View menu to change your view of the document. The View menu can let you change how your document looks in Word without actually making changes to the format. For example, Print Layout will show approximately what your document will look like when it’s printed out, while Web Layout will display the whole document in one long chunk without any page breaks.
- The View menu also lets you zoom in and out on your document.
- You can also change your view with the buttons and zoom slider at the bottom right side of the document pane, or with the View tab in the Ribbon.


Advertisement
-
1
Change the font face. On the Home tab, you will a drop-down menu containing a list of fonts to choose from. Use your mouse to select the text you want to change, then choose a font from the list.
-
2
Change font size and color. Also on the Home tab, you can change the size, color, and highlighting for your font. Select the text you want to format, then choose your options.
- By default, they will be set to the size and font associated with your document’s current Style settings. For example, if you’re using Word’s default template, the Normal style will use Calibri as the default font and 12 pt. as the default text size.
- Always consider the formatting guidelines of the document you are writing when choosing the font style and size.
- The standard font for most college and professional papers is Times New Roman font, text size 12.
-
3
Make text bold, underlined, or italicized. Besides setting the font style and size, you can also adjust the emphasis of words and lines in your document. Near the font and text size menus, you will see the Bold, Italics, and Underline buttons.
- Just click the buttons to make your text bold, underlined, or italicized.
- In this section, you can also find special text formatting options such as Strikethrough, Subscript, and Superscript.
-
4
Highlight text on the page. If you would like to change the background color behind selected text, similar to using a highlighter on a printed page, click the Text Highlight icon, which is a pen above a colored line.
- You can also add special text effects with the Text Effects button, which looks like a capital A with a glowing blue border.


Advertisement
-
1
Drag an image into your document. This is a quick way to add a picture to your Word document. Simply select an image on your desktop and drag and drop it into the document window. Make sure your image is placed exactly where you want it before you drop it.
- You can also insert an image by going to the Insert tab, then clicking Pictures. Select one of the options to browse for images on your computer, the web, or Word’s gallery of stock photos.
- You can also insert graphics or other media (such as video or audio clips) using the Shapes, Icons, or 3D Models, and Media buttons.
-
2
Enable text wrapping. Text wrapping changes the layout of your document, allowing the text to flow around the image no matter where it is placed. To turn on text wrapping:
- Right-click (or ctrl-click, on a Mac) on the image and hover over Wrap Text. Select the alignment that best suits your document. You will see a preview as you hover over each option.
- To change the location of the image in the document, select the image and then hold the Ctrl key. While holding the key, use the arrow keys to move the picture around the document.
- When you right-click or ctrl-click your image, you’ll also see an option in the context menu to add a caption under your image.
-
3
Edit your image in the Picture Format tab. Once you insert your image, you can select it to open a new Picture Format tab in the ribbon. From there, you can choose from a variety of tools, such as:
- Making corrections or adding artistic filters to the image
- Adding style effects, such as a drop shadow or frame, to the picture
- Entering alt text
- Tweaking the position of your image or changing the text-wrap settings
-
4
Add a graph or chart in the Insert tab. Click the Insert tab on the Ribbon, and then click the Chart option. Choose your preferred type of graph, such as a pie or bar chart, from the dropdown menu.
- Depending on the type of chart or graph you choose, Word may automatically launch Excel and create a new spreadsheet, where you can enter data for your chart.
-
5
Modify your graph. When you choose a graph type, a new tab will appear in the Ribbon menu called Chart Design. Navigate to that tab with the chart selected to make changes to the look of your graph or chart, or choose the Edit in Excel button to make changes to the data in your chart.
-
6
Use the Table tool to insert a table. If you want to add a table to your document, head over to the Insert tab and click the Table button. A menu will pop open where you can either scroll over a grid of squares to select your number of rows and columns, or select an option like Insert Table or Draw Table.
- Insert Table opens a pop-up menu where you can specify parameters like the number of rows and columns and whether or not the contents of the table autofit your document window.
- The Draw Table tool allows you to draw the table with your mouse directly in the document.
- Once you start creating a table, you’ll see several new table editing tools in the Layout tab.


Advertisement
-
1
Choose a template from the New Documents pane. Templates are a great way to create a nice-looking document without having to do all the formatting from scratch. To use one, open Word and select New from the side menu to create a new document, or select New from Template from the File menu. Click one of the templates on the screen to select it.[3]
- If you don’t see a template you like, use the Search bar at the top of the window to find one that fits your needs. For instance, use keywords like “flyer,” “resume,” or “research paper” to find different styles of templates.
-
2
Click Create to open the template. The template will open as a new document.
-
3
Select text within the template to modify it. Word templates are simply preformatted documents with text, graphics, and other elements already in place. To add your own text, select text anywhere on the document and type in your own. The new text will have the same format as whatever text you selected and replaced. You can also click on a blank area of the document and start typing to add new text.
- To select a single word, double-click it. You can select longer pieces of text by clicking and dragging your mouse, or positioning your cursor at the start of the selection and holding down Shift while pressing the Right Arrow key.
- You can also select and move, delete, or replace other elements in the template, such as images, graphs, or tables.
-
4
Modify your template with the Styles pane. Templates use styles to create their distinctive looks. If you want to change the look of the template, click the Styles button in the Home tab of the ribbon toolbar. Click the down arrow next to any of the style elements and select Modify Style… to make changes.
- You can also make any other types of changes you like using the rest of the tools in the ribbon menu or Format menu.
-
5
Save your modified template as a document. When you’ve made the changes you want to the template, save it the same way you would any other Microsoft Word document.


Advertisement
-
1
Click the file menu and select Save a Copy…. If you want to save a document as a file type other than .DOCX, you can do so with the Save a Copy function.
- If it’s a brand-new document that you haven’t already saved, select Save As… instead.
-
2
Open the File Format dropdown menu. You’ll see this menu at the bottom of the Save a Copy or Save As window.
-
3
Select the format you want from the menu. In addition to common formats like .DOC, .DOCX, .TXT and .RTF, you can also save your document as a PDF, an XML file, or a macro-enabled Word file.
- Check out the list of file formats that are supported in word here.


Advertisement
Add New Question
-
Question
What is Microsoft publishing?

UK_Gamer05
Community Answer
Publisher is a tool for making posters, leaflets, booklet,s etc. It’s for when you need to create something that isn’t a standard document.
-
Question
How do I move from page one to page two of a Word document?
UK_Gamer05
Community Answer
In Word 2016, on the insert tab, either select insert new page or page break.
Ask a Question
200 characters left
Include your email address to get a message when this question is answered.
Submit
Advertisement
Thanks for submitting a tip for review!
Tip
- Unless free-handedly writing your paper, consult the guidelines of your document first before adjusting its format.
- Besides the header, footer, and page layout formats (which affect the entire document), all the other formatting tools can be applied only on specific parts of the document.
About This Article
Thanks to all authors for creating a page that has been read 309,741 times.
Is this article up to date?
The following shows an intro with lower case Roman numerals. You can use any other format instead.
-
Select between the intro and the body of the document and go to Layout > Breaks > Next Page.
Tip: To see section breaks and other formatting marks, go to Home and select Show/Hide (¶) to turn on the display of formatting marks.
-
In the header for the body section, deselect Link to Previous. If Link to Previous is dimmed, check to make sure a section break was created.
-
In the intro section select Page Number and choose a location and style. If your change only affects the first page of your section, make sure Different First Page is not selected.
-
To choose a format or to control the starting number, select Page Number > Format Page Numbers.
-
Do either or both of the following:
-
Select Number format to select the format for the numbering, such as a, b, c or i, ii, iii for the intro.
-
Under Page numbering, choose Start at and type a number that you want to start the section with. For example, restart numbering at the beginning of the body section.
-
-
Select Close Header and Footer, or double-click anywhere outside the header or footer area to exit.
The following shows an intro with lower case Roman numerals. You can use any other format instead.
-
Select between the intro and the body of the document and go to Layout > Breaks > Next Page.
-
In the header for the body section, deselect Link to Previous. If Link to Previous is dimmed, check to make sure a section break was created.
Note: Headers and footers are linked separately, so if your page number is in the header, turn off linking for headers. If your page number is in the footer, turn off linking for footers.
-
Go to Header & Footer > Page Number, and then click Page Number.
-
Choose the position and alignment of page numbers. If you don’t want a page number to appear on the first page, clear Show number on first page.
-
To choose a format or to control the starting number, go to Header & Footer > Page Number > Format Page Numbers.
-
To change the numbering style, select a different style in Number format.
-
To change the starting page number of the newly created section, select Start at, and then enter a number.
-
Select OK.
-
Select Close Header and Footer, or double-click outside of the header or footer to exit.
How much time have you wasted fighting to format your Word documents, especially long or complex documents, with the right fonts, indents, and other layout choices? Microsoft Word formatting can be less frustrating when you know how Word works and applies text and layout formatting. To save time formatting a Word document, watch my training video below or continue with this article.
To help understand Microsoft Word formatting, let’s look at the four types of formatting:
- Character or Font Formatting
- Paragraph Formatting
- Document or Page Formatting
- Section Formatting
Microsoft Word Formatting for Characters or Font
In Microsoft Word documents, character or font formatting includes:
-

Font typeface (such as Calibri, Arial, Times New Roman)
- Size
- Style
- Color
- and other font enhancements

What It Is: The smallest unit character formatting can be applied to is one character (letter, number, or other). With this, a line of text could have a different style of font formatting for every single letter and number, including spaces. Although you shouldn’t have text that is randomly formatted like the example below, it is possible with character formatting in Microsoft Word.
 Paragraph Formatting
 Paragraph Formatting
Paragraph Formatting includes:
- Text alignment
- Line spacing
- Tabs
- Indents
- Bullets & Numbering
- Borders & Shading
- and other paragraph enhancements
What It Is: the smallest unit paragraph formatting can be applied to is one paragraph. A paragraph is defined by a paragraph mark at the end of the text.
How Paragraph Formatting Works in Word
 Paragraph formatting instructions are not stored in a code at the beginning of a paragraph but are stored in the paragraph mark at the end of each paragraph. If you delete a paragraph mark between two paragraphs, the paragraphs will merge and take on the formatting of the first. To display paragraph marks along with other non-printing characters, press [Ctrl] + * (in Windows) to toggle on/off the Show/Hide feature. You’ll also find this option in the Paragraph group of the Home tab.
Any changes to the paragraph formatting of existing text will only affect the paragraph where the insertion point (cursor) is currently positioned as well as any additional selected paragraphs.
One advantage of this approach is once paragraph formatting is set up, all you need to do is press [Enter], and all paragraph formatting (as well as any current character formatting) will be “copied” forward to the next paragraph. This means indents, bullets, tabs, alignment, and other formatting does not have to be turned on for each new paragraph.
Document or Page Formatting
Document or page formatting usually determines the appearance of the entire document regardless of the size of the document and includes:
- Margins
- Page size and orientation
- Headers and footers
- Page numbering
- Columns
- and other page formatting instructions
Most page formatting is handled from the Page Setup Group under the Page Layout tab.
The Frustration with Page Formatting
 The page formatting of most documents can be easily modified, that is until you want to change the formatting only for a specific page or starting a particular location.
Large documents can be a challenge in Microsoft Word unless you understand how page formatting works. For instance, even if you only want to change a header or page number starting at the top of an individual page, Word assumes you want to change the entire document. This is especially frustrating for former WordPerfect users who were able to change page formatting from any page forward.
What is the answer in Microsoft Word? Create section breaks!
Section Formatting
The longer and more complex your document is, the more likely it is to need different sections. Word’s sections aren’t chapters, that is, they don’t have anything to do with how you’ve divided your document with headings and subheadings. Sections are electronic divisions you create by adding section breaks to your document. Section breaks are a close cousin to page breaks, except a section can contain any number of pages. More importantly, each section in a Word document can have its own distinctive page formatting.
If any of the page formatting such as headers or page numbers, will change within a document, the text needs to be divided into sections that allow for customized formatting for each portion.  Think of your document as a large piece of undeveloped, flat land. Initially, it has one set of boundaries without any distinctive elements. Now, you want to divide the land into plots for individual property owners who can develop their areas in any way that they want. Each lot is divided with fences and property lines … in Word, these boundaries are called section breaks. There is a lot of power and control available with Microsoft Word section formatting, as section breaks allow you to change the document formatting for one section without modifying the rest of the document.
When You Need Section Breaks
A section break separates the document into multiple sections for individualized formatting. With section formatting, a document can easily be divided into separate pieces such as a title page, report detail, appendixes, portrait vs. landscape layout, and other changes to the document structure. Section breaks also make it easy to switch between one column to multiple columns and then back to a single column of text.
Section breaks are needed in a document when page formatting changes within the same document or your document includes more than one type of column formatting. Options for section breaks are found in the Page Setup group of the Page Layout tab.
Save time and avoid frustration by understanding section formatting and the other Microsoft Word formatting options.
Discover more ways to save time editing and formatting your Word documents at: TheSoftwarePro.com/Word.
© Dawn Bjork, MCT, MOSM, CSP®, The Software Pro®
Microsoft Certified Trainer, Productivity Speaker, Certified Speaking Professional
Dawn Bjorkhttps://www.TheSoftwarePro.com
A Microsoft Certified Trainer (MCT) and Certified Speaking Professional (CSP), Dawn Bjork is known as The Software Pro® for her work as a productivity speaker, software trainer, virtual presenter, and author of numerous training courses and videos. In addition to these credentials, Dawn is also a certified Microsoft Office Specialist Master (MOSM) and Certified Virtual Presenter (CVP).
When she’s not busy sharing her expert knowledge on software with the world, Dawn can be found hiking the Colorado mountains, trying to master Pilates, or attempting to play golf.