
convert your excel file format to .csv format with using save as option
Save below content in a file with .ctl extension in the D drive under folder_name folder. Before running this .ctl make sure that table should be present in your schema with the distinct column names not like in your posted image. And the column name should be match with names of .ctl file(sc_id,
sal, etc). And the datatypes of your columns should be match with the data present in a .csv file. And also make sure that your table should be empty otherwise you should use truncate or append options in your .ctl file.
 LOAD DATA
    INFILE 'D:folder_namecsvfile_name.CSV'
    BADFILE 'D:folder_namecsvfile_name.BAD'
    DISCARDFILE 'D:folder_namecsvfile_name.log'
    logfile 'D:folder_namecsvfile_name.DSC'
    iNTO TABLE schema_name.table_name
    FIELDS TERMINATED BY ','
    TRAILING NULLCOLS

    (
    sc_id,
    sal,
    sc_cd1,
    coll,
    sc_cd2,
    bill_mas,
   sc_cd3,
   wk_sal,
   check_bill_month,
   check_sale_wk
    )
Run your .ctl file in sql plus with use of below commands
sqlldr schema_name/password@databasename control=your control file path.
If any error occurs while loading data into table those will logged into .log file. For learn more about sqlloader Refer http://docs.oracle.com/cd/B10501_01/server.920/a96652/ch05.htm
In this oracle tutorial, we will learn how to connect excel to an oracle database. also, we will cover these topics.
- Connect Excel to Oracle Database
- Connect Excel to Oracle Database 12c
- Excel Connect to Oracle Database without ODBC
- Excel Connect to Oracle Database with ODBC
- Excel Connect to Oracle Database using OLED
- Excel Connection String to Oracle Database
- Can you link excel to Oracle Database
In this section, we will learn how to connect Excel to Oracle Database without ODBC.
- Microsoft Excel has built-in feature of connecting excel to oracle database and we show show you how to use it.
- Once the connection is established, you will be able to access all the files in the oracle database of that common particular user.
- In our case, c##sqlserverguides is the name of our common user name. Please note that it is mandatory to c## as suffix while creating a user name.
- There are three things required to connect excel with the oracle database.
- Server or SSID
- Username
- Password
- Default ssid is “orcl” which is also the Global Database name. In case you have changed it or created a new one then please mention that one.
- Open Microsoft Excel and click on the Data tab, from there click on the the From Database dropdown and select ‘From Oracle Database‘.

- If you encounter this error then simply click on the on the OK button. The error won’t create problem while connecting excel with the Oracle database.

- Enter the name of server or ssid here. ssid is the name of the global database created at the time of installation. In our case, it is ‘orcl’, click on the ok button to proceed.

- Excel is connected to oracle database now you can browse of all the oracle data on the microsoft excel.

Read How to Check Oracle Database Version
Connect Excel to Oracle Database with ODBC
In this section, we will learn how to connect excel to the oracle database on the windows operating system.
- Offline installed Excel software can only be connected to the oracle database. Web based excel won’t give option to connect with the database.
- First step in the process is we have to create a new data source on “Windows Administrative Tools” on windows operating system.

- Inside “Windows Administrative Tool” click on the ODBC Data Sources (64-bit). From the appeared prompt select “User DSN” tab and click on Add button.
- Another prompt will appear “Create New Data Source” in that prompt select “Oracle in OraDB19Home1“. This name may change in future but it will always start with the key ‘oracle’. Click on the the finish button.

- Once you clicked on the finish button in the previous option, you will see “Oracle Database Driver Configuration” window.
- Data Source Name: Name provided here will reflect in excel and you have to choose it over there.
- Description: If you want to add a little description about your database you can write it here. Description can also be treated as instruction for other users of the database.
- TNS Service Name: ‘orcl’ is the global database configured while installing the Oracle databse software. Incase you have changed it or created a new one then mention that here.
- User ID: It is optional to provide user id. You can mention the common username here.
- Click on the “Test Connection” button and provide the username and password and click on the ok button. If a prompt appear “Test Successful” that means you can move to next step now. Click on the Ok button on the “Oracle ODBC Driver Configuration” window.

- Open Microsoft Excel and click on the Data tab, from there click on the the Get Data dropdown and select ‘From Other Sources‘, click on the option “From ODBC“.

- Select the Data Source Name that we created in Oracle Odbc Driver Configuration.
- Once done, it will ask for the username and password. Enter the credential and you will see that a screen with Navigation title will appear and now you can browse your data there. This is how we can connct excel with oracle database.

Read How to Get List all Tables in Oracle Database
Connect Excel to Oracle Database 12c
In this section, we will learn how to connect excel to oracle database 12c on the windows operating system.
- Oracle has released various versions so far out of these 12c and 11g were most popular and widely used versions.
- Current stable long term version is Oracle database 19c and 21c is in innovation mode.
- Though 12c has been obsolete still many organisations are still using it.
- Steps to connect excel to oracle database 12c is similar to oracle database 19c. So you can follow section section “Connect Excel to Oracle Database with ODBC” of this tutorial.
Read: How to create table in Oracle
Excel Connect to Oracle Database without ODBC
In this section, we will learn how to connect excel connect to the oracle database without ODBC on the windows operating system.
- Most of the connection between microsoft excel and oracle database are established using ODBC.
- This type of connections are established in previous versions of microsoft excel when there was no option for from connecting oracle directly with excel.
- In new versions there is already option to connect with oracle database as you can see in the below image.

- In case this option is not available then using oled you can connect with the database.
- to see practical implementation of excel connect to oracle database with oled visit the first section of this tutorial ” Connect Excel to Oracle Database”.
Also, check: How to Fetch Data from Oracle Database in Python
Excel Connect to Oracle Database using OLED
In this section, we will learn how excel connects to an oracle database using OLED in the Microsoft Windows operating system.
- Open Microsoft Excel and click on the Data tab, from there click on the the Get Data dropdown, now click on ‘From Other Sources‘ and select From OLEDB.

- In the connection string prompt enter the below code. In our case ‘orcl’ is the name of our global database so we have set source=orcl.
provider=OraOLEDB.Oracle.1;data source=orcl
- After entering the above code click on the build button a new promot will appear “Data Link Properties”. Enter the user name and password for the user you want to connect with. In our case we are connecting with “c##sqlserverguides”.
- Once filled all the required information (username & password) click on “Test connection” button. If Test connection succeeded click on ok for all the three screens.

- New prompt will appear immedietly after clicking on ok button of “From OLE
DB” window. - Enter username and password one last time and click on connect. It may take few seconds then excel will be connected to oracle database.

- Below is the window that will appear on the successful establishment of the connection. You will be able to access all the files, folder and tables available inside the connected user.
Read: Oracle get database name
Excel Connection String to Oracle Database
In this section, we will learn how to establish an excel connection string to an oracle database.
- While connecting excel to oracle database you must have noticed ‘Credential Connection String’ box that might be optional in some cases.
- Excel Connection String holds all the information about the connecting database like host, hostname, port, IP address, server type and service name.
- while connecting excel to oracle database using oled we have to provide excel connection string that you can us the below excel connection string to connect with oracle databse.
provider=OraOLEDB.Oracle.1;data source=orcl
- If you are advance user and want to connect via oracle database on server than you can configure the setting using the below code.
provider=OraOLEDB.Oracle.1;data source=
             ("
              DESCRIPTION =
                 (ADDRESS =
                   (PROTOCOL = TCP)
                   (HOST = localhost)
                   (PORT = 1521)
                 )
              (CONNECT_DATA =
                  (SERVER = DEDICATED)
                  (SERVICE_NAME = orcl))
              )"
Can you link excel to Oracle Database
In this section, we will answer the question “can you link excel to the oracle database“.
- Yes, we can link excel to oracle database and there are multiple ways of doing that.
- In this tutorial, we have explained 3 mojor ways that are widely used to connect excel to oracle database.
- Connect excel to oracle database
- Excel Connect to Oracle Database with ODBC
- Excel Connect to Oracle Database using OLED
- Visit each section to learn more about how to connect excel with oracle database.
In this tutorial, we have learned how to connect excel to an oracle database. Also, we have covered these topics.
- Connect Excel to Oracle Database
- Connect Excel to Oracle Database 12c
- Excel Connect to Oracle Database without ODBC
- Excel Connect to Oracle Database using OLED
- Excel Connection String to Oracle Database
- Can you link excel to Oracle Database
I am Bijay having more than 15 years of experience in the Software Industry. During this time, I have worked on MariaDB and used it in a lot of projects. Most of our readers are from the United States, Canada, United Kingdom, Australia, New Zealand, etc.
Want to learn MariaDB? Check out all the articles and tutorials that I wrote on MariaDB. Also, I am a Microsoft MVP.
Задача. У вас есть файл Excel – и вы хотите, чтобы эти данные были помещены в таблицу. Я покажу вам, как это делается, и мы задокументируем каждый шаг с большим количеством иллюстраций.
Прочитав этот пост, вы будете готовы с уверенностью импортировать данные в существующую таблицу из Excel. Хотите создать новую таблицу из Excel? Мы тоже можем это сделать.
В нашем примере я буду использовать таблицу HR.EMPLOYEES для создания XLS-файла для нашего импорта. Мы будем использовать этот файл Excel для заполнения пустой копии таблицы EMPLOYEES в другой схеме.
Шаг 0: Пустая таблица Oracle и ваш файл Excel
У вас есть таблица Oracle и один или несколько файлов Excel.
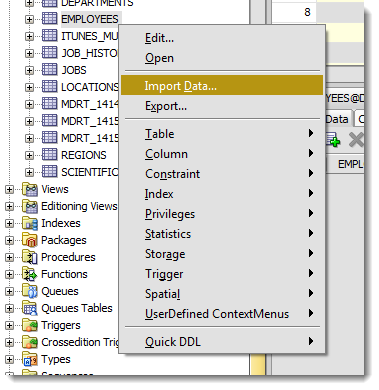
Шаг 1: Выбираем «Импорт данных» по правому щелчку мыши
Шаг 2: Выберите свой входной файл (XLSX) и проверьте данные

Когда вы выберете файл, мы захватим первые 100 строк для просмотра ниже. Этот «Предел строк предварительного просмотра» определяет, сколько строк вы можете использовать для проверки ИМПОРТА по мере прохождения мастера. Вы можете увеличить его, но это потребует больше ресурсов, так что не сходите с ума.
Кроме того, есть ли в вашем файле Excel заголовки столбцов? Хотим ли мы рассматривать их как строку к таблице? Скорее всего, нет. Если вы снимите флажок «Заголовок», имена столбцов станут новой строкой в вашей таблице – и, вероятно, не будут вставлены.
Иногда ваш файл Excel имеет несколько заголовков, или вам может потребоваться импортировать только определенное подмножество электронной таблицы. Используйте опцию «Пропустить строки», чтобы получить правильные данные.
Шаг 3: Создайте сценарий или импортируйте автоматически

alt+tab туда и обратно от Excel до SQL Developer.
Для этого упражнения будет использоваться метод «Вставки» (Insert). Каждая строка, обработанная в файле Excel, приведет к выполнению инструкции INSERT в таблице, в которую мы импортируем.
Если вы выберете «Вставить скрипт», мастер завершит работу скриптом ВСТАВКИ на вашем листе SQL. Это хорошая альтернатива, если вы хотите настроить SQL, или если вам нужно отладить/посмотреть, почему метод «Insert» не работает.
Шаг 4: Выберите столбцы Excel для импорта
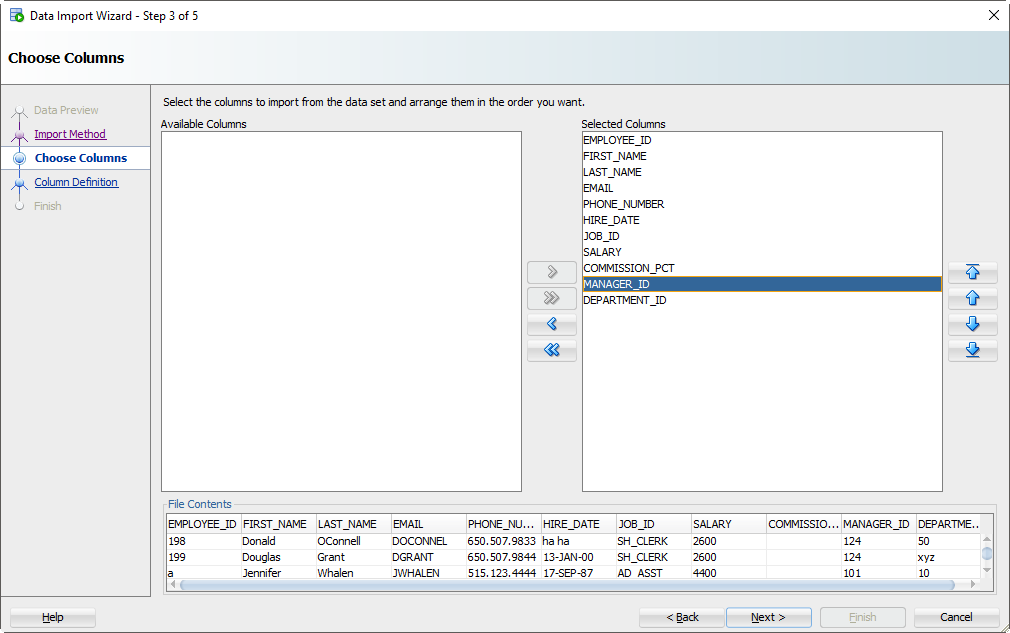
У вас может быть файл Excel со 100 столбцами, но ваша таблица имеет только 30. Здесь вы даете команду SQL Developer, какие столбцы должны использоваться для импорта. Вы также можете изменить порядок столбцов, что может сделать следующий шаг немного проще.
Шаг 5: Сопоставьте столбцы Excel со столбцами таблицы
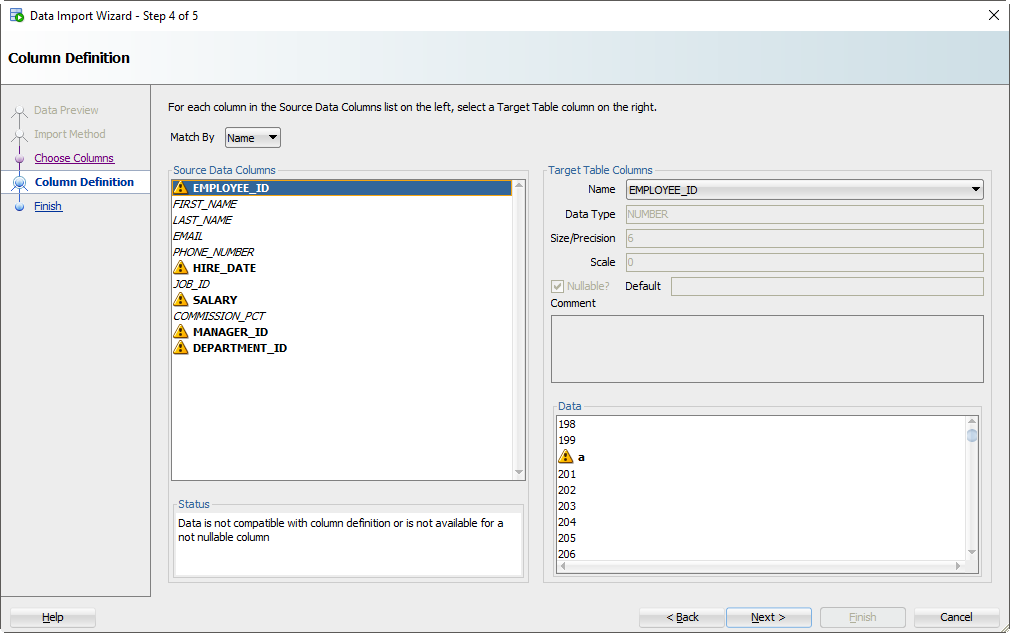
Если вы не обращаете внимания и просто позволяете Мастеру импорта делать всё по умолчанию, то сейчас самое время проснуться. Есть большая вероятность, что порядок столбцов файла Excel не будет соответствовать определению вашей таблицы. На этом шаге вы указываете SQL Developer-у, какие столбцы в электронной таблице совпадают с какими столбцами в таблице Oracle.
А помните, как мы установили это окно предварительного просмотра на 100 строк? Мы внимательно изучаем данные, ищем проблемы, пытаясь вписать их в столбец вашей таблицы. Если мы обнаружим проблему, мы пометим столбцы этими «предупреждающими» символами.
Я загрязнил свой файл Excel некоторыми намеренно ошибочными значениями, которые, как я знаю, не будут «подходить». Когда эти строки будут обнаружены в мастере, база данных их отклонит, но остальные строки будут введены.
Давайте на секунду поговорим о форматах даты и времени.
О TIMESTAMP тоже. В файле Excel у вас, вероятно, будут некоторые поля даты и времени, которые вы хотите переместить в столбцы формата DATE или TIMESTAMP. SQL Developer обрабатывает эти значения как строки – и ВАМ нужно сообщить SQL Developer формат DATE или TIMESTAMP, чтобы иметь возможность их преобразовать.
Давайте посмотрим на HIREDATE.
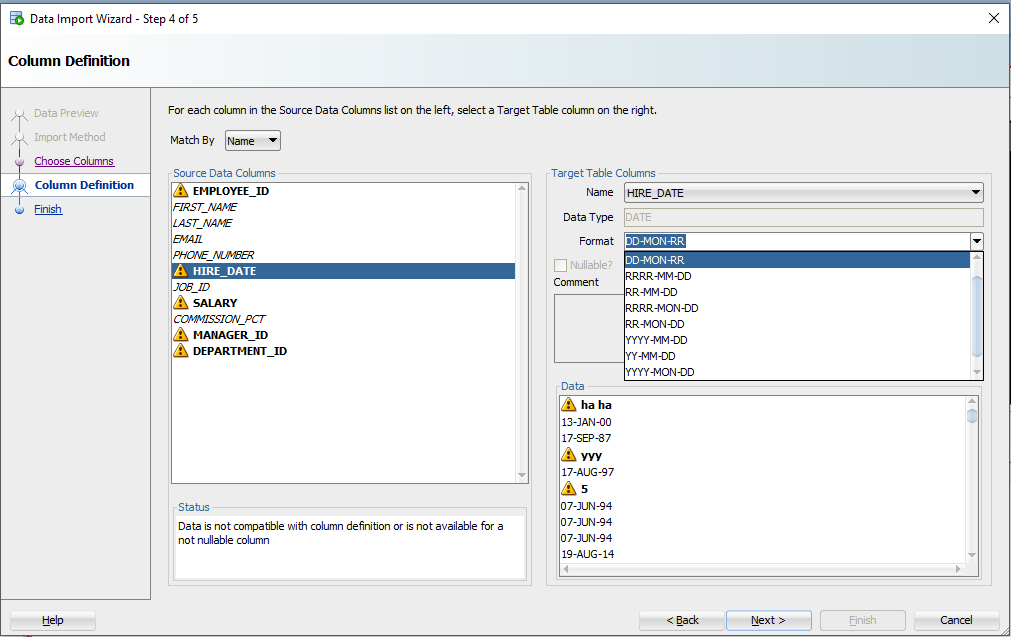
HIRE_DATE – если только вы не храните ДАТЫ в VARCHAR2, — и если вы делаете это, то делаете это НЕПРАВИЛЬНО. Всегда храните ДАТЫ в формате DATE!
Видите выпадающий селектор «Формат» (Format)? SQL Developer по умолчанию установил строку формата ДАТЫ в ‘DD-MON-RR’ – мы пытаемся угадать это на основе строк, которые мы рассматриваем в этом окне предварительного просмотра 100.
Если мы ошиблись в догадках или не смогли разобраться, вам нужно будет ввести это самостоятельно. Документы Oracle могут помочь вам определить правильную модель формата ДАТЫ. Если вы видите небольшое предупреждающее изображение рядом со значениями даты на панели данных, возможно, у вас неправильный формат.
Шаг 6: Проверьте свои настройки и ВПЕРЕД!
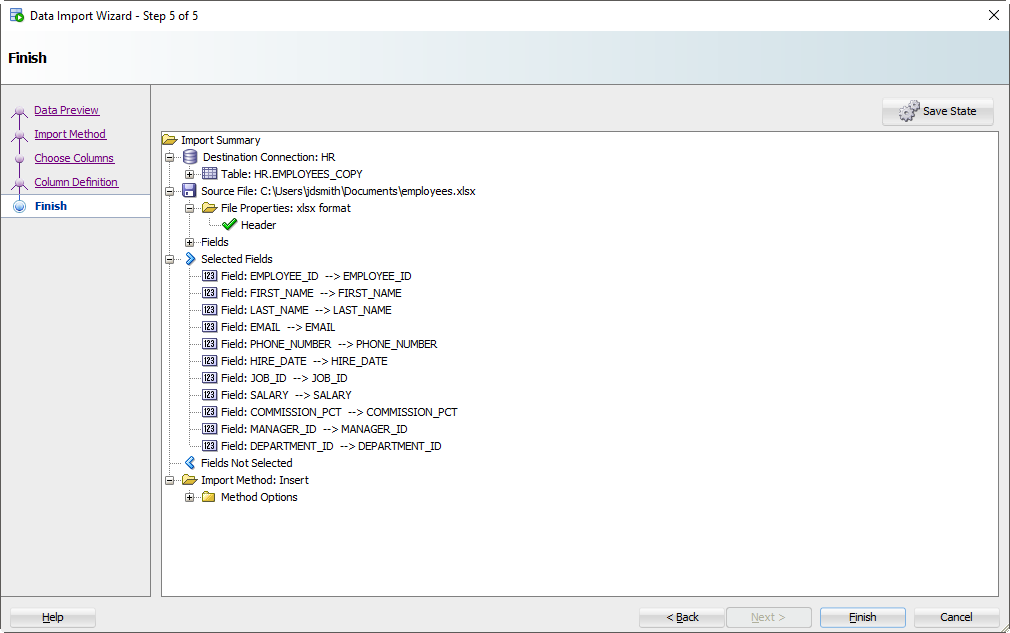
Нажмите на кнопку «Готово» (Finish).
Если Мастер столкнется с какими-либо проблемами при выполнении вставок, вы увидите следующее:
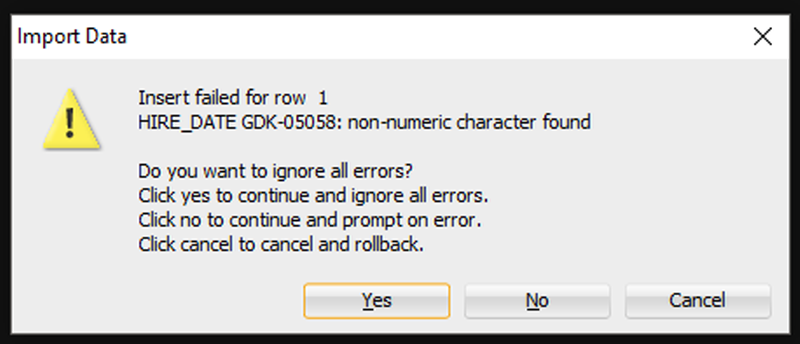
Я собираюсь сказать «Да», чтобы игнорировать все ошибки. Но если вам нужна КАЖДАЯ отдельная строка – вам нужно сказать «Отмена», чтобы начать все сначала. Затем вы можете либо исправить свои данные в файле Excel, либо внести изменения в свою таблицу, чтобы данные соответствовали/работали.
Нажав ‘Да», мы доберемся до конца нашей истории и наших данных!
Шаг 7: Посмотрите, Что сработало, а Что нет
Во-первых, есть ли плохие новости?
Если были строки, отклоненные базой данных, мы увидим их сейчас.
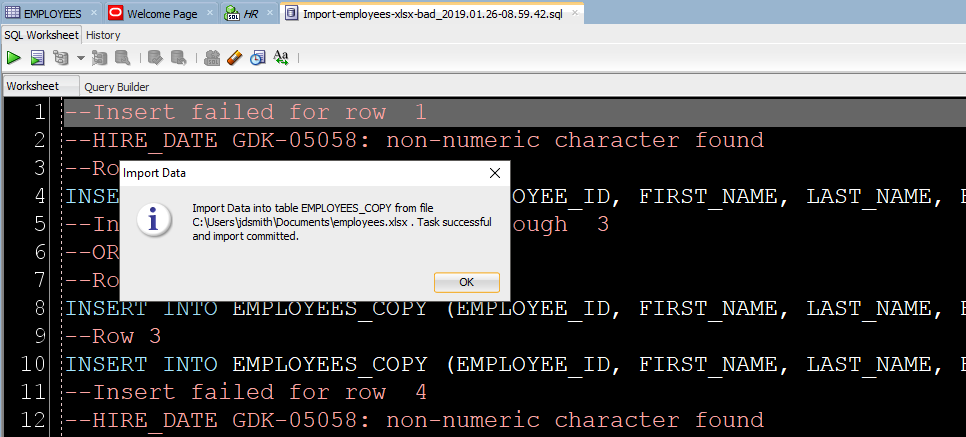
INSERT, которые мы пытались запустить, но не сработали. Вы можете изменить их вручную, чтобы исправить несколько записей. Но если у вас тысячи забракованных строк – лучше разобраться в файле (в источнике импорта).
Теперь давайте посмотрим на наши новые табличные данные!
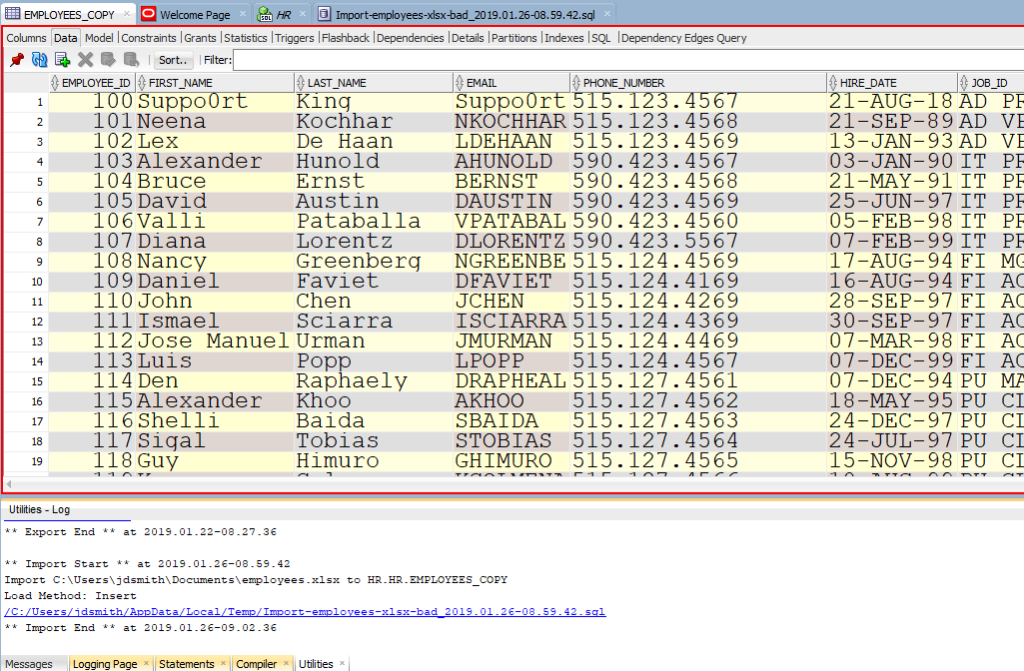
Обратите внимание на панель «Журнал» (Log). Там можно увиеть файл, с которым мы работали, и сколько времени потребовалось для загрузки данных.
Всё! Можно выдохнуть свободно. Импорт из файла Excel в таблицу базы данных Oracle завершен. В шапке статьи вы можете посмотреть видео инструкцию — копию этого мануала на английском языке.
Вас заинтересует / Intresting for you:
Steps
-

1
Open your workbook in Microsoft Excel. Excel comes with a feature called Power Query (also called Get & Transform) that makes it easy to connect to an Oracle database.[1]
- If you haven’t installed the Oracle client software on your computer, you’ll need to do so first. You can get the latest 64-bit version here, and the 32-bit version here.
-
2
Click the Data tab. It’s at the top of the screen.
Advertisement
-
3
Click Get Data. If you don’t see this option, click New Query instead.
-
4
Click From Database.
-
5
Click From Oracle Database.
-
6
Enter the Oracle server name into the ″Oracle Database″ box. This should be the host name or address of the server that hosts your database.
- If the database requires an SID, use this format to type the server name/address: servername/SID.[2]
- If the database requires an SID, use this format to type the server name/address: servername/SID.[2]
-
7
Enter a native database query (optional). If importing data from the database requires a specific query, expand the ″SQL Statement″ box by clicking the small triangle, and then type the statement.[3]
-
8
Click OK. This saves your options and initiates a connection to the database.
-
9
Log into the database. If the database requires you to log in, enter your username and password, and then click Connect. This connects the workbook to the database.
- Depending on your settings, you may also have to choose an authentication method.
- If you entered a native database query, the results will appear in a Query Editor window.


Advertisement
Ask a Question
200 characters left
Include your email address to get a message when this question is answered.
Submit
Advertisement
Thanks for submitting a tip for review!
About This Article
Article SummaryX
1. Click Data.
2. Click Get Data.
3. Click From Database.
4. Click From Oracle Database.
5. Enter the server name.
6. Enter a query (optional).
7. Click OK.
8. Log in to the database.
Did this summary help you?
Thanks to all authors for creating a page that has been read 80,202 times.
Is this article up to date?
I’ve been thinking about it for quite a long time and never really had time to implement it, but it’s finally there : a pipelined table interface to read an Excel file (.xlsx) as if it were an external table.
It’s entirely implemented in PL/SQL using an object type (for the ODCI routines) and a package supporting the core functionalities.
Available for download on GitHub :
 /mbleron/ExcelTable
Usage
ExcelTable.getRows table function :
This is the actual SQL interface, to be used in conjunction with the TABLE operator.
It returns an ANYDATASET instance whose structure is defined by the p_cols parameter.
  function getRows (
    p_file   in  blob
  , p_sheet  in  varchar2
  , p_cols   in  varchar2
  , p_range  in  varchar2 default null
  )
  return anydataset pipelined
  using ExcelTableImpl;
| Arg | Data type | Desc | Mandatory |
|---|---|---|---|
p_file |
BLOB | Input Excel file in Office Open XML format (.xlsx or .xlsm). A helper function ( ExcelTable.getFile) is available to directly reference the file from a directory. |
Yes |
p_sheet |
VARCHAR2 | Worksheet name | Yes |
p_cols |
VARCHAR2 | Column list (see specs below) | Yes |
p_range |
VARCHAR2 | Excel-like range expression that defines the table boundaries in the worksheet (see specs below) | No |
Range syntax specification
 range_expr ::= ( cell_ref [ ":" cell_ref ] | col_ref ":" col_ref | row_ref ":" row_ref )
 cell_ref   ::= col_ref row_ref
 col_ref    ::= { "A".."Z" }
 row_ref    ::= integer
If the range is empty, the table implicitly starts at cell A1.
Otherwise, there are four ways to specify the table range :
- Range of rows :
'1:100'
In this case the range of columns implicitly starts at A. - Range of columns :
'B:E'
In this case the range of rows implicitly starts at 1. - Range of cells (top-left to bottom-right) :
'B2:F150' - Single cell anchor (top-left cell) :
'C3'
Columns syntax specification
The syntax is similar to the column list in a CREATE TABLE statement, with a couple of specifics :
 column_list    ::= column_expr { "," column_expr }
 column_expr    ::= ( identifier datatype [ "column" string_literal ] | identifier for_ordinality )
 datatype       ::= ( number_expr | varchar2_expr | date_expr | clob_expr )
 number_expr    ::= "number" [ "(" ( integer | "*" ) [ "," [ "-" ] integer ] ")" ]
 varchar2_expr  ::= "varchar2" "(" integer [ "char" | "byte" ] ")"
 date_expr      ::= "date" [ "format" string_literal ]
 clob_expr      ::= "clob"
 for_ordinality ::= "for" "ordinality"
 identifier     ::= """ { char } """
 string_literal ::= "'" { char } "'"
Column names must be declared using a quoted identifier.
Supported data types are :
- NUMBER – with optional precision and scale specs
- VARCHAR2 – including CHAR/BYTE semantics
Values larger than the maximum length declared are silently truncated and no error is reported. - DATE – with optional format mask
The format mask is used if the value is stored as text in the spreadsheet, otherwise the date value is assumed to be stored as date in Excel’s internal serial format. - CLOB
A special “FOR ORDINALITY” clause (like XMLTABLE or JSON_TABLE’s one) is also available to autogenerate a sequence number.
Each column definition (except for the one qualified with FOR ORDINALITY) may be complemented with an optional “COLUMN” clause to explicitly target a named column in the spreadsheet, instead of relying on the order of the declarations (relative to the range).
Positional and named column definitions cannot be mixed.
For instance :
  "RN"    for ordinality
, "COL1"  number
, "COL2"  varchar2(10)
, "COL3"  varchar2(4000)
, "COL4"  date           format 'YYYY-MM-DD'
, "COL5"  number(10,2)
, "COL6"  varchar2(5)
  "COL1"  number        column 'A'
, "COL2"  varchar2(10)  column 'C'
, "COL3"  clob          column 'D'
Examples
Using this sample file :
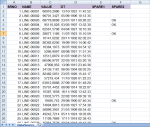
1- Loading all six columns, starting at cell A2, in order to skip the header :
SQL> select t.*
  2  from table(
  3         ExcelTable.getRows(
  4           ExcelTable.getFile('TMP_DIR','ooxdata3.xlsx')
  5         , 'DataSource'
  6         , ' "SRNO"    number
  7           , "NAME"    varchar2(10)
  8           , "VAL"     number
  9           , "DT"      date
 10           , "SPARE1"  varchar2(6)
 11           , "SPARE2"  varchar2(6)'
 12         , 'A2'
 13         )
 14       ) t
 15  ;

      SRNO NAME              VAL DT                  SPARE1 SPARE2
---------- ---------- ---------- ------------------- ------ ------
         1 LINE-00001 66916.2986 13/10/1923 11:45:52
         2 LINE-00002 96701.3427 05/09/1906 10:12:35
         3 LINE-00003 68778.8698 23/01/1911 09:26:22        OK
         4 LINE-00004  95110.028 03/05/1907 13:52:30        OK
         5 LINE-00005 62561.5708 04/04/1927 18:10:39
         6 LINE-00006 28677.1166 11/07/1923 15:10:59        OK
         7 LINE-00007 16141.0202 20/11/1902 02:02:24
         8 LINE-00008 80362.6256 19/09/1910 14:06:42
         9 LINE-00009 10384.1973 16/07/1902 04:54:12
        10 LINE-00010  5266.9097 08/08/1921 11:51:34
        11 LINE-00011 12513.0679 01/07/1908 21:53:55
        12 LINE-00012 66596.9707 22/03/1913 05:20:10

...

        95 LINE-00095 96274.2193 08/04/1914 22:48:31
        96 LINE-00096  29783.146 06/04/1915 23:49:23
        97 LINE-00097 19857.7661 16/02/1909 21:21:52
        98 LINE-00098 19504.3969 05/12/1917 01:56:05
        99 LINE-00099 98675.8673 05/06/1906 17:41:10
       100 LINE-00100 24288.2885 22/07/1920 13:25:59

100 rows selected.
2- Loading columns B and F only, from rows 2 to 10, with a generated sequence :
SQL> select t.*
  2  from table(
  3         ExcelTable.getRows(
  4           ExcelTable.getFile('TMP_DIR','ooxdata3.xlsx')
  5         , 'DataSource'
  6         , q'{
  7             "R_NUM"   for ordinality
  8           , "NAME"    varchar2(10) column 'B'
  9           , "SPARE2"  varchar2(6)  column 'F'
 10           }'
 11         , '2:10'
 12         )
 13       ) t
 14  ;

     R_NUM NAME       SPARE2
---------- ---------- ------
         1 LINE-00001
         2 LINE-00002
         3 LINE-00003 OK
         4 LINE-00004 OK
         5 LINE-00005
         6 LINE-00006 OK
         7 LINE-00007
         8 LINE-00008
         9 LINE-00009

9 rows selected.