
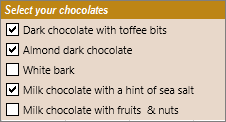
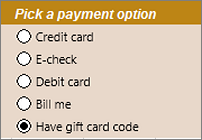
You can insert form controls such as check boxes or option buttons to make data entry easier. Check boxes work well for forms with multiple options. Option buttons are better when your user has just one choice.
To add either a check box or an option button, you’ll need the Developer tab on your Ribbon.
Notes: To enable the Developer tab, follow these instructions:
-
In Excel 2010 and subsequent versions, click File > Options > Customize Ribbon , select the Developer check box, and click OK.
-
In Excel 2007, click the Microsoft Office button
 > Excel Options > Popular > Show Developer tab in the Ribbon.
-
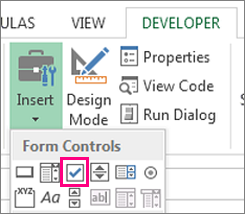
To add a check box, click the Developer tab, click Insert, and under Form Controls, click
.
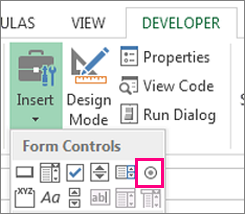
To add an option button, click the Developer tab, click Insert, and under Form Controls, click
.
-
Click in the cell where you want to add the check box or option button control.
Tip: You can only add one checkbox or option button at a time. To speed things up, after you add your first control, right-click it and select Copy > Paste.
-
To edit or remove the default text for a control, click the control, and then update the text as needed.
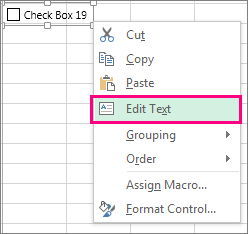
Tip: If you can’t see all of the text, click and drag one of the control handles until you can read it all. The size of the control and its distance from the text can’t be edited.
Formatting a control
After you insert a check box or option button, you might want to make sure that it works the way you want it to. For example, you might want to customize the appearance or properties.
Note: The size of the option button inside the control and its distance from its associated text cannot be adjusted.
-
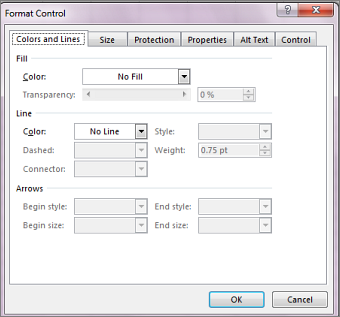
To format a control, right-click the control, and then click Format Control.
-
In the Format Control dialog box, on the Control tab, you can modify any of the available options:
-
Checked: Displays an option button that is selected.
-
Unchecked: Displays an option button that is cleared.
-
In the Cell link box, enter a cell reference that contains the current state of the option button.
The linked cell returns the number of the selected option button in the group of options. Use the same linked cell for all options in a group. The first option button returns a 1, the second option button returns a 2, and so on. If you have two or more option groups on the same worksheet, use a different linked cell for each option group.
Use the returned number in a formula to respond to the selected option.
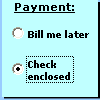
For example, a personnel form, with a Job type group box, contains two option buttons labeled Full-time and Part-time linked to cell C1. After a user selects one of the two options, the following formula in cell D1 evaluates to «Full-time» if the first option button is selected or «Part-time» if the second option button is selected.
=IF(C1=1,»Full-time»,»Part-time»)
If you have three or more options to evaluate in the same group of options, you can use the CHOOSE or LOOKUP functions in a similar manner.
-
-
Click OK.
Deleting a control
-
Right-click the control, and press DELETE.
Currently, you can’t use check box controls in Excel for the web. If you’re working in Excel for the web and you open a workbook that has check boxes or other controls (objects), you won’t be able to edit the workbook without removing these controls.
Important: If you see an «Edit in the browser?» or «Unsupported features» message and choose to edit the workbook in the browser anyway, all objects such as check boxes, combo boxes will be lost immediately. If this happens and you want these objects back, use Previous Versions to restore an earlier version.
If you have the Excel desktop application, click Open in Excel and add check boxes or option buttons.
Элемент управления пользовательской формы OptionButton для выбора одной опции из группы и передачи результата в VBA Excel. Свойства переключателя, примеры.
UserForm.OptionButton – это элемент управления пользовательской формы, который используется в группе одноименных элементов и предназначен для передачи в код VBA информации о его выборе или невыборе пользователем: False – переключатель не выбран, True – переключатель выбран.

В VBA Excel элемент управления OptionButton состоит из белого кружка с черной точкой (переключатель выбран) или без нее (переключатель не выбран) и надписи. Надпись расположена справа и реагирует на нажатие мышью так же, как и белый кружок.
В отличие от элемента управления CheckBox, только один OptionButton из группы переключателей может иметь значение True. Для разделения разных групп переключателей друг от друга используются элементы управления Frame (рамки). Все переключатели вне рамок являются одной группой.

Так же, как и элемент управления CheckBox, OptionButton принимает третье состояние при присвоении ему в коде VBA Excel значения Null. Переключатель отображается с серым кружком и серой точкой.

Свойства элемента Переключатель
| Свойство | Описание |
|---|---|
| AutoSize | Автоподбор размера переключателя. True – размер автоматически подстраивается под длину набираемой строки. False – размер элемента управления определяется свойствами Width и Height. |
| ControlSource | Ссылка на источник данных для свойства Value. |
| ControlTipText | Текст всплывающей подсказки при наведении курсора на OptionButton. |
| Enabled | Возможность взаимодействия пользователя с элементом управления. True – взаимодействие включено, False – отключено (цвет переключателя становится серым). |
| Font | Шрифт, начертание и размер текста надписи. |
| Height | Высота элемента управления. |
| Left | Расстояние от левого края внутренней границы пользовательской формы до левого края элемента управления. |
| Picture | Добавление изображения вместо текста надписи или дополнительно к нему. |
| PicturePosition | Выравнивание изображения и текста в поле надписи. |
| TabIndex | Определяет позицию элемента управления в очереди на получение фокуса при табуляции, вызываемой нажатием клавиш «Tab», «Enter». Отсчет начинается с 0. |
| TextAlign* | Выравнивание текста надписи: 1 (fmTextAlignLeft) – по левому краю, 2 (fmTextAlignCenter) – по центру, 3 (fmTextAlignRight) – по правому краю. |
| Top | Расстояние от верхнего края внутренней границы пользовательской формы до верхнего края элемента управления. |
| Value | Значение переключателя: True – включен, False – выключен, Null – серый кружок с серой точкой. |
| Visible | Видимость элемента OptionButton. True – элемент отображается на пользовательской форме, False – скрыт. |
| Width | Ширина элемента управления. |
| WordWrap | Перенос текста надписи на новую строку при достижении границы ее поля. True – перенос включен, False – перенос выключен. |
* При загруженной в поле надписи картинке свойство TextAlign не работает, следует использовать свойство PicturePosition.
Свойство по умолчанию для элемента OptionButton – Value, основное событие – Click.
В таблице перечислены только основные, часто используемые свойства переключателя. Все доступные свойства отображены в окне Properties элемента управления OptionButton.
Примеры кода VBA с OptionButton
Пример 1
Отображение элементов управления OptionButton на пользовательской форме с параметрами, заданными в коде VBA Excel:
|
1 2 3 4 5 6 7 8 9 10 11 12 13 14 15 16 17 18 19 20 21 22 23 24 25 26 27 28 29 30 31 32 33 34 |
Private Sub UserForm_Initialize() With Me .Width = 160 .Height = 110 .Caption = «Пьедестал почета» End With With OptionButton1 .Caption = «1 место» .Value = True .Width = 60 .Height = 18 .Left = 60 .Top = 18 .Font.Size = 10 End With With OptionButton2 .Caption = «2 место» .Value = False .Width = 60 .Height = 18 .Left = 12 .Top = 36 .Font.Size = 10 End With With OptionButton3 .Caption = «3 место» .Value = False .Width = 60 .Height = 18 .Left = 90 .Top = 48 .Font.Size = 10 End With End Sub |
Разместите на пользовательской форме три переключателя с именами OptionButton1, OptionButton2, OptionButton3 и добавьте в модуль формы представленный выше код. Запуск этого кода отобразит следующую форму:

Пример 2
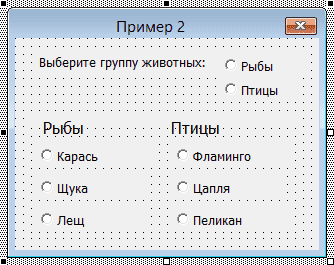
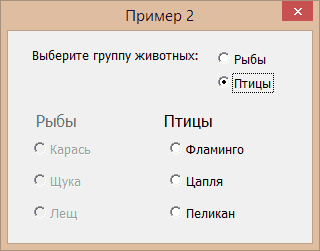
Управление доступностью двух групп переключателей, заключенных в рамки, с помощью двух управляющих элементов OptionButton, расположенных непосредственно на пользовательской форме.
Для этого создадим следующий проект формы в редакторе VBA Excel («Рыбы» и «Птицы» большими буквами – это значения свойств Caption рамок Frame1 и Frame2):
В модуль формы вставляем следующий код:
|
1 2 3 4 5 6 7 8 9 10 11 12 13 14 15 16 17 18 19 20 21 22 23 24 25 26 27 28 29 30 31 32 33 34 35 36 37 38 39 40 41 42 43 44 45 46 47 48 49 50 51 52 53 54 55 56 57 58 59 60 61 62 63 64 65 66 67 68 69 70 71 72 73 74 75 76 77 78 79 80 81 82 83 |
‘Присвоение исходных значений ‘свойствам элементов управления ‘перед отображением формы Private Sub UserForm_Initialize() OptionButton1.Value = False OptionButton2.Value = False OptionButton3.Enabled = False OptionButton4.Enabled = False OptionButton5.Enabled = False OptionButton6.Enabled = False OptionButton7.Enabled = False OptionButton8.Enabled = False Frame1.Enabled = False Frame2.Enabled = False End Sub ‘Смена значений свойств переключателей, ‘расположенных в рамке Frame1, ‘при смене значения OptionButton1.Value Private Sub OptionButton1_Change() If OptionButton1.Value Then Frame1.Enabled = True With OptionButton3 .Value = False .Enabled = True End With With OptionButton4 .Value = False .Enabled = True End With With OptionButton5 .Value = False .Enabled = True End With Else Frame1.Enabled = False With OptionButton3 .Value = False .Enabled = False End With With OptionButton4 .Value = False .Enabled = False End With With OptionButton5 .Value = False .Enabled = False End With End If End Sub ‘Смена значений свойств переключателей, ‘расположенных в рамке Frame2, ‘при смене значения OptionButton2.Value Private Sub OptionButton2_Change() If OptionButton2.Value Then Frame2.Enabled = True With OptionButton6 .Value = False .Enabled = True End With With OptionButton7 .Value = False .Enabled = True End With With OptionButton8 .Value = False .Enabled = True End With Else Frame2.Enabled = False With OptionButton6 .Value = False .Enabled = False End With With OptionButton7 .Value = False .Enabled = False End With With OptionButton8 .Value = False .Enabled = False End With End If End Sub |
При запуске пользовательской формы или процедуры UserForm_Initialize() откроется форма с неактивными переключателями в рамках Frame1 и Frame2. Нажатие мышью на элементы управления OptionButton с надписями «Рыбы» и «Птицы» будет активировать группу переключателей в одноименных рамках.
Содержание
- How to Add and Group Radio (Option) Buttons in Excel
- Add a Radio Button
- Change the Option Button Text
- Link the Option Button to a Cell
- Insert Multiple Option Buttons
- Group Option Buttons
- Add a check box, option, or Toggle button (ActiveX controls)
- Formatting a control
- VBA Excel. Элемент управления OptionButton (переключатель)
- Элемент управления OptionButton
- Свойства элемента Переключатель
- Примеры кода VBA с OptionButton
- How to Insert and Use a Radio Button (Option Button) in Excel
- Get the Developer Tab in Excel Ribbon
- How to Insert a Radio Button in Excel
- Adding Multiple Radio Buttons in Excel
- #1 Inserting Radio Buttons using the Developer Tab
- #2 Copy Pasting the Radio Buttons
- #3 Drag and Fill Cells with Radio Buttons
- How to Group Radio Buttons in Excel
- Deleting Radio Buttons in Excel
- How to Fix the Position of a Radio Button in Excel
- Enable Radio Buttons in a Protected Sheet in Excel
- Examples of Using Radio Button in Excel
- Radio Button Vs. Checkbox
How to Add and Group Radio (Option) Buttons in Excel
In this article, you will learn how to add and group radio buttons in Excel.
Add a Radio Button
In Excel, you can add radio buttons (also called “option” buttons) to collect a user’s answer to a certain question. This is done through the Developer tab in the Ribbon. In case that you don’t have it, you can add the Developer tab by customizing the Ribbon. To add a radio button to the worksheet, follow these steps:
1. In the Ribbon, go to Developer > Insert and choose Option Button under Form Controls.
2. Now the cursor turns into the cross, and you have to position and draw the option button box.
As a result of this step, the option button is created. By default, option buttons are named sequentially as Option Button 1, 2, etc. Also, the caption of the option button is the same as its name.
Change the Option Button Text
To change the text that appears next to the option button, you have to follow these steps.
1. Right-click the option button, and choose Edit Text.
2. Change the text to what you need. This example uses months, so this first option button should be labeled January.
As you can see, after this step, only the text of the option button is changed to January, while the name remains the same (Option Button 1).
Link the Option Button to a Cell
To be able to get a user’s answer, you need to link the option button to a certain cell. This way, you will get the number of the checked radio button. Say you want to store this value in cell D2.
1. Right-click the option button, and choose Format Control.
2. In the Format Object window, (1) go to the Control tab, (2) enter a cell where you want to get the result ($D$2), and (3) click OK.
Now, if the option button is unchecked, the value of cell D2 is 0.
If you check the option button, the value of cell D2 changes to 1.
Insert Multiple Option Buttons
Since option buttons expect only one answer, it’s necessary to have two or more option buttons for one question. Say you want to have 12 option buttons to allow the user to select a month. You can simply copy and paste the existing radio button, insert more buttons from the Developer tab, or drag and fill cells with more buttons. The last option is the easiest one, so we’ll show that method. You can add multiple radio buttons by following these steps:
1. In a case that the first radio button is positioned in a cell (in this case B2), you can position a cursor in the right lower corner of cell B2 until it changes to the black cross.
2. Now drag the cursor and drop it at Row 13, as you need to create 11 more radio buttons.
As you can see, you have a total of 12 radio buttons. Since all of them are copied from the first one, the caption is the same (January), but the names are different (from Option Button 1 to Option Button 12). Also, all radio buttons link to the same cell as the first one (D2). Therefore, if you select the fifth button, you will get 5 in D2.
Finally, you need to change manually text of every radio button to the appropriate month. After that, the radio buttons group looks like this.
Group Option Buttons
In case when you have multiple questions and multiple option buttons for each question, you will need to group radio buttons by question. Let’s say that, in addition from months, you also have products radio buttons in Column C. In this case, you would like to get one month (in cell D2), and one product (in D3) as an answer. Now, if you select May and Speakers, you get 16 in cell D2.
This happens, because Excel puts all option buttons in one group, and in this case, you can select only one option from the existing 17. To create two radio buttons groups (one for months and the other for products), you need to add a group box for each group. To do this, follow these steps.
1. In the Ribbon, go to Developer > Insert, and choose Group Box in the Form Control.
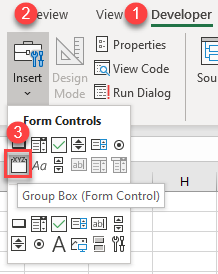
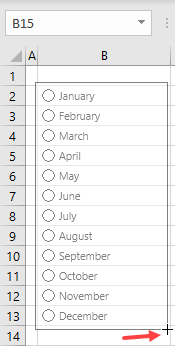
2. Now the cursor turns into the cross, and you have to position and draw the group box. In the first group box, you have to put all radio buttons for months. Therefore, you should draw the first group box around cells B2:B13.
As a result of this step, the group box for months is created. Now you need to repeat these two steps and create a group box around radio buttons for products (cells B2:B6). If you now link product radio buttons to cell D3, you should have the selected index for months in D2, and for products in D3.
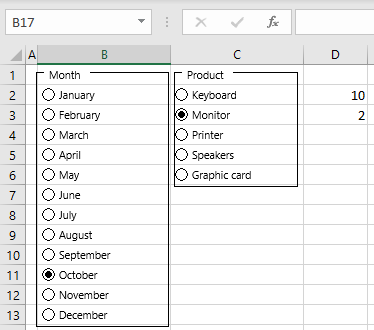
As you can see in the Month group, October is selected, so cell D2 is 10. Also, in the Product group, Monitor is checked, so 2 is the result in D3. This way, you can create multiple option buttons groups for different questions.
Unfortunately, adding radio buttons in Google Sheets is not possible.
Источник
Add a check box, option, or Toggle button (ActiveX controls)
You can insert form controls like check boxes, option, or toggle buttons to make data entry easier. Check boxes work well for forms with multiple options. Option buttons are better when your user has just one choice. Toggle buttons indicate a state between an enabled or disabled state when the button is clicked.
To add an ActiveX control, you’ll need the Developer tab on your Ribbon.
Notes: To enable the Developer tab, follow these instructions:
In Excel 2010 and subsequent versions, click File > Options > Customize Ribbon , select the Developer check box, and click OK.
In Excel 2007, click the Microsoft Office button  > Excel Options > Popular > Show Developer tab in the Ribbon.
To add a check box, click the Developer tab, click Insert, and under ActiveX Controls, click  .
.
To add an option button, click the Developer tab, click Insert, and under ActiveX Controls, click  .
.
To add a toggle button, click the Developer tab, click Insert, and under ActiveX Controls, click  .
.
Click in the cell wherever you want to add the control.
Tip: You can only add one checkbox or option button at a time. To speed things up, after you add your first control, right-click it and select Copy > Paste.
To edit the ActiveX control, make sure that you are in design mode. On the Developer tab, in the Controls group, click Design Mode.
To set the control properties, on the Developer tab, in the Controls group, click Properties.
You can also right-click the control, and then click Properties.
The Properties dialog box appears. For detailed information about each property, select the property, and then press F1 to display a Visual Basic Help topic. You can also type the property name in the Visual Basic Help Search box. For more information on properties, also see Properties (Microsoft Forms) on MSDN.
Formatting a control
To format a control, right-click the control, and then click Properties.
In the Properties dialog box, modify a property as necessary.
Источник
VBA Excel. Элемент управления OptionButton (переключатель)
Элемент управления пользовательской формы OptionButton для выбора одной опции из группы и передачи результата в VBA Excel. Свойства переключателя, примеры.
Элемент управления OptionButton
В VBA Excel элемент управления OptionButton состоит из белого кружка с черной точкой (переключатель выбран) или без нее (переключатель не выбран) и надписи. Надпись расположена справа и реагирует на нажатие мышью так же, как и белый кружок.
В отличие от элемента управления CheckBox, только один OptionButton из группы переключателей может иметь значение True. Для разделения разных групп переключателей друг от друга используются элементы управления Frame (рамки). Все переключатели вне рамок являются одной группой.
Так же, как и элемент управления CheckBox, OptionButton принимает третье состояние при присвоении ему в коде VBA Excel значения Null. Переключатель отображается с серым кружком и серой точкой.
Свойства элемента Переключатель
| Свойство | Описание |
|---|---|
| AutoSize | Автоподбор размера переключателя. True – размер автоматически подстраивается под длину набираемой строки. False – размер элемента управления определяется свойствами Width и Height. |
| ControlSource | Ссылка на источник данных для свойства Value. |
| ControlTipText | Текст всплывающей подсказки при наведении курсора на OptionButton. |
| Enabled | Возможность взаимодействия пользователя с элементом управления. True – взаимодействие включено, False – отключено (цвет переключателя становится серым). |
| Font | Шрифт, начертание и размер текста надписи. |
| Height | Высота элемента управления. |
| Left | Расстояние от левого края внутренней границы пользовательской формы до левого края элемента управления. |
| Picture | Добавление изображения вместо текста надписи или дополнительно к нему. |
| PicturePosition | Выравнивание изображения и текста в поле надписи. |
| TabIndex | Определяет позицию элемента управления в очереди на получение фокуса при табуляции, вызываемой нажатием клавиш «Tab», «Enter». Отсчет начинается с 0. |
| TextAlign* | Выравнивание текста надписи: 1 (fmTextAlignLeft) – по левому краю, 2 (fmTextAlignCenter) – по центру, 3 (fmTextAlignRight) – по правому краю. |
| Top | Расстояние от верхнего края внутренней границы пользовательской формы до верхнего края элемента управления. |
| Value | Значение переключателя: True – включен, False – выключен, Null – серый кружок с серой точкой. |
| Visible | Видимость элемента OptionButton. True – элемент отображается на пользовательской форме, False – скрыт. |
| Width | Ширина элемента управления. |
| WordWrap | Перенос текста надписи на новую строку при достижении границы ее поля. True – перенос включен, False – перенос выключен. |
* При загруженной в поле надписи картинке свойство TextAlign не работает, следует использовать свойство PicturePosition.
Свойство по умолчанию для элемента OptionButton – Value, основное событие – Click.
В таблице перечислены только основные, часто используемые свойства переключателя. Все доступные свойства отображены в окне Properties элемента управления OptionButton.
Примеры кода VBA с OptionButton
Пример 1
Отображение элементов управления OptionButton на пользовательской форме с параметрами, заданными в коде VBA Excel:
Источник
How to Insert and Use a Radio Button (Option Button) in Excel
A Radio Button in Excel (also called the Option Button) can be used to select one of the many choices/options.
You must have seen it on hundreds of web pages where you are asked to select an option by clicking on a small round shape next to the text. As soon as you select it, it gets a black dot in it (an indication that is marked).
The same thing can also be created in Excel. In this tutorial, I will refer to it as the Radio Button (as my Computer teacher taught me).
However, Excel refers to it as the ‘Option button’.
This Tutorial Covers:
To insert a radio button in Excel, you need to have the developer tab enabled in your workbook.
Can’t see the developer tab?
Don’t worry.. here are the steps.
Get the Developer Tab in Excel Ribbon
Below are the steps for getting the developer tab in the ribbon in Excel 2013. While the screenshots I share here are of Excel 2013, the process is the same in Excel 2007 or 2010.
- Right-click on any of the existing tabs in the ribbon and select Customize the Ribbon. It opens the Excel Options dialogue box.
- In the Excel Options dialogue box, you will have the Customize the Ribbon options. On the right, within the Main Tabs pane, check the Developer option.
- Click OK. This will make the developer tab appear as one of the tabs in the ribbon.
Now with the developer tab visible, you get access to a variety of interactive controls. Let’s get on with it and insert that radio button we were talking about.
How to Insert a Radio Button in Excel
Here are the steps to insert a radio button in Excel:
- Go to Developer Tab –> Controls –> Insert –> Form Controls –> Option Button.
- You would see that there are two kinds of interactive controls: Form Control and Interactive Control. While Form Controls are made to use only within Excel workbooks, interactive controls can be used in user forms as well. Interactive controls provide a lot more flexibility and have extensive properties. In this tutorial, we will focus on Form Control Radio Button (also called Option button) only .
- Hover the mouse anywhere in the worksheet. You will see a plus icon (instead of the regular cursor). Click anywhere, and it will insert a radio button.
- Congratulations! You have inserted a radio button in Excel. You can click on the button and check it. However, there is one small problem. As of now, this radio button is useless – it does nothing. For this to work, it needs to be connected with a cell in the worksheet. Only then will you be able to record the response (whether a person selects either option 1, or option 2, or option 3…). To configure this radio button, right-click on it and select Format Control.
- In the Format Control dialogue box, in the Control tab, make the following changes:
- Value: Checked (this makes sure that the radio button is checked by default when you open the workbook).
- Cell Link: $A$1 (this is the cell linked to the radio button). You can manually enter this or select the cell to get the reference.
- Click OK.
Now your radio button is linked to cell A1. When you select the radio button, it will show 1 in cell A1.
The number you see in cell A1 (the linked cell) is the number of the radio button that has been selected. If you have multiple radio buttons, and if you select the second one, cell A1 will show 2.
Unlike checkboxes in Excel, in the case of a radio button, you can only select one of the radio buttons. This means that if you have more than one radio buttons, you can only select one of it (you can, however, group sets of radio buttons, covered later in this tutorial).
To work with radio buttons in Excel, you need to have more than one radio button in the worksheet. Let’s see how we can insert multiple radio buttons in Excel.
Adding Multiple Radio Buttons in Excel
There are three ways you can add multiple radio buttons in a worksheet in Excel.
#1 Inserting Radio Buttons using the Developer Tab
The easiest way is to use the developer tab and insert the radio buttons (as shown above). With this method, you need to repeat the steps as many times as many radio buttons you want.
This can be the method of choice when you have to insert only a couple of radio buttons in Excel.
An interesting thing to note here is that if you have linked the first radio button with a cell in the worksheet, all the radio buttons that you insert after it would be linked to that same cell. Also, you will be able to check only one of the radio buttons.
#2 Copy Pasting the Radio Buttons
A quick way to insert radio button is to copy and paste an existing radio button. You can do this by simply selecting the radio button and pressing Control + D.
This would create a copy of the existing radio button.
There are a couple of things you need to know when you use this method:
- When you copy and paste an existing radio button, the Caption Name (text that you see to the right of the radio button) is also copied, but the background name (the name that Excel uses to refer to that object) changes. See the image below to understand the difference between the caption name and background name.
- If the original radio button is linked to a cell in the worksheet, all the copied radio buttons would also be linked to that same cell.
#3 Drag and Fill Cells with Radio Buttons
When you copy and paste a cell that contains a radio button, it creates a copy of the radio button as well.
Similarly, if you have a radio button in a cell and you select and drag the cell (as shown below), it will create copies of the radio button.
These again follow the same rules discussed above:
- When you create a copy of a radio button by copy pasting (or dragging) a cell that already has the radio button, the Caption Name (text that you see to the right of the radio button) of the radio button gets copied, but the background name (that Excel uses to refer to that object) changes.
- If the original radio button is linked to a cell in the worksheet, all the copied radio buttons would also be linked to that same cell.
How to Group Radio Buttons in Excel
Imagine you have a survey with ten different questions. For each question, you can choose one answer (by clicking on the radio button for that answer). This means that you would make ten radio button selections in the survey.
Now to create such a survey in Excel, you would need to group the options with radio buttons, such that in a group, you can select only one option, but at the same time, you are allowed to check the radio button of some other group.
Something as shown below:
Here are the steps to group radio buttons in Excel:
- Insert all the radio buttons that you want to group.
- Go to Developer –> Controls –> Insert –> Group Box (Form Control).
- Hover the mouse anywhere in the worksheet. You will see a plus icon (instead of the regular cursor). Click anywhere, and it will insert a group box.
- Place the group box in such a way that all the radio buttons (that you want to group) are inside it. You can move and resize the radio buttons and the group box just like any other object.
- Link one of the radio buttons to a cell in the worksheet. All the radio buttons would automatically be linked to the same cell.
- Repeat the steps above to create another group of radio buttons.
This way, you can have any number of independent groups where you can make only one selection within the group, the selection across groups is independent.
Deleting Radio Buttons in Excel
You can easily delete a single radio button in Excel by selecting it and pressing the delete key. To select a radio button, you need to hold the Control key and the press the left button of the mouse.
If you want to delete multiple radio buttons:
- Hold the Control key and select all the ones that you want to delete.
- Press the Delete key.
If you have many radio buttons scattered in your worksheet, here is a way to get a list of all the radio buttons and delete at one go:
- Go to Home –> Editing –> Find & Select –> Selection Pane.
- This will open a Selection Pane that will list all the objects on that worksheet (including radio buttons, checkboxes, shapes, and charts).
- Select all the radio buttons that you want to delete (to select multiple radio buttons, hold the control key while selecting) and hit the delete key.
- Note that the names of the radio buttons here are the backend names and not the caption names.
Note: The selection pane displays all the objects on the active worksheet only.
How to Fix the Position of a Radio Button in Excel
One common issue with using shapes and objects in Excel is that when you resize cells or hide/delete rows/columns, it also affects the shapes/radio buttons.
Something as shown below:
To stop the radio button from moving around when you resize or delete cells, do the following:
- Left click on the radio button and select Format Control.
- In the Format Control dialogue box, select the properties tab.
- In the Properties tab, within Object Positioning, select Don’t move or size with cells.
- Click OK.
Now when you resize or delete cells, the radio button would stay put.
Enable Radio Buttons in a Protected Sheet in Excel
If you want to protect the entire worksheet, but want the radio buttons to work, here are the steps:
- Right-click on the cell that is linked to the radio button and select Format Cell.
- In the Format Cells dialogue box, go to the Protection tab and uncheck the Locked Option.
Now when you protect the entire sheet, the radio button would still be working. Since Excel protects all the locked cells only, having the linked cell unlocked still makes it work.
Examples of Using Radio Button in Excel
Here are some examples where radio button is used:
Radio Button Vs. Checkbox
While both the radio button and the checkbox looks similar, there are a few differences you need to know before using these.
A radio button allows a user to select only one of the radio buttons from a group. This means that if you have radio buttons for gender, you can only select one of the genders.
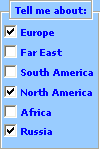
On the other hand, a checkbox is independent of other checkboxes, and you can select multiple at one time. For example, in a skill assessment survey, you can select multiple skills you have.
Here is the definition of radio button by Wikipedia that also covers the difference with a checkbox.
“A radio button or option button is a graphical control element that allows the user to choose only one of a predefined set of mutually exclusive options. The singular property of a radio button makes it distinct from a checkbox, which allows more than one (or no) item to be selected and for the unselected state to be restored.”
You May Also Like the Following Excel Tutorials:
Источник
Option buttons are a common input control in forms. It allows the users to see all available options and ensure that only one option is selected. In this guide, we’re going to show you how to insert an option button in Excel.
Download Workbook
Developer Tab and Option Button command
The command for adding option buttons can be found under the Developer tab, which is not active in Excel by default. This tab contains macro tools. along with other advanced controls, such as option buttons.

If the tab is missing in your Excel as well, follow the steps below.
- Open Excel Options under File.
- Select Customize Ribbon.
- Find and mark the checkbox for Developer in the list box on the right.
- Click the OK button to see the tab in the Ribbon.

Inserting an option button
Once the Developer tab is visible, you can find the Option Button command under the Insert button in the Controls section. When you click the Insert button, you will see the same controls under two sections:
- Form Controls
- ActiveX Controls

Clicking the Option Button button changes the cursor into a plus. Click anywhere to insert a default option button, or hold and drag the cursor to define the size of the option.

If you only need this control as a visual element, you can start to use your option button right away. On the other hand, you can bind your option buttons to a cell to retrieve the index value of the selected option.
Binding to a cell
- Right-click on your option button.
- Select Format Control.

- Activate Control tab.
- Enter or select a cell by using Cell link.
- Click OK to apply.


After binding, click on an option button to see the index of selected option button in the cell.

By default, Excel assumes all option buttons in a worksheet are related with each other. To gather option buttons into multiple groups, you need to combine them under Group Boxes. You can bind each option button in different groups to different cells. This is necessary for using multiple option buttons in the same worksheet.
The Group Box command can also be found under the Insert button.

Hold down the mouse button to create big enough group box to fit all option buttons.

Modifying and multiplying option buttons
Now, let’s take a look at further configuration options for inserting an option button. First of all, you can change the default «Option Button 1», «Option Button 2», etc. names. You can change the label by right clicking the option button and selecting Edit Text.

You can use Excel’s drag and drop feature for copying an option button multiple times. However, you need to fit the option button into a cell first.
- Use the circles around to adjust its size.
- Once the option button is in a cell, select the cell.
- Copy it down to by using tiny square at bottom right like a regular cell copying.

In this lesson you will learn how to insert Option Button (aka Radio Button) in Excel. Option button allows you to select one option from a group of options. Here’s how to use an option button in Excel:
To insert Option Button to your worksheet you should go to the Ribbon. Click Developer > Insert > Form Controls > Option Button.
Next draw your Radio Button with your mouse. Click and drag on the worksheet to draw the option buttons. You can create as many option buttons as you need.
Edit name
You can change the text on Option Button. Just right click go to Edit Text and change it.

Link with cell
To link Radio Button with cell right click and go to Format Control. Go to Control and write the address of the cell.


To link an option button to a cell in Excel, you can use the «CELL» function. The value in the cell will change when you select a different option button, allowing you to use the value in other parts of your worksheet.
Survey
Using Option Buttons in Excel you can easily create your own survey in Excel. Here you have screenshot with example on survey in Excel.

These are Option Boxes in one Group Box. That’s perfect way to create survey in Excel.
Just put some Option Boxes inside one Group Box. You can also copy/paste it to Word or Power Point.
To perform an action when an option button is selected, you can assign a macro to the option button. To do this, right-click on the option button and select «Assign Macro.»
How to make a chart with option button?
Let’s see how to create a chart with option buttons, It will work like when we click the options the graph will change as per the requirements.
Let us start by creating chart data for the same.
Now we can clearly see that there are 2 categories of products. A simple graph will look like this:

Now we will start creating the options for the same. We created new columns which have the following formulas:
=IF(J1,C1,E1)
So based on value in cell j1 it can be product2 or Products A
For based on value in cell j1 it can be product3 or Products B
So now we have added a checkbox and linked it to the cell j1 and in the graph we have changed the series types including product1 and last 2 column products which can vary.

Unchecking the option:

Further reading:
Chart with if statement
Chart with option buttons
Chart with a single x-axis but two different ranges