
Word Options is the place where you customise the look of your Word document, how it corrects your words as you type away, the spell checker, your initials on any comments and the document properties, etc. It’s a great place to explore and enables you to customise Word and get it exactly how you want it.
However, it does work slightly differently in the three most commonly used versions of Word for PC: Word 2007, Word 2010 and Word 2013, so here’s a quick guide to how to access Word Options in these different versions of Word.
How to access the Word Options in Word 2007:
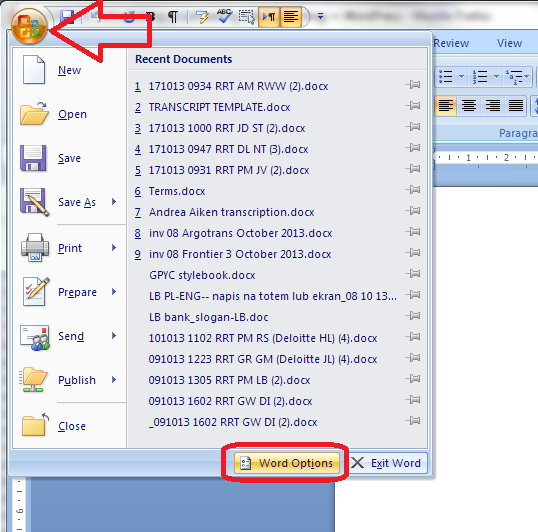
Click on the Office button in the top left of the screen, then click on Word Options at the bottom of the box:
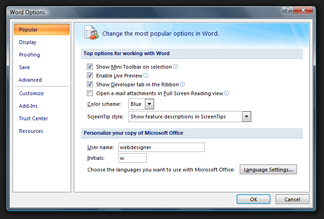
Your Word Options box will now display:

How to access the Word Options in Office 2010:
In Word 2010, click on the File tab and then select Options, one up from the bottom of the list on the left hand side:

Once you’ve clicked on Options, your Word Options box will appear:

How to access Word Options in Word 2013:
In Word 2013, click on the File tab:

This has the effect of making your screen disappear, but you will get a list of things to do, out of which you select Options at the very bottom of the list (you can click that left-pointing arrow in a circle at the top left to get back to your document):

Clicking on Options will bring up the Options box:

This is part of my series on how to avoid time-consuming “short cuts” and use Word in the right way to maximise your time and improve the look of your documents. Find all the short cuts here …
Do let me know if this has helped you – and do share with the buttons at the bottom of this article.
Previous versions of Microsoft Word had a clearly accessible Options under the Tools menu. Most people will hunt for the Word 2007 options and settings button inside the tabs of the Ribbon. To save you some time, Word 2007 stores access to the program preferences inside the new Office menu.
Access the Open Options and Settings in Word 2007
 Word 2007 options are located under the new Office menu. The «Office menu» can be opened by clicking on the Office 2007 logo in the top left corner of Word 2007: the Office menu contains commands previously stored under the «File» menu.
But notice two buttons at the bottom right corner of the Office menu: one exits Word («Exit Word«), and the other is labeled «Word Options«. Click Word Options, and the Word Options dialog will open:
Once you are done with changing options in Word 2007, click OK to validate the changes or Cancel to discard them. Other tutorials will go over customization of Word 2007, but this tutorial covered the most difficult part of configuring Word: accessing the options from a hard-to-find location!
Keyboard shortcuts to open Word 2007’s options
Microsoft made Office 2007 and Word 2007 carry over the keyboard shortcuts from previous versions of Microsoft Office. You can therefore open Word 2007’s Options dialog by hitting Alt+T,O (which corresponded to (Tools > Options).
The new keyboard shortcut for Word 2007 only is Alt+F,i. (Alt+F itself opens the Office menu.)
up ↑
December 12, 2009 at 2:17 pm
There are several default settings in Word 2007 that new users often want to change but have trouble locating. To make that task easier, here is a list a few of the configuration options my clients ask about most frequently. It’s far from comprehensive, and both the items I’ve chosen to discuss and the order of the list are somewhat random. However, the list should help you track down some of the key settings that Microsoft has tucked away in places you wouldn’t necessarily think to look.
Each of these settings can be found by clicking the Office button, then navigating to and clicking the Word Options button at the very bottom of the fly-out menu (under Recent Documents). If you prefer keyboard shortcuts, you can press the key combination Alt F, I. (In earlier versions of Word, most configuration options are located on various tabs within the Options dialog, which you invoke by clicking the Tools menu, Options.)
In Word 2007, the Word Options are grouped into categories and subcategories. Clicking a category in the navigation area at the left side of the screen produces several subcategories for that category. Depending on the category, you might need to scroll down to see all of the subcategories.
Remember to click OK before exiting the Word Options. Otherwise, Word won’t save your modified settings.
Options Listed Under “Popular”
When you first open the Word Options, you’re taken to the “Popular” category. One of the choices there that people sometimes want to disable is the Mini Toolbar. That’s the toolbar that, by default, pops up automatically when you select text — at first appearing as a faint, ghostly presence, and then solidifying when you move the mouse pointer over it. Many people like it, but if you don’t, simply uncheck it and OK out of the Word Options.
Options Listed Under “Display”
Clicking the “Display” category on the left takes you first to the “Page display options” subcategory.
My clients sometimes ask how to turn on the option that shows the top of a virtual page, including the margin area (i.e., where any header would appear), rather than hiding that portion of the page and having the first line of text appear immediately below the Ruler (if the Ruler is displayed). That is the setting at the top of this subcategory, the one labeled “Show white space between pages in Print Layout view.” To enable it, click to put a check in the box, then OK out.
Note that even with this option enabled, it’s possible to hide the white space by accident. If you are certain that you turned the option on but you’re not seeing white space between pages, move the cursor to the top of the virtual page — into the slim area between the document and the Ruler or whatever is immediately above the document — and, when the mouse pointer becomes a double-headed arrow (one pointing down and one pointing up), double-click. That should display the white space again. (Double-clicking in that area toggles between displaying and hiding the white space.)
It’s unlikely that you’ll want to change the other default settings under “Page display options,” but give them a quick glance just in case. Keep in mind that if you check any of the choices under “Always show these formatting marks on the screen,” those non-printing characters will display at all times — even if you click the paragraph symbol (pilcrow) in the Paragraph group on the Home tab in an effort to toggle them off. This is a potential “gotcha” to keep at the back of your mind.
Options Listed Under “Advanced”
There are a handful of settings listed in the “Advanced” category that you might want to change.
The “Editing options” Subcategory
One of these, hiding demurely in the middle of the “Editing options” subcategory, is “Use the Insert key to control overtype mode.” Surprisingly, this setting is turned off by default — which makes Word 2007 different from previous versions of Word and from nearly all other Windows programs, in which the Insert key toggles between Insert mode (where new typing bumps existing text over to the right, rather than replacing it) and Typeover or Overtype mode (where new typing actually erases existing text).
Upon reflection, it makes sense that Microsoft chose to disable this feature by default, considering how commonly people press the Insert key and end up overwriting existing text by accident. Still, considering what a radical departure this change represents, many people are caught off guard by it. If you want to enable the option, making Word 2007 behave more like traditional Windows programs, just click the first checkbox. Watch out, though: The second checkbox (labeled “Use overtype mode”) makes Typeover / Overtype the default, which is neither the norm nor the mode that most people prefer.
The “Cut, copy, and paste” Subcategory
Perhaps the most common question I get from clients about configuration options is how to disable the “Paste Options” buttons. By default, these little guys pop up whenever you paste text within a document or between docs. They’re designed to make it easy for you to control the formatting of pasted text — to ensure that it appears in the same format as the original text or in the same format as the text in the location where you’re pasting it — but, judging from my clients’ reactions, a lot of people find the buttons more annoying than useful. If you agree, click to uncheck “Show Paste Options buttons” and OK out.
The “Display” Subcategory
The Recent Documents list in Word 2007 allows for the display of a much larger number of docs than in previous versions of Word (where the maximum number was nine). If memory serves, the default setting is 20. You can change this setting via the “Display” subcategory of the “Advanced” Word Options by using the arrows (“spinners”) or by simply typing a higher or lower number under “Show this number of Recent Documents.”
Another useful option that you can configure in the “Display” subcategory is the one labeled “Style area pane width in Draft and Outline Views.” When you type a number higher than zero — and usually greater than 1 (meaning 1″) — Word will show the styles in use in your document in a narrow area in the left margin when you switch to Draft view. There are other ways to display the styles in your document (for example, you can add a button to the Quick Access Toolbar [QAT] that shows the style of the paragraph your cursor is in[1]), but this method has the advantage of showing all the styles in the document at a glance.
Another highly requested option that is located in the “Advanced” Category under “Display” is one that I’ve written about elsewhere in this blog, namely, the one that allows you to display a second set of “control buttons” (Minimize, Maximize / Restore, and Close) that affect individual documents, rather than the program itself. This setting is confusing for two reasons: (1) because the default setting hides the second set of control buttons — such that large numbers of people accidentally close Word when they meant to close a specific document; and (2) the wording of the option doesn’t give any indication whatsoever that the setting affects the control buttons.
The option is labeled “Show all windows in the Taskbar.” When it is enabled, as it is by default, each open document is displayed in the Windows Taskbar, which is well and good. However, the trade-off is that the second set of control buttons — the ones that affect the document rather than the program — is hidden. To display the document control buttons, you have to uncheck this option. But be aware that when you do so, individual documents will no longer display in the Taskbar.
Only you can decide which of the two alternatives you prefer. If you decide you’d rather see the document control buttons, consider adding a “Switch Windows” button to the QAT so that you have any easy way of displaying (and moving among) your open documents. (See footnote [1] below for instructions on adding buttons to the QAT.) Of course, you also have the option of using the “Switch Windows” command at the right side of the View tab, and if you like, you can cycle among your open documents by using the keyboard shortcut Ctrl F6.
Although this list isn’t exhaustive, I hope that it goes a long way toward helping you reconfigure Word to make it work the way you want it to.
____________________________________________________________
[1] To add a “Style” box to the QAT: Right-click the QAT, then click Customize Quick Access Toolbar…. When the Word Options opens, navigate to the “Choose commands from” drop-down on the left and click it, then select “All Commands” (the default is “Popular Commands”). Scroll down about 5/6 of the way until you find “Style” (not “Styles,” plural). Click to select it, then click the “Add” button toward the center of the screen. To move the style box left or right on the QAT, click the up (left) or down (right) button. Then click OK to save your settings and close the Word Options.
To add a “Switch Windows” button to the QAT: Right-click the QAT, then click Customize Quick Access Toolbar… When the Word Options opens, navigate to the “Choose commands from” drop-down on the left and click it, then select “View Tab” (the default is “Popular Commands”). Scroll down until you find “Switch Windows.” Click to select it, then click the “Add” button toward the center of the screen. To move the style box left or right on the QAT, click the up (left) or down (right) button. Then click OK to save your settings and close the Word Options.
Note that you might find it useful to move the QAT below the Ribbon, if you haven’t done so already. When you do so, it will expand all the way across the screen, allowing you to add quite a few icons to help you carry out the tasks you perform most frequently. To reposition the QAT, right-click it and click Show Quick Access Toolbar Below the Ribbon.
Entry filed under: Uncategorized.