
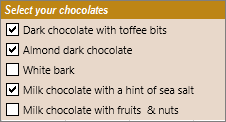
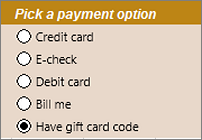
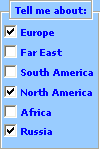
You can insert form controls such as check boxes or option buttons to make data entry easier. Check boxes work well for forms with multiple options. Option buttons are better when your user has just one choice.
To add either a check box or an option button, you’ll need the Developer tab on your Ribbon.
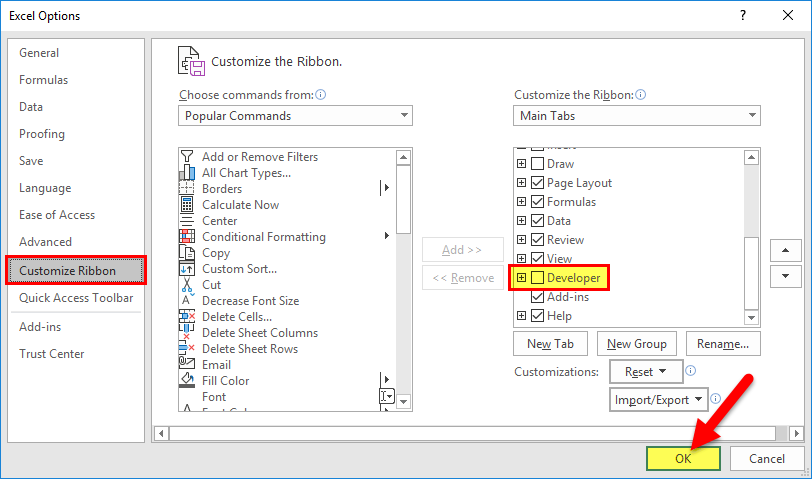
Notes: To enable the Developer tab, follow these instructions:
-
In Excel 2010 and subsequent versions, click File > Options > Customize Ribbon , select the Developer check box, and click OK.
-
In Excel 2007, click the Microsoft Office button
 > Excel Options > Popular > Show Developer tab in the Ribbon.
-
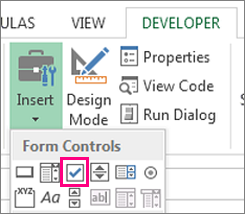
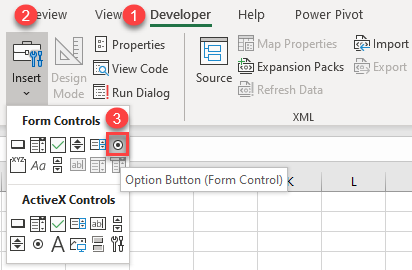
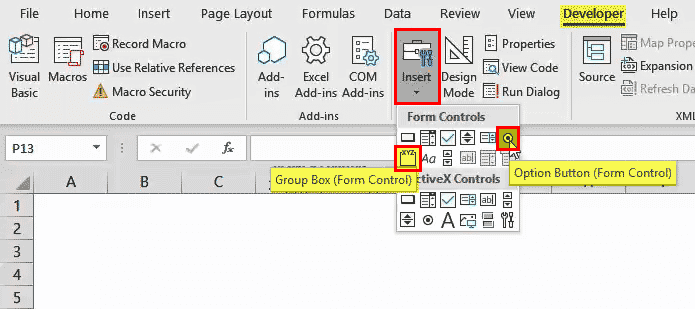
To add a check box, click the Developer tab, click Insert, and under Form Controls, click
.
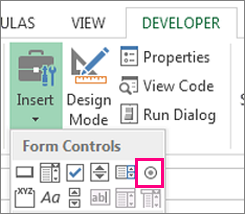
To add an option button, click the Developer tab, click Insert, and under Form Controls, click
.
-
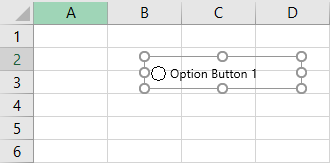
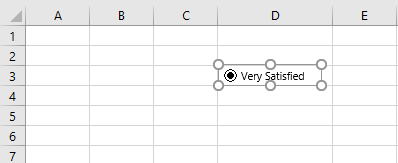
Click in the cell where you want to add the check box or option button control.
Tip: You can only add one checkbox or option button at a time. To speed things up, after you add your first control, right-click it and select Copy > Paste.
-
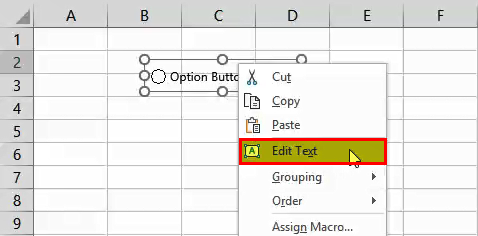
To edit or remove the default text for a control, click the control, and then update the text as needed.
Tip: If you can’t see all of the text, click and drag one of the control handles until you can read it all. The size of the control and its distance from the text can’t be edited.
Formatting a control
After you insert a check box or option button, you might want to make sure that it works the way you want it to. For example, you might want to customize the appearance or properties.
Note: The size of the option button inside the control and its distance from its associated text cannot be adjusted.
-
To format a control, right-click the control, and then click Format Control.
-
In the Format Control dialog box, on the Control tab, you can modify any of the available options:
-
Checked: Displays an option button that is selected.
-
Unchecked: Displays an option button that is cleared.
-
In the Cell link box, enter a cell reference that contains the current state of the option button.
The linked cell returns the number of the selected option button in the group of options. Use the same linked cell for all options in a group. The first option button returns a 1, the second option button returns a 2, and so on. If you have two or more option groups on the same worksheet, use a different linked cell for each option group.
Use the returned number in a formula to respond to the selected option.
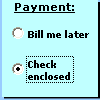
For example, a personnel form, with a Job type group box, contains two option buttons labeled Full-time and Part-time linked to cell C1. After a user selects one of the two options, the following formula in cell D1 evaluates to «Full-time» if the first option button is selected or «Part-time» if the second option button is selected.
=IF(C1=1,»Full-time»,»Part-time»)
If you have three or more options to evaluate in the same group of options, you can use the CHOOSE or LOOKUP functions in a similar manner.
-
-
Click OK.
Deleting a control
-
Right-click the control, and press DELETE.
Currently, you can’t use check box controls in Excel for the web. If you’re working in Excel for the web and you open a workbook that has check boxes or other controls (objects), you won’t be able to edit the workbook without removing these controls.
Important: If you see an «Edit in the browser?» or «Unsupported features» message and choose to edit the workbook in the browser anyway, all objects such as check boxes, combo boxes will be lost immediately. If this happens and you want these objects back, use Previous Versions to restore an earlier version.
If you have the Excel desktop application, click Open in Excel and add check boxes or option buttons.
A Radio Button in Excel (also called the Option Button) can be used to select one of the many choices/options.
You must have seen it on hundreds of web pages where you are asked to select an option by clicking on a small round shape next to the text. As soon as you select it, it gets a black dot in it (an indication that is marked).
The same thing can also be created in Excel. In this tutorial, I will refer to it as the Radio Button (as my Computer teacher taught me).
However, Excel refers to it as the ‘Option button’.
To insert a radio button in Excel, you need to have the developer tab enabled in your workbook.
Can’t see the developer tab?
Don’t worry.. here are the steps.
Get the Developer Tab in Excel Ribbon
Below are the steps for getting the developer tab in the ribbon in Excel 2013. While the screenshots I share here are of Excel 2013, the process is the same in Excel 2007 or 2010.
Now with the developer tab visible, you get access to a variety of interactive controls. Let’s get on with it and insert that radio button we were talking about.
How to Insert a Radio Button in Excel
Here are the steps to insert a radio button in Excel:
- Go to Developer Tab –> Controls –> Insert –> Form Controls –> Option Button.
- You would see that there are two kinds of interactive controls: Form Control and Interactive Control. While Form Controls are made to use only within Excel workbooks, interactive controls can be used in user forms as well. Interactive controls provide a lot more flexibility and have extensive properties. In this tutorial, we will focus on Form Control Radio Button (also called Option button) only.

- You would see that there are two kinds of interactive controls: Form Control and Interactive Control. While Form Controls are made to use only within Excel workbooks, interactive controls can be used in user forms as well. Interactive controls provide a lot more flexibility and have extensive properties. In this tutorial, we will focus on Form Control Radio Button (also called Option button) only.
- Hover the mouse anywhere in the worksheet. You will see a plus icon (instead of the regular cursor). Click anywhere, and it will insert a radio button.

- Congratulations! You have inserted a radio button in Excel. You can click on the button and check it. However, there is one small problem. As of now, this radio button is useless – it does nothing. For this to work, it needs to be connected with a cell in the worksheet. Only then will you be able to record the response (whether a person selects either option 1, or option 2, or option 3…). To configure this radio button, right-click on it and select Format Control.

- In the Format Control dialogue box, in the Control tab, make the following changes:
- Value: Checked (this makes sure that the radio button is checked by default when you open the workbook).
- Cell Link: $A$1 (this is the cell linked to the radio button). You can manually enter this or select the cell to get the reference.

- Click OK.


Now your radio button is linked to cell A1. When you select the radio button, it will show 1 in cell A1.

The number you see in cell A1 (the linked cell) is the number of the radio button that has been selected. If you have multiple radio buttons, and if you select the second one, cell A1 will show 2.
Unlike checkboxes in Excel, in the case of a radio button, you can only select one of the radio buttons. This means that if you have more than one radio buttons, you can only select one of it (you can, however, group sets of radio buttons, covered later in this tutorial).
To work with radio buttons in Excel, you need to have more than one radio button in the worksheet. Let’s see how we can insert multiple radio buttons in Excel.
Adding Multiple Radio Buttons in Excel
There are three ways you can add multiple radio buttons in a worksheet in Excel.
#1 Inserting Radio Buttons using the Developer Tab
The easiest way is to use the developer tab and insert the radio buttons (as shown above). With this method, you need to repeat the steps as many times as many radio buttons you want.
This can be the method of choice when you have to insert only a couple of radio buttons in Excel.
An interesting thing to note here is that if you have linked the first radio button with a cell in the worksheet, all the radio buttons that you insert after it would be linked to that same cell. Also, you will be able to check only one of the radio buttons.
#2 Copy Pasting the Radio Buttons
A quick way to insert radio button is to copy and paste an existing radio button. You can do this by simply selecting the radio button and pressing Control + D.
This would create a copy of the existing radio button.
There are a couple of things you need to know when you use this method:
- When you copy and paste an existing radio button, the Caption Name (text that you see to the right of the radio button) is also copied, but the background name (the name that Excel uses to refer to that object) changes. See the image below to understand the difference between the caption name and background name.

- If the original radio button is linked to a cell in the worksheet, all the copied radio buttons would also be linked to that same cell.

#3 Drag and Fill Cells with Radio Buttons
When you copy and paste a cell that contains a radio button, it creates a copy of the radio button as well.
Similarly, if you have a radio button in a cell and you select and drag the cell (as shown below), it will create copies of the radio button.

These again follow the same rules discussed above:
- When you create a copy of a radio button by copy pasting (or dragging) a cell that already has the radio button, the Caption Name (text that you see to the right of the radio button) of the radio button gets copied, but the background name (that Excel uses to refer to that object) changes.
- If the original radio button is linked to a cell in the worksheet, all the copied radio buttons would also be linked to that same cell.
How to Group Radio Buttons in Excel
Imagine you have a survey with ten different questions. For each question, you can choose one answer (by clicking on the radio button for that answer). This means that you would make ten radio button selections in the survey.
Now to create such a survey in Excel, you would need to group the options with radio buttons, such that in a group, you can select only one option, but at the same time, you are allowed to check the radio button of some other group.
Something as shown below:

Here are the steps to group radio buttons in Excel:
This way, you can have any number of independent groups where you can make only one selection within the group, the selection across groups is independent.
Deleting Radio Buttons in Excel
You can easily delete a single radio button in Excel by selecting it and pressing the delete key. To select a radio button, you need to hold the Control key and the press the left button of the mouse.
If you want to delete multiple radio buttons:
- Hold the Control key and select all the ones that you want to delete.
- Press the Delete key.
If you have many radio buttons scattered in your worksheet, here is a way to get a list of all the radio buttons and delete at one go:
Note: The selection pane displays all the objects on the active worksheet only.
How to Fix the Position of a Radio Button in Excel
One common issue with using shapes and objects in Excel is that when you resize cells or hide/delete rows/columns, it also affects the shapes/radio buttons.
Something as shown below:

To stop the radio button from moving around when you resize or delete cells, do the following:
Now when you resize or delete cells, the radio button would stay put.
Enable Radio Buttons in a Protected Sheet in Excel
If you want to protect the entire worksheet, but want the radio buttons to work, here are the steps:
Now when you protect the entire sheet, the radio button would still be working. Since Excel protects all the locked cells only, having the linked cell unlocked still makes it work.
Examples of Using Radio Button in Excel
Here are some examples where radio button is used:
- KPI Dashboard in Excel (radio button used to extract data).
- Games of Thrones Dashboard (radio button used to sort data).
Radio Button Vs. Checkbox
While both the radio button and the checkbox looks similar, there are a few differences you need to know before using these.
A radio button allows a user to select only one of the radio buttons from a group. This means that if you have radio buttons for gender, you can only select one of the genders.
On the other hand, a checkbox is independent of other checkboxes, and you can select multiple at one time. For example, in a skill assessment survey, you can select multiple skills you have.
Here is the definition of radio button by Wikipedia that also covers the difference with a checkbox.
“A radio button or option button is a graphical control element that allows the user to choose only one of a predefined set of mutually exclusive options. The singular property of a radio button makes it distinct from a checkbox, which allows more than one (or no) item to be selected and for the unselected state to be restored.”
You May Also Like the Following Excel Tutorials:
- How to Insert a Scrollbar in Excel.
- Insert Checkmark in Excel.
- Complete Guide to Creating Excel Dashboards.
- Creating a Drop-down List in Excel.
- How to Create a Heat Map in Excel.
In this article, you will learn how to add and group radio buttons in Excel.
Add a Radio Button
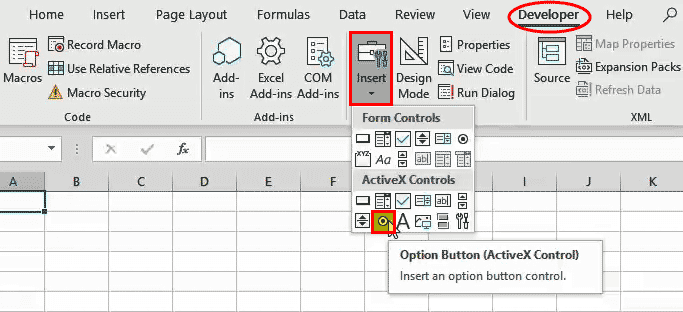
In Excel, you can add radio buttons (also called “option” buttons) to collect a user’s answer to a certain question. This is done through the Developer tab in the Ribbon. In case that you don’t have it, you can add the Developer tab by customizing the Ribbon. To add a radio button to the worksheet, follow these steps:
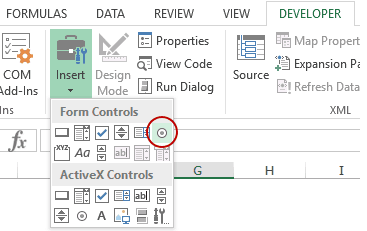
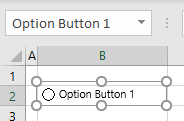
1. In the Ribbon, go to Developer > Insert and choose Option Button under Form Controls.
2. Now the cursor turns into the cross, and you have to position and draw the option button box.
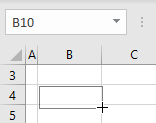
As a result of this step, the option button is created. By default, option buttons are named sequentially as Option Button 1, 2, etc. Also, the caption of the option button is the same as its name.
Change the Option Button Text
To change the text that appears next to the option button, you have to follow these steps.
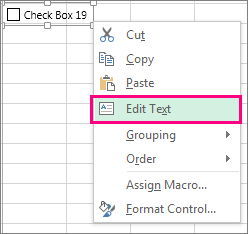
1. Right-click the option button, and choose Edit Text.

2. Change the text to what you need. This example uses months, so this first option button should be labeled January.
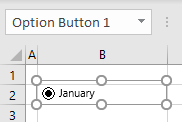
As you can see, after this step, only the text of the option button is changed to January, while the name remains the same (Option Button 1).
Link the Option Button to a Cell
To be able to get a user’s answer, you need to link the option button to a certain cell. This way, you will get the number of the checked radio button. Say you want to store this value in cell D2.
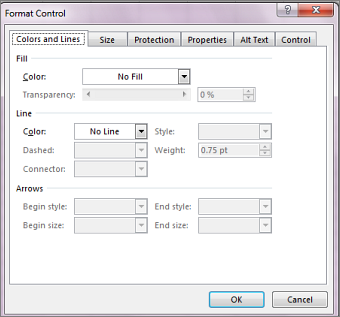
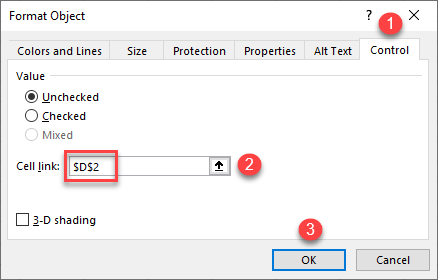
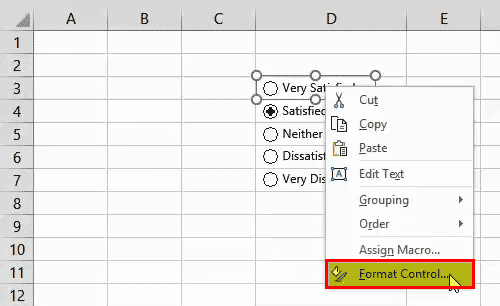
1. Right-click the option button, and choose Format Control.
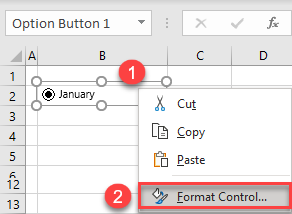
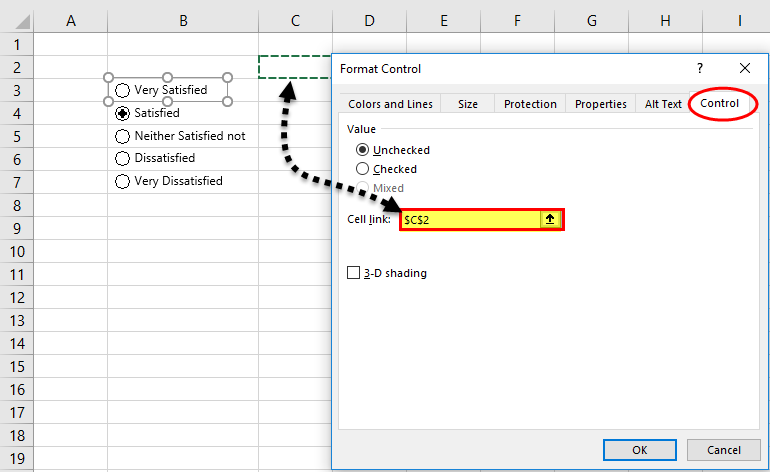
2. In the Format Object window, (1) go to the Control tab, (2) enter a cell where you want to get the result ($D$2), and (3) click OK.
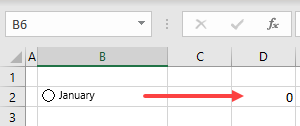
Now, if the option button is unchecked, the value of cell D2 is 0.
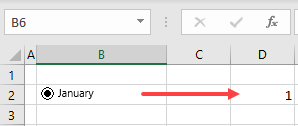
If you check the option button, the value of cell D2 changes to 1.
Insert Multiple Option Buttons
Since option buttons expect only one answer, it’s necessary to have two or more option buttons for one question. Say you want to have 12 option buttons to allow the user to select a month. You can simply copy and paste the existing radio button, insert more buttons from the Developer tab, or drag and fill cells with more buttons. The last option is the easiest one, so we’ll show that method. You can add multiple radio buttons by following these steps:
1. In a case that the first radio button is positioned in a cell (in this case B2), you can position a cursor in the right lower corner of cell B2 until it changes to the black cross.
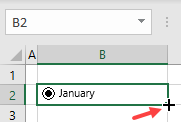
2. Now drag the cursor and drop it at Row 13, as you need to create 11 more radio buttons.
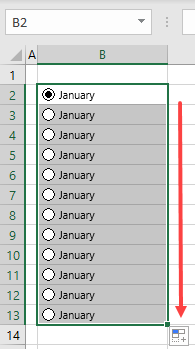
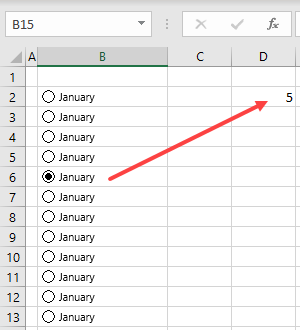
As you can see, you have a total of 12 radio buttons. Since all of them are copied from the first one, the caption is the same (January), but the names are different (from Option Button 1 to Option Button 12). Also, all radio buttons link to the same cell as the first one (D2). Therefore, if you select the fifth button, you will get 5 in D2.
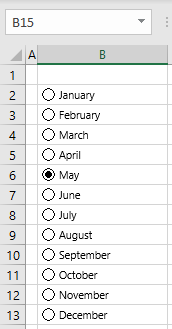
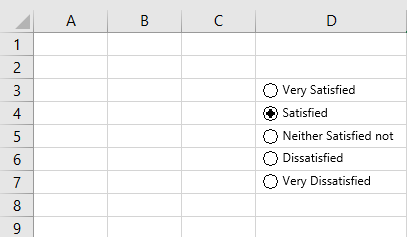
Finally, you need to change manually text of every radio button to the appropriate month. After that, the radio buttons group looks like this.
Group Option Buttons
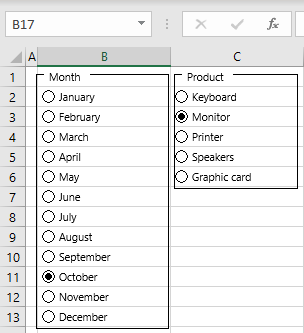
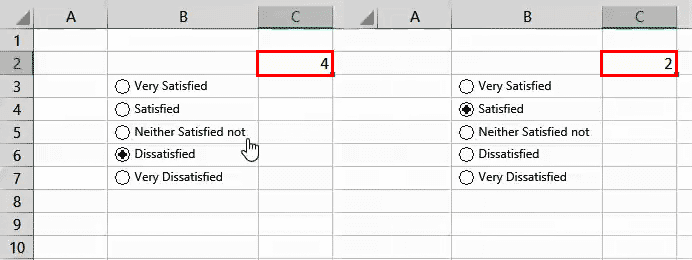
In case when you have multiple questions and multiple option buttons for each question, you will need to group radio buttons by question. Let’s say that, in addition from months, you also have products radio buttons in Column C. In this case, you would like to get one month (in cell D2), and one product (in D3) as an answer. Now, if you select May and Speakers, you get 16 in cell D2.
This happens, because Excel puts all option buttons in one group, and in this case, you can select only one option from the existing 17. To create two radio buttons groups (one for months and the other for products), you need to add a group box for each group. To do this, follow these steps.
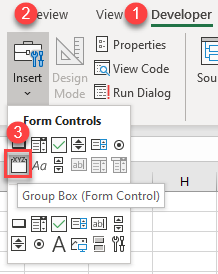
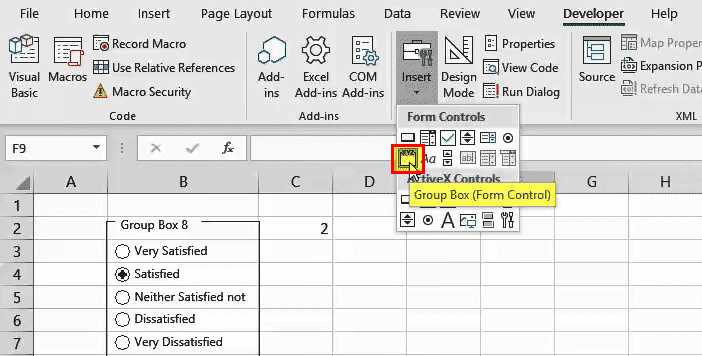
1. In the Ribbon, go to Developer > Insert, and choose Group Box in the Form Control.
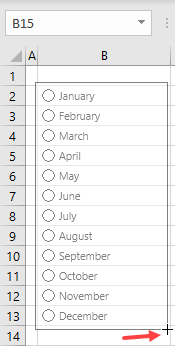
2. Now the cursor turns into the cross, and you have to position and draw the group box. In the first group box, you have to put all radio buttons for months. Therefore, you should draw the first group box around cells B2:B13.
As a result of this step, the group box for months is created. Now you need to repeat these two steps and create a group box around radio buttons for products (cells B2:B6). If you now link product radio buttons to cell D3, you should have the selected index for months in D2, and for products in D3.
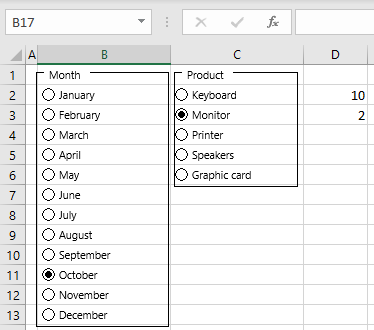
As you can see in the Month group, October is selected, so cell D2 is 10. Also, in the Product group, Monitor is checked, so 2 is the result in D3. This way, you can create multiple option buttons groups for different questions.
Note: You can also use VBA code to add and group multiple radio buttons.
Unfortunately, adding radio buttons in Google Sheets is not possible.
Содержание
- How to Add and Group Radio (Option) Buttons in Excel
- Add a Radio Button
- Change the Option Button Text
- Link the Option Button to a Cell
- Insert Multiple Option Buttons
- Group Option Buttons
- Add a check box, option, or Toggle button (ActiveX controls)
- Formatting a control
- VBA Excel. Элемент управления OptionButton (переключатель)
- Элемент управления OptionButton
- Свойства элемента Переключатель
- Примеры кода VBA с OptionButton
- How to Insert and Use a Radio Button (Option Button) in Excel
- Get the Developer Tab in Excel Ribbon
- How to Insert a Radio Button in Excel
- Adding Multiple Radio Buttons in Excel
- #1 Inserting Radio Buttons using the Developer Tab
- #2 Copy Pasting the Radio Buttons
- #3 Drag and Fill Cells with Radio Buttons
- How to Group Radio Buttons in Excel
- Deleting Radio Buttons in Excel
- How to Fix the Position of a Radio Button in Excel
- Enable Radio Buttons in a Protected Sheet in Excel
- Examples of Using Radio Button in Excel
- Radio Button Vs. Checkbox
How to Add and Group Radio (Option) Buttons in Excel
In this article, you will learn how to add and group radio buttons in Excel.
Add a Radio Button
In Excel, you can add radio buttons (also called “option” buttons) to collect a user’s answer to a certain question. This is done through the Developer tab in the Ribbon. In case that you don’t have it, you can add the Developer tab by customizing the Ribbon. To add a radio button to the worksheet, follow these steps:
1. In the Ribbon, go to Developer > Insert and choose Option Button under Form Controls.
2. Now the cursor turns into the cross, and you have to position and draw the option button box.
As a result of this step, the option button is created. By default, option buttons are named sequentially as Option Button 1, 2, etc. Also, the caption of the option button is the same as its name.
Change the Option Button Text
To change the text that appears next to the option button, you have to follow these steps.
1. Right-click the option button, and choose Edit Text.
2. Change the text to what you need. This example uses months, so this first option button should be labeled January.
As you can see, after this step, only the text of the option button is changed to January, while the name remains the same (Option Button 1).
Link the Option Button to a Cell
To be able to get a user’s answer, you need to link the option button to a certain cell. This way, you will get the number of the checked radio button. Say you want to store this value in cell D2.
1. Right-click the option button, and choose Format Control.
2. In the Format Object window, (1) go to the Control tab, (2) enter a cell where you want to get the result ($D$2), and (3) click OK.
Now, if the option button is unchecked, the value of cell D2 is 0.
If you check the option button, the value of cell D2 changes to 1.
Insert Multiple Option Buttons
Since option buttons expect only one answer, it’s necessary to have two or more option buttons for one question. Say you want to have 12 option buttons to allow the user to select a month. You can simply copy and paste the existing radio button, insert more buttons from the Developer tab, or drag and fill cells with more buttons. The last option is the easiest one, so we’ll show that method. You can add multiple radio buttons by following these steps:
1. In a case that the first radio button is positioned in a cell (in this case B2), you can position a cursor in the right lower corner of cell B2 until it changes to the black cross.
2. Now drag the cursor and drop it at Row 13, as you need to create 11 more radio buttons.
As you can see, you have a total of 12 radio buttons. Since all of them are copied from the first one, the caption is the same (January), but the names are different (from Option Button 1 to Option Button 12). Also, all radio buttons link to the same cell as the first one (D2). Therefore, if you select the fifth button, you will get 5 in D2.
Finally, you need to change manually text of every radio button to the appropriate month. After that, the radio buttons group looks like this.
Group Option Buttons
In case when you have multiple questions and multiple option buttons for each question, you will need to group radio buttons by question. Let’s say that, in addition from months, you also have products radio buttons in Column C. In this case, you would like to get one month (in cell D2), and one product (in D3) as an answer. Now, if you select May and Speakers, you get 16 in cell D2.
This happens, because Excel puts all option buttons in one group, and in this case, you can select only one option from the existing 17. To create two radio buttons groups (one for months and the other for products), you need to add a group box for each group. To do this, follow these steps.
1. In the Ribbon, go to Developer > Insert, and choose Group Box in the Form Control.
2. Now the cursor turns into the cross, and you have to position and draw the group box. In the first group box, you have to put all radio buttons for months. Therefore, you should draw the first group box around cells B2:B13.
As a result of this step, the group box for months is created. Now you need to repeat these two steps and create a group box around radio buttons for products (cells B2:B6). If you now link product radio buttons to cell D3, you should have the selected index for months in D2, and for products in D3.
As you can see in the Month group, October is selected, so cell D2 is 10. Also, in the Product group, Monitor is checked, so 2 is the result in D3. This way, you can create multiple option buttons groups for different questions.
Unfortunately, adding radio buttons in Google Sheets is not possible.
Источник
Add a check box, option, or Toggle button (ActiveX controls)
You can insert form controls like check boxes, option, or toggle buttons to make data entry easier. Check boxes work well for forms with multiple options. Option buttons are better when your user has just one choice. Toggle buttons indicate a state between an enabled or disabled state when the button is clicked.
To add an ActiveX control, you’ll need the Developer tab on your Ribbon.
Notes: To enable the Developer tab, follow these instructions:
In Excel 2010 and subsequent versions, click File > Options > Customize Ribbon , select the Developer check box, and click OK.
In Excel 2007, click the Microsoft Office button  > Excel Options > Popular > Show Developer tab in the Ribbon.
To add a check box, click the Developer tab, click Insert, and under ActiveX Controls, click  .
.
To add an option button, click the Developer tab, click Insert, and under ActiveX Controls, click  .
.
To add a toggle button, click the Developer tab, click Insert, and under ActiveX Controls, click  .
.
Click in the cell wherever you want to add the control.
Tip: You can only add one checkbox or option button at a time. To speed things up, after you add your first control, right-click it and select Copy > Paste.
To edit the ActiveX control, make sure that you are in design mode. On the Developer tab, in the Controls group, click Design Mode.
To set the control properties, on the Developer tab, in the Controls group, click Properties.
You can also right-click the control, and then click Properties.
The Properties dialog box appears. For detailed information about each property, select the property, and then press F1 to display a Visual Basic Help topic. You can also type the property name in the Visual Basic Help Search box. For more information on properties, also see Properties (Microsoft Forms) on MSDN.
Formatting a control
To format a control, right-click the control, and then click Properties.
In the Properties dialog box, modify a property as necessary.
Источник
VBA Excel. Элемент управления OptionButton (переключатель)
Элемент управления пользовательской формы OptionButton для выбора одной опции из группы и передачи результата в VBA Excel. Свойства переключателя, примеры.
Элемент управления OptionButton
В VBA Excel элемент управления OptionButton состоит из белого кружка с черной точкой (переключатель выбран) или без нее (переключатель не выбран) и надписи. Надпись расположена справа и реагирует на нажатие мышью так же, как и белый кружок.
В отличие от элемента управления CheckBox, только один OptionButton из группы переключателей может иметь значение True. Для разделения разных групп переключателей друг от друга используются элементы управления Frame (рамки). Все переключатели вне рамок являются одной группой.
Так же, как и элемент управления CheckBox, OptionButton принимает третье состояние при присвоении ему в коде VBA Excel значения Null. Переключатель отображается с серым кружком и серой точкой.
Свойства элемента Переключатель
| Свойство | Описание |
|---|---|
| AutoSize | Автоподбор размера переключателя. True – размер автоматически подстраивается под длину набираемой строки. False – размер элемента управления определяется свойствами Width и Height. |
| ControlSource | Ссылка на источник данных для свойства Value. |
| ControlTipText | Текст всплывающей подсказки при наведении курсора на OptionButton. |
| Enabled | Возможность взаимодействия пользователя с элементом управления. True – взаимодействие включено, False – отключено (цвет переключателя становится серым). |
| Font | Шрифт, начертание и размер текста надписи. |
| Height | Высота элемента управления. |
| Left | Расстояние от левого края внутренней границы пользовательской формы до левого края элемента управления. |
| Picture | Добавление изображения вместо текста надписи или дополнительно к нему. |
| PicturePosition | Выравнивание изображения и текста в поле надписи. |
| TabIndex | Определяет позицию элемента управления в очереди на получение фокуса при табуляции, вызываемой нажатием клавиш «Tab», «Enter». Отсчет начинается с 0. |
| TextAlign* | Выравнивание текста надписи: 1 (fmTextAlignLeft) – по левому краю, 2 (fmTextAlignCenter) – по центру, 3 (fmTextAlignRight) – по правому краю. |
| Top | Расстояние от верхнего края внутренней границы пользовательской формы до верхнего края элемента управления. |
| Value | Значение переключателя: True – включен, False – выключен, Null – серый кружок с серой точкой. |
| Visible | Видимость элемента OptionButton. True – элемент отображается на пользовательской форме, False – скрыт. |
| Width | Ширина элемента управления. |
| WordWrap | Перенос текста надписи на новую строку при достижении границы ее поля. True – перенос включен, False – перенос выключен. |
* При загруженной в поле надписи картинке свойство TextAlign не работает, следует использовать свойство PicturePosition.
Свойство по умолчанию для элемента OptionButton – Value, основное событие – Click.
В таблице перечислены только основные, часто используемые свойства переключателя. Все доступные свойства отображены в окне Properties элемента управления OptionButton.
Примеры кода VBA с OptionButton
Пример 1
Отображение элементов управления OptionButton на пользовательской форме с параметрами, заданными в коде VBA Excel:
Источник
How to Insert and Use a Radio Button (Option Button) in Excel
A Radio Button in Excel (also called the Option Button) can be used to select one of the many choices/options.
You must have seen it on hundreds of web pages where you are asked to select an option by clicking on a small round shape next to the text. As soon as you select it, it gets a black dot in it (an indication that is marked).
The same thing can also be created in Excel. In this tutorial, I will refer to it as the Radio Button (as my Computer teacher taught me).
However, Excel refers to it as the ‘Option button’.
This Tutorial Covers:
To insert a radio button in Excel, you need to have the developer tab enabled in your workbook.
Can’t see the developer tab?
Don’t worry.. here are the steps.
Get the Developer Tab in Excel Ribbon
Below are the steps for getting the developer tab in the ribbon in Excel 2013. While the screenshots I share here are of Excel 2013, the process is the same in Excel 2007 or 2010.
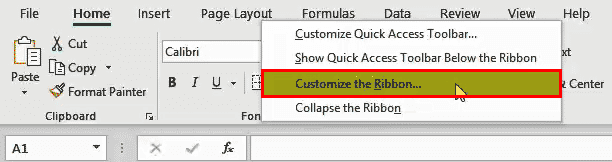
- Right-click on any of the existing tabs in the ribbon and select Customize the Ribbon. It opens the Excel Options dialogue box.
- In the Excel Options dialogue box, you will have the Customize the Ribbon options. On the right, within the Main Tabs pane, check the Developer option.
- Click OK. This will make the developer tab appear as one of the tabs in the ribbon.
Now with the developer tab visible, you get access to a variety of interactive controls. Let’s get on with it and insert that radio button we were talking about.
How to Insert a Radio Button in Excel
Here are the steps to insert a radio button in Excel:
- Go to Developer Tab –> Controls –> Insert –> Form Controls –> Option Button.
- You would see that there are two kinds of interactive controls: Form Control and Interactive Control. While Form Controls are made to use only within Excel workbooks, interactive controls can be used in user forms as well. Interactive controls provide a lot more flexibility and have extensive properties. In this tutorial, we will focus on Form Control Radio Button (also called Option button) only .
- Hover the mouse anywhere in the worksheet. You will see a plus icon (instead of the regular cursor). Click anywhere, and it will insert a radio button.
- Congratulations! You have inserted a radio button in Excel. You can click on the button and check it. However, there is one small problem. As of now, this radio button is useless – it does nothing. For this to work, it needs to be connected with a cell in the worksheet. Only then will you be able to record the response (whether a person selects either option 1, or option 2, or option 3…). To configure this radio button, right-click on it and select Format Control.
- In the Format Control dialogue box, in the Control tab, make the following changes:
- Value: Checked (this makes sure that the radio button is checked by default when you open the workbook).
- Cell Link: $A$1 (this is the cell linked to the radio button). You can manually enter this or select the cell to get the reference.
- Click OK.
Now your radio button is linked to cell A1. When you select the radio button, it will show 1 in cell A1.
The number you see in cell A1 (the linked cell) is the number of the radio button that has been selected. If you have multiple radio buttons, and if you select the second one, cell A1 will show 2.
Unlike checkboxes in Excel, in the case of a radio button, you can only select one of the radio buttons. This means that if you have more than one radio buttons, you can only select one of it (you can, however, group sets of radio buttons, covered later in this tutorial).
To work with radio buttons in Excel, you need to have more than one radio button in the worksheet. Let’s see how we can insert multiple radio buttons in Excel.
Adding Multiple Radio Buttons in Excel
There are three ways you can add multiple radio buttons in a worksheet in Excel.
#1 Inserting Radio Buttons using the Developer Tab
The easiest way is to use the developer tab and insert the radio buttons (as shown above). With this method, you need to repeat the steps as many times as many radio buttons you want.
This can be the method of choice when you have to insert only a couple of radio buttons in Excel.
An interesting thing to note here is that if you have linked the first radio button with a cell in the worksheet, all the radio buttons that you insert after it would be linked to that same cell. Also, you will be able to check only one of the radio buttons.
#2 Copy Pasting the Radio Buttons
A quick way to insert radio button is to copy and paste an existing radio button. You can do this by simply selecting the radio button and pressing Control + D.
This would create a copy of the existing radio button.
There are a couple of things you need to know when you use this method:
- When you copy and paste an existing radio button, the Caption Name (text that you see to the right of the radio button) is also copied, but the background name (the name that Excel uses to refer to that object) changes. See the image below to understand the difference between the caption name and background name.
- If the original radio button is linked to a cell in the worksheet, all the copied radio buttons would also be linked to that same cell.
#3 Drag and Fill Cells with Radio Buttons
When you copy and paste a cell that contains a radio button, it creates a copy of the radio button as well.
Similarly, if you have a radio button in a cell and you select and drag the cell (as shown below), it will create copies of the radio button.
These again follow the same rules discussed above:
- When you create a copy of a radio button by copy pasting (or dragging) a cell that already has the radio button, the Caption Name (text that you see to the right of the radio button) of the radio button gets copied, but the background name (that Excel uses to refer to that object) changes.
- If the original radio button is linked to a cell in the worksheet, all the copied radio buttons would also be linked to that same cell.
How to Group Radio Buttons in Excel
Imagine you have a survey with ten different questions. For each question, you can choose one answer (by clicking on the radio button for that answer). This means that you would make ten radio button selections in the survey.
Now to create such a survey in Excel, you would need to group the options with radio buttons, such that in a group, you can select only one option, but at the same time, you are allowed to check the radio button of some other group.
Something as shown below:
Here are the steps to group radio buttons in Excel:
- Insert all the radio buttons that you want to group.
- Go to Developer –> Controls –> Insert –> Group Box (Form Control).
- Hover the mouse anywhere in the worksheet. You will see a plus icon (instead of the regular cursor). Click anywhere, and it will insert a group box.
- Place the group box in such a way that all the radio buttons (that you want to group) are inside it. You can move and resize the radio buttons and the group box just like any other object.
- Link one of the radio buttons to a cell in the worksheet. All the radio buttons would automatically be linked to the same cell.
- Repeat the steps above to create another group of radio buttons.
This way, you can have any number of independent groups where you can make only one selection within the group, the selection across groups is independent.
Deleting Radio Buttons in Excel
You can easily delete a single radio button in Excel by selecting it and pressing the delete key. To select a radio button, you need to hold the Control key and the press the left button of the mouse.
If you want to delete multiple radio buttons:
- Hold the Control key and select all the ones that you want to delete.
- Press the Delete key.
If you have many radio buttons scattered in your worksheet, here is a way to get a list of all the radio buttons and delete at one go:
- Go to Home –> Editing –> Find & Select –> Selection Pane.
- This will open a Selection Pane that will list all the objects on that worksheet (including radio buttons, checkboxes, shapes, and charts).
- Select all the radio buttons that you want to delete (to select multiple radio buttons, hold the control key while selecting) and hit the delete key.
- Note that the names of the radio buttons here are the backend names and not the caption names.
Note: The selection pane displays all the objects on the active worksheet only.
How to Fix the Position of a Radio Button in Excel
One common issue with using shapes and objects in Excel is that when you resize cells or hide/delete rows/columns, it also affects the shapes/radio buttons.
Something as shown below:
To stop the radio button from moving around when you resize or delete cells, do the following:
- Left click on the radio button and select Format Control.
- In the Format Control dialogue box, select the properties tab.
- In the Properties tab, within Object Positioning, select Don’t move or size with cells.
- Click OK.
Now when you resize or delete cells, the radio button would stay put.
Enable Radio Buttons in a Protected Sheet in Excel
If you want to protect the entire worksheet, but want the radio buttons to work, here are the steps:
- Right-click on the cell that is linked to the radio button and select Format Cell.
- In the Format Cells dialogue box, go to the Protection tab and uncheck the Locked Option.
Now when you protect the entire sheet, the radio button would still be working. Since Excel protects all the locked cells only, having the linked cell unlocked still makes it work.
Examples of Using Radio Button in Excel
Here are some examples where radio button is used:
Radio Button Vs. Checkbox
While both the radio button and the checkbox looks similar, there are a few differences you need to know before using these.
A radio button allows a user to select only one of the radio buttons from a group. This means that if you have radio buttons for gender, you can only select one of the genders.
On the other hand, a checkbox is independent of other checkboxes, and you can select multiple at one time. For example, in a skill assessment survey, you can select multiple skills you have.
Here is the definition of radio button by Wikipedia that also covers the difference with a checkbox.
“A radio button or option button is a graphical control element that allows the user to choose only one of a predefined set of mutually exclusive options. The singular property of a radio button makes it distinct from a checkbox, which allows more than one (or no) item to be selected and for the unselected state to be restored.”
You May Also Like the Following Excel Tutorials:
Источник
Option buttons are a common input control in forms. It allows the users to see all available options and ensure that only one option is selected. In this guide, we’re going to show you how to insert an option button in Excel.
Download Workbook
Developer Tab and Option Button command
The command for adding option buttons can be found under the Developer tab, which is not active in Excel by default. This tab contains macro tools. along with other advanced controls, such as option buttons.

If the tab is missing in your Excel as well, follow the steps below.
- Open Excel Options under File.
- Select Customize Ribbon.
- Find and mark the checkbox for Developer in the list box on the right.
- Click the OK button to see the tab in the Ribbon.

Inserting an option button
Once the Developer tab is visible, you can find the Option Button command under the Insert button in the Controls section. When you click the Insert button, you will see the same controls under two sections:
- Form Controls
- ActiveX Controls

Clicking the Option Button button changes the cursor into a plus. Click anywhere to insert a default option button, or hold and drag the cursor to define the size of the option.

If you only need this control as a visual element, you can start to use your option button right away. On the other hand, you can bind your option buttons to a cell to retrieve the index value of the selected option.
Binding to a cell
- Right-click on your option button.
- Select Format Control.

- Activate Control tab.
- Enter or select a cell by using Cell link.
- Click OK to apply.


After binding, click on an option button to see the index of selected option button in the cell.

By default, Excel assumes all option buttons in a worksheet are related with each other. To gather option buttons into multiple groups, you need to combine them under Group Boxes. You can bind each option button in different groups to different cells. This is necessary for using multiple option buttons in the same worksheet.
The Group Box command can also be found under the Insert button.

Hold down the mouse button to create big enough group box to fit all option buttons.

Modifying and multiplying option buttons
Now, let’s take a look at further configuration options for inserting an option button. First of all, you can change the default «Option Button 1», «Option Button 2», etc. names. You can change the label by right clicking the option button and selecting Edit Text.

You can use Excel’s drag and drop feature for copying an option button multiple times. However, you need to fit the option button into a cell first.
- Use the circles around to adjust its size.
- Once the option button is in a cell, select the cell.
- Copy it down to by using tiny square at bottom right like a regular cell copying.

Radio buttons or also known as “Option” buttons in Excel. They are used to record a user’s input in Excel. They are available in the “Insert” section of the “Developer” tab. For any criteria, there can be multiple radio buttons. Still, only a single button can be checked rather than various options. To insert a radio button, we need to click on the insert command and draw it in any cell we want.
A radio button in Excel is also called the “Option” button. It is used to select one of the various options. We have seen it on hundreds of web pages where we are asked to choose an option by clicking on a small round shape next to the text. When we choose it, it gets a black dot (an indication that it is marked).
Table of contents
- Radio Button in Excel
- How to Insert a Radio Button in Excel?
- Create Dynamic Chart Using Radio Buttons in Excel (Options Buttons)
- Changing Cell Background Color with Radio Buttons in Excel using ActiveX Control
- Radio Button using Excel VBA
- Recommended Articles
- How to Insert a Radio Button in Excel?
How to Insert a Radio Button in Excel?
We must have the “Developer” tab to insert a radio button in Excel. To get the same, the steps are:
You can download this Radio Button Excel Template here – Radio Button Excel Template
Below are the steps to insert a radio button in Excel: –
- First, right-click anywhere on the ribbon.

- Choose ‘Customize the Ribbon in Excel‘ from the list. It will open the “Excel Options” dialog box. On the right side, ensure the “Developer” tab’s checkbox is ticked, and then click on “OK.”

- The “Developer” tab is now visible.

- To insert the radio button in Excel, we will choose the “Insert” option in the “Form Controls” group on the “Developer” tab.

- It will create after choosing the radio button from the Form Controls in excel, clicking anywhere on the worksheet, or options button in Excel.

- As we can see, the caption (label) for the options button is by default “Option Button 1.” We can rename this by right-clicking and choosing “Edit Text.”

We can also resize the “option button” along with the gridlines of the cells. For doing the same, the ALT key is very helpful. While pressing the “ALT” key, if we resize the “option button” in Excel, it is automatically adjusted along with gridlines.

As the name indicates, we create option/radio buttons in Excel to choose one of the various options. That is why only one option button in Excel is not enough. We need to create more. For example, we can develop using “Ctrl+D” or Copy-Paste (Ctrl+C and Ctrl+V).

The main feature of an option button in Excel is : if we select one, others are deselected automatically. So how can we get to know which one is preferred? For this, we need to link the options buttons with a cell, where the sequence number of the options button in Excel is displayed. We can use this number for different purposes (dynamic chart in excel, display a message, etc.)

In the “Format Control” dialog box, please select the cell link under the “Control” tab and click “OK.”
Now, the value of the C2 cell is changed according to the options button in Excel.


As we can observe, all option buttons in Excel are linked to only one cell. However, what if we have 10 questions in a survey and 4 options for each question? Then we want to have 10 answers. In that case, we need a “Group box” to group the option buttons in Excel. We can find the same in the Developer Tab -> Controls group -> Insert Command – Group Box (Form Control).

We need to cover all 5 options buttons in the Excel group box.

We can delete the label of the group box using the “Edit Text” contextual command and the “Delete” button and resize the group box using the “ALT” key.

In the same way, we can create more option buttons in Excel and group boxes.


Create Dynamic Chart Using Radio Buttons in Excel (Options Buttons)
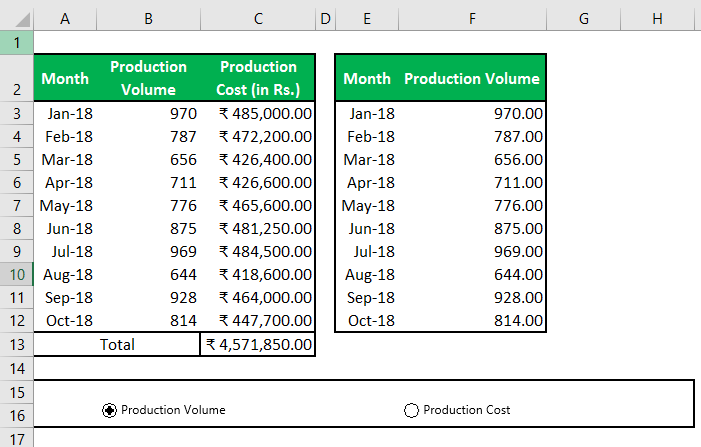
Suppose we have procurement data of an organization as below:
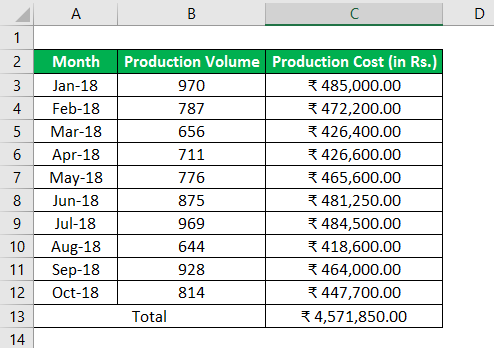
We need to make a dynamic chart so that if the user wants to view the chart based on either Production Volume or Production Cost, he can.
For this,
- We need to copy the first column of the table except the “Total” row to a new range.

- Then, we will create two option buttons in Excel captioned as “Production Volume” and “Production Cost.”

- We will link the “Option” buttons to ‘C1.’
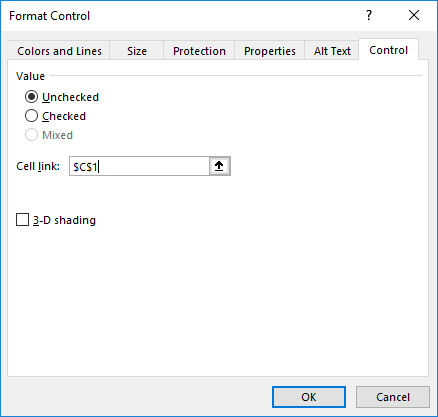
- Now, we will use the value of the C1 cell (1 for “Production Volume” and 2 for “Production Cost”) to display the data in the second table and then make the dynamic chart.
- We have used the ‘=INDEX($A$2:$C$12,ROWS($E$2:E2),$C$1+1)’ formula for the range ‘F2:F12’ for showing data according to the selection of the radio button in Excel. (learn more about Index Excel FunctionThe INDEX function in Excel helps extract the value of a cell, which is within a specified array (range) and, at the intersection of the stated row and column numbers.read more and Row function in excelThe row function in Excel is a worksheet function that displays the current row index number of the selected or target cell. The syntax to use this function is as follows: =ROW( Value ).read more)
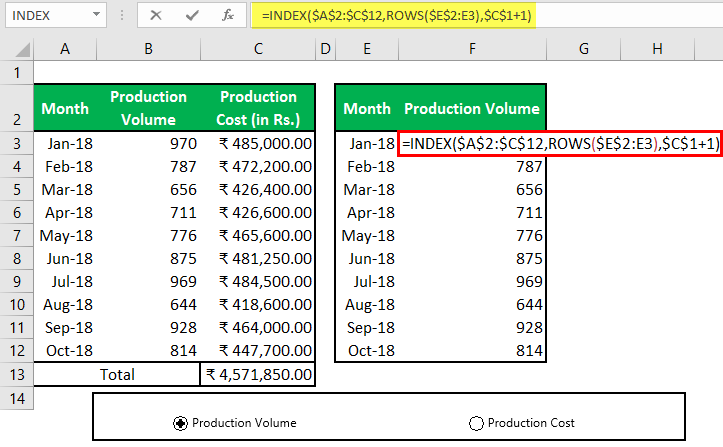
We can copy the formatting of the last column of Table 1 using the copy and Paste Special –> Format command.
- Now, using the new table, we can create the “Clustered Column” chart using the Insert tab -> Charts group -> Recommended Charts -> Clustered Column excel chartIn Excel, a clustered column chart depicts data in a series of vertical columns. Though these charts are simple to create, analyzing them becomes increasingly difficult as the number of categories increases from single to multiple. read more. Make sure you follow these steps after selecting the new table. We will be formatting the chart according to our choice.
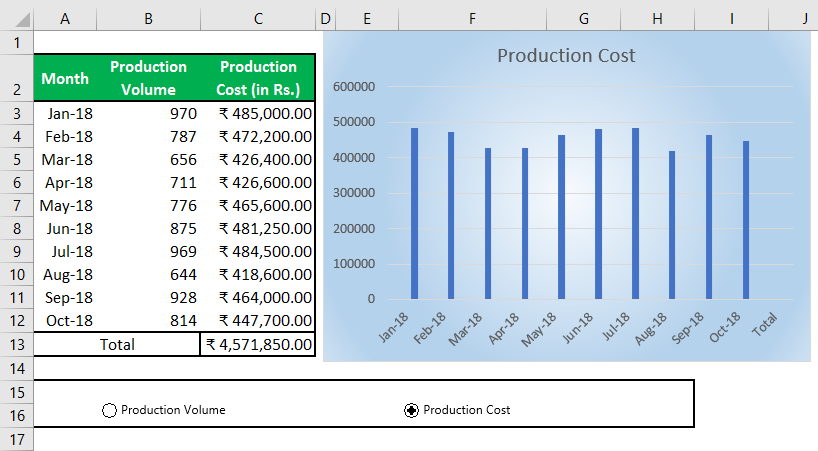
- Now, we will adjust the “Option” buttons in Excel and wrap their location with cell borders and make the font color white of the C1 cell so that this is not displayed to the user (The user does not get confused). It should show him only the required information.
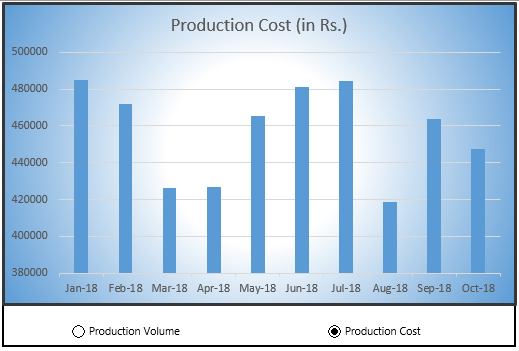
Whether we select “Production Volume” or “Production Cost,” the data in the table and chart is displayed accordingly.
Changing Cell Background Color with Radio Buttons in Excel using ActiveX Control
Following are the steps to do the same:
- We need to create three ActiveX Radio buttons using DeveloperEnabling the developer tab in excel can help the user perform various functions for VBA, Macros and Add-ins like importing and exporting XML, designing forms, etc. This tab is disabled by default on excel; thus, the user needs to enable it first from the options menu.read more tab -> Controls Group -> Insert Command -> Option Button (ActiveX Control).
- Please copy the first radio button using Ctrl+C and paste it to the second twice using Ctrl+V. You can resize the “Option” buttons in Excel using the “ALT” key.
- Using the contextual menu, we need to change the caption and name for all three radio buttons in Excel. First, ensure the “Design Mode” is activated. Then, in the “Contextual” menu, choose “Properties” and change the (name) and caption using the “Properties” dialog box.
 .
.

Radio Button using Excel VBA
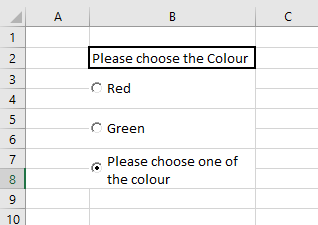
- Double click on each “Radio Button in Excel” to insert the coding area and paste the following code between the sub-procedures.
For ‘Red’ Radio Button in Excel
Range(“b2”).Interior.Color = 255
For ‘Green’ Radio Button in Excel
Range(“b2”).Interior.Color = 5296274
For ‘Please choose one of the colour’ radio button in excel
MsgBox “Choose one of the colour”
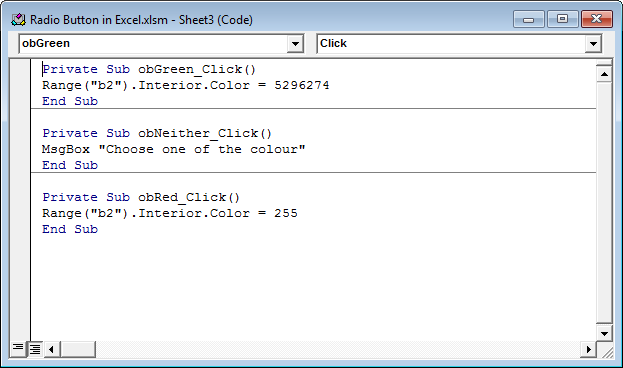
- Save the Excel workbook with the .xlsm extension.
Now, if we click on the “Red,” the background color of the B2 cell changes to “Red,” and if we select the “Green,” then the background color of the B2 cell changes to “Green.” In addition, if we choose the third radio button in Excel, a message box is displayed showing the message “Choose one of the colors.”
Recommended Articles
This article guides what Radio Button (Options Button) in Excel is. Here, we provide a step-by-step guide to inserting the radio button (options button) using “Form Control” and “ActiveX Control,” along with practical examples and downloadable templates. You may also look at these useful tools in Excel: –
- Combo Box in ExcelCombo Box in Excel is a type of data validation tool that can create a dropdown list for the user to select from the pre-determined list. It is a form control which is available in the insert tab of the developer’s tab.read more
- List Box in ExcelThe list box in Excel VBA is a list assigned to a variable with a variety of inputs to select from. It allows multiple options to be selected at the same time and can be added on a UserForm using the list box option.read more
- Scenario Manager ExcelScenario Manager is a what-if analysis tool that works with many scenarios that are supplied to it. It uses a set of ranges that have an effect on a certain output and can be used to generate different scenarios such as bad and medium depending on the values.read more
Элемент управления пользовательской формы OptionButton для выбора одной опции из группы и передачи результата в VBA Excel. Свойства переключателя, примеры.
UserForm.OptionButton – это элемент управления пользовательской формы, который используется в группе одноименных элементов и предназначен для передачи в код VBA информации о его выборе или невыборе пользователем: False – переключатель не выбран, True – переключатель выбран.

В VBA Excel элемент управления OptionButton состоит из белого кружка с черной точкой (переключатель выбран) или без нее (переключатель не выбран) и надписи. Надпись расположена справа и реагирует на нажатие мышью так же, как и белый кружок.
В отличие от элемента управления CheckBox, только один OptionButton из группы переключателей может иметь значение True. Для разделения разных групп переключателей друг от друга используются элементы управления Frame (рамки). Все переключатели вне рамок являются одной группой.

Так же, как и элемент управления CheckBox, OptionButton принимает третье состояние при присвоении ему в коде VBA Excel значения Null. Переключатель отображается с серым кружком и серой точкой.

Свойства элемента Переключатель
| Свойство | Описание |
|---|---|
| AutoSize | Автоподбор размера переключателя. True – размер автоматически подстраивается под длину набираемой строки. False – размер элемента управления определяется свойствами Width и Height. |
| ControlSource | Ссылка на источник данных для свойства Value. |
| ControlTipText | Текст всплывающей подсказки при наведении курсора на OptionButton. |
| Enabled | Возможность взаимодействия пользователя с элементом управления. True – взаимодействие включено, False – отключено (цвет переключателя становится серым). |
| Font | Шрифт, начертание и размер текста надписи. |
| Height | Высота элемента управления. |
| Left | Расстояние от левого края внутренней границы пользовательской формы до левого края элемента управления. |
| Picture | Добавление изображения вместо текста надписи или дополнительно к нему. |
| PicturePosition | Выравнивание изображения и текста в поле надписи. |
| TabIndex | Определяет позицию элемента управления в очереди на получение фокуса при табуляции, вызываемой нажатием клавиш «Tab», «Enter». Отсчет начинается с 0. |
| TextAlign* | Выравнивание текста надписи: 1 (fmTextAlignLeft) – по левому краю, 2 (fmTextAlignCenter) – по центру, 3 (fmTextAlignRight) – по правому краю. |
| Top | Расстояние от верхнего края внутренней границы пользовательской формы до верхнего края элемента управления. |
| Value | Значение переключателя: True – включен, False – выключен, Null – серый кружок с серой точкой. |
| Visible | Видимость элемента OptionButton. True – элемент отображается на пользовательской форме, False – скрыт. |
| Width | Ширина элемента управления. |
| WordWrap | Перенос текста надписи на новую строку при достижении границы ее поля. True – перенос включен, False – перенос выключен. |
* При загруженной в поле надписи картинке свойство TextAlign не работает, следует использовать свойство PicturePosition.
Свойство по умолчанию для элемента OptionButton – Value, основное событие – Click.
В таблице перечислены только основные, часто используемые свойства переключателя. Все доступные свойства отображены в окне Properties элемента управления OptionButton.
Примеры кода VBA с OptionButton
Пример 1
Отображение элементов управления OptionButton на пользовательской форме с параметрами, заданными в коде VBA Excel:
|
1 2 3 4 5 6 7 8 9 10 11 12 13 14 15 16 17 18 19 20 21 22 23 24 25 26 27 28 29 30 31 32 33 34 |
Private Sub UserForm_Initialize() With Me .Width = 160 .Height = 110 .Caption = «Пьедестал почета» End With With OptionButton1 .Caption = «1 место» .Value = True .Width = 60 .Height = 18 .Left = 60 .Top = 18 .Font.Size = 10 End With With OptionButton2 .Caption = «2 место» .Value = False .Width = 60 .Height = 18 .Left = 12 .Top = 36 .Font.Size = 10 End With With OptionButton3 .Caption = «3 место» .Value = False .Width = 60 .Height = 18 .Left = 90 .Top = 48 .Font.Size = 10 End With End Sub |
Разместите на пользовательской форме три переключателя с именами OptionButton1, OptionButton2, OptionButton3 и добавьте в модуль формы представленный выше код. Запуск этого кода отобразит следующую форму:

Пример 2
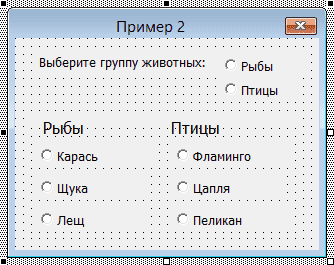
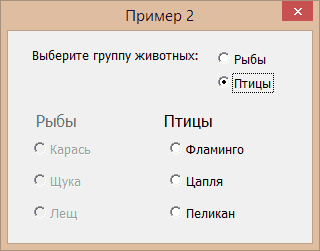
Управление доступностью двух групп переключателей, заключенных в рамки, с помощью двух управляющих элементов OptionButton, расположенных непосредственно на пользовательской форме.
Для этого создадим следующий проект формы в редакторе VBA Excel («Рыбы» и «Птицы» большими буквами – это значения свойств Caption рамок Frame1 и Frame2):
В модуль формы вставляем следующий код:
|
1 2 3 4 5 6 7 8 9 10 11 12 13 14 15 16 17 18 19 20 21 22 23 24 25 26 27 28 29 30 31 32 33 34 35 36 37 38 39 40 41 42 43 44 45 46 47 48 49 50 51 52 53 54 55 56 57 58 59 60 61 62 63 64 65 66 67 68 69 70 71 72 73 74 75 76 77 78 79 80 81 82 83 |
‘Присвоение исходных значений ‘свойствам элементов управления ‘перед отображением формы Private Sub UserForm_Initialize() OptionButton1.Value = False OptionButton2.Value = False OptionButton3.Enabled = False OptionButton4.Enabled = False OptionButton5.Enabled = False OptionButton6.Enabled = False OptionButton7.Enabled = False OptionButton8.Enabled = False Frame1.Enabled = False Frame2.Enabled = False End Sub ‘Смена значений свойств переключателей, ‘расположенных в рамке Frame1, ‘при смене значения OptionButton1.Value Private Sub OptionButton1_Change() If OptionButton1.Value Then Frame1.Enabled = True With OptionButton3 .Value = False .Enabled = True End With With OptionButton4 .Value = False .Enabled = True End With With OptionButton5 .Value = False .Enabled = True End With Else Frame1.Enabled = False With OptionButton3 .Value = False .Enabled = False End With With OptionButton4 .Value = False .Enabled = False End With With OptionButton5 .Value = False .Enabled = False End With End If End Sub ‘Смена значений свойств переключателей, ‘расположенных в рамке Frame2, ‘при смене значения OptionButton2.Value Private Sub OptionButton2_Change() If OptionButton2.Value Then Frame2.Enabled = True With OptionButton6 .Value = False .Enabled = True End With With OptionButton7 .Value = False .Enabled = True End With With OptionButton8 .Value = False .Enabled = True End With Else Frame2.Enabled = False With OptionButton6 .Value = False .Enabled = False End With With OptionButton7 .Value = False .Enabled = False End With With OptionButton8 .Value = False .Enabled = False End With End If End Sub |
При запуске пользовательской формы или процедуры UserForm_Initialize() откроется форма с неактивными переключателями в рамках Frame1 и Frame2. Нажатие мышью на элементы управления OptionButton с надписями «Рыбы» и «Птицы» будет активировать группу переключателей в одноименных рамках.
Содержание
- Получите вкладку разработчика на ленте Excel
- Как вставить радиокнопку в Excel
- Добавление нескольких радиокнопок в Excel
- Как сгруппировать радиокнопки в Excel
- Удаление радиокнопок в Excel
- Как исправить положение переключателя в Excel
- Включение радиокнопок на защищенном листе в Excel
- Примеры использования радиокнопки в Excel
- Радиокнопка Vs. Флажок
Радиокнопку в Excel (также называемую кнопкой выбора) можно использовать для выбора одного из множества вариантов / вариантов.
Вы, должно быть, видели его на сотнях веб-страниц, где вас просят выбрать вариант, щелкнув небольшую круглую фигуру рядом с текстом. Как только вы выберете его, на нем появится черная точка (обозначение, которое отмечено).
То же самое можно сделать и в Excel. В этом уроке я буду называть его переключателем (как меня учил мой компьютерный учитель).
Однако Excel называет ее «кнопкой выбора».
Чтобы вставить переключатель в Excel, в вашей книге должна быть включена вкладка разработчика.
Не видите вкладку разработчика?
Не волнуйтесь … вот шаги.
Ниже приведены шаги по размещению вкладки разработчика на ленте в Excel 2013. Хотя приведенные здесь скриншоты относятся к Excel 2013, в Excel 2007 или 2010 процесс такой же.
Теперь, когда вкладка разработчика отображается, вы получаете доступ к множеству интерактивных элементов управления. Давайте продолжим и вставим тот переключатель, о котором мы говорили.
Как вставить радиокнопку в Excel
Вот шаги, чтобы вставить переключатель в Excel:
- Перейдите на вкладку разработчика -> Элементы управления -> Вставить -> Элементы управления формы -> Кнопка выбора.
- Вы увидите, что существует два типа интерактивных элементов управления: элемент управления формой и интерактивный элемент управления. Хотя элементы управления формами предназначены для использования только в книгах Excel, интерактивные элементы управления также могут использоваться в пользовательских формах. Интерактивные элементы управления обеспечивают большую гибкость и обладают обширными свойствами. В этом руководстве мы сосредоточимся только на радио-кнопке управления формой (также называемой кнопкой выбора)..
- Вы увидите, что существует два типа интерактивных элементов управления: элемент управления формой и интерактивный элемент управления. Хотя элементы управления формами предназначены для использования только в книгах Excel, интерактивные элементы управления также могут использоваться в пользовательских формах. Интерактивные элементы управления обеспечивают большую гибкость и обладают обширными свойствами. В этом руководстве мы сосредоточимся только на радио-кнопке управления формой (также называемой кнопкой выбора)..
- Наведите указатель мыши на любое место на листе. Вы увидите значок плюса (вместо обычного курсора). Щелкните в любом месте, и он вставит переключатель.
- Поздравляю! Вы установили переключатель в Excel. Вы можете нажать на кнопку и проверить это. Однако есть одна небольшая проблема. На данный момент этот переключатель бесполезен — он ничего не делает. Чтобы это работало, его необходимо связать с ячейкой на листе. Только тогда вы сможете записать ответ (независимо от того, выберет ли человек вариант 1, вариант 2 или вариант 3…). Чтобы настроить этот переключатель, щелкните его правой кнопкой мыши и выберите «Управление форматом».
- В диалоговом окне «Управление форматом» на вкладке «Управление» внесите следующие изменения:
- Значение: установлен (это гарантирует, что переключатель установлен по умолчанию при открытии книги).
- Ссылка на ячейку: $ A $ 1 (это ячейка, связанная с переключателем). Вы можете ввести это вручную или выбрать ячейку, чтобы получить ссылку.
- Щелкните ОК.


Теперь ваш переключатель привязан к ячейке A1. Когда вы выбираете переключатель, в ячейке A1 будет отображаться 1.

Число, которое вы видите в ячейке A1 (связанная ячейка), — это номер выбранного переключателя. Если у вас есть несколько переключателей, и если вы выберете второй, в ячейке A1 отобразится 2.
В отличие от флажков в Excel, в случае переключателя вы можете выбрать только один из переключателей. Это означает, что если у вас более одного переключателя, вы можете выбрать только один из них (однако вы можете сгруппировать наборы переключателей, о которых будет рассказано далее в этом руководстве).
Для работы с переключателями в Excel вам необходимо иметь более одного переключателя на листе. Давайте посмотрим, как мы можем вставить несколько переключателей в Excel.
Добавление нескольких радиокнопок в Excel
Есть три способа добавить несколько переключателей на лист в Excel.
# 1 Вставка радиокнопок с помощью вкладки разработчика
Самый простой способ — использовать вкладку разработчика и вставить переключатели (как показано выше). При использовании этого метода вам нужно повторять шаги столько раз, сколько вам нужно переключателей.
Это может быть предпочтительный метод, когда вам нужно вставить только пару переключателей в Excel.
Здесь интересно отметить, что если вы связали первый переключатель с ячейкой на листе, все переключатели, которые вы вставляете после него, будут связаны с этой же ячейкой. Кроме того, вы сможете выбрать только одну из радиокнопок.
# 2 Копирование и вставка радиокнопок
Быстрый способ вставить переключатель — скопировать и вставить существующий переключатель. Вы можете сделать это, просто выбрав переключатель и нажав Control + D.
Это создаст копию существующего переключателя.
При использовании этого метода вам необходимо знать несколько вещей:
- Когда вы копируете и вставляете существующий переключатель, имя заголовка (текст, который вы видите справа от переключателя) также копируется, но имя фона (имя, которое Excel использует для ссылки на этот объект) изменяется. См. Изображение ниже, чтобы понять разницу между названием заголовка и именем фона.
- Если исходный переключатель связан с ячейкой на листе, все скопированные переключатели также будут связаны с этой же ячейкой.

# 3 Перетащите и заполните ячейки с помощью радиокнопок
Когда вы копируете и вставляете ячейку, содержащую переключатель, она также создает копию переключателя.
Точно так же, если у вас есть переключатель в ячейке, и вы выбираете и перетаскиваете ячейку (как показано ниже), она создаст копии переключателя.

Они снова следуют тем же правилам, о которых говорилось выше:
- Когда вы создаете копию радиокнопки, копируя вставку (или перетаскивая) ячейку, в которой уже есть радиокнопка, имя заголовка (текст, который вы видите справа от радиокнопки) копируется, но имя фона (которое Excel использует для ссылки на этот объект) изменяется.
- Если исходный переключатель связан с ячейкой на листе, все скопированные переключатели также будут связаны с этой же ячейкой.
Как сгруппировать радиокнопки в Excel
Представьте, что у вас есть опрос с десятью разными вопросами. Для каждого вопроса вы можете выбрать один ответ (щелкнув переключатель для этого ответа). Это означает, что в опросе вы должны выбрать десять переключателей.
Теперь, чтобы создать такой опрос в Excel, вам нужно будет сгруппировать параметры с помощью переключателей, так что в группе вы можете выбрать только один вариант, но в то же время вам разрешено установить переключатель для какого-либо другого. группа.
Что-то вроде того, что показано ниже:

Вот шаги для группировки переключателей в Excel:
Таким образом, у вас может быть любое количество независимых групп, в которых вы можете сделать только один выбор внутри группы, выбор по группам будет независимым.
Удаление радиокнопок в Excel
Вы можете легко удалить один переключатель в Excel, выбрав его и нажав клавишу удаления. Чтобы выбрать радиокнопку, нужно удерживать клавишу Control и нажать левую кнопку мыши.
Если вы хотите удалить несколько переключателей:
- Удерживая клавишу Control, выберите все те, которые хотите удалить.
- Нажмите клавишу Delete.
Если на вашем листе разбросано много переключателей, вот способ получить список всех переключателей и удалить их за один раз:
Примечание. В области выбора отображаются все объекты только на активном листе.
Как исправить положение переключателя в Excel
Одна из распространенных проблем с использованием фигур и объектов в Excel заключается в том, что изменение размера ячеек или скрытие / удаление строк / столбцов также влияет на фигуры / переключатели.
Что-то вроде того, что показано ниже:

Чтобы переключатель не перемещался при изменении размера или удалении ячеек, выполните следующие действия:
Теперь, когда вы изменяете размер или удаляете ячейки, переключатель остается на месте.
Включение радиокнопок на защищенном листе в Excel
Если вы хотите защитить весь лист, но хотите, чтобы переключатели работали, выполните следующие действия:
Теперь, когда вы защищаете весь лист, переключатель все равно будет работать. Поскольку Excel защищает только все заблокированные ячейки, разблокировка связанной ячейки по-прежнему позволяет ей работать.
Примеры использования радиокнопки в Excel
Вот несколько примеров использования переключателя:
- Панель KPI в Excel (переключатель, используемый для извлечения данных).
- Панель управления Игры престолов (переключатель используется для сортировки данных).
Радиокнопка Vs. Флажок
Хотя и переключатель, и флажок выглядят одинаково, есть несколько отличий, которые вам нужно знать перед их использованием.
Радиокнопка позволяет пользователю выбрать только одну радиокнопку из группы. Это означает, что если у вас есть переключатели для пола, вы можете выбрать только один из полов.
С другой стороны, флажок не зависит от других флажков, и вы можете выбрать несколько одновременно. Например, в опросе по оценке навыков вы можете выбрать несколько навыков, которыми вы владеете.
Вот определение радиокнопки из Википедии, которое также покрывает разницу с помощью флажка.
«Радиокнопка или кнопка выбора — это графический элемент управления, который позволяет пользователю выбрать только один из предопределенного набора взаимоисключающих параметров. Уникальное свойство переключателя отличает его от флажка, который позволяет выбрать более одного (или ни одного) элемента и восстановить невыделенное состояние ».
In this lesson you will learn how to insert Option Button (aka Radio Button) in Excel. Option button allows you to select one option from a group of options. Here’s how to use an option button in Excel:
To insert Option Button to your worksheet you should go to the Ribbon. Click Developer > Insert > Form Controls > Option Button.
Next draw your Radio Button with your mouse. Click and drag on the worksheet to draw the option buttons. You can create as many option buttons as you need.
Edit name
You can change the text on Option Button. Just right click go to Edit Text and change it.

Link with cell
To link Radio Button with cell right click and go to Format Control. Go to Control and write the address of the cell.


To link an option button to a cell in Excel, you can use the «CELL» function. The value in the cell will change when you select a different option button, allowing you to use the value in other parts of your worksheet.
Survey
Using Option Buttons in Excel you can easily create your own survey in Excel. Here you have screenshot with example on survey in Excel.

These are Option Boxes in one Group Box. That’s perfect way to create survey in Excel.
Just put some Option Boxes inside one Group Box. You can also copy/paste it to Word or Power Point.
To perform an action when an option button is selected, you can assign a macro to the option button. To do this, right-click on the option button and select «Assign Macro.»
How to make a chart with option button?
Let’s see how to create a chart with option buttons, It will work like when we click the options the graph will change as per the requirements.
Let us start by creating chart data for the same.
Now we can clearly see that there are 2 categories of products. A simple graph will look like this:

Now we will start creating the options for the same. We created new columns which have the following formulas:
=IF(J1,C1,E1)
So based on value in cell j1 it can be product2 or Products A
For based on value in cell j1 it can be product3 or Products B
So now we have added a checkbox and linked it to the cell j1 and in the graph we have changed the series types including product1 and last 2 column products which can vary.

Unchecking the option:

Further reading:
Chart with if statement
Chart with option buttons
Chart with a single x-axis but two different ranges