
You can use Object Linking and Embedding (OLE) to include content from other programs, such as Word or Excel.
OLE is supported by many different programs, and OLE is used to make content that is created in one program available in another program. For example, you can insert an Office Word document in an Office Excel workbook. To see what types of content that you can insert, click Object in the Text group on the Insert tab. Only programs that are installed on your computer and that support OLE objects appear in the Object type box.
If you copy information between Excel or any program that supports OLE, such as Word, you can copy the information as either a linked object or an embedded object. The main differences between linked objects and embedded objects are where the data is stored and how the object is updated after you place it in the destination file. Embedded objects are stored in the workbook that they are inserted in, and they are not updated. Linked objects remain as separate files, and they can be updated.
Linked and embedded objects in a document
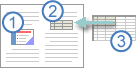
1. An embedded object has no connection to the source file.
2. A linked object is linked to the source file.
3. The source file updates the linked object.
When to use linked objects
If you want the information in your destination file to be updated when the data in the source file changes, use linked objects.
With a linked object, the original information remains stored in the source file. The destination file displays a representation of the linked information but stores only the location of the original data (and the size if the object is an Excel chart object). The source file must remain available on your computer or network to maintain the link to the original data.
The linked information can be updated automatically if you change the original data in the source file. For example, if you select a paragraph in a Word document and then paste the paragraph as a linked object in an Excel workbook, the information can be updated in Excel if you change the information in your Word document.
When to use embedded objects
If you don’t want to update the copied data when it changes in the source file, use an embedded object. The version of the source is embedded entirely in the workbook. If you copy information as an embedded object, the destination file requires more disk space than if you link the information.
When a user opens the file on another computer, he can view the embedded object without having access to the original data. Because an embedded object has no links to the source file, the object is not updated if you change the original data. To change an embedded object, double-click the object to open and edit it in the source program. The source program (or another program capable of editing the object) must be installed on your computer.
Changing the way that an OLE object is displayed
You can display a linked object or embedded object in a workbook exactly as it appears in the source program or as an icon. If the workbook will be viewed online, and you don’t intend to print the workbook, you can display the object as an icon. This minimizes the amount of display space that the object occupies. Viewers who want to display the information can double-click the icon.
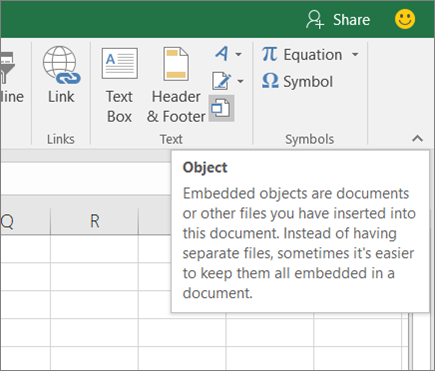
Embed an object in a worksheet
-
Click inside the cell of the spreadsheet where you want to insert the object.
-
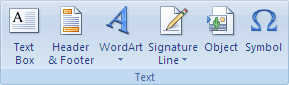
On the Insert tab, in the Text group, click Object
 .
. -
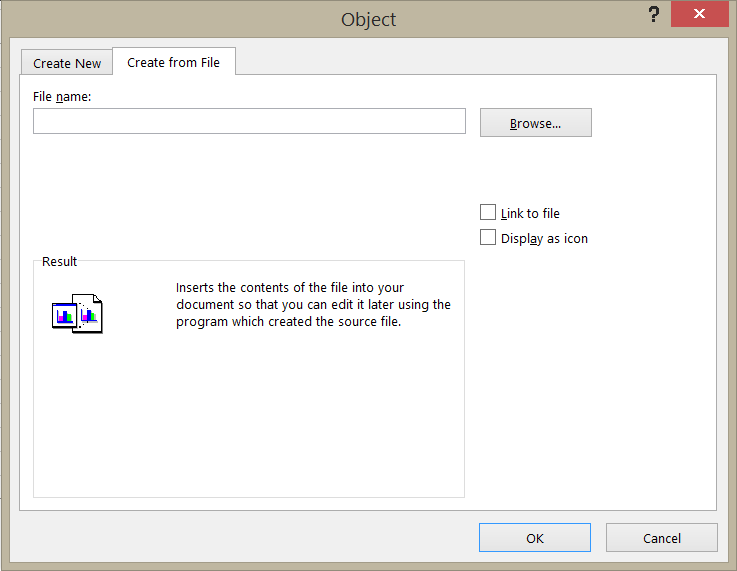
In the Object dialog box, click the Create from File tab.
-
Click Browse, and select the file you want to insert.
-
If you want to insert an icon into the spreadsheet instead of show the contents of the file, select the Display as icon check box. If you don’t select any check boxes, Excel shows the first page of the file. In both cases, the complete file opens with a double click. Click OK.
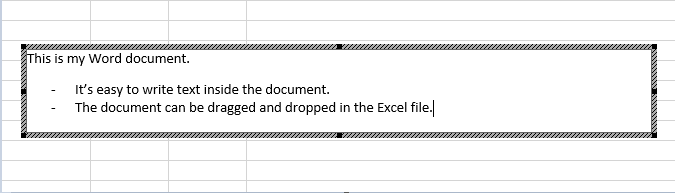
Note: After you add the icon or file, you can drag and drop it anywhere on the worksheet. You can also resize the icon or file by using the resizing handles. To find the handles, click the file or icon one time.
 .
.
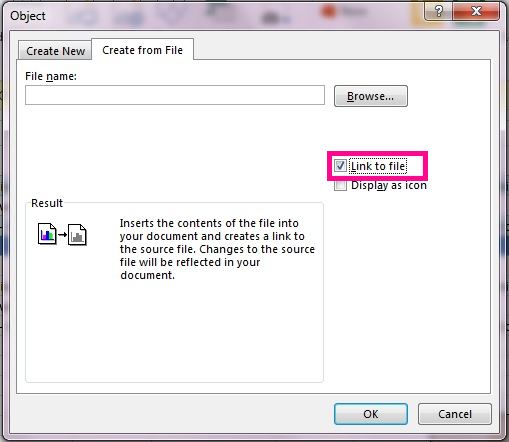
Insert a link to a file
You might want to just add a link to the object rather than fully embedding it. You can do that if your workbook and the object you want to add are both stored on a SharePoint site, a shared network drive, or a similar location, and if the location of the files will remain the same. This is handy if the linked object undergoes changes because the link always opens the most up-to-date document.
Note: If you move the linked file to another location, the link won’t work anymore.
-
Click inside the cell of the spreadsheet where you want to insert the object.
-
On the Insert tab, in the Text group, click Object
. -
Click the Create from File tab.
-
Click Browse, and then select the file you want to link.
-
Select the Link to file check box, and click OK.
Create a new object from inside Excel
You can create an entirely new object based on another program without leaving your workbook. For example, if you want to add a more detailed explanation to your chart or table, you can create an embedded document, such as a Word or PowerPoint file, in Excel. You can either set your object to be displayed right in a worksheet or add an icon that opens the file.
-
Click inside the cell of the spreadsheet where you want to insert the object.
-
On the Insert tab, in the Text group, click Object
. -
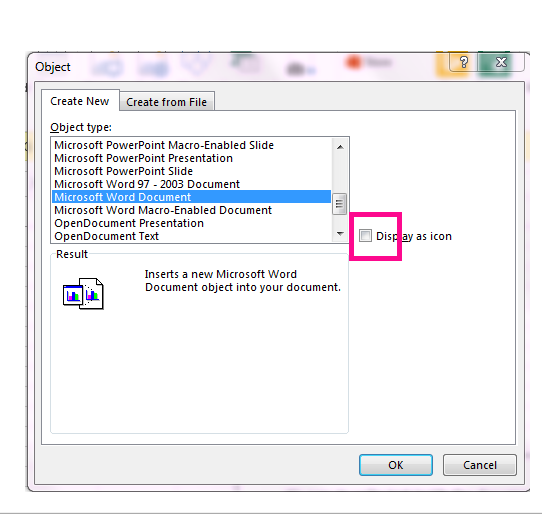
On the Create New tab, select the type of object you want to insert from the list presented. If you want to insert an icon into the spreadsheet instead of the object itself, select the Display as icon check box.
-
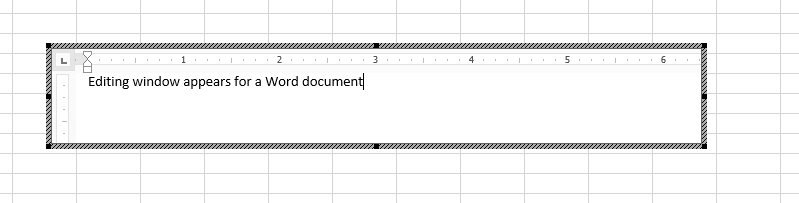
Click OK. Depending on the type of file you are inserting, either a new program window opens or an editing window appears within Excel.
-
Create the new object you want to insert.
When you’re done, if Excel opened a new program window in which you created the object, you can work directly within it.
When you’re done with your work in the window, you can do other tasks without saving the embedded object. When you close the workbook your new objects will be saved automatically.
Note: After you add the object, you can drag and drop it anywhere on your Excel worksheet. You can also resize the object by using the resizing handles. To find the handles, click the object one time.
Embed an object in a worksheet
-
Click inside the cell of the spreadsheet where you want to insert the object.
-
On the Insert tab, in the Text group, click Object.
-
Click the Create from File tab.
-
Click Browse, and select the file you want to insert.
-
If you want to insert an icon into the spreadsheet instead of show the contents of the file, select the Display as icon check box. If you don’t select any check boxes, Excel shows the first page of the file. In both cases, the complete file opens with a double click. Click OK.
Note: After you add the icon or file, you can drag and drop it anywhere on the worksheet. You can also resize the icon or file by using the resizing handles. To find the handles, click the file or icon one time.
Insert a link to a file
You might want to just add a link to the object rather than fully embedding it. You can do that if your workbook and the object you want to add are both stored on a SharePoint site, a shared network drive, or a similar location, and if the location of the files will remain the same. This is handy if the linked object undergoes changes because the link always opens the most up-to-date document.
Note: If you move the linked file to another location, the link won’t work anymore.
-
Click inside the cell of the spreadsheet where you want to insert the object.
-
On the Insert tab, in the Text group, click Object.
-
Click the Create from File tab.
-
Click Browse, and then select the file you want to link.
-
Select the Link to file check box, and click OK.
Create a new object from inside Excel
You can create an entirely new object based on another program without leaving your workbook. For example, if you want to add a more detailed explanation to your chart or table, you can create an embedded document, such as a Word or PowerPoint file, in Excel. You can either set your object to be displayed right in a worksheet or add an icon that opens the file.
-
Click inside the cell of the spreadsheet where you want to insert the object.
-
On the Insert tab, in the Text group, click Object.
-
On the Create New tab, select the type of object you want to insert from the list presented. If you want to insert an icon into the spreadsheet instead of the object itself, select the Display as icon check box.
-
Click OK. Depending on the type of file you are inserting, either a new program window opens or an editing window appears within Excel.
-
Create the new object you want to insert.
When you’re done, if Excel opened a new program window in which you created the object, you can work directly within it.
When you’re done with your work in the window, you can do other tasks without saving the embedded object. When you close the workbook your new objects will be saved automatically.
Note: After you add the object, you can drag and drop it anywhere on your Excel worksheet. You can also resize the object by using the resizing handles. To find the handles, click the object one time.
Link or embed content from another program by using OLE
You can link or embed all or part of the content from another program.
Create a link to content from another program
-
Click in the worksheet where you want to place the linked object.
-
On the Insert tab, in the Text group, click Object.
-
Click the Create from File tab.
-
In the File name box, type the name of the file, or click Browse to select from a list.
-
Select the Link to file check box.
-
Do one of the following:
-
To display the content, clear the Display as icon check box.
-
To display an icon, select the Display as icon check box. Optionally, to change the default icon image or label, click Change Icon, and then click the icon that you want from the Icon list, or type a label in the Caption box.
Note: You cannot use the Object command to insert graphics and certain types of files. To insert a graphic or file, on the Insert tab, in the Illustrations group, click Picture.
-
Embed content from another program
-
Click in the worksheet where you want to place the embedded object.
-
On the Insert tab, in the Text group, click Object.
-
If the document does not already exist, click the Create New tab. In the Object type box, click the type of object that you want to create.
If the document already exists, click the Create from File tab. In the File name box, type the name of the file, or click Browse to select from a list.
-
Clear the Link to file check box.
-
Do one of the following:
-
To display the content, clear the Display as icon check box.
-
To display an icon, select the Display as icon check box. To change the default icon image or label, click Change Icon, and then click the icon that you want from the Icon list, or type a label in the Caption box.
-
Link or embed partial content from another program
-
From a program other than Excel, select the information that you want to copy as a linked or embedded object.
-
On the Home tab, in the Clipboard group, click Copy.
-
Switch to the worksheet that you want to place the information in, and then click where you want the information to appear.
-
On the Home tab, in the Clipboard group, click the arrow below Paste, and then click Paste Special.
-
Do one of the following:
-
To paste the information as a linked object, click Paste link.
-
To paste the information as an embedded object, click Paste. In the As box, click the entry with the word «object» in its name. For example, if you copied the information from a Word document, click Microsoft Word Document Object.
-

Change the way that an OLE object is displayed
-
Right-click the icon or object, point to object typeObject (for example, Document Object), and then click Convert.
-
Do one of the following:
-
To display the content, clear the Display as icon check box.
-
To display an icon, select the Display as icon check box. Optionally, you can change the default icon image or label. To do that, click Change Icon, and then click the icon that you want from the Icon list, or type a label in the Caption box.
-
Control updates to linked objects
You can set links to other programs to be updated in the following ways: automatically, when you open the destination file; manually, when you want to see the previous data before updating with the new data from the source file; or when you specifically request the update, regardless of whether automatic or manual updating is turned on.
Set a link to another program to be updated manually
-
On the Data tab, in the Connections group, click Edit Links.
Note: The Edit Links command is unavailable if your file does not contain links to other files.
-
In the Source list, click the linked object that you want to update. An A in the Update column means that the link is automatic, and an M in the Update column means that the link is set to Manual update.
Tip: To select multiple linked objects, hold down CTRL and click each linked object. To select all linked objects, press CTRL+A.
-
To update a linked object only when you click Update Values, click Manual.
Set a link to another program to be updated automatically
-
On the Data tab, in the Connections group, click Edit Links.
Note: The Edit Links command is unavailable if your file does not contain links to other files.
-
In the Source list, click the linked object that you want to update. An A in the Update column means that the link will update automatically, and an M in the Update column means that the link must be updated manually.
Tip: To select multiple linked objects, hold down CTRL and click each linked object. To select all linked objects, press CTRL+A.
-
Click OK.
Issue: I can’t update the automatic links on my worksheet
The Automatic option can be overridden by the Update links to other documents Excel option.
To ensure that automatic links to OLE objects can be automatically updated:
-
Click the Microsoft Office Button
, click Excel Options, and then click the Advanced category. -
Under When calculating this workbook, make sure that the Update links to other documents check box is selected.
 , click Excel Options, and then click the Advanced category.
Update a link to another program now
-
On the Data tab, in the Connections group, click Edit Links.
Note: The Edit Links command is unavailable if your file does not contain linked information.
-
In the Source list, click the linked object that you want to update.
Tip: To select multiple linked objects, hold down CTRL and click each linked object. To select all linked objects, press CTRL+A.
-
Click Update Values.
Edit content from an OLE program
While you are in Excel, you can change the content linked or embedded from another program.
Edit a linked object in the source program
-
On the Data tab, in the Connections group, click Edit Links.
Note: The Edit Links command is unavailable if your file does not contain linked information.
-
In the Source file list, click the source for the linked object, and then click Open Source.
-
Make the changes that you want to the linked object.
-
Exit the source program to return to the destination file.
Edit an embedded object in the source program
-
Double-click the embedded object to open it.
-
Make the changes that you want to the object.
-
If you are editing the object in place within the open program, click anywhere outside of the object to return to the destination file.
If you edit the embedded object in the source program in a separate window, exit the source program to return to the destination file.
Note: Double-clicking certain embedded objects, such as video and sound clips, plays the object instead of opening a program. To edit one of these embedded objects, right-click the icon or object, point to object typeObject (for example, Media Clip Object), and then click Edit.
Edit an embedded object in a program other than the source program
-
Select the embedded object that you want to edit.
-
Right-click the icon or object, point to object typeObject (for example, Document Object), and then click Convert.
-
Do one of the following:
-
To convert the embedded object to the type that you specify in the list, click Convert to.
-
To open the embedded object as the type that you specify in the list without changing the embedded object type, click Activate.
-
Select an OLE object by using the keyboard
-
Press CTRL+G to display the Go To dialog box.
-
Click Special, select Objects, and then click OK.
-
Press TAB until the object that you want is selected.
-
Press SHIFT+F10.
-
Point to Object or Chart Object, and then click Edit.
Issue: When I double-click a linked or embedded object, a «cannot edit» message appears
This message appears when the source file or source program can’t be opened.
Make sure that the source program is available If the source program is not installed on your computer, convert the object to the file format of a program that you do have installed.
Ensure that memory is adequate Make sure that you have enough memory to run the source program. Close other programs to free up memory, if necessary.
Close all dialog boxes If the source program is running, make sure that it doesn’t have any open dialog boxes. Switch to the source program, and close any open dialog boxes.
Close the source file If the source file is a linked object, make sure that another user doesn’t have it open.
Ensure that the source file name has not changed If the source file that you want to edit is a linked object, make sure that it has the same name as it did when you created the link and that it has not been moved. Select the linked object, and then click the Edit Links command in the Connections group on the Data tab to see the name of the source file. If the source file has been renamed or moved, use the Change Source button in the Edit Links dialog box to locate the source file and reconnect the link.
Need more help?
You can always ask an expert in the Excel Tech Community or get support in the Answers community.
Microsoft Windows itself provides a powerful and easy-to-use tool for sharing data known as OLE, or Object Linking and Embedding. With OLE, you can transfer data between Excel and other Windows’ programs, as described in the paragraphs that follow.
How OLE Works
In order to make sense of OLE, it’s helpful both to understand the basic operation of the Windows clipboard and the terminology of OLE. The following paragraphs provide this background information.
Anytime you use the Copy or Cut command, Windows stores your copy of the copied or cut selection using the Clipboard. When you later choose the Paste command, the Win- dows program—this might be Excel—retrieves what is stored on the Clipboard and pastes it into the worksheet at the location of the cell marker or insertion bar.
While you most often use the Clipboard to move and copy data within a program like Excel, you can also use the Clipboard data between programs because the contents of the Clip- board are stored until you exit Windows.
OLE is simply the name that Microsoft has given to this Clipboard-based method of sharing document data. With OLE you can use a chart from an Excel workbook in a Microsoft Word document. In this case, and using the terminology of OLE, Excel is the server application, the Excel workbook is the source, Word is the client application, and the Word document is the container.
OLE objects can be either static, or embedded, which means that what gets stored in the container document is simply a copy. And OLE objects can also be dynamic, or linked, which means that the client application actually retrieves a picture of the actual data from the server application. With a linked object, this “picture” changes as the data changes.
Although OLE provides you with powerful opportunities to share data between programs, you’ll find it easy to use. You create an OLE connection by copying and pasting the data you want to share. Windows hides the complexity from you and takes care of the actual work of data sharing.
Creating an Embedded OLE Object
As an example of how to create an embedded OLE object, suppose that you do want to use an Excel chart created in a Word document. To easily create such an embedded OLE ob- ject, follow these steps:
- Open both the source and destination documents.
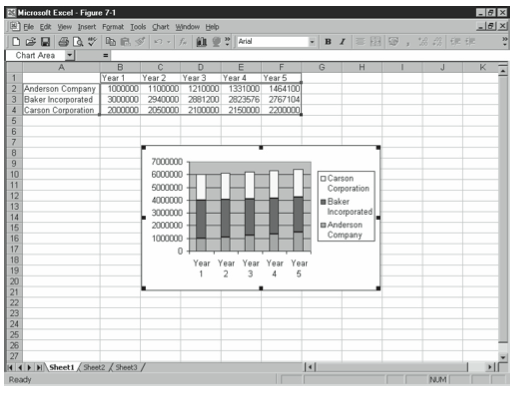
To most easily create embedded OLE objects, start both the server application and the client application. You should also open both the source document and the container document. If you’re working with brand-new, as-yet unsaved documents, first save them. - Select the chart object.
To select an object, simply click it. For example, to select the chart object shown in Fig- ure 7-1, simply click the chart.
Figure 7-1. An Excel chart such as you might use for an OLE source document. - Copy the object to the clipboard.
You can copy and object to the clipboard by clicking the Copy toolbar button. Or you can choose the Edit menu’s Copy command. - Display the source document.
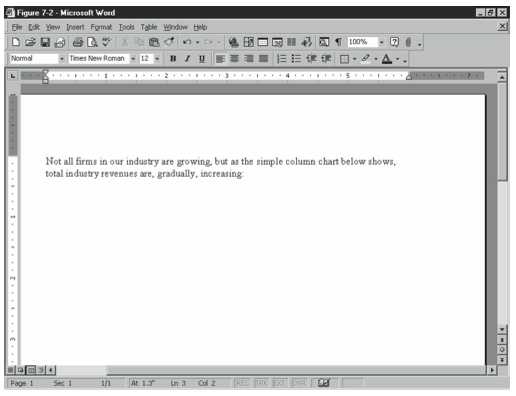
You could do this by clicking the document’s button on the Taskbar. If you wanted to copy the object to a Word document named Report, you would click the Report taskbar button. - Position the insertion point at the location where you want to paste the object.
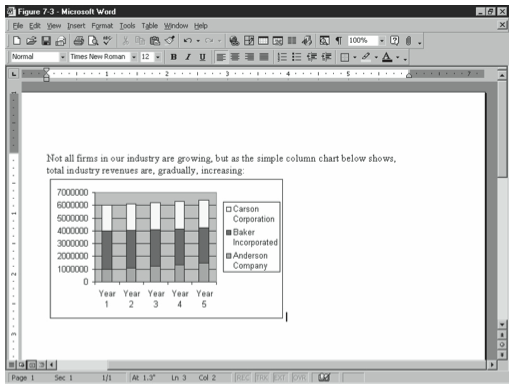
You can typically position the insertion point by clicking the point in the document where you want to place the object. For example, if you wanted to paste a chart object after the first paragraph, as shown in Figure 7-2, you would click on the line following the first paragraph.
Figure 7-2. A Word document such as you might use for an OLE destination document. - Paste the chart object into the client application’s container document.
You can paste an object to the clipboard by clicking the Paste toolbar button. You can also choose the Edit menu’s Paste command. When you do, the client application (with Windows’ help) creates an embedded object that looks as much like the source document object as the server application, Windows, and the client application allow. In other words, Windows and Windows programs use the richest format available for the pasted object. Figure 7-3 shows the Excel chart from Figure 7-1 embedded in the Word document from Figure 7-2.
Figure 7-3. The Word document after adding the Excel chart object.
Creating a Linked OLE Object
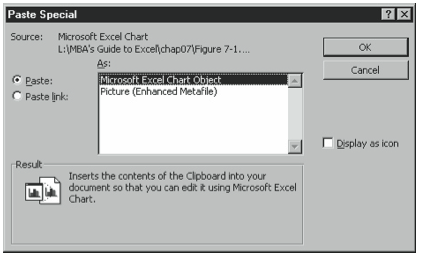
You create a linked OLE object in almost the same way as you create an embedded OLE object. There’s just one minor twist. You use the Edit menu’s Paste Special command be- cause it lets you indicate you want to create a linked object. For example, to create a linked OLE object using the same Excel chart shown in Figure 7-1 and the same Word document shown in Figure 7-2, follow these steps:
- Open both the source and container documents.
Again, to easily create embedded OLE objects, both the server application and the cli- ent application must be running and both the source document and container document should be open. - Select the chart object.
As mentioned earlier, to select an object you simply click it. - Copy the object to the clipboard.
You can copy an object to the clipboard by clicking the Copy toolbar button or by choosing the Edit menu’s Copy command. - Display the source document.
You could do this by clicking the document’s button on the Taskbar. - Position the insertion point at the location where you want to paste the object.
You can typically position the insertion point by clicking the point in the document where you want to place the object. - Paste the chart object into the client application’s container.
This is the only step that works differently from pasting an embedded object. When you paste a linked object, you need to use the Edit menu’s Paste Special command. When you choose this command, the client program displays a Paste Special dialog box. (Fig- ure 7-4 shows Microsoft Word’s version of the Paste Special dialog box, but other program’s Paste Special dialog boxes look almost the same and work in the same basic way.) When the client program displays its Paste Special dialog box, click the Paste Link option button and click OK. Optionally, you can also select a format for the object from the As list box.
Figure 7-4. The Paste Special dialog box.
When you open a document into which you’ve placed linked OLE objects, the program asks whether you want to update the links. If you do, click Yes, and the client application retrieves updated information from the source document.
By the way, it’s possible to inadvertently break a link. For example, this may happen if the same source document is moved or renamed while the client application and container document are closed. In this case, you need to reestablish the link by repeating the steps you took to originally establish the link.
Editing OLE Objects
You can easily modify linked and embedded objects. To change an object, double-click it. The client application starts the server application and opens the appropriate source document. Once the server application is running and displaying the source, you can make your changes.
Inserting OLE Objects in Excel Workbooks
The object sharing method described in the preceding paragraphs works well in situations in which you want to share data between programs and display that shared data in the con- tainer document. You should also know, however, that Excel’s Insert menu provides an Object command, which you can use to place icons in a workbook that point to source documents.
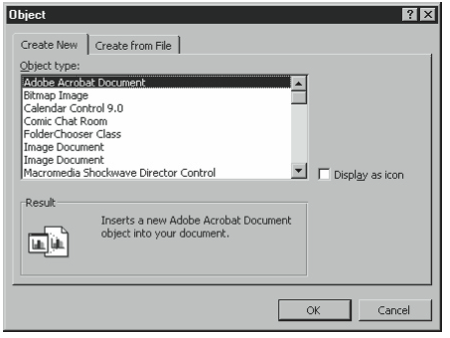
To use the Insert menu’s Object command to point to new OLE objects, choose the Insert menu’s Object command. When Excel displays the Object dialog box (see Figure 7-5), click the Create New tab, select the program necessary to create the object, and then click OK. Excel starts the server application, and you use it to create the new object. When you fin- ish creating the object, click outside the object—such as on a worksheet cell—to return to Excel. Use the Display As Icon check box to indicate whether you want to see a picture of the object or simply a clickable icon you can use to access the object.
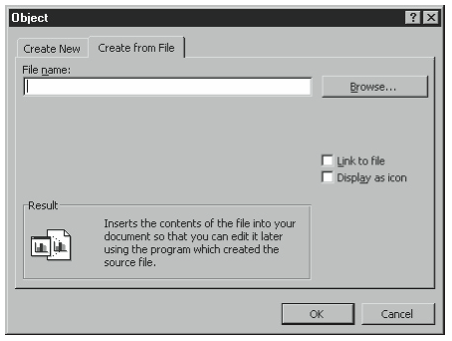
To use the Insert menu’s Object command to point to an existing document, you also choose the Insert menu’s Object command. When Excel displays the Object dialog box, however, you click the Create From File tab and then identify the file you want to use to create the object (see Figure 7-6). To identify the file, enter the complete pathname in the Name box or use the Browse button to display a dialog box you can use to search disks and folders for the file. Select the Link To File check box if you want to create a linked object. Select the Display As Icon check box to indicate whether you want to see a picture of the object or simply a clickable icon you can use to access the object.
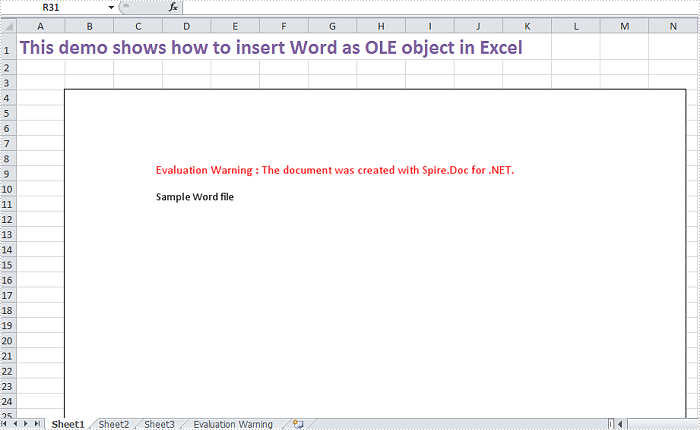
OLE object is used to make content created in one program available in another program, for instance, we can insert Word as OLE object in Excel sheet.
As a robust component, Spire.XLS supports to insert Word and PowerPoint slide as linked object or embedded object into Excel. In this article, we make an example to explain how to insert Word as OLE object into Excel using Spire.XLS and Spire.Doc. Before coding, you need to download Spire.Office and reference related the Dlls in your VS project.
Code Snippet:
Step 1: Define a GetDocImage(string doxcFile) method to get olePicture. Actually, the olePicture is an image of data information in original Word document. The image generated from the specified page will be shown in Excel sheet after inserting OLE object into it.
private static Image GetDocImage(string docxFile)
{
    Document document = new Document();
    document.LoadFromFile(docxFile);
    return document.SaveToImages(0, Spire.Doc.Documents.ImageType.Bitmap);

}
Step 2: Insert OLE object in Excel. After getting the worksheet from Excel file, we call GetDocImage(string doxcFile) method which is defined in the first step to get image source and then use the ws.OleObjects.Add(string FileName, Image image, OleLinkType linkType) method to insert the new OLE object to worksheet.
static void Main(string[] args)
{
    //load Excel file
    Workbook workbook = new Workbook();
    workbook.LoadFromFile("d:\sample.xlsx");
    Worksheet ws = workbook.Worksheets[0];
    //insert OLE object
    string docx = "d:\sample.docx";
    Image image = GetDocImage(docx);
    IOleObject oleObject = ws.OleObjects.Add(docx,image,OleLinkType.Embed);
    oleObject.Location=ws.Range["B4"];
    oleObject.ObjectType = OleObjectType.WordDocument;
    //save the file
    workbook.SaveToFile("result.xlsx",ExcelVersion.Version2010);
    System.Diagnostics.Process.Start("result.xlsx");
}
Result:
Full Code:
[C#]
using Spire.Doc;
using Spire.Xls;
using Spire.Xls.Core;
using System.Drawing;
namespace InsertOLEObject
{
    class Program
    {
        private static Image GetDocImage(string docxFile)
        {
            Document document = new Document();
            document.LoadFromFile(docxFile);
            return document.SaveToImages(0, Spire.Doc.Documents.ImageType.Bitmap);

        }
        static void Main(string[] args)
        {
            //load Excel file
            Workbook workbook = new Workbook();
            workbook.LoadFromFile("d:\sample.xlsx");
            Worksheet ws = workbook.Worksheets[0];
            //insert OLE object
            string docx = "d:\sample.docx";
            Image image = GetDocImage(docx);
            IOleObject oleObject = ws.OleObjects.Add(docx, image, OleLinkType.Embed);
            oleObject.Location = ws.Range["B4"];
            oleObject.ObjectType = OleObjectType.WordDocument;
            //save the file
            workbook.SaveToFile("result.xlsx", ExcelVersion.Version2010);
            System.Diagnostics.Process.Start("result.xlsx");
        }
    }
}
[VB.NET]
Imports Spire.Doc
Imports Spire.Xls
Imports Spire.Xls.Core
Imports System.Drawing
Namespace InsertOLEObject
	Class Program
		Private Shared Function GetDocImage(docxFile As String) As Image
			Dim document As New Document()
			document.LoadFromFile(docxFile)
			Return document.SaveToImages(0, Spire.Doc.Documents.ImageType.Bitmap)

		End Function
		Private Shared Sub Main(args As String())
			'load Excel file
			Dim workbook As New Workbook()
			workbook.LoadFromFile("d:sample.xlsx")
			Dim ws As Worksheet = workbook.Worksheets(0)
			'insert OLE object
			Dim docx As String = "d:sample.docx"
			Dim image As Image = GetDocImage(docx)
			Dim oleObject As IOleObject = ws.OleObjects.Add(docx, image, OleLinkType.Embed)
			oleObject.Location = ws.Range("B4")
			oleObject.ObjectType = OleObjectType.WordDocument
			'save the file
			workbook.SaveToFile("result.xlsx", ExcelVersion.Version2010)
			System.Diagnostics.Process.Start("result.xlsx")
		End Sub
	End Class
End Namespace
Общим
свойством связывания и внедрения
является то, что ре¬зультаты работы
одного приложения могут быть включены
в дру¬гое. Осуществить это можно с
помощью двух довольно различных средств
OLE.
1. связывание
и внедрение
2. использование
OLE
Связывание
При
связывании файлов образуется связь
между файлом-источником и фай¬лом-приемником.
Источником может быть, например, лист
Excel, часть которо¬го или весь лист
используется в файле-приемнике WORD Пока
будет су¬ществовать связь между этими
двумя документами, любые изменения в
диа¬грамме Excel (исходные данные) будут
отражены в документе WORD (связан¬ные
данные). Рабочая таблица на самом деле
не является частью документа WORD, это
просто окно, через которое вы можете
видеть рабочую таблицу Ex¬cel. Если обновить
данные в файле-источнике, скажем в
рабочей таблице Excel, то эти данные
автоматически обновятся во всех связанных
с этой таблицей до¬кументах. Еще одним
преимуществом связывания является
экономия размера файла-приемника, т.е.
с одним файлом-приемником может быть
связано не¬сколько объектов, которые
при вставке в файл резко увеличили бы
его объем.
Для
организации связи, как правило, требуется
гораздо меньше ресурсов, чем для вставки
объектов непосредственно в файл-приемник.
Однако при использовании связанных
файлов существует риск потери инфор¬мации.
Частой причиной потери или искажения
данных является разрыв связи. Это обычно
происходит при перемещении файла-источника
в другую папку или при его переименовании.
Можно столкнуться с неприятными
ситуациями, когда после передачи файла
по компьютерной сети обнаружится, что
связи на¬рушены.
Часто
файлы-источники хранятся на сервере, и
любое количество пользовате¬лей может
установить связь с ними. Пока
документы-приемники связаны с файлами
на сервере, все хорошо. Но если вашему
коллеге в другом конце стра¬ны нужен
файл с вашего компьютера, то при пересылке
необходимо будет пе¬редать все
файлы-источники и установить новые
связи, так как местоположе¬ние папки,
содержащей файлы-источники, будет
изменено. В этом случае луч¬шим выбором
будет второе средство ОLЕ — внедрение.
Внедрение
Внедрение
больше похоже на обычное копирование
и вставку, так как поме¬щает копию
объекта из приложения-источника в файл
приложения-приемника. Главным и
существенным преимуществом внедрения
перед обычным копиро¬ванием и вставкой
является то, что вы можете редактировать
внедренный объ¬ект, оставаясь в
приложении-приемнике. При обычном
копировании и вставке вы должны были
бы переключиться в приложение-источник,
отредактировать объект и еще раз
скопировать его в файл-приемник, а при
редактировании вне¬дренного объекта
приложение-приемник обычно передает
управление прило¬жению-источнику. После
внесения каких-либо изменений управление
переда¬ется обратно приложению-приемнику,
а от приложения-источника не остается
никаких следов, кроме обновленного
объекта. Главным преимуществом вне¬дрения
перед связыванием является удобство
при перемещении файлов. Вы не ограничены
связями, ассоциирующимися с исходными
объектами. Вы можете внедрить объект в
файл, передать его своим коллегам,
проживающим в другом конце страны, и
они смогут открыть его, как и любой
другой документ, если только у них есть
в наличии соответствующее приложение-приемник.
Кроме того, располагая соответствующим
приложением-источником, они смогут
так¬же отредактировать и изменить
внедренные объекты.
Документы,
содержащие внедренные объекты, могут
становиться довольно-таки объемными,
даже большими, чем сумма размеров всех
файлов-источников, потому что, кроме
внедренных данных, в документ включается
не¬которая дополнительная информация,
связанная с процессом внедрения. При
использовании внедренных объектов
необходимо принять во внимание и то,
что изменения в оригинальном файле-источнике
никак не отражаются на фай¬ле-приемнике,
в отличие от связанных файлов.
Для
связи и внедрения объектов можно
воспользоваться следующими способами:
1. выполнить
команду «Копировать» в буфер и
воспользоваться диалоговым окном
«Специальная вставка»
2. вставить
объект с помощью команд «Объект» и
«Рисунок» из меню «Встав¬ка»
3. переместить
объект с помощью мыши непосредственно
из приложения — ис¬точника в приложение
— приёмник (возможно, с использованием
Рабочего стола в качестве промежуточного
пункта).
Окно
«Специальная вставка» примет другой
вид в нашей задаче. Охарактеризу¬ем
его.
В
верхней части окна — Источник окно «Как»
помогает выбрать тип сведений (формата)
для специальной вставки. Если нужно
получить после вставки точ¬ную копию
объекта с возможностью его последующего
редактирования, то вы¬брать формат
«Объект Документ МS Word». Если нужна
точная копия объекта, но изменения
вносится не будут, то формат Рicturе
позволит уменьшить размер файла, что
особенно важно при передаче данных.
Формат Тех1 подходит, когда нужно вставить
только основной текст, а форматирование
будет осуществлять¬ся средствами
приложения — приёмника. Описанное выше
справедливо для внедрения. Если в
диалоговом окне установить параметр
«Связать», то сохра¬нится возможность
выбора трех форматов для вставки, но
только один позво¬лит вставить объект
корректно — это формат объект Документ
МS Word.
Диалоговое
окно Связи
Можно
получить информацию о связанном объекте,
выбрав пункт Связи из ме¬ню Правка.
В
окне списка Исходный файл приведена
информация о всех связях в докумен¬те
с указанным именем файлов, а также
методов обновления для каждого фай¬ла.
Можно также установить обновление связи
по запросу вместо принятого по умолчанию
автоматического обновления. Используя
командные кнопки в пра¬вой части
диалогового окна, можно обновить связь
по запросу, открыть в при¬ложении —
источнике, изменить источник или
разорвать связь между приложе¬нием —
источником и объектом. В случае разрыва
связи копия объекта будет восстановлена
в файл — приёмник. Разорванная связь
может быть восстановле¬на только в
случае повтора полного процесса установки
связи. В дополнение к диалоговому окну
Специальная вставка, связь или внедрение
объекта в документ МS Offiсе возможны по
командам меню Вставка, отра¬жающим
названия различных типов объектов.
Связывание файла состоит из указания
полного имени файла и установки параметра
Связать с файлом, в) Обмен данными между
приложениями. При использовании метода
drag & drор рекомендуется расположить
горизонтально два окна приложения
одно¬временно. Чтобы освободить
пространство окно можно убрать ПИ и
строку со-стояния. Иногда при использовании
метода drag& drор данные перемещаются
или копируются (Сtrl), а иногда внедряются.
Использование
фрагментов для передачи данных. Данные
в виде текста или диапазонов ячеек можно
хранить в виде фрагментов на Рабочем
столе. Фраг¬менты имеют свои атрибуты,
которые могут быть изменены с помощью
коман¬ды Свойства. Фрагменты хранятся
в папке WindowsРабочий стол.
Соседние файлы в предмете [НЕСОРТИРОВАННОЕ]
- #
- #
- #
- #
- #
- #
- #
- #
- #
- #
- #
![]()
Download Article
![]()
Download Article
- Inserting a File
- Inserting an Image
|
Microsoft Excel allows you to include other files, such as Word documents and PDFs, into a spreadsheet. This wikiHow will show you how to insert a file as an object into an Excel project using OLE (object linking and embedding).
-
1
Open your project in Excel. You can open your project within Excel by clicking Open from the File tab, or you can right-click on the file in a file browser and click Open With and Excel.
- This method works for newer versions of Excel on either PC or Mac.
-
2
Click the cell in which you want to insert the object. Whenever people view this cell, they will find the embedded document.
Advertisement
-
3
Click the Insert tab. You’ll find this in the ribbon above the document editor or at the top of your screen.
-
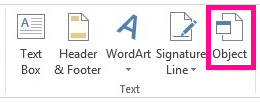
4
Click the icon that looks like a program window on a sheet of paper. This is the «Object» icon and can be found in the «Text» group. A box will pop up.
-
5
Click the Create from File tab. The tab will switch from «Create New.»
-
6
Click Browse. Your file browser will open.
-
7
Navigate to and double-click your file. Only compatible files will show up in the browser, like PowerPoints, PDFs, and Word documents.
-
8
Choose to select «Display as icon.« If you select «Display as icon,» you’ll see the icon of the document appear in the cell; if you don’t choose «Display as icon,» the full first page of the document will appear. Regardless of your choice, both embedded documents will link to the full document.
-
9
Click OK. You’ll see this at the bottom right of the pop-up window. The document you selected will appear in the cell either as the full first-page document or icon.[1]


Advertisement
-
1
Open your project in Excel. You can open your project within Excel by clicking Open from the File tab, or you can right-click on the file in a file browser and click Open With and Excel.
- This method works for newer versions of Excel on either PC or Mac.
-
2
Click the cell you want to insert the object.
-
3
Click the Insert tab. You’ll find this in the ribbon above the document editor or at the top of your screen.
-
4
Click the Pictures icon. You’ll find this in the «Illustrations» group. A file browser will pop up.
-
5
Navigate to and double-click on your image. The list of compatible file types is long, but all the common file types are accepted like GIF, JPG, and PNG.
- The image is inserted into your document. You can edit the image using the Picture Tools tab.[2]
- The image is inserted into your document. You can edit the image using the Picture Tools tab.[2]


Advertisement
Ask a Question
200 characters left
Include your email address to get a message when this question is answered.
Submit
Advertisement
Thanks for submitting a tip for review!
References
About This Article
Article SummaryX
1. Open your project in Excel.
2. Click the cell you want to insert the object.
3. Click the Object icon in the Insert tab.
4. Click the Create from File tab.
5. Click Browse and navigate to and double-click the file.
6. Choose to «Display as icon» or not.
7. Click OK.
Did this summary help you?
Thanks to all authors for creating a page that has been read 28,976 times.