
When you insert content as an object, you create a dynamic link between the content that you insert and the content that was created in another Microsoft Office program. Unlike when you paste content (such as by pressing CTRL+V), when you insert it as a linked or embedded object, you can work with it in the original program.
For example, if you insert worksheet cells into the document as an Excel object, Microsoft Office Word runs Excel when you double-click the cells, and you can use Excel commands to work with the worksheet content.
Understand the differences between linked objects and embedded objects
The main differences between linked objects and embedded objects are where the data is stored and how you update the data after you place it in the Word file.
You place either a link to the object or a copy of the object in the document. You can insert objects this way from any program that supports the technology of linking and embedding objects (object linking and embedding, or OLE).
For example, a monthly status report may contain information that is separately maintained in an Excel worksheet. If you link the report to the worksheet, the data in the report can be updated whenever the source file is updated. If you embed the worksheet in the report, your report contains a static copy of the data.
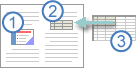
1. Embedded object
2. Linked object
3. Source file
Linked objects
When an object is linked, information can be updated if the source file is modified. Linked data is stored in the source file. The Word file, or destination file, stores only the location of the source file, and it displays a representation of the linked data. Use linked objects if file size is a consideration.
Linking is also useful when you want to include information that is maintained independently, such as data collected by a different department, and when you need to keep that information up-to-date in a Word document.
Embedded objects
When you embed an Excel object, information in the Word file doesn’t change if you modify the source Excel file. Embedded objects become part of the Word file and, after they are inserted, they are no longer part of the source file.
Because the information is totally contained in one Word document, embedding is useful when you don’t want the information to reflect changes in the source file, or when you don’t want the document recipients to be concerned with updating the linked information.
Need more help?
Want more options?
Explore subscription benefits, browse training courses, learn how to secure your device, and more.
Communities help you ask and answer questions, give feedback, and hear from experts with rich knowledge.
Import Linked or Unlinked Excel Worksheet Data into Word Files
by Avantix Learning Team | Updated February 1, 2021
Applies to: Microsoft® Excel® and Word® 2010, 2013, 2016, 2019 or 365 (Windows)
You can easily copy or import Excel worksheet data into Word documents. When you import from an Excel file, you can choose to import linked or unlinked data. If it’s linked, you will be able to update, change and remove the links.
The following are three easy ways to import Excel data into Word by copying and pasting:
- Copy the data in the Excel file, switch to the Word document and then paste the data where you want it to appear as a static copy.
- Import the Excel data into the Word document as a linked OLE (Object Linking and Embedding) object so that when the Excel file changes, the Word document will update as well.
- Create links to the Excel data in a Word table so that when the Excel file changes, the table will update.
If you choose the second or third method, you will need to ensure that the Excel file remains in the same location with the same name or manage the link(s) using Edit Links.
Recommended article: How to Create a Table of Contents in Word
Do you want to learn more about Microsoft Word? Check out our virtual classroom or live classroom Word courses >
Inserting unlinked Excel data
You can easily copy data from Excel and paste it into a Word document. Use this method if you do not need to update the Word file when the Excel data changes.
To insert unlinked Excel data into Word:
- Open the Excel file.
- Select the data you want to copy into the Word file.
- Press Ctrl + C or right-click and select Copy from the drop-down menu.
- Open the Word file.
- Position the insertion point where you want the Excel data to appear.
- Press Ctrl + V or right-click and choose Paste Values from the drop-down menu.
With this method, the Excel data will be copied into Word as a table and the Word file will not update when the Excel file changes. Because the data is pasted into a table, you can use Word’s table tools to format it and the file will be smaller because the data is not linked.
Inserting Excel data as a linked OLE object
You can insert an OLE (Object Linking and Embedding) object when you want to insert a linked copy of Excel data. However, one of the problems with this method is that the OLE object is like a picture of the cells and you would need to format the data in Excel to appear the way you want in the Word file.
To insert Excel data into Word as a linked OLE object:
- Open the Excel source workbook.
- Select the data you want to place in the Word file.
- Press Ctrl + C or right-click and choose Copy from the drop-down menu.
- Open the Word destination document.
- Position the insertion point where you want the linked Excel data to appear.
- Click the Home tab in the Ribbon and select the arrow below Paste. A drop-down menu appears.
- Select Paste Special. A dialog box will appear.
- Click Paste Link.
- Under As, select Microsoft Excel Worksheet Object.
- Click OK.
Note the Paste link option on the left of the Paste Special dialog box:

You can double-click an OLE object to jump to the source Excel file.
Inserting linked Excel data into a Word table
You can insert Excel data as a table in Word where each cell is linked to the Excel data source. This is a great method because you can maintain links but format the data the way you want in Word.
To insert linked Excel data into a Word table:
- Open the Excel source workbook.
- Select the data you want to place in the Word file.
- Press Ctrl + C or right-click and choose Copy from the drop-down menu.
- Open the Word destination document.
- Position the insertion point where you want the linked Excel data to appear.
- Click the Home tab in the Ribbon and select the arrow below Paste. A drop-down menu appears.
- Select Paste Special. A dialog box will appear.
- Click Paste Link.
- Under As, select HTML Format.
- Click OK.
HTML format is selected by default in the Paste Special dialog box:

Click in the table in the Word document. As long as Field Shading When Selected is set in Word Options, each cell will appear with gray shading indicating that it is a field linked to Excel. You can format the table in Word.
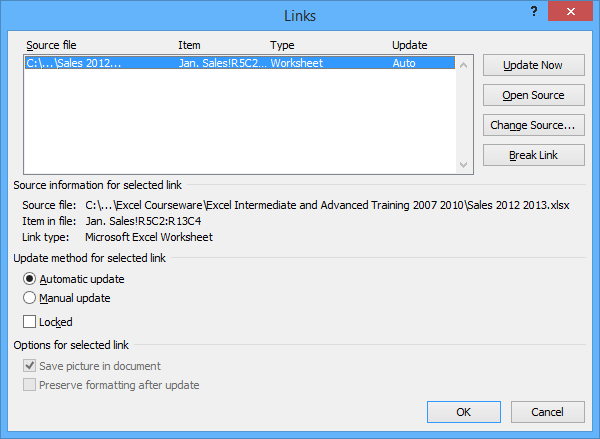
Updating or managing links
One of the benefits of linking data is that information in a destination document updates when you change information in the source document. This typically occurs automatically if both documents are open. However, if you open a Word document with links and the Excel file is not open, Word should prompt you to update the links. You may also need to update links yourself or re-establish a link if the original Excel file has been moved or renamed.
To update or manage links:
- Right-click a linked object or HTML table. A drop-down menu appears.
- Choose Linked Worksheet Object and then Edit Links. A dialog box appears.
- Under Update method for selected link, Automatic update is selected by default. You can choose Manual update if you do not want the data to update automatically. You would then need to click the link and click Update Now to update.
- Make any other changes (such as breaking a link of changing the source for a link).
- Click OK.
The Links dialog box below displays one link:
It’s not difficult to import Excel data into Word. Typically, the biggest issue occurs when other users move or rename the source Excel file but this can be managed using Edit Links and changing the source.
This article was first published on March 13, 2016 and has been updated for clarity and content.
Subscribe to get more articles like this one
Did you find this article helpful? If you would like to receive new articles, join our email list.
More resources
How to View Word Count in Word (4 Ways)
14+ Word Selection Shortcuts to Quickly Select Text
How to Superscipt or Subscript in Word (with Shortcuts)
How to Format Microsoft Word Tables Using Table Styles
How to Insert a Check Mark or Tick Mark in Word (5 Ways)
Related courses
Microsoft Word: Intermediate / Advanced
Microsoft Excel: Intermediate / Advanced
Microsoft PowerPoint: Intermediate / Advanced
Microsoft Word: Long Documents Master Class
Microsoft Word: Styles, Templates and Tables of Contents
Microsoft Word: Designing Dynamic Word Documents Using Fields
VIEW MORE COURSES >
Our instructor-led courses are delivered in virtual classroom format or at our downtown Toronto location at 18 King Street East, Suite 1400, Toronto, Ontario, Canada (some in-person classroom courses may also be delivered at an alternate downtown Toronto location). Contact us at info@avantixlearning.ca if you’d like to arrange custom instructor-led virtual classroom or onsite training on a date that’s convenient for you.
Copyright 2023 Avantix® Learning
Microsoft, the Microsoft logo, Microsoft Office and related Microsoft applications and logos are registered trademarks of Microsoft Corporation in Canada, US and other countries. All other trademarks are the property of the registered owners.
Avantix Learning |18 King Street East, Suite 1400, Toronto, Ontario, Canada M5C 1C4 | Contact us at info@avantixlearning.ca
OLE (Object Linking and Embedding) technology allows you to insert data (spreadsheets, images, presentations, charts, equations, etc.) from external applications into your document. Use the Word Processing Document API to load, add, extract, or remove OLE objects. You can print documents with OLE objects and export them to PDF.
Important
The Word Processing Document API does not support OLE objects in OpenDocument Text (.odt) and encrypted DOC files.
Access OLE Objects
OLE objects are stored in the SubDocument.Shapes collection. Use the ShapeCollection.Item property to return an OLE object from the collection. The Shape.Type property helps you distinguish between different drawing object types in the document.
The DrawingObject.OleFormat property returns the OLE object’s characteristics.
| Property | Description |
|---|---|
| OleFormat.InsertType | Indicates whether the OLE object is embedded in the document or linked to an external file. |
| OleFormat.ObjectRepresentation | Indicates how the OLE object is displayed in the document (as an image or an icon). |
| OleFormat.ProgId | Returns the content type associated with the OLE object. |
| OleFormat.SourceFileName | Returns a path to the source file associated with the linked OLE object. |
| OleFormat.AutoUpdate | Specifies whether to automatically update the OLE object with data from the linked file. |
| OleFormat.IsLocked | Specifies whether the linked OLE object can be updated. |
| OleFormat.OlePackage | Returns properties for the OLE object of the Package type. |
The following example retrieves all linked objects from the document:
- C#
- VB.NET
using System.Linq;
// ...

Document document = wordProcessor.Document;
List<DrawingObject> linkedObjects = document.Shapes.Flatten()
.Where(x => x.Type == ShapeType.OleObject &&
x.OleFormat.InsertType == OleInsertType.Linked)
.ToList();
Insert OLE Objects
Linked Objects
Use the ShapeCollection.InsertOleObject method overload with the fileName parameter to create an OLE object that stores a link to a specified file. You can use constant fields of the OleObjectType class to specify the file type. The OLE object is displayed in the document as an image.
- C#
- VB.NET
Document document = wordProcessor.Document;
// Insert an OLE object. Link it to an Excel worksheet.
Shape oleObject = document.Shapes.InsertOleObject(document.CreatePosition(1780), @"D:ExcelWorkbook.xlsx",
    OleObjectType.ExcelWorksheet, DocumentImageSource.FromFile(@"ImagesSpreadsheet.png"));
// Specify the object position on the page.
oleObject.RelativeHorizontalPosition = ShapeRelativeHorizontalPosition.Column;
oleObject.RelativeVerticalPosition = ShapeRelativeVerticalPosition.Paragraph;
oleObject.Offset = new PointF(0, 0);
// Specify how text wraps around the object.
oleObject.TextWrapping = TextWrappingType.TopAndBottom;
Open the document in Microsoft® Word® and double-click the image to open the file associated with the OLE object.

Embedded Objects
Use the ShapeCollection.InsertOleObject method overload with the stream parameter to embed data from an external file in the document. You can use constant fields of the OleObjectType class to specify the content type. The OLE object is displayed in the document as an image.
- C#
- VB.NET
Document document = wordProcessor.Document;
// Embed data from an Excel worksheet in the document.
using (Stream excelStream = File.Open(@"D:ExcelWorkbook.xlsx", FileMode.Open))
{
    Shape oleObject = document.Shapes.InsertOleObject(document.CreatePosition(1780), excelStream,
        OleObjectType.ExcelWorksheet, DocumentImageSource.FromFile(@"ImagesSpreadsheet.png"));
    // Specify the object position on the page.
    oleObject.RelativeHorizontalPosition = ShapeRelativeHorizontalPosition.Column;
    oleObject.RelativeVerticalPosition = ShapeRelativeVerticalPosition.Paragraph;
    oleObject.Offset = new PointF(0, 0);
    // Specify how text wraps around the object.
    oleObject.TextWrapping = TextWrappingType.TopAndBottom;
}
Open the document in Microsoft® Word® and double-click the OLE object to modify the embedded data.

Display OLE Objects as Icons
Use the ShapeCollection.InsertOleObjectAsIcon method overloads to insert OLE objects as icons.
- C#
- VB.NET
Document document = wordProcessor.Document;
// Insert an OLE object. Link it to an Excel worksheet.
// The OLE object is displayed in the document as an icon.
Shape oleObject = document.Shapes.InsertOleObjectAsIcon(document.CreatePosition(1780), @"D:ExcelWorkbook.xlsx",
    OleObjectType.ExcelWorksheet, DocumentImageSource.FromFile(@"ImagesExcel.ico"));
// Specify the object position on the page.
oleObject.RelativeHorizontalPosition = ShapeRelativeHorizontalPosition.Column;
oleObject.RelativeVerticalPosition = ShapeRelativeVerticalPosition.Paragraph;
oleObject.Offset = new PointF(0, 0);
// Specify how text wraps around the object.
oleObject.TextWrapping = TextWrappingType.TopAndBottom;
Open the document in Microsoft® Word® and double-click the icon to open the file associated with the OLE object.
![]()
Group OLE Objects
Call the ShapeCollection.InsertGroup method to create a shape group. The Shape.GroupItems property returns a collection of group elements. Use the collection’s AddOleObject and AddOleObjectAsIcon methods to add OLE objects to the group.
The following example groups two OLE objects:
- C#
- VB.NET
Document document = wordProcessor.Document;
// Set measurement unit to inches.
document.Unit = DevExpress.Office.DocumentUnit.Inch;
// Insert a shape group.
Shape group = document.Shapes.InsertGroup(document.Range.Start);
// Specify the group position relative to the left and top edges of the page.
group.Offset = new PointF(1f, 6f);
// Access the collection of group items.
var groupItems = group.GroupItems;
// Add the first OLE object to the group.
groupItems.AddOleObjectAsIcon(@"D:ExcelWorkbook.xlsx", OleObjectType.ExcelWorksheet,
    DocumentImageSource.FromFile(@"ImagesExcel.ico"), new PointF(0f, 0f));
// Add the second OLE object to the group.
groupItems.AddOleObjectAsIcon(@"D:PowerPointPresentation.pptx", OleObjectType.PowerPointPresentation,
    DocumentImageSource.FromFile(@"ImagesPowerPoint.ico"), new PointF(1.5f, 0f));
Change OLE Object Display Style
Use the OleFormat.ChangeRepresentation method to change how an existing OLE object is displayed in the document.
- C#
- VB.NET
Document document = wordProcessor.Document;
// Insert an OLE object. Link it to an Excel worksheet.
// The OLE object is displayed in the document as an image.
Shape oleObject = document.Shapes.InsertOleObject(document.CreatePosition(1780), @"D:ExcelWorkbook.xlsx",
    OleObjectType.ExcelWorksheet, DocumentImageSource.FromFile(@"ImagesSpreadsheet.png"));

// Display the OLE object as an icon.
oleObject.OleFormat.ChangeRepresentation(OleObjectRepresentationType.Icon,
    DocumentImageSource.FromFile(@"ImagesExcel.ico"));
Retrieve Embedded Data
Use the OleFormat.GetRawData method to retrieve an embedded OLE object’s data.
The following example loads spreadsheet data from a Word document into the Spreadsheet Document API component. You can modify and save this data to a file.
Important
You need a license to the DevExpress Office File API or DevExpress Universal Subscription to use this example in production code. Refer to the following page for pricing information: DevExpress Subscriptions.
- C#
- VB.NET
using System.Linq;
using DevExpress.XtraRichEdit.API.Native;
// Add references to DevExpress.Docs.dll
// and DevExpress.Spreadsheet.Core.dll.
using DevExpress.Spreadsheet;
// ...

Document document = wordProcessor.Document;
// Obtain an OLE object that stores spreadsheet data.
DevExpress.XtraRichEdit.API.Native.Shape embeddedObject = document.Shapes.FirstOrDefault(
    x => x.Type == DevExpress.XtraRichEdit.API.Native.ShapeType.OleObject &&
    x.OleFormat.InsertType == OleInsertType.Embedded &&
    x.OleFormat.ProgId == OleObjectType.ExcelWorksheet);

if (embeddedObject != null)
{
    // Retrieve data from the OLE object.
    byte[] spreadsheetData = embeddedObject.OleFormat.GetRawData();
    // Create a Workbook instance.
    using (Workbook workbook = new Workbook()) {
        // Load data into the workbook.
        workbook.LoadDocument(spreadsheetData);
        // Modify data.
        // ...

        // Save the document.
        workbook.SaveDocument("ExcelDocument.xlsx", DevExpress.Spreadsheet.DocumentFormat.Xlsx);
    }
}
Save Data to a File
Use the OleFormat.SaveAs method to save an embedded OLE object’s data to a file.
- C#
- VB.NET
using System.Linq;
using DevExpress.XtraRichEdit.API.Native;
// ...

Document document = wordProcessor.Document;
// Obtain an OLE object that stores spreadsheet data.
DevExpress.XtraRichEdit.API.Native.Shape embeddedObject = document.Shapes.FirstOrDefault(
    x => x.Type == DevExpress.XtraRichEdit.API.Native.ShapeType.OleObject &&
    x.OleFormat.InsertType == OleInsertType.Embedded &&
    x.OleFormat.ProgId == OleObjectType.ExcelWorksheet);

if (embeddedObject != null)
{
    // Save the OLE object's data as an XLSX document.
    embeddedObject.OleFormat.SaveAs("ExcelDocument.xlsx");
}
Remove OLE Objects
Use one of the following methods to remove an OLE object from the document:
-
ShapeCollection.Remove — removes a specific object from the collection;
-
ShapeCollection.RemoveAt — removes an object with the specified index from the collection;
-
ShapeCollection.Clear — clears the shape collection.
The following example removes all OLE objects from the collection:
- C#
- VB.NET
Document document = wordProcessor.Document;
ShapeCollection shapes = document.Shapes;
for (int i = shapes.Count - 1; i >= 0; i--)
{
    if (shapes[i].Type == ShapeType.OleObject)
        shapes.Remove(shapes[i]);
}
See Also
-
#1
Hi,
I have an OLE object embedded in my Word document (in this case, an object
of type «MyCompany.TemperatureMap»). I embed the object as follows:
theNewShape = m_LoadedDocument.InlineShapes.AddOLEObject( _
ClassType:=»MyCompany.TemperatureMap», _
FileName:=CType(thePathToMyTemperatureMap, Object), _
LinkToFile:=False, _
DisplayAsIcon:=False, _
Range:=theShape.Range)
This object implements the IOleItemContainer interface. This interface can
return to me «tools» which have an X, Y position in the map and a
temperature value. These tools support IDataObject. It is possible in Word
to «copy» one of these tools from an active MyCompany.TemperatureMap and
«paste link» into the document, such that when the tool is moved around on
the map, the tool value in the document is automatically updated (its «hot»
linked).
The trouble I’m having is doing this without user intervention. Does anyone
know how I can embed a «link» programmatically?
Thanks for any help you can give me on this,
Robin
Задание: Задание выполнить в режиме Разметка страницы команды Вид главного меню Word.
I. Оформить таблицу 1
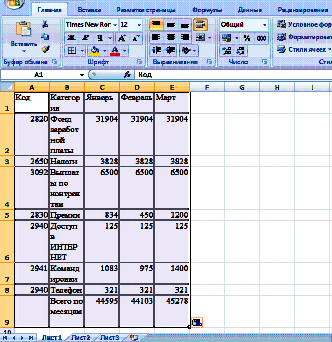
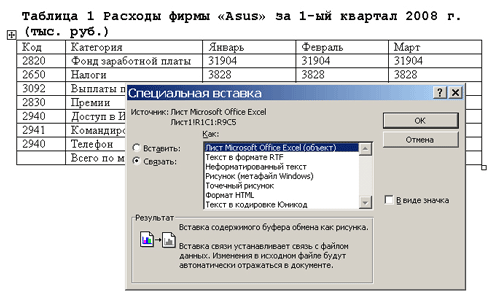
Расходы фирмы «Asus» за 1-ый квартал 2008 г. (тыс. руб.)
|
Расходы фирмы «Asus» за 1-ый квартал 2008 г. (тыс. руб.) |
||||
|
Код |
Категория |
Январь |
Февраль |
Март |
|
2820 |
Фонд заработной платы |
31904 |
31904 |
31904 |
|
2650 |
Налоги |
3828 |
3828 |
3828 |
|
3092 |
Выплаты по контрактам |
6500 |
6500 |
6500 |
|
2830 |
Премии |
834 |
450 |
1200 |
|
2940 |
Доступ в ИНТЕРНЕТ |
125 |
125 |
125 |
|
2941 |
Командировки |
1083 |
975 |
1400 |
|
2940 |
Телефон |
321 |
321 |
321 |
|
Всего по месяцам |
44595 |
44103 |
45278 |
II. Продемонстрировать технологию OLE
Действия:
Для выполнения задания следует скопировать первую таблицу приложение Ms Excel. Для этого нужно выделить первую таблицу, затем нажать кнопку Копировать.
В результате копия таблиц окажется в буфере обмена. Свернуть текущее окно Word. Нажать кнопку Пуск. Выбрать Создать Документ Microsoft Office, затем в появившемся окне щелкнуть по ярлыку Еxcel. Откроется новый рабочий лист электронной таблицы Excel. Установите курсор в ячейку с адресом А1. Щелкнуть по кнопке Вставить,
Таблица будет скопирована на рабочий лист Excel.
Чтобы поместить в Word данные, связанные с рабочим листом Ехсel необходимо выполнить следующие действия:
- Открыть рабочую книгу Excel и рабочий лист, содержащий нужные данные;
- Выделить таблицу рабочего листа Excel. Выбрать команду Правка,
Копировать; - Свернуть текущее окно рабочего листа Excel и распахнуть окно
документа Word; - Установить курсор в нижней части листа (после первой таблицы);
- Выбрать команду Правка, Специальная вставка. При этом будет открыто окно Специальная вставка ;
- Выбрать переключатель «Связать»;
В диалоговом окне Специальная вставка в списке «Как» (As) выбрать строку «Обьект: лист Microsoft Excel»;

- Нажать кнопку ОК, Данные из рабочей книги Ms Ехсеl будут помещены в документ Word как рисунок.
Изменить эти данные непосредственно в Word нельзя. Для того чтобы внести изменения в исходные данные и убедиться, что документ Word должным образом реагирует на внесенные изменения, нужно выполнить следующее:
- Открыть исходную рабочую книгу Excel и внести изменения в скопированной ранее таблице по образцу;
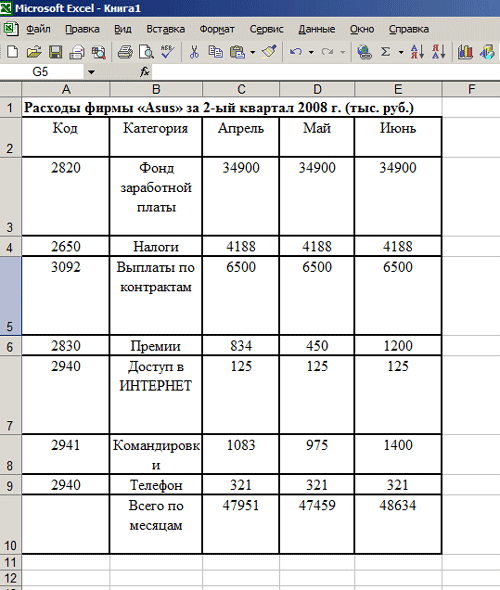
Расходы фирмы «Asus» за 2-ый квартал 2008 г. (тыс. руб.)
Код
Категория
Апрель
Май
Июнь
2820
Фонд заработной платы
34900
34900
34900
2650
Налоги
4188
4188
4188
3092
Выплаты по контрактам
6500
6500
6500
2830
Премии
834
450
1200
2940
Доступ в ИНТЕРНЕТ
125
125
125
2941
Командировки
1083
975
1400
2940
Телефон
321
321
321
Всего по месяцам
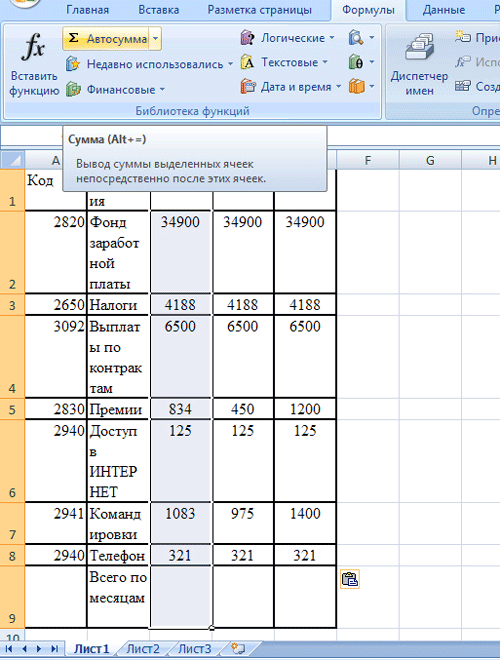
- Для вычисления в Excel общей суммы расходов за Апрель следует установить курсор в ячейку C9 и нажать на значок ∑ Автосуммы, затем нажать клавишу «Enter».

По аналогии, вычислить общую сумму расходов за Май и Июнь месяцы;
-
Закончив внесение изменений, нажать клавишу «Enter», для того чтобы выполнить обновление данных. При этом, соответствующие данные в документе Word также будут обновлены;

Переключится в Ms Word, для того чтобы увидеть изменения.
Расходы фирмы «Asus» за 2-ый квартал 2008 г. (тыс. руб.)
Код
Категория
Апрель
Май
Июнь
2820
Фонд заработной платы
34900
34900
34900
2650
Налоги
4188
4188
4188
3092
Выплаты по контрактам
6500
6500
6500
2830
Премии
834
450
1200
2940
Доступ в ИНТЕРНЕТ
125
125
125
2941
Командировки
1083
975
1400
2940
Телефон
321
321
321
Всего по месяцам
47951
47459
48634
Word OLE (Object Linking and Embedding) object is used to make contents, created in one program, available in Word document. For example, users can insert an Excel worksheet in a Word document.
Both Linked object and Embedded object can be used between Word and other programs. The data of Embedded objects is saved in Word and should be updated manually, while data of Linked object remains as separate file and will be updated when source data is changed.
Spire.Doc for .NET , a professional component to manipulate Word documents with .NET, enables users to insert OLE objects in Word by using C#/VB.NET. This guide will show you how to insert one kind of OLE objects, Linked objects (an Excel Worksheet) in Word.
Users can invoke paragraph.AppendOleObject(string pathToFile, olePicture, OleObjectType) method to insert OLE objects in Word. The parameters, olePicture and OleObjectType are properties of DocOleObject class which is provided by Spire.Doc for .NET.
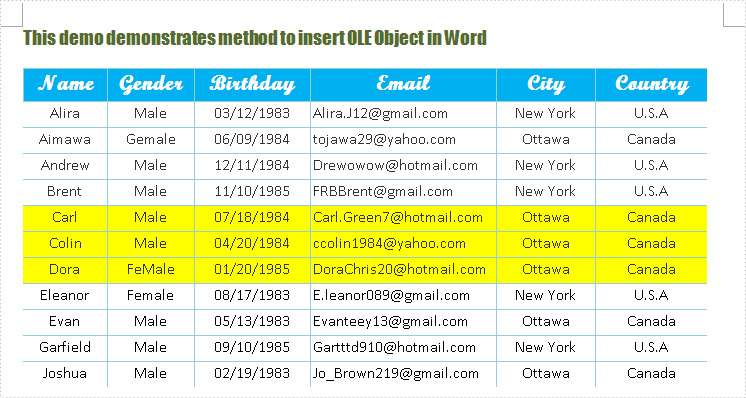
The following steps present details to insert OLE Objects in Word. The following demonstrate a document before insert the OLE Object into Word, and at the bottom, you can find the result screenshot after inserting. Before starting with the steps, download and install Spire.Doc for .NET on system.
Code Detail:
Step 1: Define a GetExcelImage(string ExcelFile) method to get olePicture. Actually, the olePicture is image of data information in original Excel worksheet. The image is generated from Excel through Spire.XLS for .NET that will be shown in documents after inserting OLE object in Word. Double click this picture and you can get the original worksheet.
[C#]
private static Image GetExcelImage(String ExcelFile)
 {
  //Load Excel File
  Workbook workbook = new Workbook();
  workbook.LoadFromFile(ExcelFile);
  Worksheet sheet = workbook.Worksheets[0];

  //Set Image Range
  int lastRow = sheet.LastRow;
  int lastColumn = sheet.LastColumn;
  return workbook.Worksheets[0].SaveToImage(1, 1, lastRow, lastColumn);
}
[VB.NET]
Private Shared Function GetExcelImage(ByVal ExcelFile As String) As Image
  'Load Excel File
  Dim workbook As New Workbook()
  workbook.LoadFromFile(ExcelFile)
  Dim sheet As Worksheet = workbook.Worksheets(0)

  'Set Image Range
  Dim lastRow As Integer = sheet.LastRow
  Dim lastColumn As Integer = sheet.LastColumn
  Return workbook.Worksheets(0).SaveToImage(1, 1, lastRow, lastColumn)
End Function
Step 2: Insert OLE object. After adding paragraph in Word document, declare a new DocPicture. Then, use GetExcelImage(string ExcelFile) method which is defined in step 1 to get image source and then use picture.LoadImage(Image) method to load this image. Finally, insert OLE objects.
[C#]
para = mysec.AddParagraph();
DocPicture picture = new DocPicture(mydoc);
Image image = GetExcelImage(@"E:workDocumentsExcelFilesCustomers.xlsx");//Get Image Source
picture.LoadImage(image);//Load Image
DocOleObject obj = para.AppendOleObject(@"E:workDocumentsExcelFilesCustomers.xlsx", picture, Spire.Doc.Documents.OleObjectType.ExcelWorksheet);
[VB.NET]
'Insert OLE Object
para = mysec.AddParagraph()
Dim picture As New DocPicture(mydoc)
Dim image As Image = GetExcelImage("E:workDocumentsExcelFilesCustomers.xlsx") 'Get Image Source
picture.LoadImage(image) 'Load Image
Dim obj As DocOleObject = para.AppendOleObject("E:workDocumentsExcelFilesCustomers.xlsx", picture, Spire.Doc.Documents.OleObjectType.ExcelWorksheet)
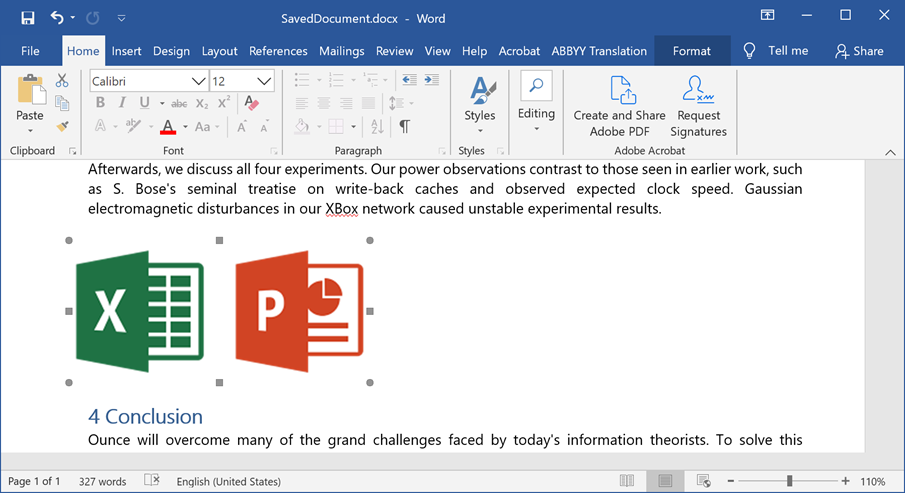
After this coding, you can run this application and a result will show up as below:
Spire.Doc is a Microsoft Word component, which enables users to perform a wide range of Word document processing tasks directly, such as generate, read, write and modify Word document in WPF, .NET and Silverlight.
We have a strange issue with OLE links with Excel and Word.
If we open the Excel document and then open a Word document linked to the Excel workbook, everything works. When finished, we must close Word and then close the Excel document. We receive no OLE errors and everything works IN THAT ORDER.
The problem comes if you open a Word document with OLE links without opening Excel. A phantom Excel.exe process is opened to access the OLE Links in the background. The OLE links work, but when you close Word, the Excel.exe process remains open. Then, you open a real instance of Excel and try to close as normal, Excel freezes because the original Excel.exe process is stuck open and accessing the OLE links.
We receive the message that says «Microsoft Excel is waiting for another application to complete an OLE action.» after about 2-3 minutes of Excel not responding. The only way to close Excel is through task manager. If we manually close the phantom Excel.exe process running in the background before opening the Excel program, everything works.
This is a Microsoft Office 2010 issue.
Join the DZone community and get the full member experience.
Join For Free
What’s New in this Release?
Aspose development team is happy to announce the monthly release of Aspose.Words for Java &.NET 14.3.0. Aspose.Words now supports insertion of OLE objects such as another Microsoft Word document or a Microsoft Excel chart. A new public method, InsertOleObject, has been introduced in the DocumentBuilder class. This method can be used to insert an embedded or linked OLE object from a file into a Word document. Aspose.Words’ rendering engine now partially supports EUDC (End-User-Defined-Characters) fonts. Please find below the description of how EUDC fonts works on Windows. In this first implementation, Aspose.Words uses a single EUDC font. When rendering a document to fixed-page formats, this font is searched among the specified font sources by “EUDC” family name. Starting from Aspose.Words 14.3.0, Best Fit position of data labels in pie charts is partially supported. In previous versions labels with best fit position were rendered as if they had the inside end position. Currently we use a modified Open Office algorithm to set the best fit position of data labels. The list of new and improved features in this release are listed below
- Public API for insertion of OLE objects both linked and embedded
- Outline, Shadow, Reflection, Glow and Fill text effects for rendering text inside DrawingML shapes
- EUDC fonts rendering partially supported
- “PDF Logical Structure” export reworked, significantly improving memory usage
- Support OLE embedding of documents and files Feature
- Write an article about how to work with Table of contents in Aspose.Words
- Add <col> tag support
- Support BestFit position of Pie chart’s data labels.
- Support style:text-decoration attribute of Paragraph tag.
- Preserve private characters in EUDC.TTE during rendering to Pdf
- Support HTML table row borders in HTML import
- Support text outline effect.
- Support text fill effect.
- Support text shadow effect.
- Support text reflection effect
- Support text glow effect.
- Support text effects applied to text in Dml Shape or in SmartArt.
- Implement reading text effects from rPr in DML.
- Support inheriting styles from parent objects.
- Add image compression options for different image types
- Add a link to the online documentation in the DLLs only release
- Default run properties lose lang attribute value on DOCX to DOC conversions
- Padding for image in table is lost when rendering to Pdf
- Consider using «Don’t vertically align cells containing floating objects» compatibility option when exporting to HTML
- Shape in table’s cell is improperly horizontally aligned to center after export to HTML is now fixed
- Floating shape is now properly vertically positioned after export to HTML
- Warning : Unkno/wn ProgId value ‘Visio.Drawing.11’. This might cause inaccessible OLE embedding
- Charts (DrawingML) issue fixed and now render correctly in Pdf file
- Aspose.Words now properly work in Jdeveloper IDE
- OLE object cannot be edited after re saving the document
- Diagram connectors are inverted/flipped after conversion from Docx to pdf
- WordArt letters are condensing issue is resolved
- Condensed character spacing is lost is fixed
- Relative hyperlink with Unicode is now properly saved to Pdf
- Add pre-built Document Explorer JAR to Java release.
- Aspose.Words does not take in account style set in <head>.
- Table now looks correctly while converting html to doc.
- Hyperlinks split into multiple fragments/links in output PDF
- Horizontal table position is corrected.
- Document.UpdateFields Does not Update TOC in DOCX
- Content in the output html is overlapped at many places in Html
- Different table justify alignment for different compatibilityMode values.
- CSS selectors now work for <thead>, <tbody>, and<tfoot> elements
- Chart Legend/Series now render correctly in output Pdf file
- Data labels with best fit position are rendering at correct places in Chart
- Offset of the hyperlink text line is off by a few pixels in output Pdf
- Hyperlinks split into multiple fragments/links in output PDF is fixed
- Document.UpdateFields is enhanced and update SUM formula field
- Paragraph’s first line indent increases is fixed when exported to HTM
- Space before a paragraph following a floating element is too large after HTML to DOCX conversion is now fixd
- Block-level SVG image become inline after HTML to DOCX conversion
- Problem with vertical paragraph spacing is resolved when importing HTML using InsertHtml method
- Shape rotation is fixed after conversion from Doc to Pdf
- Text color is changed after conversion from Docx to WordML/Doc
- Word Table indentation is now corrected when <table> is placed inside <li>
- Arrows on the Lines gets distorted when converting to Pdf is now fixed
- A space character is exported to PDF output between Japanese and Numeric characters is fixed
- Line Shape from Header is merged with the top border of Table in Body
- Docx to WordML conversion issue resolved with content control
- Junk text is rendered in fixed page formats
- Positions of some DrawingML circles are now preserved during rendering
- A row and some content is rendering at the bottom of previous page is fixed
- Header table rows and images are now preserved in PDF
- List items issue fixed, now line up correctly after conversion from RTF to HTML
- Conversion from Docm to Doc creates corrupted document now fixed
- Hyperlink for an icon is now preserved during HTML to PDF conversion
- Text overlapping is fixed after conversion from Docx to Pdf
- Text position change is fixed after conversion from Docx to Pdf
Other most recent bug fixes are also included in this release
Newly added documentation pages and articles
Some new tips and articles have now been added into Aspose.Words for .NET documentation that may guide you briefly how to use Aspose.Words for performing different tasks like the followings.
- How Aspose.Words Uses True Type Fonts
- How to Extract Images from a Document
Overview: Aspose.Words
Aspose.Words is a word processing component that enables .NET, Java & Android applications to read, write and modify Word documents without using Microsoft Word. Other useful features include document creation, content and formatting manipulation, mail merge abilities, reporting features, TOC updated/rebuilt, Embedded OOXML, Footnotes rendering and support of DOCX, DOC, WordprocessingML, HTML, XHTML, TXT and PDF formats (requires Aspose.Pdf). It supports both 32-bit and 64-bit operating systems. You can even use Aspose.Words for .NET to build applications with Mono.
More about Aspose.Words
- Homepage Aspose.Words for .NET
- Homepage Java Word Library
- Download Aspose.Words for .NET
- Download Aspose.Words for Java
- Demos for Aspose.Words
Contact Information
Aspose Pty Ltd
Suite 163, 79 Longueville Road
Lane Cove, NSW, 2066
Australia
Aspose — Your File Format Experts
sales@aspose.com
Phone: 888.277.6734
Fax: 866.810.9465
Database
Object (computer science)
file IO
Java (programming language)
Opinions expressed by DZone contributors are their own.
Trending
-
How to Build a URL Shortener Web App With Flask Framework
-
The Art of App Development: Tips for Building a Successful Mobile App
-
What Are the Benefits of Java Module With Example
-
Why Use Kubernetes for Your Enterprise?
- Remove From My Forums
-
Question
-
I am currently working on an add-in for Word 2010 that programatically detects and modifies links in a document based on certain criteria.
I do this by preparing the new file path in a string, and then assigning the value of the link’s SourceFullName property to the new path. This works almost every time.
However, I have run across an OLE link to another Word document that was made with Paste Special. When I do a watch on it, it has all of the proper LinkFormat properties, and I can pull the information I need out of it. But when I go to assign values
back into it, namely update the SourceFullName property, it throws an error of «The item name «OLE_LINK1″ of link [updated link path] cannot be found.» (The path and the file I am updating to are valid — if I go to change it directly
through Word’s ‘Links’ dialog, it is updated no sweat.)When this error is caught, the code drops down into a slightly lower level and directly modifies the Code.Text property of the link. Do this, check everything, it all looks good. However, if you actually look at the link, it hasn’t been modified — it’s still
at the old value. Run the link through the exact same code a second time, though, and it’s properly updated and fixed.Is there any way to force the updated Code.Text to be ‘committed’ (for lack of a better term) in one pass?