
В этой главе даётся очень краткий обзор редактора Visual Basic в Excel. Если Вы любознательный читатель и хотите узнать еще больше информации о редакторе, то при желании без проблем найдете ресурсы с более подробным описанием.
Содержание
- Запуск редактора Visual Basic
- Окна редактора Visual Basic
- Окно проекта (Project)
- Окно кода (Code)
- Окно свойств (Properties)
- Окно отладчика (Immediate)
- Окно переменных (Locals)
- Окно отслеживания (Watches)
Запуск редактора Visual Basic
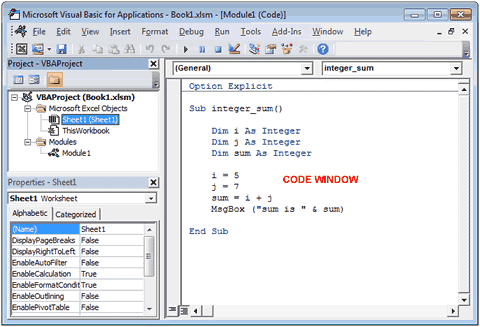
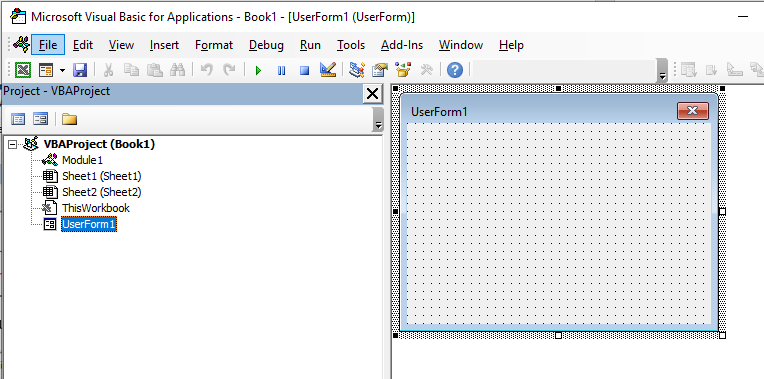
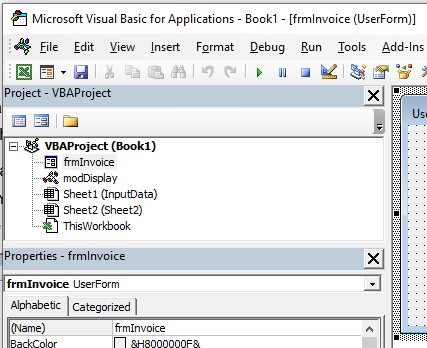
Простейший способ запустить редактор Visual Basic в Excel – нажать комбинацию клавиш Alt+F11 (то есть нажать клавишу Alt и, удерживая её, нажать клавишу F11). После этого откроется окно редактора Visual Basic, как показано на картинке ниже. Имейте ввиду, что окно Excel остается открытым и находится позади окна редактора.
Окна редактора Visual Basic
В процессе работы в редакторе Visual Basic в Excel могут быть открыты различные окна. Управление окнами осуществляется в меню View, которое находится в верхней части окна редактора VBA. Ниже дано описание отдельных окон.
Окно проекта (Project)
Окно Project открывается в левой части редактора VBA (показано на картинке выше). В этом окне для каждой открытой рабочей книги создаётся проект VBA (VBA Project). Проект VBA – это набор всех объектов и модулей VBA, привязанных к текущей книге. Изначально в него входят:
- Объект ЭтаКнига (ThisWorkbook), привязанный к книге Excel;
- Объекты Лист (Sheet), привязанные к каждому листу текущей рабочей книги Excel.

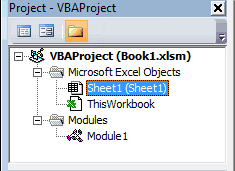
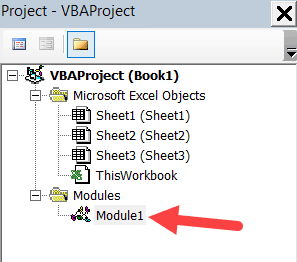
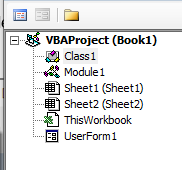
Самостоятельно в проект можно добавить объекты Userform, Module и Class Module. Если Вы посмотрите на картинку выше, то увидите, что в проект VBA для книги Book1.xlsm добавлен объект Module с названием Module1.
Вот как можно создать новый объект Userform, Module или Class Module:
- В окне Project выберите рабочую книгу, в которую нужно добавить объект, и кликните по ней правой кнопкой мыши.
- В появившемся меню кликните Insert и в раскрывшемся меню выберите Userform, Module или Class Module.
Для каждого из описанных выше объектов предусмотрено специальное окно, в котором будет создаваться и храниться новый код VBA. Порядок при этом такой:
- Код, который относится к рабочей книге, должен быть введён в соответствующий объект ЭтаКнига (ThisWorkbook);
- Код, который относится к рабочему листу, должен быть введён в соответствующий объект Лист (Sheet);
- Код более общего характера должен быть введён в Module;
- Код для нового объекта должен быть введён в Class Module;
- Если нужно создать диалоговое окно для взаимодействия с пользователем, то можно использовать Userform.
Окно кода (Code)
Двойной щелчок мышью по любому объекту в окне Project открывает соответствующее окно Code, предназначенное для ввода кода VBA с клавиатуры. На одном из приведённых выше рисунков показано окно кода для Module1.
По мере ввода кода VBA в окно Code, редактор Visual Basic следит за правильностью ввода, ищет ошибки в коде и выделяет код, который требует исправления.
Окно свойств (Properties)
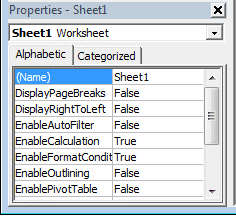
В окне Properties перечислены свойства объекта, который в момент создания (не в процессе выполнения программы) выделен в окне проекта. Эти свойства могут быть различными в зависимости от типа выделенного объекта (лист, книга, модуль и другие).
Окно отладчика (Immediate)
Окно Immediate можно отобразить в редакторе Visual Basic через меню View > Immediate Window или нажатием комбинации клавиш Ctrl+G. Это окно помогает при отладке кода. Оно выполняет роль области вывода для отладки выражений и позволяет вычислять отдельные выражения или выполнять строки кода по одной.
Например, введите выражение «?j» и нажмите Enter – в результате будет выведено текущее значение переменной j.

Окно переменных (Locals)
Чтобы открыть окно Locals, нажмите Locals Window в меню View редактора Visual Basic. В этом окне отображаются все переменные, объявленные в текущей процедуре. Окно делится на столбцы, в которых содержатся имя, значение и тип каждой переменной, и эта информация обновляется автоматически в ходе выполнения программы. Окно Locals очень полезно при отладке кода VBA.

Окно отслеживания (Watches)
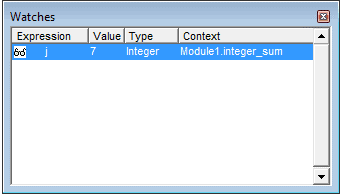
Окно Watches также очень помогает при отладке кода VBA, так как в нём можно увидеть значение, тип и контекст любого отслеживаемого выражения, которое задаст пользователь. Чтобы открыть окно Watches, нажмите Watch Window в меню View редактора Visual Basic. Также окно Watches будет открыто автоматически, если задать отслеживаемое выражение.
Чтобы задать отслеживаемое выражение, нужно:
- Выделить выражение в редактируемом коде VBA.
- В меню Debug редактора VBA нажать Quick Watch.
- Нажать Add.
Кроме рассмотренных, в меню редактора Visual Basic в Excel существует ещё множество параметров и команд, используемых при создании, выполнении и отладке кода VBA.
Оцените качество статьи. Нам важно ваше мнение:
The first step to working with VBA in Excel is to get yourself familiarized with the Visual Basic Editor (also called the VBA Editor or VB Editor).
In this tutorial, I will cover all there is to know about the VBA Editor and some useful options that you should know when coding in Excel VBA.
What is Visual Basic Editor in Excel?
Visual Basic Editor is a separate application that is a part of Excel and opens whenever you open an Excel workbook. By default, it’s hidden and to access it, you need to activate it.
VB Editor is the place where you keep the VB code.
There are multiple ways you get the code in the VB Editor:
- When you record a macro, it automatically creates a new module in the VB Editor and inserts the code in that module.
- You can manually type VB code in the VB editor.
- You can copy a code from some other workbook or from the internet and paste it in the VB Editor.
Opening the VB Editor
There are various ways to open the Visual Basic Editor in Excel:
- Using a Keyboard Shortcut (easiest and fastest)
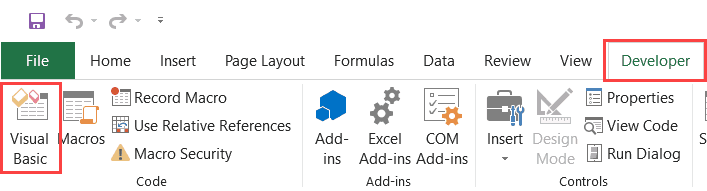
- Using the Developer Tab.
- Using the Worksheet Tabs.
Let’s go through each of these quickly.
Keyboard Shortcut to Open the Visual Basic Editor
The easiest way to open the Visual Basic editor is to use the keyboard shortcut – ALT + F11 (hold the ALT key and press the F11 key).

As soon as you do this, it will open a separate window for the Visual Basic editor.
This shortcut works as a toggle, so when you use it again, it will take you back to the Excel application (without closing the VB Editor).
The shortcut for the Mac version is Opt + F11 or Fn + Opt + F11
Using the Developer Tab
To open the Visual Basic Editor from the ribbon:
- Click the Developer tab (if you don’t see a developer tab, read this on how to get it).
- In the Code group, click on Visual Basic.
Using the Worksheet Tab
This is a less used method to open the Vb Editor.
Go to any of the worksheet tabs, right-click, and select ‘View Code’.
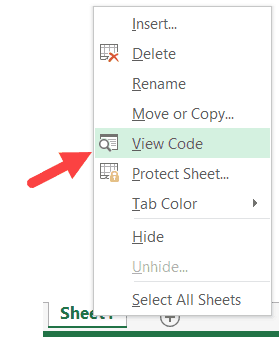
This method wouldn’t just open the VB Editor, it will also take you to the code window for that worksheet object.
This is useful when you want to write code that works only for a specific worksheet. This is usually the case with worksheet events.
Anatomy of the Visual Basic Editor in Excel
When you open the VB Editor for the first time, it may look a bit overwhelming.
There are different options and sections that may seem completely new at first.
Also, it still has an old Excel 97 days look. While Excel has improved tremendously in design and usability over the years, the VB Editor has not seen any change in the way it looks.
In this section, I will take you through the different parts of the Visual Basic Editor application.
Note: When I started using VBA years ago, I was quite overwhelmed with all these new options and windows. But as you get used to working with VBA, you would get comfortable with most of these. And most of the time, you’ll not be required to use all the options, only a hand full.
Below is an image of the different components of the VB Editor. These are then described in detail in the below sections of this tutorial.
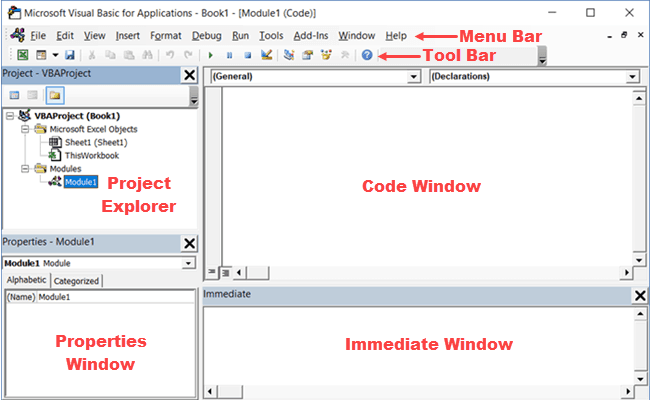
Now let’s quickly go through each of these components and understand what it does:
Menu Bar
This is where you have all the options that you can use in the VB Editor. It is similar to the Excel ribbon where you have tabs and options with each tab.
You can explore the available options by clicking on each of the menu element.
You will notice that most of the options in VB Editor have keyboard shortcuts mentioned next to it. Once you get used to a few keyboard shortcuts, working with the VB Editor becomes really easy.
Tool Bar
By default, there is a toolbar in the VB Editor which has some useful options that you’re likely to need most often. This is just like the Quick Access Toolbar in Excel. It gives you quick access to some of the useful options.
You can customize it a little by removing or adding options to it (by clicking on the small downward pointing arrow at the end of the toolbar).

In most cases, the default toolbar is all you need when working with the VB Editor.
You can move the toolbar above the menu bar by clicking on the three gray dots (at the beginning of the toolbar) and dragging it above the menu bar.
Note: There are four toolbars in the VB Editor – Standard, Debug, Edit, and User form. What you see in the image above (which is also the default) is the standard toolbar. You can access other toolbars by going to the View option and hovering the cursor on the Toolbars option. You can add one or more toolbars to the VB Editor if you want.
Project Explorer
Project Explorer is a window on the left that shows all the objects currently open in Excel.
When you’re working with Excel, every workbook or add-in that is open is a project. And each of these projects can have a collection of objects in it.
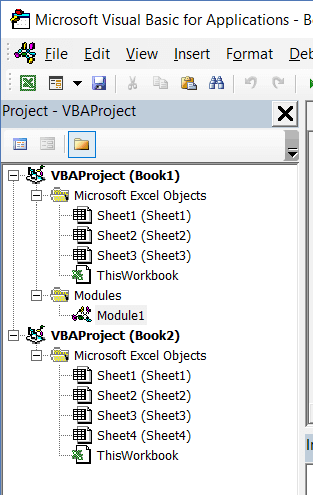
For example, in the below image, the Project Explorer shows the two workbooks that are open (Book1 and Book2) and the objects in each workbook (worksheets, ThisWorkbook, and Module in Book1).
There is a plus icon to the left of objects that you can use to collapse the list of objects or expand and see the complete list of objects.
The following objects can be a part of the Project Explorer:
- All open Workbooks – within each workbook (which is also called a project), you can have the following objects:
- Worksheet object for each worksheet in the workbook
- ThisWorkbook object which represents the workbook itself
- Chartsheet object for each chart sheet (these are not as common as worksheets)
- Modules – This is where the code that is generated with a macro recorder goes. You can also write or copy-paste VBA code here.
- All open Add-ins
Consider the Project Explorer as a place that outlines all the objects open in Excel at the given time.
The keyboard shortcut to open the Project Explorer is Control + R (hold the control key and then press R). To close it, simply click the close icon at the top right of the Project Explorer window.
Note: For every object in Project Explorer, there is a code window in which you can write the code (or copy and paste it from somewhere). The code window appears when you double click on the object.
Properties Window
Properties window is where you get to see the properties of the select object. If you don’t have the Properties window already, you can get it by using the keyboard shortcut F4 (or go to the View tab and click Properties window).
Properties window is a floating window which you can dock in the VB Editor. In the below example, I have docked it just below the Project Explorer.
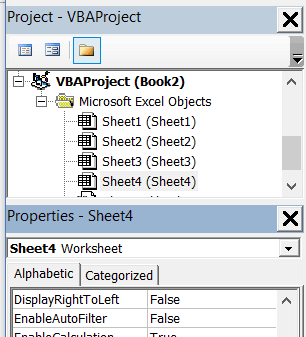
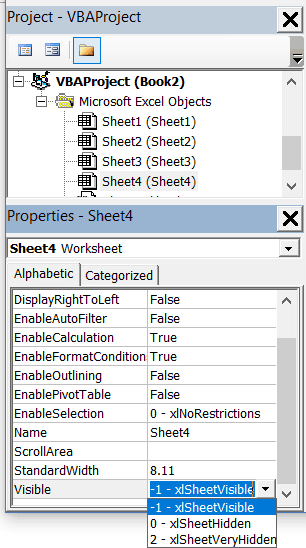
Properties window allows us to change the properties of a selected object. For example, if I want to make a worksheet hidden (or very hidden), I can do that by changing the Visible Property of the selected worksheet object.
Related: Hiding a Worksheet in Excel (that can not be un-hidden easily)
Code Window
There is a code window for each object that is listed in the Project Explorer. You can open the code window for an object by double-clicking on it in the Project Explorer area.
Code window is where you’ll write your code or copy paste a code from somewhere else.
When you record a macro, the code for it goes into the code window of a module. Excel automatically inserts a module to place the code in it when recording a macro.
Related: How to Run a Macro (VBA Code) in Excel.
Immediate Window
The Immediate window is mostly used when debugging code. One way I use the Immediate window is by using a Print.Debug statement within the code and then run the code.
It helps me to debug the code and determine where my code gets stuck. If I get the result of Print.Debug in the immediate window, I know the code worked at least till that line.
If you’re new to VBA coding, it may take you some time to be able to use the immediate window for debugging.
By default, the immediate window is not visible in the VB Editor. You can get it by using the keyboard shortcut Control + G (or can go to the View tab and click on ‘Immediate Window’).
Where to Add Code in the VB Editor
I hope you now have a basic understanding of what VB Editor is and what all parts it has.
In this section of this tutorial, I will show you where to add a VBA code in the Visual Basic Editor.
There are two places where you can add the VBA code in Excel:
- The code window for an object. These objects can be a workbook, worksheet, User Form, etc.
- The code window of a module.
Module Code Window Vs Object Code Window
Let me first quickly clear the difference between adding a code in a module vs adding a code in an object code window.
When you add a code to any of the objects, it’s dependent on some action of that object that will trigger that code. For example, if you want to unhide all the worksheets in a workbook as soon as you open that workbook, then the code would go in the ThisWorkbook object (which represents the workbook).
The trigger, in this case, is opening the workbook.
Similarly, if you want to protect a worksheet as soon as some other worksheet is activated, the code for that would go in the worksheet code window.
These triggers are called events and you can associate a code to be executed when an event occurs.
Related: Learn more about Events in VBA.
On the contrary, the code in the module needs to be executed either manually (or it can be called from other subroutines as well).
When you record a macro, Excel automatically creates a module and inserts the recorded macro code in it. Now if you have to run this code, you need to manually execute the macro.
Adding VBA Code in Module
While recording a macro automatically creates a module and inserts the code in it, there are some limitations when using a macro recorder. For example, it can not use loops or If Then Else conditions.
In such cases, it’s better to either copy and paste the code manually or write the code yourself.
A module can be used to hold the following types of VBA codes:
- Declarations: You can declare variables in a module. Declaring variables allows you to specify what type of data a variable can hold. You can declare a variable for a sub-routine only or for all sub-routines in the module (or all modules)
- Subroutines (Procedures): This is the code that has the steps you want VBA to perform.
- Function Procedures: This is a code that returns a single value and you can use it to create custom functions (also called User Defined Functions or UDFs in VBA)
By default, a module is not a part of the workbook. You need to insert it first before using it.
Adding a Module in the VB Editor
Below are the steps to add a module:
- Right-click on any object of the workbook (in which you want the module).

- Hover the cursor on the Insert option.
- Click on Module.


This would instantly create a folder called Module and insert an object called Module 1. If you already have a module inserted, the above steps would insert another module.
Once the module is inserted, you can double click on the module object in the Project Explorer and it will open the code window for it.
Now you can copy-paste the code or write it yourself.
Removing the Module
Below are the steps to remove a module in Excel VBA:
- Right-click on the module that you want to remove.
- Click on Remove Module option.

- In the dialog box that opens, click on No.


Note: You can export a module before removing it. It gets saved as a .bas file and you can import it in some other project. To export a module, right-click on the module and click on ‘Export file’.
Adding Code to the Object Code Window
To open the code window for an object, simply double-click on it.
When it opens, you can enter the code manually or copy-paste the code from other modules or from the internet.
Note that some of the objects allow you to choose the event for which you want to write the code.
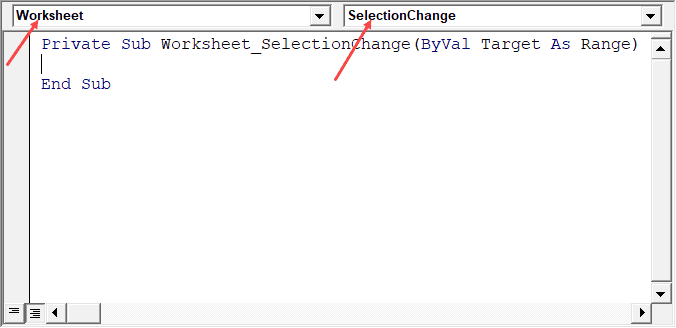
For example, if you want to write a code for something to happen when selection is changed in the worksheet, you need to first select worksheets from the drop-down at the top left of the code window and then select the change event from the drop-down on the right.
Note: These events are specific to the object. When you open the code window for a workbook, you will see the events related to the workbook object. When you open the code window for a worksheet, you will see the events related to the worksheet object.
Customizing the VB Editor
While the default settings of the Visual Basic Editor are good enough for most users, it does allow you to further customize the interface and a few functionalities.
In this section of the tutorial, I will show you all the options you have when customizing the VB Editor.
To customize the VB Editor environment, click Tools in the menu bar and then click on Options.
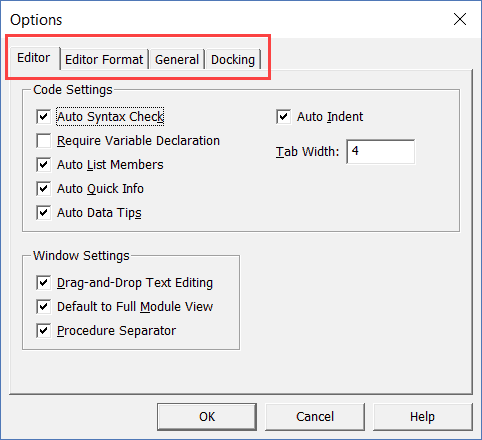
This would open the Options dialog box which will give you all the customization options in the VB Editor. The ‘Options’ dialog box has four tabs (as shown below) that have various customizations options for the Visual Basic Editor.
Let’s quickly go through each of these tabs and the important options in each.
Editor Tab
While the inbuilt settings work fine in most cases, let me still go through the options in this tab.
As you get more proficient working with VBA in Excel, you may want to customize the VB Editor using some of these options.
Auto Syntax Check
When working with VBA in Excel, as soon as you make a syntax error, you will be greeted by a pop-up dialog box (with some description about the error). Something as shown below:
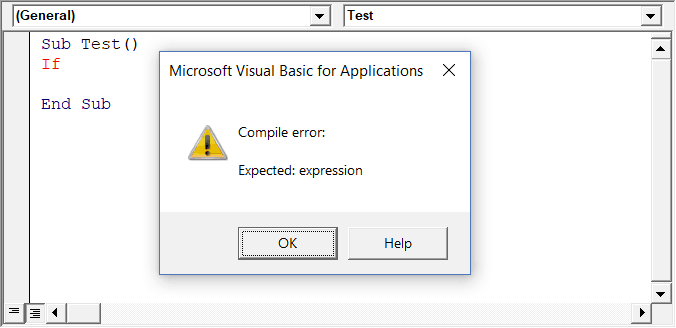
If you disable this option, this pop-up box will not appear even when you make a syntax error. However, there would be a change in color in the code text to indicate that there is an error.
If you’re a beginner, I recommend you keep this option enabled. As you get more experienced with coding, you may start finding these pop-up boxes irritating, and then you can disable this option.
Require Variable Declaration
This is one option I recommend enabling.
When you’re working with VBA, you would be using variables to hold different data types and objects.
When you enable this option, it automatically inserts the ‘Option Explicit’ statement at the top of the code window. This forces you to declare all the variables that you’re using in your code. If you don’t declare a variable and try to execute the code, it will show an error (as shown below).
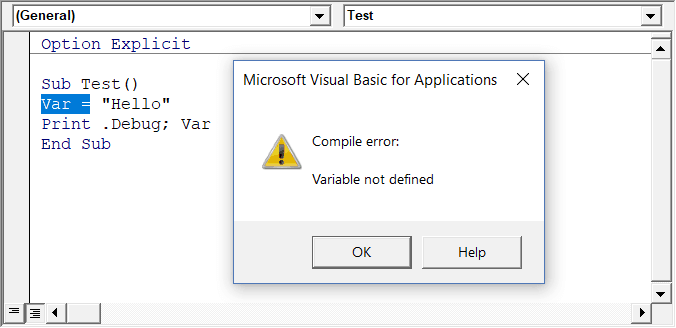
In the above case, I used the variable Var, but I didn’t declare it. So when I try to run the code, it shows an error.
This option is quite useful when you have a lot of variables. It often helps me find misspelled variables names as they are considered as undeclared and an error is shown.
Note: When you enable this option, it does not impact the existing modules.
Auto List Member
This option is quite useful as it helps you get a list of properties of methods for an object.
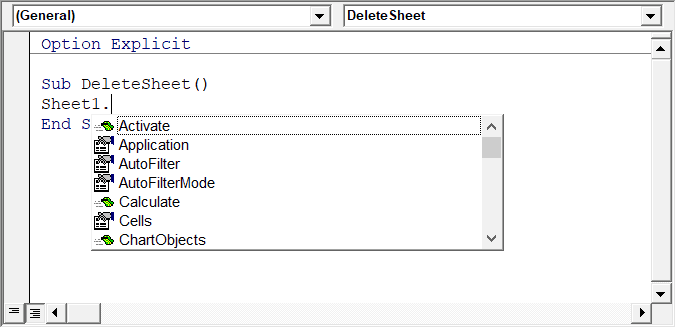
For example, if I want to delete a worksheet (Sheet1), I need to use the line Sheet1.Delete.
While I am typing the code, as soon as I type the dot, it will show me all the methods and properties associated with the Worksheet object (as shown below).
Auto list feature is great as it allows you to:
- Quickly select the property and method from the list and saves time
- Shows you all the properties and methods which you may not be aware of
- Avoid making spelling errors
This option is enabled by default and I recommend keeping it that way.
Auto Quick Info Options
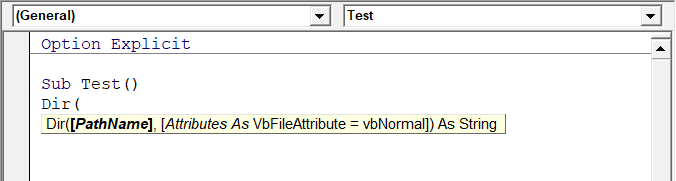
When you type a function in Excel worksheet, it shows you some information about the function – such as the arguments it takes.
Similarly, when you type a function in VBA, it shows you some information (as shown below). But for that to happen, you need to make sure the Auto Quick Info option is enabled (which it is by default).
Auto Data Tips Options
When you’re going through your code line by line and place your cursor above a variable name, it will show you the value of the variable.
I find it quite useful when debugging the code or going through the code line by line which has loops in it.

In the above example, as soon as I put the cursor over the variable (var), it shows the value it holds.
This option is enabled by default and I recommend you keep it that way.
Auto Indent
Since VBA codes can get long and messy, using indentation increases the readability of the code.
When writing code, you can indent using the tab key.
This option ensures that when you are done with the indented line and hit enter, the next line doesn’t start from the very beginning, but has the same indentation as the previous line.
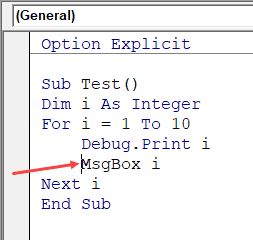
In the above example, after I write the Debug.Print line and hit enter, it will start right below it (with the same indentation level).
I find this option useful and turning this off would mean manually indenting each line in a block of code that I want indented.
You can change the indentation value if you want. I keep it at the default value.
Drag and Drop Text Editing
When this option is enabled, it allows you to select a block of code and drag and drop it.
It saves time as you don’t have to first cut and then paste it. You can simply select and drag it.
This option is enabled by default and I recommend you keep it that way.
Default to Full Module View
When this option is enabled, you will be able to see all the procedures in a module in one single scrollable list.
If you disable this option, you will only be able to see one module at a time. You will have to make a selection of the module you want to see from the drop-down at the top right of the code window.
This option is enabled by default and I recommend keeping it that way.
One reason you may want to disable it when you have multiple procedures that are huge and scrolling across these is taking time, or when you have a lot of procedures and you want to quickly find it instead of wasting time in scrolling.
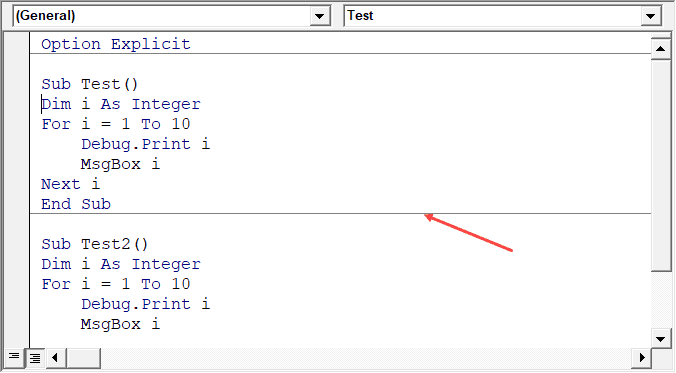
Procedure Separator
When this option is enabled, you will see a line (a kind of divider) between two procedures.
I find this useful as it visually shows when one procedure ends and the other one starts.
It’s enabled by default and I recommend keeping it that way.
Editor Format Tab
With the options in the Editor Format tab, you can customize the way your code looks in the code window.
Personally, I keep all the default options as I am fine with it. If you want, you can tweak this based on your preference.
To make a change, you need to first select an option in the Code Colors box. Once an option is selected, you can modify the foreground, background, and indicator color for it.
The font type and font size can also be set in this tab. It’s recommended to use a fixed-width font such as Courier New, as it makes the code more readable.
Note that the font type and size setting will remain the same for all code types (i.e., all the code types shown in the code color box).
Below is an image where I have selected Breakpoint, and I can change the formatting of it.
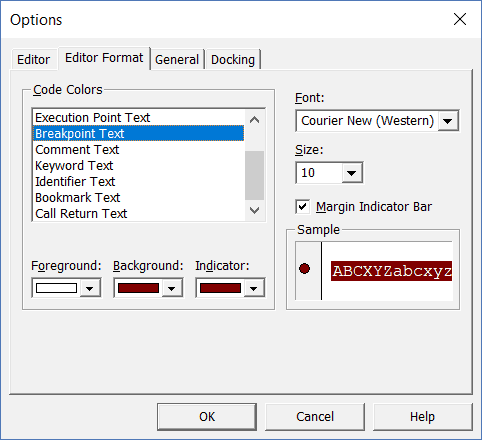
Note: The Margin Indicator Bar option when enabled shows a little margin bar to the left of the code. It’s helpful as it shows useful indicators when executing the code. In the above example, when you set a breakpoint, it will automatically show a red dot to the left of the line in the margin bar. Alternatively, to set a breakpoint, you can simply click on the margin bar on the left of the code line that you want as the breakpoint.
By default, Margin Indicator Bar is enabled and I recommend keeping it that way.
One of my VBA course students found this customization options useful and she was color blind. Using the options here, she was able to set the color and formats that made it easy for her to work with VBA.
General Tab
The General tab has many options but you don’t need to change any of it.
I recommend you keep all the options as is.
One important option to know about in this tab is Error Handling.
By default, ‘Break on Unhandled Errors’ is selected and I recommend keeping it that way.
This option means that if your code encounters an error, and you have not handled that error in your code already, then it will break and stop. But if you have addressed the error (such as by using On Error Resume Next or On Error Goto options), then it will not break (as the errors are not unhandled).
Docking Tab
In this tab, you can specify which windows you want to get docked.
Docking means that you can fix the position of a window (such as project explorer or the Properties window) so that it doesn’t float around and you can view all the different windows at the same time.
If you don’t dock, you will be able to view one window at a time in full-screen mode and will have to switch to the other one.
I recommend keeping the default settings.
Other Excel tutorials you may like:
- How to Remove Macros From an Excel Workbook
- Comments in Excel VBA (Add, Remove, Block Commenting)
- Using Active Cell in VBA in Excel (Examples)
Содержание
- Что такое редактор Visual Basic в Excel?
- Открытие редактора VB
- Анатомия редактора Visual Basic в Excel
- Куда добавить код в редакторе VB
- Настройка редактора VB
Первым шагом к работе с VBA в Excel является ознакомление с редактором Visual Basic (также называемым редактором VBA или редактором VB).
В этом руководстве я расскажу все, что нужно знать о редакторе VBA, и некоторые полезные параметры, которые вы должны знать при кодировании в Excel VBA.
Редактор Visual Basic — это отдельное приложение, которое является частью Excel и открывается всякий раз, когда вы открываете книгу Excel. По умолчанию он скрыт, и для доступа к нему необходимо активировать его.
VB Editor — это место, где вы храните код VB.
Получить код в редакторе VB можно несколькими способами:
- Когда вы записываете макрос, он автоматически создает новый модуль в редакторе VB и вставляет код в этот модуль.
- Вы можете вручную ввести код VB в редакторе VB.
- Вы можете скопировать код из другой книги или из Интернета и вставить его в редактор VB.
Открытие редактора VB
Открыть редактор Visual Basic в Excel можно разными способами:
- Использование сочетания клавиш (самый простой и быстрый)
- Используя вкладку разработчика.
- Использование вкладок рабочего листа.
Давайте быстро пройдемся по каждому из них.
Сочетание клавиш для открытия редактора Visual Basic
Самый простой способ открыть редактор Visual Basic — использовать сочетание клавиш — ALT + F11 (удерживая клавишу ALT, нажмите клавишу F11).

Как только вы это сделаете, откроется отдельное окно для редактора Visual Basic.
Этот ярлык работает как переключатель, поэтому при повторном использовании он вернет вас в приложение Excel (без закрытия редактора VB).
Ярлык для версии Mac: Opt + F11 или Fn + Opt + F11
Использование вкладки разработчика
Чтобы открыть редактор Visual Basic с ленты:
- Перейдите на вкладку «Разработчик» (если вы не видите вкладку «Разработчик», прочтите, как ее получить).
- В группе «Код» щелкните Visual Basic.

Использование вкладки рабочего листа
Это менее используемый метод открытия редактора Vb.
Перейдите на любую из вкладок рабочего листа, щелкните правой кнопкой мыши и выберите «Просмотреть код».

Этот метод не просто откроет редактор VB, он также перенесет вас в окно кода для этого объекта рабочего листа.
Это полезно, когда вы хотите написать код, который работает только для определенного рабочего листа. Обычно это происходит с событиями рабочего листа.
Анатомия редактора Visual Basic в Excel
Когда вы открываете редактор VB в первый раз, это может показаться немного подавляющим.
Существуют различные варианты и разделы, которые сначала могут показаться совершенно новыми.
Кроме того, он все еще выглядит как старый Excel 97 дней. Хотя дизайн и удобство использования Excel значительно улучшились за последние годы, редактор VB не претерпел каких-либо изменений в своем внешнем виде.
В этом разделе я познакомлю вас с различными частями приложения Visual Basic Editor.
Примечание. Когда я начал использовать VBA несколько лет назад, меня поразили все эти новые параметры и окна. Но когда вы привыкнете работать с VBA, вы освоитесь с большинством из них. И в большинстве случаев вам не нужно будет использовать все возможности, а только ручную работу.
Ниже представлены изображения различных компонентов редактора VB. Затем они подробно описаны в следующих разделах этого руководства.

Теперь давайте быстро рассмотрим каждый из этих компонентов и поймем, что он делает:
Строка меню
Здесь у вас есть все параметры, которые вы можете использовать в редакторе VB. Это похоже на ленту Excel, где у вас есть вкладки и параметры для каждой вкладки.
Вы можете изучить доступные варианты, щелкнув каждый элемент меню.
Вы заметите, что рядом с большинством параметров в редакторе VB указаны сочетания клавиш. Как только вы привыкнете к нескольким сочетаниям клавиш, работа с редактором VB станет действительно простой.
Панель инструментов
По умолчанию в редакторе VB есть панель инструментов, на которой есть несколько полезных опций, которые могут вам понадобиться чаще всего. Это похоже на панель быстрого доступа в Excel. Это дает вам быстрый доступ к некоторым полезным параметрам.
Вы можете немного настроить его, удалив или добавив к нему параметры (щелкнув небольшую стрелку, направленную вниз, в конце панели инструментов).

В большинстве случаев панель инструментов по умолчанию — это все, что вам нужно при работе с редактором VB.
Вы можете переместить панель инструментов над строкой меню, щелкнув три серые точки (в начале панели инструментов) и перетащив ее над строкой меню.
Примечание. В редакторе VB есть четыре панели инструментов — Стандартная, Отладка, Редактировать и Пользовательская форма. То, что вы видите на изображении выше (которое также используется по умолчанию), является стандартной панелью инструментов. Вы можете получить доступ к другим панелям инструментов, перейдя к параметру «Просмотр» и наведя курсор на параметр «Панели инструментов». Вы можете добавить одну или несколько панелей инструментов в редактор VB, если хотите.
Обозреватель проекта
Обозреватель проекта — это окно слева, в котором отображаются все объекты, открытые в настоящее время в Excel.
Когда вы работаете с Excel, каждая открытая книга или надстройка является проектом. И в каждом из этих проектов может быть набор объектов.
Например, на изображении ниже в Project Explorer показаны две открытые книги (Book1 и Book2) и объекты в каждой книге (рабочие листы, ThisWorkbook и Module в Book1).
Слева от объектов есть значок плюса, который можно использовать, чтобы свернуть список объектов или развернуть и просмотреть полный список объектов.

Следующие объекты могут быть частью Project Explorer:
- Все открытые книги — в каждой книге (которая также называется проектом) вы можете иметь следующие объекты:
- Объект рабочего листа для каждого листа в книге
- ThisWorkbook объект который представляет собой книгу
- Таблица объект для каждого листа диаграммы (они не так распространены, как рабочие листы)
- Модули — Здесь идет код, созданный с помощью средства записи макросов. Вы также можете написать или скопировать код VBA сюда.
- Все открытые надстройки
Рассматривайте Project Explorer как место, где отображаются все объекты, открытые в Excel в данный момент.
Сочетание клавиш для открытия Project Explorer: Ctrl + R (удерживайте контрольную клавишу, а затем нажмите R). Чтобы закрыть его, просто щелкните значок закрытия в правом верхнем углу окна Project Explorer.
Примечание. Для каждого объекта в Project Explorer есть окно кода, в котором вы можете написать код (или скопировать и вставить его откуда-нибудь). Окно кода появляется при двойном щелчке по объекту.
Окно свойств
Окно свойств — это то место, где вы можете увидеть свойства выбранного объекта. Если у вас еще нет окна «Свойства», вы можете получить его с помощью сочетания клавиш F4 (или перейдите на вкладку «Просмотр» и нажмите «Окно свойств»).
Окно свойств — это плавающее окно, которое можно закрепить в редакторе VB. В приведенном ниже примере я закрепил его чуть ниже Project Explorer.

Окно свойств позволяет нам изменять свойства выбранного объекта. Например, если я хочу сделать рабочий лист скрытым (или очень скрытым), я могу сделать это, изменив свойство Visible для выбранного объекта рабочего листа.

Связанный: Скрытие рабочего листа в Excel (который не может быть легко отсканирован)
Окно кода
Для каждого объекта, перечисленного в Project Explorer, есть окно кода. Вы можете открыть окно кода для объекта, дважды щелкнув его в области Project Explorer.
Окно кода — это то место, где вы будете писать свой код или копировать и вставлять код из другого места.
Когда вы записываете макрос, его код попадает в окно кода модуля. Excel автоматически вставляет модуль для размещения в нем кода при записи макроса.
Связанный: Как запустить макрос (код VBA) в Excel.
Немедленное окно
Окно Immediate в основном используется при отладке кода. Один из способов использования окна Immediate — использование оператора Print.Debug в коде с последующим запуском кода.
Это помогает мне отлаживать код и определять, где мой код застревает. Если я получаю результат Print.Debug в непосредственном окне, я знаю, что код работал, по крайней мере, до этой строки.
Если вы новичок в кодировании VBA, вам может потребоваться некоторое время, чтобы использовать немедленное окно для отладки.
По умолчанию непосредственное окно не отображается в редакторе VB. Вы можете получить его, используя сочетание клавиш Control + G (или можете перейти на вкладку «Просмотр» и нажать «Немедленное окно»).
Куда добавить код в редакторе VB
Я надеюсь, что теперь у вас есть общее представление о том, что такое VB Editor и какие в нем части.
В этом разделе этого руководства я покажу вам, где добавить код VBA в редактор Visual Basic.
Есть два места, где вы можете добавить код VBA в Excel:
- Окно кода для объекта. Этими объектами могут быть рабочая книга, рабочий лист, пользовательская форма и т. Д.
- Окно кода модуля.
Окно кода модуля против окна кода объекта
Позвольте мне сначала быстро пояснить разницу между добавлением кода в модуль и добавлением кода в окне объектного кода.
Когда вы добавляете код к любому из объектов, он зависит от какого-либо действия этого объекта, которое запускает этот код. Например, если вы хотите отобразить все рабочие листы в книге, как только вы откроете эту книгу, тогда код будет помещен в объект ThisWorkbook (который представляет книгу).
В данном случае триггер открывает книгу.
Точно так же, если вы хотите защитить рабочий лист, как только активируется какой-либо другой рабочий лист, код для этого будет помещен в окно кода рабочего листа.
Эти триггеры называются событиями, и вы можете связать код, который будет выполняться при возникновении события.
Связанный: Узнайте больше о событиях в VBA.
Напротив, код в модуле должен выполняться вручную (или его также можно вызывать из других подпрограмм).
Когда вы записываете макрос, Excel автоматически создает модуль и вставляет в него записанный код макроса. Теперь, если вам нужно запустить этот код, вам нужно вручную выполнить макрос.
Добавление кода VBA в модуль
При записи макроса автоматически создается модуль и вставляется в него код, однако при использовании средства записи макросов существуют некоторые ограничения. Например, он не может использовать циклы или условия If Then Else.
В таких случаях лучше либо скопировать и вставить код вручную, либо написать код самостоятельно.
Модуль может использоваться для хранения следующих типов кодов VBA:
- Декларации: Вы можете объявлять переменные в модуле. Объявление переменных позволяет указать, какой тип данных может содержать переменная. Вы можете объявить переменную только для подпрограммы или для всех подпрограмм в модуле (или всех модулях)
- Подпрограммы (процедуры): Это код, в котором есть шаги, которые вы хотите выполнить с помощью VBA.
- Функциональные процедуры: Это код, который возвращает одно значение, и вы можете использовать его для создания пользовательских функций (также называемых пользовательскими функциями или UDF в VBA).
По умолчанию модуль не является частью книги. Вам необходимо вставить его перед использованием.
Добавление модуля в редактор VB
Ниже приведены шаги по добавлению модуля:
- Щелкните правой кнопкой мыши любой объект книги (в котором вы хотите установить модуль).
- Наведите курсор на опцию Вставить.
- Щелкните по модулю.


Это мгновенно создаст папку с именем Module и вставит объект с именем Module 1. Если у вас уже есть вставленный модуль, вышеупомянутые шаги будут вставлять другой модуль.

После того, как модуль вставлен, вы можете дважды щелкнуть объект модуля в Project Explorer, и он откроет для него окно кода.
Теперь вы можете скопировать и вставить код или написать его самостоятельно.
Удаление модуля
Ниже приведены шаги по удалению модуля в Excel VBA:
- Щелкните правой кнопкой мыши модуль, который хотите удалить.
- Нажмите на опцию «Удалить модуль».
- В открывшемся диалоговом окне нажмите Нет.


Примечание. Вы можете экспортировать модуль перед его удалением. Он сохраняется как файл .bas, и вы можете импортировать его в другой проект. Чтобы экспортировать модуль, щелкните модуль правой кнопкой мыши и выберите «Экспорт файла».
Добавление кода в окно объектного кода
Чтобы открыть окно кода для объекта, просто дважды щелкните по нему.
Когда он откроется, вы можете ввести код вручную или скопировать и вставить код из других модулей или из Интернета.
Обратите внимание, что некоторые объекты позволяют выбрать событие, для которого вы хотите написать код.
Например, если вы хотите написать код, чтобы что-то происходило при изменении выбора на листе, вам нужно сначала выбрать листы из раскрывающегося списка в верхнем левом углу окна кода, а затем выбрать событие изменения из раскрывающегося списка. -вниз справа.

Примечание: эти события относятся к объекту. Когда вы откроете окно кода для книги, вы увидите события, связанные с объектом книги. Когда вы откроете окно кода для рабочего листа, вы увидите события, связанные с объектом рабочего листа.
Настройка редактора VB
Хотя настройки редактора Visual Basic по умолчанию достаточно хороши для большинства пользователей, они позволяют дополнительно настраивать интерфейс и некоторые функции.
В этом разделе руководства я покажу вам все параметры, которые у вас есть при настройке редактора VB.
Чтобы настроить среду редактора VB, нажмите «Инструменты» в строке меню, а затем нажмите «Параметры».
Это откроет диалоговое окно Параметры, которое предоставит вам все параметры настройки в редакторе VB. В диалоговом окне «Параметры» есть четыре вкладки (как показано ниже), на которых можно настроить различные параметры редактора Visual Basic.

Давайте быстро рассмотрим каждую из этих вкладок и важные параметры на каждой из них.
Вкладка «Редактор»
Хотя встроенные настройки в большинстве случаев работают нормально, позвольте мне все же пройтись по параметрам на этой вкладке.
По мере того, как вы станете более опытным в работе с VBA в Excel, вы можете настроить редактор VB, используя некоторые из этих параметров.
Автоматическая проверка синтаксиса
При работе с VBA в Excel, как только вы сделаете синтаксическую ошибку, вас встретит всплывающее диалоговое окно (с некоторым описанием ошибки). Что-то вроде того, что показано ниже:

Если вы отключите эту опцию, это всплывающее окно не появится, даже если вы допустили синтаксическую ошибку. Однако цвет текста кода изменится, что укажет на наличие ошибки.
Если вы новичок, я рекомендую оставить эту опцию включенной. По мере того, как вы набираетесь опыта в программировании, вы можете начать находить эти всплывающие окна раздражающими, и тогда вы можете отключить эту опцию.
Требовать объявление переменной
Это один из вариантов, который я рекомендую включить.
Когда вы работаете с VBA, вы будете использовать переменные для хранения различных типов данных и объектов.
Когда вы включаете этот параметр, он автоматически вставляет оператор «Option Explicit» в верхнюю часть окна кода. Это заставляет вас объявить все переменные, которые вы используете в своем коде. Если вы не объявите переменную и попытаетесь выполнить код, отобразится ошибка (как показано ниже).

В приведенном выше случае я использовал переменную Var, но не объявлял ее. Поэтому, когда я пытаюсь запустить код, он показывает ошибку.
Эта опция очень полезна, когда у вас много переменных. Это часто помогает мне найти имена переменных с ошибками, поскольку они считаются необъявленными и отображается ошибка.
Примечание. Когда вы включаете этот параметр, он не влияет на существующие модули.
Автоматический член списка
Эта опция весьма полезна, поскольку помогает получить список свойств методов для объекта.
Например, если я хочу удалить лист (Sheet1), мне нужно использовать строку Sheet1.Delete.
Пока я набираю код, как только я набираю точку, он покажет мне все методы и свойства, связанные с объектом Worksheet (как показано ниже).

Функция автоматического списка хороша тем, что позволяет:
- Быстро выберите свойство и метод из списка и сэкономьте время
- Показывает все свойства и методы, о которых вы, возможно, не знали.
- Избегайте орфографических ошибок
Эта опция включена по умолчанию, и я рекомендую оставить ее в таком состоянии.
Параметры автоматической быстрой информации
Когда вы вводите функцию на листе Excel, она показывает вам некоторую информацию о функции, например, аргументы, которые она принимает.
Точно так же, когда вы вводите функцию в VBA, она показывает вам некоторую информацию (как показано ниже). Но для этого вам нужно убедиться, что опция Auto Quick Info включена (что по умолчанию).

Параметры советов по автоматическим данным
Когда вы просматриваете свой код построчно и помещаете курсор над именем переменной, он покажет вам значение переменной.
Я считаю это весьма полезным при отладке кода или при просмотре кода построчно, в котором есть циклы.

В приведенном выше примере, как только я наведу курсор на переменную (var), отобразится значение, которое она содержит.
Этот параметр включен по умолчанию, и я рекомендую вам оставить его в таком же состоянии.
Автоматический отступ
Поскольку коды VBA могут быть длинными и беспорядочными, использование отступов увеличивает читаемость кода.
При написании кода вы можете делать отступ с помощью клавиши табуляции.
Этот параметр гарантирует, что, когда вы закончите с отступом и нажмете Enter, следующая строка не начнется с самого начала, а будет иметь тот же отступ, что и предыдущая.

В приведенном выше примере после того, как я напишу строку Debug.Print и нажму Enter, она начнется прямо под ней (с тем же уровнем отступа).
Я считаю эту опцию полезной, и ее выключение означало бы вручную отступ каждой строки в блоке кода, который я хочу иметь отступ.
При желании вы можете изменить значение отступа. Я сохраняю значение по умолчанию.
Редактирование текста перетаскиванием
Когда этот параметр включен, он позволяет выбрать блок кода и перетащить его.
Это экономит время, так как вам не нужно сначала вырезать, а потом вставлять. Вы можете просто выбрать и перетащить его.
Этот параметр включен по умолчанию, и я рекомендую вам оставить его в таком же состоянии.
По умолчанию — полный вид модуля
Когда эта опция включена, вы сможете увидеть все процедуры в модуле в одном прокручиваемом списке.
Если вы отключите эту опцию, вы сможете видеть только один модуль за раз. Вам нужно будет выбрать модуль, который вы хотите увидеть, из раскрывающегося списка в правом верхнем углу окна кода.
Этот параметр включен по умолчанию, и я рекомендую оставить его в таком же состоянии.
Одна из причин, по которой вы можете захотеть отключить его, когда у вас есть несколько процедур, которые огромны и прокрутка по ним требует времени, или когда у вас много процедур, и вы хотите быстро найти их, а не тратить время на прокрутку.
Разделитель процедур
Когда эта опция включена, вы увидите линию (своего рода разделитель) между двумя процедурами.
Я считаю это полезным, поскольку он визуально показывает, когда заканчивается одна процедура и начинается другая.

Он включен по умолчанию, и я рекомендую оставить его в таком состоянии.
Вкладка «Формат редактора»
С помощью параметров на вкладке «Формат редактора» вы можете настроить внешний вид кода в окне кода.
Лично я сохраняю все параметры по умолчанию, так как меня это устраивает. Если вы хотите, вы можете настроить это в зависимости от ваших предпочтений.
Чтобы внести изменения, вам нужно сначала выбрать параметр в поле «Цвета кода». После выбора параметра вы можете изменить для него цвет переднего плана, фона и индикатора.
На этой вкладке также можно установить тип и размер шрифта. Рекомендуется использовать шрифт фиксированной ширины, например Courier New, так как он делает код более читабельным.
Обратите внимание, что настройки типа и размера шрифта останутся одинаковыми для всех типов кода (т. Е. Для всех типов кода, показанных в поле цвета кода).
Ниже приведено изображение, на котором я выбрал точку останова и могу изменить ее форматирование.

Примечание. Параметр «Полоса индикатора полей», когда он включен, показывает небольшую полоску полей слева от кода. Это полезно, так как показывает полезные индикаторы при выполнении кода. В приведенном выше примере, когда вы устанавливаете точку останова, она автоматически показывает красную точку слева от строки на полосе полей. В качестве альтернативы, чтобы установить точку останова, вы можете просто щелкнуть полосу полей слева от строки кода, которую вы хотите использовать в качестве точки останова.
По умолчанию полоса индикатора маржи включена, и я рекомендую оставить ее в таком состоянии.
Одна из моих студенток курса VBA нашла эти параметры настройки полезными, и она была дальтоник. Используя параметры здесь, она смогла установить цвет и форматы, которые упростили ей работу с VBA.
Вкладка Общие
На вкладке «Общие» есть много параметров, но изменять их не нужно.
Я рекомендую вам оставить все параметры как есть.
Одна из важных опций, о которых следует знать на этой вкладке, — это обработка ошибок.
По умолчанию выбран параметр «Прерывание по необработанным ошибкам», и я рекомендую оставить его таким же.
Этот параметр означает, что если ваш код обнаружит ошибку, и вы еще не обработали эту ошибку в своем коде, он сломается и остановится. Но если вы устранили ошибку (например, с помощью параметров «При ошибке возобновить следующий» или «При ошибке Перейти к»), то она не сломается (поскольку ошибки не обрабатываются).
Вкладка стыковки
На этой вкладке вы можете указать, какие окна вы хотите закрепить.
Закрепление означает, что вы можете зафиксировать положение окна (например, проводника проекта или окна свойств), чтобы оно не перемещалось, и вы могли просматривать все различные окна одновременно.
Если вы не установите док-станцию, вы сможете просматривать одно окно за раз в полноэкранном режиме, и вам придется переключаться на другое.
Я рекомендую оставить настройки по умолчанию.
Written by Puneet for Excel 2007, Excel 2010, Excel 2013, Excel 2016, Excel 2019, Excel for Mac

KEY POINTS
- Visual Basic Editor is a code editor for VBA.
- It’s a separate application but you can only use it with Excel.
- You need to have the developer tab on the ribbon to access it.
- You can also use the keyboard shortcut (Alt + F11).
- It also stores the macros that you recode with the macro recorder.
- It has multiple tools to help you to write and manage all the codes.
The world of VBA starts with the Visual Basic Editor (VBE).
It’s the place where you write and manage all the macro codes and if you ask me about VBE, I’d say if you are serious about learning VBA you need to understand all the components of VBE.
That’s why it’s part of our VBA tutorial and in this guide, we have covered every single aspect of Visual Basic Editor to make you understand its functionality.
So, let’s get started.
I will be using different words (VBA editor, VB editor, or VBE) in this guide for referring to the Visual Basic Editor, so don’t be confused with it.
What is the Visual Basic Editor?
Visual Basic Editor is an application (a separate one) in which you can write and save all the VBA codes. In simple words, it’s a code editor for Excel in which you can write all the macros and store them. Even though it is a separate application (VB Editor) you can only use it with Excel.
Yes, that’s right. You can’t run VBE separately; there must be an Excel workbook open for using VBE.
Visual Basic Editor is the only way to write a VBA code in Excel. In fact, all Microsoft applications that host VBA use the Visual Basic Editor for script writing (writing code).
Below is the VBE:
Microsoft Windows

Mac

VBA is one of the ADVANCED EXCEL SKILLS and to master the VBA; you need to learn all the aspects of Visual Basic Editor.
Open the Visual Basic Editor
From the developer tab
To open the visual basic editor, you need to have the developer tab on the ribbon and to activate the developer tab (steps to add).

Now on the developer tab, in the code group, there is a button called “Visual Basic” and when you click on this button it opens the VB editor.

Shortcut Key (Window)
You can also use the keyboard shortcut key Alt + F11 to open the VBE in windows and Opt + F11 or Fn + Opt + F11 for MAC.
Even if you don’t have the developer tab on the ribbon, this shortcut key will still work and open the editor.
Edit a Macro from the List
If you want to open the VBA editor to edit a specific macro, then you can open the macros list from the developer tab.

And click on the edit button to open the VB editor to edit that specific macro.

On Quick Access Toolbar
You can also add a button on the quick access toolbar to open the VBA editor. For this, you need to click on the drop-down on the quick access toolbar and open more commands.

And then select the developer tab from “Choose Commands From” and then add the visual basic editor to the quick access toolbar by clicking on the add button.

Now you can open the visual basic editor from the button that you have on the QAT.

From the Worksheet Tab
You can also open the VBA editor by right-clicking on the worksheet tab and clicking on the view code. It will instantly take you to the code window of that worksheet.

Components of Visual Basic Editor
When you open the VBA editor first time it looks like an old application and to understand how it works you need to go component by component.

The user interface is the same (almost) for all the Excel versions in the last more than 15 years, so no matter which Excel version you are using, you can learn about Visual Basic Editor from this guide. Yes, VBE has different components which can help you in different ways, so let’s explore them one by one.
- Menu Bar
- Tool Bar
- Project Window
- Properties Window
- Code Window
- Immediate Window
- Watch Window
- Object Browser
- Find and Replace
- Locals Window
Just like any other application VBA editor has a menu bar where you can find all the options that are available to the user.
Now in the menu bar, each tab is a category of options that are available to use. Let’s suppose, in the edit menu, you can see all the options from cut-copy-paste, find and replace, and adding indent and outdent.

Along with all the options (most of them), you can find the shortcut keys to use those options.
2. Tool Bar
Just below the menu bar, you have the toolbar which is a collection of some of the options that a normal user needs to use more frequently. When you open the visual basic editor first time you will only have the standard toolbar, just like the image below.

But there are total four toolbars that you can add and use.
- Debug
- Edit
- Standard
- User Form
If you go to the view tab in the menu bar you have the option to add or remove these toolbars.

And you can also add or remove buttons from the toolbar if you want.

You can also move a toolbar just by dragging and dropping from the small dots on the right side.

3. Project Window/ Project Explorer
The project window is the place where you can see all the ongoing projects. Whenever you open a file and then open the visual basic editor you can see the hierarchy of that file in the project window.

Every project further has a collection of objects:
- Worksheet: Each worksheet in a workbook lists as an object.
- The Workbook: It represents the workbook itself as an object.
- Module: It’s the place where you write code or recorded macros stores.
- Chart Sheet: Chart sheet in the workbook will also be listed there.

When you open the VB editor, you’ll find the project window there by default. But if it’s not there somehow you can add it from the View (Menu Bar) or you can use the shortcut key Control + R.
Each object that is listed on the project window has its own code window which you can open by double click on it or you can right-click and select the view code option.

The project window is the best way to navigate through all the ongoing projects and when you start working with the editor you will get to know more about it.
4. Properties Window
As the name suggests the properties window gives you access to the properties of the selected object. Each object, for example, a worksheet has its own properties that you can see and make changes in it.

For each property, there is a drop-down on the right side from where you can change or edit that property.

Quick Tip: You can change the name of a project from the properties window.

And, if the properties window is not there by default you can activate it from the view (menu bar), or you can also use the shortcut key F4.

5. Code Window
The code window is the place where you write codes and do most of your work (editing, writing, and testing). In simple words, the code window is the place where you do all the programming.

When you first see it, it looks like a simple text editor, but it has Intellisense that can help you while programming.
There is no way I have found to add line number in the code window as other code editors have but still, VB editor indicates you the line number of the code.
Note
There’s no way I have found to add line number in the code window as other code editors have but still, VB editor indicates you the line number of the code.
6. Immediate Window
Immediate Window is the place where you can debug your code. You can type a line of code and test how it works. Let’s say if you want to test the following code:
Range("A1").Value = 9999All you need to do is enter type a question mark and then paste the code there and HIT enter. It will immediately show the result of the code.

The other way is to add Debug.Print before the code and get its result value in the immediate window.
Sub Macro1()
Debug.Print Range("A1").Value = "Yes"
End Sub
By default, the immediate window won’t be there when you open the visual basic editor, so you need to activate it from the view tab in the menu bar. You can also use the shortcut key Control + G.
7. Watch Window
Just like Excel Watch Window, the visual basic editor also has a watch window where you can add expressions to track them. You simply need to select the expression and then right-click and go to add a watch.

In the below example, I have added the Selection.Value to the add watch.

Now, to activate the watch window, go to the view menu and click on the watch window option.

And here you have the watch window tracking the added expression.
![]()
8. Object Browser
VBA has its own object browser which can help you to work with all the objects by finding all the properties and which you can use.

Imagine if you want to use the range object, the object browser will tell you about all the properties and method that comes with it. Look at the below example.

To open the object browser, use the shortcut key F2 or you can also go to the view tab and click on the object browser to open it.
9. Find and Replace
Just like the find and replace in Excel, the VBA editor has its own find and replace option that you can use to find and replace values from procedures. To open the FIND option, you can use the shortcut key Control + F, and to open the replace you can use the shortcut key Control + H.

Otherwise, you can open both options from the edit menu.

The find and replace option in VBE gives you different search patterns, like, if you want to find and replace something from the current procedure, from the current module, or from the current project.
You can also use the CASE SENSITIVE search and decide the direction of the search as well.
10. Locals Window
You can use the Locals window in VBE to displays all declared variables in the current procedure and their present values.
Using VB Editor to Write a Code
At this point, you know all the major components of the VBA editor, so now let’s learn how to add code in it.
Module Code Window Vs Object Code Window
There are two different types of code windows and both look just the same but there is a difference that you need to know.
- Module Code Window: Code in the normal module can be executed manually or you can also call it from a separate procedure.
- Object Code Window: Code in the object code window can be executed by using an event. Let’s suppose you want to run code when you double click on a cell, in that case, you need to use the double click event and you need to add code to that worksheet.
2. Module Code Window
You will be writing most of the VBA code in a module. To add code in a module you need to use the SUB procedure or the FUNCTION procedure.
- Sub procedure
- Function procedure
The difference between a sub and a function procedure is sub procedure can’t return a value, on the other hand, a function procedure can return a value.
When you record a macro that code goes straight into a module that VBA inserts automatically when you use the macro recorder.
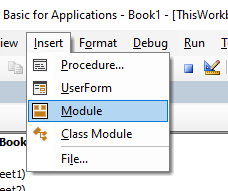
Insert a Module
When you need to write code, you have to insert a module and for this, you simply need to go to the project window and right-click on the project name, and from that menu go to insert and select module.

Remove a Module
You can also remove a module if it doesn’t require anymore so you just simply need to right-click on the module and select remove.

And when you click on remove, it asks you if you want to back up that module before removing it. There is also an option where you can export a module to save it as a file in your system.
3. Object Code Window
Open the code window for the object you simply need to double click on it and in its the code window, there is a dropdown from where you can select the event that you want to use to execute the code.

Imagine if you want to write the code and want to execute on the double click then you need to select “BeforeDoubleClick” from the dropdown.
Understanding Design Mode, Run Mode, and Debug Mode
You can use the visual basic editor in three different modes depending on the face of programming, writing the code, locating an error, and fixing an error.
- Design Mode: Normally, when you are working in VB editor on a code you are in the design mode. Even then you just writing the code instead of designing a user form or a form you are in the design mode, like typing a code. This is also called design time.
- Run Mode: When you run a code to test a code that is how it works you are in the run mode. The best example to define this mode is when you execute a code using the Run button from the toolbar. This is also called runtime.
- Break Mode: When a code is running and in between the execution is suspended, at that time you are in break mode. In this mode, you can run a code step by step. This is also called debugging.
Tips to work with VB editor like a PRO
Just like any other programming language in VBA you can also use comments to define how that code works. Using comments is a good habit and it can help you in so many ways.
- Track Changes
- Contact Details of the Programmer
- How to Troubleshoot the Code
- And much more
To add a comment, you need to type an apostrophe and then the line of code.
Related Tip: VBA Comment Block
Quick Info
Now, look at the below example where I am adding add a VBA function (VBA LEFT Function), and the moment I type the name of the function, it shows me a tooltip for all the arguments which I need to define.

You can also use the shortcut key Control + I or use the quick info option from the EDIT menu.

Auto List Members
Each object in VBA comes with some properties and methods and when you insert an object or a command in the code window and then you enter (.) it shows you the complete list of properties and methods which come with that object.

In the above example, when I added a (.) after the borders property of the range, it showed me all the available properties that are available to access.
List Constants
While defining expressions for a property or a method you can use the list of constants available. In the below example, while using the Border Around method it showed me all the constants which are available for the weight argument.

You can use the shortcut key Control + Shift + J to get the list of constants or you can also go to the edit menu and use the option from there.

Activate Option Explicit
While writing VBA codes you will need to use variables and one of the most important things while using variables is to declare their data type. And there’s a chance that you could forget to declare it.
But when you use the option explicit statement, then you have to declare the data type for every single variable which you are using, and if you fail to do so VBA will show an error message. It’s like forcing yourself to declare every single variable with its data type. For this, you can go to the tools menu and open the options.

And from the options, tick mark “Require Variable Declaration” and click OK.

Now every module will have an Option Explicit statement at the beginning, and you have to declare every single variable.

Change the Code Window View
When you can write multiple codes in a single code window and VBA separate them with a divider, but if you want to have a more focused view, you can change the view of the code window. Below I have the codes in a single module.

But I can change this view from the view buttons from the bottom left of the window.

Now I have only active code visible.
Run a Code Step by Step
When you write a VBA code there could be a chance that that code has a bug or an error that can come while executing it. In that case, the best way is to execute that code step by step and validate each line of code.

For this, you can use shortcut key F8 to execute a code line by line or use step into option from the debug menu.

And there is also a button on the debug toolbar that you can use.

Code Indenting
When you write lengthy and complex codes then it’s important to structure them in the right way so that you can understand them later. For this, there’s one thing which comes handy, INDENTING. Indenting is basically structuring the code using tabs, below is an example.

To add indenting in a line you can use the TAB key from the keyboard, or you can also use the indent/outdent buttons from the toolbar.

Get Code from a Text File
The visual basic editor allows you to import VBA codes from a text file without copy-pasting. Once you insert a module you can go to the insert menu and select the file option from there.

It opens the dialog box where you can locate the text file and import all the codes from it to the current module.
R1C1 Reference Style
If you ever worked with the R1C1 reference style, then I’m sure you can agree on this point that way easier to write codes with it.
R1C1 Reference Style
Line Break
Even though you can adjust the width of the code window and make it wide but there could be a situation when you will be dealing with long lines of code that makes it hard to read.
The best way to deal with this problem is to add a line break. Basically, a line break is something when you break a line into two lines using the line break character.
Use a SPACE & UNDERSCORE and hit enter to add a line break.

Formatting
When it comes to user interface visual basic editor is not that good looking. But there are few formatting options that you can use to customize it or change its look the way you want.
From the Tools Menu Options Editor Format, you can access the formatting option where you can change the font style size or background color as well

Check out this video on customizing the VBA editor for a dark theme.
Personal Macro Workbook
There could be some macros that you need to access within all the workbooks that you use.
In that case, you can use the Personal Macro Workbook that can help you to store all the important codes in one place and you can access them from all the workbooks.

Using Bookmarks
The visual basic editor allows you to add bookmarks to a line from Right Click ➤ Toggle ➤ Bookmark.

And then you can also navigate between bookmarks from the option from the edit menu.

Syntax Checking
When you write codes in the code window VBA check for the syntax error and notify you when you make a syntax error. This option is activated by default, but you can also turn it off if you don’t want VBA to notify you every time you make an error.
Tools Menu ➤ Options ➤ Editor Tab ➤ Auto Syntax Check.

But I would recommend you not to deactivate it because it can help you to identify all the syntax errors that you make while writing codes.
List of Macros
If you have a lot of macros in a module, there is an option that you can use to see all the macros (Tools ➤ Macro).

There’s one big benefit of using this list option is that you can run a macro, delete it, and edit it without navigating to that procedure.
Locking a Project with a Password
Visual Basic Editor also gives you an option to lock a module with a password. So, if you don’t want the users to know the code and don’t want them to make a change in the code, you can use this option.

Tools Menu ➤ VBAProject Properties ➤ Protection Tab

Important Shortcut Keys
- Shift + F7: Object browser.
- F5: Run macro.
- Tab: Add an indent.
- Alt + Q: Close.
- F8: Step into.
- Control + H: Find and replace.
- Control + G: Immediate Window.
- Control + R: Project Explorer.
- F4: Properties window.
Learn some AMAZING Keyboard Shortcuts: Excel Keyboard Shortcuts Cheat Sheet
Alternative to Visual Basic Editor
Well, I have tried quite a few other editors to write a macro but the problem which I have found is that without the Intellisense it’s really hard to use anything other than the visual basic editor itself.

VBA editor works along with Excel, you can test your codes instantly and you can save them into the workbook. But are a few names to try.
Visual Studio Code | Ultra Edit
Points to Remember
- You can maximize or minimize the code window.
- You can change a project’s name anytime.
- The project window is the best way to navigate through the editor.
- It will make a line red if there’s an error in it while writing the code.
- You can also add a bookmark to a line of code from the Right-Click Menu Toggle Bookmark.
- You cannot use the visual basic editor without opening an Excel workbook.
More on VBA
- VBA Functions
- VBA to Add a New Sheet
- VBA Code to Activate a Worksheet
- VBA IF Then Statement
- VBA User Defined Function
- VBA Message Box
- VBA to Extract Hyperlink
- Macro to Highlight Duplicate Values
- VBA to Create a Pivot Table
[icon name=”bell” class=”” unprefixed_class=””] VBA is one of the Advanced Excel Skills
Should I need to install the Visual Basic Editor?
No. You don’t need to install the visual basic editor. It comes pre-installed with the Microsoft Office applications.
What if I don’t have the Developer Tab on the Ribbon?
If you don’t have the developer tab on the Excel ribbon, you can activate it from the Excel ribbon.
Is there an alternative to the Visual Basic Editor?
Not really. The IntelliSense that you have in the VBE makes it perfect to use to write VBA codes.
In this Article
- Opening the Visual Basic Editor
- To enable the Developer Ribbon
- Understanding the VBE Screen
- Inserting a module or form into your code
- Removing a Module or Form from the Project Explorer
- The Properties Window
- The Code Window
- Understanding the Code
- Sub Procedures
- Function Procedures
- Creating a new Procedure
- Writing Code that is easy to understand and navigate
- Adding Comments
- Indenting
- UpperCase vs LowerCase
- AutoComplete
- Error trapping and Debugging
- Syntax errors
- Compilation Errors
- Runtime Errors
- Logical Errors
- On Error Go To
- On Error Resume Next
This tutorial will show you how to open and program in the Visual Basic Editor in VBA.
Opening the Visual Basic Editor
There are a few ways to access the Visual Basic Editor (VBE) in Excel.
Press Alt + F11 on your keyboard.
OR
Click View > Macros > View Macros. From here you can Edit an existing macro or Create a new one. Either option opens up the VB Editor.

OR
Developer > Visual Basic
Note: If you don’t see the Developer Ribbon, you’ll need to enable it.
To enable the Developer Ribbon
Click on the File tab in the Ribbon, and go down to Options. In the Customize Ribbon options, tick the Developer check box. This is switched off by default so you will need to switch it on to see the tab on the ribbon.
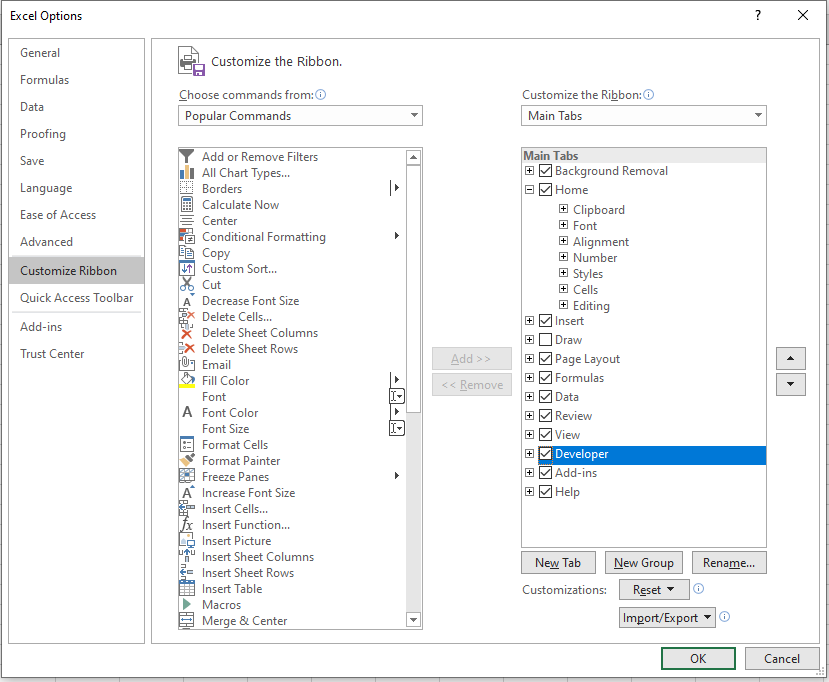
Click OK.
The Developer tab will appear on the main ribbon. Click on Visual Basic at the start of the ribbon to access the Visual Basic Editor.

Understanding the VBE Screen
The VBE Screen is shown in the graphic below.
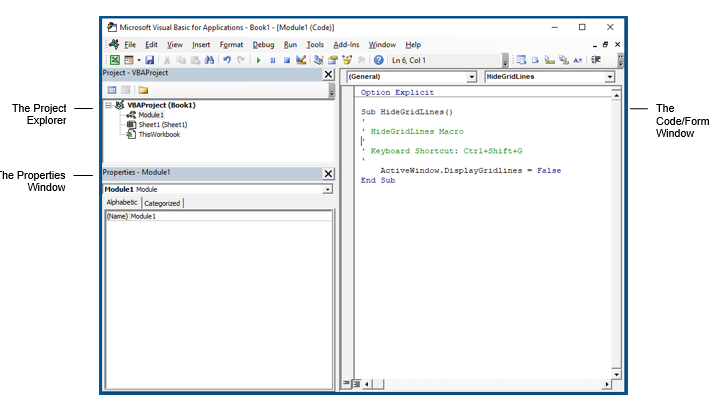
The Project Explorer
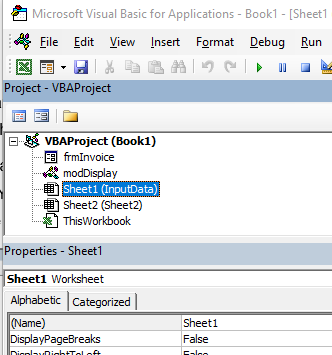
The Project Explorer enables you to see how the Project in which you are working is organized. You can see how many modules and forms are stored in the project, and can navigate between these modules and forms. A module is where the code in your workbook is stored, when you record a macro, it will be stored in a standard module – which will by default be named ‘Module1’.
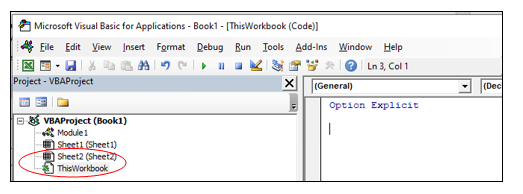
Each of the worksheets in your Excel file also has module behind it, as does the workbook itself. When you insert a new sheet into the workbook via the main Excel screen, you will see an additional sheet module appear in the Project Explorer.
Double-click on a module to move to the code for that module.
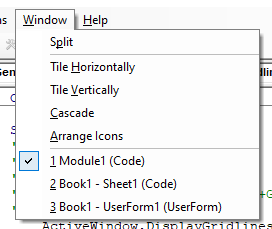
You can also click on the Window menu on the toolbar and select the module there to move to the code for that module.
Type of Modules
The modules are organized into 5 different types.
- Standard modules – most of your code will go into this type of module. When you record a macro, it gets put into a standard module. When you write a general procedure to be used throughout your workbook, it also normally goes into a standard module.
- Workbook modules – this module holds the code the is unique to that individual workbook. Most of the code in these type of modules are known as EVENTS. An event can occur when a workbook is opened or closed for example. The module can also contain code that is written by yourself and used by the events.
- Sheet modules – this module holds the code that is unique to that individual sheet. They can occur when a sheet is clicked on for example (the Click Event), or when you change data in a cell. This module can also hold code that is written by yourself and called by the Events.
- Form modules – this is the module behind a custom form that you may create. For example you may create a form to hold details for an invoice, with an OK button, the code behind the button (the Click Event) contains the code that will run when the button is clicked.
- Class modules – this module is used to create objects at run time. Class module are used by Advanced VBA programmers and will be covered at a later stage.
Inserting a module or form into your code
To insert a new module into your code, click on the Insert option on the menu bar, and click Module.
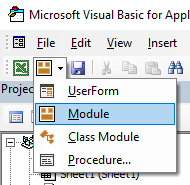
Or, click on the Insert Module button which you will find on the standard ribbon.
To insert a new user form into your code, select the UserForm option.
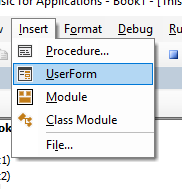
A new user form will appear in the Project Explorer and will be shown in the Code Window on the right.
You can also insert a Class Module
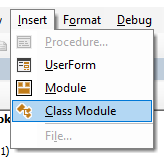
A class module is used to insert objects into your VBA project.
Removing a Module or Form from the Project Explorer
Right-click on the module or form you wish to remove to show the right click short cut menu.
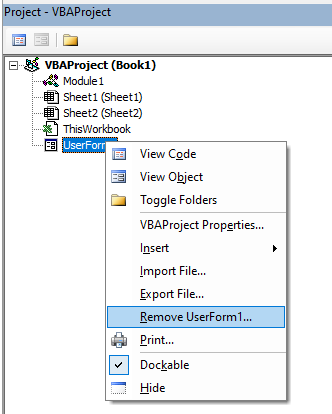
Click Remove (in this case UserForm1…)
OR
Click on the File menu, and then click on Remove (UserForm1).
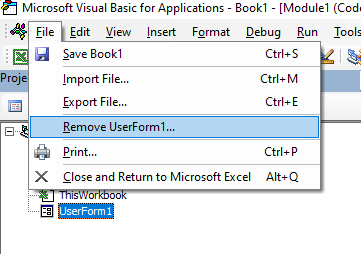
A warning box will appear asking if you want to Export the form or module before you remove it. Exporting the form or module enables you to save it as an individual file for use in a different Excel project at some other time.
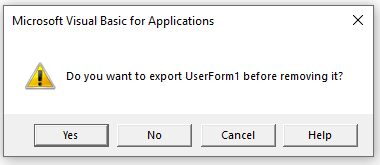
More often than not when you remove a module or form it is because you do not need it, so click No.
The Properties Window
You will see the properties window below the Project Explorer. You may need to switch this on.
Press F4 or click View, Properties Window.
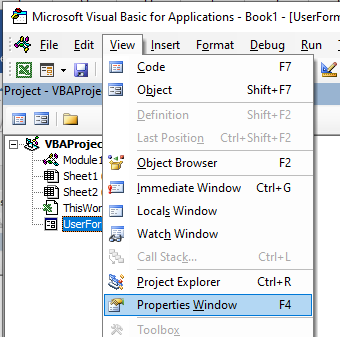
The properties window enables you to see the properties for the particular module or form that is selected in the Project Explorer. When you are working in modules, you can use the properties window to change the name of the module. This is the only property available to a module. However, when you are working with forms, there will be far more properties available and the Properties window is then used extensively to control the behavior of forms and the controls contained in the form.
When you record a macro, it is automatically put into a standard module. The module will named ‘Module1’ and any code that is contained in that module is available to be used throughout your project. You should rename your module to something that is significant, that would make your code easy to find if you were to add multiple modules to the project.
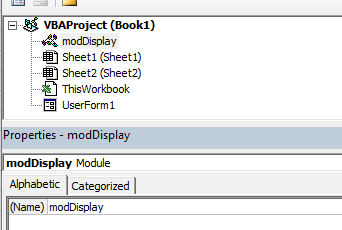
You can also rename your forms.
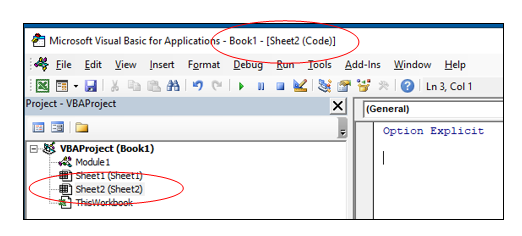
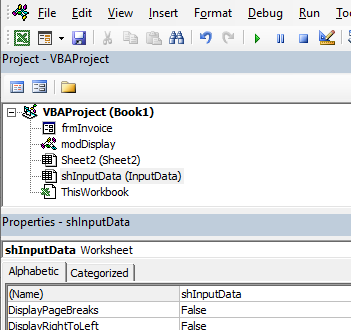
If you have renamed your sheet in Excel, the name of the sheet will show up as the name of the sheet in brackets after Sheet1.
If you want to change the name of the module behind the sheet, you can change it in the same way you change the module and user form name – by changing the Name property in the Properties Window.
VBA Coding Made Easy
Stop searching for VBA code online. Learn more about AutoMacro — A VBA Code Builder that allows beginners to code procedures from scratch with minimal coding knowledge and with many time-saving features for all users!

Learn More
The Code Window
The code window shows you the sub procedures and functions that are contained in your modules – it shows you the actual code. When you record a macro, a sub procedure will be created for you. If you add a short cut key to the macro, it will show up as a comment in the macro to let you know what the short cut key is that you assigned to the macro.
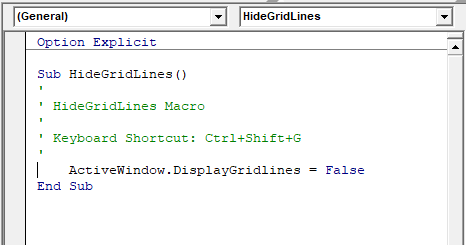
At the top of the code window are two combo boxes. These allow you to see which object (if any) within the Module that you might be working on, and which Procedure you might be working on.
In the example above, we are not working on any object – thus this is set to general, but we are working within the Gridlines procedure.
If we had more than one procedure in this module, we could use the combo box above to navigate to the other procedures.
Understanding the Code
There are 2 types of procedures – Sub procedures and Function procedures.
Sub Procedures
The macro recorder can only record Sub procedures. A Sub procedure does things. They perform actions such as formatting a table or creating a pivot table, or in the gridline example, changing the view settings of your active window. The majority of procedures written are Sub procedures. All macros are Sub procedures.
A sub procedure begins with a Sub statement and ends with an End Sub statement. The procedure name is always followed by parentheses.
Sub HideGridLines()
   ActiveWindow.DisplayGridlines  = False
End Sub
VBA Programming | Code Generator does work for you!
Function Procedures
A Function procedure returns a value. This value may be a single value, an array, a range of cells or an object. Functions usually perform some type of calculation. Functions in Excel can be used with the Function Wizard or they can be called from Sub Procedures.
Function Kilos(pounds as Double)
  Kilos = (pounds/2.2)
End Function
This function could be used within the Insert Function dialog box in Excel to convert Pounds to Kilograms.

Creating a new Procedure
Before you create your new procedure, make sure you are in the module in which you wish to store the procedure. You can create a new procedure by clicking on the Insert menu, Procedure;
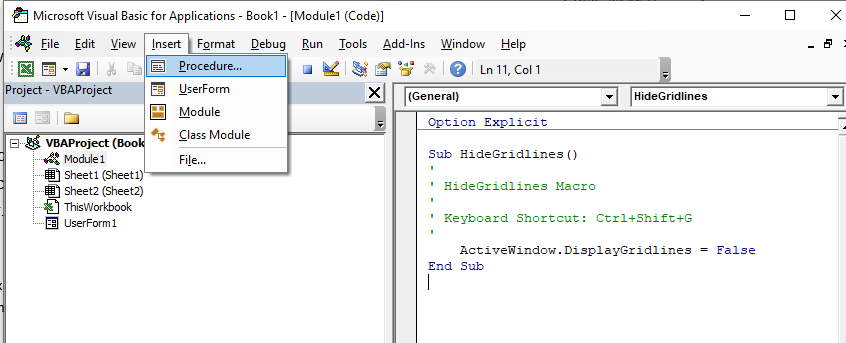
or you can click on the icon on the toolbar
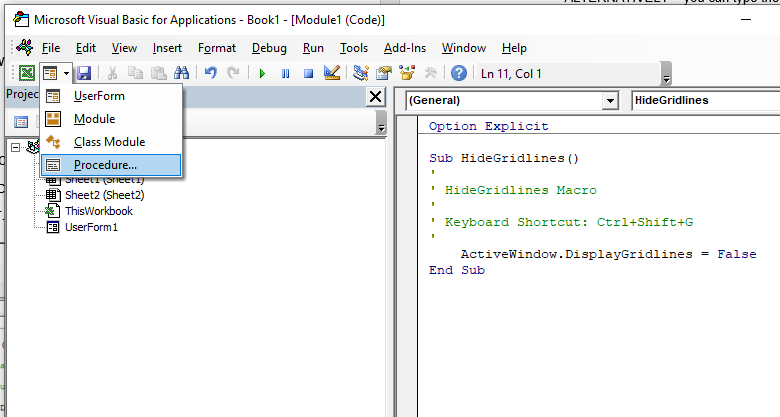
The following dialog box will appear
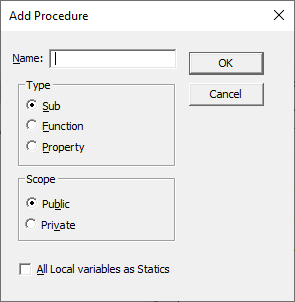
- Type the name of your new procedure in the name box – this must start with a letter of the alphabet and can contain letters and number and be a maximum of 64 characters.
- You can have a Sub procedure, a Function procedure or a Property procedure. (Properties are used in Class modules and set properties for ActiveX controls that you may have created).
- You can make the scope of the procedure either Public or Private. If the procedure is public (default), then it can be used by all the modules in the project while if the procedure is private, it will only be able to be used by this module.
- You can declare local variables in this procedure as Statics (this is to do with the Scope of the variable and makes a local procedure level variable public to the entire module). We will not use this option.
When you have filled in all the relevant details, click on OK.
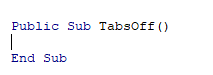
You then type your code between the Sub and End Sub statements.
ALTERNATIVELY – you can type the Sub and End Sub statements in your module exactly as it appears above. You do not need to put the word Public in front of the word sub – if this word is omitted, all procedures in the module are automatically assumed to be Public.
Then you type Sub and then the name of your procedure followed by parenthesis.
ie:
Sub test()
The End Sub statement will appear automatically.
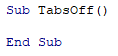
Writing Code that is easy to understand and navigate
Get into the habit of putting in comments in your code in order to remind yourself at a later stage of the functionality of the code.
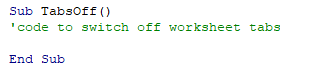
You can insert a comment in your code but typing an apostrophe on the keyboard or you can switch on the Edit toolbar, and use the comment button which appears on that toolbar.
Right-click on the toolbars.
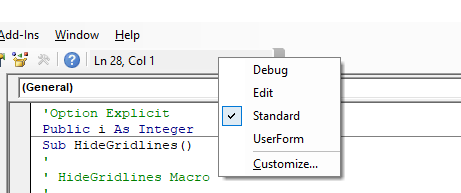
Select Edit.
![]()
Click on the comment button to insert a comment into your code.
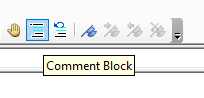
NOTE: You usually only use the comment block button when you have a few lines of code you wish to comment out (and not delete). It is easier for a single comment to use an apostrophe.
Indenting
A good habit to get into is to indent your code making it easy to read through the code and see the different parts of the code.

There can be many levels of indenting, depending on the logic of your code.
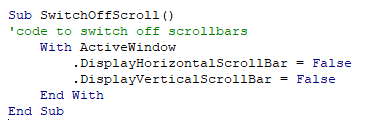
AutoMacro | Ultimate VBA Add-in | Click for Free Trial!
UpperCase vs LowerCase
VBA adjusts all code to Proper Case so if you type ALL IN UPPERCASE or all in lowercase it will Readjust Your Code To Be In Proper Case!
AutoComplete
When you adjust your code, you will notice that VBA tries to help you by suggesting the code that you can type. This is known as AutoComplete.
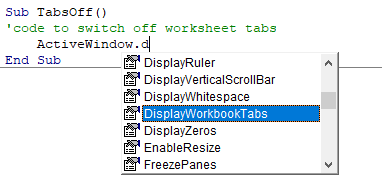
Error trapping and Debugging
There are 4 types of errors that can occur when you write VBA code – Syntax errors, Compilation errors, Runtime errors and Logical Errors.
Syntax errors
These occur when you write the code incorrectly. This is largely prevented by VBA by having the Syntax check option switch on. This is normally on by default but if your is switch off, then switch it on by going to Tools, Options and click Auto Syntax Check.
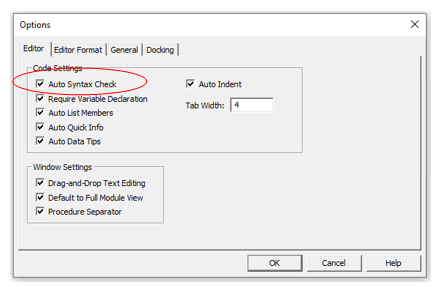
If you type the code incorrectly (for example excluding something that should be in the code), a message box will pop up while you are writing the code giving you the opportunity to amend the code.
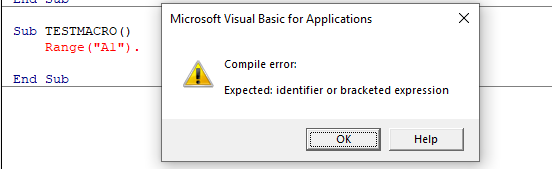
AutoMacro | Ultimate VBA Add-in | Click for Free Trial!
Compilation Errors
These occur when something is missing from the code that prevents the code from running. The error does not come up when you write the code, but it occurs when you try and run the code.
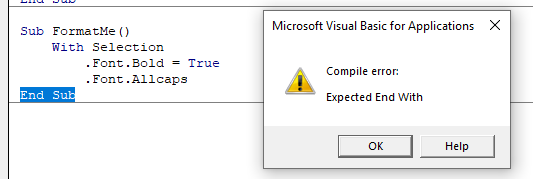
Runtime Errors
These occur when you run the code, and the syntax and compilation is correct, but something else occurs to prevent the code from running correctly.
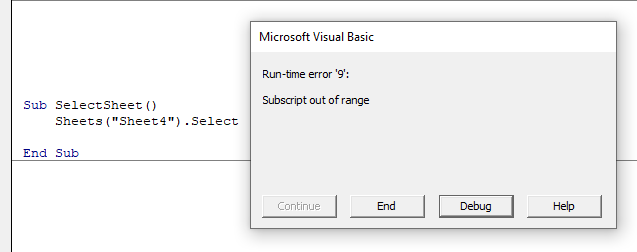
In this case, Sheet4 does not exist. This error message is more useful than the compile error messages as it gives you the opportunity to Debug the code and see why it is not working.
Click Debug. The code will stop at the error and highlight the error in yellow enabling you to correct your error.
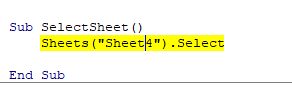
Amend Sheet4 to Sheet2 (as Sheet 2 exists and Sheet 4 does not exist).
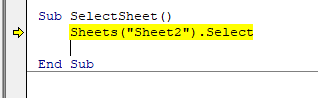
Press F5 or click on the Continue button on the toolbar.
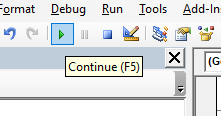
Logical Errors
These are the most difficult to find. In their case, the code is written correctly but the actual logic of the code is flawed, so you may not get the result that you want from the code. For logical errors, error trapping is essential.
There are 2 types of error traps
On Error Go To
The following code is to open the File Open Dialog box – it will give us an error if the user clicks Cancel.
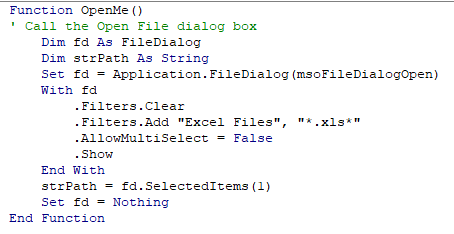
When you run the code the File Open dialog box appears.
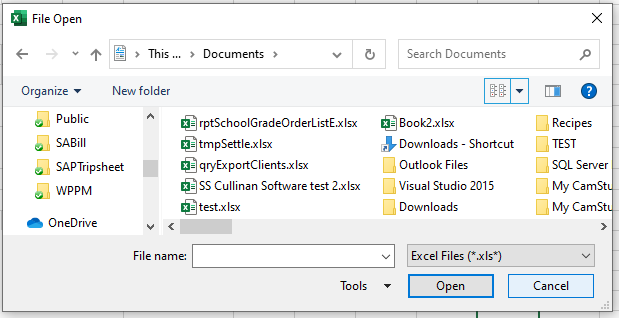
When you then click cancel, the error will occur.
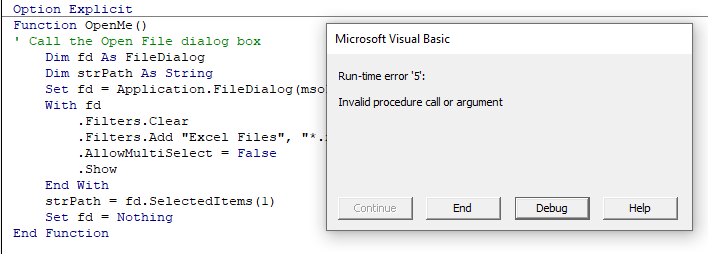
The following Error trap will continue the code to the Exit Function of the code, and return message.
This makes use of On Error GoTo to exit the function.
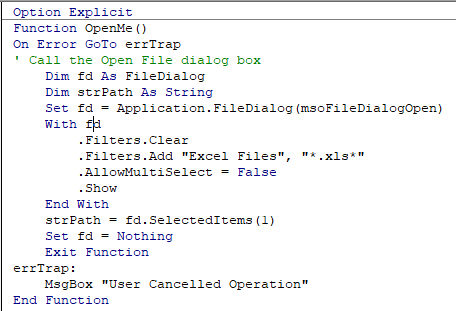
When you run the code and click cancel, the message box will appear.

On Error Resume Next
If you put the On Error Resume Next Statement into your code, the line that contains the error will be ignored and the code will continue.
For example, if the user clicks Cancel in the code below, the code will not give you a run-time error, it will just end without the code doing anything further.
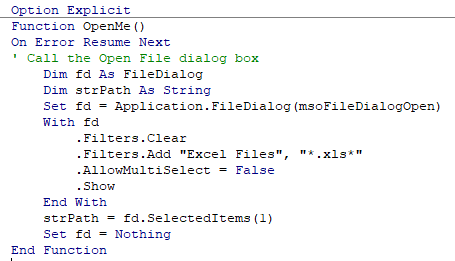
There are times when this is very useful but it can also be very dangerous in some circumstances as it does not return a message as to why you obtained an error.