
Все привет, в этой статье опишу исчерпывающие примеры работы с excel на языке C#.
Для начала работы нам необходимо подключить библиотеку COM как на рисунке ниже:
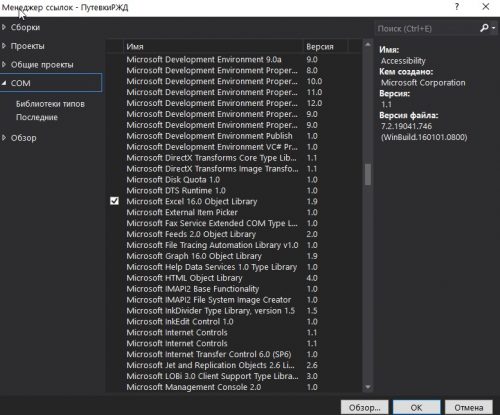
Для этого добавляем ссылку в проект, надеюсь вы знаете как это делается) Выбираем пункт COM ищем библиотеку Microsoft Excel 16.0 Object Library ставим галочку и жмем Ок.
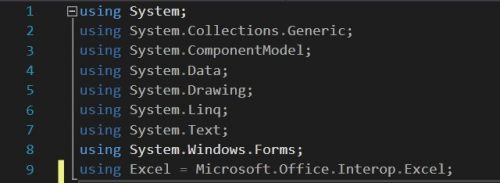
Далее нам не обходимо для сокращения записи и удобства создать алиас.
|
using Excel = Microsoft.Office.Interop.Excel; |
Теперь нам нужно объявить объект Excel задать параметры и приступать к работе.
|
//Объявляем приложение Excel.Application app = new Excel.Application { //Отобразить Excel Visible = true, //Количество листов в рабочей книге SheetsInNewWorkbook = 2 }; //Добавить рабочую книгу Excel.Workbook workBook = app.Workbooks.Add(Type.Missing); //Отключить отображение окон с сообщениями app.DisplayAlerts = false; //Получаем первый лист документа (счет начинается с 1) Excel.Worksheet sheet = (Excel.Worksheet)app.Worksheets.get_Item(1); //Название листа (вкладки снизу) sheet.Name = «Имя должно быть не больше 32сим»; |
Пример заполнения ячейки:
|
//Пример заполнения ячеек №1 for (int i = 1; i <= 9; i++) { for (int j = 1; j < 9; j++) sheet.Cells[i, j] = String.Format(«nookery {0} {1}», i, j); } //Пример №2 sheet.Range[«A1»].Value = «Пример №2»; //Пример №3 sheet.get_Range(«A2»).Value2 = «Пример №3»; |
Захват диапазона ячеек:
|
//Захватываем диапазон ячеек Вариант №1 Excel.Range r1 = sheet.Cells[1, 1]; Excel.Range r2 = sheet.Cells[9, 9]; Excel.Range range1 = sheet.get_Range(r1, r2); //Захватываем диапазон ячеек Вариант №2 Excel.Range range2 = sheet.get_Range(«A1»,«H9» ); |
Оформление, шрифт, размер, цвет, толщина.
|
//Шрифт для диапазона range.Cells.Font.Name = «Tahoma»; range2.Cells.Font.Name = «Times New Roman»; //Размер шрифта для диапазона range.Cells.Font.Size = 10; //Жирный текст range.Font.Bold = true; //Цвет текста range.Font.Color = ColorTranslator.ToOle(Color.Blue); |
Объединение ячеек в одну
|
//Объединение ячеек с F2 по K2 Excel.Range range3 = sheet.get_Range(«F2», «K2»); range3.Merge(Type.Missing); |
Изменяем размеры ячеек по ширине и высоте
|
//увеличиваем размер по ширине диапазон ячеек Excel.Range range2 = sheet.get_Range(«D1», «S1»); range2.EntireColumn.ColumnWidth = 10; //увеличиваем размер по высоте диапазон ячеек Excel.Range rowHeight = sheet.get_Range(«A4», «S4»); rowHeight.EntireRow.RowHeight = 50;range.EntireColumn.AutoFit();range.EntireColumn.AutoFit(); //авторазмер |
Создаем обводку диапазона ячеек
|
Excel.Range r1 = sheet.Cells[countRow, 2]; Excel.Range r2 = sheet.Cells[countRow, 19]; Excel.Range rangeColor = sheet.get_Range(r1, r2); rangeColor.Borders.Color = ColorTranslator.ToOle(Color.Black); |
Производим выравнивания содержимого диапазона ячеек.
|
Excel.Range r = sheet.get_Range(«A1», «S40»); //Оформления r.Font.Name = «Calibri»; r.Cells.Font.Size = 10; r.VerticalAlignment = Excel.XlVAlign.xlVAlignCenter; r.HorizontalAlignment = Excel.XlHAlign.xlHAlignCenter; |
Примеры вычисления формул, все вставки формул были скопированы из самой Excel без изменений. Позиция ячейки взята из счетчика переменно и подставлен к букве ячейки
|
sheet.Cells[countRow, countColumn] = $«=G{countRow}-F{countRow}»; sheet.Cells[countRow, countColumn].FormulaLocal = $«=ЕСЛИ((H{countRow}*O{countRow})+(I{countRow}*P{countRow})/100<=0;J{countRow}*O{countRow}/100;((H{countRow}*O{countRow})+(I{countRow}*P{countRow}))/100)»; sheet.Cells[countRow, countColumn] = $«=K{countRow}+N{countRow}-R{countRow}»; sheet.Cells[33, 22].FormulaLocal = «=СУММ(V3:V32)»; |
Добавляем разрыв страницы.
|
//Ячейка, с которой будет разрыв Excel.Range razr = sheet.Cells[n, m] as Excel.Range; //Добавить горизонтальный разрыв (sheet — текущий лист) sheet.HPageBreaks.Add(razr); //VPageBreaks — Добавить вертикальный разрыв |
Как открыть фаил Excel
|
app.Workbooks.Open(@»C:UsersUserDocumentsExcel.xlsx», Type.Missing, Type.Missing, Type.Missing, Type.Missing, Type.Missing, Type.Missing, Type.Missing, Type.Missing, Type.Missing, Type.Missing, Type.Missing, Type.Missing, Type.Missing, Type.Missing); |
Сохраняем документ Excel
|
app.Application.ActiveWorkbook.SaveAs(«MyFile.xlsx», Type.Missing, Type.Missing, Type.Missing, Type.Missing, Type.Missing, Excel.XlSaveAsAccessMode.xlNoChange, Type.Missing, Type.Missing, Type.Missing, Type.Missing, Type.Missing); |
Завершение работы с объектом Excel.Application
|
app.Quit(); System.Runtime.InteropServices.Marshal.ReleaseComObject(app); |
Пример как выбрать фаил и загрузив его и узнать количество заполненных строк и колонок в одном конкретном листе по имени.
|
1 2 3 4 5 6 7 8 9 10 11 12 13 14 15 16 17 18 19 20 21 22 23 24 25 |
//поиск файла Excel OpenFileDialog ofd = new OpenFileDialog(); ofd.Multiselect =false; ofd.DefaultExt = «*.xls;*.xlsx»; ofd.Filter = «Microsoft Excel (*.xls*)|*.xls*»; ofd.Title = «Выберите документ Excel»; if (ofd.ShowDialog() != DialogResult.OK) { MessageBox.Show(«Вы не выбрали файл для открытия», «Внимание», MessageBoxButtons.OK, MessageBoxIcon.Information); return; } string xlFileName = ofd.FileName; //имя нашего Excel файла //рабоата с Excel Excel.Range Rng; Excel.Workbook xlWB; Excel.Worksheet xlSht; int iLastRow, iLastCol; Excel.Application xlApp = new Excel.Application(); //создаём приложение Excel xlWB = xlApp.Workbooks.Open(xlFileName); //открываем наш файл xlSht = xlWB.Worksheets[«Лист1»]; //или так xlSht = xlWB.ActiveSheet //активный лист iLastRow = xlSht.Cells[xlSht.Rows.Count, «A»].End[Excel.XlDirection.xlUp].Row; //последняя заполненная строка в столбце А iLastCol = xlSht.Cells[1, xlSht.Columns.Count].End[Excel.XlDirection.xlToLeft].Column; //последний заполненный столбец в 1-й строке |
Получаем список всех загруженных книг «листов» из файла
|
1 2 3 4 5 6 7 8 9 10 11 12 13 14 15 16 17 18 19 |
//поиск файла Excel OpenFileDialog ofd = new OpenFileDialog(); ofd.Multiselect = false; ofd.DefaultExt = «*.xls;*.xlsx»; ofd.Filter = «Microsoft Excel (*.xls*)|*.xls*»; ofd.Title = «Выберите документ Excel»; if (ofd.ShowDialog() != DialogResult.OK) { MessageBox.Show(«Вы не выбрали файл для открытия», «Внимание», MessageBoxButtons.OK, MessageBoxIcon.Information); return; } string xlFileName = ofd.FileName; //имя нашего Excel файла Excel.Workbook xlWB = ex.Workbooks.Open(xlFileName); ///загружаем список всех книг foreach (object item in xlWB.Sheets) { Excel.Worksheet sheet = (Excel.Worksheet)item; } |
- Remove From My Forums
-
Question
-
I have been searching, googling, and so on for quite some time on how to do a simple task of opening a Excel Workbook so I can read from it in a C# console application. I have seen lots of samples, but they are not working for me at all.
This is my current code:
Excel.Application exApp = new Excel.Application();
Excel.Workbook exWbk = exApp.Workbooks.Open("Sample Data", Type.Missing, Type.Missing, Type.Missing, Type.Missing, Type.Missing, Type.Missing, Type.Missing, Type.Missing, Type.Missing, Type.Missing, Type.Missing, Type.Missing, Type.Missing, Type.Missing);
Excel.Worksheet exWks = (Excel.Worksheet)exWbk.Sheets["Sheet1"];
The Sample Data file is in the main project directory, and as part of my build, it gets copied to the output directory as well. The error I get is that it can find the file.
All the samples I have seen to date specify a full path to the file. I dont want that. I want it to read from the current directory to look for the file. When I do this with tab delimited data, and the File.ReadAll type operation, this
works fine.I have also seen samples where they use the @ before the file path. I am not sure what this does, or if I need it. I know this is a simple silly query, but I can not seem to get the it working.
TIA.
Answers
-
While not your primary question, the @ is a quoted string literal. The difference is that escape characters are not processed, which makes paths for instance much easier on the eyes.
var regularPath = «C:\mydirectory\myfile.txt»
var quotedPath = @»C:mydirectorymyfile.txt»http://msdn.microsoft.com/en-us/library/362314fe(v=VS.71).aspx
As for the excel question, from a quick look at a debug of this, it seems Office.Interop.Excel isn’t seeing the same CurrentDirectory I am with Directory.CurrentDirectory. no worries. I placed the xlsx file in the binDebug directory and found
the absolute path:// Get fully qualified path for xlsx file var spreadsheetLocation = Path.Combine(Directory.GetCurrentDirectory(), "Sample Data.xlsx"); var exApp = new Microsoft.Office.Interop.Excel.Application(); var exWbk = exApp.Workbooks.Open(spreadsheetLocation); var exWks = (Microsoft.Office.Interop.Excel.Worksheet)exWbk.Sheets["Sheet1"];
Also, I noticed you added a bunch of Type.Missing arguments to Workbooks.Open. This is unnecessary, as they are optional parameters. You can use the method as I did above. The other parameters have default values and do not need to be specified.
Christopher Wilcox
If I have answered your question, Please click «Mark As Answer«-
Marked as answer by
Thursday, February 28, 2013 3:53 PM
-
Marked as answer by
Microsoft Excel is powerful spreadsheet tool with lots of features for data visualization, analysis and documentation. Excel formats data in the form of rows and columns and cells. As a developer, many times you are required to read or write data into an Excel file. There are multiple ways to read and write data in excel programmatically i.e. by using COM Components and using third party components/SDKs.
This tutorial shows you how to Read and Write Excel files in Microsoft C#. We are going to use Microsoft COM Objects i.e. Excel 16 object in our application. Use the following sample C# source code for Excel reading and writing. There are multiple examples discussed in this tutorial to read Excel files using C# and write data back to Excel file.
Table of Contents
- Write data to Excel file
- Read data from Excel file
- Steps to read and write data from Excel using C#
- Step 1: Create a new C# project in Visual Studio
- Step 2: Add COM Component Reference i.e. Excel 14 Object
- Step 3: Import the namespaces in C# code
- Step 4: Write Data to Excel File
- Step 5: Read Data from Excel File
- Step 6: Run the C# Program
Write data to Excel file
The following C# code uses the Excel interop library to create a new Excel instance, open a specified workbook and write text to the first cell of the worksheet. It also includes cleanup code to release resources and ensure that the Excel process is fully closed.
|
1 2 3 4 5 6 7 8 9 10 11 12 13 14 15 16 17 18 19 20 21 22 23 24 25 26 27 28 29 30 |
// Set cursor as hourglass Cursor.Current = Cursors.WaitCursor; Excel.Application xlApp = new Excel.Application(); Excel.Workbook xlWorkbook = xlApp.Workbooks.Open(FileName); Excel._Worksheet xlWorksheet = xlWorkbook.Sheets[1]; Excel.Range xlRange = xlWorksheet.UsedRange; xlWorksheet.Cells[1, 1] = txtWrite.Text; xlApp.Visible = false; xlApp.UserControl = false; xlWorkbook.Save(); //cleanup GC.Collect(); GC.WaitForPendingFinalizers(); //release com objects to fully kill excel process from running in the background Marshal.ReleaseComObject(xlRange); Marshal.ReleaseComObject(xlWorksheet); //close and release xlWorkbook.Close(); Marshal.ReleaseComObject(xlWorkbook); //quit and release xlApp.Quit(); Marshal.ReleaseComObject(xlApp); // Set cursor as default arrow Cursor.Current = Cursors.Default; |
Read data from Excel file
The following C# code also uses the same mechanism to read the data from an Excel sheet. First, it creates a new Excel instance, open a specified workbook and read value from the second cell of the worksheet. It also includes cleanup code to release resources and ensure that the Excel process is fully closed.
|
1 2 3 4 5 6 7 8 9 10 11 12 13 14 15 16 17 18 19 20 21 22 23 24 25 26 27 28 29 30 31 |
// Set cursor as hourglass Cursor.Current = Cursors.WaitCursor; Excel.Application xlApp = new Excel.Application(); Excel.Workbook xlWorkbook = xlApp.Workbooks.Open(FileName); Excel._Worksheet xlWorksheet = xlWorkbook.Sheets[1]; Excel.Range xlRange = xlWorksheet.UsedRange; if (xlRange.Cells[1, 2] != null && xlRange.Cells[1, 2].Value2 != null) { txtRead.Text = xlRange.Cells[1, 2].Value2.ToString(); } //cleanup GC.Collect(); GC.WaitForPendingFinalizers(); //release com objects to fully kill excel process from running in the background Marshal.ReleaseComObject(xlRange); Marshal.ReleaseComObject(xlWorksheet); //close and release xlWorkbook.Close(); Marshal.ReleaseComObject(xlWorkbook); //quit and release xlApp.Quit(); Marshal.ReleaseComObject(xlApp); // Set cursor as default arrow Cursor.Current = Cursors.Default; |
Steps to read and write data from Excel using C#
In this tutorial, we are going to use Microsoft Visual Studio 2017 Community Edition.
Step 1: Create a new C# project in Visual Studio
Open up Visual Studio and create a new Windows Desktop application using Visual C#. You can choose any .NET Framework available in your computer. We are going to use .NET Framework 4.6.1.

Step 2: Add COM Component Reference i.e. Excel 14 Object
Next step is to right click on ExcelReaderWriter C# Project under Solution Explorer and choose Add->Reference.

Then choose COM->Type Libraries and select the desired COM Component for Excel. In our case we used Microsoft Excel 16.0 Object Library.

Step 3: Import the namespaces in C# code
Add the following namespaces to import into the code.
|
using System.Runtime.InteropServices; //Microsoft Excel 16 object in references-> COM tab using Excel = Microsoft.Office.Interop.Excel; |
Also create a class variable to hold Excel File name i.e.
|
private string FileName = @«C:data.xlsx» |
Step 4: Write Data to Excel File
Add a Button and TextBox controls on the form. Then double click on the button to show up the code view and Visual Studio Automatically creates the button click event handler. Add the code to the handler so that it looks like below:
|
1 2 3 4 5 6 7 8 9 10 11 12 13 14 15 16 17 18 19 20 21 22 23 24 25 26 27 28 29 30 31 32 33 34 |
private void btnWrite_Click(object sender, EventArgs e) { // Set cursor as hourglass Cursor.Current = Cursors.WaitCursor; Excel.Application xlApp = new Excel.Application(); Excel.Workbook xlWorkbook = xlApp.Workbooks.Open(FileName); Excel._Worksheet xlWorksheet = xlWorkbook.Sheets[1]; Excel.Range xlRange = xlWorksheet.UsedRange; xlWorksheet.Cells[1, 1] = txtWrite.Text; xlApp.Visible = false; xlApp.UserControl = false; xlWorkbook.Save(); //cleanup GC.Collect(); GC.WaitForPendingFinalizers(); //release com objects to fully kill excel process from running in the background Marshal.ReleaseComObject(xlRange); Marshal.ReleaseComObject(xlWorksheet); //close and release xlWorkbook.Close(); Marshal.ReleaseComObject(xlWorkbook); //quit and release xlApp.Quit(); Marshal.ReleaseComObject(xlApp); // Set cursor as default arrow Cursor.Current = Cursors.Default; } |
Step 5: Read Data from Excel File
Create another Button and TextBox control to use for reading the data from Excel file. Add the following code to button click even handler.
|
1 2 3 4 5 6 7 8 9 10 11 12 13 14 15 16 17 18 19 20 21 22 23 24 25 26 27 28 29 30 31 32 33 34 35 |
private void btnRead_Click(object sender, EventArgs e) { // Set cursor as hourglass Cursor.Current = Cursors.WaitCursor; Excel.Application xlApp = new Excel.Application(); Excel.Workbook xlWorkbook = xlApp.Workbooks.Open(FileName); Excel._Worksheet xlWorksheet = xlWorkbook.Sheets[1]; Excel.Range xlRange = xlWorksheet.UsedRange; if (xlRange.Cells[1, 2] != null && xlRange.Cells[1, 2].Value2 != null) { txtRead.Text = xlRange.Cells[1, 2].Value2.ToString(); } //cleanup GC.Collect(); GC.WaitForPendingFinalizers(); //release com objects to fully kill excel process from running in the background Marshal.ReleaseComObject(xlRange); Marshal.ReleaseComObject(xlWorksheet); //close and release xlWorkbook.Close(); Marshal.ReleaseComObject(xlWorkbook); //quit and release xlApp.Quit(); Marshal.ReleaseComObject(xlApp); // Set cursor as default arrow Cursor.Current = Cursors.Default; } |
Step 6: Run the C# Program
Compile and run the program now. The output should be similar to the one showing below. Enter some data in first text box and click Write button. It will write data to already created Excel file C:data.xlsx. Similarly, you can click on Read button, which will read the data from same Excel file and show it in the second text file.

There are other third party libraries available, which you can use in your code to read and write Excel files. These libraries are available both under open source as well as commercially available. Few of them are:
- https://github.com/nissl-lab/npoi – Open Source, Apache 2.0 License
- https://github.com/EPPlusSoftware/EPPlus – Commercially Available
- https://github.com/JanKallman/EPPlus – Available under LGPL
- https://bytescout.com/products/developer/spreadsheetsdk/bytescoutspreadsheetsdk.html – Commercially Available
- Download source files — .NET 4.0 Office 2007 — 975.7 KB
- Download source files — .NET 1.0 Office XP — 347.5 KB
Introduction
Note: This article has been updated to interact with Office 2007. I left the old .NET 1.0 solution for Office XP available for download for reference (in case you are using an old version of Office).
This is a short introduction to opening an existing Microsoft Excel spreadsheet using Visual C# .NET. The computer must have Excel installed on the system for this code to run properly. The Excel assembly is used to open and manipulate Excel spreadsheets.
Code Explanation
First, the Excel assembly must be added to the project. To do this you must add a reference to the Microsoft.Office.Interop.Excel library by going to the Project -> Add Reference menu item. Go to the .NET tab of the dialog box that pops up and scroll down the Microsoft.Office.Interop.Excel list item. Double click on it and press OK. This adds the reference to your project. In the «using» section of your code, type
using Excel = Microsoft.Office.Interop.Excel;
Once the assembly is added to the project, a new application needs to be created:
Excel.Application excelApp = new Excel.Application();
If you want to make Excel visible to the user you have to set the Visible property to true, the default is false.
excelApp.Visible = true;
The code above opens the Excel application, in order to use the application, you have to open a workbook by creating a Workbook object. You can open a new blank workbook by using the following code:
Excel.Workbook newWorkbook = excelApp.Workbooks.Add();
The preceding code opens a blank workbook with one sheet. The .Add method optionally takes a template object. If the parameter is left blank, the default template will be used (like when you open Excel manually).
If you want to open an existing document for editing instead of creating a new one, you can use the following code to open the Workbook object:
string workbookPath = "c:/SomeWorkBook.xls";
Excel.Workbook excelWorkbook = excelApp.Workbooks.Open(workbookPath,
        0, false, 5, "", "", false, Excel.XlPlatform.xlWindows, "",
        true, false, 0, true, false, false);
The preceding code may need a little explanation. The workbookPath is of course the path to the existing spreadsheet that you want to open, and if using .NET 4.0 and the Office 2007 library (Microsoft.Office.Interop.Excel library), it is the only parameter required. The rest of the excelApp.Workbooks.open parameters are a little less obvious. The following is the list of parameters that are passed to the function:
WorkBooks.open(string Filename, object UpdateLinks, object ReadOnly, object Format, object Password, object WriteResPassword, object ReadOnlyRecommend, object Origin, object Delimiter, object Editable, object Notify, object Converter, object AddToMru, object Local, object CorruptLoad )
To view the documentation on this function, follow the link to Microsoft’s website for further explanation of the function at:
http://msdn.microsoft.com/en-us/library/bb179167%28v=office.12%29.aspx
Once the workbook is either created or opened, you must create a Sheets object that holds the Worksheets within the workbook. The following code will get all of the sheets in the workbook you previously opened.
Excel.Sheets excelSheets = excelWorkbook.Worksheets;
Now that you have the collection of Worksheets, you must get an individual sheet edit data within.
string currentSheet = "Sheet1";
Excel.Worksheet excelWorksheet = (Excel.Worksheet)excelSheets.get_Item(currentSheet);
In the preceding code, you have to type cast the excelSheets.get_Item(string) method because it returns an
object. Now that you have the sheet you are ready to access individual cells with the following code:
Excel.Range excelCell =
        (Excel.Range)excelWorksheet.get_Range("A1", "A1");
The get_Range function must take two parameters. If the two parameters are equal, a single cell is selected; otherwise a range of cells will be selected. Again you have to type cast the return value of the method. Once you have a cell object, your can set its value using the .Value2 property, or use any of the other properties to manipulate ranges of cells.
This member has not yet provided a Biography. Assume it’s interesting and varied, and probably something to do with programming.
Оставляю заметку по работе с Excel с помощью C#.
Привожу фрагменты кода, которые искал когда-то сам для работы с Excel документами.
Наработки очень пригодились в работе для формирования отчетности.
Прежде всего нужно подключить библиотеку Microsoft.Office.Interop.Excel.

Далее создаем псевдоним для работы с Excel:
using Excel = Microsoft.Office.Interop.Excel;
//Объявляем приложение
Excel.Application ex = new Microsoft.Office.Interop.Excel.Application();

//Отобразить Excel
ex.Visible = true;

//Количество листов в рабочей книге
ex.SheetsInNewWorkbook = 2;

//Добавить рабочую книгу
Excel.Workbook workBook = ex.Workbooks.Add(Type.Missing);

//Отключить отображение окон с сообщениями
ex.DisplayAlerts = false;

//Получаем первый лист документа (счет начинается с 1)
Excel.Worksheet sheet = (Excel.Worksheet)ex.Worksheets.get_Item(1);

//Название листа (вкладки снизу)
sheet.Name = "Отчет за 13.12.2017";

//Пример заполнения ячеек
for (int i = 1; i <= 9; i++)
{
  for (int j = 1; j < 9; j++)
  sheet.Cells[i, j] = String.Format("Boom {0} {1}", i, j);
}

//Захватываем диапазон ячеек
Excel.Range range1 = sheet.get_Range(sheet.Cells[1, 1], sheet.Cells[9, 9]);

//Шрифт для диапазона
range1.Cells.Font.Name = "Tahoma";
//Размер шрифта для диапазона
range1.Cells.Font.Size = 10;

//Захватываем другой диапазон ячеек
Excel.Range range2 = sheet.get_Range(sheet.Cells[1, 1], sheet.Cells[9, 2]);
range2.Cells.Font.Name = "Times New Roman";

//Задаем цвет этого диапазона. Необходимо подключить System.Drawing
range2.Cells.Font.Color = ColorTranslator.ToOle(Color.Green);
//Фоновый цвет
range2.Interior.Color = ColorTranslator.ToOle(Color.FromArgb(0xFF, 0xFF, 0xCC));
Расстановка рамок.
Расставляем рамки со всех сторон:
range2.Borders.get_Item(Excel.XlBordersIndex.xlEdgeBottom).LineStyle = Excel.XlLineStyle.xlContinuous;
range2.Borders.get_Item(Excel.XlBordersIndex.xlEdgeRight).LineStyle = Excel.XlLineStyle.xlContinuous;
range2.Borders.get_Item(Excel.XlBordersIndex.xlInsideHorizontal).LineStyle = Excel.XlLineStyle.xlContinuous;
range2.Borders.get_Item(Excel.XlBordersIndex.xlInsideVertical).LineStyle = Excel.XlLineStyle.xlContinuous;
range2.Borders.get_Item(Excel.XlBordersIndex.xlEdgeTop).LineStyle = Excel.XlLineStyle.xlContinuous;
Цвет рамки можно установить так:
range2.Borders.Color = ColorTranslator.ToOle(Color.Red);
Выравнивания в диапазоне задаются так:
rangeDate.VerticalAlignment = Excel.XlVAlign.xlVAlignCenter;
rangeDate.HorizontalAlignment = Excel.XlHAlign.xlHAlignLeft;
Формулы
Определим задачу: получить сумму диапазона ячеек A4:A10.
Для начала снова получим диапазон ячеек:
Excel.Range formulaRange = sheet.get_Range(sheet.Cells[4, 1], sheet.Cells[9, 1]);
Далее получим диапазон вида A4:A10 по адресу ячейки ( [4,1]; [9;1] ) описанному выше:
string adder = formulaRange.get_Address(1, 1, Excel.XlReferenceStyle.xlA1, Type.Missing, Type.Missing);
Теперь в переменной adder у нас хранится строковое значение диапазона ( [4,1]; [9;1] ), то есть A4:A10.
Вычисляем формулу:
//Одна ячейка как диапазон
Excel.Range r = sheet.Cells[10, 1] as Excel.Range;
//Оформления
r.Font.Name = "Times New Roman";
r.Font.Bold = true;
r.Font.Color = ColorTranslator.ToOle(Color.Blue);
//Задаем формулу суммы
r.Formula = String.Format("=СУММ({0}", adder);
Выделение ячейки или диапазона ячеек
Так же можно выделить ячейку или диапазон, как если бы мы выделили их мышкой:
sheet.get_Range("J3", "J8").Activate();
//или
sheet.get_Range("J3", "J8").Select();
//Можно вписать одну и ту же ячейку, тогда будет выделена одна ячейка.
sheet.get_Range("J3", "J3").Activate();
sheet.get_Range("J3", "J3").Select();
Авто ширина и авто высота
Чтобы настроить авто ширину и высоту для диапазона, используем такие команды:
range.EntireColumn.AutoFit();
range.EntireRow.AutoFit();
Получаем значения из ячеек
Чтобы получить значение из ячейки, используем такой код:
//Получение одной ячейки как ранга
Excel.Range forYach = sheet.Cells[ob + 1, 1] as Excel.Range;
//Получаем значение из ячейки и преобразуем в строку
string yach = forYach.Value2.ToString();
Добавляем лист в рабочую книгу
Чтобы добавить лист и дать ему заголовок, используем следующее:
var sh = workBook.Sheets;
Excel.Worksheet sheetPivot = (Excel.Worksheet)sh.Add(Type.Missing, sh[1], Type.Missing, Type.Missing);
sheetPivot.Name = "Сводная таблица";
Добавление разрыва страницы
//Ячейка, с которой будет разрыв
Excel.Range razr = sheet.Cells[n, m] as Excel.Range;
//Добавить горизонтальный разрыв (sheet - текущий лист)
sheet.HPageBreaks.Add(razr);
//VPageBreaks - Добавить вертикальный разрыв
Сохраняем документ
ex.Application.ActiveWorkbook.SaveAs("doc.xlsx", Type.Missing,
  Type.Missing, Type.Missing, Type.Missing, Type.Missing, Excel.XlSaveAsAccessMode.xlNoChange,
  Type.Missing, Type.Missing, Type.Missing, Type.Missing, Type.Missing);
Как открыть существующий документ Excel
ex.Workbooks.Open(@"C:UsersMyuserDocumentsExcel.xlsx",
  Type.Missing, Type.Missing, Type.Missing, Type.Missing,
  Type.Missing, Type.Missing, Type.Missing, Type.Missing,
  Type.Missing, Type.Missing, Type.Missing, Type.Missing,
  Type.Missing, Type.Missing);
Комментарии
При работе с Excel с помощью C# большую помощь может оказать редактор Visual Basic, встроенный в Excel.
Для этого в настройках ленты надо добавить пункт «Разработчик». Далее начинаем запись макроса, производим действия и останавливаем запись.
Далее заходим в редактор Visual Basic и смотрим код, который туда записался:

Например:
Sub Макрос1()
'
' Макрос1 Макрос
'

'
    Range("E88").Select
    ActiveSheet.ListObjects.Add(xlSrcRange, Range("$A$1:$F$118"), , xlYes).Name = _
        "Таблица1"
    Range("A1:F118").Select
    ActiveSheet.ListObjects("Таблица1").TableStyle = "TableStyleLight9"
    Range("E18").Select
    ActiveWindow.SmallScroll Down:=84
End Sub
В данном макросе записаны все действия, которые мы выполнили во время его записи. Эти методы и свойства можно использовать в C# коде.
Данный метод так же может оказать помощь в формировании относительных формул, например, выполнить сложение чисел, находящиеся слева от текущей ячейки на 4 столбца, и т.п. Пример:
//Складываем значения предыдущих 12 ячеек слева
rang.Formula = "=СУММ(RC[-12]:RC[-1])";
Так же во время работы может возникнуть ошибка: метод завершен неверно. Это может означать, что не выбран лист, с которым идет работа.
Чтобы выбрать лист, выполните sheetData.Select(Type.Missing); где sheetData это нужный лист.
Просмотрено:
81 944