This article will show in detail how to work with Excel files and how to modify specific data with Python.
First we will learn how to work with CSV files by reading, writing and updating them. Then we will take a look how to read files, filter them by sheets, search for rows/columns, and update cells of xlsx files.
Let’s start with the simplest spreadsheet format: CSV.
Part 1 — The CSV file
A CSV file is a comma-separated values file, where plain text data is displayed in a tabular format. They can be used with any spreadsheet program, such as Microsoft Office Excel, Google Spreadsheets, or LibreOffice Calc.
CSV files are not like other spreadsheet files though, because they don’t allow you to save cells, columns, rows or formulas. Their limitation is that they also allow only one sheet per file. My plan for this first part of the article is to show you how to create CSV files using Python 3 and the standard library module CSV.
This tutorial will end with two GitHub repositories and a live web application that actually uses the code of the second part of this tutorial (yet updated and modified to be for a specific purpose).
Writing to CSV files
First, open a new Python file and import the Python CSV module.
import csvCSV Module
The CSV module includes all the necessary methods built in. These include:
- csv.reader
- csv.writer
- csv.DictReader
- csv.DictWriter
- and others
In this guide we are going to focus on the writer, DictWriter and DictReader methods. These allow you to edit, modify, and manipulate the data stored in a CSV file.
In the first step we need to define the name of the file and save it as a variable. We should do the same with the header and data information.
filename = "imdb_top_4.csv"
header = ("Rank", "Rating", "Title")
data = [
(1, 9.2, "The Shawshank Redemption(1994)"),
(2, 9.2, "The Godfather(1972)"),
(3, 9, "The Godfather: Part II(1974)"),
(4, 8.9, "Pulp Fiction(1994)")
]
Now we need to create a function named writer that will take in three parameters: header, data and filename.
def writer(header, data, filename):
  pass
The next step is to modify the writer function so it creates a file that holds data from the header and data variables. This is done by writing the first row from the header variable and then writing four rows from the data variable (there are four rows because there are four tuples inside the list).
def writer(header, data, filename):
  with open (filename, "w", newline = "") as csvfile:
    movies = csv.writer(csvfile)
    movies.writerow(header)
    for x in data:
      movies.writerow(x)
The official Python documentation describes how the csv.writer method works. I would strongly suggest that you to take a minute to read it.
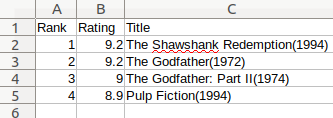
And voilà! You created your first CSV file named imdb_top_4.csv. Open this file with your preferred spreadsheet application and you should see something like this:
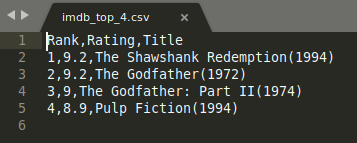
The result might be written like this if you choose to open the file in some other application:
Updating the CSV files
To update this file you should create a new function named updater that will take just one parameter called filename.
def updater(filename):
    with open(filename, newline= "") as file:
        readData = [row for row in csv.DictReader(file)]
        # print(readData)
        readData[0]['Rating'] = '9.4'
        # print(readData)

    readHeader = readData[0].keys()
    writer(readHeader, readData, filename, "update")
This function first opens the file defined in the filename variable and then saves all the data it reads from the file inside of a variable named readData. The second step is to hard code the new value and place it instead of the old one in the readData[0][‘Rating’] position.
The last step in the function is to call the writer function by adding a new parameter update that will tell the function that you are doing an update.
csv.DictReader is explained more in the official Python documentation here.
For writer to work with a new parameter, you need to add a new parameter everywhere writer is defined. Go back to the place where you first called the writer function and add “write” as a new parameter:
writer(header, data, filename, "write")Just below the writer function call the updater and pass the filename parameter into it:
writer(header, data, filename, "write")
updater(filename)
Now you need to modify the writer function to take a new parameter named option:
def writer(header, data, filename, option):From now on we expect to receive two different options for the writer function (write and update). Because of that we should add two if statements to support this new functionality. First part of the function under “if option == “write:” is already known to you. You just need to add the “elif option == “update”: section of the code and the else part just as they are written bellow:
def writer(header, data, filename, option):
        with open (filename, "w", newline = "") as csvfile:
            if option == "write":

                movies = csv.writer(csvfile)
                movies.writerow(header)
                for x in data:
                    movies.writerow(x)
            elif option == "update":
                writer = csv.DictWriter(csvfile, fieldnames = header)
                writer.writeheader()
                writer.writerows(data)
            else:
                print("Option is not known")
Bravo! Your are done!
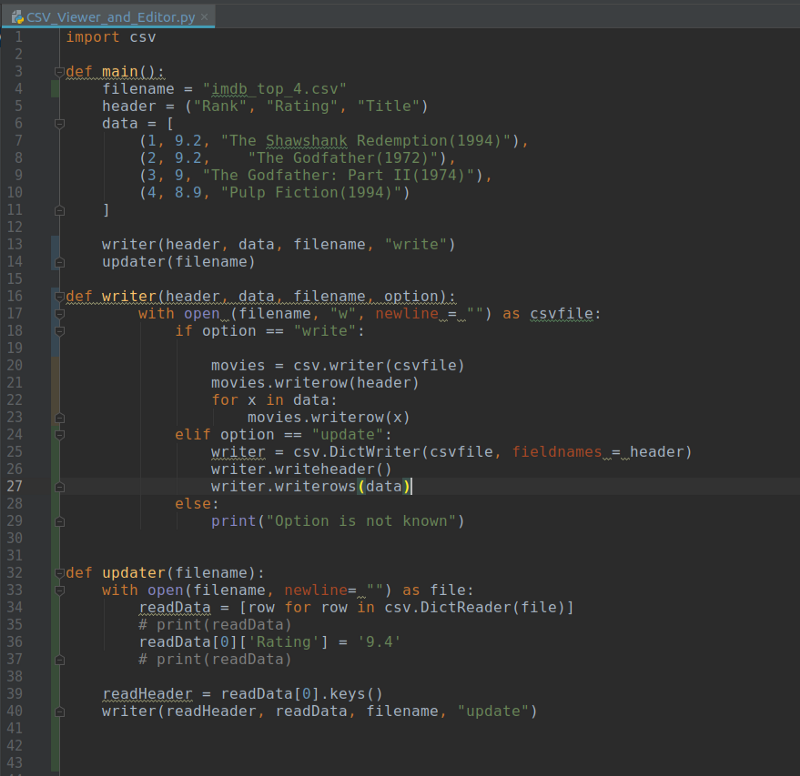
Now your code should look something like this:
You can also find the code here:
https://github.com/GoranAviani/CSV-Viewer-and-Editor
In the first part of this article we have seen how to work with CSV files. We have created and updated one such file.
Part 2 — The xlsx file
For several weekends I have worked on this project. I have started working on it because there was a need for this kind of solution in my company. My first idea was to build this solution directly in my company’s system, but then I wouldn’t have anything to write about, eh?
I build this solution using Python 3 and openpyxl library. The reason why I have chosen openpyxl is because it represents a complete solution for creating worksheets, loading, updating, renaming and deleting them. It also allows us to read or write to rows and columns, merge or un-merge cells or create Python excel charts etc.
Openpyxl terminology and basic info
- Workbook is the name for an Excel file in Openpyxl.
- A workbook consists of sheets (default is 1 sheet). Sheets are referenced by their names.
- A sheet consists of rows (horizontal lines) starting from the number 1 and columns (vertical lines) starting from the letter A.
- Rows and columns result in a grid and form cells which may contain some data (numerical or string value) or formulas.
Openpyxl in nicely documented and I would advise that you take a look here.
The first step is to open your Python environment and install openpyxl within your terminal:
pip install openpyxlNext, import openpyxl into your project and then to load a workbook into the theFile variable.
import openpyxl

theFile = openpyxl.load_workbook('Customers1.xlsx')
print(theFile.sheetnames)
currentSheet = theFile['customers 1']
print(currentSheet['B4'].value)
As you can see, this code prints all sheets by their names. It then selects the sheet that is named “customers 1” and saves it to a currentSheet variable. In the last line, the code prints the value that is located in the B4 position of the “customers 1” sheet.
This code works as it should but it is very hard coded. To make this more dynamic we will write code that will:
- Read the file
- Get all sheet names
- Loop through all sheets
- In the last step, the code will print values that are located in B4 fields of each found sheet inside the workbook.
import openpyxl

theFile = openpyxl.load_workbook('Customers1.xlsx')
allSheetNames = theFile.sheetnames

print("All sheet names {} " .format(theFile.sheetnames))


for x in allSheetNames:
    print("Current sheet name is {}" .format(x))
    currentSheet = theFile[x]
    print(currentSheet['B4'].value)
This is better than before, but it is still a hard coded solution and it still assumes the value you will be looking for is in the B4 cell, which is just silly 
I expect your project will need to search inside all sheets in the Excel file for a specific value. To do this we will add one more for loop in the “ABCDEF” range and then simply print cell names and their values.
import openpyxl

theFile = openpyxl.load_workbook('Customers1.xlsx')
allSheetNames = theFile.sheetnames

print("All sheet names {} " .format(theFile.sheetnames))


for sheet in allSheetNames:
    print("Current sheet name is {}" .format(sheet))
    currentSheet = theFile[sheet]
    # print(currentSheet['B4'].value)

    #print max numbers of wors and colums for each sheet
    #print(currentSheet.max_row)
    #print(currentSheet.max_column)

    for row in range(1, currentSheet.max_row + 1):
        #print(row)
        for column in "ABCDEF":  # Here you can add or reduce the columns
            cell_name = "{}{}".format(column, row)
            #print(cell_name)
            print("cell position {} has value {}".format(cell_name, currentSheet[cell_name].value))
We did this by introducing the “for row in range..” loop. The range of the for loop is defined from the cell in row 1 to the sheet’s maximum number or rows. The second for loop searches within predefined column names “ABCDEF”. In the second loop we will display the full position of the cell (column name and row number) and a value.
However, in this article my task is to find a specific column that is named “telephone” and then go through all the rows of that column. To do that we need to modify the code like below.
import openpyxl

theFile = openpyxl.load_workbook('Customers1.xlsx')
allSheetNames = theFile.sheetnames

print("All sheet names {} " .format(theFile.sheetnames))


def find_specific_cell():
    for row in range(1, currentSheet.max_row + 1):
        for column in "ABCDEFGHIJKL":  # Here you can add or reduce the columns
            cell_name = "{}{}".format(column, row)
            if currentSheet[cell_name].value == "telephone":
                #print("{1} cell is located on {0}" .format(cell_name, currentSheet[cell_name].value))
                print("cell position {} has value {}".format(cell_name, currentSheet[cell_name].value))
                return cell_name

for sheet in allSheetNames:
    print("Current sheet name is {}" .format(sheet))
    currentSheet = theFile[sheet]
This modified code goes through all cells of every sheet, and just like before the row range is dynamic and the column range is specific. The code loops through cells and looks for a cell that holds a text “telephone”. Once the code finds the specific cell it notifies the user in which cell the text is located. The code does this for every cell inside of all sheets that are in the Excel file.
The next step is to go through all rows of that specific column and print values.
import openpyxl

theFile = openpyxl.load_workbook('Customers1.xlsx')
allSheetNames = theFile.sheetnames

print("All sheet names {} " .format(theFile.sheetnames))


def find_specific_cell():
    for row in range(1, currentSheet.max_row + 1):
        for column in "ABCDEFGHIJKL":  # Here you can add or reduce the columns
            cell_name = "{}{}".format(column, row)
            if currentSheet[cell_name].value == "telephone":
                #print("{1} cell is located on {0}" .format(cell_name, currentSheet[cell_name].value))
                print("cell position {} has value {}".format(cell_name, currentSheet[cell_name].value))
                return cell_name

def get_column_letter(specificCellLetter):
    letter = specificCellLetter[0:-1]
    print(letter)
    return letter

def get_all_values_by_cell_letter(letter):
    for row in range(1, currentSheet.max_row + 1):
        for column in letter:
            cell_name = "{}{}".format(column, row)
            #print(cell_name)
            print("cell position {} has value {}".format(cell_name, currentSheet[cell_name].value))


for sheet in allSheetNames:
    print("Current sheet name is {}" .format(sheet))
    currentSheet = theFile[sheet]
    specificCellLetter = (find_specific_cell())
    letter = get_column_letter(specificCellLetter)

    get_all_values_by_cell_letter(letter)
This is done by adding a function named get_column_letter that finds a letter of a column. After the letter of the column is found we loop through all rows of that specific column. This is done with the get_all_values_by_cell_letter function which will print all values of those cells.
Wrapping up
Bra gjort! There are many thing you can do after this. My plan was to build an online app that will standardize all Swedish telephone numbers taken from a text box and offer users the possibility to simply copy the results from the same text box. The second step of my plan was to expand the functionality of the web app to support the upload of Excel files, processing of telephone numbers inside those files (standardizing them to a Swedish format) and offering the processed files back to users.
I have done both of those tasks and you can see them live in the Tools page of my Incodaq.com site:
https://tools.incodaq.com/
Also the code from the second part of this article is available on GitHub:
https://github.com/GoranAviani/Manipulate-Excel-spreadsheets
Thank you for reading! Check out more articles like this on my Medium profile: https://medium.com/@goranaviani and other fun stuff I build on my GitHub page: https://github.com/GoranAviani
Learn to code for free. freeCodeCamp’s open source curriculum has helped more than 40,000 people get jobs as developers. Get started
Is there a way to update a spreadsheet in real time while it is open in Excel? I have a workbook called Example.xlsx which is open in Excel and I have the following python code which tries to update cell B1 with the string ‘ID’:
import openpyxl

wb = openpyxl.load_workbook('Example.xlsx')
sheet = wb['Sheet']
sheet['B1'] = 'ID'

wb.save('Example.xlsx')
On running the script I get this error:
PermissionError: [Errno 13] Permission denied: 'Example.xlsx'
I know its because the file is currently open in Excel, but was wondering if there is another way or module I can use to update a sheet while its open.
asked May 18, 2018 at 12:28
WestWest
2,2333 gold badges28 silver badges66 bronze badges
7
I have actually figured this out and its quite simple using xlwings. The following code opens an existing Excel file called Example.xlsx and updates it in real time, in this case puts in the value 45 in cell B2 instantly soon as you run the script.
import xlwings as xw

wb = xw.Book('Example.xlsx')
sht1 = wb.sheets['Sheet']
sht1.range('B2').value = 45
answered May 19, 2018 at 4:26
WestWest
2,2333 gold badges28 silver badges66 bronze badges
1
You’ve already worked out why you can’t use openpyxl to write to the .xlsx file: it’s locked while Excel has it open. You can’t write to it directly, but you can use win32com to communicate with the copy of Excel that is running via its COM interface.
You can download win32com from https://github.com/mhammond/pywin32 .
Use it like this:
from win32com.client import Dispatch
xlApp = Dispatch("Excel.Application")
wb=xlApp.Workbooks.Item("MyExcelFile.xlsx")
ws=wb.Sheets("MyWorksheetName")
At this point, ws is a reference to a worksheet object that you can change. The objects you get back aren’t Python objects but a thin Python wrapper around VBA objects that obey their own conventions, not Python’s.
There is some useful if rather old Python-oriented documentation here: http://timgolden.me.uk/pywin32-docs/contents.html
There is full documentation for the object model here: https://msdn.microsoft.com/en-us/library/wss56bz7.aspx but bear in mind that it is addressed to VBA programmers.
answered May 18, 2018 at 14:47
BoarGulesBoarGules
16.2k2 gold badges30 silver badges43 bronze badges
4
If you want to stream real time data into Excel from Python, you can use an RTD function. If you’ve ever used the Bloomberg add-in use for accessing real time market data in Excel then you’ll be familiar with RTD functions.
The easiest way to write an RTD function for Excel in Python is to use PyXLL. You can read how to do it in the docs here: https://www.pyxll.com/docs/userguide/rtd.html
There’s also a blog post showing how to stream live tweets into Excel using Python here: https://www.pyxll.com/blog/a-real-time-twitter-feed-in-excel/
If you wanted to write an RTD server to run outside of Excel you have to register it as a COM server. The pywin32 package includes an example that shows how to do that, however it only works for Excel prior to 2007. For 2007 and later versions you will need this code https://github.com/pyxll/exceltypes to make that example work (see the modified example from pywin32 in exceltypes/demos in that repo).
answered Aug 3, 2018 at 8:08
1
You can’t change an Excel file that’s being used by another application because the file format does not support concurrent access.
answered May 18, 2018 at 15:32
Charlie ClarkCharlie Clark
18.1k4 gold badges47 silver badges54 bronze badges
5
in this tutorial, I will create a python script that will read excel file data and modified them, and update the excel file. I am using python 3.7 and some colors libs to display logs colorful.
I have created a python script that updates the excel sheet based on some input parameters, I just need to read all rows and column values and update accordingly.
You can also checkout other python excel tutorials:
- Popular Python excel Library
- Reading Excel Using Python Pandas
- How To Read & Update Excel File Using Python
- Inserting & Deleting rows/columns using openpyxl
There are the following functionality will achieve in this tutorial –
- Read excel file using an absolute path.
- File the column index based on excel column heading
- Iterate on all rows
- Get and Update column field value
- Save the excel file
Read and Update Microsoft Excel File In Python
We will create a “sample.xlsx” excel file that will have the following data –employee.xlsx
Name         age     Salary
Roji          32      1234
Adam          34      2134
We will update grade column value A or B based on salary filed value, Update the grade column value if the salary column value is greater > 1500.
How To Read Excel File in Python
We will create emp.py file and add the below code into this file, I am using some python packages that will install using pip command.
pip install colorama
pip install openpyxl
The colorama package is optional, that only used to display logs in colorful format. The openpyxl mandatory required package.
Let’s import all packages into emp.py file.
import sys
from colorama import Fore, init, Back, Style
import openpyxl
import re
How To Read excel file Using openpyxl
The openpyxl package has load_workbook() method that will use to open xlsx file. There is a number of helper methods that help to read and write excel file.
path = "C:\employee.xlsx"
wb_obj = openpyxl.load_workbook(path.strip())
# from the active attribute
sheet_obj = wb_obj.active
We have also set the active sheet to read the data of the excel file.
How To Read Column and rows Length
We will use max_column and max_row properties of the excel file object.
# get max column count
max_column=sheet_obj.max_column
max_row=sheet_obj.max_row
How To iterate on Excel File Rows in Python
We will use range() method to iterate excel file on rows length, skipped the first row which has excel file header information.
for j in range(2, 5):
        salary_cell=sheet_obj.cell(row=i,column=colum_index)
How To Get and Set Excel File data
We will get row cell object and then get cell value using .value property.
//get col object
salary_cell=sheet_obj.cell(row=i,column=2)
//get value
salary = salary_cell.value:
//set value
salary_cell.value = 2000;
The full source code :
I have consolidated all parts of the code and added them into emp.py file.
import sys
from colorama import Fore, init, Back, Style
import openpyxl
import re

init(convert=True)
print("n")
path = input("Enter xls file path, ex- C:\employee.xlsx : ")
input_col_name = input("Enter colname, ex- Endpoint : ")
try:
    print(Fore.RESET)
    #path = "C:\employee.xlsx"
    wb_obj = openpyxl.load_workbook(path.strip())
    # from the active attribute
    sheet_obj = wb_obj.active

    # get max column count
    max_column=sheet_obj.max_column
    max_row=sheet_obj.max_row
    for j in range(2, 5):
        salary_cell=sheet_obj.cell(row=i,column=2)
        if salary_cell.value > 1500:
            salary_cell.value =  salary_cell.value+500

    wb_obj.save()
except Exception as e:
    print(e)
    print (Fore.RED + "Error : The file does not found")
print(Fore.GREEN + "###################### Successfully! Excel file has been read/write. ##############################")
Improve Article
Save Article
Like Article
Improve Article
Save Article
Like Article
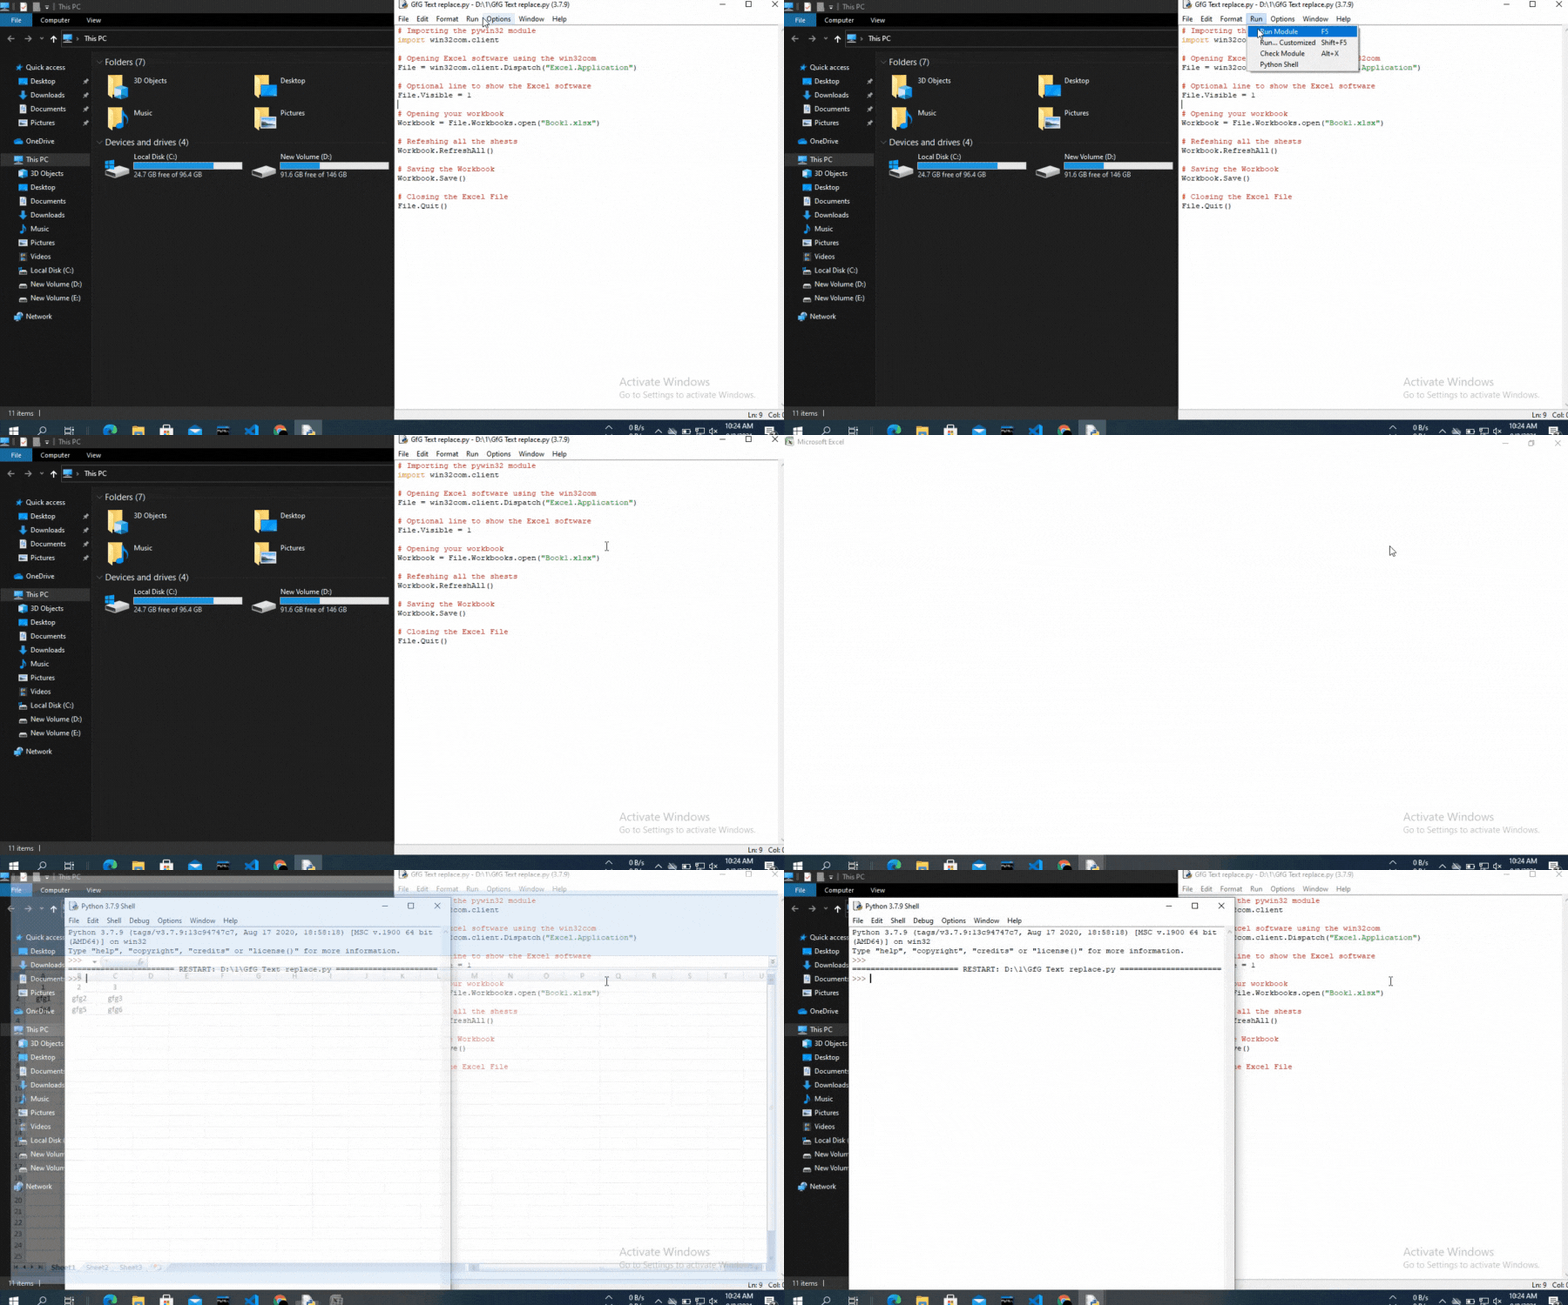
In this article, we will learn how we can automate refreshing an Excel Spreadsheet using Python.
So to open the Excel application and workbooks we are going to use the pywin32 module. You can install the module using the below code:
pip install pywin32
Then we are going to open the Excel application using the win32com.client.Dispatch() method and workbooks using the Workbooks.open() method.
Syntax: File.Workbooks.open(PATH_OF_FILE)
Parameters: It will take the path of the excel file as its parameter.
And then use refresh the file using RefershAll():
Workbook.RefreshAll()
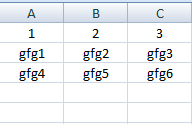
For this example, we created an excel file named “Book1” with the below content:
Below is the implementation:
Python3
import win32com.client
File = win32com.client.Dispatch("Excel.Application")
File.Visible = 1
Workbook = File.Workbooks.open("Book1.xlsx")
Workbook.RefreshAll()
Workbook.Save()
File.Quit()
Output:
Like Article
Save Article
В Pandas есть встроенная функция для сохранения датафрейма в электронную таблицу Excel. Все очень просто:
|
df.to_excel( path ) # где path это путь до файла, куда будем сохранять |
Как записать в лист с заданным именем
В этом случае будет создан xls / xlsx файл, а данные сохранятся на лист с именем Sheet1. Если хочется сохранить на лист с заданным именем, то можно использовать конструкцию:
|
df.to_excel( path, sheet_name=«Лист 1») # где sheet_name название листа |
Как записать в один файл сразу два листа
Но что делать, если хочется записать в файл сразу два листа? Логично было бы использовать две команды
df.to_excel друг за другом, но с одним путем до файла и разными
sheet_name , однако в Pandas это так не работает. Для решения этой задачи придется использовать конструкцию посложнее:
|
from pandas.io.excel import ExcelWriter with ExcelWriter(path) as writer: df.sample(10).to_excel(writer, sheet_name=«Лист 1») df.sample(10).to_excel(writer, sheet_name=«Лист 2») |
В результате будет создан файл Excel, где будет два листа с именами Лист 1 и Лист 2.
Как добавить ещё один лист у уже существующему файлу
Если использовать предыдущий код, то текущий файл будет перезаписан и в него будет записан новый лист. Старые данные при этом, ожидаемо, будут утеряны. Выход есть, достаточно лишь добавить модификатор «a» (append):
|
with ExcelWriter(path, mode=«a») as writer: df.sample(10).to_excel(writer, sheet_name=«Лист 3») |
Но что, если оставить этот код, удалить существующий файл Excel и попробовать выполнить код? Получим ошибку Файл не найден. В Python существует модификатор «a+», который создает файл, если его нет, и открывает его на редактирование, если файл существует. Но в Pandas такого модификатора не существует, поэтому мы должны выбрать модификатор для ExcelWriter в зависимости от наличия или отсутствия файла. Но это не сложно:
|
with ExcelWriter(path, mode=«a» if os.path.exists(path) else «w») as writer: df.sample().to_excel(writer, sheet_name=«Лист 4») |
К сожалению в Pandas, на момент написания поста, такого функционала нет. Но это можно реализовать с помощью пакета openpyxl. Вот пример такой функции:
|
def update_spreadsheet(path : str, _df, starcol : int = 1, startrow : int = 1, sheet_name : str =«ToUpdate»): »’ :param path: Путь до файла Excel :param _df: Датафрейм Pandas для записи :param starcol: Стартовая колонка в таблице листа Excel, куда буду писать данные :param startrow: Стартовая строка в таблице листа Excel, куда буду писать данные :param sheet_name: Имя листа в таблице Excel, куда буду писать данные :return: »’ wb = ox.load_workbook(path) for ir in range(0, len(_df)): for ic in range(0, len(_df.iloc[ir])): wb[sheet_name].cell(startrow + ir, starcol + ic).value = _df.iloc[ir][ic] wb.save(path) |
Как работает код и пояснения смотри в видео
Если у тебя есть вопросы, что-то не получается или ты знаешь как решить задачи в посте лучше и эффективнее (такое вполне возможно) то смело пиши в комментариях к видео.


