
| title | description | ms.date | ms.topic | dev_langs | helpviewer_keywords | author | ms.author | manager | ms.technology | ms.workload | ||||||||||
|---|---|---|---|---|---|---|---|---|---|---|---|---|---|---|---|---|---|---|---|---|
|
Excel Object model overview |
Learn that you can interact with the objects provided by the Excel object model to develop solutions that use Microsoft Office Excel. |
08/14/2019 |
conceptual |
|
|
John-Hart |
johnhart |
jmartens |
office-development |
office |
Excel object model overview
[!INCLUDE Visual Studio]
To develop solutions that use Microsoft Office Excel, you can interact with the objects provided by the Excel object model. This topic introduces the most important objects:
-
xref:Microsoft.Office.Interop.Excel.Application
-
xref:Microsoft.Office.Interop.Excel.Workbook
-
xref:Microsoft.Office.Interop.Excel.Worksheet
-
xref:Microsoft.Office.Interop.Excel.Range
[!INCLUDEappliesto_xlalldocapp]
[!includeAdd-ins note]
The object model closely follows the user interface. The xref:Microsoft.Office.Interop.Excel.Application object represents the entire application, and each xref:Microsoft.Office.Interop.Excel.Workbook object contains a collection of Worksheet objects. From there, the major abstraction that represents cells is the xref:Microsoft.Office.Interop.Excel.Range object, which enables you to work with individual cells or groups of cells.
In addition to the Excel object model, Office projects in Visual Studio provide host items and host controls that extend some objects in the Excel object model. Host items and host controls behave like the Excel objects they extend, but they also have additional functionality such as data-binding capabilities and extra events. For more information, see Automate Excel by using extended objects and Host items and host controls overview.
This topic provides a brief overview of the Excel object model. For resources where you can learn more about the entire Excel object model, see Use the Excel object model documentation.
Access objects in an Excel project
When you create a new VSTO Add-in project for Excel, Visual Studio automatically creates a ThisAddIn.vb or ThisAddIn.cs code file. You can access the Application object by using Me.Application or this.Application.
When you create a new document-level project for Excel, you have the option of creating a new Excel Workbook or Excel Template project. Visual Studio automatically creates the following code files in your new Excel project for both workbook and template projects.
| Visual Basic | C# |
|---|---|
| ThisWorkbook.vb | ThisWorkbook.cs |
| Sheet1.vb | Sheet1.cs |
| Sheet2.vb | Sheet2.cs |
| Sheet3.vb | Sheet3.cs |
You can use the Globals class in your project to access ThisWorkbook, Sheet1, Sheet2, or Sheet3 from outside of the respective class. For more information, see Global access to objects in Office projects. The following example calls the xref:Microsoft.Office.Interop.Excel._Worksheet.PrintPreview%2A method of Sheet1 regardless of whether the code is placed in one of the Sheetn classes or the ThisWorkbook class.
C#
:::code language=»csharp» source=»../vsto/codesnippet/CSharp/Trin_VstcoreExcelAutomationCS/Sheet1.cs» id=»Snippet82″:::
VB
:::code language=»vb» source=»../vsto/codesnippet/VisualBasic/Trin_VstcoreExcelAutomation/Sheet1.vb» id=»Snippet82″:::
Because the data in an Excel document is highly structured, the object model is hierarchical and straightforward. Excel provides hundreds of objects with which you might want to interact, but you can get a good start on the object model by focusing on a small subset of the available objects. These objects include the following four:
-
Application
-
Workbook
-
Worksheet
-
Range
Much of the work done with Excel centers around these four objects and their members.
Application object
The Excel xref:Microsoft.Office.Interop.Excel.Application object represents the Excel application itself. The xref:Microsoft.Office.Interop.Excel.Application object exposes a great deal of information about the running application, the options applied to that instance, and the current user objects open within the instance.
[!NOTE]
You should not set the xref:Microsoft.Office.Interop.Excel.ApplicationClass.EnableEvents%2A property of the xref:Microsoft.Office.Interop.Excel.Application object in Excel to false. Setting this property to false prevents Excel from raising any events, including the events of host controls.
Workbook object
The xref:Microsoft.Office.Interop.Excel.Workbook object represents a single workbook within the Excel application.
The Office development tools in Visual Studio extend the xref:Microsoft.Office.Interop.Excel.Workbook object by providing the xref:Microsoft.Office.Tools.Excel.Workbook type. This type gives you access to all features of a xref:Microsoft.Office.Interop.Excel.Workbook object. For more information, see Workbook host item.
Worksheet object
The xref:Microsoft.Office.Interop.Excel.Worksheet object is a member of the xref:Microsoft.Office.Interop.Excel.Worksheets collection. Many of the properties, methods, and events of the xref:Microsoft.Office.Interop.Excel.Worksheet are identical or similar to members provided by the xref:Microsoft.Office.Interop.Excel.Application or xref:Microsoft.Office.Interop.Excel.Workbook objects.
Excel provides a xref:Microsoft.Office.Interop.Excel.Sheets collection as a property of a xref:Microsoft.Office.Interop.Excel.Workbook object. Each member of the xref:Microsoft.Office.Interop.Excel.Sheets collection is either a xref:Microsoft.Office.Interop.Excel.Worksheet or a xref:Microsoft.Office.Interop.Excel.Chart object.
The Office development tools in Visual Studio extend the xref:Microsoft.Office.Interop.Excel.Worksheet object by providing the xref:Microsoft.Office.Tools.Excel.Worksheet type. This type gives you access to all features of a xref:Microsoft.Office.Interop.Excel.Worksheet object, as well as new features such as the ability to host managed controls and handle new events. For more information, see Worksheet host item.
Range object
The xref:Microsoft.Office.Interop.Excel.Range object is the object you will use most within your Excel applications. Before you can manipulate any region within Excel, you must express it as a xref:Microsoft.Office.Interop.Excel.Range object and work with methods and properties of that range. A xref:Microsoft.Office.Interop.Excel.Range object represents a cell, a row, a column, a selection of cells that contains one or more blocks of cells, which might or might not be contiguous, or even a group of cells on multiple sheets.
Visual Studio extends the xref:Microsoft.Office.Interop.Excel.Range object by providing the xref:Microsoft.Office.Tools.Excel.NamedRange and xref:Microsoft.Office.Tools.Excel.XmlMappedRange types. These types have most of the same features as a xref:Microsoft.Office.Interop.Excel.Range object, as well as new features such as the data binding capability and new events. For more information, see NamedRange control and XmlMappedRange control.
Use the Excel object model documentation
For complete information about the Excel object model, you can refer to the Excel primary interop assembly (PIA) reference and the VBA object model reference.
Primary interop assembly reference
The Excel PIA reference documentation describes the types in the primary interop assembly for Excel. This documentation is available from the following location: Excel 2010 primary interop assembly reference.
For more information about the design of the Excel PIA, such as the differences between classes and interfaces in the PIA and how events in the PIA are implemented, see Overview of classes and interfaces in the Office primary interop assemblies.
VBA object model reference
The VBA object model reference documents the Excel object model as it is exposed to Visual Basic for Applications (VBA) code. For more information, see Excel 2010 object model reference.
All of the objects and members in the VBA object model reference correspond to types and members in the Excel PIA. For example, the Worksheet object in the VBA object model reference corresponds to the xref:Microsoft.Office.Interop.Excel.Worksheet object in the Excel PIA. Although the VBA object model reference provides code examples for most properties, methods, and events, you must translate the VBA code in this reference to Visual Basic or Visual C# if you want to use them in an Excel project that you create by using Visual Studio.
Related topics
| Title | Description |
|---|---|
| Excel solutions | Explains how you can create document-level customizations and VSTO Add-ins for Microsoft Office Excel. |
| Work with ranges | Provides examples that show how to perform common tasks with ranges. |
| Work with worksheets | Provides examples that show how to perform common tasks with worksheets. |
| Work with workbooks | Provides examples that show how to perform common tasks with workbooks. |
 If you’ve read any of the other macro or VBA tutorials in Power Spreadsheets, you’ve probably noticed that some terms keep popping up over and over.
One of the concepts that keep coming up, and will continue to come up in future tutorials, is that of objects. The main reason for this is simple:
VBA is (loosely) based on Object Oriented Programming. At a basic level, this (roughly) means that the VBA paradigm mostly relies on working with (or manipulates) objects.
As a consequence of the above, if you want to really master Excel macros and Visual Basic for Applications, you must have a good understanding of the following 3 topics:
- Objects.
- How to manipulate VBA objects.
- Excel’s VBA object model.
My 2 main purposes when writing this VBA tutorial are to:
- Explain the main characteristics of Excel’s VBA object model.
- Illustrate how you construct VBA object references when working with Visual Basic for Applications. This allows you to identify the Excel VBA object you want to work with and manipulate.
More precisely, in this macro tutorial I explain the following topics:
I’ll say from the start that the topics of Excel’s VBA object model and building VBA object references are not particularly simple. However…
Your knowledge and understanding of Excel’s VBA object model and object references will improve as you continue to study, and work with, Visual Basic for Applications. Therefore, don’t worry if, after reading this VBA tutorial things are not absolutely clear. This guide should provide you with a solid base and, with some work I’m sure you’ll master this topic and know all you need about Excel VBA objects.
Let’s begin by answering the first question that you probably have regarding the introduction I’ve made above by understanding…
Why Excel’s VBA Object Model Is Important
Visual Basic for Applications is included in most products that are part of Microsoft Office. In addition to Excel, the list of applications that have VBA includes PowerPoint, Word and Access.
This underscores one of the great advantaged of learning VBA:
Once you know Visual Basic for Applications, you can immediately start writing macros for the other products that use VBA. In fact, you’ll be able to create macros that work across all of those different applications.
One of the main topics you need to master in order to reach those levels of expertise is objects. At a basic level, VBA manipulates objects.
Each individual Application that works with VBA (for example, Excel, Word, PowerPoint, Outlook) has its own unique object model. Having a good understanding of the principles behind objects and object models helps you work with VBA in these different Applications.
OK. So Excel’s VBA object model is clearly important. The next question you may have is…
What Is Excel’s VBA Object Model
At a basic level, the Excel VBA Object Model is a hierarchy of the objects you can use when working with Excel VBA.
Among other advantages, this hierarchy makes VBA objects easier to reference. Therefore, let’s take a closer look at…
Excel’s VBA Object Hierarchy

An object hierarchy looks as follows:
- Level #1: At the very top, you have one single object.
- Level #2: The object at the top of the hierarchy contains some objects.
- Level #3: In turn, the object in the second level of the hierarchy, may contain other objects.
- Level #4: The objects in level 3 may contain other objects.
- …
- You probably get the idea… Objects may contain other objects. The process repeats itself until you reach objects that don’t contain any other objects.
When you’re working with a particular software application, the first object to consider is the application itself (the Application object). Generally, the application is at the top of the hierarchy.
In the case of Excel, the Application object is Excel itself.
Since Visual Basic for Applications can communicate with other applications and programs beyond Excel, this isn’t strictly speaking the top level of the hierarchy. However, you’ll usually see most people referring to the Application object itself as being the top of Excel’s VBA object hierarchy. That’s the convention I use in this macro tutorial.
The Application object contains other VBA objects. Some of the VBA objects contained by the Excel Application object are the following:
- Add-Ins, which contains all Add-In objects.
- Windows, which (at this level) contains all Window objects in the application.
- Workbooks, which contains all Workbook objects.
Each of these VBA objects, in turn, is capable of containing other objects. For example, some of the VBA objects that can be contained within a Workbook object are the following:
- Charts, which contains Chart objects.
- Names, which contains Name objects.
- VBProjects, which represents open projects.
- Windows, which (at this level) contains Window objects in the specified Excel workbook.
- Worksheets, which contains Worksheet objects.
Again, these VBA objects can contain other objects. Continuing with the example above, a Worksheet object can contain the following VBA objects:
- ChartObjects, which contains ChartObject objects.
- Comment, which represents a cell comment.
- Hyperlink, which represents a hyperlink.
- Name, which represents a defined name for a particular cell range.
- PageSetup, which is used to store printing information.
- PivotTables, which contains PivotTable objects.
- Range, which represents cells, rows, columns, selections of cells with contiguous blocks of cells, or 3-D ranges.
- As I explain here, the Range object is one of the most important (and most frequently used) objects.
Graphically, the portion of Excel’s VBA object hierarchy described above looks roughly as follows:

The image above illustrates only a very small portion of Excel’s VBA object hierarchy. The Excel Object Model has a very large number of objects. A full diagram of Excel’s VBA object hierarchy exceeds the scope of this Excel VBA Object Model Tutorial.
What can you do about this?
You can definitely master Visual Basic for Applications despite the huge amount of Excel VBA objects. There are several reasons for this, including the following:
- In practice, you’ll usually deal with a limited amount of VBA objects. There are some objects that you’re unlikely to ever need (or will very rarely need).
- If you’re stuck when working on a particular problem, you can use certain strategies for purposes of finding out which Excel VBA objects to use. You can, for example, use the macro recorder to discover VBA objects.
Additionally, as you continue working with Visual Basic for Applications, you’ll start noticing the logic behind the structure of the Excel VBA object hierarchy.
Object Collections
Collections are defined by 2 main characteristics:
- They are themselves objects.
- Their main purpose is to group and manage VBA objects of the same class.
In other words, collections are VBA objects that are used to group and manage other objects (which are related).
The fact you can group and manage several VBA objects by using collections is extremely useful in some situations. Imagine, for example, that you want to do something with or to a particular group of objects. If all of these objects are part of the same collection, you can structure your VBA code to go through each of the members of the collection and carry out the desired actions. As you can imagine, this structure is simpler than, for example, having to list each of the collection members individually.
In other words, collections allow you to work with a complete group of VBA objects at the same time, instead of working with each single object.
The following are examples of common collections:
- Workbooks, which is a collection of all the Excel workbooks that are currently open.
- Worksheets, the collection of all the Excel worksheets within a particular Workbook.
- Charts, which groups all chart sheets that are inside a particular Workbook.
- Sheets, which is a collection of all the sheets within a particular Workbook. In this case, it doesn’t matter the type of sheet. Therefore, this collection includes both worksheets and charts sheets.
In fact, if you go back up to the explanation of Excel’s VBA object hierarchy, you’ll find several other examples of collections. Basically, any VBA object which is listed there as containing other objects is a collection.
By now you probably have a firm grasp of what an object and a collection are. So let’s get into the actual practice. Let’s look at how you can start referencing VBA objects with Visual Basic for Applications:
Introduction To VBA Object References
Knowing how to refer to objects when writing VBA code is essential. The reason for this is that, obviously, when you want to start working with a particular VBA object, you must identify it.
The question is, how do you do it? How do you refer to an object in Visual Basic for Applications?
Let’s take a look at some of the most common and basic situations. The purpose of this section is to serve as an introduction to VBA object references. There are many other more advanced cases. For example, I explain several ways to refer to VBA’s Range object in Excel VBA Object Model And Object References: The Essential Guide which you can find in the Archives.
Object References: Fully Qualified References And Connecting VBA Objects
Let’s start by taking a look at how to refer to an object by going through the whole hierarchy of Excel VBA objects. This is known as a fully qualified reference because you tell Excel exactly what VBA object you want to work with by referencing all of its parents.
As I explain in the following sections, you can usually simplify fully qualified references. However, you must learn how fully qualified references work. They are the basis of VBA object references and, in practice, you’ll use them most of the time. Additionally, they’re quite useful for purposes of understanding better the VBA code behind your macros.
You already know that the object at the top of the Excel VBA object hierarchy is Application. Referring to this object is very easy. In the Visual Basic Editor, you refer to Application by typing:
Application
From there on, you need to start moving along the hierarchy by using the dot (.) operator. In other words, you connect each VBA object to the previous one (the object parent) by using a dot (.). Those dots (.) are used to connect and reference members of Excel’s VBA object model from the top down.
To see this in practice, let’s go back to the example of the Excel VBA object hierarchy that I display above. Assume that you want to refer to a Range object. As shown in the graph displayed below, this object is at the bottom of the pyramid used in the example. There are 2 VBA objects and 3 steps between the Application and the Range object, as shown by the image below:

You already know that you simply need to connect the different objects with a dot (.) while you’re going down the Excel VBA object hierarchy. In other words, you know that, in very general terms, you can refer to a Range object using the following basic structure:
Application.Workbooks.Worksheets.Range
Graphically:

Easy, right?
This is, however, just a basic framework. You’ll notice that this very basic structure is not actually identifying an individual VBA object. You may be wondering:
- If there are several workbooks or worksheets how does Excel know to which one I’m referring to?
- How does Excel know what is the range I want to work with?
These questions can be summarized by the following:
How do you refer to a particular object within a collection?
Let’s answer this question so that you can complete the fully qualified reference above.
VBA Object References: An Object From A Collection
It is likely that, most of the time, you’ll be working with a particular VBA object from a collection. This is in contrast with the collection as a whole.
Note that you can also work with a collection as a whole. In fact, the ability to do this is one of the advantages of collections.
However, let’s focus for now on how you can reference an object from a collection. For these purposes, you can use either of the following 2 options:
Option #1: Using The VBA Object Name.
In this case, the syntax that you must use to refer to an object is “Collection_name(“Object_name”)”. In other words:
- #1: The name of the relevant collection (collection_name) goes first.
- #2: Collection_name is followed by parentheses ().
- #3: Within the parentheses, you have the name of the individual VBA object (Object_name).
- #4: The VBA object name is within quotations (“”).
- If you fail to include the quotation marks, Excel understands that the VBA object name is a variable name. Therefore, it won’t be able to identify the object you want.
- In other words, don’t forget the quotations when using this VBA object reference method.
For example, if you’re working with an Excel Workbook that has 3 worksheets and you want to work with Sheet1, you can use either of the following:
Worksheets("Sheet1")
or
Sheets("Sheet1")
Option #2: Using Index Number.
If you choose to use this option, you refer to a VBA object using “Collection_name(Index_number)”. This structure is substantially the same as that above with the following 2 differences:
- Instead of using the VBA object name, you refer to it by using its index number.
- You don’t use double quotes within the parentheses, just a number.
Going back to the example above, where you’re want to work with Sheet1, you can use either of the following 2 options:
Worksheets(1)
or
Sheets(1)
Now that you know how to refer to an individual VBA object within a collection, let’s go back to the fully qualified reference that I used as an example in the section above:
Application.Workbooks.Worksheets.Range
How can you complete this, assuming that the object you want to work with is cell A1 from Worksheet Sheet1 within Workbook Book1?
If you’re using the object name to refer to each of the individual VBA objects (option #1 above), the fully qualified reference for this cell is:
Application.Workbooks("Book1.xlsx").Worksheets("Sheet1").Range("A1")
As you may guess, if you had to reference each and every single object using a fully qualified reference, your VBA code would get quite long very fast. From a typing perspective, this may get a little bit annoying. Additionally, and perhaps more importantly, these very long pieces of VBA code can be difficult to read.
There are some ways in which you can simplify object references, making the VBA code much shorter. Let’s take a look at some of the methods that you can apply for these purposes…
Simplifying Fully Qualified Object References
The ability to simplify a VBA object reference has several advantages. Mainly, this allows you to shorten your VBA code and make it easier to read.
The main reason why you can simplify fully qualified object references is because Excel’s VBA object model has some default objects. These default objects are assumed by Excel unless you enter something different. This leads me to a very important point, which is that…
Simplifying fully qualified object references is not without dangers. In particular, the second simplification method described below relies on you correctly identifying the current active Workbook and Worksheet. If you make a mistake by for example, thinking that the current active Worksheet is Sheet1 when in reality its Sheet2, you’ll face problems. The most likely issues you’ll encounter in these cases are:
- Excel returns an error.
- Excel returns an erroneous result.
- Excel executes an erroneous action that you can’t undo.
Another possible disadvantage of simplifying fully qualified object references is related to execution speed. This happens, for example, if you’re working with a particular macro that works with several Excel worksheets. In that case, you have to go through all of them to activate them. Needless to say, this isn’t very efficient.
Considering the above, ensure that you’re only using these simplification methods when appropriate. Perhaps more importantly, remember that you shouldn’t blindly simplify fully qualified references all the time.
In fact, you should probably (as a general rule):
- Fully qualify VBA object references; and
- Avoid relying on default objects, with a few exceptions.
- One of these main exceptions, as I explain below, is relying on the Application default object. This particular VBA object is seldom included in VBA code, although there are some cases in which you must reference the Application.
In other words, having a deep knowledge of Excel’s VBA object model and using fully qualified references has 2 main advantages:
- Reliability.
- Accuracy.
An alternative to the extremes of fully qualifying references or simplifying them is using With… End With statements. These statements simplify macro syntax by executing several statements which refer to the same VBA object. At the same time, due to their structure, they allow you to maintain fully qualified object references.
You can see a very simple example of a With…End With statement in this macro that deletes rows based on whether a cell in a given range is blank.
With the warning above in mind, let’s take a look at the methods you can use to simplify fully qualified object references:
Simplification #1: The Application Object.
The main default VBA object is the Application object. As a general rule:
- This object is always assumed; and
- It doesn’t matter where the VBA code is located.
When creating macros, it is assumed that you’ll be working with Excel. In other words, Excel assumes that you’re working with the Application object. Therefore, as you may expect, you can generally omit this Excel VBA object from your object references.
Explicitly referring to (entering) the Application object makes sense in only a few cases.
Applying this shortcut to the statement referring to cell A1 in Sheet1 within Book1 that has been used as an example simplifies the reference as follows:
Workbooks("Book1.xlsx").Worksheets("Sheet1").Range("A1")
Simplification #2: The Active Workbook and Worksheet.
The second group of default objects you can use to simplify fully qualified object references applies when you’re working inside a standard module. Within the Visual Basic Editor, you can usually find standard modules in the Project Window under the Modules node:

In these cases, in addition to assuming that you’re working with the Application object, Excel also assumes that you’re working with the active Workbook.
Therefore, if you know that the current active Excel workbook is the Workbook you want to work with, you can omit that part of the VBA object reference. Continuing with the example above, the statement can then be shortened to the following:
Worksheets("Sheet1").Range("A1")
Finally, if you’re sure that the Excel worksheet you want to work with is the current active Worksheet, you can also omit that part of the VBA object reference. The statement above can then be shortened even further:
Range("A1")
In addition to the dangers of using this simplification that I explain at the beginning of this section, there is a further aspect you must consider. The 2 assumptions that I’ve listed in Simplification #2 above only work as long as you’re in a standard module. Therefore, you must avoid relying on these assumptions when working in another type of module. For example:
Conclusion
Excel’s VBA object model is extremely important. You can’t ignore this topic if you really want to become a master in Excel macros and Visual Basic for Applications.
Excel’s VBA object model is not the simplest topic to understand but, if you practice and study, you’ll eventually master the topic. Then, you’ll be on your way to creating powerful macros that increase your productivity and efficiency when working with Excel.
If you’ve studied this particular VBA tutorial, you not only have a good understanding of what is Excel’s VBA object model, but also know how to start building object references in Visual Basic for Applications. This ability to create appropriate VBA object references is what allows you to tell Excel which object you want to work with and manipulate. This is an essential skill that you now have in your VBA knowledge-box.
Due to the complexity and extensiveness of Excel’s VBA object model, this is a topic that we’re all constantly studying and learning about.
Visual Basic for Applications is an Object-Oriented language and to make the best out of it you need to understand Excel Objects. The workbook you use in Excel is made up of different Objects.
And there are several properties that are attached to an object which you can access and there several methods which you can use on/with an object. Let’s understand this with an example.
Think about a big grocery store, which has different sections for products, and then those sections further have racks and, in those racks, have products.

So, if you want to buy clothes, you need to go to the clothes section and in the clothes section, you could have subsections for Men and Women.
And when you pick a cloth that cloth would have a specific color, size, and fabric (which are the properties of that cloth).
In the same way, in VBA, there are objects which are structured in a hierarchy.
VBA Object Model (Hierarchy)
In Excel Application, when you open a workbook, in that workbook, you have a worksheet (or multiple worksheets) and in that worksheet, you have cells and a range of cells.
Excel’s Hierarchy starts with itself Excel Application and below is the structure that defines this hierarchy:

Let’s say if you want to refer to a workbook the code you have written should be like this:

In the above code, you are referring to the workbook “Book1”.
What you have written is, you refer to the Excel application first and you have used “Workbooks” which is further a part of the Application object.
Now let’s say you want to go further and wants to refer to a worksheet in the workbook “Book1” and the code for this would be:

You know what it means, Right? But let me tell you. In the above code, after referring to the workbook “Book1” you have referred to the worksheet “Sheet1” which is a further part of the workbook.
Let’s go a bit further. Let’s refer to a specific cell in the worksheet “Sheet1” and the code for this would be:

Before you ask, let me tell you this. In the above code, you referred to cell A1 which is in the worksheet “Sheet1” of the workbook “Book1”.
When you refer to a Range object in this way, it’s called a fully qualified reference.
Note: Using the Application object is optional. Reason? When you do something in VBA you are already in the Excel Application.
Simplify the Reference to an Object
In the above code, you have used a fully qualified reference. That means you tell VBA to which workbook, worksheet, and cell to refer. But what if you are already in the Book1 workbook?
In that case, you can simply refer to the worksheet in which you want to refer to a cell, just like the below code:

Even further, if the worksheet “Sheet1” is activated then you can simply refer to the cell or range of the cells, just like the below code:

VBA Objects: VBA Workbook Object | VBA Worksheet Object | VBA Range Object
In this Article
- Application Object
- Workbooks Object
- Workbook Object
- Sheets Object
- Worksheets Object
- Worksheet Object
- Range Object
- Shapes Object
- Shape Object
- Excel VBA Object Model
- Declaring and Assigning an Object Variable
Excel VBA objects refer to single “entities” made up of code and data. The Excel application itself is an object, as are workbooks, worksheets, cell ranges, and shapes. Every object has associated properties, and methods. Objects can also contain other objects and the collections object is used to refer to a group of the same Excel objects.
In this tutorial, we are going to look at some commonly used Excel Objects.
Application Object
The Application Object refers to the entire Excel application. The Application object contains the workbook object.
The following code uses the WindowState property of the Application object to set the Excel window to the maximum size available:
Sub MaximizingTheExcelWindow()

Application.WindowState = xlMaximized

End Sub
Workbooks Object
The Workbooks object refers to the collection of all the currently open Excel workbooks.
The following code uses the Workbooks.Add method to create a new workbook and add it to the collection:
Sub AddingANewWorkbookToTheWorkbooksCollection()

Workbooks.Add

End Sub
You can access an individual workbook in the Workbooks collection through its index number or name. So you could refer to a Workbook called ExcelWb, by using Workbooks(“ExcelWB”).
Workbook Object
The workbook object is part of the Workbooks collection. The workbook object contains the worksheets collection (worksheets) and the sheets collection (worksheets, chart sheets, and macrosheets). The ActiveWorkbook object refers to the workbook that is active.
The following code uses the ActiveWorkbook.Save method to save the current active workbook:
Sub SavingTheWorkbook()

ActiveWorkbook.Save

End Sub
Sheets Object
The sheets object refers to the collection of all the worksheets, chart sheets and macrosheets in a workbook. The following code uses the Sheets.Add method to add a new worksheet called ExtraSheet, after the last worksheet in the workbook:
Sub AddingANewSheet()

ActiveWorkbook.Sheets.Add(After:=ActiveWorkbook.Worksheets(Worksheets.Count), Count:=1, _
Type:=xlWorksheet).Name = "ExtraSheet"

End Sub
Note the syntax of the Sheets.Add method is:
Sheets.Add(Before, After, Count, Type) where:
-Before is optional and specifies that the new sheet should be added before an existing sheet.
-After is optional and specifies that the new sheet should be added after an existing sheet.
-Count is optional and specifies the number of sheets to add.
-Type is optional and specifies the sheet type. xlWorksheet would add a new worksheet, xlChart would add a new chart sheet, and xlExcel4MacroSheet or xlExcel4IntlMacroSheet would add a new macrosheet. If blank the default xlWorksheet is used.
You can access an individual sheet in the Sheets collection through its index number or name. So you could refer to a Worksheet called SheetOne, by using Sheets(“SheetOne”).
Worksheets Object
The Worksheets object refers to the collection of all the worksheets in a workbook. The following code uses the Worksheets.Add method to add a new worksheet:
Sub AddingANewSheet()

Worksheets.Add

End Sub
You can access an individual sheet in the Worksheets collection through its index number or name. So you could refer to a Worksheet called SheetTwo, by using Worksheets(“SheetTwo”).
Worksheet Object
The worksheet object is part of the Worksheets collection. The worksheet object contains the range object and other objects. The ActiveSheet object refers to the sheet that is active.
The following code changes the page orientation of the active sheet to landscape:
Sub ChangingOrientationToLandscape()

ActiveSheet.PageSetup.Orientation = xlLandscape

End Sub
Note the Sheet object contains the PageSetup object and its orientation property is set to xlLandscape.
VBA Coding Made Easy
Stop searching for VBA code online. Learn more about AutoMacro — A VBA Code Builder that allows beginners to code procedures from scratch with minimal coding knowledge and with many time-saving features for all users!

Learn More
Range Object
The Range object can refer to a single cell or a set of cells in a worksheet. The following code shows you how to use the Range.Select method to select cells A1:B1:
Sub SelectingARange()

Range("A1:B1").Select

End Sub
Shapes Object
The Shapes object refers to the collection of all the shapes in a worksheet. The following code would select all the shapes on the ActiveSheet:
Sub SelectingAllTheShapes()

ActiveSheet.Shapes.SelectAll

End Sub
Shape Object
The Shape Object is part of the Shapes collection. The following code would create a rounded rectangle shape and then set the name property of the shape object:
Sub UsingTheShapeObject()

With Worksheets(1).Shapes.AddShape(msoShapeRoundedRectangle, _
200, 100, 80, 80)
.Name = "A Rounded Rectangle"

End With

End Sub
VBA Programming | Code Generator does work for you!
Excel VBA Object Model
Excel’s VBA Object model describes the hierarchy of all the objects you can use in Excel. For example, you can use the Workbooks object to refer to all the other objects indirectly or directly. The following code shows you how to select cell A1, using the hierarchical structure:
Sub UsingTheHierachicalStructure()

Workbooks("Book1").Worksheets("Sheet1").Range("A1").Select

End Sub
Declaring and Assigning an Object Variable
You can declare and assign an object to a variable by using the Dim and Set keywords.
For example:
Dim ws as worksheet
Set ws = ActiveWorkbook.ActiveSheet
The following code shows you how to declare and assign a Range object to a variable:
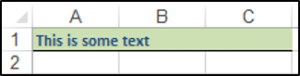
Sub AssigningARangeToAVariable()

Dim rngOne As Object
Set rngOne = Range("A1:C1")

rngOne.Font.Bold = True
With rngOne
.Font.Bold = True
.Font.Name = "Calibri"
.Font.Size = 9
.Font.Color = RGB(35, 78, 125)
.Interior.Color = RGB(205, 224, 180)
.Borders(xlEdgeBottom).LineStyle = xlContinuous
End With

End Sub
The result is:
It’s essential to understand how objects work to master VBA. You can learn more with our Interactive VBA Tutorial.