
You have already seen in action, in some of the examples in this chapter, the Workbooks, and Worksheets collection objects, as well as the Workbook and Worksheet objects. The difference between collection objects and regular objects was discussed earlier. When working with these objects, keep in mind that the Workbook object is higher in the hierarchy than the Worksheet object. If you are familiar with Excel, this makes sense to you because a single workbook can hold multiple worksheets.
However, the Window object may be unfamiliar and/or a bit confusing. Window objects refer to instances of windows within either the same workbook, or the application. Within the Excel application, the Windows collection object contains all Window objects currently opened; this includes all Workbook objects and copies of any Workbook objects. The Window objects are indexed according to their layering. For example, in Figure 5.2, you could retrieve Book2 with the following code:
Application.Windows(2).Activate because Book2 is the center window in a total of three Window objects. After Book2 is retrieved and thus brought to the top layer its index would change to 1 when using the Windows collection object. This is different from accessing Book2 using the Workbooks collection object. As stated previously, Workbook objects are indexed according to the order of their creation after the value of 1, which is reserved for the selected, or top-level Workbook object.
You may be thinking that the Windows collection object within the Application object is essentially the same as the Workbooks collection object. This may or may not be true depending whether or not the user creates a new window by selecting New Window from the Window menu in the Excel application. This effectively makes a copy of the currently selected workbook. You may also use the NewWindow() method of either the Window or Workbook object in your code to accomplish the same task.
Application.Windows(1).NewWindow
When a new window is created, the caption in the title bar from the original window is concatenated with a colon and an index number. For example, Bookl becomes Book1:1 and Book1:2 when a new window is created (see Figure 5.11). These captions can be changed in code by manipulating the Caption property of the Window object.
Do not confuse the creation of a new window from the Window menu with that of a new workbook. New workbooks are created when the user selects New from the File menu, or by using the Add() method of the Workbooks collection object. Of course, creating a new workbook also creates a new window, but the reverse is not true. If a new Window object is created through the use of the Window menu in Excel (or NewWindow() method in VBA), then this window does not belong to the Workbooks collection object and thus, cannot be accessed in code by using the following:
Application.Workbooks(«Book1:2»).Activate
Creating a new window in Excel.
Creating a new window in Excel.

This code fails because Book1:2 does not belong to the Workbooks collection object but to the Windows collection object of either the Application object or the Workbook object named Book1. It could be accessed with either of the following lines of code:
Workbooks(«Book1»).Windows(«Book1:2»).Activate
Application.Windows(«Book1:2»).Activate
These examples and the above descriptions demonstrate that there may be more than one path to retrieving an object of interest in your code, and that differences between some objects may be quite subtle. I recommend that you play with these examples and create instances of new windows and new workbooks in your code. Then access these objects through as many paths as you can think of. You will find that it doesn’t take long to get comfortable working with the Workbooks collection, Windows collection, Workbook, and Window objects.
All properties, methods, and events for these objects can be viewed in the Object Browser. Let’s take a closer look at a few of them via an example, starting with the Workbooks collection object, shown in Figure 5.4.
There are only a few properties and methods of the Workbooks collection object and their functions are straightforward. Add the following procedure to a standard module in a workbook.
Public Sub AddWorkbooks() Dim I As Integer For I = 1 To 3
Workbooks.Add Next I End Sub
If you execute this procedure by selecting AddWorkbooks from the Macro menu in Excel, you will immediately see three new workbooks opened in Excel. To select a specific workbook, insert the following line of code after the For/Next loop in the AddWorkbooks() sub procedure.
Workbooks(Workbooks.Count).Activate
This is another example of nesting, and it will activate the last workbook to be opened in Excel. The statement Workbooks.Count returns the number of open workbooks in Excel and is then used as the index to activate the last workbook added. If you prefer, edit the above code to make it more readable:
Dim numWorkbooks as Integer NumWorkbooks = Workbooks.Count Workbooks(NumWorkbooks).Activate
Through the Object Browser, you will notice that the Workbooks collection object only has a few members. They are relatively straightforward to use, and you have already seen a couple of them (the Add() method and Count property). You may find the Open() and Close() methods and Item property useful as well. Some of these members will be addressed later, albeit with different objects. You will find that many of the collection objects share the same properties and methods. This is not unusual, but be aware that depending on the object you use, the parameters that are either available or required for these members may vary. Figures 5.12 and 5.13 show that the Workbooks collection object and the Workbook object both have Close() methods.
If you look at the bottom of the Object Browser windows displayed in Figure 5.12 and Figure 5.13, you will see that the Close() method of the Workbooks collection object does not accept any arguments, but the Close() method of the Workbook object can accept up to three arguments, all of which are optional (denoted by the brackets).
Consider the following VBA procedure illustrating the use of the Close() method of the Workbook object. The code can be placed in a standard or object module.
Public Sub CloseFirstLast()
Workbooks(Workbooks.Count).Close SaveChanges:=False Workbooks(1).Close SaveChanges:=False End Sub
The Close() method of the Workbooks collection object.
The Close() method of the Workbooks collection object.

The Close() method
Workbook objects.
The Close() method
Workbook objects.

This procedure will close the first and last workbooks opened in Excel without prompting the user to save changes. However, if this procedure is contained somewhere in a code module for the last workbook to be opened, then only the last workbook will be closed. This is because the module containing this code will close before the last line (Workbooks(l).Close SaveChanges:=False) is executed. In the example above, the Close() method of the Workbook object is used, not the Close() method of the Workbooks collection object. This must be the case because an index value was specified, and therefore only the Workbook object designated by an index of 1 is available. Because the Workbook object is used, optional arguments can be used with the method. In this case, the prompt to the user for saving changes to the workbook is set to false (the default is true), so the workbook closes immediately. If you want to close all workbooks simultaneously, then use the Close() method of the Workbooks collection object.
Workbooks.Close
In this case, there are no optional arguments allowed, so the user will be prompted to save the currently selected workbook. All open workbooks will be closed using the line of code above. There is no way to close a single workbook using the Workbooks collection object. To close just one workbook, you need to use the Close() method for a Workbook object.
Now consider an example that sizes and centers the application in the middle of the user’s screen such that one-eighth of the screen on every side is unused by Excel. In addition, the workbook is sized so that it just fits inside the available space provided by the application window.
The following code was added to an open workbook and saved as Center.xls on this book’s CD-ROM.
Option Explicit
Private Sub Workbook_Open()
Application.WindowState = xlMaximized CenterApp Application.Width, Application.Height CenterBook End Sub
Private Sub CenterApp(ByVal maxWidth As Integer, maxHeight As Integer) ‘This procedure is used to center the application window Application.WindowState = xlNormal Application.Left = maxWidth / 8 Application.Top = maxHeight / 8 Application.Width = 3 * maxWidth / 4 Application.Height = 3 * maxHeight / 4 End Sub
Private Sub CenterBook()
‘This procedure will center the workbook within the application with no extra space ‘below or above the workbook window ActiveWindow.WindowState = xlNormal
Workbooks(«Center.xls»).Windows(1).Width = Application.UsableWidth Workbooks(«Center.xls»).Windows(1).Height = Application.UsableHeight Workbooks(«Center.xls»).Windows(1).Left = 0 Workbooks(«Center.xls»).Windows(1).Top = 0 End Sub
Private Sub Workbook_WindowResize(ByVal Wn As Window) ‘Display 20-21 rows of the workbook.
If (Wn.VisibleRange.Rows.Count < 21) Then Do
Wn.Zoom = Wn.Zoom — 1 Loop Until (Wn.VisibleRange.Rows.Count >= 21)
Else
Do Until (Wn.VisibleRange.Rows.Count <= 21) Wn.Zoom = Wn.Zoom + 1
Loop End If End Sub
Explicit variable declaration is turned on as usual in the general declarations section of the code window. The main procedure is the Open() event of the Workbook object to ensure that the program is executed immediately after the workbook is opened. You can access the object module for the workbook through the ThisWorkbook selection in the project explorer, as shown in Figure 5.14.
The name of the module ThisWorkbook can be change via the Name property in the properties window for the Workbook object.
The-
ThisWorkbook object
ThisWorkbook object module.
The-
ThisWorkbook object
ThisWorkbook object module.

The WindowState property (xlMaximized is a constant defined by VBA) of the Application object is used to maximize the Excel window (fill the user’s screen). The application window is set to fill the user’s screen so that its maximum size can be determined. The Width and Height properties of the Application object are then passed to the CenterApp() sub procedure while the application is maximized.
Different users will have different monitor resolution settings. To ensure consistency from one machine to another, you must first learn the dimensions of the user’s screen. Most languages provide a Screen object from which to determine these properties. VBA has no Screen object; therefore, you have to be a bit less elegant about getting the desired width and height.
The CenterApp() sub procedure receives two arguments, maxWidth and maxHeight. The function of the CenterApp() procedure is to center the application window within the user’s screen, leaving one-eighth of the screen (on all sides) unoccupied by Excel. The CenterApp() sub procedure begins by setting the WindowState property to xlNormal. This is the equivalent of the user clicking the middle window icon at the top-right corner of the workbook window. The application window must be returned to a normal state because you cannot move a maximized window; thus, trying to set the Left property of the Application object will cause an error and the program will crash. After returning the window state to normal, the application window is resized by setting the Left, Top, Width, and Height properties accordingly.
Next, the Open() event procedure calls the CenterBook() sub procedure without passing arguments. The CenterBook() procedure is called for the purpose of filling the workbook within the Excel application window. The workbook window is set to a normal state just like the application window so that it may be resized. The UsableWidth and UsableHeight properties of the Application object are used to set the values for the Width and Height properties of the Window object representing the workbook. The Windows property of the Workbook object is used to return the top-level window (Windows(l)). Finally, the position (Left, Top) properties of the window are set to the upper-left corner of the application window (0,0).
It is not necessary to use WorkbooksCCenter.xls») qualifier in the CenterBook() procedure. I did this only to illustrate the path to the desired object. If the reference to the Workbook object Center.xls were to be omitted, then VBA would simply use the default object path. The default object path is to the active window of the current workbook. Since this code runs immediately after opening Center.xls, it is the current workbook. An index of 1 is used to select the active or top-level window. As there is only one window in Center.xls, you don’t have to worry about getting to the desired window; however, if you created multiple windows in the Center.xls workbook, then you might want to use the Window object’s Caption property instead of an index number.
The last procedure in the Center.xls project is the WindowResize() event of the Workbook object. This event procedure accepts one argument representing the Window object associated with the workbook being centered. The WindowResize() event triggers whenever the workbook window is resized; thus, the previous code in the CenterBook() procedure will trigger this event. The code in the WindowResize() event serves to increase or decrease the Zoom property of the Window object such that approximately 21 rows of the worksheet are displayed in the window. The VisibleRange property of the Window object returns a Range object (discussed later) representing those cells that are visible to the user in the Excel application. The Rows property of the Range object then returns another Range object representing the visible rows. Finally, the Count property (a property common to collection objects) of the Range object returns the number of cells in the Range object returned by the Rows property. The entire object/property path effectively returns the number of rows in the range of cells visible to the user.
Continue reading here: The Range Object
Was this article helpful?
Содержание
- Объект Window (Excel)
- Замечания
- Пример
- Методы
- Свойства
- См. также
- Поддержка и обратная связь
- Visual Basic Editor – How to Open and Use it in Excel
- What is Visual Basic Editor in Excel?
- Opening the VB Editor
- Keyboard Shortcut to Open the Visual Basic Editor
- Using the Developer Tab
- Using the Worksheet Tab
- Anatomy of the Visual Basic Editor in Excel
- Menu Bar
- Tool Bar
- Project Explorer
- Properties Window
- Code Window
- Immediate Window
- Where to Add Code in the VB Editor
- Module Code Window Vs Object Code Window
- Adding VBA Code in Module
- Adding a Module in the VB Editor
- Removing the Module
- Adding Code to the Object Code Window
- Customizing the VB Editor
- Editor Tab
- Auto Syntax Check
- Require Variable Declaration
- Auto List Member
- Auto Quick Info Options
- Auto Data Tips Options
- Auto Indent
- Drag and Drop Text Editing
- Default to Full Module View
- Procedure Separator
- Editor Format Tab
- General Tab
- Docking Tab
Объект Window (Excel)
Замечания
Многие характеристики листа, такие как полосы прокрутки и линии сетки, фактически являются свойствами окна. Объект Window является членом коллекции Windows .
Коллекция Windows для объекта Application содержит все окна в приложении, тогда как коллекция Windows для объекта Workbook содержит только окна в указанной книге.
Пример
Используйте Windows (index), где index — это имя окна или номер индекса, чтобы вернуть один объект Window . В следующем примере активное окно разворачивается.
Обратите внимание, что активное окно всегда Windows(1) имеет значение .
Заголовок окна — это текст, отображаемый в строке заголовка в верхней части окна, если окно не развернуто. Заголовок также отображается в списке открытых файлов в нижней части меню Windows . Используйте свойство Caption , чтобы задать или вернуть заголовок окна. Изменение заголовка окна не изменяет имя книги.
В следующем примере линии сетки ячеек отключают для листа, показанного в окне Book1.xls:1.
Методы
Свойства
См. также
Поддержка и обратная связь
Есть вопросы или отзывы, касающиеся Office VBA или этой статьи? Руководство по другим способам получения поддержки и отправки отзывов см. в статье Поддержка Office VBA и обратная связь.
Источник
Visual Basic Editor – How to Open and Use it in Excel
The first step to working with VBA in Excel is to get yourself familiarized with the Visual Basic Editor (also called the VBA Editor or VB Editor).
In this tutorial, I will cover all there is to know about the VBA Editor and some useful options that you should know when coding in Excel VBA.
This Tutorial Covers:
What is Visual Basic Editor in Excel?
Visual Basic Editor is a separate application that is a part of Excel and opens whenever you open an Excel workbook. By default, it’s hidden and to access it, you need to activate it.
VB Editor is the place where you keep the VB code.
There are multiple ways you get the code in the VB Editor:
- When you record a macro, it automatically creates a new module in the VB Editor and inserts the code in that module.
- You can manually type VB code in the VB editor.
- You can copy a code from some other workbook or from the internet and paste it in the VB Editor.
Opening the VB Editor
There are various ways to open the Visual Basic Editor in Excel:
- Using a Keyboard Shortcut (easiest and fastest)
- Using the Developer Tab.
- Using the Worksheet Tabs.
Let’s go through each of these quickly.
Keyboard Shortcut to Open the Visual Basic Editor
The easiest way to open the Visual Basic editor is to use the keyboard shortcut – ALT + F11 (hold the ALT key and press the F11 key).

As soon as you do this, it will open a separate window for the Visual Basic editor.
This shortcut works as a toggle, so when you use it again, it will take you back to the Excel application (without closing the VB Editor).
The shortcut for the Mac version is Opt + F11 or Fn + Opt + F11
Using the Developer Tab
To open the Visual Basic Editor from the ribbon:
- Click the Developer tab (if you don’t see a developer tab, read this on how to get it).
- In the Code group, click on Visual Basic.
Using the Worksheet Tab
This is a less used method to open the Vb Editor.
Go to any of the worksheet tabs, right-click, and select ‘View Code’.
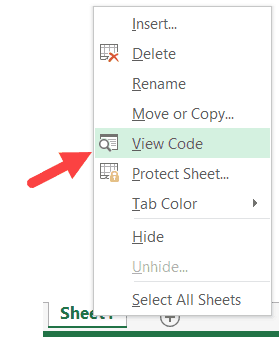
This method wouldn’t just open the VB Editor, it will also take you to the code window for that worksheet object.
This is useful when you want to write code that works only for a specific worksheet. This is usually the case with worksheet events.
Anatomy of the Visual Basic Editor in Excel
When you open the VB Editor for the first time, it may look a bit overwhelming.
There are different options and sections that may seem completely new at first.
Also, it still has an old Excel 97 days look. While Excel has improved tremendously in design and usability over the years, the VB Editor has not seen any change in the way it looks.
In this section, I will take you through the different parts of the Visual Basic Editor application.
Note: When I started using VBA years ago, I was quite overwhelmed with all these new options and windows. But as you get used to working with VBA, you would get comfortable with most of these. And most of the time, you’ll not be required to use all the options, only a hand full.
Below is an image of the different components of the VB Editor. These are then described in detail in the below sections of this tutorial.
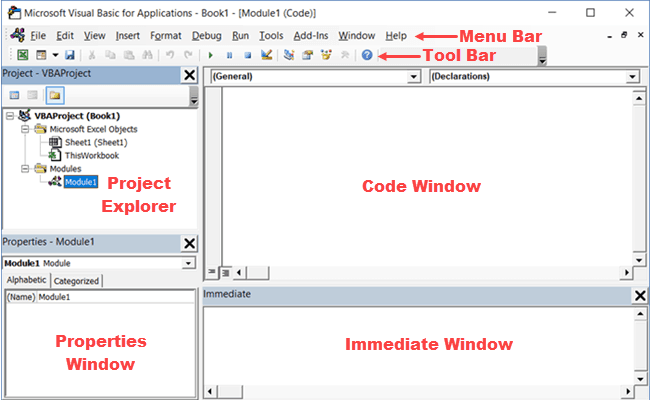
Now let’s quickly go through each of these components and understand what it does:
This is where you have all the options that you can use in the VB Editor. It is similar to the Excel ribbon where you have tabs and options with each tab.
You can explore the available options by clicking on each of the menu element.
You will notice that most of the options in VB Editor have keyboard shortcuts mentioned next to it. Once you get used to a few keyboard shortcuts, working with the VB Editor becomes really easy.
Tool Bar
By default, there is a toolbar in the VB Editor which has some useful options that you’re likely to need most often. This is just like the Quick Access Toolbar in Excel. It gives you quick access to some of the useful options.
You can customize it a little by removing or adding options to it (by clicking on the small downward pointing arrow at the end of the toolbar).

In most cases, the default toolbar is all you need when working with the VB Editor.
You can move the toolbar above the menu bar by clicking on the three gray dots (at the beginning of the toolbar) and dragging it above the menu bar.
Note: There are four toolbars in the VB Editor – Standard, Debug, Edit, and User form. What you see in the image above (which is also the default) is the standard toolbar. You can access other toolbars by going to the View option and hovering the cursor on the Toolbars option. You can add one or more toolbars to the VB Editor if you want.
Project Explorer
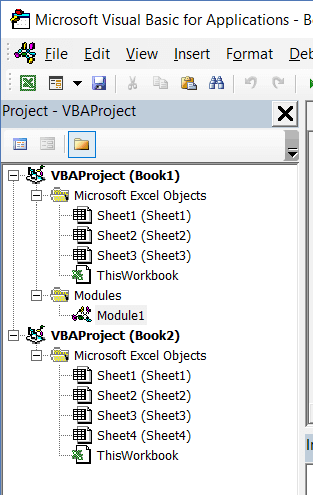
Project Explorer is a window on the left that shows all the objects currently open in Excel.
When you’re working with Excel, every workbook or add-in that is open is a project. And each of these projects can have a collection of objects in it.
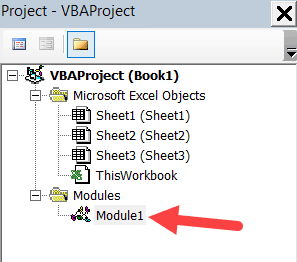
For example, in the below image, the Project Explorer shows the two workbooks that are open (Book1 and Book2) and the objects in each workbook (worksheets, ThisWorkbook, and Module in Book1).
There is a plus icon to the left of objects that you can use to collapse the list of objects or expand and see the complete list of objects.
The following objects can be a part of the Project Explorer:
- All open Workbooks – within each workbook (which is also called a project), you can have the following objects:
- Worksheet object for each worksheet in the workbook
- ThisWorkbook object which represents the workbook itself
- Chartsheet object for each chart sheet (these are not as common as worksheets)
- Modules – This is where the code that is generated with a macro recorder goes. You can also write or copy-paste VBA code here.
- All open Add-ins
Consider the Project Explorer as a place that outlines all the objects open in Excel at the given time.
The keyboard shortcut to open the Project Explorer is Control + R (hold the control key and then press R). To close it, simply click the close icon at the top right of the Project Explorer window.
Properties Window
Properties window is where you get to see the properties of the select object. If you don’t have the Properties window already, you can get it by using the keyboard shortcut F4 (or go to the View tab and click Properties window).
Properties window is a floating window which you can dock in the VB Editor. In the below example, I have docked it just below the Project Explorer.
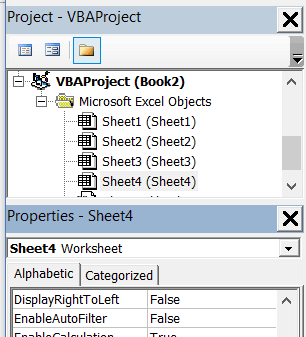
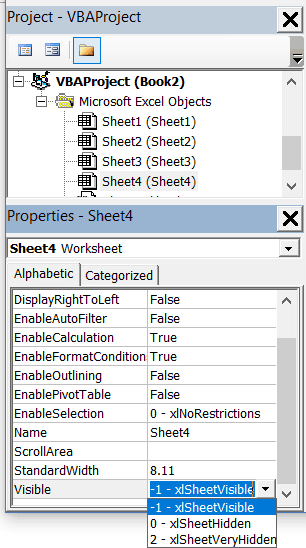
Properties window allows us to change the properties of a selected object. For example, if I want to make a worksheet hidden (or very hidden), I can do that by changing the Visible Property of the selected worksheet object.
Code Window
There is a code window for each object that is listed in the Project Explorer. You can open the code window for an object by double-clicking on it in the Project Explorer area.
Code window is where you’ll write your code or copy paste a code from somewhere else.
When you record a macro, the code for it goes into the code window of a module. Excel automatically inserts a module to place the code in it when recording a macro.
Immediate Window
The Immediate window is mostly used when debugging code. One way I use the Immediate window is by using a Print.Debug statement within the code and then run the code.
It helps me to debug the code and determine where my code gets stuck. If I get the result of Print.Debug in the immediate window, I know the code worked at least till that line.
If you’re new to VBA coding, it may take you some time to be able to use the immediate window for debugging.
By default, the immediate window is not visible in the VB Editor. You can get it by using the keyboard shortcut Control + G (or can go to the View tab and click on ‘Immediate Window’).
Where to Add Code in the VB Editor
I hope you now have a basic understanding of what VB Editor is and what all parts it has.
In this section of this tutorial, I will show you where to add a VBA code in the Visual Basic Editor.
There are two places where you can add the VBA code in Excel:
- The code window for an object. These objects can be a workbook, worksheet, User Form, etc.
- The code window of a module.
Module Code Window Vs Object Code Window
Let me first quickly clear the difference between adding a code in a module vs adding a code in an object code window.
When you add a code to any of the objects, it’s dependent on some action of that object that will trigger that code. For example, if you want to unhide all the worksheets in a workbook as soon as you open that workbook, then the code would go in the ThisWorkbook object (which represents the workbook).
The trigger, in this case, is opening the workbook.
Similarly, if you want to protect a worksheet as soon as some other worksheet is activated, the code for that would go in the worksheet code window.
These triggers are called events and you can associate a code to be executed when an event occurs.
On the contrary, the code in the module needs to be executed either manually (or it can be called from other subroutines as well).
When you record a macro, Excel automatically creates a module and inserts the recorded macro code in it. Now if you have to run this code, you need to manually execute the macro.
Adding VBA Code in Module
While recording a macro automatically creates a module and inserts the code in it, there are some limitations when using a macro recorder. For example, it can not use loops or If Then Else conditions.
In such cases, it’s better to either copy and paste the code manually or write the code yourself.
A module can be used to hold the following types of VBA codes:
- Declarations: You can declare variables in a module. Declaring variables allows you to specify what type of data a variable can hold. You can declare a variable for a sub-routine only or for all sub-routines in the module (or all modules)
- Subroutines (Procedures): This is the code that has the steps you want VBA to perform.
- Function Procedures: This is a code that returns a single value and you can use it to create custom functions (also called User Defined Functions or UDFs in VBA)
By default, a module is not a part of the workbook. You need to insert it first before using it.
Adding a Module in the VB Editor
Below are the steps to add a module:
- Right-click on any object of the workbook (in which you want the module).

- Hover the cursor on the Insert option.
- Click on Module.


This would instantly create a folder called Module and insert an object called Module 1. If you already have a module inserted, the above steps would insert another module.
Once the module is inserted, you can double click on the module object in the Project Explorer and it will open the code window for it.
Now you can copy-paste the code or write it yourself.
Removing the Module
Below are the steps to remove a module in Excel VBA:
- Right-click on the module that you want to remove.
- Click on Remove Module option.
- In the dialog box that opens, click on No.


Note: You can export a module before removing it. It gets saved as a .bas file and you can import it in some other project. To export a module, right-click on the module and click on ‘Export file’.
Adding Code to the Object Code Window
To open the code window for an object, simply double-click on it.
When it opens, you can enter the code manually or copy-paste the code from other modules or from the internet.
Note that some of the objects allow you to choose the event for which you want to write the code.
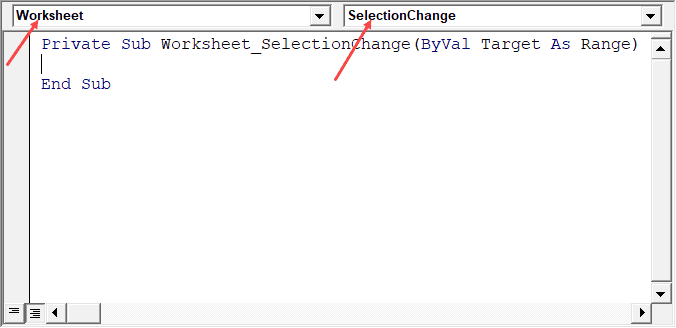
For example, if you want to write a code for something to happen when selection is changed in the worksheet, you need to first select worksheets from the drop-down at the top left of the code window and then select the change event from the drop-down on the right.
Note: These events are specific to the object. When you open the code window for a workbook, you will see the events related to the workbook object. When you open the code window for a worksheet, you will see the events related to the worksheet object.
Customizing the VB Editor
While the default settings of the Visual Basic Editor are good enough for most users, it does allow you to further customize the interface and a few functionalities.
In this section of the tutorial, I will show you all the options you have when customizing the VB Editor.
To customize the VB Editor environment, click Tools in the menu bar and then click on Options.
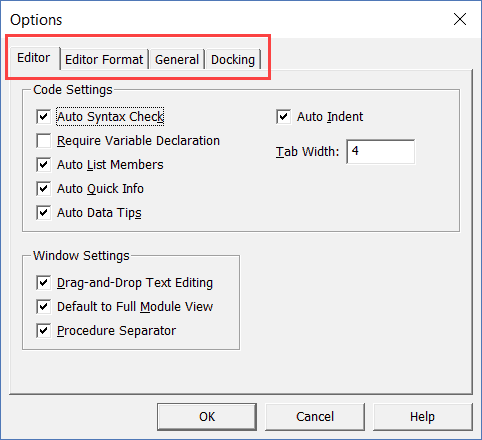
This would open the Options dialog box which will give you all the customization options in the VB Editor. The ‘Options’ dialog box has four tabs (as shown below) that have various customizations options for the Visual Basic Editor.
Let’s quickly go through each of these tabs and the important options in each.
Editor Tab
While the inbuilt settings work fine in most cases, let me still go through the options in this tab.
As you get more proficient working with VBA in Excel, you may want to customize the VB Editor using some of these options.
Auto Syntax Check
When working with VBA in Excel, as soon as you make a syntax error, you will be greeted by a pop-up dialog box (with some description about the error). Something as shown below:
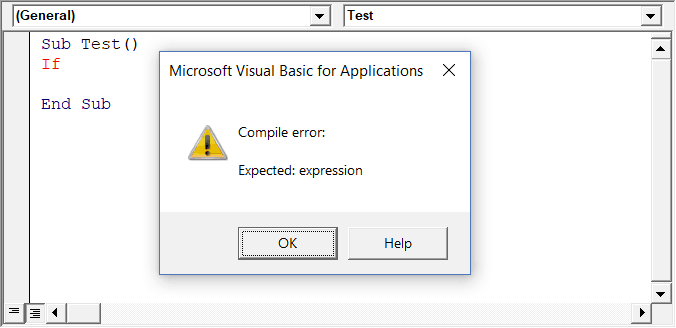
If you disable this option, this pop-up box will not appear even when you make a syntax error. However, there would be a change in color in the code text to indicate that there is an error.
If you’re a beginner, I recommend you keep this option enabled. As you get more experienced with coding, you may start finding these pop-up boxes irritating, and then you can disable this option.
Require Variable Declaration
This is one option I recommend enabling.
When you’re working with VBA, you would be using variables to hold different data types and objects.
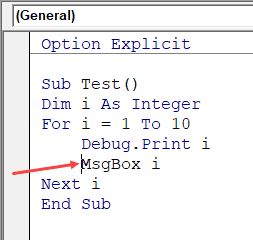
When you enable this option, it automatically inserts the ‘Option Explicit’ statement at the top of the code window. This forces you to declare all the variables that you’re using in your code. If you don’t declare a variable and try to execute the code, it will show an error (as shown below).
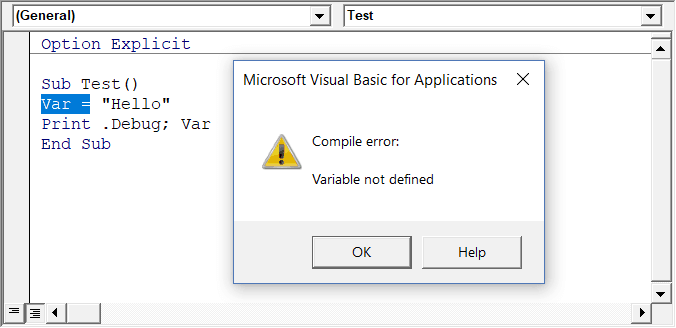
In the above case, I used the variable Var, but I didn’t declare it. So when I try to run the code, it shows an error.
This option is quite useful when you have a lot of variables. It often helps me find misspelled variables names as they are considered as undeclared and an error is shown.
Note: When you enable this option, it does not impact the existing modules.
Auto List Member
This option is quite useful as it helps you get a list of properties of methods for an object.
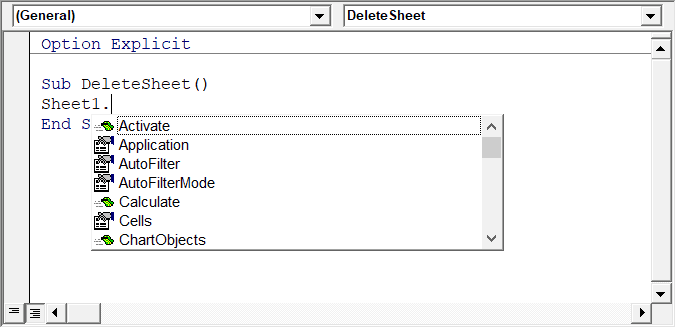
For example, if I want to delete a worksheet (Sheet1), I need to use the line Sheet1.Delete.
While I am typing the code, as soon as I type the dot, it will show me all the methods and properties associated with the Worksheet object (as shown below).
Auto list feature is great as it allows you to:
- Quickly select the property and method from the list and saves time
- Shows you all the properties and methods which you may not be aware of
- Avoid making spelling errors
This option is enabled by default and I recommend keeping it that way.
Auto Quick Info Options
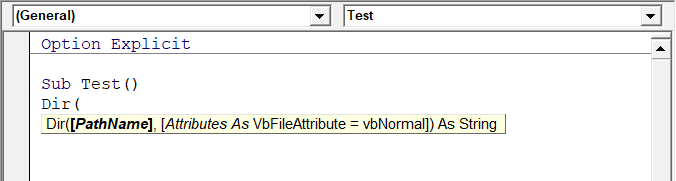
When you type a function in Excel worksheet, it shows you some information about the function – such as the arguments it takes.
Similarly, when you type a function in VBA, it shows you some information (as shown below). But for that to happen, you need to make sure the Auto Quick Info option is enabled (which it is by default).
Auto Data Tips Options
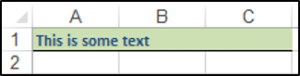
When you’re going through your code line by line and place your cursor above a variable name, it will show you the value of the variable.
I find it quite useful when debugging the code or going through the code line by line which has loops in it.

In the above example, as soon as I put the cursor over the variable (var), it shows the value it holds.
This option is enabled by default and I recommend you keep it that way.
Auto Indent
Since VBA codes can get long and messy, using indentation increases the readability of the code.
When writing code, you can indent using the tab key.
This option ensures that when you are done with the indented line and hit enter, the next line doesn’t start from the very beginning, but has the same indentation as the previous line.
In the above example, after I write the Debug.Print line and hit enter, it will start right below it (with the same indentation level).
I find this option useful and turning this off would mean manually indenting each line in a block of code that I want indented.
You can change the indentation value if you want. I keep it at the default value.
Drag and Drop Text Editing
When this option is enabled, it allows you to select a block of code and drag and drop it.
It saves time as you don’t have to first cut and then paste it. You can simply select and drag it.
This option is enabled by default and I recommend you keep it that way.
Default to Full Module View
When this option is enabled, you will be able to see all the procedures in a module in one single scrollable list.
If you disable this option, you will only be able to see one module at a time. You will have to make a selection of the module you want to see from the drop-down at the top right of the code window.
This option is enabled by default and I recommend keeping it that way.
One reason you may want to disable it when you have multiple procedures that are huge and scrolling across these is taking time, or when you have a lot of procedures and you want to quickly find it instead of wasting time in scrolling.
Procedure Separator
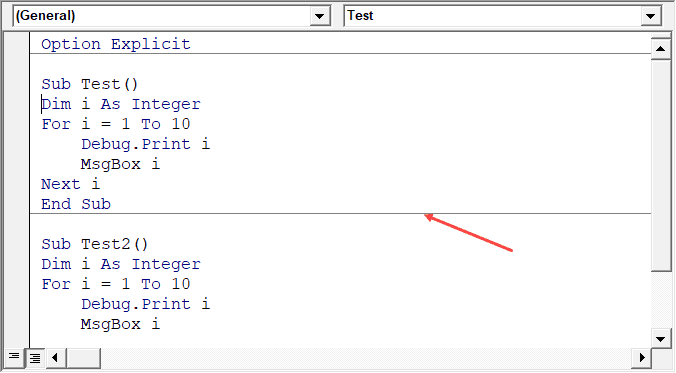
When this option is enabled, you will see a line (a kind of divider) between two procedures.
I find this useful as it visually shows when one procedure ends and the other one starts.
It’s enabled by default and I recommend keeping it that way.
Editor Format Tab
With the options in the Editor Format tab, you can customize the way your code looks in the code window.
Personally, I keep all the default options as I am fine with it. If you want, you can tweak this based on your preference.
To make a change, you need to first select an option in the Code Colors box. Once an option is selected, you can modify the foreground, background, and indicator color for it.
The font type and font size can also be set in this tab. It’s recommended to use a fixed-width font such as Courier New, as it makes the code more readable.
Note that the font type and size setting will remain the same for all code types (i.e., all the code types shown in the code color box).
Below is an image where I have selected Breakpoint, and I can change the formatting of it.
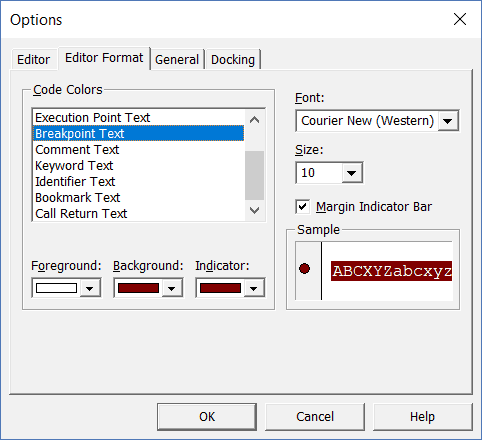
Note: The Margin Indicator Bar option when enabled shows a little margin bar to the left of the code. It’s helpful as it shows useful indicators when executing the code. In the above example, when you set a breakpoint, it will automatically show a red dot to the left of the line in the margin bar. Alternatively, to set a breakpoint, you can simply click on the margin bar on the left of the code line that you want as the breakpoint.
By default, Margin Indicator Bar is enabled and I recommend keeping it that way.
One of my VBA course students found this customization options useful and she was color blind. Using the options here, she was able to set the color and formats that made it easy for her to work with VBA.
General Tab
The General tab has many options but you don’t need to change any of it.
I recommend you keep all the options as is.
One important option to know about in this tab is Error Handling.
By default, ‘Break on Unhandled Errors’ is selected and I recommend keeping it that way.
This option means that if your code encounters an error, and you have not handled that error in your code already, then it will break and stop. But if you have addressed the error (such as by using On Error Resume Next or On Error Goto options), then it will not break (as the errors are not unhandled).
Docking Tab
In this tab, you can specify which windows you want to get docked.
Docking means that you can fix the position of a window (such as project explorer or the Properties window) so that it doesn’t float around and you can view all the different windows at the same time.
If you don’t dock, you will be able to view one window at a time in full-screen mode and will have to switch to the other one.
I recommend keeping the default settings.
Other Excel tutorials you may like:
Источник
This object represents all the windows within the Excel application. It is easy to confuse this with the Workbooks collection, but they are not always the same thing. You can open a new window by selecting Window New Window from the Excel menu. This produces another window with a copy of the existing workbook within it. If you select Window from the Excel menu again, you will see that at the bottom of the menu bar there are now two windows, Book1:1 and Book1:2, but both are based on one workbook.
The Windows collection represents what you see when you select the Window option on the Excel menu, and many of this object’s methods relate to the options on the Window menu, such as Split or Freeze Panes.
Main Properties, Methods, and Collections
These are the main properties, methods, and collections you will use within the Windows object.
Activate, ActivateNext, and ActivatePrevious
These methods allow you to activate a particular window from within your code by specifying the window within the Windows collection. Index with the name or number of that window and then use the Activate method:
Windows("Book1").Activate
You can also refer to the window by its index number:
Windows(1).Activate
You can use ActivateNext and ActivatePrevious to move to windows relative to the active one:
 ActiveWindow.ActivateNext
 ActiveWindow.ActivatePrevious
ActiveCell
This property gives the active cell details for a particular window. The active cell is the cell that the cursor is on. The following example shows how to get the address of the active cell :
MsgBox Windows("Book1").ActiveCell.Address
ActivePane
This property is unique to the Windows collection because it works in terms of the window itself and not the worksheet. It allows you to get the details of the pane itself, such as the visible area ‚ that is, the cell addresses that the user can see onscreen.
Select Windows Split from the Excel menu so that your worksheet window splits into four panes. One pane will have the active cell on it, which will also be the active pane. You can find the visible area of this pane by using the following:
MsgBox Windows(1).ActivePane.VisibleRange.Address
This assumes that you are in window number 1. This will return a range address of the visible cells within the worksheet, such as $C$1:$L$7.
ActiveSheet
You can use the ActiveSheet property to find out the name of the worksheet that is active within that particular window:
MsgBox Windows(1).ActiveSheet.Name
This displays Sheet1 or whatever the active sheet is.
Caption
This property alters the caption in the window:
ActiveWindow.Caption = "MyWindow"
Interestingly, sending an empty string does not return it back to default but blanks the caption completely. If you need to change it back to its original setting, you need to save the original caption in a variable:
ActiveWindow.Caption = ""
Close
This method closes the window just as if you clicked the X symbol in the top right-hand corner of the window. You can include optional parameters for SaveChanges , FileName , and RouteWorkBook .
Display Properties
The Windows object has a rich variety of display options that allow the following settings:
DisplayFormulas
DisplayGridlines
DisplayHeadings
DisplayHorizontalScrollBar
DisplayOutline
DisplayRightToLeft
DisplayVerticalScrollBar
DisplayworkBookTabs
DisplayZeros
These properties are all Boolean, which means they hold a True or False value. They reflect the settings when you select Tools Options from the Excel menu. Click the View tab and you will see check boxes for all of these.
You can alter your display considerably by manipulating these properties, for example,
ActiveWindow.DisplayWorkbookTabs = False
This will remove the tabs from the bottom of the active window.
FreezePanes
This property works the same way as locating the cursor on a cell in the worksheet and then selecting Window Freeze Panes from the Excel menu. It holds a Boolean value (True or False). The panes are frozen on the current cursor position.
ActiveWindow.FreezePanes = True
GridLineColor
This property alters the color of gridlines in the window display:
ActiveWindow.GridLineColor = QBColor(14)
You can also use RGB (Red Green Blue) colors.
NewWindow
This creates a new window based on the active window, just as if you selected Window New Window from the Excel menu:
ActiveWindow.NewWindow
Panes
This is a collection of all the panes within the window that you can use to find out how many panes are in a particular window:
MsgBox ActiveWindow.Panes.Count
The Pane object within the Panes collection allows you to access further properties and methods.
RangeSelection
This very useful property tells you what range the user selected:
MsgBox ActiveWindow.RangeSelection.Address
It displays a single cell, such as $C$10, or a range of cells if the user selects several cells, such as $B$10:$E$12.
SelectedSheets
This is another very useful collection that determines what selection the user made. You may have noticed in the previously covered RangeSelection property that, although the information returned was extremely useful in obtaining the cells that the user selected, there was no mention of which sheets they selected.
If you want to write professional code for Excel, you must take into account that the user can not only select cells on a particular worksheet, but can also select the same cells on other worksheets and these worksheets may be noncontiguous. For example, the user may select Sheet1 , Sheet4 , and Sheet5 .
This method is very useful for add-ins where the user can be working across several worksheets and possibly workbooks.
By cycling through the SelectedSheets collection, you can find out which sheets have been selected:
 Dim MySheet As Worksheet
 For Each MySheet In ActiveWindow.SelectedSheets
 MsgBox MySheet.Name
 Next MySheet
This displays in turn all the sheets that have been selected. Concatenate this with the RangeSelection to address all cells that are selected.
You will see this being used in some of the practical examples presented in Chapters 20 to 41.
Split
This property splits the current window into panes or sets it back to one pane. It will split at the current cursor position.
ActiveWindow.Split = True
This is the same as selecting Windows Split from the Excel menu.
TabRatio
This property sets the size of the tab display area. Its values go from 0 to 1. It dictates how much of the bottom of the screen will be for the worksheet tabs and how much will be for the horizontal scroll bar. A value of zero means no tabs showing, only the horizontal scroll bar. A value of 1 means tabs showing, no horizontal scroll bar. A value of 0.5 means 50 percent of the area is for tabs and 50 percent is for the horizontal scroll bar.
ActiveWindow.TabRatio = 0.5
WindowState
This property will allow you to find out the state of a window or to set it to one of three states:
|
Window State |
Property Value |
|
Window Maximized |
xlMaximized |
|
Window Minimized |
xlMinimized |
|
Window Normal |
xlNormal |
ActiveWindow.WindowState = xlMinimized
This will set the Active Window to a minimized state, just as when you click the Minimize button in the top right-hand corner of the window. You can also use it to check the state of the window, as it is read/write.
Zoom
This sets the Zoom property of the window, just as if you selected View Zoom from the Excel menu.
ActiveWindow.Zoom = 80
This will give a zoom of 80 percent.
In this Article
- Application Object
- Workbooks Object
- Workbook Object
- Sheets Object
- Worksheets Object
- Worksheet Object
- Range Object
- Shapes Object
- Shape Object
- Excel VBA Object Model
- Declaring and Assigning an Object Variable
Excel VBA objects refer to single “entities” made up of code and data. The Excel application itself is an object, as are workbooks, worksheets, cell ranges, and shapes. Every object has associated properties, and methods. Objects can also contain other objects and the collections object is used to refer to a group of the same Excel objects.
In this tutorial, we are going to look at some commonly used Excel Objects.
Application Object
The Application Object refers to the entire Excel application. The Application object contains the workbook object.
The following code uses the WindowState property of the Application object to set the Excel window to the maximum size available:
Sub MaximizingTheExcelWindow()

Application.WindowState = xlMaximized

End Sub
Workbooks Object
The Workbooks object refers to the collection of all the currently open Excel workbooks.
The following code uses the Workbooks.Add method to create a new workbook and add it to the collection:
Sub AddingANewWorkbookToTheWorkbooksCollection()

Workbooks.Add

End Sub
You can access an individual workbook in the Workbooks collection through its index number or name. So you could refer to a Workbook called ExcelWb, by using Workbooks(“ExcelWB”).
Workbook Object
The workbook object is part of the Workbooks collection. The workbook object contains the worksheets collection (worksheets) and the sheets collection (worksheets, chart sheets, and macrosheets). The ActiveWorkbook object refers to the workbook that is active.
The following code uses the ActiveWorkbook.Save method to save the current active workbook:
Sub SavingTheWorkbook()

ActiveWorkbook.Save

End Sub
Sheets Object
The sheets object refers to the collection of all the worksheets, chart sheets and macrosheets in a workbook. The following code uses the Sheets.Add method to add a new worksheet called ExtraSheet, after the last worksheet in the workbook:
Sub AddingANewSheet()

ActiveWorkbook.Sheets.Add(After:=ActiveWorkbook.Worksheets(Worksheets.Count), Count:=1, _
Type:=xlWorksheet).Name = "ExtraSheet"

End Sub
Note the syntax of the Sheets.Add method is:
Sheets.Add(Before, After, Count, Type) where:
-Before is optional and specifies that the new sheet should be added before an existing sheet.
-After is optional and specifies that the new sheet should be added after an existing sheet.
-Count is optional and specifies the number of sheets to add.
-Type is optional and specifies the sheet type. xlWorksheet would add a new worksheet, xlChart would add a new chart sheet, and xlExcel4MacroSheet or xlExcel4IntlMacroSheet would add a new macrosheet. If blank the default xlWorksheet is used.
You can access an individual sheet in the Sheets collection through its index number or name. So you could refer to a Worksheet called SheetOne, by using Sheets(“SheetOne”).
Worksheets Object
The Worksheets object refers to the collection of all the worksheets in a workbook. The following code uses the Worksheets.Add method to add a new worksheet:
Sub AddingANewSheet()

Worksheets.Add

End Sub
You can access an individual sheet in the Worksheets collection through its index number or name. So you could refer to a Worksheet called SheetTwo, by using Worksheets(“SheetTwo”).
Worksheet Object
The worksheet object is part of the Worksheets collection. The worksheet object contains the range object and other objects. The ActiveSheet object refers to the sheet that is active.
The following code changes the page orientation of the active sheet to landscape:
Sub ChangingOrientationToLandscape()

ActiveSheet.PageSetup.Orientation = xlLandscape

End Sub
Note the Sheet object contains the PageSetup object and its orientation property is set to xlLandscape.
VBA Coding Made Easy
Stop searching for VBA code online. Learn more about AutoMacro — A VBA Code Builder that allows beginners to code procedures from scratch with minimal coding knowledge and with many time-saving features for all users!

Learn More
Range Object
The Range object can refer to a single cell or a set of cells in a worksheet. The following code shows you how to use the Range.Select method to select cells A1:B1:
Sub SelectingARange()

Range("A1:B1").Select

End Sub
Shapes Object
The Shapes object refers to the collection of all the shapes in a worksheet. The following code would select all the shapes on the ActiveSheet:
Sub SelectingAllTheShapes()

ActiveSheet.Shapes.SelectAll

End Sub
Shape Object
The Shape Object is part of the Shapes collection. The following code would create a rounded rectangle shape and then set the name property of the shape object:
Sub UsingTheShapeObject()

With Worksheets(1).Shapes.AddShape(msoShapeRoundedRectangle, _
200, 100, 80, 80)
.Name = "A Rounded Rectangle"

End With

End Sub
VBA Programming | Code Generator does work for you!
Excel VBA Object Model
Excel’s VBA Object model describes the hierarchy of all the objects you can use in Excel. For example, you can use the Workbooks object to refer to all the other objects indirectly or directly. The following code shows you how to select cell A1, using the hierarchical structure:
Sub UsingTheHierachicalStructure()

Workbooks("Book1").Worksheets("Sheet1").Range("A1").Select

End Sub
Declaring and Assigning an Object Variable
You can declare and assign an object to a variable by using the Dim and Set keywords.
For example:
Dim ws as worksheet
Set ws = ActiveWorkbook.ActiveSheet
The following code shows you how to declare and assign a Range object to a variable:
Sub AssigningARangeToAVariable()

Dim rngOne As Object
Set rngOne = Range("A1:C1")

rngOne.Font.Bold = True
With rngOne
.Font.Bold = True
.Font.Name = "Calibri"
.Font.Size = 9
.Font.Color = RGB(35, 78, 125)
.Interior.Color = RGB(205, 224, 180)
.Borders(xlEdgeBottom).LineStyle = xlContinuous
End With

End Sub
The result is:
It’s essential to understand how objects work to master VBA. You can learn more with our Interactive VBA Tutorial.