
Multilevel numbering in Word is the #1 headache for many people working with large documents.
Believe it or not, it’s not complicated. It just takes somebody to lead the way and point out the pitfalls you need to avoid.
Today that pleasure falls to me!
Before I start, grab your free multilevel numbering troubleshooting guide that shows you the steps to get multilevel numbering working properly first time, every time, together with answers to over 20 FAQs and plenty of real client examples constructed step by step to help you fix what isn’t working with your numbering.

1. What Multi-level Numbering Looks Like
Often used in the legal profession or in large corporate documents, multilevel numbering creates a logical hierarchy and easy navigation within the document. The headings can also be summarised later on in a table of contents. Here is a simple example:

2. How to Set Up Multilevel Numbering
Here is the correct process:
1. Select the text that you want to number (this can be a section of text or the whole document).

2. Select the Home tab.
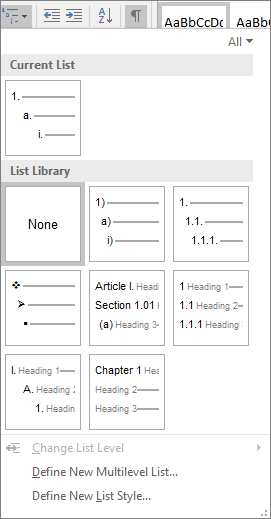
3. Click the multilevel numbering icon in the Paragraph group.
![]()
4. You can either select an existing layout from the list to use as a starting point, or you can create a new numbering system from scratch. As you hover over each thumbnail image, Word provides a larger image of the numbering system.
5. Choose Define New Multilevel List to display the control dialog.

The dialog box can be broken down as follows:
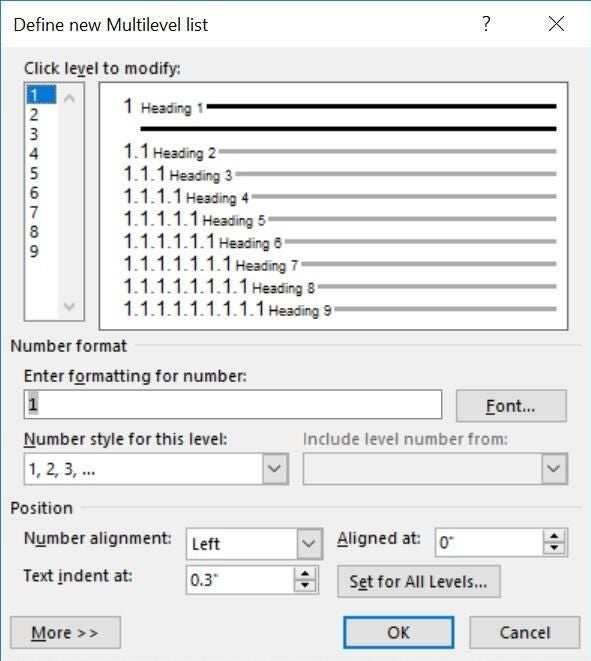
Step #1 Click level to modify
In the top left is a list of levels. As you select each level, the settings in the rest of the dialog box changes.
Level 1 is the highest level, i.e. the main headings such as chapter or section titles.
Level 2 is subordinate to level 1.
Level 3 is subordinate to level 2.

Step #2 Enter formatting for number
This is where the level number is constructed. If you include a previous level number, it will be displayed with a grey background, as will the number for the current level.
Type anything you wish to put in between the numbers such as dots, dashes, brackets etc.
Clear any text in the ‘Enter formatting for this number’ box.
Step #3 Include level number from
When creating a subordinate level (or child level), you can first specify the level number of the parent.
For example, for section 3.2
- ‘3’ is the parent level (level 1) and
- ‘2’ is the child level (level 2)

Step #4 Number style for this level
Each level can have its own number style. It may be a standalone style, e.g. 1, 2, 3 or a, b, c or continue on from a higher level, e.g. 1.1.1 or 1.a.i.
- When creating 1.1 numbering, this option is 1, 2, 3.
- When creating 1.a numbering, this option is a, b, c

Step #5 Font
Set the font formatting for the selected level, if you want.

Step #6 Position
What position from the left margin do you want items for each level of numbering. For example, level 1 items may be 0cm from the left margin, level 2, 1cm from the left margin and level 3, 2cm from the left margin.
Here’s what they mean:
- The Aligned At determines how far from the left margin the number appears.
- The Text indent at figure determines how far from the left margin the text following the number is.

6. Click OK to save all the settings and close the dialog box.
The text you selected in step 1 now looks like this.

The next part is where the magic happens …
3. How to Apply Multilevel Numbering
Once you have created your numbering system:
1. Position the cursor at the beginning of a line.

2. Press the TAB key to move the text down a level (demote).

3. Press the SHIFT and TAB keys together to move the text up a level (promote).

If you prefer, you can also click the indent icon to demote and the outdent icon to promote between levels.
![]()
4. How to Change Multilevel Settings
Once you have created your numbering system:
1. Reselect all text that is using the multilevel numbering.
2. Click the multilevel numbering icon and select Define New Multilevel List (yes, you choose this option even if you are modifying an existing multilevel list).

The original settings that you defined are redisplayed.
3. In the top-left box select the level that you wish to change, then change your settings.
4. Repeat for the other settings.
5. Click OK to save the settings. Your numbered list should now reflect your new settings.
5. Linking Multilevel Numbering to Styles
Each level of a multilevel numbering system can be linked to a style. This means that as you apply styles throughout the document, the numbering is applied appropriately and automatically. You can either use the built-in Heading 1, Heading 2, Heading 3 styles or use your own custom styles.
1. In the Numbering dialog box, click the MORE button in the bottom-left corner to expand the dialog box.
2. Select level to modify in the top-left box.
3. Open the Link level to style drop-down list and choose the style you wish to connect to the numbering level.

4. Click OK.
5. In the document, apply the Heading 1, Heading 2, Heading 3 styles where needed.
It’s a good idea to create a body text style and apply that where appropriate, so that the body text does not inadvertently get caught up in the multi-level numbering.
6. Select the whole document (or the portion of the document where you want to apply your numbered sections).
7. Click the icon in the Paragraph group (Home tab).
8. Select your custom numbering style from the gallery. The thumbnail image should show the linked styles.

6. How to Use Styles to Set Number Levels
1. Select all the text that you wish to apply the same number level to. Alternatively, if you wish to go line by line, you can place the cursor anywhere in a line of text.
2. In the Styles gallery, click the style that corresponds to the number level you wish to apply. For example, to apply the top level numbering click Heading 1 and for the third level numbering click Heading 3 (assuming those are the styles you assigned).
The numbering and all the numbering settings will be applied to the selected text or the paragraph in which the cursor was positioned.

And that, my friend, is how you do multilevel numbering in Word with no loose ends.
How to set up a dual-multilevel numbering system in Word
7. Two resources to help you
1. Grab your free multilevel numbering troubleshooting guide.

2. Watch over my shoulder as I set up multilevel numbering from scratch.

8. What next?
I hope you found plenty of value in this post. I’d love to hear your biggest takeaway in the comments below together with any questions you may have.
Have a fantastic day.


About the author
Jason Morrell
Jason loves to simplify the hard stuff, cut the fluff and share what actually works. Things that make a difference. Things that slash hours from your daily work tasks. He runs a software training business in Queensland, Australia, lives on the Gold Coast with his wife and 4 kids and often talks about himself in the third person!
SHARE
Word for Microsoft 365 Word 2021 Word 2019 Word 2016 Word 2013 Word 2010 Word 2007 More…Less
You can apply a numbering scheme to the headings in your document by using multilevel-list templates and built-in heading styles in Word (Heading 1, Heading 2, and so on).
Important: Make sure you’re using built-in heading styles in your document.
You can number headings so that top-level headings (Heading 1) are numbered 1, 2, 3, for example, and second-level headings (Heading 2) are numbered 1.1, 1.2, 1.3.
-
Open your document that uses built-in heading styles, and select the first Heading 1.
-
On the Home tab, in the Paragraph group, choose Multilevel List.

-
Under List Library, choose the numbering style you would like to use in your document.
Note: Depending on the type of documentation you’ve prepared, you might choose a template that includes the word «Heading» in the example.
Need more help?
- Insert Roman numerals by typing English letters
- Insert Roman numerals as a numbering style
- Insert Roman numerals as a page number
- Insert Roman numerals using Unicode
- Insert Roman numerals by MS Word fields
Method 1: Insert Roman Numerals by Typing English Letters
This first method is the fastest way to insert Roman numerals. We’ll make use of the English alphabets on your keyboard that look like the Roman numbers we want.
Step 1: Open up an MS Word file.

Step 2: Type in the Roman numeral.
Once your document is opened, start typing the Roman numbers you need.
We’ve provided a table below that you can use to figure out the numerical counterpart.
| Roman Numeral | Number |
| Ⅰ | 1 |
| Ⅴ | 5 |
| Ⅹ | 10 |
| Ⅼ | 50 |
| Ⅽ | 100 |
| Ⅾ | 500 |
| Ⅿ | 1000 |
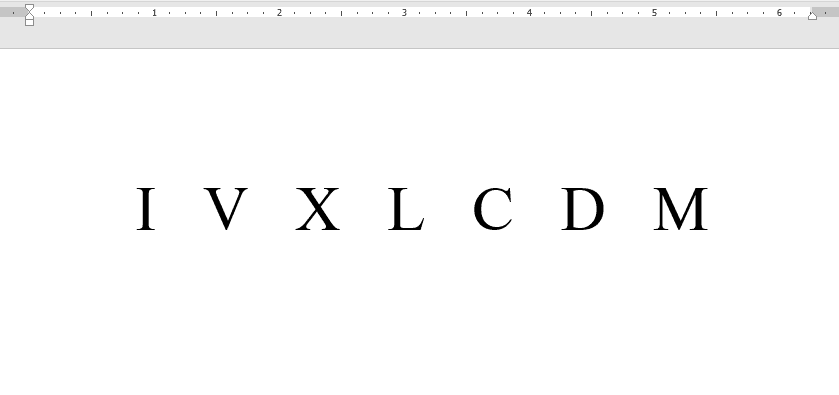
As an example, simply type MMXII from your keyboard to insert the year 2021.
Of course, feel free to make it look more convincing by changing the font into something like Times New Roman. MMXII
Method 2: Insert Roman Numerals as a List Style
Roman numerals are also used as a numbering system. In this method, we’ll guide you through each step on using MS Word’s Numbering Format tool to insert Roman numerals. This tool is part of the list styles of the paragraph toolbar found in the Ribbon.
Step 1: Open up an MS Word file.

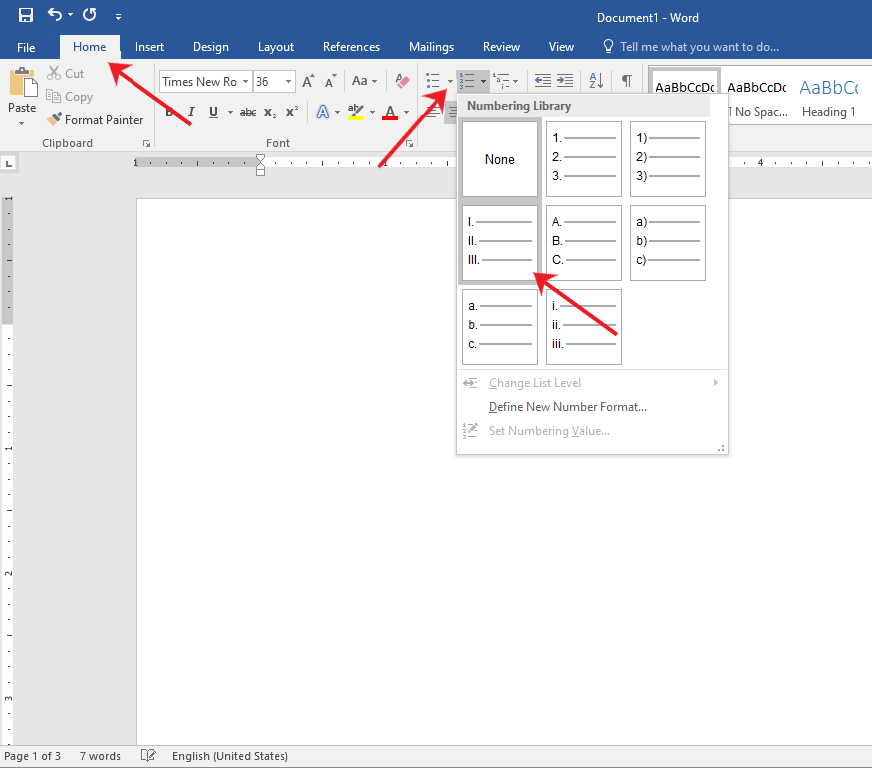
Step 2: Go to the Home tab.
On your MS Word window, navigate to the Home tab in the Ribbon and click on the Number Library drop-down menu.
Then, select the Roman numeral option in the selection.
Method 3: Insert Roman Numerals as Page Numbers
One of the most common uses of Roman numerals is to serve as page numbers. They are usually placed in appendices or introductions of a book.
In this method, we’ll walk you through the steps on how to insert Roman numerals as page numbers.
Step 1: Open up a Word file.

Step 2: Insert a page number.
Go to the Insert tab and click on the Page Number drop-down menu.
Then, select Bottom of Page.
Choose one of the options under the Simple group.
For this example, we’ll use Plain Number 2.

Step 3: Convert page number into Roman Numeral.
You should see the page number we just inserted at the footer. By default, this should be highlighted and ready for editing. If not, select the page number to start editing.
Now, go to the Design tab and click the Quick Parts button. On the drop-down menu, select Field…
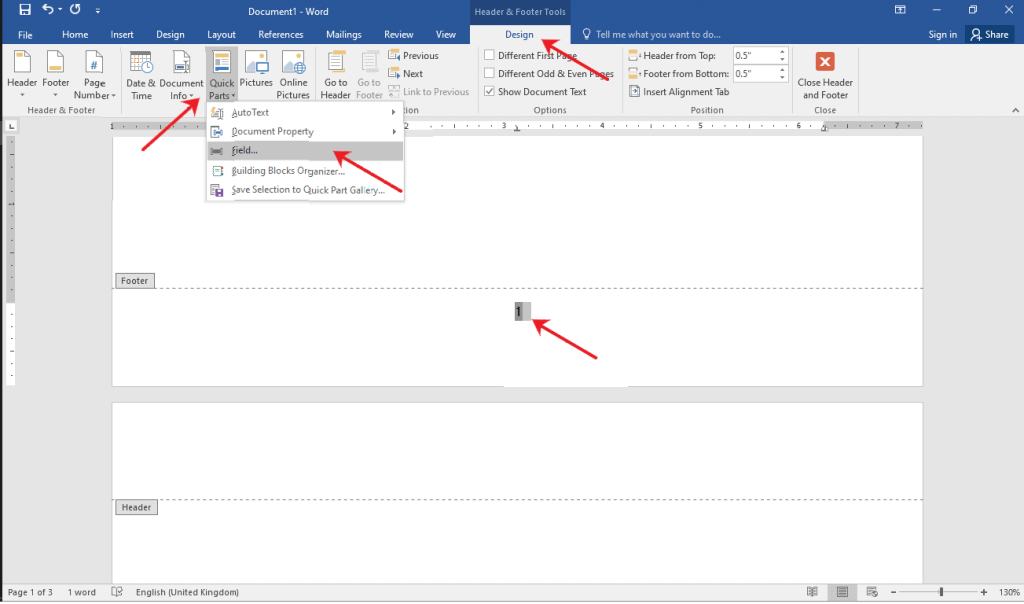
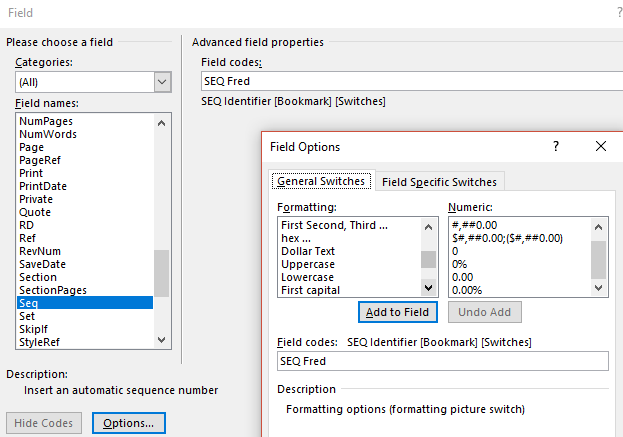
The Field dialogue box will appear in the middle of your window.
In the Categories: drop-down menu select Numbering.
Now, select Page under the Field names: and the roman numerals under Field Properties Format.
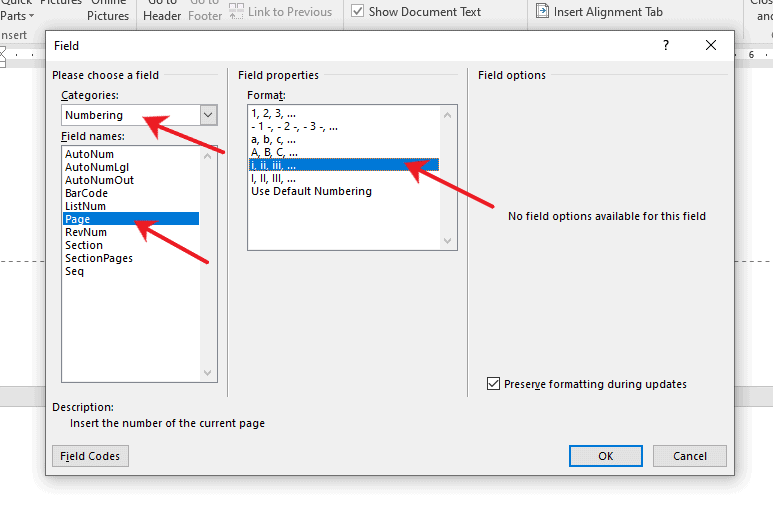
Click the OK button to apply changes. Otherwise, click the Cancel button.
Method 4: Insert Roman Numerals using Unicode
This method allows you to use unicodes to insert Roman numerals. Unicodes are the standard codes assigned to every character we use. You’ll find this method helpful, especially when you want to insert Roman numerals anywhere in your document.
Step 1: Open up a Word file.
Step 2: Type in the Unicode.
Type in the Unicode of the Roman numeral you want to insert. We’ve provided a list below.
| Roman Numeral | Unicode |
| Ⅰ | 2160 |
| Ⅴ | 2164 |
| Ⅹ | 2169 |
| Ⅼ | 216C |
| Ⅽ | 216D |
| Ⅾ | 216E |
| Ⅿ | 216F |
For the complete list of Roman numeral Unicodes, visit this site.
After you’ve typed out the unicodes, highlight them by left-clicking your mouse and dragging it over the text.
Now, simply press and hold the ALT key for at least two seconds and then press X.
You should see the Unicodes transform into Roman numerals.
Method 5: Insert Roman Numerals using MS Word Fields
Step 1: Open up an MS Word file.

Step 2: Insert a Word field.
On your keyboard, press CTRL + F9.
Type in an equal sign then the number that you want to convert to a Roman number followed by “*Roman”.
For example, if we want to convert 2021 into a Roman numeral, we would type “=2021*Roman”.
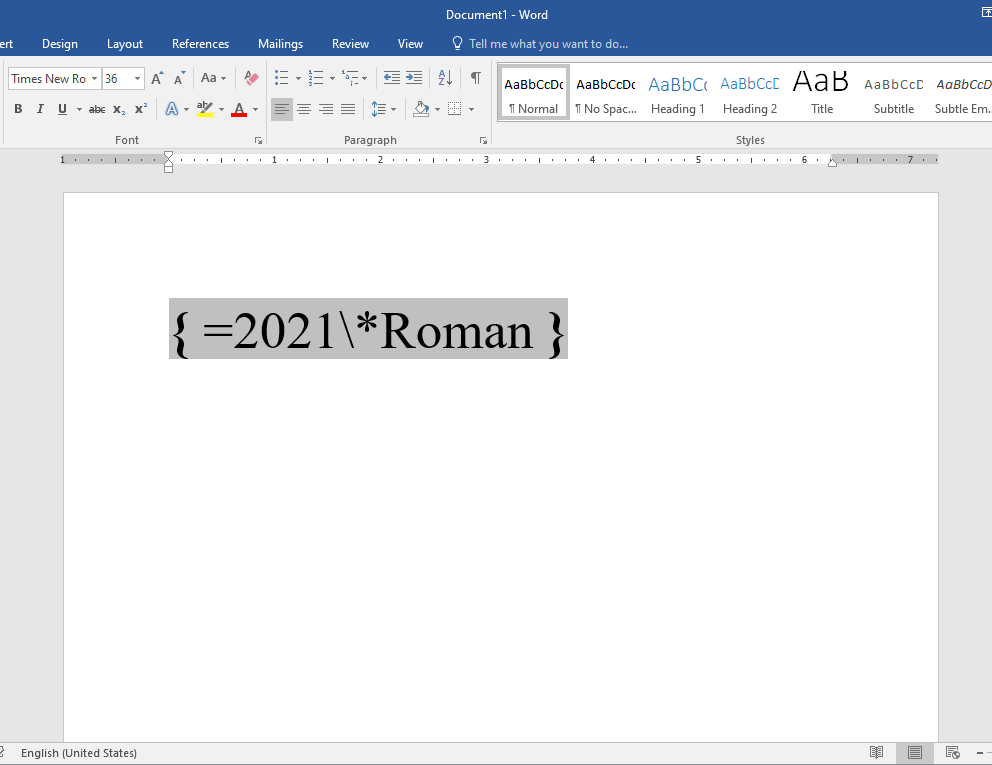
Note that the field is highlighted and enclosed in curly braces.
Now, press F9 to apply the formula and exit the Word field.
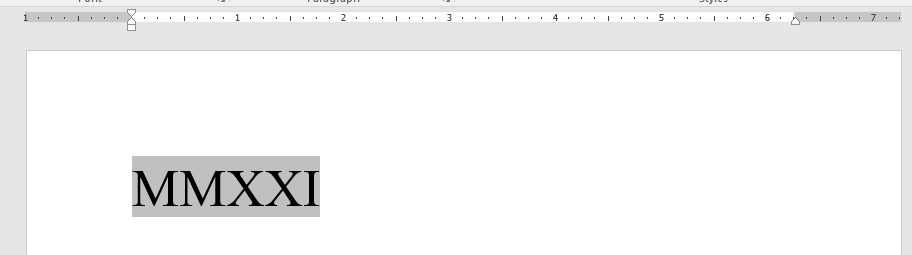
This will insert the corresponding roman numeral in the document.
Editing and Deleting Roman Numerals in MS Word
To delete, select the Roman numerals and hit the Delete key on your keyboard.
Conclusion
We hope you’ve found this article helpful!
To start a numbered list, type 1, a period (.), a space, and some text. Then press Enter. Word will automatically start a numbered list for you. Type* and a space before your text, and Word will make a bulleted list. To complete your list, press Enter until the bullets or numbering switch off.
Just so, What is bullets and numbering in MS Word 2010?
Microsoft word provides bullets and numbers to put a list of items in a nice order.
Besides, What is a bullet or numbered list? Bullet or numbered lists, also known as unordered and ordered lists, can make writing easy to read; however, be careful not to overuse them, as lists that are too long, or multiple lists on one page, can be difficult to read. Lists should only be used when there is more than one entry.
What is bullets and numbering in MS Word 2007? Bulleted and numbered lists can be used in your documents to arrange and format text to draw emphasis. In this lesson, you will learn how to modify existing bullets, insert new bulleted and numbered lists, and select symbols as bullets.
Subsequently, What are bullets in MS Word? A bullet is usually a black circle, but it can be any other symbol used to highlight items in a list. Use bullets to list items that do not have to be in any particular order.
What do you mean by bullets and numbers Class 10?
Bullets and Numbering is a paragraph level attribute that applies a bullet character or a numeral to the start of the paragraph. Applying a bullet is straightforward; numbering is a bit more complicated. rosariomividaa3 and 2 more users found this answer helpful.
What is a numbered list?
Numbered-list definition. Filters. A list whose items are numbered, with various styles including Arabic numerals and Roman numerals.
What is the importance of bullets and numbering?
Bullets and numbering allow you to organize text in lists. Bullets are useful for unordered lists in which each item is not significantly more important than others. Numbering is useful for lists in which each item is part of a sequence of steps and ought to be followed in that order.
What are bullets for Class 9?
Alternatively referred to as a bullet point, a bullet is an asterisk, black dot, circle, or another mark found before the text. Bullet lists are used to identify key items or denote significance when order does not matter.
How do you insert bullets and numbering in Word?
Position the cursor where you want to insert the number list. Either click the number button or bullet button (as shown at the beginning of the document) or click Format and then Bullets and Numbering. When you’re ready to insert a new line without creating a new bullet or number, press Shift + Enter .
Which is an example of bullet list?
The most common forms are the heavy black dot ( ● ) and the open circle ( ○ ). Other common bullet choices include squares (filled and open), diamonds, dashes and checkmarks.
Which list is bulleted list?
An unordered list typically is a bulleted list of items.
What are the use of bullets?
Bullet lists are used to identify key items or denote significance when order does not matter. Bullet points are often used in documents and presentations to help organize information and make it easier to read or understand. Which programs use bulleted lists?
When should you use bullets vs using numbering?
Use a bulleted list for items that do not have to be in a specific order. Use a numbered list for items that must be in a specific order, such as steps or a timeline of events.
Why do we need to present some content with bullets & numbering give examples?
Explanation : The major purpose of presenting the content in bullets and numbering format is to emphasize the points and it helps one to get the core idea of the content and guidelines. It also helps one to save time by giving the theme of the content. The Government Order .
What are bullets answer?
Answer. Answer: Bullets are thick dots, they are utilized to identify key items or denote significance. Bullet points are often used in presentations to help organize information and make it easier to read or understand.
What is the importance of bullet?
If used correctly, bullet points can act as a point of entry for readers, a form of emphasis, or a way to denote importance. They can break up long paragraphs of text and add variety to a body of work while providing your reader with easy reference to quick information.
What are lists and numbering explain with example?
Numbered lists are used for items that have a sequence or priority, such as a series of instructions. They can also be used for identification, so that the item can be referred to easily. Examples of numbering systems used in numbered lists include: The Arabic numbering system 1, 2, 3…
Where are bullets in Microsoft Word?
Place your cursor where you want a bulleted list. Click Home> Paragraph, and then click the arrow next to Bullets. Choose a bullet style and start typing.
How do you use bullets in Word?
How many types of bullets are there in Microsoft Word?
UNDERSTANDING LISTS
There are three types of lists that you can create in Microsoft Word: bulleted, numbered and multilevel. Items in a bulleted list are preceded by a bullet ● or other symbol.
What are the 3 main types of bullets?
Ammunition: One or more loaded cartridges consisting of a primed case, propellant, and projectile(s). Three main types are rimfire, centerfire, and shotshell.
What is bullet in writing?
A mark of punctuation (•) commonly used in business writing and technical writing to introduce items in a list (or series) is known as a bullet point.
How do you use bullets?
How to use bullet points
- Make sure all items in the list are related to each other.
- Use the same font and margin width in each bulleted point.
- Keep bullet points short, preferably no more than three lines long.
- Begin all items with the same part of speech (active verbs work well) and make sure they are in parallel form.
- Reference 1
- Reference 2
- Reference 3
- Reference 4
- Reference 5
This tutorial shows two ways to create numbered lists in Microsoft Word. We will also look at how to change list levels, start with a different list number, and change the font, size, and color of list numbers.
Do you want to create bulleted lists? Please see my previous tutorial “How to Create Bulleted Lists in Microsoft Word.”
What about Lists Ordered by Letters?
For simplicity, this tutorial refers to “numbered lists” because Word organizes all ordered (hierarchical) list options in the Numbering Library. However, all the steps shown here also apply to lists organized by letters.
If you would like to learn more about ordered and unordered lists, please see “How to Write Vertical Lists (Ordered and Unordered).”
Table of Contents
- How to Create a Numbered List — Basic Method 1
- How to Create a Numbered List — Basic Method 2
- How to Change Numbered List Levels
- How to Start a List with a Different Number
- How to Change the Font, Size, and Color of List Numbers
Watch all the steps shown here in real time!
Explore more than 200 other writing-related software tutorials on my YouTube channel.
The images below are from Word for Microsoft 365. These steps also apply to Word 2021, Word 2019, Word 2016, and Word 2013.
The basic steps are similar in Word for Mac. However, the more advanced steps, such as starting a list with a different number, are different on Mac. So, we will cover this topic for Word for Mac in a separate tutorial.
How to Create a Numbered List — Basic Method 1
This is the basic method to create a numbered list in Word. This method requires you to type each item as you create the list. If you have already typed your list items, see Method Two below.
- Place your cursor where you want to start your list.
- Select the Home tab in the ribbon.

- Select the menu arrow next to the Numbering button.
![]()
- Choose a number style from the Numbering Library.

The number one will appear in your document.

- Type your first list item after the number, and then press the Enter key on your keyboard. The next number will appear.

Continue typing your list items and pressing the Enter key until your list is complete.
- After typing the final item, press the Enter key twice to remove your cursor from the list.
How to Create a Numbered List — Basic Method 2
This method is for existing text formatted vertically as a list.
- Select the text.

- Select the Home tab in the ribbon (see figure 1).
- Select the menu arrow next to the Numbering button (see figure 2).
- Choose a style from the Numbering Library (see figure 3).
Your selected items should become a numbered list.

How to Change Numbered List Levels
Word lets you create numbered lists with up to nine nested levels. Here are two ways to change the level of list items.
Change List Levels — Method 1
Important note: This method won’t work for the first item in your list.
- Select one or more list items (other than the first item).

- Select the Home tab in the ribbon (see figure 1).
- Select the Increase Indent button in the Paragraph group.

Each time you select the Increase Indent button, the item(s) will move one level and take on the appropriate format for that level (e.g., lowercase letters, roman numerals, etc.).

Pro Tip: To return the selected text to a previous level, select the Decrease Indent button to the left of the Increase Indent button.
Change List Levels — Method 2
- Select one or more list items (see figure 8).
- Select the Home tab in the ribbon (see figure 1).
- Select the menu arrow next to the Numbering button (see figure 2).
- Select Change List Level from the drop-down menu.

- Select a list level from the list-level menu.

Your list item(s) should move to the next level.
How to Start a List with a Different Number
You can start a list with a number other than one or continue the numbering from the previous list.
- Select the first list number or place your cursor within the first list item. If you select the list number, all numbers on that level should also be selected.

- Select the Home tab in the ribbon (see figure 1).
- Select the menu arrow next to the Numbering button (see figure 2).
- Select Set Numbering Value from the drop-down menu.

5.a. Enter the number you want to start with in the Set value to text box in the Set Numbering Value dialog box.

5.b. (Alternative Option) Select Continue from previous list if you want to continue the numbering from a previous list in your document.

- Select the OK button.

Your list should be renumbered according to your selections in the Set Numbering Value dialog box.
How to Change the Font, Size, and Color of List Numbers
By default, the font, size, and color of your list numbers will be the same as your normal text style. However, you can manually change the appearance of list numbers by selecting them separately from the text.
- Select one list number. All numbers on that level should also be selected.

- Select the Home tab in the ribbon (see figure 1).
- Select a new font, size, or color from the Font group.

Your list numbers should change to the new formatting. Repeat these steps for each level in your list, as necessary.

Related Resources
How to Write Run-In Lists
How to Create and Update a List of Tables or Figures in Microsoft Word
How to Create Numbered Lists in PowerPoint (PC & Mac)
Updated February 12, 2023
Microsoft 365, Microsoft Office for Mac, Microsoft Word, Office 2007, Office 2010, Office 2013, Office 2016, Office 2019, Office 2021 / Office LTSC, Office 365, Office for Mere Mortals /
28 February 2022
Word has at least seven in-built numbering for common uses in documents, some that you know and appear automatically with others hidden away and little understood.
We’ve told you about Word Numbered List tricks and Hidden Numbering options in Word plus Faster Numbered and Multi-Level Level changes
Headings have numbering options at each level which can include chapter numbering.
Page Numbers are available in headers/footers.
Captions to pictures have their own numbering, right-click on an image then choose ‘Insert Caption’.
Multi-Level Lists allow a lot more flexibility at each level, switching between numbered levels and letters
Line Numbers for each page are at Layout | Page Setup | Layout | Line Numbers.
Numbered list limitations
There are some things you might want from Word’s Numbered Lists but aren’t possible, such as:
- Change increments from 1 – for example increment by 10.
- Reverse numbering – counting down from a higher number or numbering down to one.
- Fix the numbering in place so it doesn’t change. Numbering isn’t done with field codes, so there’s no option for converting fields to text.
Need more flexible numbering?
Sometimes the numbering options just aren’t enough. For example, the numbering can only be at the start of the paragraph and you can’t automate something like this:

{LISTNUM } Field Code
{LISTNUM } is another way to number that works within text.
For example a inline numbered list like this:

That’s made with a {LISTNUM } field code before each dwarf, like this with field codes revealed.

The advantage of {LISTNUM } is the flexibility. The numbering changes automatically if you add, remove or rearrange a list.
Sadly, {LISTNUM } has limited formatting choices compared with {SEQ }
{SEQ } Field Code
If Numbering is too limited the alternative is the {SEQ } field code.
SEQ can be placed anywhere in a paragraph and has more formatting options. Each SEQ sequence has a unique name (eg ‘Fred’) so you can have different numbering flowing through a document.
Word Numbered List tricks
Hidden Numbering options in Word
Faster Numbered and Multi-Level Level changes
Need more Word numbering options?
Changing Word numbering
How to Easily Create Numbered or Bullet list in Word without indents
Line And Paragraph Numbering In Word

on
June 11, 2018, 12:25 PM PDT
How to create multilevel numbered headings in Word 2016
Multilevel number headings don’t have to complicate your work. This technique takes a few clicks and you’re done.
We may be compensated by vendors who appear on this page through methods such as affiliate links or sponsored partnerships. This may influence how and where their products appear on our site, but vendors cannot pay to influence the content of our reviews. For more info, visit our Terms of Use page.

Over the last few months, we’ve reviewed Word’s numbered list features. Specifically, How to control spacing and alignment in a numbered list in Microsoft Word shows how to control spacing and alignment and How to number headings in a Word 2016 document shows a simple way to number headings. In this article, we’ll continue by reviewing Word’s Multilevel List feature. Fortunately, it’s easier to implement and modify than you might think.
I’m using Word 2016 on a Windows 10 64-bit system, but this feature is available in earlier versions. However, the multilevel list options discussed in this article aren’t available in the online 365 browser edition. For your convenience, you can download the demonstration .docx and .doc files, or you can work with your own content.
LEARN MORE: Office 365 Consumer pricing and features
What doesn’t work
You can’t use Word’s Numbering feature to generate a multilevel numbering system, even if you use built-in heading styles. Figure A shows a document with two styled heading levels: Heading 1 and Heading 2. You can apply the Numbering option (in the Paragraph group) and Word will number the headings consequently, but the feature ignores different levels; if you expected 1, 1.1, 2, 2.1, and 2.2, you might be surprised. If you select the entire document first, Numbering not only ignores the different levels, but it also numbers the paragraphs!
Figure A
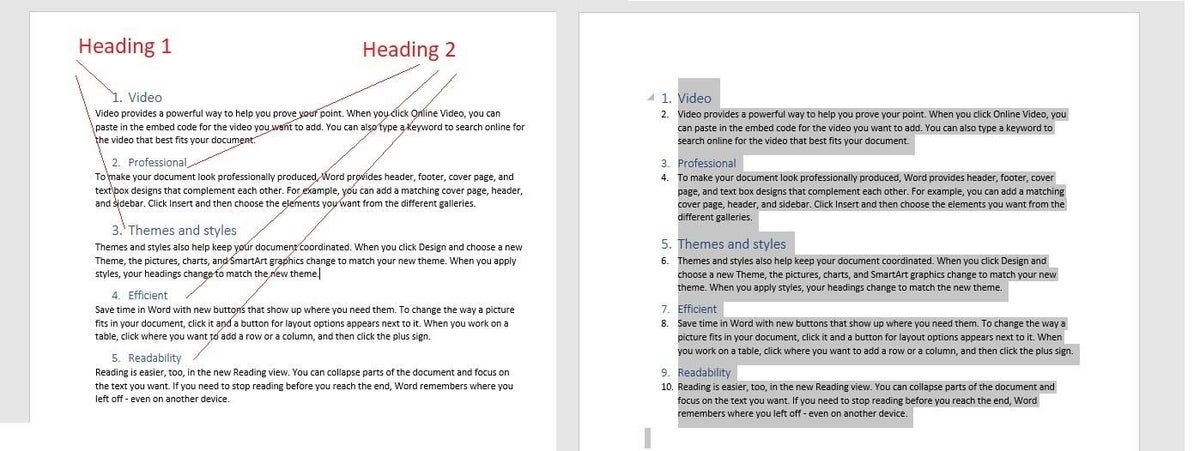
Word’s Numbering option can’t handle multilevel headings.
The easy way
If you use built-in heading styles, applying a multilevel list style is as simple as a few clicks. First, position the cursor anywhere in the document. Then, click the Multilevel List option and choose an option (Figure B). As you can see in Figure C, two quick clicks and you’re done!
Figure B
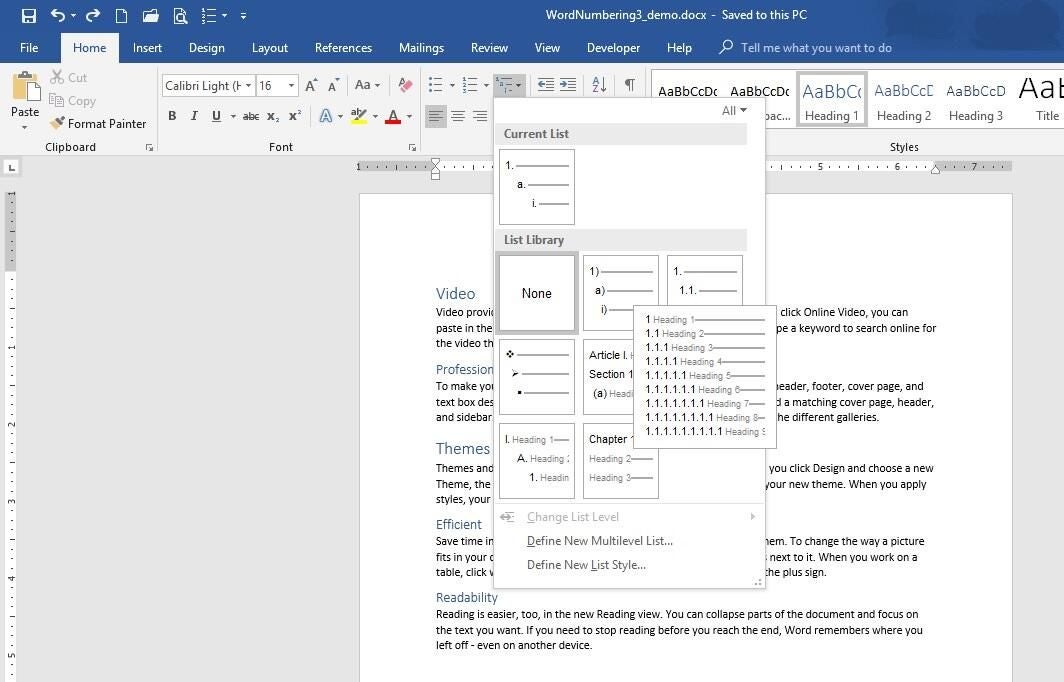
Choose one of the built-in multilevel options from the gallery.
What’s important to note is that the List Library collection displays styles linked to the built-in heading styles. If one of these works for you, you needn’t go any further.
Figure C
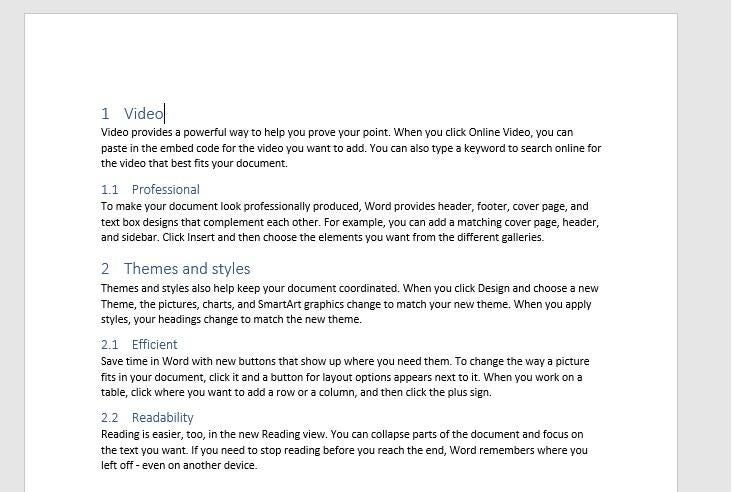
It took two clicks to apply this multilevel numbering scheme.
Tweak it
The default options are adequate most of the time, but you might want to customize the results a bit and that’s where things can get a bit confusing. The options are straightforward, but there are a lot of them; Word can handle up to nine levels!
To modify the options, click the Multilevel List option (in the Paragraph Group). Word selects all lists currently in use in the List Library. You’ll see two options below the gallery: Define New Multilevel List and Define New List Style. Use the first to create and save a stable custom list style. You’ll use the second to change list styles. You can also use the latter to create a new style. So, what’s the difference? The Define New List Style option lets you name a style, so you can share, modify, and delete it later. Most users will never need this option. Now, let’s move on: choose Define New Multilevel List. Figure D shows the resulting dialog.
Figure D
Open this dialog to create a new multilevel list.
Now you’re ready to choose settings that will reflect your numbered heading needs:
- Select the level you want to modify. You can change one, a few or all of the levels.
- Select a numbering format to apply to the chosen level, adjust the formatting; adjust the spacing and aligning, and so on.
- Repeat the above for each level you want to change.
- Click OK when you’re done.
To save the list style to a template so you can use it with other documents, select the list in the document. Access the Multilevel List dropdown and choose Define New List Style. Enter a descriptive new and select the New documents based on this template (at the bottom). Once you click OK, the multilevel list style will be available in all new documents.
SEE: 30 things you should never do in Microsoft Office (free PDF) (TechRepublic)
An example
Let’s use what we’ve learned to modify the built-in style applied earlier (Figure C). Specifically, we’ll change the numbering style for both levels and indent level 2. To begin, click anywhere inside the list area, and then do the following:
- Click Multilevel List in the Paragraph group, and then choose Define New Multilevel List.
- Select 1 in the Click level to modify list to choose the first level.
- From the Number style for this level dropdown, choose I, II, III, (Figure E). We’re done with level 1.
- Select level 2 and change the number style to l, ll, lll, as you did for level 1.
- Click the Font button, choose Italics, and click OK.
- In the Aligned at control, enter .50. (Figure F).
- Click OK to see the new list attributes in Figure G.
Figure E
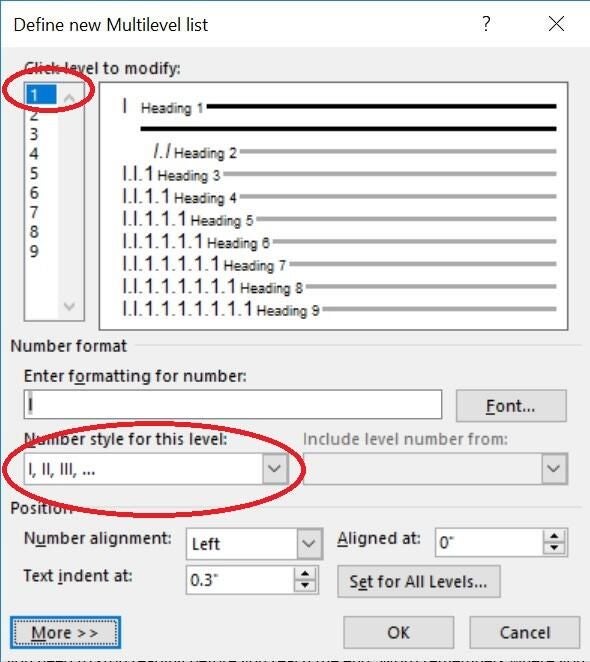
Alter level 1.
Figure F
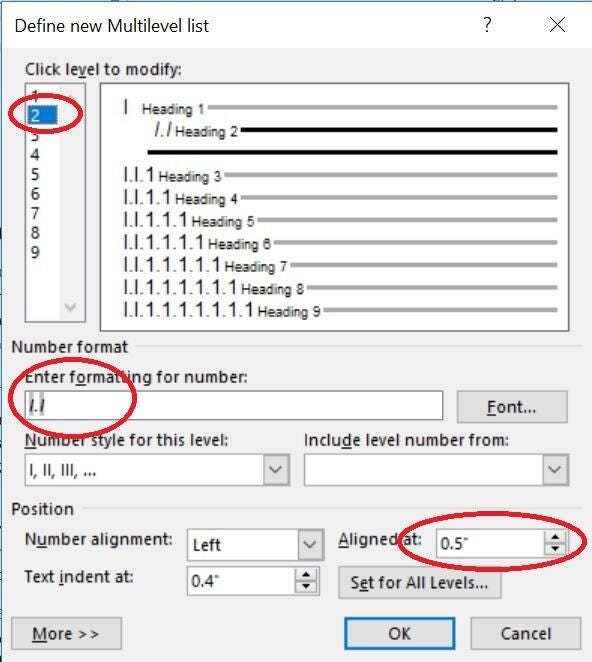
Alter level 2.
Figure G
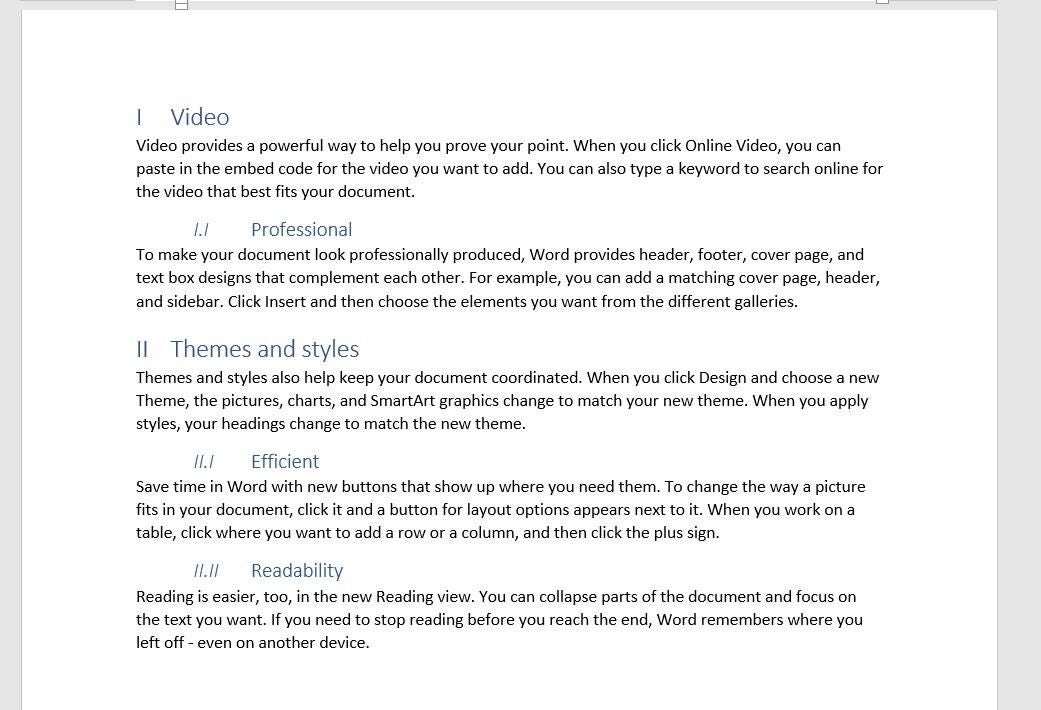
We reset only a few options, but substantially changed the look of the headings.
Notice that the Font option (when you applied italics) changes only the number, not the heading text. To update the heading text, modify the heading style as you normally would. Word assumes you want all Heading 1 and Heading 2 styles included in the new numbering scheme. If you want to omit a heading level from the scheme, don’t use a built-in heading style to format those headings.
There are lots of options. For instance, you might reduce the amount of space between the number and the text by changing the Text indent at setting. Or, you might center the heading by choosing Center from the Number alignment dropdown. For even more options, click More to expose several more settings. You could use the Apply changes to option when setting level 1 to the I, II, III numbering style instead of changing it for each level.
To add new levels to the list, simply use a lower level built-in heading style. For a visual review of the document’s structure, display the Navigation pane: Click the view tab and check Navigation Pane in the Show group.
This feature is easiest to use when you combine it with Word’s built-in heading styles. However, you can map a custom heading style to the multilevel numbering feature–it just takes more work. Word handles nine levels, but any document with more than four levels should receive a serious developmental edit. More than four becomes confusing and perhaps worse, unreadable.
Stay tuned
Word’s Multilevel List feature works nicely with the built-in heading styles. However, you can get the same effect working with custom styles. Next month, I’ll show you how to do so.
Send me your question about Office
I answer readers’ questions when I can, but there’s no guarantee. Don’t send files unless requested; initial requests for help that arrive with attached files will be deleted unread. You can send screenshots of your data to help clarify your question. When contacting me, be as specific as possible. For example, “Please troubleshoot my workbook and fix what’s wrong” probably won’t get a response, but “Can you tell me why this formula isn’t returning the expected results?” might. Please mention the app and version that you’re using. I’m not reimbursed by TechRepublic for my time or expertise when helping readers, nor do I ask for a fee from readers I help. You can contact me at susansalesharkins@gmail.com.
Also see:
- How to add a drop-down list to an Excel cell (TechRepublic)
- How to become a cloud engineer: A cheat sheet (TechRepublic)
- 50 time-saving tips to speed your work in Microsoft Office (free PDF) (TechRepublic download)
- How to add a drop-down list to an Excel cell (TechRepublic)
- Cost comparison calculator: G Suite vs. Office 365 (Tech Pro Research)
- Microsoft Office has changed, how you use it should too (ZDNet)
- Best cloud services for small businesses (CNET)
- Best to-do list apps for managing tasks on any platform (Download.com)
- More must-read Microsoft-related coverage (TechRepublic on Flipboard)
-
Microsoft
-
Software
Long Microsoft Word documents such as detailed project quotations, student’s project works or thesis, proposals, annual reports, product manuals, technical white papers, and so on require formal features like page numbers to help the reader navigate the document easily.
In today’s article, we are going to explain everything you need to know to insert both Roman Numerals and English numbers (or Arabic numerals) as page numbers in one Microsoft Word document.
In Microsoft Word, you have the flexibility of choosing the page numbering style that works well for you. You are not limited to using only the standard or ordinary English numbers when numbering your pages.
Perhaps you want to use Roman numerals (e.g., i, ii, iii, iv, etc.) for numbering the introductory pages and then restart numbering with pages 1, 2, 3, 4, etc., for the main content.
This is exactly what this article is about.
In the first section, we will look at how to insert the roman numerals as page numbers in Word. Then comes the second section where we talked about how to insert the normal English numbers (or Arabic numerals) as page numbers. Then in the third section, we will discuss how to combine these two number formats in the same document.
You can use the Table of Content below to navigate around this page.
Let’s dive right in.
To insert Roman Numerals as page numbers in Microsoft Word, first, you need to insert the default page numbers, then convert them into Roman numerals using the Page Number Format settings.
The below steps will show you everything with screenshots.
Step 1. First, Specify the location you want to insert the page numbers in MS Word
There are two popular places to enter the page number in a Word document: the header and the footer. I often prefer the footer section to enter page numbers.


Step 2. Add the page numbers
To add page numbers in Word, first, go to the Insert tab of MS Word.

On this tab, in the Header & Footer section, click on the Page Number drop-down button.

Then select either the “Top of Page” or “Bottom of Page” option in the drop-down list. This will create page numbering in the header or footer section of your Word document respectively.

Step 3. Convert The Page Numbers Into Roman numerals
After inserting the page numbers, it’s now time to convert them to Roman Numerals.
To do so, click on the Page Number drop-down again.
In the drop-down list, you will find an option called “Format Page Numbers“, Click on this option.

Clicking on the Format Page Numbers option will open a small popup window in your Word document.
Click on the “Number Format” drop-down.

From the drop-down list, select the Roman Numeral number format and save your document settings by clicking on the OK button.

At this stage, the pages in your document should be numbered with the Roman numerals number format.
Section 2: Walkthrough on Adding the Normal English page numbers in Word
The above section discussed how you may add roman numerals as page numbers in MS Word.
In this section, we are going to brush through how to insert the normal English page numbers (or Arabic Numerals) in Word.
If you already learn how to do this from the previous section, you can quickly jump to the next section on how to use both number formats to number pages on different sections in the same MS Word.
Let’s dive right into it.
Step 1. Click on the Insert tab
Open your document in Microsoft Word, and then click on the Insert tab at the top of the screen.

Step 2. Click on “Page Number” from the “Header & Footer” section
In the Insert tab, you will see the “Header & Footer” section. In the header and footer section, you will see the option “Page Number”.
Click on this “page number” drop-down button.

Step 3. Select the location where you want to place the page number
On clicking on this drop-down, you will see some more options. In which you will be asked to specify the location to enter the page number.
In most documents, the page number is inserted in the header or footer.
Select where you want your page number to appear.

Step 4. Select either the Top of Page or Bottom of page
Click on the “Top of Page” or “Bottom of Page” option to insert the page number in the header or footer, then select the style you want (whether to insert it in the center, left, right, etc.).

These are the steps you need to take to insert page numbers in Microsoft Word.
Section 3: How to Add Different Page Numbers to Different Sections in the same document
This section will finally show you how to insert Roman Numerals and Page Numbers In Word.
For example, you can use Arabic numerals (1, 2, 3, etc.) to number the main document, then Roman numerals (I, II, III, etc.) for the introductory sections like the table of contents, glossary, Acknowledgment, etc.
To be able to achieve this in Microsoft Word, you’ll need to use the section break feature to separate the document into sections. This will give you the flexibility to number pages with different number formats in the same document.
Without any further ado, let’s get into it.
Step 1. Divide your document into sections
First, you need to open your desired Word document where you need to insert the Roman numerals and Arabic numerals as page numbers.
Place your insertion pointer at where the roman numerals will end or where regular page numbers will start.
On the Layout tab, click on the “Breaks” option.

Step 2. From the drop-down menu select the “Next Page” option
A drop-down menu will open.
From this menu, click on the “Next Page” option under the Section Breaks category.
As the description indicates, this section break begins a new section on the next page.

Step 3. Select Link to Previous from the “Header & Footer” tab
Now, to change the format of the page numbers in the new section you created, you must disconnect the link between the new section and the previous section of your document.
To do so, double click on the header or footer of the new section from where you want the regular page numbers to appear.
Once you are into the Header or Footer, the Header & Footer tab will get activated.
Under this tab, go to the Navigation section and click on the Link to Previous button to deselect it.

Step 4. Now, change the page numbers of the First Section to Roman Numerals
At this point, you can change the page numbers of the first section to Roman Numerals without it affecting the entire document.
To do so, double-click to activate the Header or Footer section where the page number is, then select the page number and right-click on it.
This will give you some options. One of these options is to click on the “Format Page Numbers” option.

Clicking on the Format Page Numbers option will open a small popup window in your Word document.
Click on the “Number Format” drop-down.

From the drop-down list, select the Roman Numeral number format and save your document settings by clicking on the OK button.

At this stage, the pages in the first section of your document should be numbered with the Roman numerals number format.
Meanwhile, the second section of the document will maintain the regular pager numbering format.
Section 4: How to Make Page Numbering Not Appear on the First Page of a Document
Removing page numbers from the first page of a document or section can be a helpful way to make your document look more professional.
It is also useful if you want to avoid repeating numbers on multiple pages (for example, if your document has chapters that begin on odd-numbered pages).
With a few simple steps, you can remove page numbering from the first page of your document or section, giving it a clean and polished look.
So, follow these steps to remove the page number from the first page or from your specific page in MS Word.
Step 1. Open the Word document and double click on the header section
Open the required document of your MS Word. And double click on the header or footer section of the first page where you have inserted the page number.

Step 2. Click on “Different First Page” to remove page number
In the “Header & Footer” tab, you will find the “Different First Page” button in the “Options” section which you will select. Selecting it will remove the number from your first page.

The “Different First Page” option enables you to enter different content for your header and footer on the first page of a document.
Frequently Asked Questions about Inserting Roman Numerals and Page Numbers in Word
How do I insert the Page Number and footer at the same time?
How do I insert Page Numbers and a footer all at once? If you want to add page numbers and a footer to your document, there’s an easy way to do it all at once. Here’s how:
1. Open the document in Microsoft Word.
2. Go to the Insert tab.
3. In the Header & Footer section, click on the Page Number button.
4. A drop-down menu will appear. Choose the location of the page number (top of the page, bottom of the page, or page margin).
5. The page number will be inserted where you selected.
6. To add a footer, go to the Insert tab and click on the Footer button.
7. A drop-down menu will appear. Choose the location of the footer (top of the page, bottom of the page, or page margin).
8. The footer will be inserted where you selected. Add text or objects to the footer as desired. When you’re finished, click on the Close Header and Footer button (or press Esc) to close it. That’s all there is to it! Now you know how to add both page numbers and a footer to your document all at once.
What Is The Importance Of Adding Roman Numerals In Word?
When you type a number in Microsoft Word, the program automatically formats it as Arabic numerals. This is the standard way to write numbers in most of the world. However, there are occasions when it might be necessary to use Roman numerals. Here are some reasons why you might want to add Roman numerals to your documents:
1. They’re easy to grasp: Roman numerals are one of the simplest numbering systems there is, which makes them easy to understand and use, even for complex documents.
2. They’re highly visible: The large, distinct characters of Roman numerals make them very easy to spot in a document, which can be helpful when you’re trying to find a specific section quickly.
3. They add professionalism: Roman numerals have a long history of using informal documents, so adding them to your MS Word document can give it a more polished, professional look.
4. They’re flexible: Unlike other numbering systems, Roman numerals can be used in a variety of ways, such as listing chapters sequentially (I, II, III, etc.), or using them to indicate page numbers (XIII in the case of this article). This flexibility can be useful when you need to number sections in a non-standard way.
5. They’re easy to update: If you need to add or remove sections from your document, Roman numerals can be easily updated to reflect the new numbering scheme.
In short, Roman numerals offer a number of advantages over other numbering systems, making them a valuable addition to any MS Word document.
What Is The Importance Of Adding Page Numbering In MS Word?
Adding page numbers to your document is important for a few reasons.
First, it helps your reader keep track of their place within the document.
Second, it allows you to easily reference specific pages or sections within the document.
Lastly, page numbering can help you organize your thoughts and information when creating a table of contents.
There are a few different ways to add page numbers in MS Word, so be sure to explore all the options to find the best fit for your needs.
Regardless of which method you choose, adding page numbers to your document is a helpful way to keep your information organized and easy to reference.
Final Thoughts on Inserting Roman Numerals and Page Numbers in Word
That’s all there is to it! Now I hope you know better how to insert or put Roman numerals and page numbers in your Word document. How to put Roman Numerals and page numbers in different styles and on different pages in this article. These methods are verified and checked before writing the article.
With these methods, you will need a few minutes to insert the page numbers and Roman Numerals into the Word document and your document will look more professional than before. If you like this article, be sure to share it with your friends on social media accounts. Thanks for reading!