
Word for Microsoft 365 Word 2021 Word 2019 Word 2016 Word 2013 Word 2010 Word 2007 More…Less
You can use the numbered list feature in Word to add numbers to cells in a table.
Note: If a table cell contains multiple lines of text, Word numbers each line in the cell.
-
Select the table cells that you want to number.
To number the beginning of each row, select only the first column in the table by clicking the column’s top border.

-
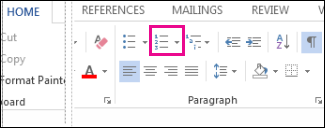
On the Home tab, in the Paragraph group, click Numbering.
Note: To select a different number format, right-click a number in the list, point to Numbering, click Define New Number Format, and then select the options that you want.

See also
Automatically number rows in Excel
Need more help?
For large tables in Word, it would be more convenient if we can auto number their rows or columns. Follow this article to learn how.
Many of us may know how to use the AutoNumber feature in Excel worksheets. In fact, this feature can also be applied to Word tables. For complex documents that may contain large tables, you may want Word to number the rows automatically to save time. Besides, if you have inserted auto-number to the rows or columns of a table, then you will never need to adjust numbers when you insert or remove rows or columns from your table anymore, because Word will update them automatically. In this article, we will mainly introduce how to do so.
Method 1: Create a Normal Auto-numbered List
For better understanding, I will show you how to insert an auto-numbered list in the first left column of the table like this: 
- Select the column of your table where you want to insert a numbered list.
- Go to “Home” tab, and then click “Numbering” drop down list.
- Select a numbered list from “Numbering Library”.


Method 2: Apply Customized Number Format
In Word, you can also change the style and format of the numbered lists. For example, sometimes you may need to restart the sequence, or specify a new start number like this:
To do so, you can follow these steps:
- Select the column of your table where you want to insert a numbered list with other formatting.
- Switch to “Home” tab, and click “Numbering” drop down list. And then select “Define New Number Format”

- In the subsequent dialog box, enter your customized number format under “Number Format” box.
- Select the style of numbers from “Number Style” drop-down list. And then click “OK” to save it.

- In this way, we will be able to define new number format of our own. And if we delete or add an item into the table, the numbered list will update accordingly.


Take Assistance of a Specialized Repair Tool
All in all, we can quickly add row or column numbers to a large Word table automatically. And also, Word provides many other features to bring common users convenience. However, Word sometimes can be affected by malware intrusion or virus attacks. Thus, it is essential to keep a stellar repair tool nearby to recover word. This tool is capable of examining Word files and restoring them to their prior condition in a jiffy.
Author Introduction
Kelly Zhao is a data recovery expert in DataNumen, Inc., which is the world leader in data recovery technologies, including excel recovery and pdf repair software products. For more information visit www.datanumen.com

on
March 27, 2008, 5:00 PM PDT
How to number rows in a Word table
Number Word table rows and columns
I love discovering an easy trick, especially one I’ve never seen used before. Did you know that you can quickly add row and column numbers to a Word table? Simply use the Numbering tool on the Formatting toolbar (in version 2003 and earlier):
- To number rows, select the left most column in the table and click Numbering on the Formatting toolbar. To select a column, hover the mouse over the column until Word displays the selection arrow (see below) and click. In Word 2007, select the column and then click Numbering in the Paragraph group on the Home tab.
- To number columns, select the top row in the table and click Numbering on the Formatting toolbar. To select a row, hover the mouse in the left margin just next to the row you want to click. When Word displays the selection tool (see below) click to select the row. In Word 2007, select the row and then click Numbering in the Paragraph group on the Home tab.
Select a column
Select a row
In truth, you can number any row or column, but most likely, you’ll want to display numbers to the left or across the top of the table. I realize that you won’t want to number most tables and columns, but I still like knowing I can do it.
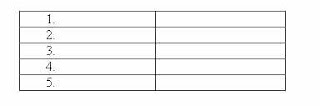
Number rows
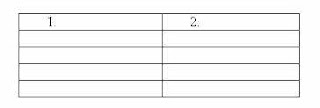
Number columns
-
Software
Jeff wanted to know how to find out how many rows he had in a very long table in his Word document. Word Count doesn’t tell you — it tells you how many lines in the document, but each cell (except one) in a table is treated as a ‘line’ for Word Count purposes.
You can find out how many rows (and/or columns) there are in an individual table by checking the table properties. Here’s how:
- Select the entire table. This selects all rows and columns.
- Right-click on the selected table and select Table Properties from the shortcut menu.
- Click on the Row tab — the number of rows selected is listed at the top of the dialog box.
- Click on the Column tab — the number of columns selected is listed at the top of the dialog box.
- Click Cancel to close the Table Properties dialog box.


NOTE 1: If you now select another table to check its number of rows and columns, you may find that when the Table Dialog box opens to the last-viewed tab (Row or Columns), no numbers are displayed. Just go back to the Table tab, then click the Row or Column tab again and the number should display. If it doesn’t, save and close the document, then close Word. Reopen the document and try it again (see my comment dated 17 December 2022).
NOTE 2: Merged cells are mostly treated as though the rows and columns existed as they did when the table was first created. However, if you’ve merged all the cells from several adjacent rows, the row count will reduce.

Tables are a Word tool that everyone needs to use at some point to organize otherwise unruly text and numbers. From timetables to rosters to invoices to calendars, all kinds of projects are based on tables.
Although tables are simple to create in Word, you can do lots of things with them. When you need to total a column of numbers in a table, don’t bother fetching a calculator—let Word add them automatically. If your tables span multiple pages, don’t painstakingly add the column headings to each page—make Word do it for you. In this article I’ll show you ten secrets for working with tables in Microsoft Word.
1. Have Word Do the Math
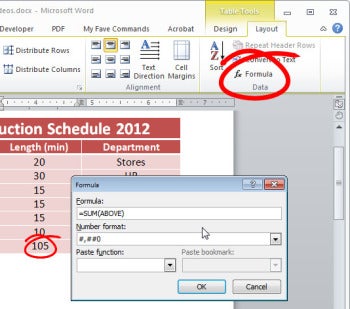
If you need to total a column of figures in a table, Microsoft Word can do the math. Once you’ve drawn the table, click in a cell in a column of numbers where you want the column total to appear. Go to Table Tools > Layout, and click Formula. If =SUM(ABOVE) does not automatically appear in the Formula dialog box’s Formula field, type it there. Select a format from the ‘Number format’ list—I chose #,##0 to get a whole number result—and click OK. Word will automatically insert the total into the cell.
If you later change any of the values that contribute to the total, click in the cell where the formula field code resides and press F9. You can also press Ctrl-A to select the entire document and then press F9 to update all of the field codes in the document.
2. Place Table Headings on Every Page
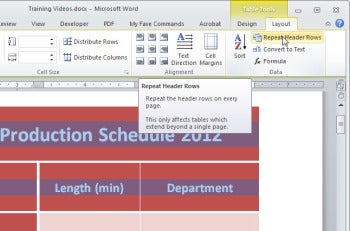
When you have a large table that spans multiple pages, it’s useful to make the table’s heading rows repeat at the top of each page. This arrangement ensures that anyone viewing a page can see clearly what each column contains without having to refer back to the top of the table.
First select the heading rows to be repeated. You can select multiple rows, but they must be consecutive and they must appear at the top of the table. In the Table Tools > Layout tab, click Repeat Header Rows.
You won’t necessarily see any immediate difference in your table when you do this; but once the table grows beyond one page, the heading rows will automatically repeat at the top of each subsequent page.
3. Create Business Cards and Name Badges
You might be surprised to learn that you can easily lay out business cards and name badges using Word tables. You must first determine which paper stock to use, so that the table will print correctly.
In Word, you configure business cards and name badges the same way you do sheets of sticky labels, so start with a new empty Word document and click Mailings > Start Mail Merge > Labels. In the Label Options dialog box, select the type of printer you’re using, the label vendor, and then the product number (the ‘Product number’ list includes not only labels but also business-card stock and name badges). Your label manufacturer might not be on the list; in that case, look over the label packet to see if it claims to have a similar layout to another manufacturer’s product, and tell Word to use that product number instead. If you cannot find a match anywhere, click New Label and configure the settings for your paper.
Once you’ve selected the correct paper, click OK; a new table will appear in your document. The table layout will match the layout of your paper stock, but the gridlines you see won’t print. Create your business cards or name badges, one per cell table, and print them on your paper stock.
Next Page: Make Table Rows the Same Height
4. Make All Table Rows of Equal Height
If a table has all of the same type of data in it, you might want to format it to make the rows the same height. If you wish, start by dragging the bottom border of the table to the position where the table should end. For example, you could drag the bottom border up until it’s just above the footer area, so that the table will fill the page. Alternatively, you could drag the bottom border down a little to make the table a bit larger, so that you have some extra space that you can use to resize the rows.
Now select the entire table or a series of rows, and make them all the same height by right-clicking and choosing Distribute Rows Evenly. Word will adjust each selected row, and the table will consume the entire area down to where you dragged its bottom border. You can render selected columns of equal width using a similar process.
5. Break a Table in Two or Fuse Two Tables Together

When you want to break a table into two pieces, either by splitting it at a certain row or by removing a few rows and making a new table from them, you can use a handy keystroke. Start by selecting all the rows that you want to move to a second table, and then press Shift-Alt-Down Arrow (or Shift-Alt-Up Arrow, depending on the direction you want to move in) to start moving the selected rows through the table. As soon as the rows reach the top (or bottom) of the table, they’ll break away and form a second, independent table.
Likewise, to fuse two tables into one, you can select all the rows in one table and press Shift-Alt-Up Arrow or Shift-Alt-Down Arrow to move the rows up or down until they join up with another table.
6. Place Two Tables Side by Side
Word offers several ways to position two tables side by side on a page. If you need the tables to be formatted differently, create one or both inside a text box (because tables inside text boxes can sit anywhere on a page). To place a table in a text box, click Insert > Text Box > Draw Text Box, and draw a text box in the document. Click inside the box and add the table by clicking Insert > Table. You can remove the text-box border by clicking the text box, choosing Drawing Tools > Format > Shape Outline, and selecting No Outline. If you are having trouble placing a text box beside an existing table or beside another text box, click each text box in turn and choose Drawing Tools > Format tab > Wrap Text > In Front of Text.
Alternatively, if the two tables can share a general layout in terms of row height, you can create them as a single table and then place an empty column in the middle to provide visual separation.
7. Add an Image Inside a Table Cell
You can place an image inside a table cell so that it does not move. To do this, click in the table cell, choose Insert > Picture or Insert > Clip Art, and select the image to use. The default Word image format is In Line With Text, so the picture should stay in place; you’ll simply need to resize it to fit it inside the table cell. If the image is not stuck in the table cell, click it, choose Picture Tools > Format, and in the Wrap Text list choose In Line With Text.
8. Make Smart Headings for Narrow Columns

When you create a table with lots of columns, the columns could become extremely narrow in order to fit within the document’s margins. If you use long strings of text for column headings, they might become hyphenated beyond comprehension, or even truncated. The solution is to rotate that text. Select the cells containing the column headings, and choose Table Tools > Layout. Select Text Direction from the Alignment options, and click until the Ribbon image displays the text oriented in the appropriate direction (typically, pointing up). Now type the text into the heading cells in the table, and it will rotate and fit much better.
Next Page: Convert a Table to Text, and Vice Versa
9. Convert a Table to Text, and Vice Versa
If you have text in a table that you’d prefer to appear as regular text—if, say, you copied a table from a website and pasted it into a document—here’s an easy way to make the conversion. Select the table by clicking the icon outside its top-left corner, and choose Table Tools > Layout > Convert to Text. When prompted, choose to separate the text using paragraph marks, tabs, or some other character (paragraph marks is usually the best option), and click OK. Word will remove the table and convert the data to regular text.
Word also allows you to perform the opposite conversion, turning regular text into a table. Select the text and click Insert > Table > Convert Text to Table. Choose the number of columns for your table, and let Word automatically select the number of rows. Indicate whether to separate the text at paragraphs, commas, tabs, or another character (specify which character), and click OK. Once the data is in the table, you can rearrange it as you see fit.
10. Quickly Number Table Rows
You can number the rows in a table in such a way that they will automatically update if you add, move, or remove rows. Add a new column in which to place the numbers, select it (or select an existing column if you want to place numbers in front of the contents of each cell in that column), and click Home > Numbering.
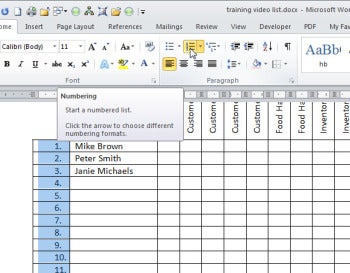
Word will automatically number the cells in the table. If you move a row to a different position—if, for example, you use the Shift-Alt-Up Arrow or Shift-Alt-Down Arrow keystrokes—the row numbers will instantly update.
Bonus Table Tip
One confusing aspect of working with a table is deleting it when you no longer want it. To do this in one keystroke, click the indicator outside the top-left corner of the table and press the Backspace key.
Doing so deletes the entire table, contents and all, whereas pressing the Delete key simply removes the contents and leaves the table in place.
If you liked this article, you might also like:
Five Microsoft Word Nightmares—and How You Can Fix Them
Work Faster in Microsoft Word: 10 Secrets
Make Image Magic in Microsoft Office 2010: 10 Cool Tricks
How to Create Smart Microsoft Word Templates
9 Microsoft Office Tips Everyone Should Know
Quick Tips for Microsoft Word, Cool Windows Tools
Microsoft Word Tip: Quickly Add Filler Text to Your Document
/VBA Tips /How to Count Number of Rows in a Word Table?

Microsoft Word does not have an automatic feature to count the number of rows in a table; however, you can create a simple macro to return these values
Method 1: Use the Information property to return the number of rows
Use the Microsoft Visual Basic for Applications Selection.Information property to return the number of rows in a table.
NOTE: The insertion point must be located in the table before you run the macro.
   Sub numRowsInCurrentTable()
      MsgBox Selection.Information(wdMaximumNumberOfRows)
   End sub
Method 2: Use the the Tables property to return the number of rows
Use the Microsoft Visual Basic for Applications Tables property to return the number of rows within a table. This method will return the total number of rows for the first table in the document. The insertion point does not need to be in the table.
   Sub numRowsInSpecificTable()
      MsgBox ActiveDocument.Tables(1).Rows.Count
   End Sub
Quick Steps
- Open MS Word and Select any table
- Press Alt+F11, Copy Paste the code in this Article
- Press F5.
Related
How to number rows in a Word table
- To number rows, select the left most column in the table and click Numbering on the Formatting toolbar. To select a column, hover the mouse over the column until Word displays the selection arrow (see below) and click. In Word 2007, select the column and then click Numbering in the Paragraph group on the Home tab.
- To number columns, select the top row in the table and click Numbering on the Formatting toolbar. To select a row, hover the mouse in the left margin just next to the row you want to click. When Word displays the selection tool (see below) click to select the row. In Word 2007, select the row and then click Numbering in the Paragraph group on the Home tab.


Select a column

Select a row
In truth, you can number any row or column, but most likely, you’ll want to display numbers to the left or across the top of the table. I realize that you won’t want to number most tables and columns, but I still like knowing I can do it.
 |
| Number Rows |
 |
| Number Columns |
Insert and Edit a Table with Multiple Columns and Rows in Word
by Avantix Learning Team | Updated August 23, 2022
Applies to: Microsoft® Word® 2013, 2016, 2019, 2021 and 365 (Windows)
You can create a table in a Word document in 4 easy ways using the Ribbon. A table is a grid made up of columns and rows that intersect to form cells. You can insert text, numbers and images in a table. Once you have inserted a table, you can easily add and resize columns and rows and change table formatting.
It’s best to avoid using Draw Table to create a table since the table may not be created in a consistent way.
Note: Buttons and Ribbon tabs may display in a different way (with or without text) depending on your version of Word, the size of your screen and your Control Panel settings. For newer versions of Word, Ribbon tabs may appear with different names. For example, the Table Design tab may appear as Table Tools Design.
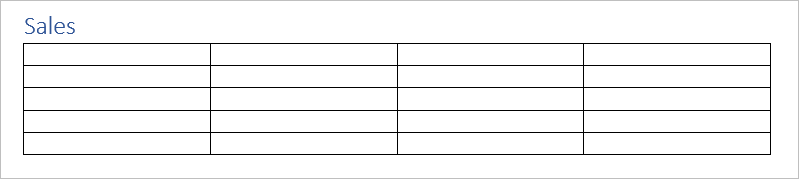
In the following example, a table with 4 columns and 5 rows has been inserted in a Word document:
Recommended article: 10 Microsoft Word Shortcuts for Moving Around in Tables
Do you want to learn more about Microsoft Word? Check out our virtual classroom or in-person classroom Word courses >
Create a table using the Table Grid
To insert a table using Insert Table and select columns and rows in the Table Grid:
- Click in the Word document where you want to insert a table.
- Click the Insert tab in the Ribbon.
- Click Table in the Tables group. A drop-down menu appears with a Table Grid.
- Hover over the grid until the number of columns and rows you want is selected.
- Click in the highlighted area of the grid to insert a table.
To insert a table, select cells in the Table Grid as follows:

Create a table using the Insert Table dialog box
To insert a table using the Insert Table dialog box:
- Click in the Word document where you want to insert a table.
- Click the Insert tab in the Ribbon.
- Click Table in the Tables group. A drop-down menu appears.
- Select Insert Table. A dialog box appears.
- Enter the number of columns and rows you want to create.
- Select the desired options below AutoFit behavior (typically Fixed column width: Auto).
- Click OK.
The Insert Table dialog box appears with options to select the number of columns and rows:

Create a table using Quick Tables
To insert a table using Quick Tables:
- Click in the Word document where you want to insert a table.
- Click the Insert tab in the Ribbon.
- Click Table in the Tables group. A drop-down menu appears.
- Select Quick Tables. A gallery appears.
- Click the table you want to insert.
Quick Tables appear in the Table drop-down menu:

Create a table by converting text to a table
If you have used tabs or other delimiters in paragraphs, you can convert the data into a table (if the delimiters are entered consistently). Wherever you have pressed Enter or Return to create a new paragraph, Word will create a new table row. You can use various delimiters to separate data but the most common are tabs, spaces or commas.
To convert delimited data to a table:
- Select the text that you want to convert.
- Click the Insert tab in the Ribbon.
- Click Table in the Tables group. A drop-down menu appears.
- Select Convert Text to Table. A dialog box appears.
- Enter the number of columns if necessary and ensure a delimiter is selected in the Separate text at area.
- Under AutoFit behavior, choose how you want your table to appear. Word chooses a width for the table columns by default. If you want a different column width, choose AutoFit to contents or AutoFit to window.
- Click OK.
In the Convert Text to Table dialog box, enter the number of columns as well as the delimiter:

Show table gridlines
Gridlines show the cell boundaries of a table on screen if table borders are not applied. Gridlines appear only on the screen and are not printed.
Gridlines are not visible when you view a document in a Web browser or in Print Preview.
To show table gridlines in a Word document:
- Click in a table.
- Click the Table Layout or Table Tools Layout tab in the Ribbon.
- In the Table group, check View Gridlines.
View Gridlines appears on the Table Tools Layout or Table Layout tab in the Ribbon:

Move around in a table
You can use the following keys to move from one cell to another in a table:
- Tab to move to the next cell to the right.
- Shift-Tab to move to the cell to left.
- Ctrl-Tab to tab within a cell.
Add a row or a column
To add a row in a table:
- Click in a cell that is located above or below where you want to add a row.
- Click the Table Layout or Table Tools Layout tab in the Ribbon.
- To add a row above the cell you clicked in, click Insert Above in the Rows and Columns group. To add a row below the cell you clicked in, in the Rows and Columns group, click Insert Below.
The commands to insert rows or columns appear on the Table Tools Layout or Table Layout tab in the Ribbon:

You can also right-click in a row and choose Insert from the drop-down menu and insert options from the sub-menu.
If you click in the last cell in a table and press Tab, Word will automatically add a row.
To add a column in a table:
- Click in a cell that is located to the right or left of where you want to add a column.
- Click the Table Layout or Table Tools Layout tab in the Ribbon.
- To add a column to the left of the cell you clicked in, click Insert Left in the Rows and Columns group. To add a column to the right of the cell you clicked in, in the Rows and Columns group, click Insert Right.
You can also right-click in a row and choose Insert from the drop-down menu and insert options from the sub-menu.
Delete a column or row
To delete a row or column:
- Select the row or column (drag over the cells or click to the left of a row or above a column when the arrow appears).
- Click the Table Layout or Table Tools Layout tab in the Ribbon.
- In the Rows & Columns group, click Delete. A drop-down menu applears.
- Click Delete Rows or Delete Columns as appropriate.
You can also right-click in a row or column and choose Delete from the drop-down menu and delete options from the sub-menu.
Change column width
To change column width:
- Select the column or columns you want to change.
- Click the Table Layout or Table Tools Layout tab in the Ribbon.
- Click Properties in the Table group. You can also right-click and choose Properties from the drop-down menu. A dialog box appears.
- Click the Column tab.
- Check Preferred Width.
- Type the new measurement for the column width. For example, typer 1.0″ or click the up and down arrows.
- Click OK.
The Table Properties dialog box appears as follows with the Column tab selected:

You can also drag the right line of a column to resize it.
Change row height
To change row height:
- Select the row or rows you want to change.
- Click the Table Layout or Table Tools Layout tab in the Ribbon.
- Click Properties in the Table group. You can also right-click and choose Properties from the drop-down menu. A dialog box appears.
- Click the Row tab.
- Check Specify Height.
- Type the new measurement for the row height. For example, type 1.0″ or click the up and down arrows.
- Specify row height as At Least or Exactly.
- Click OK.
The Table Properties dialog box appears as follows with the Row tab selected:

You can also drag the bottom line of a row to resize it.
Distribute rows and columns evenly
To distribute rows and columns evenly:
- Select the entire table by clicking the four-arrows that appear on the top left of the table.
- Click the Table Layout or Table Tools Layout tab in the Ribbon.
- Click Distribute Rows and / or Distribute Columns in the Cell Size group.
Apply a table style
To apply a table style:
- Click in the table.
- Click the Table Design or Table Tools Design tab in the Ribbon.
- Click a table style or click the More arrow to display the Table Styles gallery and click a style.
Table Styles gallery appears on the Table Tools Design or Table Design tab in the Ribbon:

To learn more about working with table styles, check out the article How to Format Microsoft Word Tables Using Table Styles (Ultimate Guide).
Subscribe to get more articles like this one
Did you find this article helpful? If you would like to receive new articles, JOIN our email list.
More resources
4 Ways to Delete a Table in Word
How to Make Columns in Word (Newspaper-style)
How to Insert Formulas and Functions in Word Tables
How to Keep a Microsoft Word Table Together on One Page
How to Delete a Page in Word (Remove Blank or Extra Pages)
Related courses
Microsoft Word: Intermediate / Advanced
Microsoft Excel: Intermediate / Advanced
Microsoft PowerPoint: Intermediate / Advanced
Microsoft Word: Long Documents Master Class
Microsoft Word: Styles, Templates and Tables of Contents
Microsoft Word: Designing Dynamic Word Documents Using Fields
VIEW MORE COURSES >
Our instructor-led courses are delivered in virtual classroom format or at our downtown Toronto location at 18 King Street East, Suite 1400, Toronto, Ontario, Canada (some in-person classroom courses may also be delivered at an alternate downtown Toronto location). Contact us at info@avantixlearning.ca if you’d like to arrange custom instructor-led virtual classroom or onsite training on a date that’s convenient for you.
Copyright 2023 Avantix® Learning
Microsoft, the Microsoft logo, Microsoft Office and related Microsoft applications and logos are registered trademarks of Microsoft Corporation in Canada, US and other countries. All other trademarks are the property of the registered owners.
Avantix Learning |18 King Street East, Suite 1400, Toronto, Ontario, Canada M5C 1C4 | Contact us at info@avantixlearning.ca