
Word for Microsoft 365 Word 2021 Word 2019 Word 2016 Word 2013 Word 2010 Word 2007 More…Less
You can apply a numbering scheme to the headings in your document by using multilevel-list templates and built-in heading styles in Word (Heading 1, Heading 2, and so on).
Important: Make sure you’re using built-in heading styles in your document.
You can number headings so that top-level headings (Heading 1) are numbered 1, 2, 3, for example, and second-level headings (Heading 2) are numbered 1.1, 1.2, 1.3.
-
Open your document that uses built-in heading styles, and select the first Heading 1.
-
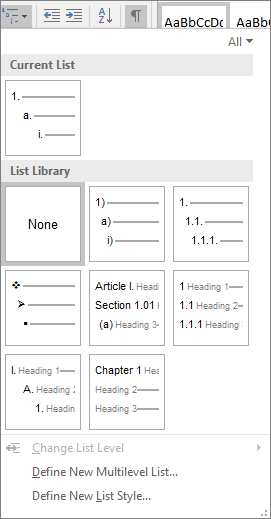
On the Home tab, in the Paragraph group, choose Multilevel List.

-
Under List Library, choose the numbering style you would like to use in your document.
Note: Depending on the type of documentation you’ve prepared, you might choose a template that includes the word «Heading» in the example.
Need more help?
Microsoft Word is one of the most popular word processing tools for creating reports and other documents. Whether you are a student, professional or anyone who does documentation works, proficiency in Microsoft Word is a skill that is necessary for today’s digital age. Microsoft Word software comes with a vast number of features to improve the productivity of your works and to produce accurate outputs. In this post, I will show you how to use some of these features to create professional reports with Microsoft Word.
When you write a Thesis, Dissertation, Project Report, and Technical Report, etc… Microsoft Word helps you to keep your content more organized, clear and structured. Microsoft Word comes with inbuilt options such as Source Manager for managing your citations, Track Changes, Document Outlines, etc… to make it easier to handle your documents and related resources.
If you closely observed any professional report created with Microsoft Word, you can identify there are several common features in every document. Those common features include Table of Contents, List of Tables, List of Figures, different levels of Heading Styles, Sections, Image and Table Captions, Index, Headers & Footers, Page Numbering, etc… Microsoft Word has specific ways of creating and generating those features. If you follow those methods correctly, you can create your report more easily and correctly.
In this series of tutorials, I will show you how to create Microsoft Word reports and make use of the inbuilt features correctly to make your report looks professional.
For better understanding, I have created a separate post for each key options that you will need to create reports and documents with Microsoft Word. I have listed out all the posts below, and it is not necessary to follow the same order. How ever, to use some options there are some prerequisites. I have added links to those prerequisites within the post itself.
First of all, let’s identify the main sections of a report.
Identify the main sections of a report
In a professional report, the appearance or look of the report as well as it’s flow is significant. So, you should first identify the main sections of the report. The sections given below are the most common in a professional report. (in this post I assume that you know the meaning of bellow terms)
- Cover Page
- Title Page
- Abstract
- Acknowledgement
- Table of Contents
- List of Figures
- List of Tables
- List of Acronyms
- Main Content/ Chapters
- References
- Appendixes
- Index
Creating these sections manually is not an easy task. However, if you practice the following Microsoft Word features, you can easily create the above sections.
The list of must-know features in Microsoft Word to create Professional Reports
Each feature below described in separate pages. You may click the post image or “read more” link to access these pages.
Insert Section Breaks

As the name suggests, section breaks used to break the document into separate sections. Sections allow you to handle its contents separately with the contents of other sections. Read More…
Create Numbered Multilevel Heading Styles

Numbered multilevel heading styles let you clearly distinguish the heading levels make the report easy to read & track. Correctly styled headings are used to generate… Read More…
Add Captions

It is a good practice to caption all the tables, images, maps, etc… added to your report. Caption helps you to refer to those objects precisely in your text. Read More…
Add Citations and Bibliography

Citation is “a word or piece of writing taken from a written work” [Cambridge Dictionary]. If you are obtaining information from another source, you must reference them. Read More…
Add Headers and Footers

Headers and footers are areas in the top or bottom of each page in a document. You can add title, page numbers, dates, or some graphics to every page in a document using headers and footers. Read More…
Add Page Numbers

Page numbers are generally added in the footer section of the document. Therefore the easiest way to add Page Numbers in Microsoft Word is to select a footer with page numbers when you are adding footers to the document. Read More…
Create a Table of Contents

Table of content help readers to easily navigate through your document. In this post, I will show you how easily you can create a table of contents in Microsoft Word. Read More…
Create List of Tables and Figures

When you add several tables and figures or any other objects in your report, it is a best practice to create a list of tables and figures or lists of other objects in the preface of the report. Read More…
Create an Index

An Index is a list of terms and topics that are discussed in a document. The terms and topics are listed along with the page numbers that they appear in the document. Read More…
Wrapping Up
The listed above are the essential features required to create professional reports with Microsoft Word. Here I have explained the basics of those features only. Once you get used to them, you can find more design and customization options inside those features. These features not only adding rich & professional looks to your documents, but they also help you to create and manage your report more easily and productively.
Usually, if you number the pages in a Microsoft Word document, you will number each of the pages sequentially starting from one. In some cases, such as long business reports or books with introductions or other special sections, you may want to use different page numbers in Word for different sections. You might also want to leave certain pages unnumbered, such as if you want to start page numbering on Page 3. This is all possible using Word’s built-in numbering feature.
Numbering Pages in Microsoft Word
It’s easy to add page numbers to a document in Microsoft Word. Simply click the «Insert» option on the ribbon menu, then click «Page Number.» Choose from one of the options to position the numbers where you want them, such as on the top or bottom of the page. Click «Page Number» again and click «Format Page Numbers» to choose font, size and other display settings.
Numbers will automatically appear where you placed them on each page.
Start Page Numbers Within Document
If you’re using a desktop edition of Microsoft Word, you can start with a page number other than one and start numbering anywhere in a document or a section.
To simply skip numbering on the first page, click the «Insert» tab in the ribbon menu, then click «Header» and «Edit Header.» In the «Header & Footer Tools» menu that appears, click the «Design» tab and check the box next to «Different First Page.»
If you want to otherwise start page numbering later in the document, you’ll want to insert a section break in the document before the section you want to number. To do this, go to the page where you want numbering to start and click «Layout» then click «Breaks» and «Next Page.» Double-click the header or footer where you want the page numbers to appear, and in the menu that pops up, uncheck the «Link to Previous» button, then click «Page Number» and pick the settings you want.
If you want to number multiple sections independently, create a section break for each one and uncheck «Link to Previous.»
Custom Page Numbers in Word
Once you have page numbers in sections where you want them or in the entire document in the Desktop version of Word, you can customize the numbering. Double click the header or footer where the numbers are, then click «Page Number» and «Format Page Numbers.»
Click the «Start at» drop-down and choose the number you want to start numbering. Repeat this for each section where you wan to customize the numbering.
If you want to delete page numbers for a particular section, double-click them on the header or footer of a page in that section and delete the numbers. The changes will apply to the entire section.
Using Word Online
If you’re using an online version of Word, your page number customization options are somewhat limited. You can skip numbering on the first page, but you can’t otherwise customize where numbering starts or what number comes first. If you need to make such changes, you may want to use a desktop version of Word or ask someone with the program to help you customize your document and send it back to you.
If you want to skip numbering the first page in Word online, click the «Insert» tab on the ribbon menu and then click «Header & Footer.» Click «Options,» then click «Different First Page.» Click the «Options» button again and click «Remove Page Numbers.»
If you need to add the numbers to the rest of the document, click the «Other Pages» button in the «Header & Footer» menu and then click «Insert» and «Page Number.»
Multilevel numbering in Word is the #1 headache for many people working with large documents.
Believe it or not, it’s not complicated. It just takes somebody to lead the way and point out the pitfalls you need to avoid.
Today that pleasure falls to me!
Before I start, grab your free multilevel numbering troubleshooting guide that shows you the steps to get multilevel numbering working properly first time, every time, together with answers to over 20 FAQs and plenty of real client examples constructed step by step to help you fix what isn’t working with your numbering.

1. What Multi-level Numbering Looks Like
Often used in the legal profession or in large corporate documents, multilevel numbering creates a logical hierarchy and easy navigation within the document. The headings can also be summarised later on in a table of contents. Here is a simple example:

2. How to Set Up Multilevel Numbering
Here is the correct process:
1. Select the text that you want to number (this can be a section of text or the whole document).

2. Select the Home tab.
3. Click the multilevel numbering icon in the Paragraph group.
![]()
4. You can either select an existing layout from the list to use as a starting point, or you can create a new numbering system from scratch. As you hover over each thumbnail image, Word provides a larger image of the numbering system.
5. Choose Define New Multilevel List to display the control dialog.

The dialog box can be broken down as follows:
Step #1 Click level to modify
In the top left is a list of levels. As you select each level, the settings in the rest of the dialog box changes.
Level 1 is the highest level, i.e. the main headings such as chapter or section titles.
Level 2 is subordinate to level 1.
Level 3 is subordinate to level 2.

Step #2 Enter formatting for number
This is where the level number is constructed. If you include a previous level number, it will be displayed with a grey background, as will the number for the current level.
Type anything you wish to put in between the numbers such as dots, dashes, brackets etc.
Clear any text in the ‘Enter formatting for this number’ box.
Step #3 Include level number from
When creating a subordinate level (or child level), you can first specify the level number of the parent.
For example, for section 3.2
- ‘3’ is the parent level (level 1) and
- ‘2’ is the child level (level 2)

Step #4 Number style for this level
Each level can have its own number style. It may be a standalone style, e.g. 1, 2, 3 or a, b, c or continue on from a higher level, e.g. 1.1.1 or 1.a.i.
- When creating 1.1 numbering, this option is 1, 2, 3.
- When creating 1.a numbering, this option is a, b, c

Step #5 Font
Set the font formatting for the selected level, if you want.

Step #6 Position
What position from the left margin do you want items for each level of numbering. For example, level 1 items may be 0cm from the left margin, level 2, 1cm from the left margin and level 3, 2cm from the left margin.
Here’s what they mean:
- The Aligned At determines how far from the left margin the number appears.
- The Text indent at figure determines how far from the left margin the text following the number is.

6. Click OK to save all the settings and close the dialog box.
The text you selected in step 1 now looks like this.

The next part is where the magic happens …
3. How to Apply Multilevel Numbering
Once you have created your numbering system:
1. Position the cursor at the beginning of a line.

2. Press the TAB key to move the text down a level (demote).

3. Press the SHIFT and TAB keys together to move the text up a level (promote).

If you prefer, you can also click the indent icon to demote and the outdent icon to promote between levels.
![]()
4. How to Change Multilevel Settings
Once you have created your numbering system:
1. Reselect all text that is using the multilevel numbering.
2. Click the multilevel numbering icon and select Define New Multilevel List (yes, you choose this option even if you are modifying an existing multilevel list).

The original settings that you defined are redisplayed.
3. In the top-left box select the level that you wish to change, then change your settings.
4. Repeat for the other settings.
5. Click OK to save the settings. Your numbered list should now reflect your new settings.
5. Linking Multilevel Numbering to Styles
Each level of a multilevel numbering system can be linked to a style. This means that as you apply styles throughout the document, the numbering is applied appropriately and automatically. You can either use the built-in Heading 1, Heading 2, Heading 3 styles or use your own custom styles.
1. In the Numbering dialog box, click the MORE button in the bottom-left corner to expand the dialog box.
2. Select level to modify in the top-left box.
3. Open the Link level to style drop-down list and choose the style you wish to connect to the numbering level.

4. Click OK.
5. In the document, apply the Heading 1, Heading 2, Heading 3 styles where needed.
It’s a good idea to create a body text style and apply that where appropriate, so that the body text does not inadvertently get caught up in the multi-level numbering.
6. Select the whole document (or the portion of the document where you want to apply your numbered sections).
7. Click the icon in the Paragraph group (Home tab).
8. Select your custom numbering style from the gallery. The thumbnail image should show the linked styles.

6. How to Use Styles to Set Number Levels
1. Select all the text that you wish to apply the same number level to. Alternatively, if you wish to go line by line, you can place the cursor anywhere in a line of text.
2. In the Styles gallery, click the style that corresponds to the number level you wish to apply. For example, to apply the top level numbering click Heading 1 and for the third level numbering click Heading 3 (assuming those are the styles you assigned).
The numbering and all the numbering settings will be applied to the selected text or the paragraph in which the cursor was positioned.

And that, my friend, is how you do multilevel numbering in Word with no loose ends.
How to set up a dual-multilevel numbering system in Word
7. Two resources to help you
1. Grab your free multilevel numbering troubleshooting guide.

2. Watch over my shoulder as I set up multilevel numbering from scratch.

8. What next?
I hope you found plenty of value in this post. I’d love to hear your biggest takeaway in the comments below together with any questions you may have.
Have a fantastic day.


About the author
Jason Morrell
Jason loves to simplify the hard stuff, cut the fluff and share what actually works. Things that make a difference. Things that slash hours from your daily work tasks. He runs a software training business in Queensland, Australia, lives on the Gold Coast with his wife and 4 kids and often talks about himself in the third person!
SHARE
This tutorial shows two ways to create numbered lists in Microsoft Word. We will also look at how to change list levels, start with a different list number, and change the font, size, and color of list numbers.
Do you want to create bulleted lists? Please see my previous tutorial “How to Create Bulleted Lists in Microsoft Word.”
What about Lists Ordered by Letters?
For simplicity, this tutorial refers to “numbered lists” because Word organizes all ordered (hierarchical) list options in the Numbering Library. However, all the steps shown here also apply to lists organized by letters.
If you would like to learn more about ordered and unordered lists, please see “How to Write Vertical Lists (Ordered and Unordered).”
Table of Contents
- How to Create a Numbered List — Basic Method 1
- How to Create a Numbered List — Basic Method 2
- How to Change Numbered List Levels
- How to Start a List with a Different Number
- How to Change the Font, Size, and Color of List Numbers
Watch all the steps shown here in real time!
Explore more than 200 other writing-related software tutorials on my YouTube channel.
The images below are from Word for Microsoft 365. These steps also apply to Word 2021, Word 2019, Word 2016, and Word 2013.
The basic steps are similar in Word for Mac. However, the more advanced steps, such as starting a list with a different number, are different on Mac. So, we will cover this topic for Word for Mac in a separate tutorial.
How to Create a Numbered List — Basic Method 1
This is the basic method to create a numbered list in Word. This method requires you to type each item as you create the list. If you have already typed your list items, see Method Two below.
- Place your cursor where you want to start your list.
- Select the Home tab in the ribbon.

- Select the menu arrow next to the Numbering button.
![]()
- Choose a number style from the Numbering Library.

The number one will appear in your document.

- Type your first list item after the number, and then press the Enter key on your keyboard. The next number will appear.

Continue typing your list items and pressing the Enter key until your list is complete.
- After typing the final item, press the Enter key twice to remove your cursor from the list.
How to Create a Numbered List — Basic Method 2
This method is for existing text formatted vertically as a list.
- Select the text.

- Select the Home tab in the ribbon (see figure 1).
- Select the menu arrow next to the Numbering button (see figure 2).
- Choose a style from the Numbering Library (see figure 3).
Your selected items should become a numbered list.

How to Change Numbered List Levels
Word lets you create numbered lists with up to nine nested levels. Here are two ways to change the level of list items.
Change List Levels — Method 1
Important note: This method won’t work for the first item in your list.
- Select one or more list items (other than the first item).

- Select the Home tab in the ribbon (see figure 1).
- Select the Increase Indent button in the Paragraph group.

Each time you select the Increase Indent button, the item(s) will move one level and take on the appropriate format for that level (e.g., lowercase letters, roman numerals, etc.).

Pro Tip: To return the selected text to a previous level, select the Decrease Indent button to the left of the Increase Indent button.
Change List Levels — Method 2
- Select one or more list items (see figure 8).
- Select the Home tab in the ribbon (see figure 1).
- Select the menu arrow next to the Numbering button (see figure 2).
- Select Change List Level from the drop-down menu.

- Select a list level from the list-level menu.

Your list item(s) should move to the next level.
How to Start a List with a Different Number
You can start a list with a number other than one or continue the numbering from the previous list.
- Select the first list number or place your cursor within the first list item. If you select the list number, all numbers on that level should also be selected.

- Select the Home tab in the ribbon (see figure 1).
- Select the menu arrow next to the Numbering button (see figure 2).
- Select Set Numbering Value from the drop-down menu.

5.a. Enter the number you want to start with in the Set value to text box in the Set Numbering Value dialog box.

5.b. (Alternative Option) Select Continue from previous list if you want to continue the numbering from a previous list in your document.

- Select the OK button.

Your list should be renumbered according to your selections in the Set Numbering Value dialog box.
How to Change the Font, Size, and Color of List Numbers
By default, the font, size, and color of your list numbers will be the same as your normal text style. However, you can manually change the appearance of list numbers by selecting them separately from the text.
- Select one list number. All numbers on that level should also be selected.

- Select the Home tab in the ribbon (see figure 1).
- Select a new font, size, or color from the Font group.

Your list numbers should change to the new formatting. Repeat these steps for each level in your list, as necessary.

Related Resources
How to Write Run-In Lists
How to Create and Update a List of Tables or Figures in Microsoft Word
How to Create Numbered Lists in PowerPoint (PC & Mac)
Updated February 12, 2023

Bullets and numbering pose a problem in Word. They are complicated. Word tries to be very helpful and predict what you want, with sometimes very peculiar consequences.
It is easy enough to insert bulleted lists or numbered lists, but it is not so easy to control exactly how they look and behave once you are working with larger or more complex documents.
If you don’t use styles…
…then your best course of action is to do the Microsoft on-line training to learn exactly how Microsoft intends you to use them. There are good PowerPoint instructions, but you must be using Internet Explorer Browser to access them.
- Click this link. Training presentation: Word 2007—Bullets, numbers, and lists
- Click the Download button, save, and print if required.
- Follow the instructions and good luck. If you are writing small documents and not sharing them with others, this system will probably work for you.
If you do use styles…
…there are two main tricks to getting this right:
- If you are working in a document that has lots of complex lists, use the built-in Multilevel List styles and re-define them to suit.
- Associate those styles with a single gallery box from the Numbering Library accessed through the Ribbon.
Display multi-level lists
- Create a new document based on Normal template.
- Click Home tab, Styles group, dialog box launcher, to display the Styles pane and see all the styles displayed.
- Click Manage Styles to display the Manage Styles dialog box.
- Click the Recommend tab.
- Scroll down the list to near the bottom where you will find styles starting with the word List. They are likely to be greyed out and have the words (Hide Until Used) next to them.
- Highlight all these items and click Show .
- Click OK.
Re-define styles to suit
Work out what numbered lists you want and how deep you want them to go. For example, I often use a three level list for normal text, a three level list inside tables and a third three level list for special formatting, which makes 9 styles in all.
- Apply the pre-defined list style to some text.
- Re-format the text to look the way you want.
- Locate the style in the Styles pane.
- Right click and click Update *style name* to match selection. The style now possesses the formatting of your selected text which will be applied to all other text formatting with that style.
Do this for all the styles you want to create. To change style names:
- Right click on style in Style pane.
- Change the name.
- Click OK.
Associate styles with numbers
- Click Home tab, Paragraph group, Multi-level list button down arrow.
- Identify and click a number format from the Numbering Library that is closest to the required numbering style.
- If you exit the dialog box, click Home tab, Paragraph group, Multi-level list button down arrow again.
- Ensuring your selected box is still highlighted, click Define New Multi-Level list. You will work in this dialog box to define how every numbered list you have will work.
Style 1
- With level 1 selected, click the More button.
- In the Link level to style box, select your first style in a sequence, for example «table list 1».
- In the Enter formatting for number, enter the numbering type you want.
- In the Start at field, enter the start number, usually 1
- In the Aligned at field, enter the identical left margin defined in the style.
- In the Text indent at field, enter the identical indent defined in the style.
- In the Add tab stop field, enter the same indent tab defined in the style.
Style 2
- Click level 2.
- In the Link level to style box, select your second style in a sequence, for example «table list 2».
- In the Enter formatting for number, enter the numbering type you want.
- In the Start at field, enter the start number, usually 1
- In the Aligned at field, enter the identical left margin defined in the style.
- In the Text indent at field, enter the identical indent defined in the style.
- In the Add tab stop field, enter the same indent tab defined in the style.
Repeat this process with all your remaining styles — try to get every list style you will use defined in this one gallery box. It doesn’t matter that they are not the same list sequence, just link your styles and define your number format, number style, number alignment, indent and tabs.
Place re-start numbering button on Quick Access Toolbar
- Right click in any blank area of the Ribbon.
- Click Customize Quick Access Toolbar.
- In the Choose Commands from field, click All Commands.
- Scroll down to Restart numbering and highlight.
- Click Add.
- Click OK.
This should work reliably for all your styles providing they are all defined in the one Gallery box in the Numbering Library.
Long Microsoft Word documents such as detailed project quotations, student’s project works or thesis, proposals, annual reports, product manuals, technical white papers, and so on require formal features like page numbers to help the reader navigate the document easily.
In today’s article, we are going to explain everything you need to know to insert both Roman Numerals and English numbers (or Arabic numerals) as page numbers in one Microsoft Word document.
In Microsoft Word, you have the flexibility of choosing the page numbering style that works well for you. You are not limited to using only the standard or ordinary English numbers when numbering your pages.
Perhaps you want to use Roman numerals (e.g., i, ii, iii, iv, etc.) for numbering the introductory pages and then restart numbering with pages 1, 2, 3, 4, etc., for the main content.
This is exactly what this article is about.
In the first section, we will look at how to insert the roman numerals as page numbers in Word. Then comes the second section where we talked about how to insert the normal English numbers (or Arabic numerals) as page numbers. Then in the third section, we will discuss how to combine these two number formats in the same document.
You can use the Table of Content below to navigate around this page.
Let’s dive right in.
To insert Roman Numerals as page numbers in Microsoft Word, first, you need to insert the default page numbers, then convert them into Roman numerals using the Page Number Format settings.
The below steps will show you everything with screenshots.
Step 1. First, Specify the location you want to insert the page numbers in MS Word
There are two popular places to enter the page number in a Word document: the header and the footer. I often prefer the footer section to enter page numbers.


Step 2. Add the page numbers
To add page numbers in Word, first, go to the Insert tab of MS Word.

On this tab, in the Header & Footer section, click on the Page Number drop-down button.

Then select either the “Top of Page” or “Bottom of Page” option in the drop-down list. This will create page numbering in the header or footer section of your Word document respectively.

Step 3. Convert The Page Numbers Into Roman numerals
After inserting the page numbers, it’s now time to convert them to Roman Numerals.
To do so, click on the Page Number drop-down again.
In the drop-down list, you will find an option called “Format Page Numbers“, Click on this option.

Clicking on the Format Page Numbers option will open a small popup window in your Word document.
Click on the “Number Format” drop-down.

From the drop-down list, select the Roman Numeral number format and save your document settings by clicking on the OK button.

At this stage, the pages in your document should be numbered with the Roman numerals number format.
Section 2: Walkthrough on Adding the Normal English page numbers in Word
The above section discussed how you may add roman numerals as page numbers in MS Word.
In this section, we are going to brush through how to insert the normal English page numbers (or Arabic Numerals) in Word.
If you already learn how to do this from the previous section, you can quickly jump to the next section on how to use both number formats to number pages on different sections in the same MS Word.
Let’s dive right into it.
Step 1. Click on the Insert tab
Open your document in Microsoft Word, and then click on the Insert tab at the top of the screen.

Step 2. Click on “Page Number” from the “Header & Footer” section
In the Insert tab, you will see the “Header & Footer” section. In the header and footer section, you will see the option “Page Number”.
Click on this “page number” drop-down button.

Step 3. Select the location where you want to place the page number
On clicking on this drop-down, you will see some more options. In which you will be asked to specify the location to enter the page number.
In most documents, the page number is inserted in the header or footer.
Select where you want your page number to appear.

Step 4. Select either the Top of Page or Bottom of page
Click on the “Top of Page” or “Bottom of Page” option to insert the page number in the header or footer, then select the style you want (whether to insert it in the center, left, right, etc.).

These are the steps you need to take to insert page numbers in Microsoft Word.
Section 3: How to Add Different Page Numbers to Different Sections in the same document
This section will finally show you how to insert Roman Numerals and Page Numbers In Word.
For example, you can use Arabic numerals (1, 2, 3, etc.) to number the main document, then Roman numerals (I, II, III, etc.) for the introductory sections like the table of contents, glossary, Acknowledgment, etc.
To be able to achieve this in Microsoft Word, you’ll need to use the section break feature to separate the document into sections. This will give you the flexibility to number pages with different number formats in the same document.
Without any further ado, let’s get into it.
Step 1. Divide your document into sections
First, you need to open your desired Word document where you need to insert the Roman numerals and Arabic numerals as page numbers.
Place your insertion pointer at where the roman numerals will end or where regular page numbers will start.
On the Layout tab, click on the “Breaks” option.

Step 2. From the drop-down menu select the “Next Page” option
A drop-down menu will open.
From this menu, click on the “Next Page” option under the Section Breaks category.
As the description indicates, this section break begins a new section on the next page.

Step 3. Select Link to Previous from the “Header & Footer” tab
Now, to change the format of the page numbers in the new section you created, you must disconnect the link between the new section and the previous section of your document.
To do so, double click on the header or footer of the new section from where you want the regular page numbers to appear.
Once you are into the Header or Footer, the Header & Footer tab will get activated.
Under this tab, go to the Navigation section and click on the Link to Previous button to deselect it.

Step 4. Now, change the page numbers of the First Section to Roman Numerals
At this point, you can change the page numbers of the first section to Roman Numerals without it affecting the entire document.
To do so, double-click to activate the Header or Footer section where the page number is, then select the page number and right-click on it.
This will give you some options. One of these options is to click on the “Format Page Numbers” option.

Clicking on the Format Page Numbers option will open a small popup window in your Word document.
Click on the “Number Format” drop-down.

From the drop-down list, select the Roman Numeral number format and save your document settings by clicking on the OK button.

At this stage, the pages in the first section of your document should be numbered with the Roman numerals number format.
Meanwhile, the second section of the document will maintain the regular pager numbering format.
Section 4: How to Make Page Numbering Not Appear on the First Page of a Document
Removing page numbers from the first page of a document or section can be a helpful way to make your document look more professional.
It is also useful if you want to avoid repeating numbers on multiple pages (for example, if your document has chapters that begin on odd-numbered pages).
With a few simple steps, you can remove page numbering from the first page of your document or section, giving it a clean and polished look.
So, follow these steps to remove the page number from the first page or from your specific page in MS Word.
Step 1. Open the Word document and double click on the header section
Open the required document of your MS Word. And double click on the header or footer section of the first page where you have inserted the page number.

Step 2. Click on “Different First Page” to remove page number
In the “Header & Footer” tab, you will find the “Different First Page” button in the “Options” section which you will select. Selecting it will remove the number from your first page.

The “Different First Page” option enables you to enter different content for your header and footer on the first page of a document.
Frequently Asked Questions about Inserting Roman Numerals and Page Numbers in Word
How do I insert the Page Number and footer at the same time?
How do I insert Page Numbers and a footer all at once? If you want to add page numbers and a footer to your document, there’s an easy way to do it all at once. Here’s how:
1. Open the document in Microsoft Word.
2. Go to the Insert tab.
3. In the Header & Footer section, click on the Page Number button.
4. A drop-down menu will appear. Choose the location of the page number (top of the page, bottom of the page, or page margin).
5. The page number will be inserted where you selected.
6. To add a footer, go to the Insert tab and click on the Footer button.
7. A drop-down menu will appear. Choose the location of the footer (top of the page, bottom of the page, or page margin).
8. The footer will be inserted where you selected. Add text or objects to the footer as desired. When you’re finished, click on the Close Header and Footer button (or press Esc) to close it. That’s all there is to it! Now you know how to add both page numbers and a footer to your document all at once.
What Is The Importance Of Adding Roman Numerals In Word?
When you type a number in Microsoft Word, the program automatically formats it as Arabic numerals. This is the standard way to write numbers in most of the world. However, there are occasions when it might be necessary to use Roman numerals. Here are some reasons why you might want to add Roman numerals to your documents:
1. They’re easy to grasp: Roman numerals are one of the simplest numbering systems there is, which makes them easy to understand and use, even for complex documents.
2. They’re highly visible: The large, distinct characters of Roman numerals make them very easy to spot in a document, which can be helpful when you’re trying to find a specific section quickly.
3. They add professionalism: Roman numerals have a long history of using informal documents, so adding them to your MS Word document can give it a more polished, professional look.
4. They’re flexible: Unlike other numbering systems, Roman numerals can be used in a variety of ways, such as listing chapters sequentially (I, II, III, etc.), or using them to indicate page numbers (XIII in the case of this article). This flexibility can be useful when you need to number sections in a non-standard way.
5. They’re easy to update: If you need to add or remove sections from your document, Roman numerals can be easily updated to reflect the new numbering scheme.
In short, Roman numerals offer a number of advantages over other numbering systems, making them a valuable addition to any MS Word document.
What Is The Importance Of Adding Page Numbering In MS Word?
Adding page numbers to your document is important for a few reasons.
First, it helps your reader keep track of their place within the document.
Second, it allows you to easily reference specific pages or sections within the document.
Lastly, page numbering can help you organize your thoughts and information when creating a table of contents.
There are a few different ways to add page numbers in MS Word, so be sure to explore all the options to find the best fit for your needs.
Regardless of which method you choose, adding page numbers to your document is a helpful way to keep your information organized and easy to reference.
Final Thoughts on Inserting Roman Numerals and Page Numbers in Word
That’s all there is to it! Now I hope you know better how to insert or put Roman numerals and page numbers in your Word document. How to put Roman Numerals and page numbers in different styles and on different pages in this article. These methods are verified and checked before writing the article.
With these methods, you will need a few minutes to insert the page numbers and Roman Numerals into the Word document and your document will look more professional than before. If you like this article, be sure to share it with your friends on social media accounts. Thanks for reading!
Tables are visual displays of data arranged in rows and columns. Table cells contain numbers, text, or a combination of numbers and text. Some cells can include images, symbols, links, and other objects. See how to create and modify tables in Word.
Each table should be referenced in the document content. Typically, tables have a number and a title, which are referenced. Microsoft Word offers functionality to create automatically updated numbers for figures, tables, and equations. The numbers and titles, created using the Captions functionality, are used to cross-reference tables in a document and create a List of Tables.
The word Table and a number identify a table then follows the caption. A caption is a short block of text that explain table contents without referring to the document content:

See more about creating numbers and captions for figures: images, pictures, charts, etc., creating captions for equations, and creating captions for photographs.
Attention! We highly recommend checking the formatting requirements, accepted by your college, university, company, or established on the project, etc.
Insert a caption for tables
To add automatically updated numbers and a title (caption) for a table, select it by:
- Selecting all rows or columns of the table one by one, or
- Moving the mouse over the table until you see the table selection icons in the upper-left corner of the table and clicking it:

Note: You can also click on the table selection icon in the bottom-right corner for the same effect. See how to select table elements for more details.

After selecting a table, do one of the following:
- On the References tab, in the Captions group, click the Insert Caption button:

- Right-click on the selection and select the Insert Caption… in the popup menu:


In the Caption dialog box:

Select the label and its position
- Under Options:
- From the Label dropdown list, select the item type you need:

- Table,
- Equation – see how to create captions for equations,
- Figure (selected by default) — see how to create captions for figures,
- Another label (in this example, My Caption) was created using the New Label… button (see how to create a new label below).
Note: Remember that each type of object you labeled will be numbered sequentially within its group.
- From the Position dropdown list, select one of the options:
- Above selected item (selected by default for the Table label), or
- Below selected item (selected by default for the Figure label).
Note: The captions for tables are usually located above the tables.
- From the Label dropdown list, select the item type you need:


Exclude label from caption
- Select the Exclude label from caption check box if you don’t need to add the label to the caption:
Some requirements recommend using the lowercase word table instead of the automatically added Table in Word cross-references.
The option Exclude label from caption hides the label from being displayed in cross-references or a List of Tables.
For example:
- When you insert a cross-reference with the selected option Entire captions or Only label and number (see more details how to use cross-references in Word), Word adds the capitalized label and number, as you see in the Caption field of the Caption dialog box. E.g., “are listed in Table 3” or “are listed in Table 3 Number of articles by statuses and products”.
- All captions, created with selected option Exclude label from caption, Word adds in cross-references as their numbers without the labels. Type the word table (as required) and insert a reference to a caption (e.g., “are listed in table 3”).

Add a new label
- Click the New Label… button to create a new label:
In the New Label dialog box, type a new label name:


Note: See also how to delete a custom label.
Modify caption numbering
- Click the Numbering… button if you want to change any of the numbering options:
In the Caption Numbering dialog box:

- In the Format dropdown list, select the numbering format you need (some requirements recommend using Latin capital letters instead of numbers for tables):
- Select the Include chapter number check box to include the chapter number in the caption number. After selecting this option, two more options will be unlocked:
- From the Chapter starts with style dropdown list, select the heading level you need to include in the caption:
- In the Use separator dropdown list, select the punctuation you need to insert between the chapter number and the table number:
- At the bottom of the dialog box, see how your choices will look in the Examples section. E.g., Table 2.3” means the third table in chapter 2.
- Click the OK button.
- From the Chapter starts with style dropdown list, select the heading level you need to include in the caption:


Add a title
- To add the text of your caption, click after the table number and enter the text. E.g.:

Notes:
- There are several standard requirements for table titles:
- Chicago style recommends using the table title in line with the label and number. E.g.:

- In opposite, APA (American Psychological Association) and MLA (Modern Language Association) styles recommend using the table title with one double-spaced line below the table number (see how to adjust line spacing). E.g.:

To create such a title, don’t type any text in the Caption field, leave it, then do the following:
- Create a caption without a title.
- Position cursor after a caption number and add a new line (by pressing Shift+Enter) in which type of title you need.
Note: You can press Enter and create a new paragraph instead of a new line. See how to create a List of Tables (Table of Figures) for more details.
- Format the caption to adjust line spacing (see how to change caption line spacing).
- In addition, MLA style recommends using a hanging indent to the second line of long titles. E.g.:

- Chicago style recommends using the table title in line with the label and number. E.g.:
- Word offers very helpful functionality to create a text that can be displayed in a List of Tables instead of a caption text. See how to create a Table of Contents Entry.
- For most requirements, the number and the title should be without an ending period. If you need a period after a number, type it in the Caption field.
- If a table spans more than one page, the first page of that table should have a complete caption; the subsequent pages should have an abbreviated caption consisting of a label, a number, and the word Continued. E.g., “Table 3. Continued”.


Using an AutoCaption
See Adding captions with AutoCaption.
Group a table and its caption
According to all requirements, a table (or its part) with its caption should appear on the same page. Word adds captions for tables as a regular paragraph with selected Keep with next option. See how to keep lines and paragraphs together for more details.
See also how to keep a table row on one page and keep a table on one page of a Word document.
Edit or modify a caption
Microsoft Word adds numbers in captions as fields.
![]()
You can show all fields in a document with a gray background, see how to turn on or turn off highlighting of fields in a Word document.
- Labels:
If needed, you can change the label. Word for Microsoft 365 will update the reference if available. In this case, Word will not create a new label and a separate numbering. Be careful!
- Numbers:
DO NOT edit caption numbers! If you change a number:
- In some cases, Word will update it, and you will lose your changes,
- Otherwise, the caption number may stop updating automatically.
- Text:
To add or modify a caption text, click on it and change what you need, like in a regular paragraph.
Do not forget to format a caption according to the requirements you use!
Delete a caption and an unnecessary label
If you need to remove some caption, select the caption paragraph (full line or several lines) and press Delete. Do not forget to update fields in the document!
To remove the unnecessary label, do the following:
1. Open the Caption dialog box.
2. In the Label dropdown list, select the label you want to remove.
3. Click the Delete Label to remove a custom label:

Note: You can’t delete predefined labels: Equation, Figure, and Table.
Update caption numbering
Word automatically updates references and numbering if you insert a new text. However, copying, deleting, or moving context often leads to confusion in the document. After such operations, you have to update all dependencies manually.
To update fields in the document, select the entire document by clicking Ctrl+A, and do one of the following:
- Press F9,
- Right-click on any of the fields and select Update Field in the popup menu:


Word will update all fields. You can be sure that the numbering and references are correct.
We strongly recommend checking a document at least visually after changes!
Sometimes you’ve got to make longer documents—such as business reports, school papers, and book-length materials. Microsoft Word headers, footers, and page numbers organize the document and make it easier for your readers to navigate.


Here are a few good reasons to use Microsoft Word headers, footers, and page numbers:
- Find a page in the document. Imagine trying to find a specific passage in a 250-page document without page numbers! Microsoft Word page numbers update automatically as you add or delete pages. Plus, they’re easy to work with. You’ve got no excuse for not using this useful feature.
- Identify what you’re reading. Headers and footers also help the reader situate themselves in the document. For example, a glance at the footer can remind them that they’re reading Chapter 16 of The Greatest Novel Ever Written.
- Brand the document. Branding is another reason to use headers and footers. Add your organization’s name and logo. And, if you export your Word Doc into a PDF, you can even make the headers and footers clickable (or hyperlinked) to your website.
Insert Microsoft Word headers, footers, and page numbers in your document or start with a Microsoft Word template that includes pre-formatted headers, footers, and page numbers. Envato Elements and GraphicRiver are great sources of templates for Microsoft Word.
In this article, you’ll learn how to work with headers, footers, and page numbers in Microsoft Word. So, you and your readers can reap all their benefits. Let’s get started!
Note: I’m on Microsoft Word for Mac version 16.33. The steps may differ slightly depending on what version of Microsoft Word you’re using.
Your Quick Start Guide to Add Headers, Footers and Page Numbers (Video)
Are you ready to learn more about using headers, footers, and page numbers in Microsoft Word? Watch this quick screencast to learn all about Word headers and footers.

Or, study the complete written tutorial below.
Work With Headers and Footers in MS Word
Adding a Microsoft Word header or footer is quite intuitive. Follow these steps:
1. How to Insert Headers and Footers
To add a header, go to Insert > Header.


Choose the built-in format you want to use from the menu that appears. You’ve got the option of a blank header, a blank header with three columns, or other built-in styles.


Choose the style you wish to use.


Follow the same steps to add a Microsoft Word footer, but click Insert > Footer instead to get started.
2. How to Insert Text in a Header or Footer
Double-click into the header or footer to open it. Replace the placeholder text, if there’s one, with your own. Otherwise, type your text.


Then, format header or footer text to make it look the way you want. Select the text, then click on the Home tab. From there, change the font, font size, color, and other settings.


To close the header or footer, under the Header & Footer tab, click the Close Header and Footer button. Or, double-click outside the header or footer.


Note: When the header or footer is closed, it’s locked and can’t be edited. Double-click on the header or footer section to open the Header & Footer view.
3. How to Insert the Date or Time in a Header or Footer
To add a date or time in a header or footer, click Insert > Date & Time.


The Date and Time dialog opens.


Choose the format you wish you use. Check Update automatically, if you want the date and time to update each time you modify the document.


4. How to Insert a Logo in a Header or Footer
Aside from text, you can also insert images in a Microsoft Word header or footer. This is a good opportunity for you to brand your document by including your logo.
To insert a logo, open the header or footer. Double-click at the top (for header) or bottom (for footer) of the document. In this example, I’m adding a logo in the footer.
Click Insert > Pictures > Photo Browser.


Locate the logo on your computer, select the file, then click Insert.
![]()
![]()
![]()
The logo is now in the footer.
![]()
![]()
![]()
Double-click outside the footer or click on the Close Header and Footer button in the ribbon to close it.
Work With Microsoft Word Page Numbers
Page numbers are a common element to include in either the header or footer of your document. To learn how to number pages in Microsoft Word, follow these instructions:
1. How to Insert Page Numbers to a Header or Footer in Word
With the header or footer open, click Insert > Page Numbers ….


The Page Numbers dialog opens:


Select the settings you want to use. Decide on the page number’s position and alignment.
There’s also a radio button to Show number on first page. By default, this button is unchecked. This means the first page of your document can be its cover, and the page number won’t be displayed on it. If you want the page number to appear on the first page, check this button.
From here, you can also change the format of the page numbers. With the Header & Footer tab open, click Page Number > Format Page Numbers ….


This opens the page numbering format box, where you can make other settings:
- Number format allows you to choose from Roman numerals or Arabic numerals or letters
- Include chapter number, if you’ve set up chapters in your document and want to include them in the page numbering, then check this button.
- Page numbering
- Continue from previous section continues the page count from the previous page.
- Start at ___ lets you restart the page count at any number.
After making your settings, click OK to apply.
2. How to Make Page Numbering Not Appear on the First Page
If you want the first page of your document or section to be the cover page, then you wouldn’t want it to have a page number. To hide the page number from the first page of a document or section, do the following:
Click Insert > Page Numbers ….
The Page Numbers dialog opens. Uncheck the Show number on first page radio button.


Click OK.
3. How to Number Odd and Even Pages Differently
By default, headers and footers appear the same way on odd and even pages, like this:


But sometimes, you may want odd and even pages to appear differently. An example is in the case of books or magazines, where you want the page number to be on the outer edge of the spread when the (printed) document is open.
This is possible in Microsoft Word, where you can format headers, footers, and page numbers differently on odd and even pages.
To do this, double-click inside the header or footer. This opens the Header & Footer ribbon. Check the button for Different Odd & Even Pages.


Edit your odd and even headers/footers separately. When you’re done, double-click outside the header/footer to close.
Now, the positions of the logo and page numbers are different for odd and even pages on my document:


4. How to Add Different Numbers and Formats to Different Sections
You can also use different page numbers and formats for different sections of your document. For example, in my document I want the page numbers in the Introduction section to be Roman numerals.
First, make sure you’ve broken your document into sections.
To define a new section, place the cursor where you want a new section to begin. Then, click Insert > Break > Section Break. Choose whether you want the section to begin on the next page, continue on the same page as the previous section, or begin on either an odd or even page.


In this example, I inserted section breaks before and after the Introduction to make it a separate section from the rest of my document.
To double check if you’ve inserted section breaks where you want them, click on the Show/Hide Paragraph button on the ribbon. This displays how your document into paragraphs as well as sections.


Now, you’re ready to format the page numbers in a specific section.
Double-click in the footer part of the page to open the Header & Footer view. Click inside the footer you want to format.
On the Header & Footer ribbon, click Page Number > Format Page Numbers.


Change the format to the settings you wish to use.


Click OK.
5. How to Control Page Numbers Using Fields
So far, we’ve been using Microsoft Word’s built-in formats for page numbers. For more control over how the page numbers display, use fields.
Double-click on the top or bottom of page to open the Header & Footer view. In the header or footer, place the cursor where you want to insert the page number.
From the Header & Footer ribbon, click on the Field button.


The Field dialog box opens. To add a page number, scroll down Categories, and select Numbering. Then, under Field names, select Page.


Click Options to change the number formatting. Make the selections you want to use, then click OK.
6. How to Fix Broken Page Numbers
Sometimes as the document gets larger and new pages and sections are added, page numbering can break. Below are two common page number errors and how to fix them.
Example 1: Page number starts over at 1 in the middle of the document
This can happen when you’ve defined a section, formatted its page number to restart at 1, then inserted a section break again.
Solution:
Examine the section breaks in your document by clicking on the Show/Hide Paragraph button.
Check how the page numbers are formatted in the section, and make sure to uncheck Start at:___.


Example 2: Word is counting the cover page as page 1
The first page of the document is usually the cover page as well. Naturally, we don’t want it to be included in the page count. But what if your document does? Here’s one way to fix that.
Solution:
Insert a section break after the cover: click Insert > Break > Section break. Select one of the options that appear.
Check the button for Different First Page.


On the page where you want the page count to begin, go to Page Number > Format Page Numbers. Check the radio button for Start at:___. Type the page number that you want the page count to begin at.


Work With Templates With Header and Footer Designs for Microsoft Word
If you’d rather not make any design and formatting decisions, the easiest thing to do is to start with a Microsoft Word template. A good template comes with header, footer, and page numbers all pre-formatted. These will automatically update as you add or remove pages.
Select a Word template like this e-book template for Microsoft Word that I found in Envato Elements.


If you want to edit the header, footer, or page number, click into the header/footer to open it. Make the changes you want to make following the relevant steps above.


When you’re done, double-click outside the header/footer to close it.
Work With Other Header Options and Change Designs
Microsoft Word headers and footers also come with built-in designs for you to choose from.
To select one, click in the header or footer. Click the Header or Footer button on the ribbon. Scroll down to see all the available options. Choose a design from the selections that appear.


Note: This will override any header or footer and page number settings you’ve already made.
Use Microsoft Word Header, Footer, and Page Numbers to Give Readers a Good Experience
By following the steps in this article, even beginning users of Microsoft Word can add headers, footers, and page numbers in their documents. Or, if you’d rather not worry about formatting these page elements, use a Microsoft Word template instead of starting from scratch.
Envato Elements is a wonderful source of professionally designed Microsoft Word templates. Your subscription includes unlimited downloads of everything you need to produce a high-caliber document, from custom fonts to stock photos.
To get templates a la carte, then GraphicRiver is another source of great Microsoft Word templates for you to explore.
Whether creating your own layout or starting with a template, Microsoft Word headers, footers, and page numbers help you provide a better experience for your readers. They’ll be able to more easily navigate the document and find the pages or sections they need.
You can also make the most of headers and footers to brand the document. Add your logo and organization name, as well as the author’s name, to increase brand recognition and establish your thought leadership.
What are your tips for using Word in long documents? Leave a comment and let us know.