
In Word, we often use automatic numbering to add sequences to paragraphs for us. However, we often encounter some weird problems in the actual application process. Therefore, the author will share with you the solutions to several problems that we often encounter in automatic numbering.
How To Adjust Space In A Bullet List?
If you think the space between the numbering and the text is too large, you can use this method.
Select the list and right-click to choose Adjust List Indents.

Follow number with nothing can shorten the spacing.


What To Do If Automatic Numbering Is Not Continuous?
After adding the automatic numbering to the document, we performed operations such as modification and deletion, and found that the numbering became discontinuous. I believe most people have encountered this problem, so how did you solve it? In fact, it’s very simple. We only need to re-select all the added automatic numbering content and add the “number” again to solve it easily.
What If There Is No Format You Want?
What if you don’t find the format effect you want in the automatic numbering? For example, what you need is [1], [2], [3], this effect. Actually, we can modify it by ourselves.
Go to Home in the toolbar and click on the arrow of Numbering

Choose the Define New Number Format.

You can choose other effects in the list, or you can create the format your like.


How To Custom Automatic Number Starting Value
As we all know, the default starting value of automatic numbering is1. If I want to start from any value, how should I set it?
Choose the Set Numbering Value behind Numbering and you can adjust the start value.


How to Cancel auto numbering?
If we manually enter the first value in document, after pressing Enter key, the second value will automatically appear, which means that Word has automatically turned on the automatic numbering function for you at this time.

If we don’t want to turn on this feature, how should we turn it off?
Go to File at the top of your toolbar and choose Options. Find Proofing and choose AutoCorrect Options.

Now you got the AutoCorrect Window, and you need to uncheck the checkbox before Automatic numbered lists.

Copyright Statement: Regarding all of the posts by this website, any copy or use shall get the written permission or authorization from Myofficetricks.
Restart each list manually
Restart each list manually by right-clicking its first item and choosing Restart at 1 from the shortcut menu. Wait until the document is finished before you restart numbering, because otherwise, the numbers may walk as you insert further lists.
Restarting lists manually is seldom a satisfactory solution, but if your goal is simply to get the document printed with steps numbered correctly, it may be enough.
Restarting a list manually (Restart at 1) places a restart marker in the first paragraph of the list. If you copy or move this paragraph, the restart marker goes with it. So if you restart a list, then copy the first paragraph and paste it later in the document to create a new list, the numbering on the first list changes from “restart” to “continue,” continuing the numbering of the previous list. You’ll have to insert a new restart marker at the beginning of that list to preserve the correct numbering.
Continue Numbering
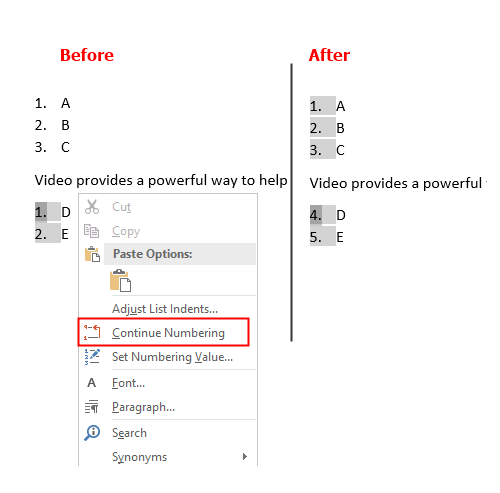
Some of your numbered list items might be separated by elements such as charts, explanatory paragraphs, or sidebars. When you click the Numbering button, if Word doesn’t automatically continue with the next numbered step in your process, you can continue numbers in an existing numbered list by right-clicking the first incorrect number in a numbered list and then click Continue Numbering.
Set Numbering Value
You can also force the Word to start a numbered list with a specific number. Right-click the first incorrect number and select Set Numbering Value to display the “Set Number Value dialog box”, which will allow to choose one of the following:
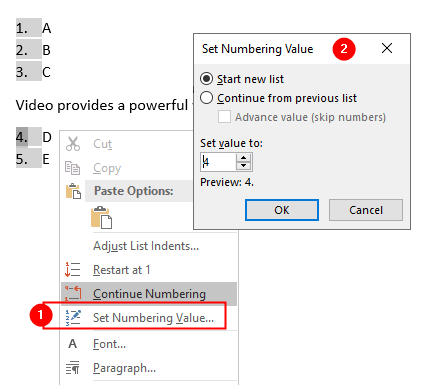
- Start a new list
Restart numbering from 1. - Continue from the previous list
Assign the next number used in the last numbered list (at any point of the document). - Set value to
Choose a number to set your list to start at.
Click on the OK button to commit the change.
More Tutorials on Word Lists:
- Bullets and Numbering
- Create and Customize Bulleted List
- Create and Customize a Numbered List
- Fix Numbering Problems in Numbered Lists
- Multilevel Lists
- Define new Multilevel list dialog box
- Define Multilevel List with “ListNum field list name”
List Numbering using SEQ Fields
Sort Paragraphs or Lists Alphabetically
My organization is transitioning to Office 2016. I decided to try it with just two Windows 10 workstations initially, to detect any issues before a full transition. It was a good thing I did, because an exasperating bug popped up right away. I’ve exhaustively
tried to troubleshoot it on the web, and there is no fix — just a workaround, and that doesn’t work either.
The problem is with page numbering, and I know that this is not as isolated issue — this is a genuine bug that multiple parties have experienced and that Microsoft simply will not acknowledge unless you come up with $500. (Their «contact support»
feature in Word is a joke — all you ever get is a message saying «an error occurred — try again later.»)

To eliminate the obvious:
YES, I’ve tried deleting Built-in Building Blocks.dotx file from the personal profile and having Word re-create it.
NO, there are no add-ins to Word.
The full extent of Microsoft acknowledgement of this problem is
here. Can anyone actually fix this bug?
The Problem:
Automatic numbering of lists is wonderful until it goes wrong, and then it’s a screaming nightmare. I’m working on a 300-page document that contains about 200 numbered lists explaining procedures. Each time I start a new list, the numbering gets all flaky. First off, Word assumes that I’m trying to continue the previous list, even if it’s five pages back. So I right-click in the new list and choose Restart Numbering to tell Word to restart numbering for the list. It’s okay for about the first three items, then it gets confused and starts again with number 1. If I right-click in the list and tell Word to continue numbering for this paragraph (which should be number 4), it continues the whole list from the previous list. I’ve seen this behavior in several versions of Word. I figured the problem would be fixed in Word 2003, but if anything, it’s even worse than Word 2000.
The Solution:
Bad news. If this starts happening, you’re unlikely to find happiness in your near future. What’s going wrong? The short answer is that Word’s list templates, the templates on which lists are based, get uncomfortably wobbly once you’ve created more than a few lists in a document. There are a few ways that you can try to correct the numbering, but the best way to work around this weakness in Word is not to create list templates by clicking the Numbering button on the Formatting toolbar or using the Bullets and Numbering dialog box. Let’s take a look at your options for correcting (or avoiding) the problem.
Restart each list manually
If you have the patience, you can restart each list manually by right-clicking its first item and choosing Restart Numbering from the shortcut menu. Word 2000 doesn’t offer this command, so you must display the Bullets and Numbering dialog box, make sure the correct list template is selected, choose the «Restart numbering» option, and click the OK button.
Wait until the document is finished before you restart numbering, because otherwise the numbers may walk as you insert further lists.
Restarting lists manually is seldom a satisfactory solution, but if your goal is simply to get the document printed with steps numbered correctly, it may be enough.
Warning: Restarting a list manually places a restart marker in the first paragraph of the list. If you copy or move this paragraph, the restart marker goes with it. So if you restart a list, then copy the first paragraph and paste it later in the document to create a new list, the numbering on the first list changes from «restart» to «continue,» continuing the numbering of the previous list. You’ll have to insert a new restart marker at the beginning of that list to preserve the correct numbering.
Reset the list templates
If your list numbering has gone wobbly, try resetting the list templates. Choose Format » Bullets and Numbering to display the Bullets and Numbering dialog box. On each tab, click each of the list templates in turn; if the Reset button is available for that list template, click the button and click the Yes button in the confirmation dialog box. When you’ve finished, click the Close button.
This may fix the numbering problems for the time being. It’s usually worth trying, as it takes only a moment or two.
Use a designated style to start each list
If you have the time to design (or redesign) a template to help avoid numbering problems, you can designate a style to start each list. The paragraph in this style is not part of the list, but indicates that the list starts after it. For example, you might create a style named Body List Intro to use for the body paragraph that leads into each list:
-
In Word 2003 or Word XP, choose Format » Styles and Formatting, and then click the New Style button. In Word 2000, choose Format » Style, and then click the New Style button.
-
Name the new Style «Body List Intro» (or your preferred name). Select the style you’ll use for your numbered list in the «Style for following paragraph» drop-down list.
-
Check the «Add to template» box.
-
Click the Format button and choose Paragraph from the pop-up menu. On the Indents and Spacing tab, choose Level 1 in the «Outline level» drop-down list. Click the OK button to close the Paragraph dialog box.
-
Click the Format button again, and choose Numbering from the pop-up menu. Click the Outline Numbered tab, click the list template on which you want to base the list, and then click the Customize button.
-
In the Level list, make sure that 1 is selected, so that you’re working with the top level of the listthat is, the introductory paragraph that will not have a number. Delete the contents of the «Number format» box (unless you want your introductory paragraphs to bear a number). Click the More button (unless the dialog box is already displaying a Less button), select Body List Intro in the «Link level to style» drop-down list, and select Nothing in the «Follow number with» drop-down list.
-
In the Level list, click 2, and edit the format in the «Number format» boxfor example, change it to «1.» instead of «.1.» (with the leading period). Select the appropriate numbered list style in the «Link level to style» drop-down list. Check the «Restart numbering after» box, and choose Level 1 in the drop-down list. Then click the OK button twice to close the Customize Outline Numbered List dialog box and the New Style dialog box.
When you need to create a list, create a new paragraph and apply your list-intro style to it. If the list-intro style is for a «real» paragraph, type the text for that paragraph. Press Enter to switch to the list style and start the numbering.
If your documents don’t consistently use a particular style as the lead-in to a list, one option is to create a style that consists of a nonprinting frame in the left (or right) margin of the page. You can then use this style to start your lists and enforce correct numbering without adding an extra paragraph or space above the list. Turn on the display of paragraph marks to make sure that the frame is visible so that you don’t delete it by accident.
by updated Aug 01, 2016
|
11-02-2011, 02:17 AM |
|||
|
|||
|
Problems with numbering! Hi! First post here I’m trying to make a numbered list, from which I will be able to press enter to write stuff beneath the numbered title. Example: 1. Title The problem is, that when I press enter standing on title 1, the list will change to somthing like this: 1. Title Is there any way to lock these numbered titles, and be able to just move from them without having to press shift+enter?
|


|
11-02-2011, 03:33 AM |
|
Hi makube, If you press Enter twice, the errant number will disappear. A better way to manage this is to use a paragraph Style with numbering, perhaps defined so that presseing Enter creates an un-numbered paragraph (based on a different paragraph Style) and to use different Styles for numbered and un-numbered paragraphs.
__________________
|
|
11-02-2011, 03:56 AM |
|||
|
|||
|
Thank you! Saved my day at the office! Been trying to create a template for protocols at my new job, and this may have just about solved all my current problems. But one more thing: are the paragraph styles compatible with earlier versions of Word? Wouldn’t help much if they weren’t compatible with for example Word 2003, since some people I work with havent upgraded yet.
|
|
11-02-2011, 05:12 AM |
|
Hi makube, Styles have been around since Word’s MS-DOS days!!!
__________________
|
|
11-02-2011, 05:20 AM |
|||
|
|||
|
Sweet! I am having problems with the creation though. The protocol will look somewhat like this: 1. Subject 2. Subject 2 3. Subject 3 And I’ve been given orders to do this in the fashion of the above list. But how do I make a style/template that will allow for the tabs to remain the same and the list number to continue from 3-?? without starting from scratch with 1,2,3 all over again, and tabs messing things up? Here’s how it should be: 11w14 Writing alot of stuff so people will see what I’m trying to do JL
Last edited by Makube; 11-02-2011 at 06:00 AM. Reason: to clarify
|
|
11-02-2011, 07:08 AM |
||||
|
||||
|
As Paul suggested, you would need a numbered paragraph style and then apply that style to each of the numbered paragraphs. For the unnumbered paragraphs with tab stops but no numbering in them, use a separate para style. You can use the built-in List Number style as a starting point for your numbered list; use the Modify Style dialog box to alter the numbering as desired. Or you can create a custom style for the purpose.
__________________
|

Multilevel numbering in Word is the #1 headache for many people working with large documents.
Believe it or not, it’s not complicated. It just takes somebody to lead the way and point out the pitfalls you need to avoid.
Today that pleasure falls to me!
Before I start, grab your free multilevel numbering troubleshooting guide that shows you the steps to get multilevel numbering working properly first time, every time, together with answers to over 20 FAQs and plenty of real client examples constructed step by step to help you fix what isn’t working with your numbering.

1. What Multi-level Numbering Looks Like
Often used in the legal profession or in large corporate documents, multilevel numbering creates a logical hierarchy and easy navigation within the document. The headings can also be summarised later on in a table of contents. Here is a simple example:

2. How to Set Up Multilevel Numbering
Here is the correct process:
1. Select the text that you want to number (this can be a section of text or the whole document).

2. Select the Home tab.
3. Click the multilevel numbering icon in the Paragraph group.
![]()
4. You can either select an existing layout from the list to use as a starting point, or you can create a new numbering system from scratch. As you hover over each thumbnail image, Word provides a larger image of the numbering system.
5. Choose Define New Multilevel List to display the control dialog.

The dialog box can be broken down as follows:
Step #1 Click level to modify
In the top left is a list of levels. As you select each level, the settings in the rest of the dialog box changes.
Level 1 is the highest level, i.e. the main headings such as chapter or section titles.
Level 2 is subordinate to level 1.
Level 3 is subordinate to level 2.

Step #2 Enter formatting for number
This is where the level number is constructed. If you include a previous level number, it will be displayed with a grey background, as will the number for the current level.
Type anything you wish to put in between the numbers such as dots, dashes, brackets etc.
Clear any text in the ‘Enter formatting for this number’ box.
Step #3 Include level number from
When creating a subordinate level (or child level), you can first specify the level number of the parent.
For example, for section 3.2
- ‘3’ is the parent level (level 1) and
- ‘2’ is the child level (level 2)

Step #4 Number style for this level
Each level can have its own number style. It may be a standalone style, e.g. 1, 2, 3 or a, b, c or continue on from a higher level, e.g. 1.1.1 or 1.a.i.
- When creating 1.1 numbering, this option is 1, 2, 3.
- When creating 1.a numbering, this option is a, b, c

Step #5 Font
Set the font formatting for the selected level, if you want.

Step #6 Position
What position from the left margin do you want items for each level of numbering. For example, level 1 items may be 0cm from the left margin, level 2, 1cm from the left margin and level 3, 2cm from the left margin.
Here’s what they mean:
- The Aligned At determines how far from the left margin the number appears.
- The Text indent at figure determines how far from the left margin the text following the number is.

6. Click OK to save all the settings and close the dialog box.
The text you selected in step 1 now looks like this.

The next part is where the magic happens …
3. How to Apply Multilevel Numbering
Once you have created your numbering system:
1. Position the cursor at the beginning of a line.

2. Press the TAB key to move the text down a level (demote).

3. Press the SHIFT and TAB keys together to move the text up a level (promote).

If you prefer, you can also click the indent icon to demote and the outdent icon to promote between levels.
![]()
4. How to Change Multilevel Settings
Once you have created your numbering system:
1. Reselect all text that is using the multilevel numbering.
2. Click the multilevel numbering icon and select Define New Multilevel List (yes, you choose this option even if you are modifying an existing multilevel list).

The original settings that you defined are redisplayed.
3. In the top-left box select the level that you wish to change, then change your settings.
4. Repeat for the other settings.
5. Click OK to save the settings. Your numbered list should now reflect your new settings.
5. Linking Multilevel Numbering to Styles
Each level of a multilevel numbering system can be linked to a style. This means that as you apply styles throughout the document, the numbering is applied appropriately and automatically. You can either use the built-in Heading 1, Heading 2, Heading 3 styles or use your own custom styles.
1. In the Numbering dialog box, click the MORE button in the bottom-left corner to expand the dialog box.
2. Select level to modify in the top-left box.
3. Open the Link level to style drop-down list and choose the style you wish to connect to the numbering level.

4. Click OK.
5. In the document, apply the Heading 1, Heading 2, Heading 3 styles where needed.
It’s a good idea to create a body text style and apply that where appropriate, so that the body text does not inadvertently get caught up in the multi-level numbering.
6. Select the whole document (or the portion of the document where you want to apply your numbered sections).
7. Click the icon in the Paragraph group (Home tab).
8. Select your custom numbering style from the gallery. The thumbnail image should show the linked styles.

6. How to Use Styles to Set Number Levels
1. Select all the text that you wish to apply the same number level to. Alternatively, if you wish to go line by line, you can place the cursor anywhere in a line of text.
2. In the Styles gallery, click the style that corresponds to the number level you wish to apply. For example, to apply the top level numbering click Heading 1 and for the third level numbering click Heading 3 (assuming those are the styles you assigned).
The numbering and all the numbering settings will be applied to the selected text or the paragraph in which the cursor was positioned.

And that, my friend, is how you do multilevel numbering in Word with no loose ends.
How to set up a dual-multilevel numbering system in Word
7. Two resources to help you
1. Grab your free multilevel numbering troubleshooting guide.

2. Watch over my shoulder as I set up multilevel numbering from scratch.

8. What next?
I hope you found plenty of value in this post. I’d love to hear your biggest takeaway in the comments below together with any questions you may have.
Have a fantastic day.


About the author
Jason Morrell
Jason loves to simplify the hard stuff, cut the fluff and share what actually works. Things that make a difference. Things that slash hours from your daily work tasks. He runs a software training business in Queensland, Australia, lives on the Gold Coast with his wife and 4 kids and often talks about himself in the third person!
SHARE
paragraph numbering in word
Word’s automatic paragraph numbering feature is a great time-saver when it works. But, once a numbering sequence gets messed up, it seems impossible to get it back on track. Here are a few tricks for making your automatic paragraph numbering in Word behave.
How to Automatically Number Paragraphs in Word
If you’re not already familiar with Microsoft Word’s paragraph numbering feature, it’s located on the Home tab in the Paragraph section.
- The left-most button is for bullets.
- The one in the middle is for single-level numbering.
- The one on the right is for multi-level numbering.
Use the Multi-Level Option for More Flexibility
Even if I’m numbering just one level of the paragraph, I always use the multi-level style instead of single-level numbering. Multi-level gives me more options for formatting. And it even allows me to save my own numbering schemes for future use.
Three Ways Paragraph Numbering Goes Off Track
I typically see three problems with paragraph numbering getting off track, all of which can be cured with a simple right-click.
1. Most people really don’t like Word’s default indentation for automatic numbering. Fixing it is simple: Just right-click on one of the numbers and choose Adjust List Indents. Depending on whether you’re using single-level or multi-level numbering, you’ll get a dialog box that’ll allow you to set the indentation for the number itself and the following text. If you’re using the multi-level paragraph numbering style, you can also set the alignment of the number to right versus left if that’s what you prefer. In multi-level numbering, you can also reset the alignment of the first level of the numbering scheme, then instruct Word to increment the indentation for the remaining levels by a consistent measurement.
2. The numbers themselves somehow get out of sequence. When this happens, right-click and choose either Continue Numbering (if you want to connect your current paragraph to the previous list to continue that sequence) or Set Numbering Value (if you need to deliberately start at a specific number). This trick also comes in handy if you need to insert an unnumbered paragraph in the middle and then pick the number sequence back up in a subsequent paragraph.
Occasionally, however, some paragraph numbers just don’t respond to the Continue Numbering command. Here’s what I do as a fallback position. I place my cursor somewhere within a paragraph in the sequence I want to continue, and then on the Home tab click the Format Painter button. Notice that the mouse cursor is now a paintbrush. That means it’s copied the formatting of the paragraph that my cursor is currently sitting in, and now it’s looking to paste it elsewhere. So once I click into the offending paragraph, then it continues numbering.
3. You need to add more space between paragraphs. You probably want a little space between each paragraph, which, unfortunately, is not the default. To fix this, select all your numbered paragraphs, right-click, and choose Paragraph. In the Paragraph dialog box, set a bit of space after each paragraph. Be sure to uncheck the “Don’t add space between paragraphs of the same style” box to ensure that spacing is honored. Once you click OK, your numbered paragraphs should be correctly spaced.
Click here to read more of Deborah’s Microsoft Office tips.
Updated March 31, 2021.
llustration ©iStockPhoto.com
check
Best Answer

Oh, I «get it» now. I believe this is a problem with the Building Blocks.dotx file. Make sure you can access this file:
C:Users{username}AppDataRoamingMicrosoftDocument Building Blocks1033Building Blocks.dotx
If you can — try renaming it, to see if Word will recreate it.
1 found this helpful
thumb_up
thumb_down
View Best Answer in replies below
14 Replies
-
Where is it displaying these things? Do you mean in the status bar, or in a footer of a specific document, or where? I’m not sure I understand the description all the way.
Was this post helpful?
thumb_up
thumb_down
-
He doesn’t have this menu? (Attached) At the bottom of the manu in my screenshot, I have an option of pulling more page numbers from office.com… Mine tells me that content isn’t available though.
I’m unsure what you mean by, «won’t display a list of available page numbers».
attach_file
Attachment
PageNumbers.JPG
123 KB
Was this post helpful?
thumb_up
thumb_down
-
Oh, I «get it» now. I believe this is a problem with the Building Blocks.dotx file. Make sure you can access this file:
C:Users{username}AppDataRoamingMicrosoftDocument Building Blocks1033Building Blocks.dotx
If you can — try renaming it, to see if Word will recreate it.
1 found this helpful
thumb_up
thumb_down
-
@David1618, exactly that snapshot that is where I’m having problem
Was this post helpful?
thumb_up
thumb_down
-
@ Spike, yes I can access the defined path, but are you certain that that would solve the problem?
Was this post helpful?
thumb_up
thumb_down
-
I knew I should have posted the whole screenshot… Here’s what that full menu looks like on my Word 2010… Showing the «no content available» on the «office.com» sub-menu…
So, is this what his looks like? That’s the way it has always looked, default, out of the box. (I hardly use word at all)
attach_file
Attachment
PageNumbers2.JPG
107 KB
Was this post helpful?
thumb_up
thumb_down
-
Sometimes this issue is caused when, either:
- Word cannot access that file, or
- That file is corrupted
I’m not *positive* that this is the problem, but if you rename it, and see if Word recreates it, that is one of the first things to try when troubleshooting it. If something else messes up after renaming the file, just change the name back.
Was this post helpful?
thumb_up
thumb_down
-
Yeah David, 4 me it kind of weird cuz my word works perfectly fine(including all page numbering display) with any problem. I don’t just get why my client computer is seriously refusing to display the page number thing for him, even after re-installation.
Was this post helpful?
thumb_up
thumb_down
-
without any problem i mean
Was this post helpful?
thumb_up
thumb_down
-
What did you uninstall / reinstall? The whole Microsoft Office suite? The issue here is that Word is unable or not allowed to find the contents of the menu where it goes to look for it. The menu is a list of building blocks, so something is probably wrong with the building blocks template. If you only uninstalled / reinstalled Microsoft Word, it wouldn’t necessarily replace all the office shared resources.
Was this post helpful?
thumb_up
thumb_down
-
@Spike7 Thank you so!!!!!! much. I’ve done exactly what you said and my problem was solved.
Was this post helpful?
thumb_up
thumb_down
-
All hail the gr8 IT pro Spike 7 4 solving my problem today.
Was this post helpful?
thumb_up
thumb_down
-
Under posts that answered the question, you can click «manage» and mark them as best answer, or helpful post. There’s (I believe) a max of 2 helpful posts and 1 best answer.
Was this post helpful?
thumb_up
thumb_down
-
Urchmichael wrote:
@Spike7 Thank you so!!!!!! much. I’ve done exactly what you said and my problem was solved.
Do I get a ‘best answer’ then?
Glad it worked!
Was this post helpful?
thumb_up
thumb_down

 Glad it worked!