Unlike most images, pictures, and charts captions, photo captions (also often called cutlines) have multiple lines of text. Many publications share the title of the photo (caption) and a more detailed description (cutline). The terms Captions and Cutlines are often used interchangeably, particularly in magazines.
The caption requirements for a figure and a photo is are different because photographs usually attract more attention than the rest of the text in the document. Moreover, it is important to tell who is represented in the photo, when, where, and under what circumstances it was taken. Often, it is also important who made the photo, as well as some prehistory (or history) of the photo:

and

Adding captions for a photo also provides you an opportunity to include additional information that you might not otherwise be able to include in the document.
Many guidelines describe what information and details order should be for good captions and cutlines. Most of them recommend:
- The caption (title) should introduce the photo and grab the reader attention,
- The cutline (description) should tell the reader names, stories, dates, places, significance (the 5W’s and H who, what, when, where, even why, and how).
Attention! We highly recommend checking the formatting requirements, accepted by your college, university, company, or established on the project, etc.
Preparing a photo (optional)
Microsoft Word helps automate numbering but does not tie the caption to the object in any way. Like a regular paragraph, the caption cannot be moved easily “together” with the photograph. Also, it is not easy to leave all parts of the photo description on one page when editing, deleting, or formatting the document.
We recommend inserting photos as floating images (images with text wrapping) for grouping the caption text box with an image below.
Ensure one of the With Text Wrapping choices is selected (see Text wrapping in the Word document) to group a photo and its caption and cutline later.
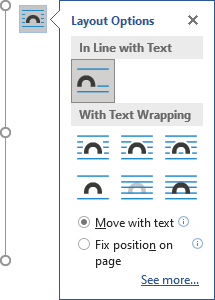
Note: If you don’t need photo numbering, skip the next step.
Insert a caption for photographs
To add automatically updated numbers and a title (caption) for a photo, select it and do one of the following:
- On the References tab, in the Captions group, click the Insert Caption button:
- Right-click on the selection and select the Insert Caption… in the popup menu:
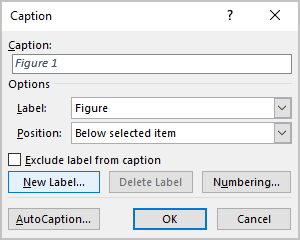
In the Caption dialog box:
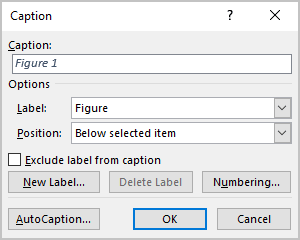
Select the label and its position
- Under Options:
- From the Label dropdown list, select the item type you need:
- Equation – see how to create captions for equations,
- Figure (selected by default) — see how to create captions for figures,
- Table – see how to create captions for tables,
- Another label (in this example, My Caption) was created using the New Label… button (see how to create a new label below).
Note: Remember that each type of object you labeled will be numbered sequentially within its group.
- From the Position dropdown list, select one of the options:
- Below selected item (selected by default for the Figure label), or
- Above selected item (selected by default for the Table label).
Notes:
- The document formatting requirements can regulate the caption’s location for a photograph and any figure. Please check the requirements that you must follow.
- If you inserted a photo as a floating image (see the point Preparing a photo above), it would be easy to change the caption placement later.
- From the Label dropdown list, select the item type you need:
Exclude label from caption
- Select the Exclude label from caption check box if you don’t need to add the label to the caption:
The option Exclude label from caption hides the label from being displayed in cross-references or a Table of Figures.
Add a new label
- Click the New Label… button to create a new label:
In the New Label dialog box, type a new label name:
Note: See also how to delete a custom label.
Modify caption numbering
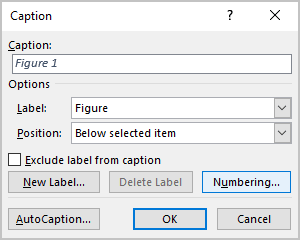
- Click the Numbering… button if you want to change any of the numbering options:
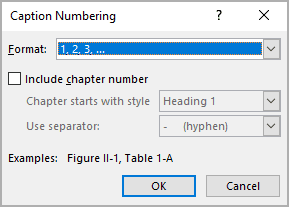
In the Caption Numbering dialog box:
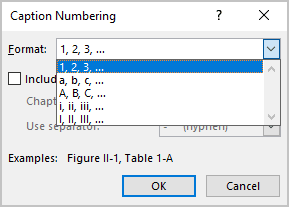
- In the Format dropdown list, select the numbering format you prefer:
- Select the Include chapter number check box to include the chapter number in the caption number. After selecting this option, two more options will be unlocked:
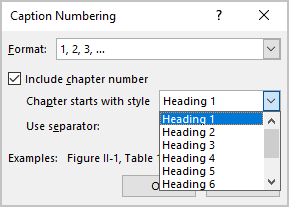
- From the Chapter starts with style dropdown list, select the heading level you need to include in the caption:
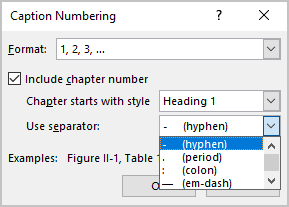
- In the Use separator dropdown list, select the punctuation you want to insert between the chapter number and the figure number:
- At the bottom of the dialog box, see how your choices will look in the Examples section. E.g., “Figure 2.7” means the seventh figure in chapter 2.
- Click the OK button.
- From the Chapter starts with style dropdown list, select the heading level you need to include in the caption:
Note: See how to update caption numbering.
Add a description
- To add the text of your caption, click after the number and enter your text. E.g.:
Note: See how to edit and modify a caption.
Using an AutoCaption
See Adding captions with AutoCaption.
Add cutlines
As mentioned above, photographs have such a feature that their description contains more than one sentence and even more than one paragraph.
If you have a floating picture (photo with any of the wrapping text options):
- If you inserted a caption with numbering using the Caption dialog box, Word adds it as a separate text box:
- If you don’t need numbering and skip steps for using the Caption dialog box, you need to add a text box with a caption.
To create a new text box, on the Insert tab, in the Text group, click Text Box:
or
Select the Draw Text Box option in the drop-down list.
Click on the added text box, add a new line or paragraph, and add all text you need. See the differences in how to create a List of Figures.
See also how to change the Caption style.
Group a photo and its caption
Naturally, the photo and its description appear on the same page. To move objects as a single block, you need to group them by doing the following:
1. Select the floating photo (photo with any wrapping text options).
2. Hold down the Shift key and select a text box with the photo’s caption and cutline:

3. Do one of the following:
- On the Shape Format tab, in the Arrange group, click the Group command:
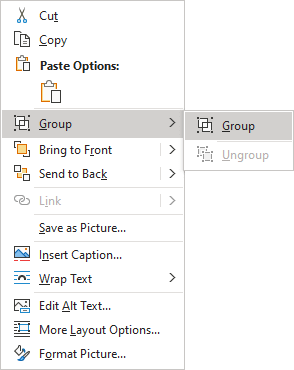
- Right-click one of the objects and choose Group -> Group from the popup menu:
Word puts a single box around the objects instead of separate boxes around each object:

After these steps, a text should flow around the photo and its description, like one block. Also, the photograph, title, and description will stay together if you move them elsewhere on the page or document.
Delete a caption and an unnecessary label
If you need to remove some caption, select the caption paragraph (full line or several lines) and press Delete. Do not forget to update fields in the document!
To remove the unnecessary label, do the following:
1. Open the Caption dialog box.
2. In the Label dropdown list, select the label you want to remove.
3. Click the Delete Label to remove a custom label:
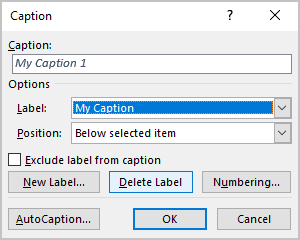
Note: You can’t delete predefined labels: Equation, Figure, and Table.
See also edit or modify a caption.
We strongly recommend checking a document at least visually after changes!
I have MS Word document which contains around 50 images with caption.
My problem is if I am inserting images in between (say inserting image after image 21) then the image is not taking the caption on its own(new image must be inserted with caption 22).
I need to manually update number for all the images after the newly added image. Can I automate it?
asked Jun 14, 2011 at 6:37
Sunil AgarwalSunil Agarwal
4,0595 gold badges42 silver badges80 bronze badges
1
I assume you are using the caption feature of Word, that is, captions were not typed in as normal text, but were inserted using Insert > Caption (Word versions before 2007), or References > Insert Caption (in the ribbon of Word 2007 and up). If done correctly, the captions are really ‘fields’. You’ll know if it is a field if the caption’s background turns grey when you put your cursor on them (or is permanently displayed grey).
Captions are fields — Unfortunately fields (like caption fields) are only updated on specific actions, like opening of the document, printing, switching from print view to normal view, etc. The easiest way to force updating of all (caption) fields when you want it is by doing the following:
- Select all text in your document (easiest way is to press ctrl—a)
- Press F9, this command tells Word to update all fields in the selection.
Captions are normal text — If the caption number is not a field, I am afraid you’ll have to edit the text manually.
answered Jun 14, 2011 at 6:44
RabarberskiRabarberski
23.5k21 gold badges74 silver badges94 bronze badges
7
- Select whole document (Ctrl+A)
- Press F9
- Save
Should update the figure caption automatically.
My question is tho, how can one also ‘assign’ referenced figures ‘(Fig.4)’ in the text to do the same thing — aka change when an image is added above it?
EDIT:
Figured it out.. In word go to Insert and Cross-ref and assign the ref. Then Ctrl+A and F9 and everything should sort itself out.
answered Mar 29, 2013 at 13:10
1
Office 2007
Right click the figure,
select Insert Caption,
Select Numbering,
check box next to
‘Include chapter number’,
select OK,
Select OK again,
then you figure identifier should be updated.
answered May 30, 2013 at 22:14
MJ12
-
#1
— Hello, I’m writing a tutorial and I have a number of photos embedde
in the document. In the text, I’d like to say «See figure 1,» «Se
figure 2,» etc
Is there a way to have Word tag the photos with an appropriate labe
(figure 1, figure 2, etc.) and update the numbering scheme automatically i
I add or delete photos in the document?
Thanks in advance
MJ1
Advertisements
sarah.schreffler
-
#2
MJ12 said:
— Hello, I’m writing a tutorial and I have a number of photos embedded
in the document. In the text, I’d like to say «See figure 1,» «See
figure 2,» etc.
Is there a way to have Word tag the photos with an appropriate label
(figure 1, figure 2, etc.) and update the numbering scheme automatically if
I add or delete photos in the document?
Thanks in advance,
MJ12
Try checking out Insert… reference… Caption… and see if that
suits your purpose.
You will have to choose Figure
- Status
- Not open for further replies.
-
#1
I can not figure out how to automatically number images in Word document.
I am able to number images individually however I need to do it automatically for all images.
Insert caption > autocaption > bitmap image
Doesn’t work.
I spent good amount of time googling solution, I am asking the question wrong or nobody needs this feature in word.
Please help.
Thanks
-
#2
-
#3
This puts a caption such as Figure1… under the figure, wroth your descriptive text as the figure title: «Figure 1 My house». Each figure caption is auto-numbered, and updates as you add/delete/etc.
-
#4
- Status
- Not open for further replies.
| Thread starter | Similar threads | Forum | Replies | Date |
|---|---|---|---|---|
|
T
|
Question Add page breaks automatically to a ODT/ Word file | Apps General Discussion | 0 | Dec 12, 2020 |
|
T
|
Question Add page breaks automatically to a ODT or Word file | Apps General Discussion | 3 | Dec 10, 2020 |
|
J
|
Solved! Fill and submit forms automatically without clicking? | Apps General Discussion | 2 | Nov 1, 2019 |
|
I
|
Question Automatic video creation software | Apps General Discussion | 0 | Sep 1, 2019 |
|
L
|
Question App for automatically clicking links in emails (or not) | Apps General Discussion | 3 | May 17, 2019 |
|
M
|
Solved! how to automatically get a website address opens and closes a thousands times a day | Apps General Discussion | 5 | Feb 4, 2019 |
|
S
|
Solved! Is There A Free Tool To Automatically Backup Email Accounts And Messages And Restore Them? | Apps General Discussion | 3 | Jan 29, 2019 |
|
I
|
Solved! When im playing free fire…automatically it stop and come to home screen during the game..plz help me soon.. | Apps General Discussion | 2 | Dec 10, 2018 |
|
R
|
Solved! email receiving automatic server | Apps General Discussion | 1 | Oct 9, 2018 |
|
|
How to get the cursor to the search box automatically when google is opened. | Apps General Discussion | 3 | Sep 9, 2018 |
|
K
|
Software to automatically collect SIP ladder diagrams | Apps General Discussion | 1 | Sep 5, 2018 |
|
H
|
Google Chrome is reloading pages automatically !! | Apps General Discussion | 2 | Sep 2, 2018 |
|
A
|
What my phone is automatically paused YouTube videos | Apps General Discussion | 4 | Jun 10, 2018 |
|
S
|
Solved! Hello, I did exactly as you described, it worked, but the gadget does not update automatically. Can you help me? Tks S. Lorber | Apps General Discussion | 4 | May 9, 2018 |
|
|
Windows 10 automatically relaunch app | Apps General Discussion | 2 | Feb 8, 2018 |
|
D
|
Everything pauses automatically | Apps General Discussion | 1 | Dec 13, 2017 |
|
|
Application automatically changes my microphone volume… I don’t know how to stop it. | Apps General Discussion | 1 | Nov 20, 2017 |
|
|
UTorrent automatically shuts down after some time? | Apps General Discussion | 2 | Jul 30, 2017 |
|
|
Word 2003 automatic page numbering | Apps General Discussion | 4 | Oct 16, 2016 |
|
|
Automatic number sequence in excel | Apps General Discussion | 4 | Oct 19, 2011 |
- Advertising
- Cookies Policies
- Privacy
- Term & Conditions
- Topics
This thread is old but included a banner that new input is welcome. So here goes.
I was editing a document created by converting a pdf to docx. Some of my editing included replacing images. In the process I observed that my new images would obscure the page number in the footer while the originals, of similar size and similarly positioned, did not. Try as I might, I could not get the new images to sit behind the footer. Searching led me here.
What I finally figured out is that the original images were png format and included transparent sections where the page number was located. Converting the new images to png and using IrfanView to make a section transparent solved the problem. It worked for me.
I gather that there are several other formats that support transparency (see here). But, as best I can tell, the image cannot be positioned behind the footer/header. Note that I think there are some games that can be played with watermarks. Perhaps there are others here that can flesh all that out.
An annoyance which made it harder to figure out why I was having the problem was that I’m unaware of a way to extract a picture from a document in it’s native format. Back in the Office 2000 era I recall that you could edit a picture while in Word (in a manner similar to what is currently available in Acrobat). The default was Microsoft Photo Editor but, as I recall, you could specify what editor was used. Apparently not any more.
If you want to make an intuitive reference to an image, you can insert a caption. You can quickly add a caption to a picture or photo in Word by using the Insert Caption function. Word will automatically number your captions of tables or figures. However, sometimes the caption numbering of the figure is incorrect in your Word document and not sequential, which can be a problem. You will find out that figure caption numbers do not show in the correct order. This article will show you how to insert a figure caption in Word and explain how the numbering works. Read about the solutions to fix the wrong numbering in figure captions.
Table of contents
- How to insert a caption in Word
- Create a new label
- Figure caption numbering incorrect due to errors in Seq field
- Solution of wrong figure caption numbering in Seq field
- Problem caption number for figures incorrect
- Check if a picture is in line with text or with text wrapping
- Solution for figure caption numbering incorrect due to With Text Wrapping
- Conclusion
How to insert a caption in Word
Open your Word document and add an image. You can add a caption to a picture by following the steps below.
- Right-click on the image
- Selection opens up > Click on Insert Caption > The Caption dialog box opens up
Or you can use the method below:
- Go to the References tab
- Click on the Insert Caption icon > The Caption dialog box opens up
Create a new label
In the Caption dialog box, you can choose from three different labels. A label is a text that appears before the picture numbering, which you can select by default, such as Equation, Figure, or Table. Note that these labels differ when you change your language settings in Word.
There is also an option to create a new label yourself. Click on New Label in the Caption dialog box underneath > This will open a new box called New Label where you can write your customized Label > Lastly, click OK.
In our example below, we have used the word Photo.
Once you have made your new label and clicked the OK button, you will automatically return to the Caption dialog box. Here, you will find the customized word (e.g., Photo) under Caption and the Label selection. You have to click OK in the Caption dialog box to confirm the changes.
Figure caption numbering incorrect due to errors in Seq field
Sometimes the captions don’t follow the same order even though the numbering under the figure is correct. This is because when you add a caption to a picture, photo, figure, and other items in Word, it automatically sets the identifier in a Seq field.
{ SEQ Identifier }Seq stands for sequence, and it numbers the captions. For more details on Seq fields, read the Microsoft article about Fields codes: Sequence field.
When you insert captions via References > Insert Caption, Word sets the Seq field equal to the label you have selected. You can view the field code in the Seq fields and other types of fields. Turn the field code display on by pressing Alt + F9. It will look like the example below.
{ SEQ Figure * ARABIC } All the Seq fields with the same identifier count as one series of consecutive numbers. Therefore, every time you add, delete or change an item with its Seq field, you must update the remaining items with its Seq fields to maintain a new sequence.
Remember that you will only see a Seq field if you add a caption to a picture or photo via References > Insert Caption in Word. If you add a caption manually, you will not get automatic numbering, and there is no Seq field. So a caption with the identifier Figure could look like the example below.
Figure { SEQ Figure * ARABIC } If you have copied content with captions from another document, the captions may not use the same identifier or label. The same problem happens if you create Seq fields manually in Word. For example, some captions use Figure as an identifier, while others use Table as an identifier. In this case, you will have two different series of captions that count separately, e.g., one numbering for Figure and another numbering for Table.
Solution of wrong figure caption numbering in Seq field
There is no problem with the caption itself, but sometimes Word won’t let you delete the label or numbering in the caption. You can fix the wrong figure caption numbering in the Seq field.
In our example below, we have inserted four different captions without any pictures. Insert a figure caption in Word > Go to References > Insert Caption > Write your caption and click OK. Unfortunately, the order of the captions is wrong. If you change it manually, the automatic numbering will not work anymore. Follow the steps below to see how you can change it.
Step 1 – The numbering of the captions is incorrect in the below picture. It states Figure 1-2-1-3 instead of Figure 1-2-3-4.
Step 2 – Display the Seq field codes by pressing Alt + F9. Now, you should be able to see the Seq fields of all the captions. However, as you can see below, the third identifier of the Seq Field looks different from the others as it states SEQ Figur instead of SEQ Figure. It can occur when you copy a caption from another document or write captions manually.
Step 3 – Now, you should change the Seq field of the third caption. You can do this by copying the Seq field of the correct figure caption and past it instead of the third caption. Or you can correct it by writing the same Seq field as the other figure. Now the Seq field will look all the same.
Step 4 – Once you correct the Seq fields, you should press Alt + F9 to return. There is a chance that the order of the caption is still incorrect, like in the left picture. It is because you have not updated the captions.
- You can do this by selecting all the captions > Press Alt + A
- Then update the numbering of the captions > Press Alt + F9
Now the numbering of the caption figure should look like the right picture below.
If you did not fix the correct order of the caption numbering, please read about the following problem to find the solution.
Problem caption number for figures incorrect
If you have two pictures next to each other, you may want to label them correctly to make the readers understand. However, even if you start to label your pictures in the correct order, the automatic caption number for each picture shifts.
In our example, we will start to insert a caption for the left picture in Word.
- Go to the References tab
- Click on Insert Caption > The Caption dialog box opens
- The caption automatically states Figure 1 > Now you can write a caption > Click OK
- The caption under the picture looks correct
Let’s say you want to add a caption to the right photo in your Word document, as Figure 2.
- First, click on the right picture where you want to enter the caption > Go to the References tab
- Click on the Insert Caption button
- The Caption dialog box opens up, but the figure numbering is wrong.
For example, in the picture below, you can see that it automatically states Figure 1 in the Caption dialog box. Also, the left picture automatically changes from Figure 1 to Figure 2. But why is this happening?
Check if a picture is in line with text or with text wrapping
The problem occurs when you have pictures set With Text Wrapping. For example, let’s say that you have two images next to each other, and one of them is set something else than In Line With Text. In this case, each caption ends up in a text box. The right picture in the example below is set with text wrapping. You can check that by clicking on the picture or text box underneath it once. Now an icon called Layout Options appears. Click on the icon to see which layout you have selected for this particular picture.
You can also check it in the Picture Tools tab when you click on the picture. Finally, in the ribbon, you can either click on Position or Wrap Text, which will give you the same options.
Once you add a caption to a picture set with text wrapping in Word, the figure caption numbering becomes incorrect. The numbering of the captions depends on the positions of the text box anchors, which will be explained later. Read further to understand how to insert a caption of a figure in Word with the correct method.
Solution for figure caption numbering incorrect due to With Text Wrapping
Follow the steps below to fix the wrong order due to Pictures With Text Wrapping. You already know how to insert a caption of a figure in a Word document. For this example, we have inserted four pictures in a Word document with incorrect figure caption numbering.
- Go to the Home tab
- Press the ¶ button under the Paragraphs group. It displays object anchors as well as other non-printing marks.
- Or use the shortcut Ctrl + Shift + 8
Sometimes you will not see the object anchors immediately. It is because you have not clicked inside the text box under the picture.
- Click inside a caption to see its anchor. See the below picture for further illustration.
- Now click and drag the anchor so that it appears in the correct sequence.
- Click on an anchor and move it downwards if you want the numbering to come in second.
- Click on an anchor and move it upwards if you want the numbering to be first.
Sometimes you have to bring the anchor to the end of the document to change its caption numbering. Look at the picture below to see how to drag the anchor icon down. Please check the location of the anchor for the individual text fields with incorrect numbers. Then, please do the same steps for figure 3 and drag its anchor down.
The caption numbering does not always change immediately, but that is not a problem. Read the following steps to see how to update the caption numbering in your Word document.
- Update the caption numbers by switching to Print Preview > Use the shortcut Ctrl + F2 or shortcut Ctrl + P. Now you will see the correct order of your captions on the right side.
- Then go back to the current view by clicking on the arrow in the upper left corner > Use the Esc button.
These problems do not occur if your pictures are In Line With Text in Word, and therefore it is the safest way to add a caption to a picture. There is no need to move the anchors anymore.
Conclusion
You have learned how to insert a caption of a figure in Word. However, sometimes the figure caption numbering is incorrect in Word. If you have pictures set with text wrapping, there is a high chance of having the wrong order numbering in your captions. It could also be due to the wrong identifier in the Seq field, which can easily be changed manually. Now, you can add a caption to a photo in Word using the correct method.
I have a word document containing images and tables. These have captions which are numbered, like «Image 1-Example of something». Later on I decided to rearrange some of chapters of my document. However numbering of objects remained the same, so the first image is image 8, the second is image 3, etc.
I want to force Word to recompute image numbering so first image in document would be image 1, the second — image 2, etc.
Is that possible? Will references (added through cross reference feature) to those objects be updated?
asked Apr 9, 2012 at 20:43
Vojtech RuzickaVojtech Ruzicka
3731 gold badge4 silver badges8 bronze badges
1
You need to update all references in your document. To do so select all of the document (Ctrl+A) then press F9.
answered Apr 10, 2012 at 9:53
4
Word 2011 for Mac updates these field values for the whole document before printing. You don’t actually have to print the file but just open and close the print dialog via File --> Print... --> Cancel. Don’t know if this works for all versions.
answered Apr 10, 2012 at 21:53
6
I’ve just come across a scenario where Word had decided that the second figure in my document was Figure 1, and that the first one was Figure 2, and that there was nothing I could do to persuade it otherwise.
The eventual solution turned out to be,
- Select the second figure and its caption and cut it.
- Update fields with F9.
- Paste the figure and caption back in.
- Update the field in the newly-pasted caption.
- Fix the inevitable resulting formatting SNAFU.
answered Mar 19, 2014 at 12:45
FlytoFlyto
7161 gold badge7 silver badges13 bronze badges
2
If Track Changes are turned on and tables, figures, and associated captions have been modified, I found I had to accept those changes before the suggestions above worked.
answered Feb 5, 2015 at 7:15
1
I know this might seem late and old, but I would like to share this:
I double clicked/selected the number only (If it is Figure 2, then double click/select the «2»), after that I right clicked and in the pop up, there was «Update field», I clicked this and the figure got updated.
I think the only downside in this is you must do for each figure/table, but it works.
Frank
answered Nov 9, 2019 at 11:46
DajiDaji
212 bronze badges
Ctrl—A then F9 will only work if you have added the captions using the add caption option when right clicking the image.
If you have added lines manually saying
Figure 1 — blah blah
then Word won’t renumber them, because they are just another line of text. You can tell which captions are added and managed by Word and which one aren’t by toggling on field codes. I do this by hitting Ctrl—A, then right clicking on a caption or blank area and clicking «toggle field codes».
Captions which have been created by Word will now look something like
Figure {SEQ Figure * ARABIC} — blah blah
instead of having a number. If your captions do not show this, then Word won’t renumber them. So erase them and replace them with captions created using the Insert Caption option.
zx485
2,17011 gold badges17 silver badges23 bronze badges
answered Dec 2, 2016 at 10:43
To update the things containing references, like the table of contents or cross-references, select the document contents and press F9.
Of course, this will not work if you numbered the captions by hand, instead of letting Word do the counting.
answered Apr 10, 2012 at 9:54
Arseni MourzenkoArseni Mourzenko
1,8037 gold badges23 silver badges41 bronze badges
Update field may not always be linked to F9. In some cases the shortcut is shift+alt+cmd + U, though right clicking generally works
answered Apr 20, 2018 at 15:18
I had to combine the answer given by bytesum with the other solutions.
- open the print dialogue (updates the numbers in the captions)
- select all and press F9 (updates the references to these captions)
edit: i am using word 2011 (mac)
answered Feb 27, 2015 at 16:07
1
The other way in case your F9 key doesn’t work (i.e. remote desktop to pc platform from a mac) use Ctrl+A then right click and select «update field !»
techraf
4,83211 gold badges24 silver badges40 bronze badges
answered Feb 16, 2016 at 19:15
First you need to select all and only images :
let consider your images have caption starting like this : «Figure #nb «,
- Select the world Figure from any caption you want,
- go to Home tab,
- Editing->Select->Select text with similar formatting,
- press the F9 keyboard.
Toto
16.5k50 gold badges29 silver badges41 bronze badges
answered May 1, 2018 at 18:11
Track changes does indeed interfere with updating figure caption numbering after moving or deleting figures. All of the instructions to F9, Alt-F9 and Shift-F9 or printing had no effect. Very frustrating.
Still then, I found that the removed reference stays invisibly on the page, so the table of figures continues to index it. I had to remove the text around the previously location to fully get rid of the embedded and invisible reference code. I then re-entered the text manually to be sure I didn’t reinsert it.
I also had some XE index references displaying in the text (but only in one set of headers) and could not toggle them out while Track Changes was active.
answered Apr 6, 2020 at 15:36


