
Note: The screen shots in this article were taken in Excel 2016. If you have a different version your view might be slightly different, but unless otherwise noted, the functionality is the same.
Add page numbers on a single worksheet
-
Click the worksheet for which you want to insert page numbers.
-
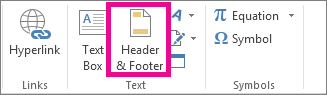
On the Insert tab, in the Text group, click Header & Footer.

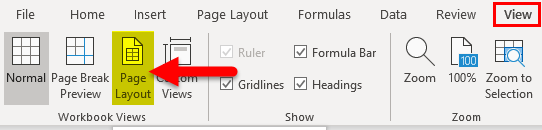
Excel displays the worksheet in Page Layout view. You can also click Page Layout
on the status bar to display this view. -
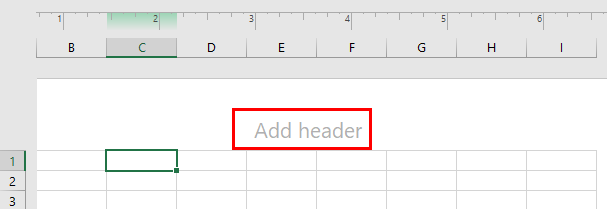
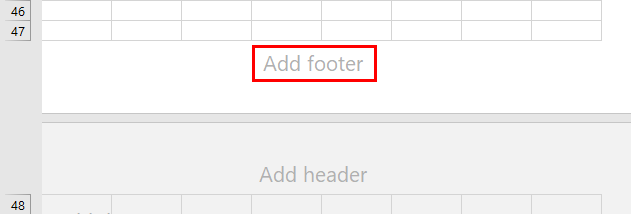
On the worksheet, click Click to add header or Click to add footer.
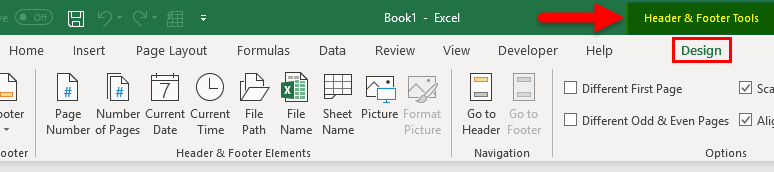
This displays the Header & Footer Tools, adding the Design tab.
-
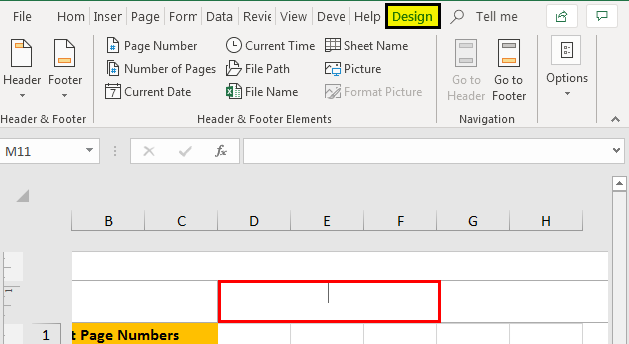
To specify where in the header or footer you want the page number to appear, click inside the Left section, Center section, or Right section box of the header or footer.
-
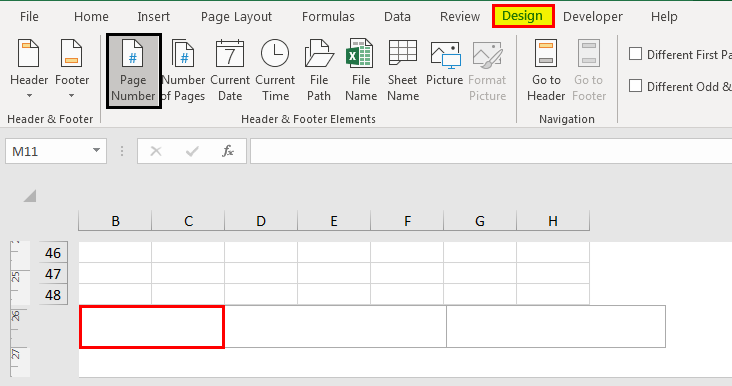
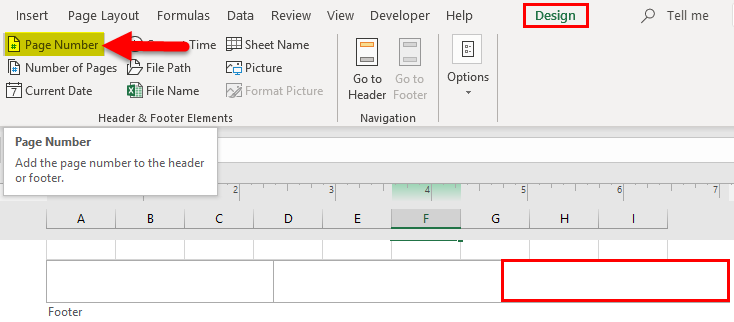
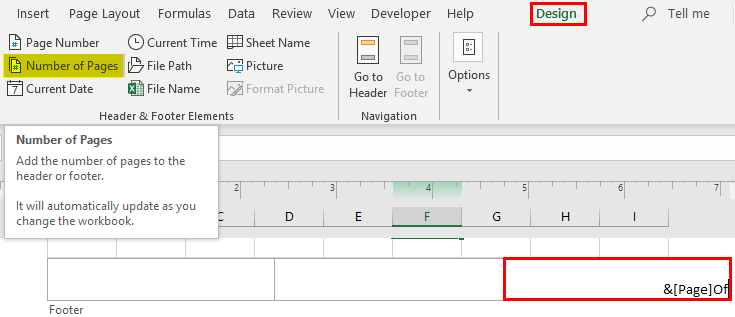
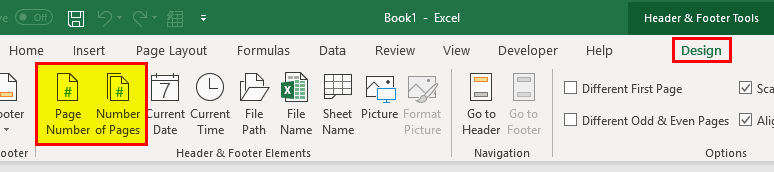
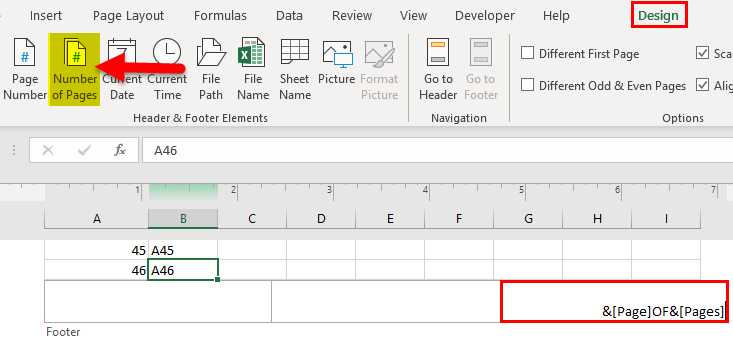
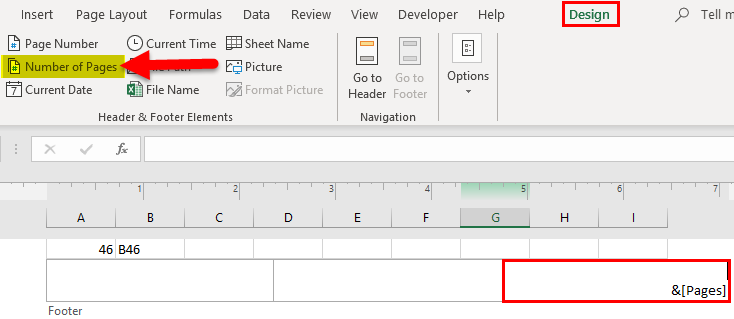
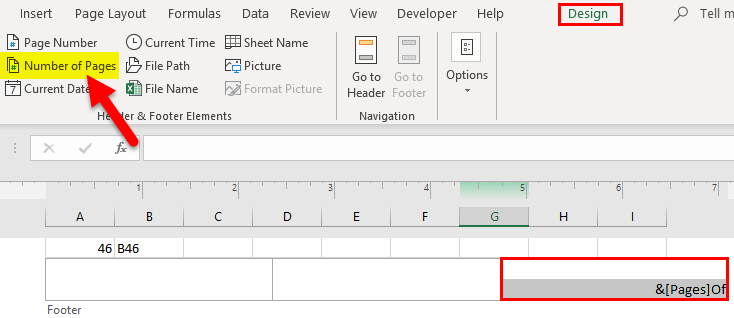
On the Design tab, in the Header & Footer Elements group, click Page Number.
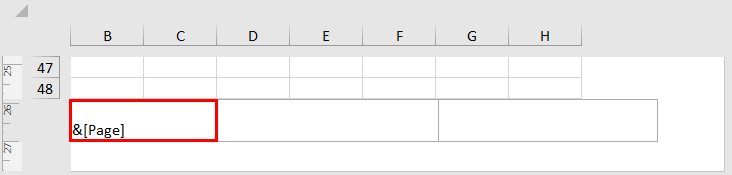
The placeholder &[Page] appears in the selected section.
If want to add the total number of pages, type a space after &[Page], type the word of followed by a space and then, in the Header & Footer Elements group, click Number of Pages.
The placeholder &[Page] of &[Pages] appears in the selected section
-
Click anywhere outside the header or footer area to display the actual page numbers in Page Layout view.
-
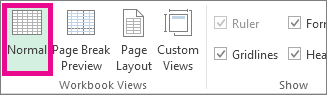
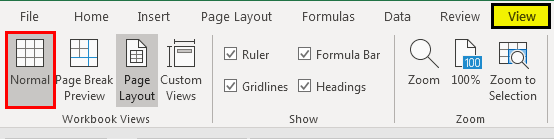
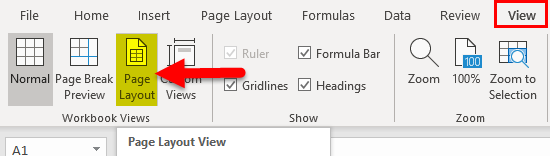
After you have completed working in Page Layout view, on the View tab, in the Workbook Views group, click Normal.
You can also click Normal
on the status bar.You can insert page numbers for a worksheet in Page Layout view, where you can see them, or you can use the Page Setup dialog box if you want to insert page numbers for more than one worksheet at the same time. For other sheet types, such as chart sheets, you can insert page numbers only by using the Page Setup dialog box.
 on the status bar to display this view.
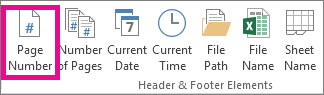
 on the status bar.
Add page numbers in multiple worksheets
You can insert page numbers on multiple worksheets in your workbook by using the Page Setup dialog box. For example, if your workbook contains two worksheets that are both two pages long, the first worksheet will contain two pages numbered 1 and 2. The second worksheet will also contain two pages numbered 1 and 2.
Tip: To add page numbers to all worksheets in a workbook sequentially, you must change the number that each worksheet starts with. For more information, see Set a different number for the starting page.
-
Click the worksheets or chart sheets to which you want to add page numbers.
|
To select |
Do this |
|---|---|
|
A single sheet |
Click the sheet tab.
If you don’t see the tab that you want, click the tab scrolling buttons to display the tab, and then click the tab.
|
|
Two or more adjacent sheets |
Click the tab for the first sheet. Then hold down Shift while you click the tab for the last sheet that you want to select. |
|
Two or more nonadjacent sheets |
Click the tab for the first sheet. Then hold down Ctrl while you click the tabs of the other sheets that you want to select. |
|
All sheets in a workbook |
Right-click a sheet tab, and then click Select All Sheets on the shortcut menu. |


Tip: When multiple worksheets are selected, [Group] appears in the title bar at the top of the worksheet. To cancel a selection of multiple worksheets in a workbook, click any unselected worksheet. If no unselected sheet is visible, right-click the tab of a selected sheet, and then click Ungroup Sheets.
-
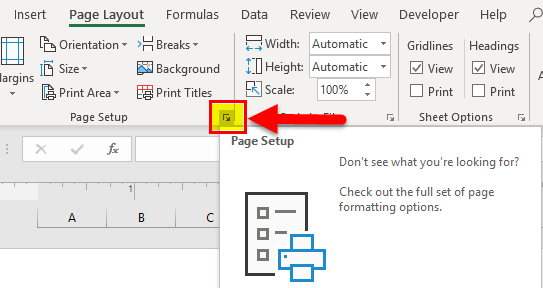
On the Page Layout tab, in the Page Setup group, click the Dialog Box Launcher
next to Page Setup.
-
In the Page Setup dialog box, on the Header/Footer tab, click Custom Header or Custom Footer.
-
To specify where in the header or footer you want the page number to appear, click inside the Left section, Center section, or Right section box.
-
To insert numbers, click the Insert Page Number button
.The placeholder &[Page] appears in the selected section.
Notes:
-
If you want to add the total number of pages, type a space after &[Page], type the word of followed by a space, and then click the Insert Number of Pages button
. -
The placeholder &[Page] of &[Pages] appears in the selected section.
-
 next to Page Setup.
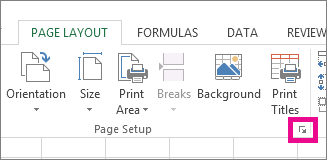
 .
. .
.Set a different number for the starting page
To number all of the worksheet pages in a workbook sequentially, first add page numbers to all worksheets in a workbook, and then use the following procedure to begin the page number for each worksheet with the appropriate number. For example, if your workbook contains two worksheets that with both be printed as two pages, you would use this procedure to begin the page numbering for the second worksheet with the number 3.
-
On the Page Layout tab, in the Page Setup group, click the Dialog Box Launcher
next to Page Setup.
-
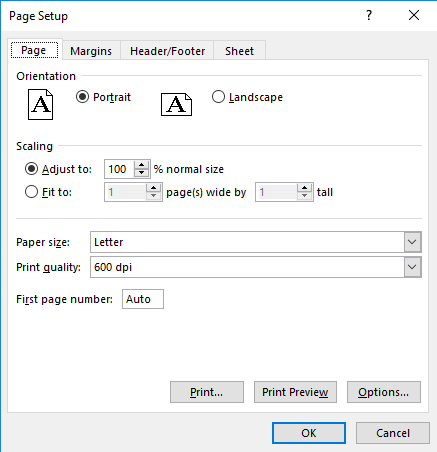
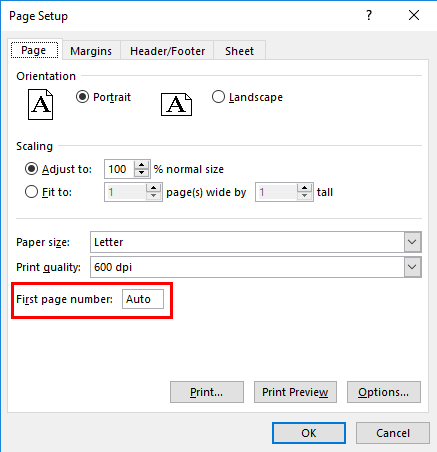
On the Page tab, in the First page number box, type the number that you want to use for the first page.
To use the default numbering system, type Auto in the First page number box.
Change the order in which pages are numbered
By default, Excel numbers and prints pages from the top down and then left to right on the worksheet, but you can change the direction to number and print pages from left to right and then from the top down.
-
Click the worksheet for which you want to change the numbering order.
-
On the Page Layout tab, in the Page Setup group, click the Dialog Box Launcher
next to Page Setup.
-
On the Sheet tab, under Page order, click Down, then over or Over, then down.
The direction of each option is displayed in the preview box.
Delete page numbers
-
Click the worksheets or chart sheets for which you want to remove page numbers.
|
To select |
Do this |
|---|---|
|
A single sheet |
Click the sheet tab.
If you don’t see the tab that you want, click the tab scrolling buttons to display the tab, and then click the tab.
|
|
Two or more adjacent sheets |
Click the tab for the first sheet. Then hold down Shift while you click the tab for the last sheet that you want to select. |
|
Two or more nonadjacent sheets |
Click the tab for the first sheet. Then hold down Ctrl while you click the tabs of the other sheets that you want to select. |
|
All sheets in a workbook |
Right-click a sheet tab, and then click Select All Sheets on the shortcut menu. |
Tip: When multiple worksheets are selected, [Group] appears in the title bar at the top of the worksheet. To cancel a selection of multiple worksheets in a workbook, click any unselected worksheet. If no unselected sheet is visible, right-click the tab of a selected sheet, and then click Ungroup Sheets on the shortcut menu.
-
On the Page Layout tab, in the Page Setup group, click the Dialog Box Launcher
next to Page Setup.
-
On the Header/Footer tab, in the Header or Footer drop-down box, click (none).
Note: You may have to scroll to the top of the list to click (none).
Add page numbers
-
On the Insert tab, click Header & Footer.
Excel automatically changes to Page Layout view.
-
On Header & Footer tab, click either the Header or Footer, and then select the page number format you want.
Header page numbers appear at the top of the printed page, and footer page numbers appear at the bottom.
-
When you’re done, you can either stay in Page Layout view, or you can switch to Normal view by clicking Normal on the View tab.
Set a different number for the starting page
You can make the first printed sheet start with a page number other than 1. This is helpful if there are other printed pages that will come before the sheet. For example, you might print a 2-page Word document that will account for pages 1 and 2, and your Excel sheet would then start on page 3.
-
On the Page Layout tab, click Page Setup.
-
On the Page tab, in the First page number box, type the number you want for the first page number. For example, if you wanted the first page number to be 3, you’d type the number 3.
-
Click OK.
If you are using a page number format that counts the total pages, for example: Page 3 of 7, you’ll need to make an adjustment to the second number. This adjustment ensures you don’t end up with something like this: Page 10 of 7.
-
In Page Setup, click the Header/Footer tab, and then click either Custom Header or Custom Footer.
-
After Page &[Page] of &[Pages], type the plus sign (+), and then type the number of pages that come before your first page number.
For example, if 3 is your first page number, you need to include 2 pages in the total page count. So you’d type a +2 at the end: Page &[Page] of &[Pages]+2 and then click OK.
-
Click OK again.
Change the order that pages are numbered
-
On the Page Layout tab, click Page Setup, and then click Sheet.
-
Under Page order, select the page numbering order that you want.
Remove page numbers
-
On the Page Layout tab, click Page Setup, and then click Header/Footer.
-
Under Header or Footer, select (none).
You might have to scroll to find (none) at the top of the list.
Add page numbers
-
On the Layout tab, under Page Setup, click Header & Footer.
-
On pop-up menu under Header or Footer, select the page number format that you want to add.
Header formats appear at the top of the printed page, and footer formats appear at the bottom.
Tips:
-
You can see how your page numbers will appear by viewing your sheet in preview mode. On the Layout tab, under Print, click Preview.
-
To add page numbers to multiple sheets in your workbook at the same time, select the sheets you want before clicking Header & Footer. The page number format you choose will be applied to all selected sheets.
-
You can create a completely custom header or footer with page numbers by clicking Customize Header or Customize Footer, and following the instructions given.
-
Set a different number for the starting page
-
On the Layout tab, under Page Setup, click Header & Footer.
-
Add page numbers in the format that you want.
-
Click Customize Header or Customize Footer, depending on where the page numbers appear.
-
Look for the page number code &[Page], and click immediately after it to move the insertion point to this location.
-
Type a plus sign (+), and then type the number of pages by which you want to advance the starting page. For example, to start on page 4, you are increasing the starting page number by three pages, so you type +3. The code now appears as &[Page]+3.
-
Click OK.
In the Header or Footer box, the new first page header or footer is shown.
Note: If you want to use a page number format that includes the total number of pages, such as Page 4 of 7, make sure that you also add the plus sign (+) and page number increase to the total pages code, &[Pages].
Change the order that pages are numbered
-
On the Layout tab, under Page Setup, click Header & Footer.
-
On the Sheet tab, under Page order, select the page numbering order that you want.
Remove page numbers
-
On the Layout tab, under Page Setup, click Header & Footer.
-
On pop-up menu under Header or Footer, select (none).
Содержание
- Нумерация в Excel
- Способ 1: обычная нумерация
- Способ 2: нумерация с указанием общего количества листов
- Способ 3: нумерация со второй страницы
- Способ 4: нумерация с указанной страницы
- Вопросы и ответы

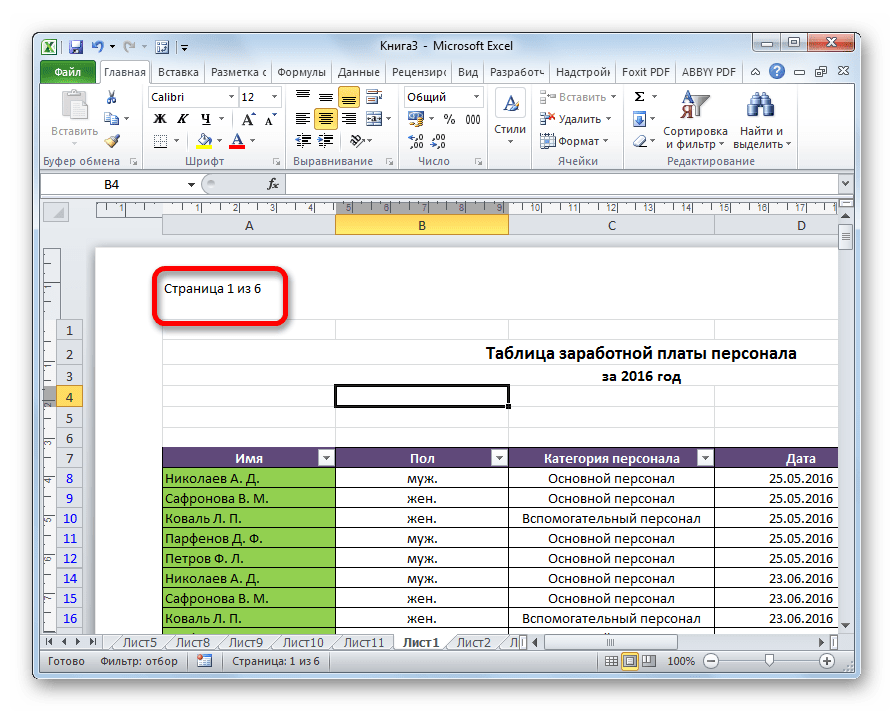
По умолчанию Microsoft Excel не производит видимую нумерацию листов. В то же время, во многих случаях, особенно, если документ посылается на печать, их необходимо пронумеровать. Эксель позволяет это сделать при помощи колонтитулов. Давайте рассмотрим различные варианты, как пронумеровать листы в этом приложении.
Нумерация в Excel
Пронумеровать страницы в Excel можно при помощи колонтитулов. Они по умолчанию скрыты, располагаются в нижней и верхней области листа. Их особенностью является то, что занесенные в данную область записи являются сквозными, то есть отображаются на всех страницах документа.
Способ 1: обычная нумерация
Обычная нумерация предполагает пронумеровать все листы документа.
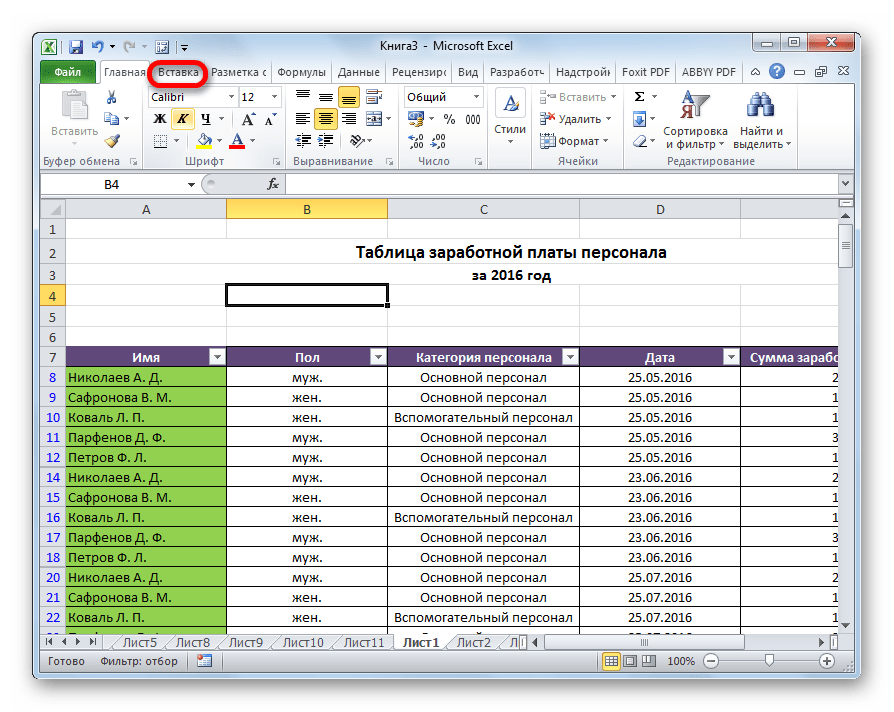
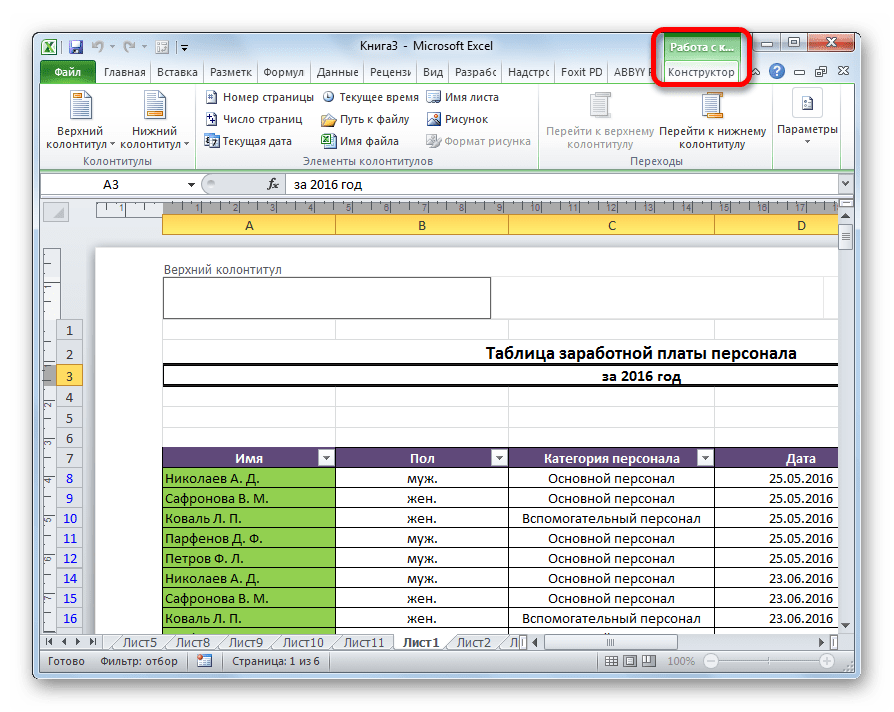
- Прежде всего, нужно включить отображение колонтитулов. Переходим во вкладку «Вставка».
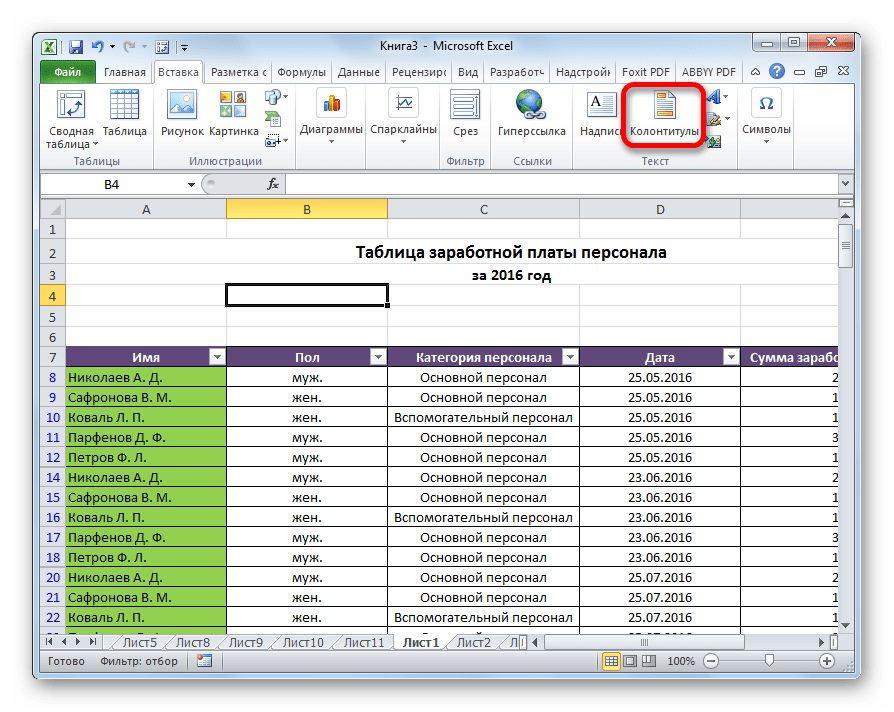
- На ленте в блоке инструментов «Текст» жмем на кнопку «Колонтитулы».
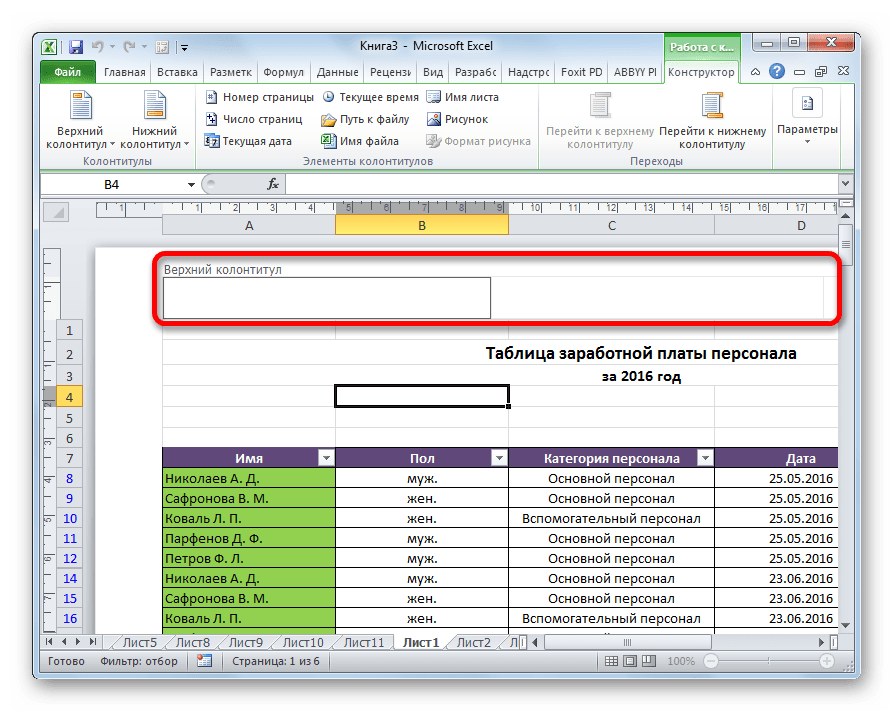
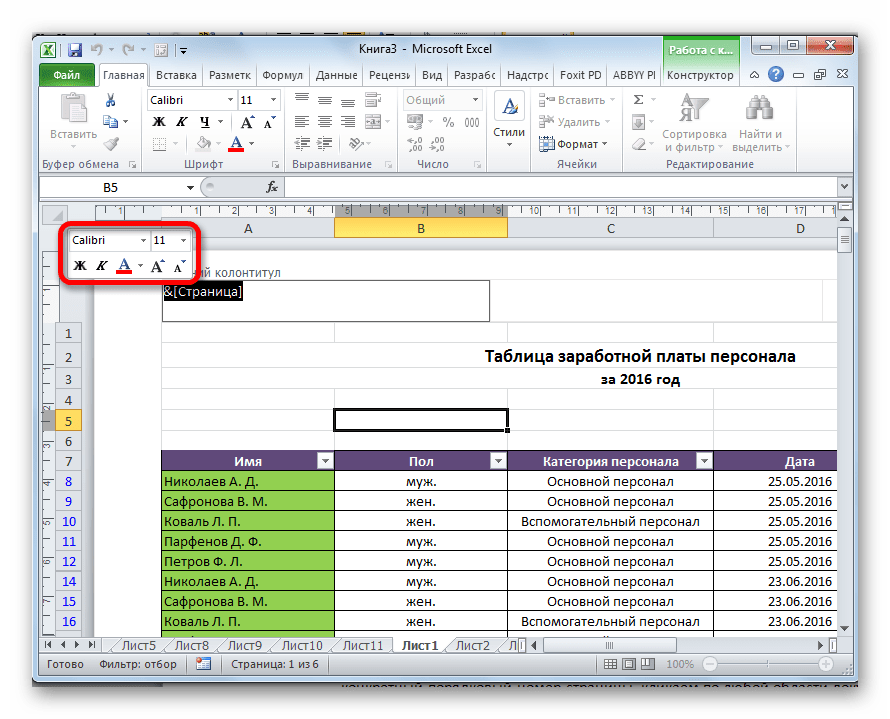
- После этого Эксель переходит в режим разметки, а на листах отображаются колонтитулы. Они располагаются в верхней и нижней области. Кроме того, каждый из них разделен на три части. Выбираем, в каком колонтитуле, а также в какой его части, будет производиться нумерация. В большинстве случаев выбирают левую часть верхнего колонтитула. Кликаем по той части, где планируется разместить номер.
- Во вкладке «Конструктор» блока дополнительных вкладок «Работа с колонтитулами» кликаем по кнопке «Номер страницы», которая размещена на ленте в группе инструментов «Элементы колонтитулов».
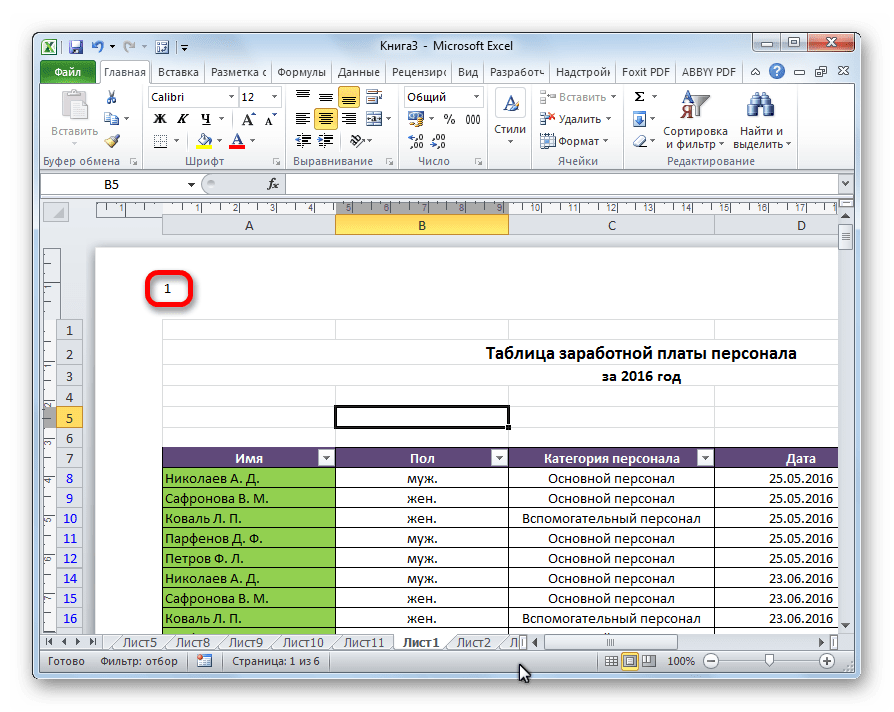
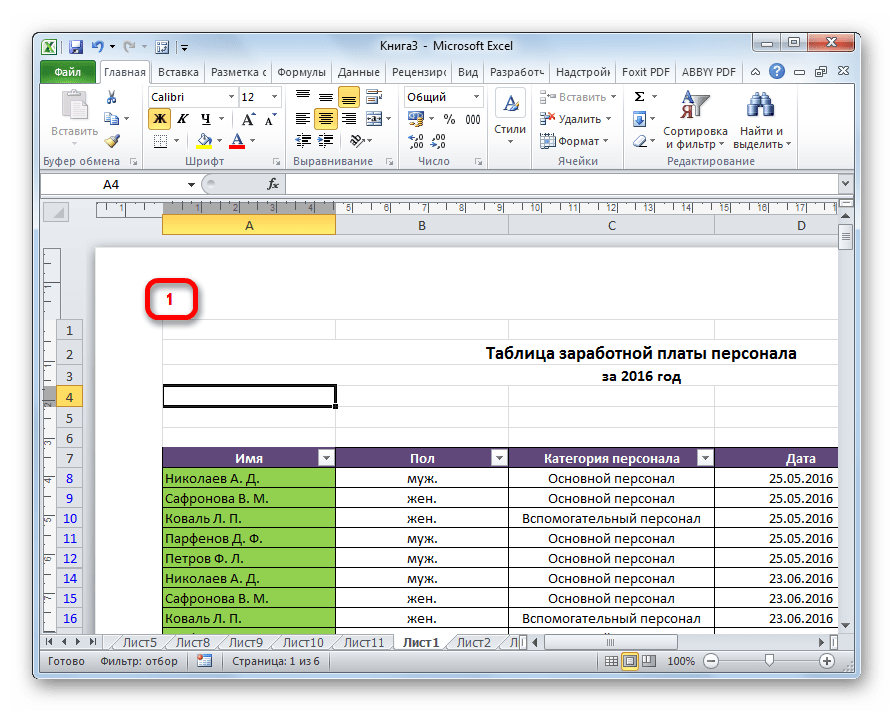
- Как видим, появляется специальный тег «&[Страница]». Чтобы он преобразовался в конкретный порядковый номер, кликаем по любой области документа.
- Теперь на каждой странице документа Эксель появился порядковый номер. Чтобы он выглядел более презентабельно и выделялся на общем фоне, его можно отформатировать. Для этого выделяем запись в колонтитуле и наводим на неё курсор. Появляется меню форматирования, в котором можно произвести следующие действия:
- изменить тип шрифта;
- сделать его курсивом или полужирным;
- изменить размер;
- изменить цвет.

Выбирайте те действия, которые хотите произвести для изменения визуального отображения номера, пока не будет достигнут удовлетворяющий вас результат.

Способ 2: нумерация с указанием общего количества листов
Кроме того, можно пронумеровать страницы в Excel с указанием их общего количества на каждом листе.
- Активируем отображение нумерации, как было указано в предыдущем способе.
- Перед тегом пишем слово «Страница», а после него пишем слово «из».
- Устанавливаем курсор в поле колонтитула после слова «из». Кликаем по кнопке «Число страниц», которая размещена на ленте во вкладке «Главная».
- Кликаем по любому месту документа, чтобы вместо тегов отобразились значения.
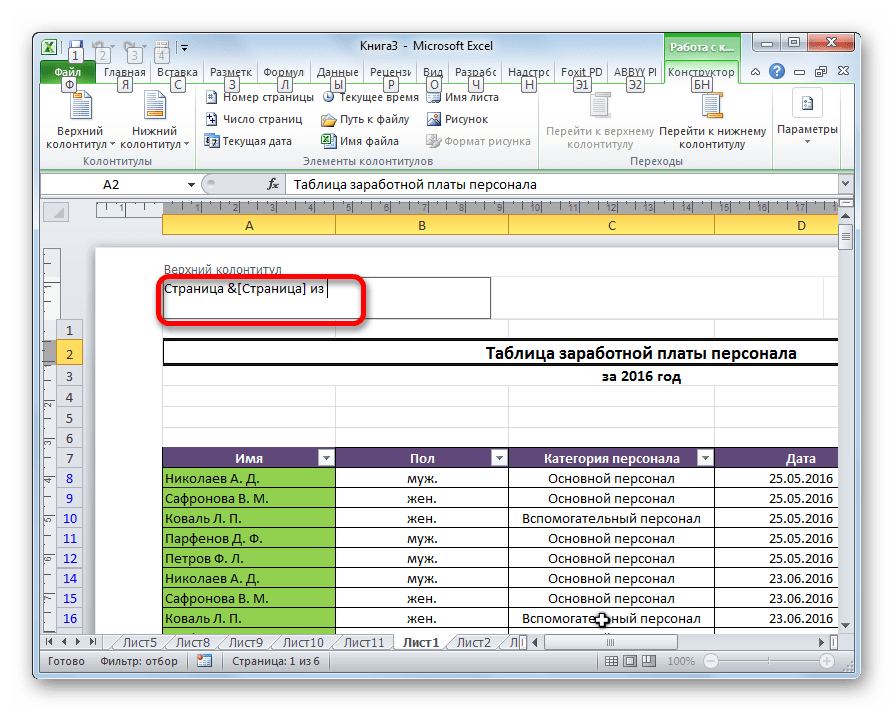
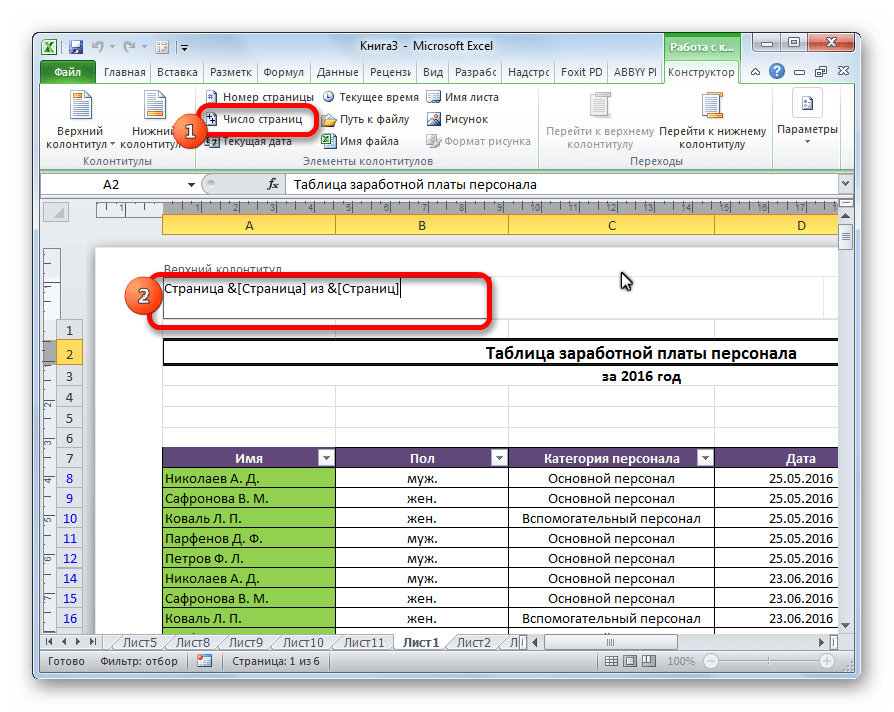

Теперь у нас отображается информация не только о текущем номере листа, но и об общем их количестве.
Способ 3: нумерация со второй страницы
Бывают случаи, что пронумеровать нужно не весь документ, а только начиная с определенного места. Давайте разберемся, как это сделать.
Для того, чтобы выставить нумерацию со второй страницы, а это уместно, например, при написании рефератов, дипломных и научных работ, когда на титульном листе не допускается присутствие номеров, нужно произвести действия, указанные ниже.
- Переходим в режим колонтитулов. Далее перемещаемся во вкладку «Конструктор колонтитулов», расположенную в блоке вкладок «Работа с колонтитулами».
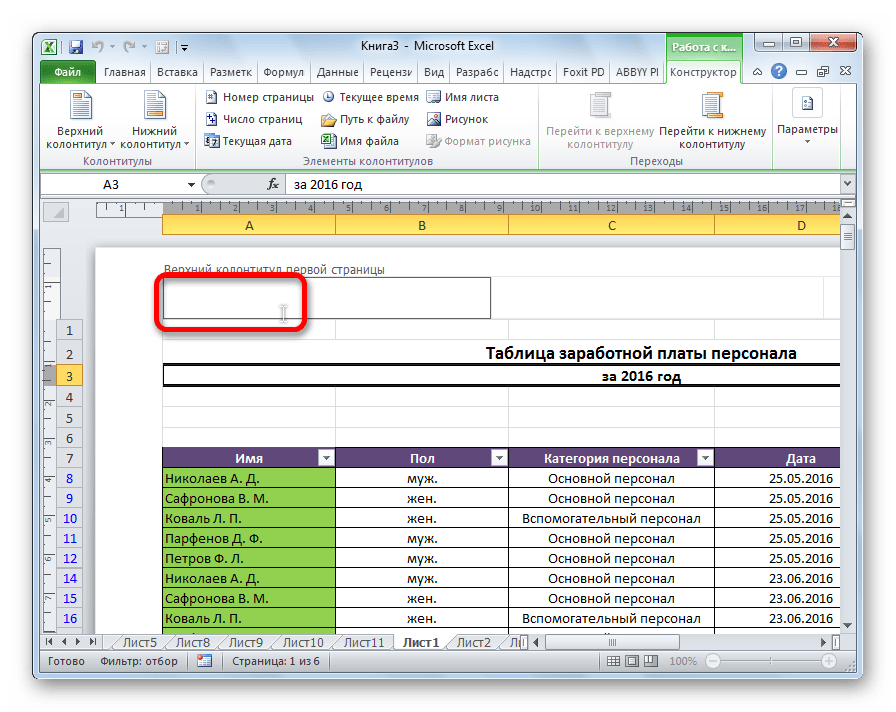
- В блоке инструментов «Параметры» на ленте отмечаем галочкой пункт настроек «Особый колонтитул для первой страницы».
- Устанавливаем нумерацию при помощи кнопки «Номер страницы», как уже было показано выше, но делаем это на любой странице, кроме первой.
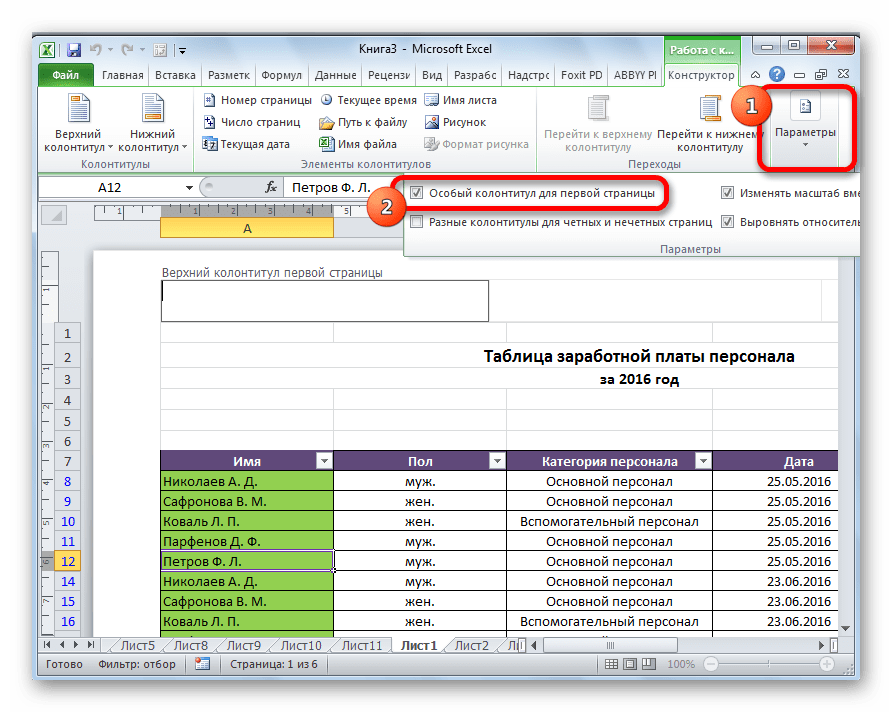
Как видим, после этого все листы пронумерованы, кроме первого. Причем первая страница учитывается в процессе нумерации других листов, но, тем не менее, на ней самой номер не отображается.
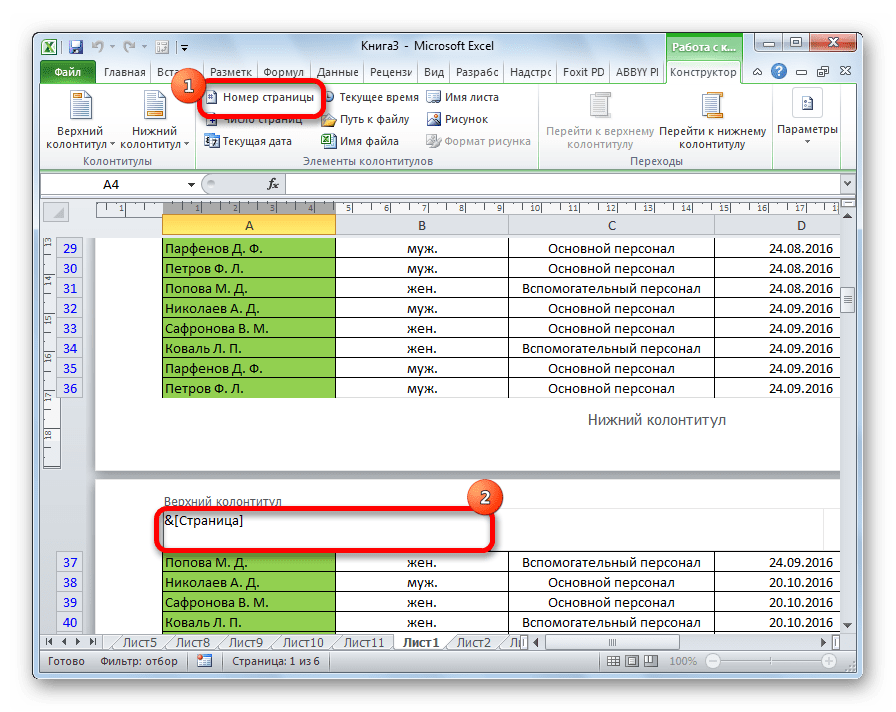
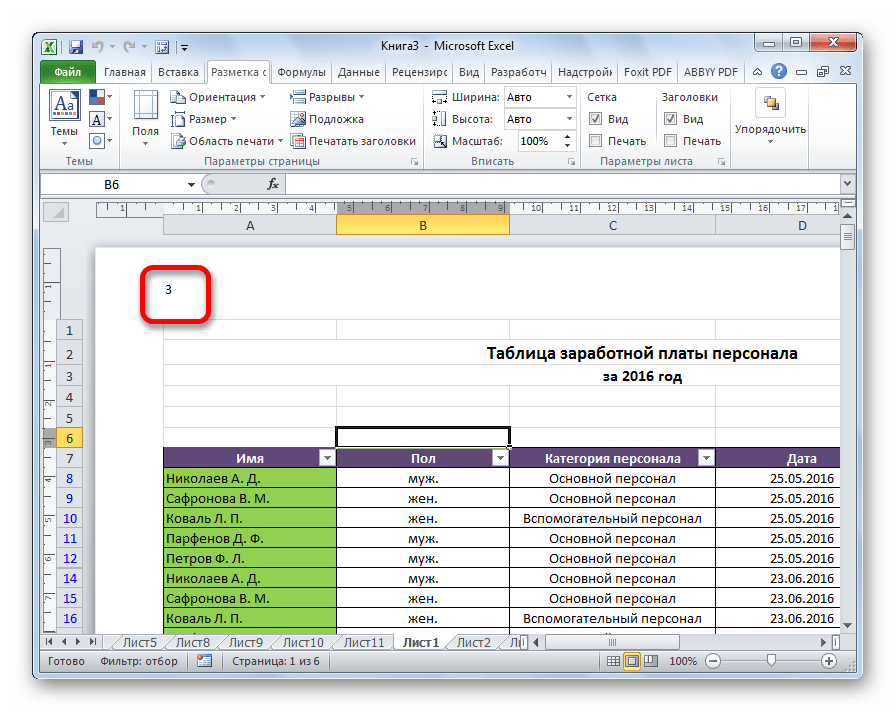
Способ 4: нумерация с указанной страницы
В то же время, бывают ситуации, когда нужно чтобы документ начинался не с первой страницы, а, например, с третьей или седьмой. Такая необходимость бывает не часто, но, тем не менее, иногда поставленный вопрос тоже требует решения.
- Проводим нумерацию обычным способом, путем использования соответствующей кнопки на ленте, подробное описание чего было дано выше.
- Переходим во вкладку «Разметка страницы».
- На ленте в левом нижнем углу блока инструментов «Параметры страницы» имеется значок в форме наклонной стрелки. Кликаем по нему.
- Открывается окно параметров, переходим во вкладку «Страница», если оно было открыто в другой вкладке. Ставим в поле параметра «Номер первой страницы» то число, нумерацию с которого нужно проводить. Кликаем на кнопку «OK».


Как видим, после этого номер фактически первой страницы в документе изменился на тот, который был указан в параметрах. Соответственно, нумерация последующих листов тоже сместилась.
Урок: Как убрать колонтитулы в Excel
Пронумеровать страницы в табличном процессоре Excel довольно просто. Эта процедура выполняется при включенном режиме колонтитулов. Кроме того, пользователь может настроить нумерацию под себя: отформатировать отображение номера, добавить указание общего числа листов документа, нумеровать с определенного места и т.д.
Еще статьи по данной теме:
Помогла ли Вам статья?
How to Insert Page Numbers in Excel?
In Excel, there are two methods to insert page numbers in Excel. However, both ways can only insert the page number as a header or footer. Furthermore, the page number (header/footer) is not visible in the normal mode.
Table of contents
- How to Insert Page Numbers in Excel?
- Method #1
- Method #2
- Different Formats to Insert Page Numbers in Excel
- How to Set a Different Starting Page Number in Excel?
- Resetting Page
- Things to Remember
- Recommended Articles
Method #1
- First, enter the Excel worksheet where you want to insert page numbers.
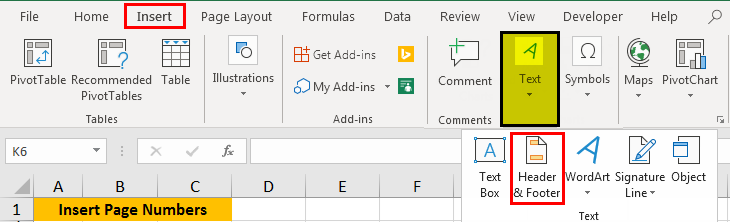
- Go to the “Insert” tab and select “Header & Footer,” given in the “Text” group.

The worksheet display will automatically change to the page layout view after clicking “Header & Footer.”
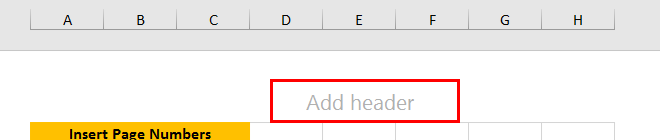
- You can now click “Add header” or “Add footer” on the worksheet.

- Upon clicking, it will add a “Design” tab. In addition, it will also display the “Header & Footer” tools in the “Design” tab.

- To add a footer, click on the “Footer.” To add the footer on the left side, click on the “Left section” box. To add the footer on the right side, click on the “Right section” box. To add the center footer, click the “Center section” box. You can also do the same to specify the position in the header.
- Click on “Page Number” to insert the page number in the (above) specified section of the header/footer. But, first, let us select the left area in the footer.

- You will notice that &[Page] will appear in the selected section. You can skip clicking “Page Number” and add “&[Page]” to the area where you want the page number to appear on the page.

- The page number will appear when you click outside of this selected box.

- You can now go back to the normal mode of display. To do this, go to the “View” tab, and click on “Normal” given in the “Workbook Views” group.


Method #2
Let us now see another example of inserting page numbers in Excel.
- Step 1: First, add the “Header & Footer” to the worksheet, then go to the “Page Layout” tab. In the “Page Setup” menu, click the dialogue box launcher given next to the “Page Setup” menu.
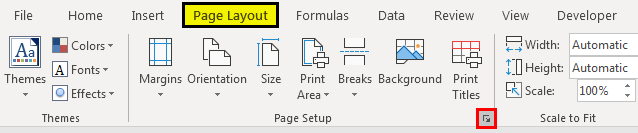
You will notice that a “Page Setup” dialog box will appear.
- Step 2: Go to the “Header/Footer” tab in this pop-up window.
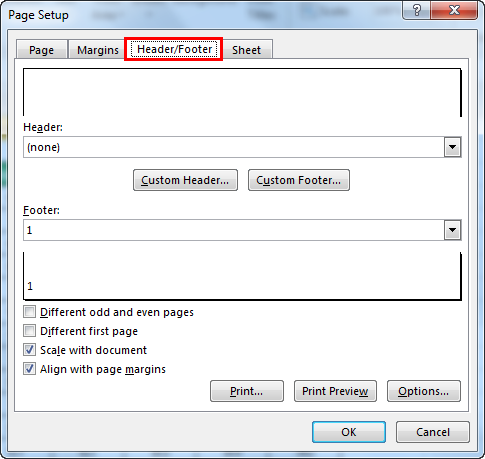
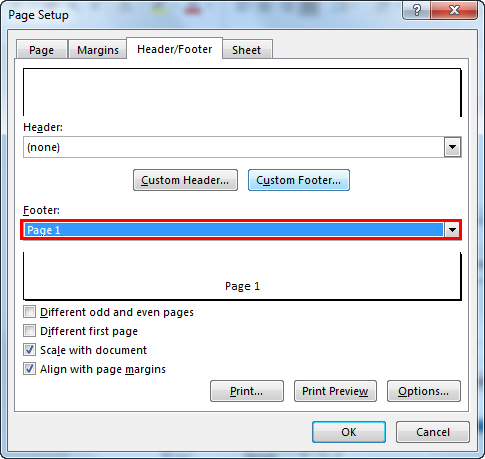
- Step 3: To insert the page number in the Excel worksheet, select “Page 1” in the “Header“ if you want to add a page number as a header, or select “Page 1” in the “Footer“ if you want to add a page number as a footer. This selection can be made by scrolling down the menu. First, let us select “Page 1”. There will be a preview that will show how the page number will appear.
- Step 4: Then, click on the “OK.” You will notice that the page number has been added.

This type of method (Method 2) is used to insert page numbers when you want to insert page numbers in multiple sheets. For example, suppose you have two worksheets in which you want to add the page numbers. Firstly, select both worksheets. Then, follow the steps discussed above.
Note: When you select more than one sheet, “Group” will be displayed along with the worksheet’s name as “[Group]” at the top.
Different Formats to Insert Page Numbers in Excel
There are different formats to insert the page numbers in Excel, such as:
Page 1
Page 1 of? (Page # of #total-pages)
Page 1, Sheet 1
Page 1, Worksheet-name.xlsx
Prepared by Name, Page 1.
You can choose which direction to display the header or footer (page number) left, right, or center. In method 1, you can directly specify on which side the page number is displayed. In method 2, you can follow the following steps:
- In the “Page Layout” tab, select a dialog box launcher given next to the “Page Setup” menu. Then, go to the “Header & Footer” tab.
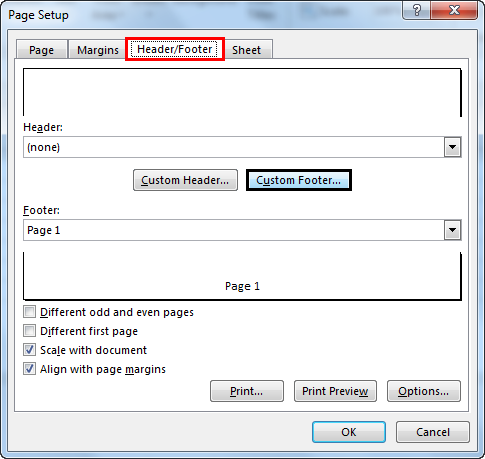
- Go to “Custom Header” or “Custom Footer.” First, let us select the “Custom Footer.”
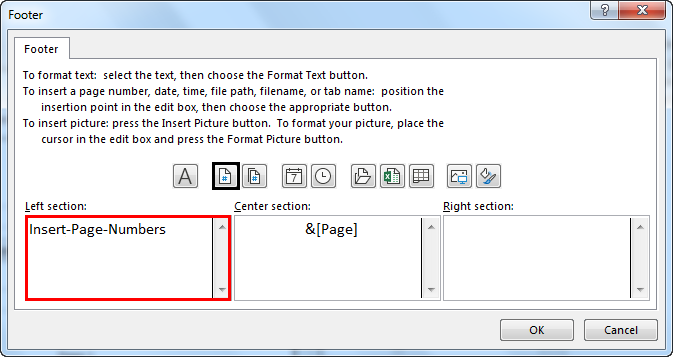
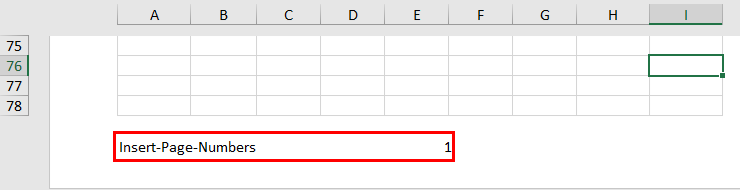
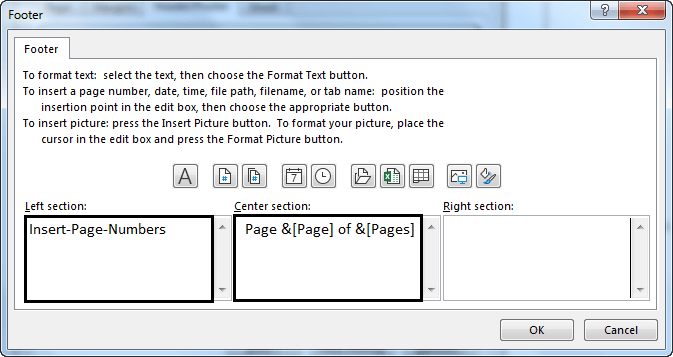
- Suppose you want to add a title on the left side of the footer and a page number in the center. Also, you do not wish to display “Page” and only want the page number. So, in the “Left section,” add the title you want to show, and in the “Center section,” add “&[Page]” (or select the box containing #) to display the page number.
- Select “OK.”
- If you want to add the format: “Page 1 of #pages”, you can use the syntax as “Page &[Page] of &[Pages].“
- Select “OK.”
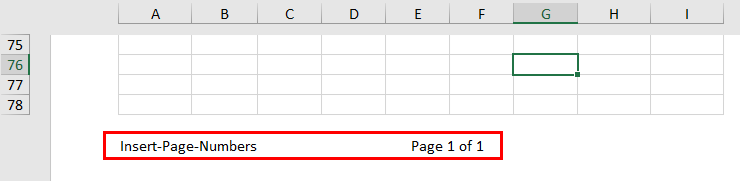
If there is only one page, it will show “Page 1 of 1”. If there are a total of two pages, it will display “Page 1 of 2”.
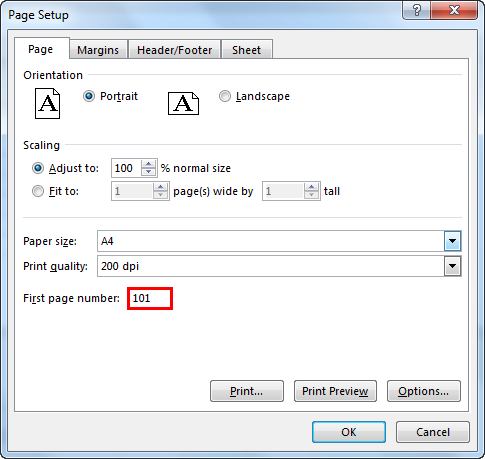
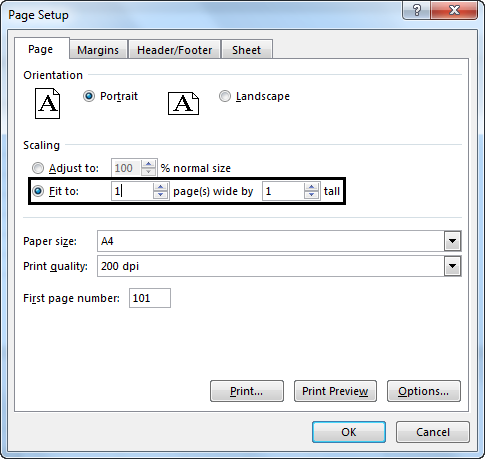
How to Set a Different Starting Page Number in Excel?
If you want to start page numbering with a different number, e.g., 101, you can do it in Excel.
- In the “Layout” tab, select “Header & Footer” and go to the “Page” tab in the “Page Setup” dialog box.
- In the “First page number” option, change “Auto” to 101. The page numbers will be automatically updated. The auto option starts numbering pages from 1 (for the first page of the print job) or the sequential number of the print job.
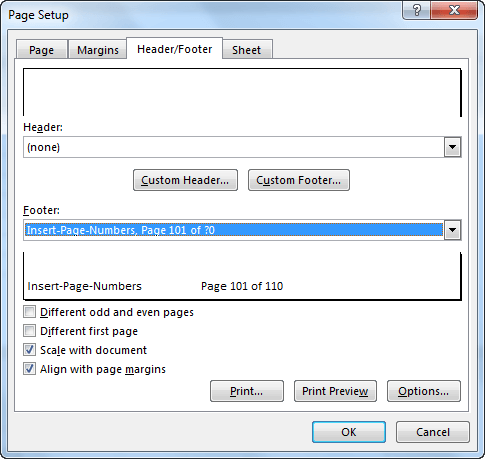
- Alternatively, in the “Page Setup” dialog box, go to the “Header/Footer” tab and select the “Custom Header” (or Footer) in the dialog box. Then you can use the syntax:
Page &[Page]+100
Or in the format “Page 101 of #pages” use the syntax as:
Page &[Page]+100 of [Pages]+100
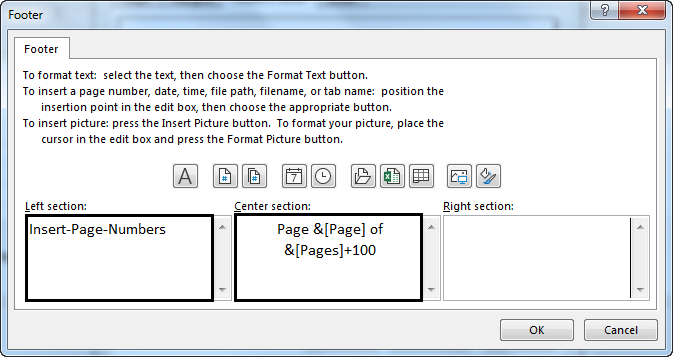
- And select, “OK.” The format will appear in the preview section of the footer.
Resetting Page
You can also reset the number of rows and columnsA cell is the intersection of rows and columns. Rows and columns make the software that is called excel. The area of excel worksheet is divided into rows and columns and at any point in time, if we want to refer a particular location of this area, we need to refer a cell.read more displayed on a single page. In this case, we have the students’ names and the marks they obtained in five different subjects. You may wish to have all these marks and student names displayed on a single page. You can select the “Fit to” “1” page-wide option.
Change the Order in which Pages are Numbered
To change the order in which pages are numbered, go to the “Layout” tab and open the Page Setup in the Excel”Toread more dialog box. Then, change the “First page number” on the “Page” tab in the dialogue box. It is default set to “Auto,” which is 1.
Things to Remember
- The page numbers in Excel can be inserted as headers and footers.
- The page numbers are displayed in the “Page Layout” mode or printed ones. They are not shown in the “Normal” way.
- Different sheets in an Excel worksheet are required to insert page numbers separately.
- We can customize the format of the page number.
- We can customize the start number in the “Page Setup” option.
Recommended Articles
This article is a guide to Page Numbers in Excel. We discuss inserting page numbers in Excel with examples and downloadable Excel templates. You may also look at these useful functions in Excel: –
- Insert a Page Break in ExcelPage breaks are used to divide an excel worksheet into multiple different pages, it is totally up to user to define the format of the page breaks, as the worksheet is printed it is printed in that page breaks, page breaks are available in the page layout tab in page setup section and when we click on it we have the option to insert a page break.read more
- Generate Random Numbers in VBATo generate random numbers in vba we have an inbuilt function called RND. It just takes two numbers as input to generate random between these numbers. It creates random numbers which are greater than 0 and smaller than 1.read more
- Print Excel CommentsTo print comments in excel, go to the print section from the files tab and page set up tab, there you will find options to print comments and where you want to display them, whether on the end of the sheet or as they are present in the sheet.read more
- Barcode in ExcelBarcodes, in general, are codes that can only be readable by machines. They are lines and bars which are codes for characters. Barcodes in Excel are fonts that represent the characters we provide.read more
Содержание
- Простая нумерация
- Отображение общего числа страниц
- Как пронумеровать страницы в версии Excel 2003?
- Проблемы с удалением номера на первой странице в Excel 2003
- Как сделать нумерацию в версиях Excel 2007 и 2010?
- Разметка страницы Excel
- Включить режим разметка страницы быстро
- Вкладка Разметка страницы, раздел Параметры страницы
- Как пронумеровать страницы
- Вручную
- Нумерация с указанием общего количества листов
- Нумерация с указанной страницы
- Нумерация с определенной страницы
- Сплошная нумерация
- Заключение
Простая нумерация
Итак, сейчас мы рассмотрим простой способ, как пронумеровать страницы в “Эксель”, однако с его помощью удастся поставить номера страниц абсолютно на всех страницах, так что, если вам необходимы разные номера на разных страницах, он вам не подойдет.
Чтобы сделать нумерацию страниц, вам необходимо:
- Включить колонтитулы. Это делается в соответствующем меню, которое находится во вкладке “Вставка”, перейдите туда.
- В панели инструментов найдите группу “Текст” и нажмите на кнопку “Колонтитулы”.
- Как только вы это сделаете, на листах появятся колонтитулы. Они располагаются снизу и сверху, точно так же как и в “Ворде”. Однако есть и отличия. Так, в “Экселе” они поделены на три части. Вам на данном этапе необходимо выбрать, в каком именно месте будет стоять номер страницы.
- После того как вы определились с расположением, вам необходимо перейти в конструктор (появившаяся вкладка) и там отыскать и нажать на кнопку “Номер страницы”.
- После этого в области, которую вы выбрали, появится специальный тег, его видоизменять никак не нужно, надо лишь кликнуть мышкой в любом другом месте таблицы.

Как видно, он очень простой. С его помощью можно быстро проставить номера во всем документе.
Отображение общего числа страниц
Итак, чтобы проставить нумерацию с указанием общего числа страниц в документе, вам необходимо сделать следующее:
- Поставить простую нумерацию. Чтобы это сделать, обратитесь к предыдущей инструкции.
- Теперь войдите в область редактирования текста колонтитула с указанием страницы и перед располагающимся там тегом впишите “Страница”, а после него “из”.
- Теперь поставьте курсор после слова “из”, предварительно сделав отступ.
- Перейдите во вкладку “Конструктор” и нажмите на кнопку “Число страниц”. Она располагается под кнопкой “Номер страницы”.

Теперь, как и в предыдущий раз, вам нужно всего лишь кликнуть на произвольную область таблицы, чтобы число страниц отобразилось.
Как пронумеровать страницы в версии Excel 2003?
К настоящему времени выпущено уже более десятка версий программы Excel. У многих пользователей до сих пор установлен Эксель версии 2003 года. Расположение и функционал инструментов, которые позволяют сделать нумерацию, существенно отличаются от возможностей свежих версий. В Экселе 2003 года нумерацию делают, используя в основном панель параметров.
- Выбрать лист, где требуется сделать нумерацию.
- Открыть панель «Параметры страницы» (Вид — Колонтитулы). Выбрать «Создать верхний колонтитул» (для
 расположения нумерации сверху) или «Создать нижний колонтитул», если номер должен быть в нижней части.
 - В открывшейся панели настройки уточнить место по горизонтали, поставив курсор в одну из трех ячеек — левую, центральную или правую.
- Нажать кнопку вставки номера (вторую слева, с изображением решетки). В выбранном поле появится строчка &[Страница]. Нажать «ОК» для закрытия панели редактирования колонтитула и кнопку «Просмотр», чтобы убедиться, что содержимое колонтитула вставилось в выбранные позиции.
- При необходимости можно изменить параметры шрифта (гарнитуру, размер, начертание). Для этого надо в окне редактирования выделить строчку &[Страница] и нажать кнопку «А» (редактирование текста).
- В открывшемся окне «Шрифт» выбрать параметры: гарнитуру, кегль, начертание. Размер поля для колонтитулов можно менять во вкладке «Поля» этой же панели.
- Если необходимо изменить число, с которого начинается нумерация, можно открыть вкладку «Страницы» панели параметров и в поле «Номер первой страницы» внести нужное число.

Проблемы с удалением номера на первой странице в Excel 2003
К сожалению, в версии 2003 года разработчики не предусмотрели возможности отдельно редактировать колонтитулы на первой странице, которую часто требуется оформить как титульную и убрать нумерацию.
При попытках удалить оттуда содержимое колонтитула нумерация удаляется на всем листе документа Эксель. Поэтому обладателям этой версии приходится придумывать решения проблемы, например, кто-то предлагает в Экселе сделать титульную страницу в отдельном файле.
Чтобы убедиться в том, что первая страница имеет пустой колонтитул, а остальные пронумерованы, удобно пользоваться панелью «Печать» (Файл — Печать). В этой панели надо выбрать радиокнопку «Всю книгу», после чего нажать кнопку «Просмотр» в левом нижнем углу панели печати. «Вся книга» — это все листы, включая титульный. Откроется окно, в котором можно увидеть все содержимое всех листов документа. Переключаться между ними можно, нажимая кнопку «Далее» и «Назад» в левом верхнем углу панели. Если такой просмотр показал, что нумерация идет в соответствии с замыслом, можно выводить книгу на распечатку.
Как сделать нумерацию в версиях Excel 2007 и 2010?
Принцип расположения инструментов и их названия в Экселе свежих версий являются более логичными и удобными. Например, панель колонтитулов расположена не в меню «Вид», а в меню «Вставка». Колонтитулы редактируются не вслепую, а в визуальном режиме. А самое главное — теперь можно удалять номер с первой страницы, не занимаясь созданием новых листов или документов; достаточно поставить одну галочку в конструкторе колонтитулов.
- Чтобы увидеть элементы документа, на которых будет размещаться номер, целесообразно выбрать в меню «Вид» вариант отображения «Разметка страницы».
- Визуально обнаружить места колонтитулов позволит «конструктор» (Вставка — Колонтитулы). Небольшая прямоугольная рамка на странице покажет место, куда может быть вставлен номер. Обычно программа предлагает поместить его наверху, делая подсказку в виде рамки. Но необязательно с этим соглашаться: курсор можно поставить слева или справа от предложенного места. Если посмотреть на нижний край, то там также обнаруживаются прямоугольники для внесения неизменных данных; нужно лишь поставить курсор в предпочитаемую область, выделив ее.
- Когда выделен один из этих прямоугольников, в правой части основного меню программы появляется надпись «Работа с колонтитулами. Конструктор». Клик на «Конструкторе» активизирует инструменты для работы с колонтитулами, которые появляются под основным меню. Из них следует выбрать «Номер страницы» (кнопка с изображением решетки). В той области, где стоял курсор, появится строчка &[Страница]. Чтобы увидеть, как выглядит нумерация, теперь не нужно нажимать кнопки просмотра, а достаточно кликнуть мышью в одной из соседних ячеек.
- В панели «Параметры страницы» делаются дополнительные настройки нумерации. Обнаруживается этот инструмент с трудом (при выборе меню «Разметка страницы»). Чтобы развернуть панель параметров, надо кликнуть на маленькую стрелку справа от названия этой панели. Панель используется, чтобы задавать другое значение начала нумерации.
- Отредактировать шрифт можно, если выделить строчку &[Страница] и перейти в раздел «Главная» основного меню, в котором выбирается не только гарнитура, кегль и начертание, но и цвет символов.
- Чтобы убрать номер на первой странице, надо выделить любой из колонтитулов и нажать кнопку «Параметры» в «Конструкторе». В раскрывающемся списке параметров поставить галочку «Особый колонтитул для первой страницы». Теперь ее номер редактируется отдельно от остальных, и при его удалении остальная нумерация не пострадает.


Если создать в этом же документе новый лист, в нем можно проделать подобные манипуляции с номерами. Таким образом, внутри одного документа можно легко создавать множество таблиц с титульными частями. Использование новых версий программы Эксель делает нумерацию приятной, наглядной и легко контролируемой.
В Excel существует достаточно удобный и качественно проработанный инструмент разметки страниц. При его использовании можно сразу просмотреть, каким именно образом будут располагаться на странице все элементы. Сразу же можно отредактировать эти элементы, если такое потребуется. Разметка страницы Excel, как настроить?
Включить режим разметка страницы быстро
Разметка страницы Excel включается и отключается пиктограммой на строке состояния. Также есть три пиктограммы-кнопки, которые переключают режим просмотра. Эти кнопки находятся внизу. Найти их можно рядом с регулятором масштаба. Это:
- обычный вид;
- постраничный;
- режим разметки страницы.

В двух режимах (страничный и разметка) лист разбивается Excel на части. Это используется как раз для демонстрации расположения текста и его вхождения в отдельные листы при печати на бумагу. Убирается это разделение в обычном режиме работы.
Помимо описанного способа переключение производится и на вкладке «Вид»:
Вид —>> Лента «Режим просмотра книги» —>> Обычный
В любом из двух описанных случаев Excel выйдет из режима разметки, а документ примет стандартный вид. Также внизу можно увидеть переключение пиктограммы-кнопки
Вкладка Разметка страницы, раздел Параметры страницы
Самая объёмная группа в использовании и в работе — Параметры страницы. Она позволяет настроить конечный вывод и демонстрацию всего содержимого на бумаге:
- Поле. Если заполнить весь лист мелким скученным текстом, больше похожим на чёрный квадрат, всё равно со всех сторон у края листа останутся белые отступы. Это и есть поля — на них принтер не будет печатать ничего. Обычно все принтеры имеют аппаратные особенности, в виду которых не могут напечатать у самого края текст. Однако здесь можно установить дополнительные задачи при печати: можно сделать какое-либо из полей (верхнее/нижнее/левое/правое) шире или уже в зависимости от окончательной компоновки документа. Данные заполняются числами, которые и задают значение отступа до текста.
- Ориентация. Как будет повёрнут лист: в книжном формате или в альбомном. Обычный лист выглядит как белый прямоугольник. Если ширина меньше высоты, то это называется Книжным форматом или ориентацией. Если же ширина больше, то тогда — Альбомным.
- Размер. Стандартный лист, к которому все привыкли, имеет формат А4 (как альбом для рисования). Его половина — А5. Соответственно два листа А4 вместе составляют А3. Параметр «Размер» и позволяет выбрать требуемый размер листа, на который будет производиться печать.
- Область печати. Возможен вариант, при котором потребуется распечатать лишь часть ячеек, даже если в документе присутствуют и необходимы для вычислений все. Изменить это можно как раз в этом параметре.
- Разрывы. С помощью этой кнопки можно указать место, где будет принудительно начинаться новая страница — для удобства демонстрации каких-либо данных. Тут же разрыв и удаляется.
- Подложка. Здесь можно дополнительно выбрать фон документа. Будет выводиться в стиле водяного знака на заднем фоне.
- Печатать заголовки. С помощью открываемой этой кнопкой вкладки можно настроить диапазон ячеек для печати, варьировать печать сетки, заголовков столбцов, примечаний и многого другого. Можно настроить печать шапки таблицы на каждой странице, если данных действительно много.
Как пронумеровать страницы
Пронумеровать страницы можно следующим образом:
Вручную
Левой кнопкой мыши кликаем на лист Excel, страницы которого нужно пронумеровать. Открываем в главном меню «Вставка», далее – «Колонтитулы».

Эксель откроет режим работы с колонтитулами, здесь, кликая мышью в одно из полей, верхнее или нижнее, можно выбрать, где будет номер страницы. Номер придется ставить вручную для каждой страницы, иначе на каждой странице при распечатке будет отображаться только одно значение.

Конечно, такой способ нельзя назвать правильным и удобным, значительно удобнее автоматическая нумерация.
Для выхода из окна работы с колонтитулами требуется кликнуть мышью на любую область страницы вне колонтитулов.
Нумерация с указанием общего количества листов
Кроме того, можно пронумеровать страницы в Excel с указанием их общего количества на каждом листе.
- Активируем отображение нумерации, как было указано в предыдущем способе.
- Перед тегом пишем слово «Страница», а после него пишем слово «из».
- Устанавливаем курсор в поле колонтитула после слова «из». Кликаем по кнопке «Число страниц», которая размещена на ленте во вкладке «Главная».
- Кликаем по любому месту документа, чтобы вместо тегов отобразились значения.


Теперь у нас отображается информация не только о текущем номере листа, но и об общем их количестве.
Нумерация с указанной страницы
В то же время, бывают ситуации, когда нужно чтобы документ начинался не с первой страницы, а, например, с третьей или седьмой. Такая необходимость бывает не часто, но, тем не менее, иногда поставленный вопрос тоже требует решения.
- Проводим нумерацию обычным способом, путем использования соответствующей кнопки на ленте, подробное описание чего было дано выше.
- Переходим во вкладку «Разметка страницы».
- На ленте в левом нижнем углу блока инструментов «Параметры страницы» имеется значок в форме наклонной стрелки. Кликаем по нему.
- Открывается окно параметров, переходим во вкладку «Страница», если оно было открыто в другой вкладке. Ставим в поле параметра «Номер первой страницы» то число, нумерацию с которого нужно проводить. Кликаем на кнопку «OK».


Как видим, после этого номер фактически первой страницы в документе изменился на тот, который был указан в параметрах. Соответственно, нумерация последующих листов тоже сместилась.

Нумерация с определенной страницы
В некоторых документах требуется проставление нумерации с определенного номера, например, со второго или, скажем, с пятого. Подобные ситуации на практике встречаются редко, но все же существуют. Для решения подобной задачи выполняем следующие действия:
- Сначала нумеруем страницы первым или вторым способами, которые мы уже рассмотрели ранее.
- Далее переходи во вкладку “Разметка страницы”.
- Снизу в правой части области с инструментами находим кнопку, которая ведет в параметры страницы, и щелкаем по ней. Она представлена виде маленького значка со стрелкой, указывающей вниз по диагонали.

- В открывшемся окне мы по умолчанию должны оказаться во вкладке “Страница”. Здесь проставляем номер первой страницы и жмем OK.

- В итоге, нумерация начнется с указанной цифры с соответствующим смещением номеров последующих страниц.


Примечание: Чтобы убрать нумерацию страниц, выделяем соответствующую часть колонтитула, и нажимаем кнопку Del (или Backspace), чтобы удалить содержащиеся в ней порядковые номера.
Сплошная нумерация
Выставить номера всех печатных листов совсем несложно. Первоначально, конечно, следует открыть файл, в котором будет осуществляться постраничный порядок. В верхней части панели инструментов необходимо найти «Вид», по умолчанию приложение сопровождается обычным видом, в подменю необходимо выбрать «Разметка».

После этого на экране можно наблюдать, как документ разделён постранично. Если пользователя всё устраивает, нет необходимости что-то редактировать, необходимо перейти в раздел «Вставка» и выбрать там «Колонтитулы».
Активировав этот пункт, на экране появляется контекстное меню, позволяющее осуществлять работу с колонтитулами. В предлагаемом перечне нужно найти фразу «Номер страницы», кликнув по ней.

Если все действия были осуществлены правильно, то в Excel появится такой текст, как «&[Страница]». Это будет обозначать, что номера были успешно добавлены в табличный редактор. Следует заметить, что, кликнув по этому тексту, он сразу изменится и покажет постраничный порядок. Если же в этом месте отсутствует информация, то увидеть нумерацию не удастся, поскольку пронумеровать удаётся только заполненные постраничные пространства.

Выполнив на практике все действия, описанные в рекомендациях, как пронумеровать страницы в Excel, становится понятно, что никаких проблем не возникает при необходимости проставить номера.
Заключение
Процедура нумерации в программе Microsoft Excel в определенных ситуациях незаменима, а ее реализация достаточно проста даже для начинающих пользователей. В первую очередь, важно активировать сами колонтитулы, после чего уже можно выбрать различные виды нумерации и настроить их отображение на свой собственный вкус и в соответствии с преследуемыми целями.
Источники
- https://FB.ru/article/346666/kak-pronumerovat-stranitsyi-v-eksel-chetyire-sposoba
- https://itguides.ru/soft/excel/kak-v-eksele-pravilno-pronumerovat-stranicy.html
- https://excelworks.ru/2018/10/17/razmetka-stranitsyi-excel/
- https://compone.ru/numeratsiya-stranits-v-excel
- https://lumpics.ru/how-to-number-pages-in-excel/
- https://MicroExcel.ru/numeratsiya-stranits/
- https://nastroyvse.ru/programs/review/numeraciya-stranic-excel.html
Page Numbers in Excel (Table of Contents)
- Page Numbers in Excel
- How to Insert Page Numbers in Excel
- How to Use Page Numbers in Excel?
Page Numbers in Excel
We come across data, which needs to be printed. When we print the data and want them to be in order, we put page numbers in it. Similar to MS Word, In Excel, we can also put page numbers to our documents when we print them.
Introduction:
As the name itself suggests, page numbers are used to order our documents when we print them. Suppose we want to start a new document and start it from where the previous document ended, let’s say it was page number 49. We can start numbering our new document from page number 50.
We insert Page numbers in a worksheet that do not display in a normal view. It is displayed in the Page Layout view, but it is visible when the document is printed on sheets of paper.
There are two ways to Insert Page Numbers to Excel:
- Insert Page numbers to a single worksheet.
- Insert page numbers to multiple worksheets.
We are going to learn both of them with examples.
How to Insert Page Numbers in Excel?
When we insert page numbers in excel by the above steps:
- Go to View Tab & Page layout view.
- In the footers section, select any block, and in the Design tab under Header & footer controls, select Page number.
- After inserting the page number, type the word “Of” and then click on the Number of pages.
- Click on anywhere in the sheet, and the sheet is ready with the page numbers.

- Click Ctrl + P to print the document.
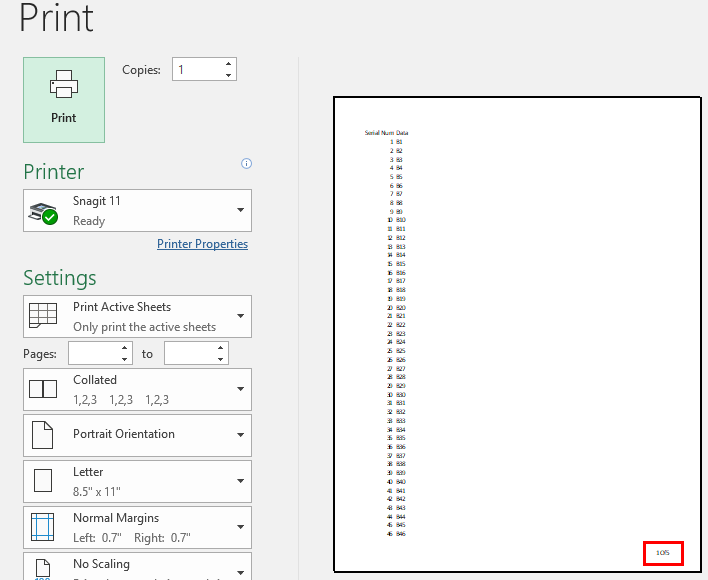
The page print preview shows the document has page numbers.
- After the document is ready with pages, click on Normal Layout in the view tab.
How to Use Page Numbers in Excel?
These Insert Page Numbers is very simple and easy to use. Let us now see how to use the Page Numbers in Excel with the help of some examples.
Page Numbers in Excel Example #1
Insert Page numbers to a single worksheet.
You can download this Page Numbers Excel Template here – Page Numbers Excel Template
- Click on the worksheet you want to insert the page number on.
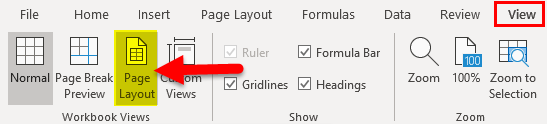
- Go to View Tab, Click on the Page Layout section.
- By default, the Normal view is selected in Excel; when clicked on the Page Layout view, an option appears for headers and footers.
The above image appears on the top of the page. At the bottom of the page, we get an option to add footers.
- There are three blocks in the footer section. Click on any one of the blocks where you want to insert the page number.

I have written a text “Third block” inside the 3rd block to highlight the third block.
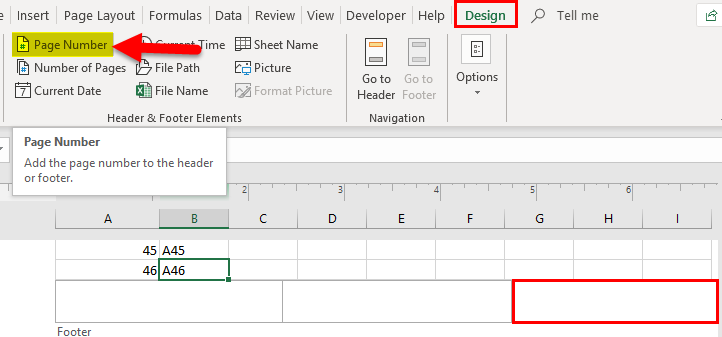
- When we click on any one of the blocks, a design tab appears in Header & Footer Tools.
- In the Design tab, there is an option of Page number & Number of pages.
- Now in the block where we want to insert page number and click on “Page Number”, a code appears in the block. Write the word “OF” after the code.

- Now again, in the design Tab, click on Number of Pages. Another code appears in the block after the word “OF”.

- Now click on anywhere in the sheet, and the sheet is ready with page numbers.
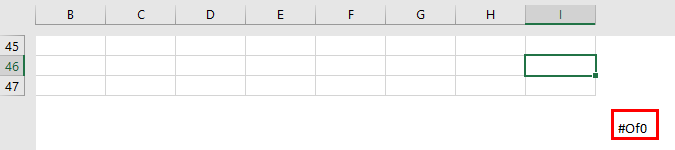
- Currently, our sheet does not contain any data, so; it shows a total number of pages 0 and a null value for the page number.
Now let us practice with some data in the sheet.
Page Numbers in Excel Example #2
Our second sheet has values in column A & B up to cell 230.
Let us give a page number to this worksheet as well.
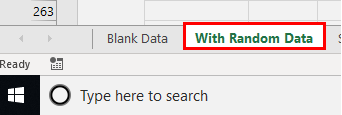
- This data is on sheet 2, so we click on Sheet 2, named as “Random Data”.
- Again, go to the view tab and click on the page layout section.
- Now the option pops up for headers & footers. The top section is for the headers, and the bottom section is for footers.


- Click on any block of footers and then click on a Page number from the Design Tab.
- A code pops up in the block. Now type the word “OF” after the code.

- Again in the design tab of the headers and footers section, click on a number of pages. Another code pops up in the block after the word “Of”.
- Now click anywhere on the sheet, and the page number is ready for the worksheet.

There are a total of five pages in the worksheet, and the page number is first. Now let us learn to insert page numbers in multiple worksheets at once in the next example.
Page Numbers in Excel Example #3
There are two sheets of sheet 3 & sheet 4. We will try to insert page numbers on both worksheets.
- Hold control and click on sheet 3 & sheet 4 to select both the sheets.

- In the view tab, click on a page layout.
- A design tab appears; in the design tab in the headers & footers section, click on a page number in the third block.
- Write the word “Of” and then click on the Number of pages in the Design Tab.
- Another code pops up in the block after the word “Of”.

- Now click anywhere in the sheet, and page numbers are ready for both pages.

The above image is for sheet 3 & the below image is for sheet 4.

Explanation of Page Numbers in Excel:
- Page number in excel is a useful tool to organize the data if we need to have the data in printed form.
- Page number in excel data can be seen in Page layout form but not in Normal view.
Things to Remember
- A page number is displayed in Page Layout View, not in Normal view.
- Footers has three blocks, and a page number can be inserted in any one of them.
- Once the Page number is inserted, when the document is printed, it contains the page number.
We can choose the starting number for page number from the following steps:
- In the Page Layout tab, click on the button as shown in the screenshot.
- A page setup dialog box appears as below:
- By default, the first-page number is Auto; we can change it to the desired number.
Recommended Articles
This has been a guide on Page Numbers in Excel. Here we discuss how to Page Numbers in Excel along with excel examples and downloadable excel templates. You may also look at these useful functions in excel –
- Page Setup in Excel
- Excel Insert Page Break
- Negative Numbers in Excel
- Excel ISNUMBER Formula
If your work involves printing your excel worksheets, it’s a good idea to insert page numbers in it.
Inserting page numbers in Excel takes a little more work as compared with other Microsoft applications such as Word or PowerPoint.
Watch Video – How to Insert Page Numbers in Excel
How to Insert Page Numbers in Excel
In this tutorial, you’ll learn how to insert page numbers in Excel worksheets.
- How to Insert Page Numbers in Excel using the using the Page Layout View.
- Insert Page Numbers in Excel Using the Page Setup Dialogue Box.
- Start Page Numbering with the Desired Number.
- Change the Order in which pages are numbered.
- Remove Page Numbers from the Excel Worksheets.
Insert Page Numbers in Excel: Page Layout View
If you want to insert page numbers in all the pages of a worksheet, using the page layout view is the fastest way to do it.
Here is how to do this:
Note that these page numbers are visible only in the Page Layout view. You would not see it when you go back to the normal view. If you print the worksheet, the page numbers also get printed.
Have a Different First Page Footer
You may want to have a different text in the footer on the first page, and regular page numbers of other pages. For example, on the first page, you may want to have Company’s name/website or copyright info along with the page number.
Here is how to do this:
Now, whatever you have entered in the first page would only be visible on the first page and rest all the pages would show page numbers.
Have Different Odd and Even Pages Footer
If you want to have different page numbers for odd and even pages, you can easily do this using the inbuilt settings.
For example, you may not want to show page numbers on even pages.
Here is how to do this:
Insert Page Numbers in Excel: Page Setup Dialogue Box
You can also insert page numbers in Excel using the page setup dialogue box.
Here is how to do this:
This will instantly insert page numbers in Excel. If you want to insert page numbers in on the active worksheet only, follow the above steps. If you want to insert page numbers in multiple worksheets, select all the worksheets (hold the SHIFT key and select the worksheet tabs) and then follow the above steps.
Start Page Numbering with the Desired Number
If you are printing a report which is a continuation of some other report, or which is a part of some the overall report, you may want to begin page numbers with a different number (instead of 1).
To do this:
Change the Page Order while Numbering
If you have a large data set, by default, Excel would first insert page numbers to the all the sheets going down, and then move to the right and then number those sheets.
If you want to change the order, you can do this by following the below steps:
Remove Page Numbers
To remove page numbers:
- Go to View and select the Page Layout view.
- Scroll down and select the footer where you see the page numbers.
- You would notice that as soon as you click on the box with the page number, it would change into a code. Delete that code.
- Click anywhere else on the worksheet.
You may also like the following Excel tutorials:
- Insert Page Numbers in Excel Worksheets – MS Help.
- How to Insert a Check Mark (Tick ✓) Symbol in Excel
- How to Quickly Insert Date and Timestamp in Excel
- How to Insert a Watermark in Excel
- How to Print Excel Sheet on One Page
- How to Insert Page Breaks in Excel (& Remove, Delete Page Breaks)
Home / Excel Basics / How to Add Page Number in Excel
Like other Microsoft Office applications such as Word or PowerPoint, Excel also has the feature to insert page numbers while printing the Excel worksheets.
Users can insert page numbers per sheet or to multiple sheets at once in Excel and can also customize the same.
We have mentioned some quick and easy steps for you to add or remove the page numbers in Excel.
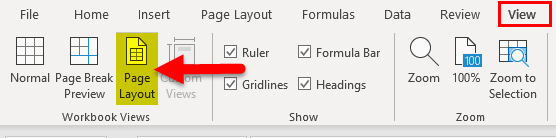
- First, go to the “View” tab and then click on the “Page Layout” icon under the “Workbook views” group.

- After that scroll down the sheet and click within the “Footer” column (Left, Center, Right) based on which side of the page you want to display the page numbers.

- Now, go to the “Design” tab and click on the “Page number” or “Number of pages” icon to add the page numbers.
- Or click on the “Footer” icon and select the page number printing style you want to add.

- Once you select the page number option which you want to add and print, Excel adds that page number to the worksheet in the form of codes.

- In the end, click anywhere outside the “Footer” to display the page numbers.


To come back to the normal view after adding the page numbers using Header & Footer option, click on the “normal view” icon on the below status bar on the Excel sheet.

Add Page Numbers Using Page Setup Dialog Box
When users have data in multiple sheets within a workbook and want to print that data in a continuous series, they can add page numbers to all the sheets in one go with the help of the “Page Setup Dialog Box” option.
- First, open the workbook and select the sheets which you want to print (select multiple sheets)

- After that, go to the “Page Layout” tab and click on the “page setup” dialogue launcher.

- Now, select the “Header/Footer” tab in the “Page Setup” window.
- In the end, click on the Footer drop-down arrow and select the page number printing style which you want to display, and click OK.
- To view the Preview, click on the “Print Preview” button.

- Once you click OK, all the selected sheets will get the page numbers in series starting from the first sheet first page


Customize the Starting Page Number
In Excel by default, the page number starts with page 1, but users have the option to change the starting number of the first page.
- First, go to the “Page Layout” tab and click on the “page setup” dialogue launcher.

- After that, select the “Page” tab in the “Page Setup” window.
- Now, enter the number in the “First-page number” column from which you want to start your first-page number and click OK.


Add Different Page number Style for Odd and Even Pages
- First, go to the “View” tab and then click on the “Page Layout” icon under the “Workbook views” group.

- After that scroll down the sheet and click within in the “Footer” column of the first sheet.
- Now go to the “Design” tab and tick mark the “Different Odd and Even Pages” icon on the ribbon
- In the end, select the page number printing style you want to display for odd number pages.

- At this moment, your page numbers with the page number printing style you selected are added for odd number pages.

- Again, scroll the sheet to the next page i.e page number 2, and select the “Footer” column of that sheet.
- After that, repeat the same process, you just did on the first page “Footer” column for the odd page number pages.
- At this moment, your page numbers with the page number printing style you selected are added for even number pages.

- Once you are done on both the odd and even footers, your odd and even numbers would get printed in two different styles based on the print page number styles you have selected.


- First, open the “Header and Footer” options.
- After that scroll down the Excel sheet and click in the “Footer” column where you have the page number code added.
- Now, select the entire page number code and press delete.

Remove the Page numbers Using Page Setup Dialog Box
- First, go to the “Page Layout” tab and click on the “page setup” dialogue launcher.
- After that, select the “Header/Footer” tab and click on the “Custom Footer” option.

- Now select the “Odd Page Footer” or “Even Page Footer”, if you have different page number styles added for odd and even pages.
- In the end, select the entire page number code and press delete, and click OK.


This example teaches you how to insert page numbers in Excel.
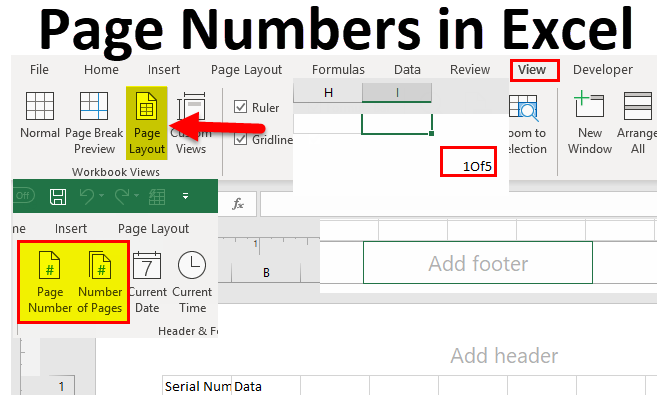
1. On the View tab, in the Workbook Views group, click Page Layout, to switch to Page Layout view.

2. Click Add footer.

3. On the Header & Footer tab, in the Header & Footer Elements group, click Page Number to add the page number.

4. Type » of «
5. On the Header & Footer tab, in the Header & Footer Elements group, click Number of Pages to add the number of pages.

Result:

Note: Excel uses codes in order to automatically update the header or footer as you change the workbook.
6. Click somewhere else on the sheet to see the footer.

7. On the Header & Footer tab, in the Options group, you can add a different first page header/footer and a different header/footer for odd and even pages.

8. On the View tab, in the Workbook Views group, click Normal, to switch back to Normal view.
Home > Microsoft Excel > How to Add Page Numbers in Excel? 2 Easy with Options
(Note: This guide on how to add page numbers in Excel is suitable for all Excel versions including Office 365)
Imagine you are holding a piece of document for the first time and someone who’s familiar with it asks you to refer to a piece of content in the document. At first, you’d be baffled about where to search, right?
And if they ask you to turn to a certain page number, it would be easy to find the content.
Page numbers are used to identify and refer to a particular content with much ease. We have already seen how to add page numbers to a Word document, but how would you add page numbers in Excel?
In this article, I will tell you how to add page numbers in Excel and how to customize them with the options available.
You’ll Learn:
- Why Add Page Numbers in Excel?
- How to Add Page Numbers in Excel and Customize Them?
- Add Page Number Using the Header and Footer Option
- Additional Options
- Add Page Number Using Page Setup
- Additional Options
- Add Page Number Using the Header and Footer Option
- How to Remove Page Numbers in Excel?
Watch our video on how to add page numbers in Excel

Related Reads:
How to Insert a Page Break in Excel? (3 Simple Steps)
How to Convert Text to Numbers in Excel? 5 Easy Methods
How to Apply the Accounting Number Format in Excel? (3 Best methods)
Why Add Page Numbers in Excel?
Before we see how to add page numbers in Excel, let us first understand what page numbers mean in Excel.
Page numbers are a crucial part of a professional document. A document with page numbers provides an easy citation for the user to refer to a certain page and helps keep the pages in order.
When it comes to a spreadsheet, Excel consists of multiple sheets and a vast number of cells. Usually, to point or refer to a particular value, we use cell numbers. But when printing them, we cannot use cell numbers to refer to values. Thereby, adding page numbers to your Excel worksheet makes it more organized and effective to refer to.
In Microsoft Word, page numbers are placed in the header or footer of each page and they can either be numbered in Roman numerals or western numbers. In the same way, we can add page numbers in Excel. Let us see how.
How to Add Page Numbers in Excel and Customize Them?
Add Page Number Using the Header and Footer Option
In the normal mode, Excel appears as a whole sheet with the scroll button consisting of cells without any page break or space to add page numbers.

When the layout is changed to Page Layout, you can see the Excel sheet in a different format.
To add page numbers in Excel sheets, navigate to the View main menu. Select the Page Layout option. Once you click this option, the Excel sheet is split up into pages both horizontally and vertically.
Note: Another way to change the layout of the sheet is by using the shortcut buttons near the zoom bar towards the bottom right of Excel.

You can either add page numbers in the header or footer. In this case, let us add page numbers in the footer.
Scroll down and click on Add Footer. This shows you three partitions in the footer to add page numbers. You can either add the page numbers on the left side of the page, to the right of the page, or in the center of the page.

Once you click on the footer, you can see the Header & Footer option in the main menu. Under the Header & Footer Elements section, click on the Page Number.

Once you click on page number, you can see the text “&[Page]” in the footer section.

Now, click anywhere in Excel and you can see the numbers populating in the selected partition of the header or the footer.

Note: Changing the layout of a sheet in Excel only pertains to that particular sheet and it doesn’t adhere to other sheets or workbooks.
Additional Options
Add Total Number of Pages With the Page Number
When you want to add the total number of pages along with the current page number, first click on Page Number in the Header & Footer section. Now, manually add “of”. Then click on Number of Pages in the same Header & Footer section. This adds the current page and the total number of pages onto the footer.

For your reference in Excel, you can see the current page you’re in and the total number of pages towards the left bottom of Excel near the accessibility status.
Note: You can only see the page numbers in the Page Layout mode and when printing. You cannot see the page numbers in Excel in normal mode.
Add Different Content in One Page
There might be some instances where you have to add a different content and page number that might only pertain to the first page. In such cases, you can manually add a different page number or different content. Let us see how.
First, change the layout of the Excel sheet to Page Layout from the View main menu. Then, click on the header or footer of any page. Now, navigate to the Header & Footer and check the checkbox for Different First Page.

Now, enter the number you want to add in the place of a footer and the number will be added as a page number. Additionally, you can add any text in the footer and they will only pertain to that certain page.

Note: When this option is checked, anything you add on the page will only pertain to that page and not other pages.
Make Changes for Odd or Even Page Numbers
When you check the Different Odd & Even Pages option, any change you make to the header and footer will only pertain to odd or even pages. This option will be more helpful when you print the sheets on the same page.

Also Read:
How to Find and Replace in Excel? A Step-by-Step Guide
How to Randomize a List in Excel? 2 Different Methods
How to Use Excel Split Screen? 3 Simple Ways
Add Page Number Using Page Setup
This is another way to add page numbers in Excel. In addition to adding page numbers, this method has a variety of options and functionalities to customize them. Let us first see how to add page numbers.
Navigate to the View main menu and change the view to Page Layout.
Now, go to the Page Layout main menu and click on the Page Setup Options which can be seen as a small extend option.

This opens the Page Setup dialog box. Navigate to the Header/Footer tab. If you want to add the page numbers as the header, click on the dropdown from Header. In the same way, you can click on the dropdown from Footer to add the page number in the footer. Select the way you want to add the page number from the suggestions. Click OK.

This inserts the page number in the Excel sheet.

You can check the checkboxes in the Page Setup dialog box under the Header/Footer tab to start numbering with different first page or make changes to alternate pages.
Additional Options
Start Numbering Page From a Different Number
If you want to start numbering the pages from a different number other than 1, navigate to the Page tab in the Page Setup dialog box. In the First page number: text box, change the Auto option to the number you want to start with. Click OK.

This adds a different number to the starting page and every page will be numbered accordingly.
Change the Order of Numbering
You would have noticed that the pages are numbered first vertically and then horizontally by default. Using the Page Setup option, you can change the order the pages are numbered.
In the same Page Setup dialog box, navigate to the Sheet tab. In the Page Order section, select Down, then over to number vertically and then horizontally, or select Over, then down to number the pages horizontally and then vertically.

How to Remove Page Numbers in Excel?
Though page numbers are a valuable addition to your worksheet, sometimes you might not need a page number.
To delete a page number, click on the Page Number in the header or footer section. This highlights the page number. Delete them and click away.

This deletes the page numbers in the selected page and the following pages.
Suggested Reads:
How to Merge Cells in Excel? 3 Easy Ways
How to Create a Venn Diagram in Excel? 2 Easy Ways
How to Convert Formulas to Values in Excel? 6 Easy Methods
Frequently Asked Questions
How to add page numbers for the entire worksheet?
You can add page numbers either by changing the Page Layout and selecting Page Number in the Header & Footer main menu. You can also do this by using the Page Setup dialog box and choosing page numbers from the Header/Footer dropdown. These changes apply to the whole worksheet and not just the single page.
When we add page numbers, do they apply to the whole workbook?
No. When you add page numbers or make any customization to the layout or formatting, the changes only pertain to the worksheet. If you want to apply the changes to the whole document, you have to manually add the page numbers in each worksheet separately.
How to know the page breaks in Excel?
First, click on the Page Layout and change the layout of the page. Once you return to the Normal view, you can see a fine dotted line that separates the page. You can use that as a cue when you add data and know how to separate them accordingly.
Closing Thoughts
Page numbers help in facilitating the reader to find the particular content in the document and know the size of the complete text.
In this article, we saw how to add page numbers in Excel using two different methods and the additional options that come with it.
Please visit our free resources center for more high-quality guides on Excel and other Microsoft Suite applications.
Ready to dive deep into Excel? Click here for advanced Excel courses with in-depth training modules.
Simon Sez IT has been teaching Excel and other business software for over ten years. For a low, monthly fee you can get access to 140+ IT training courses.
Simon Calder

Chris “Simon” Calder was working as a Project Manager in IT for one of Los Angeles’ most prestigious cultural institutions, LACMA.He taught himself to use Microsoft Project from a giant textbook and hated every moment of it. Online learning was in its infancy then, but he spotted an opportunity and made an online MS Project course — the rest, as they say, is history!