

-
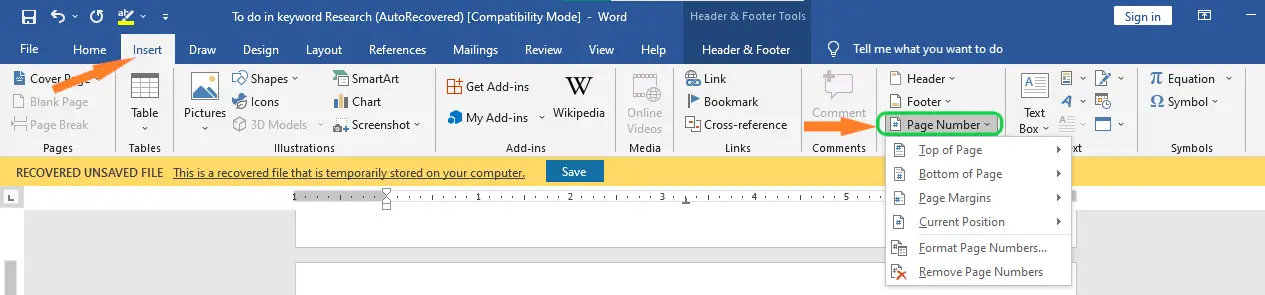
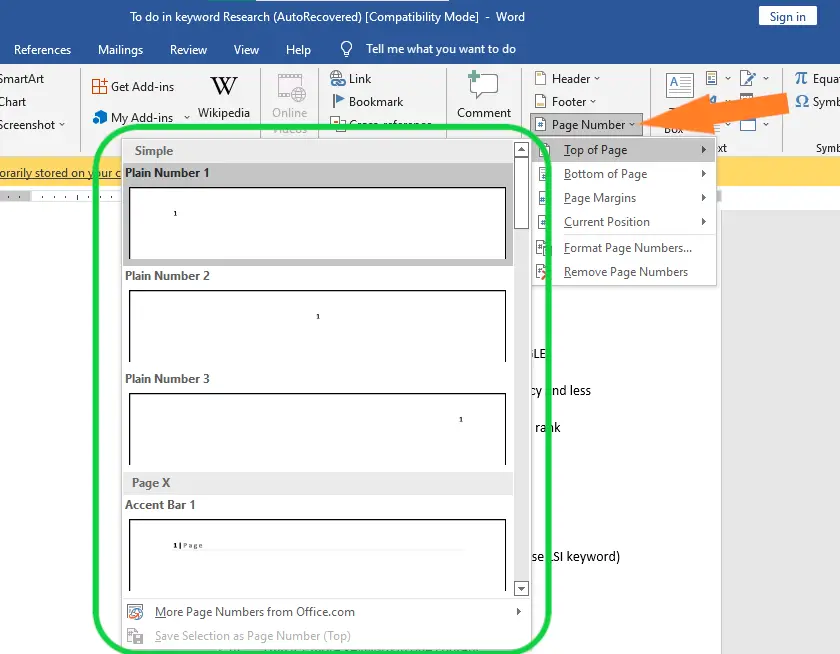
Select Insert > Page Number, and then choose the location and style you want.
-
If you don’t want a page number to appear on the first page, select Different First Page.
-
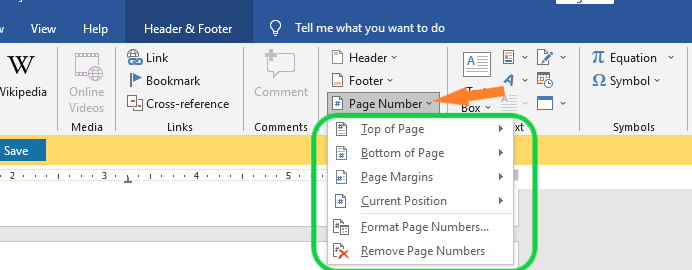
If you want numbering to start with 1 on the second page, go to Page Number > Format Page Numbers, and set Start at to 0.
-
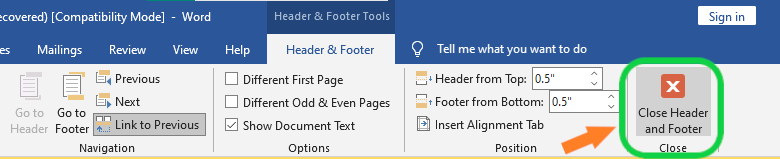
When you’re done, select Close Header and Footer or press Esc.
Tip: To get back to a header or footer to make changes, double-click in the header or footer area.
-
On the Insert tab, click the Page Number icon, and then click Page Number.
-
Select a location, and then pick an alignment style. Word automatically numbers every page, except designated title pages.
-
To change the numbering style, select Format and then choose the formatting you want to use.
-
Select OK twice to close both dialog boxes.
Word for Microsoft 365 Word 2021 Word 2019 Word 2016 Word 2013 Word 2010 Word 2007 More…Less
Word can automatically count the lines in a document and display the appropriate number beside each line of text. This is useful when you need to refer to specific lines in a document, such as a script or a legal contract.
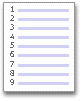
By default, Word numbers every line in a document (except those in tables, footnotes, endnotes, text boxes, and headers and footers). However, you can choose which line numbers to display. For example, you can display line numbers in all or part of the document. Or you can display line numbers at intervals, such as every tenth line (10, 20, 30, and so on).
What do you want to do?
-
Add line numbers
-
Remove line numbers
Add line numbers
You can add line numbers to all or part of a document. To view line numbers, you must be in Print Layout view (click the View tab to check).
Notes:
-
A table is counted as one line.
-
A figure is counted as one line.
-
A text box is counted as one line if it is positioned inline with the text on the page. If text on the page wraps around the text box, the lines of text on the page are counted. Lines of text inside a text box are not counted.
Add line numbers to an entire document
-
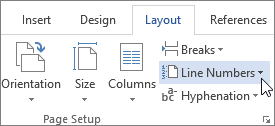
On the Layout tab, in the Page Setup group, click Line Numbers.

Note: If your document is divided into sections and you want to add line numbers to the entire document, you first need to select the document. Click Select in the Editing group on the Home tab, and then click Select All. Or press CTRL+A.
-
Do one of the following:
-
To number consecutively throughout the document, click Continuous.
-
To start with number 1 on each page, click Restart Each Page.
-
To start with number 1 after each section break, click Restart Each Section.
-
For more advanced line numbering options, such as numbering at different intervals, click Line Numbering Options, and then click Line Numbers on the Layout tab.
-
Add line numbers to a section or to multiple sections
-
Click in a section or select multiple sections.
-
On the Layout tab, in the Page Setup group, click Line Numbers.
-
Click Line Numbering Options, and then click the Layout tab.
-
In the Apply to list, click Selected sections.
-
Click Line Numbers.
-
Select the Add line numbering check box, and then select the options that you want.
Top of Page
Remove line numbers
You can remove line numbers from the entire document, from a section, or from a paragraph.
-
Click in the document, or click in the section or paragraph from which you want to remove line numbers. If you want to remove line numbers from multiple sections, select the sections.
-
On the Layout tab, in the Page Setup group, click Line Numbers.
-
Do one of the following:
-
To remove line numbers from the entire document or section, click None.
-
To remove line numbers from a single paragraph, click Suppress for Current Paragraph.
-
Top of Page
What do you want to do?
-
Add line numbers
-
Remove line numbers
Add line numbers
You can add line numbers to all or part of a document. To view line numbers, you must be in Print Layout view (click the View tab to check).
Notes:
-
A table is counted as one line.
-
A figure is counted as one line.
-
A text box is counted as one line if it is positioned inline with the text on the page. If text on the page wraps around the text box, the lines of text on the page are counted. Lines of text inside a text box are not counted.
Add line numbers to an entire document
-
On the Page Layout tab, in the Page Setup group, click Line Numbers.
Note: If your document is divided into sections and you want to add line numbers to the entire document, you first need to select the document. Click Select in the Editing group on the Home tab, and then click Select All. Or press CTRL+A.
-
Do one of the following:
-
To number consecutively throughout the document, click Continuous.
-
To start with number 1 on each page, click Restart Each Page.
-
To start with number 1 after each section break, click Restart Each Section.
-
For more advanced line numbering options, such as numbering at different intervals, click Line Numbering Options, and then click Line Numbers on the Layout tab.
-

Add line numbers to a section or to multiple sections
-
Click in a section or select multiple sections.
-
On the Page Layout tab, in the Page Setup group, click Line Numbers.
-
Click Line Numbering Options, and then click the Layout tab.
-
In the Apply to list, click Selected sections.
-
Click Line Numbers.
-
Select the Add line numbering check box, and then select the options that you want.
Top of Page
Remove line numbers
You can remove line numbers from the entire document, from a section, or from a paragraph.
-
Click in the document, or click in the section or paragraph from which you want to remove line numbers. If you want to remove line numbers from multiple sections, select the sections.
-
On the Page Layout tab, in the Page Setup group, click Line Numbers.
-
Do one of the following:
-
To remove line numbers from the entire document or section, click None.
-
To remove line numbers from a single paragraph, click Suppress for Current Paragraph.
-
Top of Page
Need more help?
Want more options?
Explore subscription benefits, browse training courses, learn how to secure your device, and more.
Communities help you ask and answer questions, give feedback, and hear from experts with rich knowledge.
![]()
Download Article
Easily add page numbers to the header or footer in your Microsoft Word document
![]()
Download Article
- Inserting (PC & Mac)
- Formatting (PC & Mac)
- Inserting (Mobile)
- Video
- Expert Q&A
- Tips
|
|
|
|
|
Adding page numbers in Microsoft Word is easy! Whether you’re writing a 10-page essay or a thesis paper, there are a variety of ways to customize the page numbers. Use the Insert tab to quickly add page numbers. From there, you can change the formatting and numbering options. This wikiHow guide will show you how to add page numbers to your Microsoft Word document on Windows and macOS, as well as in the Word mobile app on your Android, iPhone, or iPad.
Things You Should Know
- On desktop or mobile, go to the Insert tab, then select «Page Number» to add page numbers.
- Double-click the page number to make changes to the font, color, or style.
- Double-click the header or footer, then go to Page Number > Format Page Numbers for additional options.
-
1
Click Insert. This is in the tab menu bar at the top of Word. Alternatively, double-click the top or bottom of the page to open the Header or Footer editing menu.
- Don’t forget to save your work as you go!
-
2
Click Page Number. This opens a pop-up menu for choosing where to place the page numbers.[1]
- In the Insert menu, Page Number is near the center.
- In the Header & Footer design tab, Page Number is on the left.
Advertisement
-
3
Choose a page number position. This can be in the header or footer, and located left, center, or right.
- You can also toggle the option to include the page count in the page numbering (e.g. 1 of 3).
- Selecting a page number position will open the “Header & Footer” tab.


Advertisement
-
1
Double-click a page number. This will select it and show a pop-up menu with options for changing the font, color, and style. This change will edit every page number automatically.
- You could even cross out the page numbers if that’s your style.
-
2
Start numbering on the second page. If you want the first page to have no numbering, and start at 1 on the second page, follow these steps:
- Double-click the header or footer to open the Header & Footer design tab.
- Check the “Different First Page” checkbox.
- Click Page Number then Format Page Numbers.
- Select “Start at” and change it to 0.
-
3
Restart page numbers by using page breaks. If you want to start a new numbering later in the document, you’ll need to use a page break.
- Place your cursor at the beginning of the page you want to restart the numbering on.
- Go to the Layout tab, then click Breaks.
- Select Next Page in the Breaks options menu.
- Double-click the header or footer in the second section. This will open the Header & Footer design tab.
- Click Page Number then Format Page Numbers.
- Select the radio button labeled «Start At,» then select «1» to restart the page count at 1.
-
4
Use «Format Page Numbers» for additional changes. This can be located by going to Insert > Page Number > Format Page Numbers. You can change:
- The number format. You can change this to Roman numerals, letters, or another style.
- The chapter number.
- The starting number.
-
5
Click Close Header and Footer. This will return you to editing the body of the document. Alternatively, press Esc to close the header and footer editor.


Advertisement
-
1
Open your Word document on your Android, iPhone, or iPad. It’s easy to use Word on your phone or tablet to insert page numbers into your document.
-
2
Tap the more button. While in Edit mode in the Word mobile app, tap the more button (three horizontal dots).
-
3
Tap Home. Then, select Insert to switch to the Insert menu.
-
4
Choose Page Numbers. Then, select the placement location for the numbers.
-
5
Format the page number. After selecting the placement, double-click the page number. Then, tap the text edit button (the icon with the letter A and a pen). You can change the font, size, color, and more!
-
6
Go to Headers and Footers. This is in the Insert menu. You can set a different first page, change how odd and even pages look, or remove the page numbers entirely.
- When working in Online mode, any changes made in the app will appear on your desktop version of Word.


Advertisement
Add New Question
-
Question
In the insert box, the page number icon is grayed out and not available for use. How do I activate it?

Kyle Smith is a wikiHow Technology Writer, learning and sharing information about the latest technology. He has presented his research at multiple engineering conferences and is the writer and editor of hundreds of online electronics repair guides. Kyle received a BS in Industrial Engineering from Cal Poly, San Luis Obispo.
wikiHow Technology Writer
Expert Answer
The page numbering feature isn’t available in certain layouts. Go to View and select Print Layout. If this doesn’t resolve the issue, try restarting and/or updating Microsoft Word.

Ask a Question
200 characters left
Include your email address to get a message when this question is answered.
Submit
Advertisement
Video
-
If you plan on creating a complex header or footer (like your name, or a title), try and add the page numbers first. They will be much easier to work with.
-
Looking for money-saving deals on Microsoft Office products? Check out our coupon site for tons of coupons and promo codes on your next subscription.
Thanks for submitting a tip for review!
Advertisement
About This Article
Article SummaryX
1. Click Insert.
2. Click Page Number.
3. Select a position.
4. Choose a style.
Did this summary help you?
Thanks to all authors for creating a page that has been read 423,281 times.
Is this article up to date?
By default, Word keeps track of every line, word, and character in a document, and displays their numbers when the user demands.
Although Word normally does not display line numbers automatically, you can choose to do so.
For instance, you can ask Word to display line numbers in the entire document or only in some part.
You can also choose to display line numbers at certain intervals, say, at every tenth line as 10, 20, 30, 40, and so on.
Adding line numbers to a document has its advantages, especially for large documents with multiple pages.
This is useful when referring to a specific line or word in a document—like 254th line, or 4th word in the 50th line, and so on.
Just a note before we begin.
If you have tables, figures, or text boxes in your document, Word will count them as single line entities, regardless of how large they are.
Moreover, Word will display line numbers for documents only in the Print Layout, and not in Read Mode or Web Layout.
Let us start adding line numbers to our Word document.
Step #1: Open the Word document
Open the Word document where you want to add line numbers. On the top menu bar click on Layout to change the ribbon.

In the Page Setup section, click on Line numbers. Word opens a drop down menu with several choices:
- None
- Continuous
- Restart Each Page
- Restart Each Section
- Suppress for Current Paragraph
- Line Numbering Options
None—this is the default choice, where Word does not display any line numbering. This is also the choice if you want Word to stop displaying any line number.
Continuous—this choice allows Word to display a continuously incrementing line number on the left side of all lines throughout the document. Note that Word treats tables, images, and text boxes embedded in the document as a single line and numbers them as such.

Restart Each Page—as the choice suggests, Word restarts the numbering for each page.

Restart Each Section—If your document is divided into sections with a section break, Word will restart the numbering on each section, but you must turn on the numbering for each section separately. Additionally, as Word treats formatting of each section separately, you can have different numbering schemes for each of them. Note that Word attaches a line number to the blank line as well.

Suppress for Current Paragraph—If you have already adorned the document with line numbers regardless of page or section, this choice allows Word to remove line numbering from the paragraph immediately after the cursor, and arrange the line numbering for the following paragraphs accordingly.

Line Numbering Options—this option allows setting the defaults for line numbering options in a Word document. Clicking on this option opens a dialog box for Page Setup.

Click on the Layout tab. Click on the down arrow mark on the right of Apply to, to open the choices for where you would like to apply the selections. Word offers three options:
- This Section
- This Point Forward
- Whole Document

This section—the choices you make will apply only to the current section defined by the cursor location.
This point forward—the choices you make will apply to the section immediately following the cursor location.
Whole document—the choices you make will apply to the entire document.
Once you have made your selection, click on Line Numbers to open the next dialog box for Line Numbers. Word offers a number of choices here for adding line numbering and for placement of line numbers:

Add line numbering— Click on this option and ensure a tick-mark is present in the square on the left to allow making further choices.
Start at—this number tells Word how to start line numbering. For instance, setting Start at to 10, tells Word to start line numbering from 10, rather than from the customary 1.
From text—this setting defines the gap in inches or centimeters between the line number and the text in the line. Auto allows Word to make automatic adjustments.
Count by—this setting defines the increment Word uses when numbering lines. Default is 1, implying continuous numbering.
Restart each page—choosing this option sets the default for line numbering to restart on each page.
Restart each section—choosing this option sets the default for line numbering to restart on each section.
Continuous—Choosing this option sets the default for a continuously incrementing line numbering for the document.
Step #2: Close dialog box for line numbers
Once you have made your choices, click on Ok to close the dialog box and return to Page Setup dialog,

Step #3: Return to document
Close this by clicking on Ok to return to the document. By now, Word would have applied your choices of line numbering to your document.

Conclusion
It is easy to display line numbering in a Word document—once you know what type of line numbering you want. Just follow the simple three-step method we have outlined above.
Here is how you can add line number in a google doc.
In this chapter, we will discuss how to add page numbers in MS Word. Microsoft Word automatically assigns page numbers on the pages of your document.
Typically, page numbers are printed either in the header or footer, but you have the option of displaying the page number in the left or right margin at the top or bottom of a page. To learn more about header and footer, see our previous tutorial.
Table of contents
- What is Page Number in MS Word?
- What is the purpose of page number?
- How to Simply Insert Page Number
- How to Add Different Page Number
- Steps to Hide the Page number on the first Page
- How To Add Page Number to an Existing Header or Footer
- How to Insert page number from Current Position
- Summary
A page number is the particular page number within a document, often abbreviated as page no. The document may be printed or electronic, such as a Microsoft Word document or an e-book.
Furthermore, they came in many different ways to show numbers and changed them to fit your needs. Page numbering lets you start over with page numbering if you need to number some pages differently.
In addition, you can automatically number each page of your document using page numbers. They are available in a variety of numerical formats, and they could be done to your specifications.
Page numbers typically appear in the header, footer, or side margin. Read our article to learn more about header and footer and how to adjust the page margin.
What is the purpose of page number?
The purpose of page numbers is it helps you keep your document organized, makes it easy to refer back to specific parts of your paper, and make things look more professional and well-done.
So, if you want your table of contents and introduction to be numbered differently than the main body of your document, you would have to put them in a separate section at the beginning.
Moreover, most documents use Arabic numerals in the main body, but some use Roman numerals for different parts like the table of contents, introduction, and glossary. Word also lets you set up your document this way.
How to Simply Insert Page Number
Here is the simple way How to Insert Page Numbers in an MS Word document.
- Start by Clicking the “Page Number” button in the “Header & Footer” section of the “Insert” tab on the Ribbon.

- A drop-down menu displays various possibilities for where you would like the page numbers to appear, such as at the top, bottom, etc.
The final two options allow you to format page numbers more accurately.

- When you hover over one of the first four options, a gallery of page numbers appears.
Each choice in the gallery provides a broad representation of how your page’s page numbers will appear.

- Click the desired option to have Word automatically number all of your document’s pages in that format.
In this example, the “Accent Bar” style has been applied to the “Page X” format.

- Tap the “Close Header & Footer” button on the Ribbon or double-click outside the header or footer section to return to your document.
If you place page numbers at the top or bottom of the page, the header or footer of your document opens so you can add whatever around them.

That’s the easy way to add page numbers, and it works fine if you have a simple document in which you want all the pages to be numbered and numbered in the same way.
How to Add Different Page Number
In adding Different Page Number in MS Word, you will need to divide your document into distinct sections for each component.
To do this, put your insertion point at the very beginning of your document or right before the first page of your main content if you haven’t already made that preliminary content.
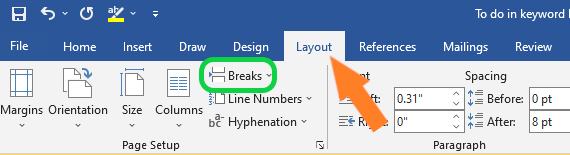
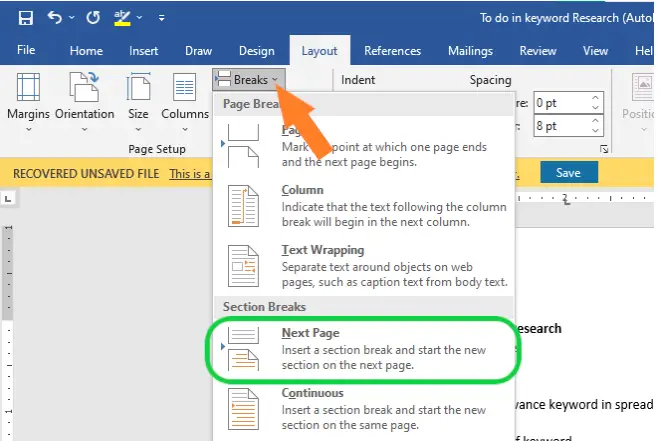
- Start on the Ribbon, click the “Breaks” button on the “Layout” tab.

- Then, click “Next Page” in the drops down menu. This makes a new section start on the next page.

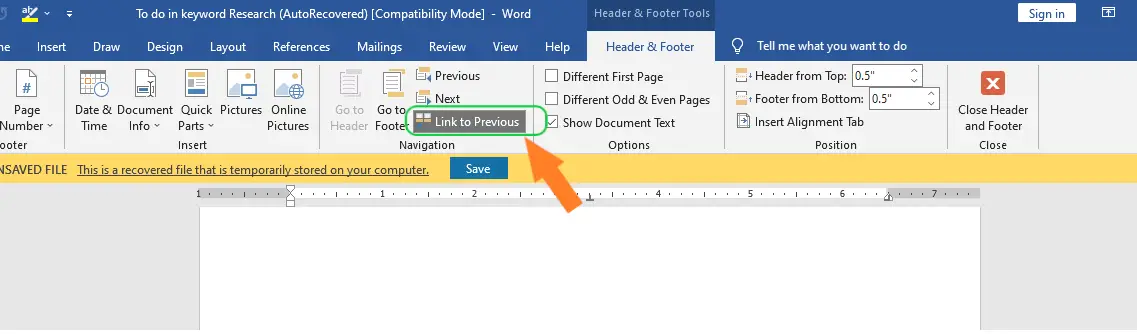
- Break the link between your new introduction and the main body of your work. To do so, open your document’s header or footer where page numbers reside.
- On the Ribbon’s “Header and Footer” tab, Click “Link to Previous” to break the link to the previous section’s header and footer.

- Now that you’ve broken the link, you can change the page numbers to how you want them.
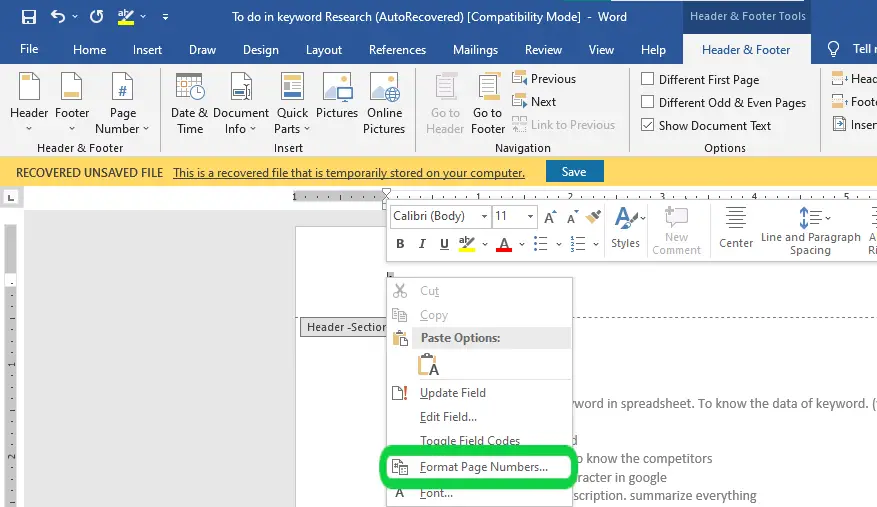
- Next, open the header and footer area of any page in that first section. You’ll see the same page numbers before you made the new section break.
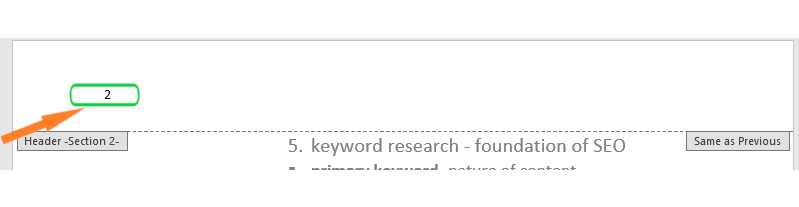
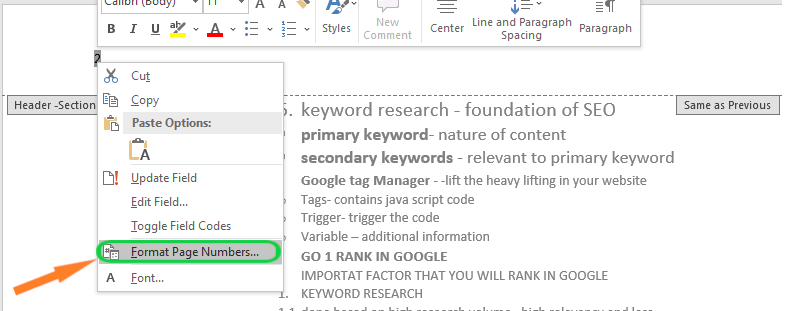
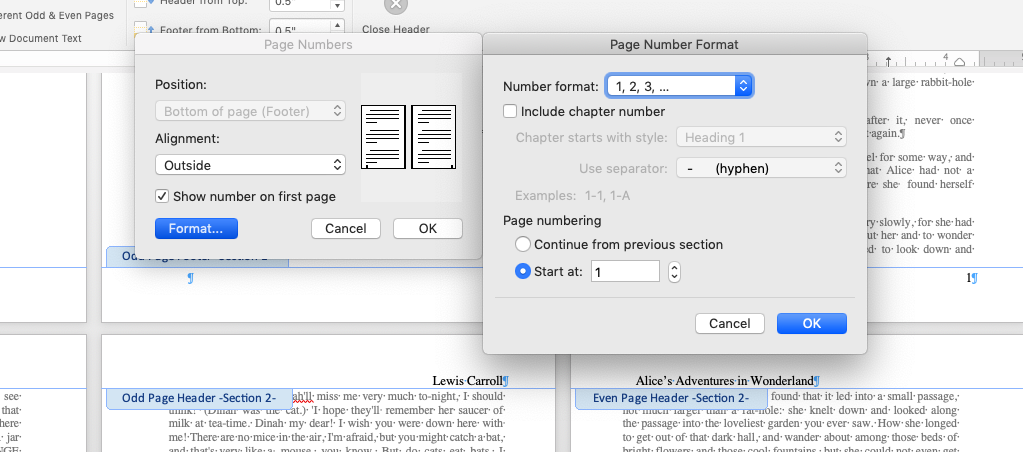
- Right-click on the page number and select “Format Page Numbers” from the menu that appears.

- In the Page Number Format window, use the “Number Format” drop-down menu to choose the type of numbers you want to use for the section.
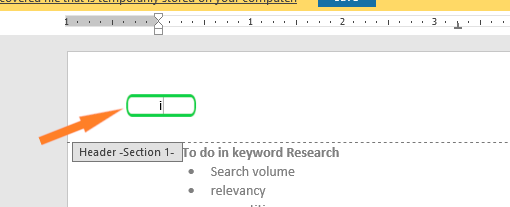
- Here, we’ve used standard Roman numerals with lowercase letters. When you’re done, click “OK.”

- As you can see that the Roman numerals have been used to number the pages in that section.

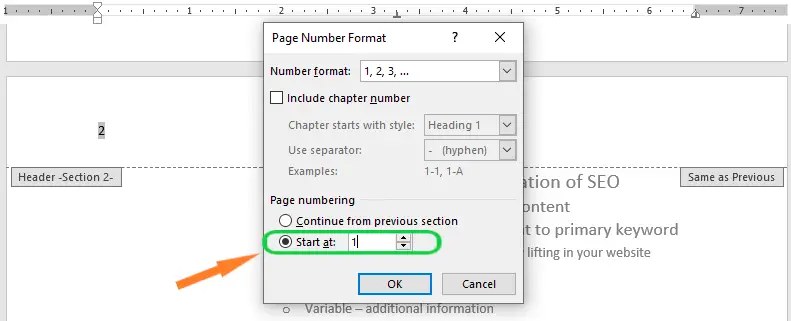
- Next page below you’ll notice that page numbering doesn’t start at 1. It kept the same numbering before you added the section.

- But it’s easy to fix. Right-click on the page number and select “Format Page Numbers” from the menu.

- Select “Start At” in the Page Number Format window and type “1” in the box to the right to start the section on page one.


That concludes the discussion. You should now have two parts with distinct numbering and formatting.
Steps to Hide the Page number on the first Page
In some documents, you may not want the first page to show the page number. You can hide the first page number without affecting the rest of the pages. Here are the steps to do it.
- Double-click the header or footer to unlock it.
- From the header and footer tab, place a checkmark next to Different First Page. The header and footer will disappear from the first page. If you want, you can type something new in the header or footer, which will only affect the first page.
If you’re unable to select Different First Page, it may be because an object within the header or footer is selected. Click an empty area within the header or footer.
If you already have a header or footer and you want to add a page number to it, Word has an option to automatically insert the page number into the existing header or footer. In our example, we’ll add page numbering to our document’s header.
- Double-click anywhere on the header or footer to unlock it.
- On the Header and Footer tab, click the Page Number command. In the menu that appears, hover the mouse over Current Position and select the desired page numbering style.
- Page numbering will appear.
- When you’re finished, press the Esc key.
How to Insert page number from Current Position
Step-by-Step Instructions:
- Go to the first page for which you want to have numbered pages.
- At the top of the page, before the first line/word, click on the document to place your curser.
- Then choose Layout from the top menu. Next select Breaks – Next Page.
- Now choose Insert from the top menu and then select Page Numbers and then choose how you want them to appear in the document.
- Now highlight the page number at which you want to start the numbering. From the Header & Footer Tools menu, unclick Link to Previous.
- With the number still highlighted, choose Page Number from the top menu, then select Format Page Numbers. Under Page Numbering, choose Start At and then select a starting number.
- The last step is to go to the top of the document and click on the first page number, and then hit delete. This will remove the beginning numbering sequence, and you will be left with the numbering sequence you created later in the document.
Summary
In summary, we’ve learned how to add page numbers in a word document as well as what those terms mean. In addition, we know why we need a page number in our document to look presentable and creative. Furthermore, we have many options to apply for page numbers in different ways.
Meanwhile, if you want to learn more about formatting text, see the previous tutorial on how to add header and footer and how to adjust page margin in Microsoft Word, which are still part of formatting your documents. You can browse those guides if you are having a hard time exploring your documents.
We hope this tutorial helps you as you format your documents in MS Word.
PREVIOUS
NEXT
If you’re publishing and using print-on-demand to sell your book, you know the pain and frustration page formatting causes. Today, we’re going to cover one of the more annoying and (unnecessarily) challenging steps when using Microsoft Word: adding page numbering to your file.
Here’s a tl;dr version, for those of you in a hurry:
Adding Page Numbers in Microsoft Word
- Finishing Writing and Editing
Finalize the content before you do any page layout. You should also add any styling and general formatting before you mess with page numbers.
- Add Breaks
Use Page Breaks for controlling where content appears on the page and Section Breaks to control section-by-section headers.
- Format Header and Footer
Each section break defines a new Header and Footer. Check the settings for all your sections before inserting page numbering.
- Insert Page Numbers
Add the Page Numbers and review each section for proper linking and accuracy.
Step 1: Finish Your File
Do not, under any circumstances, add page numbers before you have finished editing and revising your book. It’s a waste of time and energy. Book formatting is best approached in a thoughtful order; page numbering being among the last steps.
So before you insert page numbers, see to your page layout design. That includes formatting your text, adding styles, setting your page margins, and any images or graphics. Create and add all the front matter and back matter too.
Finally, the last part of formatting your book design ties directly to your page numbering: adding breaks. That’s our next step, but first, turn on Reveal Non-Printing Characters.

Non-Printing Characters include spaces, returns, and breaks. You’ll want these revealed so you can properly add breaks to your file.
Step 2: Add Breaks
Breaks—Page Breaks and Section Breaks—divide the page dynamically, so that when you export your PDF for printing, the spacing will stay uniform.
Please, NEVER use hard returns to create space on the page.
Breaks will allow you to segment and section your file. Importantly, breaking your file into sections allows you to control which pages have page numbers.
Think about it; have you ever bought a book that has a page number on the very first page (the title or half-title usually)? Go grab a couple books off your shelf and have a look. I’ll wait.

I’m guessing you found that the front matter didn’t have any page numbering. Then you get to the first official page of the book and the page numbering begins at 1.
Create Something
Create your book and share it with the world.
Create Something
Create your book and share it with the world.
Page Break
Inserting a Page Break tells Word to stop adding content and move to the next page. Simple as that.

If your book uses the same numbering style for the entire file and you don’t have unique header content, add a Page Break at the end of every chapter to start the next chapter on a new page.
Section Break
Word has four kinds of Section Break you can use:
- Section Break (Next Page) – starts the new section on the next page
- Section Break (Continuous) – starts the new section on the current page
- Section Break (Odd Page) – starts the new section on the next odd page
- Section Break (Even Page) – starts the new section on the next even page
Use the ‘Next Page’ Section Break until you’re very comfortable with Word formatting. A Section Break (Next Page) works exactly like a Page Break with one addition—the file is split into a new ‘section’ on either side of the Break.

Use a Section Break (Next Page) to make each chapter a unique section of the document. You’ll have the control to add unique content for the Header (like chapter titles) for each section.
Word offers a lot of options to format the Header and Footer. With all of your breaks added, start with the first section and work sequentially to update the settings for the header/footer in each section.

- Link to Previous – This setting defaults to being ‘ON’ so you have to check it for all your sections. If selected, the header and footer will link to the header and footer in the previous section. If you plan to add unique content for each section, you must turn off Link to Previous for all sections.
- Different First Page – A lot of authors like to leave off the header and/or footer on the first page of a section. Check this box and you’ll be able to format the first page of the section separately from the rest of the section.
- Different Odd & Even Pages – If you want to have different content on the odd and even pages (like a title on one side and author on the other) you need to check this option.
Step 4: Insert Page Numbers
If you just used page breaks to separate chapters, you’ve got it easy.
Head to the first page you want your numbers to appear on (probably the first page of the first chapter) and double-click on the footer. While in the footer, the ribbon should swap to the header/footer menu and you’ll see the ‘Insert Page Numbers’ button.
Here we see the Page Number menu and the Format… menu opened beside it. Select the alignment for your page numbering. Also set the Start at: to 1 so that the page I’m currently on will show ‘1’ in the footer. Click ‘OK’ for both menus and your page numbering will appear in the footer.
Be sure to close the header and footer (just double-click in the body of your page) to see how the page numbering will look.
If your chapters will have unique content in the header, you’ll need to insert section breaks at the end of each chapter. With that done, add page numbering to the first section. For each successive section, you’ll need to change the formatting when you insert the page numbers: select Continue from the previous section in the Page Number Format menu.

This will link the page numbering independently of the Footer linking, allowing us free to edit the Header/Footer for other content without breaking the page numbering.
Simplifying the Complex
The best way to keep page numbering simple is to do it last. This gives you the freedom to design the pages of your file without having to set up a section and ensures once you get to that step, there won’t be any additional changes to disrupt the page numbering.
Microsoft Word’s method of page numbering is much more challenging than tools like Adobe InDesign or Affinity Publisher—but these publishing programs are designed for more complex book layouts. Microsoft Word is primarily a word processor and will always struggle to match tools like InDesign for page layout.
Last note: if you’re looking at Word and what you see doesn’t match the screenshots in this article, it’s likely because your version of Word and mine are not the same. Microsoft (infuriatingly) has a tendency to change the layout and location of various commands when they update the Office software. You may need to refer to their help pages for information about your version of Word.
Book Design And Print-On-Demand Services
Once you’ve got all your pages numbered and you’ve added header content, the last test is to export a PDF for printing. Most print-on-demand companies require a PDF to print. I would be very skeptical of a printer that DIDN’T require a PDF.
Finally, once you’re satisfied with your layout in Word and the PDF looks good too, you’re ready to make a print order for a proof copy to see how the book (and your page numbering!) will look in print.
Get Started
Create a free Lulu account today to print and
publish your book for readers all over the world.
Get Started
Create a free Lulu account today to print and publish your book.

Paul H
Paul is the Content Marketing Manager at Lulu. When he’s not entrenched in the publishing and print-on-demand world, he likes to hike the scenic North Carolina landscape, read, sample the fanciest micro-brewed beer, and collect fountain pens. Paul is a dog person but considers himself cat tolerant.
This tutorial shows two ways to create numbered lists in Microsoft Word. We will also look at how to change list levels, start with a different list number, and change the font, size, and color of list numbers.
Do you want to create bulleted lists? Please see my previous tutorial “How to Create Bulleted Lists in Microsoft Word.”
What about Lists Ordered by Letters?
For simplicity, this tutorial refers to “numbered lists” because Word organizes all ordered (hierarchical) list options in the Numbering Library. However, all the steps shown here also apply to lists organized by letters.
If you would like to learn more about ordered and unordered lists, please see “How to Write Vertical Lists (Ordered and Unordered).”
Table of Contents
- How to Create a Numbered List — Basic Method 1
- How to Create a Numbered List — Basic Method 2
- How to Change Numbered List Levels
- How to Start a List with a Different Number
- How to Change the Font, Size, and Color of List Numbers
Watch all the steps shown here in real time!
Explore more than 200 other writing-related software tutorials on my YouTube channel.
The images below are from Word for Microsoft 365. These steps also apply to Word 2021, Word 2019, Word 2016, and Word 2013.
The basic steps are similar in Word for Mac. However, the more advanced steps, such as starting a list with a different number, are different on Mac. So, we will cover this topic for Word for Mac in a separate tutorial.
How to Create a Numbered List — Basic Method 1
This is the basic method to create a numbered list in Word. This method requires you to type each item as you create the list. If you have already typed your list items, see Method Two below.
- Place your cursor where you want to start your list.
- Select the Home tab in the ribbon.

- Select the menu arrow next to the Numbering button.
![]()
- Choose a number style from the Numbering Library.

The number one will appear in your document.

- Type your first list item after the number, and then press the Enter key on your keyboard. The next number will appear.

Continue typing your list items and pressing the Enter key until your list is complete.
- After typing the final item, press the Enter key twice to remove your cursor from the list.
How to Create a Numbered List — Basic Method 2
This method is for existing text formatted vertically as a list.
- Select the text.

- Select the Home tab in the ribbon (see figure 1).
- Select the menu arrow next to the Numbering button (see figure 2).
- Choose a style from the Numbering Library (see figure 3).
Your selected items should become a numbered list.

How to Change Numbered List Levels
Word lets you create numbered lists with up to nine nested levels. Here are two ways to change the level of list items.
Change List Levels — Method 1
Important note: This method won’t work for the first item in your list.
- Select one or more list items (other than the first item).

- Select the Home tab in the ribbon (see figure 1).
- Select the Increase Indent button in the Paragraph group.

Each time you select the Increase Indent button, the item(s) will move one level and take on the appropriate format for that level (e.g., lowercase letters, roman numerals, etc.).

Pro Tip: To return the selected text to a previous level, select the Decrease Indent button to the left of the Increase Indent button.
Change List Levels — Method 2
- Select one or more list items (see figure 8).
- Select the Home tab in the ribbon (see figure 1).
- Select the menu arrow next to the Numbering button (see figure 2).
- Select Change List Level from the drop-down menu.

- Select a list level from the list-level menu.

Your list item(s) should move to the next level.
How to Start a List with a Different Number
You can start a list with a number other than one or continue the numbering from the previous list.
- Select the first list number or place your cursor within the first list item. If you select the list number, all numbers on that level should also be selected.

- Select the Home tab in the ribbon (see figure 1).
- Select the menu arrow next to the Numbering button (see figure 2).
- Select Set Numbering Value from the drop-down menu.

5.a. Enter the number you want to start with in the Set value to text box in the Set Numbering Value dialog box.

5.b. (Alternative Option) Select Continue from previous list if you want to continue the numbering from a previous list in your document.

- Select the OK button.

Your list should be renumbered according to your selections in the Set Numbering Value dialog box.
How to Change the Font, Size, and Color of List Numbers
By default, the font, size, and color of your list numbers will be the same as your normal text style. However, you can manually change the appearance of list numbers by selecting them separately from the text.
- Select one list number. All numbers on that level should also be selected.

- Select the Home tab in the ribbon (see figure 1).
- Select a new font, size, or color from the Font group.

Your list numbers should change to the new formatting. Repeat these steps for each level in your list, as necessary.

Related Resources
How to Write Run-In Lists
How to Create and Update a List of Tables or Figures in Microsoft Word
How to Create Numbered Lists in PowerPoint (PC & Mac)
Updated February 12, 2023
Multilevel numbering in Word is the #1 headache for many people working with large documents.
Believe it or not, it’s not complicated. It just takes somebody to lead the way and point out the pitfalls you need to avoid.
Today that pleasure falls to me!
Before I start, grab your free multilevel numbering troubleshooting guide that shows you the steps to get multilevel numbering working properly first time, every time, together with answers to over 20 FAQs and plenty of real client examples constructed step by step to help you fix what isn’t working with your numbering.

1. What Multi-level Numbering Looks Like
Often used in the legal profession or in large corporate documents, multilevel numbering creates a logical hierarchy and easy navigation within the document. The headings can also be summarised later on in a table of contents. Here is a simple example:

2. How to Set Up Multilevel Numbering
Here is the correct process:
1. Select the text that you want to number (this can be a section of text or the whole document).

2. Select the Home tab.
3. Click the multilevel numbering icon in the Paragraph group.
![]()
4. You can either select an existing layout from the list to use as a starting point, or you can create a new numbering system from scratch. As you hover over each thumbnail image, Word provides a larger image of the numbering system.
5. Choose Define New Multilevel List to display the control dialog.

The dialog box can be broken down as follows:
Step #1 Click level to modify
In the top left is a list of levels. As you select each level, the settings in the rest of the dialog box changes.
Level 1 is the highest level, i.e. the main headings such as chapter or section titles.
Level 2 is subordinate to level 1.
Level 3 is subordinate to level 2.

Step #2 Enter formatting for number
This is where the level number is constructed. If you include a previous level number, it will be displayed with a grey background, as will the number for the current level.
Type anything you wish to put in between the numbers such as dots, dashes, brackets etc.
Clear any text in the ‘Enter formatting for this number’ box.
Step #3 Include level number from
When creating a subordinate level (or child level), you can first specify the level number of the parent.
For example, for section 3.2
- ‘3’ is the parent level (level 1) and
- ‘2’ is the child level (level 2)

Step #4 Number style for this level
Each level can have its own number style. It may be a standalone style, e.g. 1, 2, 3 or a, b, c or continue on from a higher level, e.g. 1.1.1 or 1.a.i.
- When creating 1.1 numbering, this option is 1, 2, 3.
- When creating 1.a numbering, this option is a, b, c

Step #5 Font
Set the font formatting for the selected level, if you want.

Step #6 Position
What position from the left margin do you want items for each level of numbering. For example, level 1 items may be 0cm from the left margin, level 2, 1cm from the left margin and level 3, 2cm from the left margin.
Here’s what they mean:
- The Aligned At determines how far from the left margin the number appears.
- The Text indent at figure determines how far from the left margin the text following the number is.

6. Click OK to save all the settings and close the dialog box.
The text you selected in step 1 now looks like this.

The next part is where the magic happens …
3. How to Apply Multilevel Numbering
Once you have created your numbering system:
1. Position the cursor at the beginning of a line.

2. Press the TAB key to move the text down a level (demote).

3. Press the SHIFT and TAB keys together to move the text up a level (promote).

If you prefer, you can also click the indent icon to demote and the outdent icon to promote between levels.
![]()
4. How to Change Multilevel Settings
Once you have created your numbering system:
1. Reselect all text that is using the multilevel numbering.
2. Click the multilevel numbering icon and select Define New Multilevel List (yes, you choose this option even if you are modifying an existing multilevel list).

The original settings that you defined are redisplayed.
3. In the top-left box select the level that you wish to change, then change your settings.
4. Repeat for the other settings.
5. Click OK to save the settings. Your numbered list should now reflect your new settings.
5. Linking Multilevel Numbering to Styles
Each level of a multilevel numbering system can be linked to a style. This means that as you apply styles throughout the document, the numbering is applied appropriately and automatically. You can either use the built-in Heading 1, Heading 2, Heading 3 styles or use your own custom styles.
1. In the Numbering dialog box, click the MORE button in the bottom-left corner to expand the dialog box.
2. Select level to modify in the top-left box.
3. Open the Link level to style drop-down list and choose the style you wish to connect to the numbering level.

4. Click OK.
5. In the document, apply the Heading 1, Heading 2, Heading 3 styles where needed.
It’s a good idea to create a body text style and apply that where appropriate, so that the body text does not inadvertently get caught up in the multi-level numbering.
6. Select the whole document (or the portion of the document where you want to apply your numbered sections).
7. Click the icon in the Paragraph group (Home tab).
8. Select your custom numbering style from the gallery. The thumbnail image should show the linked styles.

6. How to Use Styles to Set Number Levels
1. Select all the text that you wish to apply the same number level to. Alternatively, if you wish to go line by line, you can place the cursor anywhere in a line of text.
2. In the Styles gallery, click the style that corresponds to the number level you wish to apply. For example, to apply the top level numbering click Heading 1 and for the third level numbering click Heading 3 (assuming those are the styles you assigned).
The numbering and all the numbering settings will be applied to the selected text or the paragraph in which the cursor was positioned.

And that, my friend, is how you do multilevel numbering in Word with no loose ends.
How to set up a dual-multilevel numbering system in Word
7. Two resources to help you
1. Grab your free multilevel numbering troubleshooting guide.

2. Watch over my shoulder as I set up multilevel numbering from scratch.

8. What next?
I hope you found plenty of value in this post. I’d love to hear your biggest takeaway in the comments below together with any questions you may have.
Have a fantastic day.


About the author
Jason Morrell
Jason loves to simplify the hard stuff, cut the fluff and share what actually works. Things that make a difference. Things that slash hours from your daily work tasks. He runs a software training business in Queensland, Australia, lives on the Gold Coast with his wife and 4 kids and often talks about himself in the third person!
SHARE