
When you create a multilevel list in Microsoft Word 2013 (or earlier versions), then by default the list numbers (e.g. 3.2.4, where 3 here is the top most level) appears correctly for Left-to-Right languages. However, for Arabic, I need the number to appear mirrored: 4.2.3. How to do this? I tried defining new list but it does not work properly.
Any ideas?
![]()
asked Mar 31, 2014 at 5:51
![]()
Monika’s answer didn’t work for me in MS Word 2019, it does not accept inserting Unicode character in Multilevel List dialog (I tried both Alt+200F and 200F then Alt+X methods).
So I tried adding an space after separator character (the .) in Multilevel List dialog. It fixes the RTL problem, but there will be an empty space between numbers.
Things will get a little tricky if you want to get rid of that space. You need to use a Zero-width space character instead. It’s a totally invisible character but behaves like a normal space. Follow these steps:
- In your document type some word (like «سلام»)
- Put the cursor in the middle of the word
- From «Insert» tab click on «Symbol» and then click «More Symbols …»
- In «Symbol» window go to «Special Characters» tab
- Find and select «No-Width Non Break» in the list and click «Insert»
Your first word in document must look like «سل ام» so far. Although letters are right next to each other, but there’s something there between them that beaks the word, you need to copy that to the clipboard!
- Use Shift and arrow keys to select that, you won’t see anything selected, you just need to feel it
- Press Ctrl+C to copy the character
- Form «Home» tab click on «Multilevel List» and then «Define New Multilevel List …»
- In «Enter Formatting …» text box, put cursor after separator character(s) and press Ctrl+V to paste, again, you won’t see anything pasted
- Click OK
answered Dec 20, 2019 at 2:49
![]()
saastnsaastn
8510 bronze badges
What I understood from your question is that when you create a numbered list and want to change its’ direction to RTL, the content probably looked something like ( نص عربيl4. ) as the number 14 is touching the text instead of having the dot as a separator. If that’s your case then try this:
-
Simply highlight the text you want to change its’ direction.
-
Right click to bring the options menu
-
Choose the paragraph option
-
In the first page in the general section, choose the direction of the text «right-to-left».
The highlighted lines will change, It’s possible to show bullet points from the same list in different directions but I don’t think you can split a text from the same line and show each part in a different direction.
answered Nov 28, 2014 at 6:57
![]()
2
Here’s an example of how to do it for a depth-2 list:
- Click the menu part of the Multilevel List ribbon menu-button.
- Select «Define New Multilevel list».
- Go to level 2 of your list (there’s a listbox of the 9 levels).
- In the ‘Formatting for Number’ textbox, place the cursor after the dot (.) character.
- Insert a Unicode RLM (Right-to-Left Mark; U+200F). Here’s how you can do that.
- Accept the changes you made.
That’s it, now the numbers are in right-to-left order. Obviously you would need to do this for levels 3, 4, etc. with multiple RLMs.
![]()
answered Mar 31, 2014 at 16:47
![]()
einpoklumeinpoklum
8,29719 gold badges76 silver badges140 bronze badges
It can be easily done by VBA as follows, separator is «/» if other is needed, you can replace it
Sub rightToLiftMultiLevelList()
'
' Muhammad Abu-gabal
' Arabic Multilevel list, separator ="/"
' ChrW(8207) is the right to left character, unicode U+200F
    With ListGalleries(wdOutlineNumberGallery).ListTemplates(1).ListLevels(1)
        .NumberFormat = "%1"
        .TrailingCharacter = wdTrailingTab
        .NumberStyle = wdListNumberStyleArabic
        .NumberPosition = InchesToPoints(0)
        .Alignment = wdListLevelAlignLeft
        .TextPosition = InchesToPoints(0.3)
        .TabPosition = wdUndefined
        .ResetOnHigher = 0
        .StartAt = 1
        With .Font
            .Bold = wdUndefined
            .Italic = wdUndefined
            .StrikeThrough = wdUndefined
            .Subscript = wdUndefined
            .Superscript = wdUndefined
            .Shadow = wdUndefined
            .Outline = wdUndefined
            .Emboss = wdUndefined
            .Engrave = wdUndefined
            .AllCaps = wdUndefined
            .Hidden = wdUndefined
            .Underline = wdUndefined
            .Color = wdUndefined
            .Size = wdUndefined
            .Animation = wdUndefined
            .DoubleStrikeThrough = wdUndefined
            .Name = ""
            .SizeBi = wdUndefined
            .NameBi = ""
            .BoldBi = wdUndefined
            .ItalicBi = wdUndefined
        End With
        .LinkedStyle = "Heading 1"
    End With
    With ListGalleries(wdOutlineNumberGallery).ListTemplates(1).ListLevels(2)
        .NumberFormat = "%2/%1"
        .TrailingCharacter = wdTrailingTab
        .NumberStyle = wdListNumberStyleArabic
        .NumberPosition = InchesToPoints(0)
        .Alignment = wdListLevelAlignLeft
        .TextPosition = InchesToPoints(0.4)
        .TabPosition = wdUndefined
        .ResetOnHigher = 1
        .StartAt = 1
        With .Font
            .Bold = wdUndefined
            .Italic = wdUndefined
            .StrikeThrough = wdUndefined
            .Subscript = wdUndefined
            .Superscript = wdUndefined
            .Shadow = wdUndefined
            .Outline = wdUndefined
            .Emboss = wdUndefined
            .Engrave = wdUndefined
            .AllCaps = wdUndefined
            .Hidden = wdUndefined
            .Underline = wdUndefined
            .Color = wdUndefined
            .Size = wdUndefined
            .Animation = wdUndefined
            .DoubleStrikeThrough = wdUndefined
            .Name = ""
            .SizeBi = wdUndefined
            .NameBi = ""
            .BoldBi = wdUndefined
            .ItalicBi = wdUndefined
        End With
        .LinkedStyle = "Heading 2"
    End With
    With ListGalleries(wdOutlineNumberGallery).ListTemplates(1).ListLevels(3)
        .NumberFormat = "%3/%2/%1"
        .TrailingCharacter = wdTrailingTab
        .NumberStyle = wdListNumberStyleArabic
        .NumberPosition = InchesToPoints(0)
        .Alignment = wdListLevelAlignLeft
        .TextPosition = InchesToPoints(0.5)
        .TabPosition = wdUndefined
        .ResetOnHigher = 2
        .StartAt = 1
        With .Font
            .Bold = wdUndefined
            .Italic = wdUndefined
            .StrikeThrough = wdUndefined
            .Subscript = wdUndefined
            .Superscript = wdUndefined
            .Shadow = wdUndefined
            .Outline = wdUndefined
            .Emboss = wdUndefined
            .Engrave = wdUndefined
            .AllCaps = wdUndefined
            .Hidden = wdUndefined
            .Underline = wdUndefined
            .Color = wdUndefined
            .Size = wdUndefined
            .Animation = wdUndefined
            .DoubleStrikeThrough = wdUndefined
            .Name = ""
            .SizeBi = wdUndefined
            .NameBi = ""
            .BoldBi = wdUndefined
            .ItalicBi = wdUndefined
        End With
        .LinkedStyle = "Heading 3"
    End With
    With ListGalleries(wdOutlineNumberGallery).ListTemplates(1).ListLevels(4)
        .NumberFormat = "%4/%3/%2/%1"
        .TrailingCharacter = wdTrailingTab
        .NumberStyle = wdListNumberStyleArabic
        .NumberPosition = InchesToPoints(0)
        .Alignment = wdListLevelAlignLeft
        .TextPosition = InchesToPoints(0.6)
        .TabPosition = wdUndefined
        .ResetOnHigher = 3
        .StartAt = 1
        With .Font
            .Bold = wdUndefined
            .Italic = wdUndefined
            .StrikeThrough = wdUndefined
            .Subscript = wdUndefined
            .Superscript = wdUndefined
            .Shadow = wdUndefined
            .Outline = wdUndefined
            .Emboss = wdUndefined
            .Engrave = wdUndefined
            .AllCaps = wdUndefined
            .Hidden = wdUndefined
            .Underline = wdUndefined
            .Color = wdUndefined
            .Size = wdUndefined
            .Animation = wdUndefined
            .DoubleStrikeThrough = wdUndefined
            .Name = ""
            .SizeBi = wdUndefined
            .NameBi = ""
            .BoldBi = wdUndefined
            .ItalicBi = wdUndefined
        End With
        .LinkedStyle = "Heading 4"
    End With
    With ListGalleries(wdOutlineNumberGallery).ListTemplates(1).ListLevels(5)
        .NumberFormat = "%5/%4/%3/%2/%1"
        .TrailingCharacter = wdTrailingTab
        .NumberStyle = wdListNumberStyleArabic
        .NumberPosition = InchesToPoints(0)
        .Alignment = wdListLevelAlignLeft
        .TextPosition = InchesToPoints(0.7)
        .TabPosition = wdUndefined
        .ResetOnHigher = 4
        .StartAt = 1
        With .Font
            .Bold = wdUndefined
            .Italic = wdUndefined
            .StrikeThrough = wdUndefined
            .Subscript = wdUndefined
            .Superscript = wdUndefined
            .Shadow = wdUndefined
            .Outline = wdUndefined
            .Emboss = wdUndefined
            .Engrave = wdUndefined
            .AllCaps = wdUndefined
            .Hidden = wdUndefined
            .Underline = wdUndefined
            .Color = wdUndefined
            .Size = wdUndefined
            .Animation = wdUndefined
            .DoubleStrikeThrough = wdUndefined
            .Name = ""
            .SizeBi = wdUndefined
            .NameBi = ""
            .BoldBi = wdUndefined
            .ItalicBi = wdUndefined
        End With
        .LinkedStyle = "Heading 5"
    End With
    With ListGalleries(wdOutlineNumberGallery).ListTemplates(1).ListLevels(6)
        .NumberFormat = "%6/%5/%4/%3/%2/%1"
        .TrailingCharacter = wdTrailingTab
        .NumberStyle = wdListNumberStyleArabic
        .NumberPosition = InchesToPoints(0)
        .Alignment = wdListLevelAlignLeft
        .TextPosition = InchesToPoints(0.8)
        .TabPosition = wdUndefined
        .ResetOnHigher = 5
        .StartAt = 1
        With .Font
            .Bold = wdUndefined
            .Italic = wdUndefined
            .StrikeThrough = wdUndefined
            .Subscript = wdUndefined
            .Superscript = wdUndefined
            .Shadow = wdUndefined
            .Outline = wdUndefined
            .Emboss = wdUndefined
            .Engrave = wdUndefined
            .AllCaps = wdUndefined
            .Hidden = wdUndefined
            .Underline = wdUndefined
            .Color = wdUndefined
            .Size = wdUndefined
            .Animation = wdUndefined
            .DoubleStrikeThrough = wdUndefined
            .Name = ""
            .SizeBi = wdUndefined
            .NameBi = ""
            .BoldBi = wdUndefined
            .ItalicBi = wdUndefined
        End With
        .LinkedStyle = "Heading 6"
    End With
    With ListGalleries(wdOutlineNumberGallery).ListTemplates(1).ListLevels(7)
        .NumberFormat = "%7/%6/%5/%4/%3/%2/%1"
        .TrailingCharacter = wdTrailingTab
        .NumberStyle = wdListNumberStyleArabic
        .NumberPosition = InchesToPoints(0)
        .Alignment = wdListLevelAlignLeft
        .TextPosition = InchesToPoints(0.9)
        .TabPosition = wdUndefined
        .ResetOnHigher = 6
        .StartAt = 1
        With .Font
            .Bold = wdUndefined
            .Italic = wdUndefined
            .StrikeThrough = wdUndefined
            .Subscript = wdUndefined
            .Superscript = wdUndefined
            .Shadow = wdUndefined
            .Outline = wdUndefined
            .Emboss = wdUndefined
            .Engrave = wdUndefined
            .AllCaps = wdUndefined
            .Hidden = wdUndefined
            .Underline = wdUndefined
            .Color = wdUndefined
            .Size = wdUndefined
            .Animation = wdUndefined
            .DoubleStrikeThrough = wdUndefined
            .Name = ""
            .SizeBi = wdUndefined
            .NameBi = ""
            .BoldBi = wdUndefined
            .ItalicBi = wdUndefined
        End With
        .LinkedStyle = "Heading 7"
    End With
    With ListGalleries(wdOutlineNumberGallery).ListTemplates(1).ListLevels(8)
        .NumberFormat = "%8/%7/%6/%5/%4/%3/%2/%1"
        .TrailingCharacter = wdTrailingTab
        .NumberStyle = wdListNumberStyleArabic
        .NumberPosition = InchesToPoints(0)
        .Alignment = wdListLevelAlignLeft
        .TextPosition = InchesToPoints(1)
        .TabPosition = wdUndefined
        .ResetOnHigher = 7
        .StartAt = 1
        With .Font
            .Bold = wdUndefined
            .Italic = wdUndefined
            .StrikeThrough = wdUndefined
            .Subscript = wdUndefined
            .Superscript = wdUndefined
            .Shadow = wdUndefined
            .Outline = wdUndefined
            .Emboss = wdUndefined
            .Engrave = wdUndefined
            .AllCaps = wdUndefined
            .Hidden = wdUndefined
            .Underline = wdUndefined
            .Color = wdUndefined
            .Size = wdUndefined
            .Animation = wdUndefined
            .DoubleStrikeThrough = wdUndefined
            .Name = ""
            .SizeBi = wdUndefined
            .NameBi = ""
            .BoldBi = wdUndefined
            .ItalicBi = wdUndefined
        End With
        .LinkedStyle = "Heading 8"
    End With
    With ListGalleries(wdOutlineNumberGallery).ListTemplates(1).ListLevels(9)
        .NumberFormat = "%9/%8/%7/%6/%5/%4/%3/%2/%1"
        .TrailingCharacter = wdTrailingTab
        .NumberStyle = wdListNumberStyleArabic
        .NumberPosition = InchesToPoints(0)
        .Alignment = wdListLevelAlignLeft
        .TextPosition = InchesToPoints(1.1)
        .TabPosition = wdUndefined
        .ResetOnHigher = 8
        .StartAt = 1
        With .Font
            .Bold = wdUndefined
            .Italic = wdUndefined
            .StrikeThrough = wdUndefined
            .Subscript = wdUndefined
            .Superscript = wdUndefined
            .Shadow = wdUndefined
            .Outline = wdUndefined
            .Emboss = wdUndefined
            .Engrave = wdUndefined
            .AllCaps = wdUndefined
            .Hidden = wdUndefined
            .Underline = wdUndefined
            .Color = wdUndefined
            .Size = wdUndefined
            .Animation = wdUndefined
            .DoubleStrikeThrough = wdUndefined
            .Name = ""
            .SizeBi = wdUndefined
            .NameBi = ""
            .BoldBi = wdUndefined
            .ItalicBi = wdUndefined
        End With
        .LinkedStyle = "Heading 9"
    End With
    ListGalleries(wdOutlineNumberGallery).ListTemplates(1).Name = ""
    Selection.Range.ListFormat.ApplyListTemplateWithLevel ListTemplate:= _
        ListGalleries(wdOutlineNumberGallery).ListTemplates(1), _
        ContinuePreviousList:=True, ApplyTo:=wdListApplyToWholeList, _
        DefaultListBehavior:=wdWord10ListBehavior
End Sub
![]()
answered Jun 27, 2020 at 15:22
![]()
1

By default, the numbers on numbered lists are left-aligned in the space allotted for the numbering. However, aligning them to the center or the right (pictured on the right above) is easy, and we’ll show you how.
When the numbers are left-aligned, the decimal points are not aligned and any items with two or more digits are closer to the text of the items than the one-digit numbers, as shown on the left in the above image. We’re going to change the alignment on the numbers in our example list to right-aligned so they look like the list on the right above.
Open the document containing the list for which you want to change the numbering alignment. Put the cursor anywhere in the list and make sure the Home tab is active. Then, click the down arrow on the “Numbering” button in the Paragraph section and select “Define New Number Format” from the drop-down menu.

On the Define New Number Format dialog box, select “Right” (or “Center”) from the Alignment drop-down list.
The Preview area shows what the list will look like with the chosen alignment applied. Notice there is more space between the numbers and the item text for right-aligned numbers as opposed to left-aligned. Click “OK” to accept the change and close the dialog box.
Now, the numbers in our list are aligned by the decimal point, and there is more space between the numbers and item text.
When creating a separate list in the same document, the last alignment choice is applied. If you find that Word has reverted back to left-alignment, you might want to turn off automatic numbering, as that defaults to left-alignment.
RELATED: How to Change the Type of Numbers Used in a Numbered List in Word
You can also change the type of numbers or letters used, skip numbering, reverse a numbered (or bulleted) list, or even create a numbered list using the keyboard.
READ NEXT
- › How to Align Text Vertically or Horizontally in Microsoft Word
- › BLUETTI Slashed Hundreds off Its Best Power Stations for Easter Sale
- › This New Google TV Streaming Device Costs Just $20
- › The New NVIDIA GeForce RTX 4070 Is Like an RTX 3080 for $599
- › HoloLens Now Has Windows 11 and Incredible 3D Ink Features
- › Google Chrome Is Getting Faster
- › How to Adjust and Change Discord Fonts
How-To Geek is where you turn when you want experts to explain technology. Since we launched in 2006, our articles have been read billions of times. Want to know more?
RECOMMENDED FOR YOU
- Create the numbered list.
- Select the list items you want to realign.
- You’ll find the Numbering tool in the Paragraph group on the Home tab.
- In the resulting dialog box, choose Right from the Alignment drop-down list.
- Click OK.
Contents
- 1 How do I fix number alignment in Word?
- 2 How do I align numbers on the right side of a Word document?
- 3 How do you align text in Word?
- 4 What are the 4 alignment options?
- 5 What is the shortcut key of right alignment?
- 6 Which alignment is used to move the text to the right?
- 7 How do I align text in Word after numbering?
- 8 What is alignment in Microsoft Word?
- 9 How do I fix justified text in Word?
- 10 What are the five types of alignment in Word?
- 11 How do you align a colon in Word?
- 12 What is Ctrl J in Word?
- 13 How do I align text on the same line in Word?
- 14 What are the four shortcut keys for text alignment?
- 15 How are numbers aligned in the cell by default?
- 16 How do I move a numbered list in Word?
- 17 How do I manually justify text?
- 18 How do you force justify in Word?
- 19 How do you justify text in Word without gaps?
- 20 What is alignment give example?
How do I fix number alignment in Word?
Word doesn‘t align the numbers as expected.
Click anywhere inside the list. From the Numbering dropdown (in the Paragraph group), choose Define New Number Format (at the bottom). In the resulting dialog, change the Alignment setting from Left to Right, as shown in Figure G.
How do I align numbers on the right side of a Word document?
Align the text left or right
- Select the text that you want to align.
- On the Home tab, in the Paragraph group, click Align Left or Align Right .
How do you align text in Word?
Change text alignment
- Place the insertion point anywhere in the paragraph, document, or table that you want to align.
- Do one of the following: To align the text left, press Ctrl+L. To align the text right, press Ctrl+R. To center the text, press Ctrl+E.
What are the 4 alignment options?
There are four main alignments: left, right, center, and justified. Left-aligned text is text that is aligned with a left edge. Right-aligned text is text that is aligned with a right edge.
What is the shortcut key of right alignment?
Ctrl+R
Right-aligned text is text that is aligned with a right edge. You can also right-align your text with the shortcut Ctrl+R (Cmnd+R).
Which alignment is used to move the text to the right?
To make text right aligned, select and highlight the text first, then hold down Ctrl (the control key) on the keyboard and then press R. To make text justified, select and highlight the text first, then hold down Ctrl (the control key) on the keyboard and then press J.
How do I align text in Word after numbering?
RECOMMENDED FOR YOU
- Create the numbered list.
- Select the list items you want to realign.
- You’ll find the Numbering tool in the Paragraph group on the Home tab.
- In the resulting dialog box, choose Right from the Alignment drop-down list.
- Click OK.
What is alignment in Microsoft Word?
Alignment refers to where and how the text lines up. Default settings in Microsoft Word will left- align your text, but there are many other ways to format a document’s alignment.You can apply these alignment options to a specific section by first highlighting the text and then entering the desired keyboard command.
How do I fix justified text in Word?
Right-click on the text, and click Paragraph. On the Indents and Spacing tab, click the drop-down next to Alignment, and click Justified, OK. Right-click on the text again, and click Format, Font.
- Click the Tools menu, Options. Then click the Compatibility tab.
- Tick “Do full justification like WordPerfect…”
- Click OK.
What are the five types of alignment in Word?
There are four types of paragraph alignment available in Microsoft Word — left-aligned, center-aligned, rightaligned, and justified.
- Left-Aligned Text. A paragraph’s text is left aligned when it is aligned evenly along the left margin.
- Center Aligned Text.
- Right-Aligned Text.
- Justified Text.
How do you align a colon in Word?
First, you go to the “View”, then click on the ruler. Click the “L” like symbol continually until it becomes a upside down “T” with a dot on its right, move the ruler to the position you like to place the colon. Click “Tab” at the left of the colon and the colon will move to that position.
What is Ctrl J in Word?
Ctrl+J in Word and other word processors
In Microsoft Word and other word processor programs, pressing Ctrl+J aligns the selected text or line to justify the screen.
How do I align text on the same line in Word?
Flush Left and Flush Right On the Same Line
- Make sure the paragraph is formatted as left-aligned.
- Display the Home tab of the ribbon.
- Click the small icon at the bottom-right of the Paragraph group.
- Click the Tabs button.
- What you want to do is to insert a right-aligned tab near the right edge of the line.
What are the four shortcut keys for text alignment?
The alignment keyboard shortcut keys can vary depending on what program is used and the type of computer. However, generally speaking, use Ctrl + L to left align, Ctrl + E to center, Ctrl + R to right align, and Ctrl + J to justify text.
How are numbers aligned in the cell by default?
As a default in Microsoft Excel, text typed into a cell is aligned to the left border of the cell while numbers are aligned to the right.
How do I move a numbered list in Word?
Adjust the spacing between a bullet or number and text
- Select the list that you want to format.
- On the Home tab, under Paragraph, click the arrow next to Numbered List. , and then click Define New Number Format.
- Under Text position, in the Indent at box, enter the value that you want.
How do I manually justify text?
- Justified text is spaced so the left and right sides of the text block both have a clean edge.
- Justification works by adding white space between the words in each line so all the lines are the same length.
How do you force justify in Word?
With your cursor in the paragraph or line that you want to justify, press Ctrl-j ( Cmd-j on a Macintosh). Alternatively, from the toolbar, click the Justify Text button. Type or place your cursor at the end of the line of text that you wish to justify. There must be at least one space in the line.
How do you justify text in Word without gaps?
Method 1: Change Layout Options
- First, click “File” then click “Options” to open “Word Options” dialog box.
- Next click “Advanced” and scroll down to the bottom of the box.
- Click “Layout Options” to bring out more choices.
- Check the “Don’t expand character spaces on a line that ends with SHIFT-RETURN” box and click “OK”.
What is alignment give example?
The definition of alignment is an arrangement of objects in a way that makes a line or row.Alignment is defined as parts of something that are in the proper position relative to each other. Adjusting the front wheels on a car is an example of a front-end alignment.
If you need to customize an existing numbered list (see
how to create a numbered list) or apply your
specifications to the number format, use the Define New Number Format dialog box.
I. To create a custom numbering format, do the following:
1. On the Home tab, in the Paragraph group,
choose the Numbering button:

2. In the Numbering list, click
Define New Number Format… item to display the Define New Number Format dialog
box:

3. In the Define New Number Format dialog box:
- Number style — Specifies the numbering style that you want. Choices include Arabic numerals,
uppercase and lowercase Roman numerals, uppercase and lowercase alphabet letters, and word series
(1st, One, and First). You can also choose no numbers at all, killing the sequential numbering. - Font… — Specifies the special font or font attributes (such as bold, italic, and underline)
and the point size for the numbers. A standard Font dialog box appears when this button is chosen. - Number format — Types the characters, if any that you want to come before each number. If you
want each number enclosed in parentheses, for example, type an opening parenthesis before the number
in this box.
Do not type over this number in this box! If you do so, even replacing it with another
number, you will break the automatic numbering; each number in the list will be the same. - Alignment — Sets the distance from the left, centered or right margin that Word places the
number.
II. To create a custom multilevel list format, following:
On the Home tab, in the Paragraph group, choose the Multilevel List button and
click Define New Multilevel List… item to display the Define new Multilevel List dialog
box:

If the button in the lower-left corner is the More >> button, click it. Word displays an
extra panel at the right of the dialog box, so you see the full dialog box, as shown here. Word also
changes the More >> button to a << Less button that you can click to hide the
extra section of the dialog box again.
- In the Click Level To Modify, select the list level you want to change. Word selects the
first level, 1, when you open the Define New Multilevel List dialog box. - If you need to link this numbered list level to a particular style, select the style in the Link
Level To Style drop-down list. - Use the controls in the Number Format area to specify the number format.
- In the Number Style For This Level drop-down list, select the number format you want
to use. For example:- «1, 2, 3,»
- «i, ii, iii,»
- «A, B, C.»
- To include the number from the previous level (or a higher level), choose the level from the
Include Level Number From drop-down list. (This drop-down list is unavailable for the
first level because there’s no level above it.) For example: if Level 1 uses «1, 2, 3»
numbering and Level 2 uses «a, b, c» numbering, applying Level 1 in the Include Level
Number From drop-down list to Level 2 changes the Level 2 numbering to 1a, 1b, and
so on. - Word displays the number formatting you’ve chosen in the Enter Formatting For Number
text box. Type any changes for the text of the format into this text box. For example, you
might edit the «A)» format to «Section A)» so that each instance of the number included the
word «Section.» - To specify font formatting, click the Font button. Word displays the Font
dialog box. Choose the font, font style, size, and any extras (such as color or effects),
and then click the OK button. - To customize the numbering, use the Start At spinner to change the starting number.
If you want to restart numbering after a certain level, select the Restart List After
check box and choose that level in the drop-down list. (The Restart List After
controls aren’t available for the first level in the list, because there’s no higher level.) - Select the Legal Style Numbering check box if you want to use legal-style numbering:
changing any roman numeral to an Arabic numeral. For example, 1.1.1 instead of
I.1.1.
- In the Number Style For This Level drop-down list, select the number format you want
- Use the controls in the Position box to customize where the number appears.
- In the Number Alignment drop-down list, choose Left, Centered, or
Right. - In the Aligned At text box, choose the position at which to align the number.
- In the Text Indent At text box, set the indent position for the text.
- In the Follow Number With drop-down list, select the character to include after the
number: a tab, a space, or nothing. If you choose a tab, you can select the Add Tab Stop
At check box and set the distance at which to place a tab stop.
- In the Number Alignment drop-down list, choose Left, Centered, or
Note: more details are available
in the Numbered lists section
in the Work with bulleted, numbered and multi-level lists lesson
of the Create basic documents free course.
See also this tip in French:
Comment personnaliser une liste numérotée.
Multilevel numbering in Word is the #1 headache for many people working with large documents.
Believe it or not, it’s not complicated. It just takes somebody to lead the way and point out the pitfalls you need to avoid.
Today that pleasure falls to me!
Before I start, grab your free multilevel numbering troubleshooting guide that shows you the steps to get multilevel numbering working properly first time, every time, together with answers to over 20 FAQs and plenty of real client examples constructed step by step to help you fix what isn’t working with your numbering.

1. What Multi-level Numbering Looks Like
Often used in the legal profession or in large corporate documents, multilevel numbering creates a logical hierarchy and easy navigation within the document. The headings can also be summarised later on in a table of contents. Here is a simple example:

2. How to Set Up Multilevel Numbering
Here is the correct process:
1. Select the text that you want to number (this can be a section of text or the whole document).

2. Select the Home tab.
3. Click the multilevel numbering icon in the Paragraph group.
![]()
4. You can either select an existing layout from the list to use as a starting point, or you can create a new numbering system from scratch. As you hover over each thumbnail image, Word provides a larger image of the numbering system.
5. Choose Define New Multilevel List to display the control dialog.

The dialog box can be broken down as follows:
Step #1 Click level to modify
In the top left is a list of levels. As you select each level, the settings in the rest of the dialog box changes.
Level 1 is the highest level, i.e. the main headings such as chapter or section titles.
Level 2 is subordinate to level 1.
Level 3 is subordinate to level 2.

Step #2 Enter formatting for number
This is where the level number is constructed. If you include a previous level number, it will be displayed with a grey background, as will the number for the current level.
Type anything you wish to put in between the numbers such as dots, dashes, brackets etc.
Clear any text in the ‘Enter formatting for this number’ box.
Step #3 Include level number from
When creating a subordinate level (or child level), you can first specify the level number of the parent.
For example, for section 3.2
- ‘3’ is the parent level (level 1) and
- ‘2’ is the child level (level 2)

Step #4 Number style for this level
Each level can have its own number style. It may be a standalone style, e.g. 1, 2, 3 or a, b, c or continue on from a higher level, e.g. 1.1.1 or 1.a.i.
- When creating 1.1 numbering, this option is 1, 2, 3.
- When creating 1.a numbering, this option is a, b, c

Step #5 Font
Set the font formatting for the selected level, if you want.

Step #6 Position
What position from the left margin do you want items for each level of numbering. For example, level 1 items may be 0cm from the left margin, level 2, 1cm from the left margin and level 3, 2cm from the left margin.
Here’s what they mean:
- The Aligned At determines how far from the left margin the number appears.
- The Text indent at figure determines how far from the left margin the text following the number is.

6. Click OK to save all the settings and close the dialog box.
The text you selected in step 1 now looks like this.

The next part is where the magic happens …
3. How to Apply Multilevel Numbering
Once you have created your numbering system:
1. Position the cursor at the beginning of a line.

2. Press the TAB key to move the text down a level (demote).

3. Press the SHIFT and TAB keys together to move the text up a level (promote).

If you prefer, you can also click the indent icon to demote and the outdent icon to promote between levels.
![]()
4. How to Change Multilevel Settings
Once you have created your numbering system:
1. Reselect all text that is using the multilevel numbering.
2. Click the multilevel numbering icon and select Define New Multilevel List (yes, you choose this option even if you are modifying an existing multilevel list).

The original settings that you defined are redisplayed.
3. In the top-left box select the level that you wish to change, then change your settings.
4. Repeat for the other settings.
5. Click OK to save the settings. Your numbered list should now reflect your new settings.
5. Linking Multilevel Numbering to Styles
Each level of a multilevel numbering system can be linked to a style. This means that as you apply styles throughout the document, the numbering is applied appropriately and automatically. You can either use the built-in Heading 1, Heading 2, Heading 3 styles or use your own custom styles.
1. In the Numbering dialog box, click the MORE button in the bottom-left corner to expand the dialog box.
2. Select level to modify in the top-left box.
3. Open the Link level to style drop-down list and choose the style you wish to connect to the numbering level.

4. Click OK.
5. In the document, apply the Heading 1, Heading 2, Heading 3 styles where needed.
It’s a good idea to create a body text style and apply that where appropriate, so that the body text does not inadvertently get caught up in the multi-level numbering.
6. Select the whole document (or the portion of the document where you want to apply your numbered sections).
7. Click the icon in the Paragraph group (Home tab).
8. Select your custom numbering style from the gallery. The thumbnail image should show the linked styles.

6. How to Use Styles to Set Number Levels
1. Select all the text that you wish to apply the same number level to. Alternatively, if you wish to go line by line, you can place the cursor anywhere in a line of text.
2. In the Styles gallery, click the style that corresponds to the number level you wish to apply. For example, to apply the top level numbering click Heading 1 and for the third level numbering click Heading 3 (assuming those are the styles you assigned).
The numbering and all the numbering settings will be applied to the selected text or the paragraph in which the cursor was positioned.

And that, my friend, is how you do multilevel numbering in Word with no loose ends.
How to set up a dual-multilevel numbering system in Word
7. Two resources to help you
1. Grab your free multilevel numbering troubleshooting guide.

2. Watch over my shoulder as I set up multilevel numbering from scratch.

8. What next?
I hope you found plenty of value in this post. I’d love to hear your biggest takeaway in the comments below together with any questions you may have.
Have a fantastic day.


About the author
Jason Morrell
Jason loves to simplify the hard stuff, cut the fluff and share what actually works. Things that make a difference. Things that slash hours from your daily work tasks. He runs a software training business in Queensland, Australia, lives on the Gold Coast with his wife and 4 kids and often talks about himself in the third person!
SHARE
How to number lines and paragraphs in Microsoft Word and format the numbers with a different font, size or color.
When you’re discussing a speech or other document ‘in progress’ you might want to number the lines or paragraphs for easy reference “Please change paragraphs 6, 7, 21 and 27”. Sure, these days there’s a lot of linking and online collaboration but there’s still a place for line or paragraph numbering.
Line numbering will give you left hand line numbering like this:

Line numbering is simple. Paragraph numbering is done indirectly. As usual in Microsoft Office, there’s complications and surprising pitfalls. Office-Watch.com doesn’t just give you the simple ‘Microsoft approved’ answer but digs deeper.
Line Numbering
Line numbering is simple in Word. Go to Layout tab click on the small arrow at bottom right of the Page Setup section to reach the Page Setup dialog then Layout | Line Numbers. This dialog and option hasn’t changed for many versions of Word.

In Word the Layout tab has a Line Numbers pull down.

The full Line Numbering dialog has options for continuous line numbers or numbering for each page or section also the start number and increments. ‘From text’ controls the distance between the numbering and the document text.
Line numbering can be applied on a per-paragraph basis to selected paragraphs or the entire document. (Strictly speaking you can have line numbering for a single line but the results aren’t helpful – try for yourself).
Stop or Suspend Line Numbering
The line numbering can be stopped at any time or suspended for selected paragraphs via Line Numbering | Suppress for Current Paragraph or Paragraph dialog | Line and Page Breaks | Formatting exceptions | Suppress line numbers.
Change the look for line numbers
You can change the look of just the line numbers using the ‘Line Number’ style.

Line Number is one of those annoying hidden Word styles. It doesn’t show up in the ‘In use’ or ‘In current document’ style lists even when it’s being used in the document. You have to choose ‘All Styles’ to see the Line Number style and modify it.
Curiously, line numbering itself isn’t a formatting option in Paragraph styles. At least we can’t find it.
You can use a style to suppress line numbering at Format Paragraph | Line and Page Breaks | Formatting Exceptions | Suppress Line Numbers.
However styles can’t enable the line numbering in the first place. That’s a curious omission since Microsoft developers themselves should be aware of one common use for line numbering – in samples of computer code. These samples are usually formatted with a special style (fixed space font, indent and a special color) to which automatic line numbering would be very useful.
Paragraph numbering
Since there’s line numbering in Word, you’d expect to also find a paragraph numbering option. It’s common to find draft documents with paragraphs numbered so that people can refer to each by that number (“We mention government oversight in paragraphs 6, 7, 9 and 12”).
There’s no direct option for paragraph numbering in Word that works similarly to the line numbering feature.
The workaround is to use numbered lists instead. It’s not a good workaround but it’s what Microsoft leaves us with.
Select the paragraphs then choose Numbering to make a numbered list.

Unfortunately, the defaults for this also mess up the formatting of your document.

If the document already has numbers or lists, making this choice will override that formatting (we did say this is a workaround).
To fix the formatting, change the position of the numbers to put them in the margin as a hanging indent. You can do that by dragging the ruler markers to the left.

Or in the Format Paragraph dialog box, a Before Text indent plus a Hanging indent both of the same value.

You can create or modify a style to do this and turn on/off quickly.
Change look of Paragraph numbering
Paragraph numbering is formatted with the List Paragraph style. Or select one of the numbers so the whole column of numbers is selected, then change the formatting

Wish List
As usual, there’s features missing from Word’s numbering options that really should be present in such a long standing product. We mention these to save you the trouble of looking for options that Microsoft left out.
We’ve already mentioned there’s no real paragraph numbering option that numbers the paragraphs without changing the formatting of the document. This omission alone makes us wonder about Microsoft’s customer research and decision making process. There are plenty of ‘use cases’ for numbered paragraphs, especially in the legal profession.
Sometimes line/paragraph numbering should be on the right of the page. On the right it’s less obtrusive and would be more appropriate for ‘right-to-left’ languages.
For longer documents, it could be useful to show the line/paragraph number range in the header/footer for example “ Page 7 Paras 23-28 “ .

on
April 23, 2018, 7:54 AM PDT
How to control spacing and alignment in a numbered list in Microsoft Word
Modifying results in Word’s numbered list feature isn’t as intuitive as many users would like. Here are some tips for using settings to control spacing and alignment in a numbered list.
We may be compensated by vendors who appear on this page through methods such as affiliate links or sponsored partnerships. This may influence how and where their products appear on our site, but vendors cannot pay to influence the content of our reviews. For more info, visit our Terms of Use page.

Word’s numbered list feature is easy to use but modifying the results isn’t always as intuitive as you might like. As is often the case with Office, knowing the right setting to use and where to find it is the key. In this article, we’ll take a basic look at Word’s numbering feature and then move on to two common problems–indents and alignment–that are easy to solve if you know where to look and how to alter the setting to get the results you want.
It’s important to remember that the numbered list settings might not be what you expect because Word applies the last numbering style selected. Keep this in mind as you work through the examples, and don’t worry if your settings don’t match those in the article. The concepts are the same even if your settings don’t match mine.
I’m using Word 2016 (desktop) on a Windows 10 64-bit system, but this article applies to earlier versions. 365’s browser edition displays numbered lists and offers a few basic settings. However, you can’t apply either option discussed in this article using the browser. For your convenience, you can download the sample demonstration .docx or .doc file.
The basics
Adding a numbered list is simple, and often you won’t need to alter a thing. There are two ways to add a numbered list. You can use the Numbering option as a simple toggle as follows:
- Position the cursor where you want to start your list.
- Click the Numbering option in the Paragraph group. Word adds 1. and positions the cursor a bit to the right.
- Enter your first list item and press Enter to wrap to the next line. Word enters 2. and positions the cursor to the right waiting for the next list item (Figure A).
- Repeat steps 2 and 3 as many times as needed to complete the list.
- At this point, you can press Enter once and then click the Numbering option or press Enter twice to disable the numbering feature.
Figure A

Word adds the sequential numbers to the left of each item for you.
You can also generate a numbered list from an existing list. Select the list and click Numbering; Word adds sequential numbers, beginning with 1, to the complete list all at once, as shown in Figure B.
Figure B

Generate the numbers after the fact.
Creating a numbered list is simple and most users catch on right away. One more thought before we move on–use numbered lists correctly. A numbered list, by its nature implies that the number of items or the order of those items has meaning. A list of simple facts, where neither order nor number have meaning is a bulleted list, not a numbered list. You can turn what might otherwise be a bulleted list by forcing a number into the mix, as I’ve done with our example list. Remove the word Seven from the title and you have a bulleted list!
SEE: 10 all-purpose keyboard shortcuts to boost your Word efficiency (free PDF) (TechRepublic)
Line indents and spacing
After adding a numbered list, you probably notice a few things:
- Word indents the list a quarter of an inch to the right of the left margin.
- There’s a half inch between the number and the first character in the item.
- That half inch is composed of a Tab character, not spaces. (This is less obvious than the first two.)
You can change all three settings, but they aren’t on the Numbering option’s dropdown, where you might expect them. To access these options, right-click the numbers (not the list) and choose Adjust List Indents from the resulting submenu, as shown in Figure C. In the resulting dialog, adjust the appropriate settings. For example, in Figure D, you can see that I’ve transposed the first two settings. Figure E shows the new settings in place. If the ruler is enabled, you can also see that the left tab the feature uses moved accordingly.
Figure C
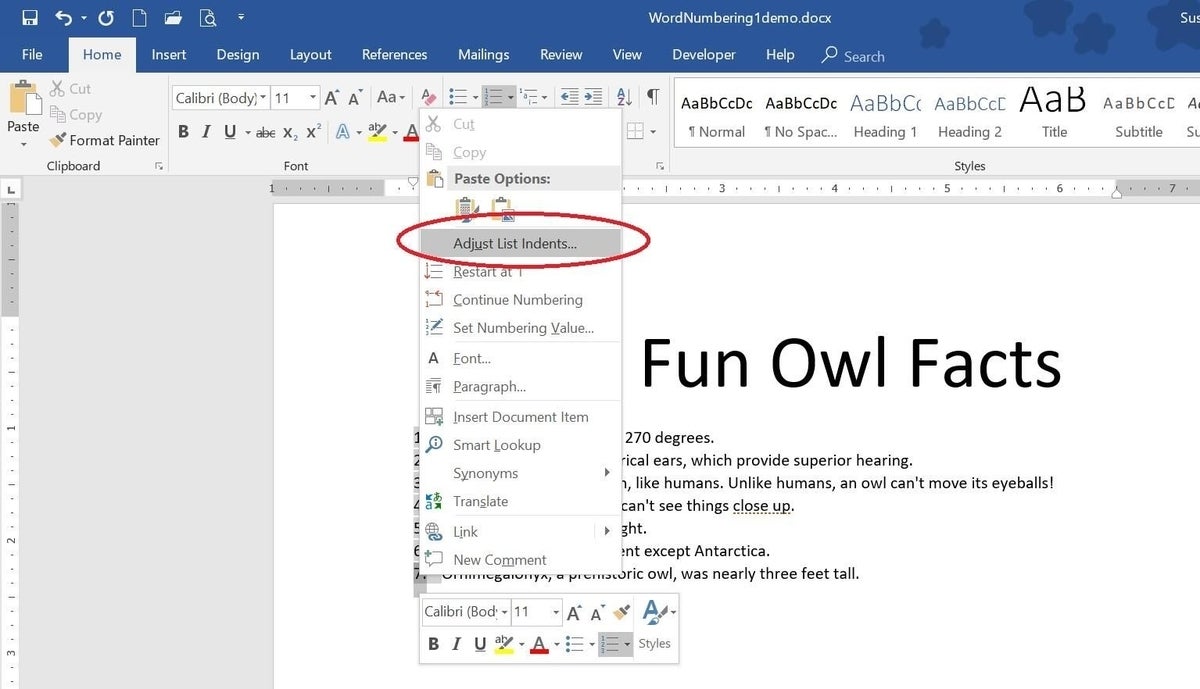
Modify the default list indent settings.
Figure D

Modify the settings.
Figure E

The new list is closer to the left margin and there’s less space between each number and the item.
You could change the Follow number with option (Figure D) from a Tab character to spaces, but I don’t recommend doing so unless you have a specific reason for doing so–and you seldom will. If you choose Nothing from this setting, Word ignores the Text indent setting.
SEE: Microsoft Teams: The right collaboration platform for your organization? (free PDF) (TechRepublic)
Alignment
After adding a few more facts, as shown in Figure F, you might notice something new–the two-digit numbers don’t align with the previous one-digit numbers. You could leave the list as is, but most likely you’ll want to adjust it. Leaving it as is makes the reader uncomfortable; it’s simply not as readable as it should be. We expect numbers to align using the period character or the right-most digit if there’s no punctuation.
Figure F
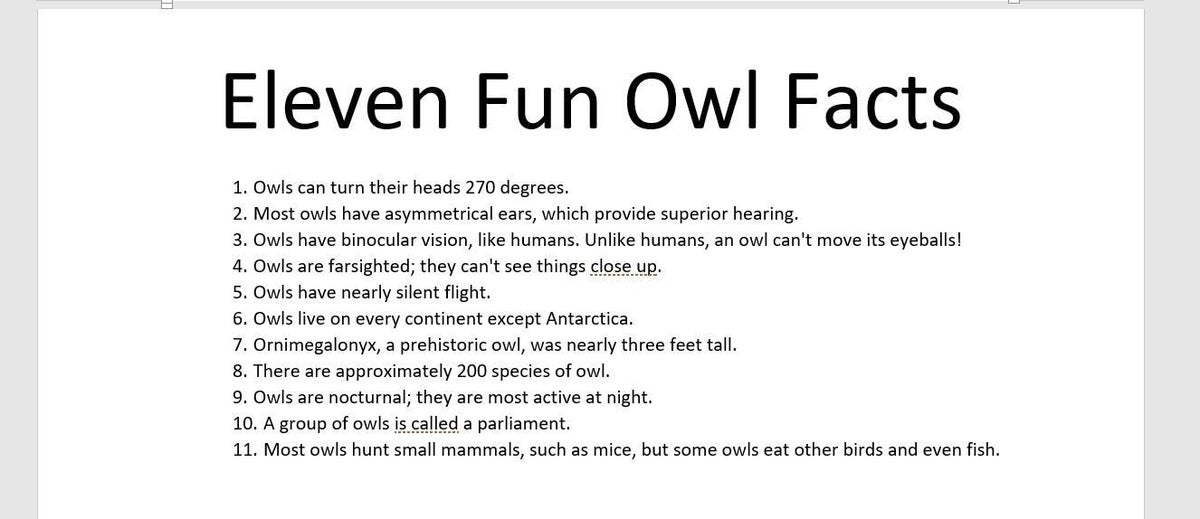
Word doesn’t align the numbers as expected.
Fortunately, the alignment setting is easier to find than indent and spacing settings; you’ll create a right-aligned number format as follows:
- Click anywhere inside the list.
- From the Numbering dropdown (in the Paragraph group), choose Define New Number Format (at the bottom).
- In the resulting dialog, change the Alignment setting from Left to Right, as shown in Figure G.
- Click OK to see the newly aligned list shown in Figure H.
Figure G

Change the Alignment setting.
Figure H

Word aligns the numbers as expected.
Stay tuned
Numbering basics are easy, but numbered lists can be much more complex. Over the next few months, we’ll look at some common numbering problems and their solutions.
Send me your question about Office
I answer readers’ questions when I can, but there’s no guarantee. Don’t send files unless requested; initial requests for help that arrive with attached files will be deleted unread. You can send screenshots of your data to help clarify your question. When contacting me, be as specific as possible. For example, “Please troubleshoot my workbook and fix what’s wrong” probably won’t get a response, but “Can you tell me why this formula isn’t returning the expected results?” might. Please mention the app and version that you’re using. I’m not reimbursed by TechRepublic for my time or expertise when helping readers, nor do I ask for a fee from readers I help. You can contact me at susansalesharkins@gmail.com.
Also see:
- How to use Excel’s Data Model to turn related data into meaningful information (TechRepublic)
- 5 ways to modify and customize styles in Microsoft Word (TechRepublic)
- How to use COUNTIFS() to compare multiple data sets (TechRepublic)
- Office Q&A: An easy Word Replace trick for a big problem and exposing duplicate records in Excel (TechRepublic)
- How to use Excel formulas to compare multi-column lists (TechRepublic)
-
Microsoft
-
Software