
Figure 1: To have Word magically number your figures for you
- Type the name of the figure.
- Click in front of the name of the figure.
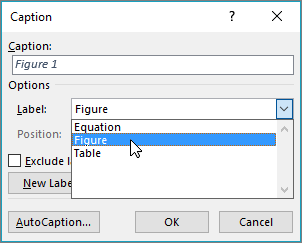
- In Insert menu on top of screen, select Caption.
- Under Options: Label, select Figure.
- Click OK.
- Add a space and/or a colon if necessary. Be tidy and consistent.
Contents
- 1 How do you automatically number tables and figures in Word?
- 2 How do you add figure numbers?
- 3 How do you automatically update figure numbers in Word?
- 4 How do I manually change figure numbers in Word?
- 5 How do you annotate a figure in Word?
- 6 How do you add numbers to shapes in Word?
- 7 How do I insert a numbered circle in Word?
- 8 How do I update figure numbers in Word 2016?
- 9 What does F9 do in Word?
- 10 How do I change my figure number?
- 11 How do I reset figure numbers in Word?
- 12 How do you reference figures?
- 13 How do you use bookmarks in Word?
- 14 How do you reference a figure in text?
- 15 How do I annotate a PNG?
- 16 How do you annotate an image?
- 17 How do you annotate a painting?
- 18 How do you add a shape to a header in Word?
- 19 How do you draw shapes in Word?
- 20 How do I apply a shape style in Word?
How do you automatically number tables and figures in Word?
On the Home tab, in the Paragraph group, click Numbering. Note: To select a different number format, right-click a number in the list, point to Numbering, click Define New Number Format, and then select the options that you want.
How do you add figure numbers?
14. Type your caption or title after the label and number in the Caption text box. Pro Tip: Most of our primary style guides recommend placing a period after the figure or table number. However, Word doesn’t provide a way to add that period automatically, so remember to add it manually as you type each caption.
How do you automatically update figure numbers in Word?
Instead of searching and replacing all the figure numbers in the text, click “Edit” -> “Select All” (or, Ctrl + A), which select the entire document, then, press “F9”. This updates all the figure number automatically.
How do I manually change figure numbers in Word?
Changing Caption Numbering Styles
- Display the References tab of the ribbon.
- Click the Insert Caption tool, in the Captions group.
- Click on the Numbering button.
- Using the Format drop-down list, choose the format you want used for your caption numbers.
- Click on OK to close the Caption Numbering dialog box.
How do you annotate a figure in Word?
To annotate an image in Word, insert the image in a document, then draw a shape over the image.
- Go to the Insert tab and select Pictures.
- In the Insert Picture dialog box, select the file folder that contains the image.
- Choose the image, then select Insert.
How do you add numbers to shapes in Word?
To add a shape, click Insert, click Shapes, select a shape, and then click and drag to draw the shape. After you add one or more shapes, you can add text, bullets, and numbering to them, and you can change their fill, outline, and other effects on the Format tab.
How do I insert a numbered circle in Word?
You simply use Insert –>Shapes, select the circle shape, type a number inside the circle, and then drop the circle on top off the picture where you want to showcase something.
How do I update figure numbers in Word 2016?
Update caption numbers
- Click anywhere in the document and press CTRL+A to select the entire document.
- Right-click, and then choose Update Field on the shortcut menu. All of the captions in the document should now be updated.
What does F9 do in Word?
F9. F9: Update a field. This is the same as right-clicking a field and choosing the “Update Field” command.
How do I change my figure number?
Place your cursor in front of ANY automated caption number for ANY figure. Go to the References tab and click Insert Caption to open the Caption dialog box. Change the Label to Figure. Click Numbering to open the Caption Numbering dialog box.
How do I reset figure numbers in Word?
1 Answer
- Select the number in the caption you want to start the custom numbering at.
- Right-click and choose “Edit Field…”.
- Click the Options button.
- Choose the Field Specific Switches tab.
- Select the r switch, and click Add To Field.
- Type the number desired to restart the caption numbering after the r .
How do you reference figures?
The citation would normally be given after the title of the figure, table, diagram, etc.
- Example: Figure 1, A four pointed star (Jones, 2015, p. 54).
- Example: (Jones, 2015, p.33)
- Example:
- Example: (United Nations, 1975, cited in Smith, 2016, p.33)
How do you use bookmarks in Word?
Bookmark the location
- Select text, a picture, or a place in your document where you want to insert a bookmark.
- Click Insert > Bookmark.
- Under Bookmark name, type a name and click Add. Note: Bookmark names need to begin with a letter. They can include both numbers and letters, but not spaces.
How do you reference a figure in text?
All figures and tables must be mentioned in the text (a “callout”) by their number. Do not refer to the table/figure using either “the table above” or “the figure below.” Assign table/figure # in the order as it appears, numbered consecutively, in your paper – not the figure # assigned to it in its original resource.
How do I annotate a PNG?
How to annotate PNG documents online
- Click inside the file drop area to upload a PNG file or drag & drop a PNG file.
- File will be automatically rendered for you to view instantly.
- Scroll down to navigate between pages.
- Add annotations to the document.
- Download the annotated version of your PNG file.
How do you annotate an image?
For annotating an object, simply hover over the object in the selected image, click and drag to create a rectangular box of the intended size. After creating the bounding box, a new entry is added under Bounding Box column on the right. Click to select desired label for the object.
How do you annotate a painting?
Using annotation
- analyse the work of an inspirational artist or designer.
- record a technique.
- record ideas.
- explain the thinking behind an idea.
- analyse the success of a technique, idea or composition.
- explain how a particular artist or designer’s style or technique has influenced your work.
To add the shape, do the following:
- Open the footer by double-clicking the footer area. In Word 2003, choose Header and Footer from the View menu.
- While in the header, click the Insert tab.
- Click inside the footer and drag to create the shape.
- With the shape inserted, use the contextual Format tab to format the shape.
How do you draw shapes in Word?
Click in your document where you want to create the drawing. On the Insert tab, in the Illustrations group, click Shapes.
Add a drawing to a document
- Insert a shape.
- Change a shape.
- Add text to a shape.
- Group selected shapes.
- Draw in the document.
- Adjust the size of the shapes.
How do I apply a shape style in Word?
To change the shape style:
- Select the shape you want to change.
- On the Format tab, click the More drop-down arrow in the Shape Styles group.
- A drop-down menu of styles will appear. Select the style you want to use.
- The shape will appear in the selected style.
Word for Microsoft 365 Word 2021 Word 2019 Word 2016 Word 2013 Word 2010 Word 2007 More…Less
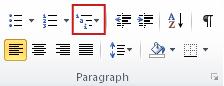
If you’re writing a multi-chapter document, such as a book, that includes figures, you may want to have your figure captions prefaced with the number of the chapter the figure appears in. For example the third figure in chapter five might be labeled «Figure 5-3». Fortunately it’s not hard to add chapter numbers to your captions and have them automatically update if you move a figure from chapter to chapter in the course of editing.
Step 1: Apply numbering to the chapter headings in your document
Note: To include chapter numbers in captions, you must use a unique heading style for chapter headings. For example, if you use the Heading 1 style for chapter headings, do not use the Heading 1 style for any other text in the document.
-
Select the first chapter heading in your document.
-
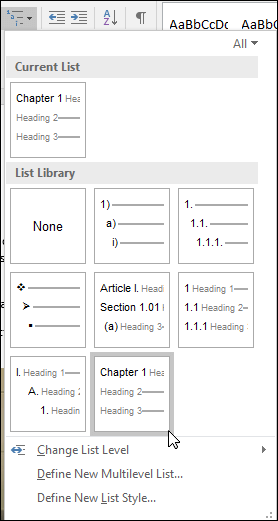
On the Home tab, in the Paragraph group, click the arrow next to Multilevel List.

-
Click a chapter-numbering list definition (one that includes the text Heading 1 or Chapter 1).
The chapter-numbering list definition will be automatically applied to all of the headings in your document that used that style (i.e. Heading 1 in this example).
Step 2: Add chapter numbers to captions
-
Select the object (table, equation, figure, or another object) that you want to add a caption to.
-
On the References tab, in the Captions group, click Insert Caption.
-
In the Label list, select the label that best describes the object, such as a figure or equation. If the list doesn’t provide the label you want, click New Label, type the new label in the Label box, and then click OK.
-
Type any text, including punctuation, that you want to appear after the label.
-
In the Caption dialog box click Numbering.
-
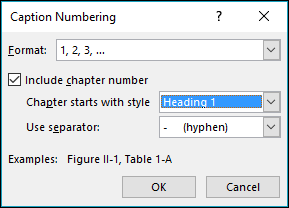
Select the Include chapter number check box.
-
In the Chapter starts with style list, select the heading style that was applied to the chapter heading.
-
In the Use separator list, select a punctuation mark to separate the chapter number from the caption number. In this example a hyphen has been selected so the caption on the first image in Chapter 2 would appear as «Figure 2-1».
-
Click OK.

Tip: If your numbering doesn’t appear to be correct, especially after adding or moving figures, try updating your captions by pressing CTRL+A (to select your entire document) and then press F9 to update all captions.
See also
-
Add captions in Word
-
Field Codes: Seq (Sequence) field
Do you have a question about using captions in Word that we didn’t answer here?
Post a question in the Word Answers Forum
Help us improve Word
Do you have suggestions about how we can improve Word? If so, let us know by providing us feedback. See How do I give feedback on Microsoft Office? for more information.
Need more help?
Want more options?
Explore subscription benefits, browse training courses, learn how to secure your device, and more.
Communities help you ask and answer questions, give feedback, and hear from experts with rich knowledge.
 As shown in this tutorial, you can quickly create a list of tables or figures in Microsoft Word if you used Word’s caption tool to number your tables and figures. (See “How to Insert Figure Captions in Microsoft Word” for step-by-step instructions on using the caption tool.)
We will also look at how to update the list as you add, move, or delete tables or figures.
Terminology Note: This tutorial uses the terms list of tables and list of figures, which are common terms in the publishing industry. However, Word refers to a list of tables or figures as a table of figures.
This tutorial is also available as a YouTube video showing all the steps in real time.
Watch more than 200 other writing-related software tutorials on my YouTube channel.
The images below are from Word in Microsoft 365 (formerly Office 365). The steps are the same in Word 2021, Word 2019, Word 2016, and Word 2013. However, your interface may look different in those older versions of the software.
Remember that these steps will only work if you used Word’s caption tool to number your tables or figures before creating the list.
- Insert your cursor where you want to place your list.
- Select the References tab in the ribbon.

- Select Insert Table of Figures from the Captions group.

- Select a visual style from the Formats menu in the Table of Figures dialog box. (The From Template option is based on the styles established in your current template.)

- Select Figure or Table from the Caption label menu. (There is no option for listing figures and tables together.)

- Ensure that Include label and number is checked if you want the label (i.e., Figure or Table) and the number to be included in the list. (Recommended)

- (Optional Step) Select additional options concerning page numbers and the tab leaders, which are the dots, dashes, or lines that appear before the page numbers.

Pro Tip: The Web Preview section shows how your list will look if you convert your Word file to a web page.
- Select the OK button.

- Manually type a title above your list.

- Save your file to save your changes.
The next section shows how to update a list of tables or figures.
How to Update a List of Tables or Figures
Word will not automatically update your list as you add or delete tables or figures. Instead, you can manually trigger updates, as necessary.
- Right-click the list and select Update Field from the shortcut menu.

- Select Update entire table from the Update Table of Figures dialog box.

- Select the OK button.

Your updates should appear immediately.
- Save your file to save your changes.
Important Note: Word’s caption tool, which inserts table titles and figure captions, will automatically number new tables and figures as you add titles and captions (e.g., Table 1, Table 2, Table 3). However, Word will not automatically update the numbering if you move or delete tables or figures.
See “How to Update Table and Figure Numbers in Microsoft Word” to learn how to force an update after moving or deleting a table or figure.
Related Resources
How to Create and Customize Charts in Microsoft Word
How to Insert and Modify Images in Microsoft Word
Three Ways to Insert Tables in Microsoft Word
How to Change the Style of Table Titles and Figure Captions in Microsoft Word
How to Cross-Reference Tables and Figures in Microsoft Word
How to Reference Tables and Figures in Text
Updated December 14, 2022
Quickly Update and Renumber Figures in a Word Document
by Avantix Learning Team | Updated May 13, 2021
Applies to: Microsoft® Word® 2010, 2013, 2016, 2019 or 365 (Windows)
If you have inserted figure numbers for images or drawings in a Microsoft Word document, you can update them throughout the document and the figures will renumber automatically. This is helpful if you have moved or inserted new images. In order to renumber figures, the figure titles and numbers must be inserted as captions (using the References tab in the Ribbon). Since captions are fields, they can be updated in a couple of steps.
Recommended article: How to Insert Built-in and Custom Fields in Microsoft Word
Updating figure numbers in a Word document
To update all figure numbers (caption fields) in a Word document:
- Click in the body of the Word document.
- Press Ctrl + A to select all.
- Press F9 (some users may need to press Fn + F9).
You can insert figure captions and table captions. If you select all and update, both figure and table captions will be renumbered if the images or tables have been moved.
Subscribe to get more articles like this one
Did you find this article helpful? If you would like to receive new articles, join our email list.
More resources
How to Insert Cross-References in Word
How to Insert a Watermark in Word (Like DRAFT)
How to Superscipt or Subscript in Word (with Shortcuts)
5 Ways to Insert or Type the Square Root Symbol in Word (√)
How to Create a Table of Contents in Word (Insert, Format and Update a TOC)
Related courses
Microsoft Word: Intermediate / Advanced
Microsoft Excel: Intermediate / Advanced
Microsoft PowerPoint: Intermediate / Advanced
Microsoft Word: Long Documents Master Class
Microsoft Word: Styles, Templates and Tables of Contents
Microsoft Word: Designing Dynamic Word Documents Using Fields
VIEW MORE COURSES >
Our instructor-led courses are delivered in virtual classroom format or at our downtown Toronto location at 18 King Street East, Suite 1400, Toronto, Ontario, Canada (some in-person classroom courses may also be delivered at an alternate downtown Toronto location). Contact us at info@avantixlearning.ca if you’d like to arrange custom instructor-led virtual classroom or onsite training on a date that’s convenient for you.
Copyright 2023 Avantix® Learning
Microsoft, the Microsoft logo, Microsoft Office and related Microsoft applications and logos are registered trademarks of Microsoft Corporation in Canada, US and other countries. All other trademarks are the property of the registered owners.
Avantix Learning |18 King Street East, Suite 1400, Toronto, Ontario, Canada M5C 1C4 | Contact us at info@avantixlearning.ca
If you create long Word documents with lots of captioned diagrams, tables, or figures in them, then you may be faced with the nightmare of having to update the numbering whenever you add a new figure or table to the document. And if you refer to this number within the text (e.g. “See Table 4”), that’s another place you have to remember to keep up to date.
You can automate this process—and produce automated Tables of Figures as well, just like an automated Table of Contents.
These instructions apply to any captioned tables, figures and diagrams. I will use ‘figure’ to refer to each of them—if you are creating table captions and a list of tables, substitute ‘table’ and choose the ‘Table’ option in the steps below instead of ‘Figure’.
Labeling a figure in Word
- Position your cursor beneath the figure.
- Open the Caption window:
* Word 2003: Select Insert > Reference > Caption from the menu.
* Word 2007 and later: Go to the References tab > Captions command group, then click Insert Caption. - Select Figure from the Label drop-down list.
Caption – default settings for Figure
- Optional: If you use headings with Outline Numbering, you may want to add a Chapter number. To do so, click Numbering and select the Include chapter number check box. You can also specify the number format, style, and separator.
Caption with chapter numbering included
Caption settings for chapter numbering
- Add any extra caption information after the caption number (e.g. Figure 3: xxxx).
Caption complete
- Click OK.


The caption is added, using the Caption style (you can modify this default style on the Styles and Formatting task pane in Word 2003, or the Styles floating window in Word 2007 or later). The number is automatically sequenced even if you add another figure between two existing figures with captions inserted like this.
NOTE: If the number doesn’t update automatically, or if you’ve copied an earlier caption and pasted it in another place then modified the caption’s text, update the field by selecting it and pressing F9. Update ALL the auto captions [and all other fields such as the TOC, List of Figures etc.] by pressing Ctrl+A, then F9.
Referring to a figure in the body text
The caption must exist (see above)—you can’t reference something that isn’t there.
- In the body text, place the cursor when you want the cross-reference text to be inserted.
- To insert a cross reference:
* Word 2003: Select Insert > Reference > Cross-Reference from the menu.
* Word 2007 and later: Go to the References tab > Captions command group, then click Cross-reference. - Select Figure from the Reference Type drop-down list. All figures that have been inserted as a caption are listed in the bottom half.
Cross-reference settings
- Click once on the figure that you want to refer to.
- In the Insert reference to drop-down list, select how you want the information displayed (e.g. select Only label and number to just display “Figure x” and not the entire caption; select Entire caption to display “Figure x: yyyyyy”).
- Click Insert, then click Close. The reference is added to the document—if you click in it, you should notice the gray shading indicating that it’s a field.
The cross-reference is inserted as a field


Creating the Table of Figures
- Position the cursor where you want the Table of Figures to be placed (it usually goes immediately after the Table of Contents).
- Insert the Table of Figures:
* Word 2003: Select Insert > Reference > Index and Tables from the menu.
* Word 2007 and later: Go to the References tab > Captions command group, then click Insert Table of Figures. - Click on the Table of Figures tab, if it’s not already selected.
- From the Caption Label drop-down list, select the type of table you want to create—Figure in this example.

Table of Figures settings
- Make any other changes as required.
- Click OK.
- Add a title (e.g. List of Figures) above the list just like you do for Contents.

A table of figures


Update February 2012: Really long captions: Several people have asked questions in the comments about dealing with really long captions, and there have been some excellent suggestions. Take a look at the comments from March 29, 2010, June/July 2011, and especially August 8, 2011 — one of these may solve your problem.
See also:
- Table and figure numbering: https://cybertext.wordpress.com/2009/04/28/table-and-figure-numbering/
[This article was first published in the March 2003 CyberText Newsletter; steps last checked and updated for Word 2007, 21 August 2008; screen shots added February 2009]
I have MS Word document which contains around 50 images with caption.
My problem is if I am inserting images in between (say inserting image after image 21) then the image is not taking the caption on its own(new image must be inserted with caption 22).
I need to manually update number for all the images after the newly added image. Can I automate it?
asked Jun 14, 2011 at 6:37
![]()
Sunil AgarwalSunil Agarwal
4,0595 gold badges42 silver badges80 bronze badges
1
I assume you are using the caption feature of Word, that is, captions were not typed in as normal text, but were inserted using Insert > Caption (Word versions before 2007), or References > Insert Caption (in the ribbon of Word 2007 and up). If done correctly, the captions are really ‘fields’. You’ll know if it is a field if the caption’s background turns grey when you put your cursor on them (or is permanently displayed grey).
Captions are fields — Unfortunately fields (like caption fields) are only updated on specific actions, like opening of the document, printing, switching from print view to normal view, etc. The easiest way to force updating of all (caption) fields when you want it is by doing the following:
- Select all text in your document (easiest way is to press ctrl—a)
- Press F9, this command tells Word to update all fields in the selection.
Captions are normal text — If the caption number is not a field, I am afraid you’ll have to edit the text manually.
answered Jun 14, 2011 at 6:44
![]()
RabarberskiRabarberski
23.5k21 gold badges74 silver badges94 bronze badges
7
- Select whole document (Ctrl+A)
- Press F9
- Save
Should update the figure caption automatically.
My question is tho, how can one also ‘assign’ referenced figures ‘(Fig.4)’ in the text to do the same thing — aka change when an image is added above it?
EDIT:
Figured it out.. In word go to Insert and Cross-ref and assign the ref. Then Ctrl+A and F9 and everything should sort itself out.
answered Mar 29, 2013 at 13:10
![]()
1
Office 2007
Right click the figure,
select Insert Caption,
Select Numbering,
check box next to
‘Include chapter number’,
select OK,
Select OK again,
then you figure identifier should be updated.
answered May 30, 2013 at 22:14
![]()