
![]()
Written by Allen Wyatt (last updated August 27, 2020)
This tip applies to Word 2007, 2010, and 2013
Reynolds is a book editor, and she works with manuscripts in Word. She turns on Track Changes and does her work so that the author can see what was done. She needs a way to number comments that appear in comment balloons so that they can be referenced to the author and to others working on the project.
When entering comments they should be numbered by default. That is, they should be numbered as long as you have Word configured to add the initials of the commenter to each comment. For instance, if I insert comments, then they show up in the comment balloons with my intials (ALW) followed by numbers (1, 2, 3, etc.). (See Figure 1.)
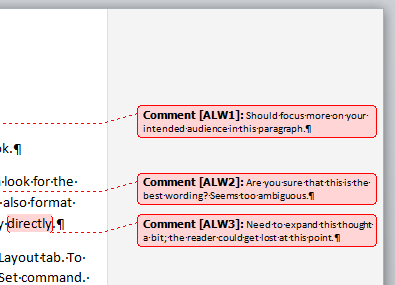
Figure 1. Comments are automatically numbered in Word.
If your comments don’t show up this way, it could be because you don’t have Word configured properly. Follow these steps:
- Display the Word Options dialog box. (In Word 2007 click the Office button and then click Word Options. In Word 2010 or Word 2013 display the File tab of the ribbon and then click Options.)
- Click Popular (Word 2007) or General (Word 2010 and Word 2013) at the left side of the dialog box. (It may already be selected, by default, in the dialog box.) (See Figure 2.)
- Make sure the Initials box has something in it. (Like your initials.)
- Click OK.
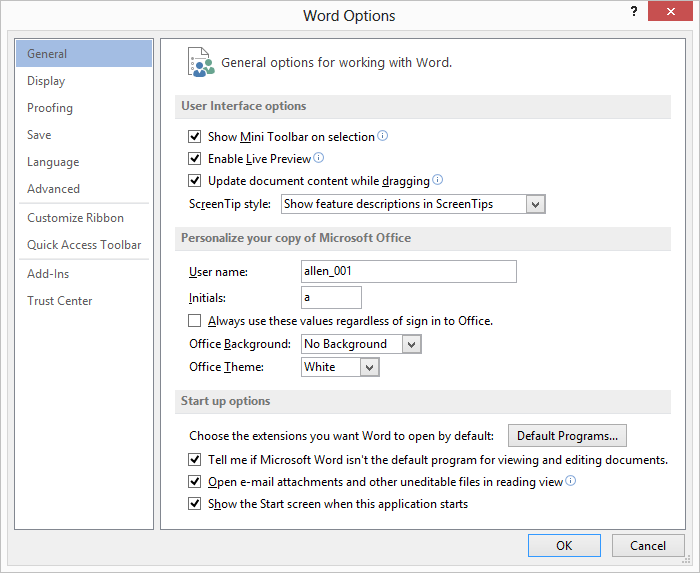
Figure 2. The general options of the Word Options dialog box.
One thing you need to be aware of is that as you insert comments, Word renumbers them so they are always sequential. In other words, if you have 17 comments in a document and you insert a new one after comment 5, then the current comment 5 (ALW5) becomes 6 (ALW6) and so on, so that you have 18 sequentially numbered comments in a document.
Another approach is to modify the style used to display the comment text. This text uses, appropriately enough, the built-in Comment Text style. You could easily modify this style so that it is automatically numbered. Follow these general steps:
- Display the Styles task pane. (Display the Home tab of the ribbon and click the small icon at the bottom right of the Styles group.)
- Click the Options link at the bottom of the task pane and change the options so that All Styles are displayed.
- In the task pane, hover the mouse pointer over the Comment Text style, click the down-arrow to the right of the style name, and choose Modify Style. Word displays the Modify Style dialog box.
- Click Format and then click Numbering.
- Pick a numbering style and close all open dialog boxes.
Your existing comments (and any you add in the future) should now be numbered. This approach has the same problem as the earlier approach: the numbers are dynamic, they are not static. The only way to make the numbers non-dynamic is to type them manually and then not change them later.
Of course, you may simply want to rethink how you are referring to your comments. Word keeps track of who enters a comment (thus the initials) as well as the date and time at which a comment was entered. You can see the time for a comment by simply hovering the mouse pointer over the comment. If you referred to comments in this way (perhaps in conjunction with the number), then there could be no confusion on the part of the author as to which comment you reference.
WordTips is your source for cost-effective Microsoft Word training.
(Microsoft Word is the most popular word processing software in the world.)
This tip (13385) applies to Microsoft Word 2007, 2010, and 2013.
Author Bio
With more than 50 non-fiction books and numerous magazine articles to his credit, Allen Wyatt is an internationally recognized author. He is president of Sharon Parq Associates, a computer and publishing services company. Learn more about Allen…
MORE FROM ALLEN
Getting Rid of Many Hyperlinks
Need to get rid of hyperlinks that result when you paste information from the Internet into your document? Here’s the …
Discover More
Limiting Number of Characters in a Cell
Need to limit the number of characters that can be entered into a cell? One easy way to do it is through the use of Data …
Discover More
Some Documents Open Slower than Others
It’s great when your documents open quickly, particularly when you need to work with lots of documents at the same time. …
Discover More
It appears Microsoft turned off auto-numbering of comments in Word 2013. So when going to Review in the ribbon and adding a «New Comment» there is no way to identify the comment when discussing with colleagues. In previous versions of word, adding a new comment included an auto-incremented comment number.
This is particularly problematic for example when a colleague is using an older version of office and refers to a comment by number — e.g. #5.
Is there any way to identify the comment numbers in Word 2013, so comments can be identified during discussions?
![]()
Ƭᴇcʜιᴇ007
111k19 gold badges199 silver badges264 bronze badges
asked Jun 26, 2013 at 19:24
![]()
Not in the edditing view as you are used to in Word 2010. Comment numbering only shows up if you go to the outline or draft viewing mode.
Go to the view menu and select outline or draft in the views section
answered Jun 26, 2013 at 19:38
![]()
3
- In the upper-right corner of the Word application, find the Quick Access toolbar.
- At the right-end of the toolbar click the down arrow and select More Commands… from the menu.
- In the dialog box in the Choose commands from drop-down select All Commands.
- Select Print Preview Edit Mode in the list and click Add >> to add it to the Quick Access toolbar.
After that, I clicked on Print Preview Edit Mode and I was able to see comment numbers. Make sure that you deselect the magnifier that will appear so that you can edit the document.
One more thing, the document where I performed this was sent to me by somebody using Word 2010. I do not know if the numbering will appear for comments added with Word 2013.
![]()
answered Feb 24, 2014 at 4:35
![]()
JuanJuan
511 silver badge1 bronze badge
2
Not optimal but you can hover the mouse over the number to read the comment.
Would be nice to have the 2010 feature back
answered Mar 7, 2014 at 13:17
![]()
For the use case where a colleague refers to comments by number, the following workaround may help.
- Navigate to the «Go To» tab of the «Find and Replace» dialog (default shortcut
Ctrl+G). - Under «Go to what», select «Comment».
- In the drop-down box labelled «Enter reviewer’s name», type in the number of the comment (ignore the fact the Word is actually asking for a reviewer name) and press Enter. Word will navigate to the comment number you have specified.
Unfortunately, this cannot help you identify the number of a given comment, but it works the other way around.
Depending on the number of comments in your document, you could guess a number, see where Word takes you and then type +1 or -1 into the drop-down box. Pressing Enter repeatedly would then take you through the comments one by one and you can count in your head until you reach the one you are looking for.
I admit this is tedious, but it may be a good workaround for small documents and is always effective at finding a comment if you know the number.
answered Mar 23, 2017 at 19:06
![]()
I have already published a range of posts on issues with comment boxes or comment balloons, including ones on comment boxes suddenly going tiny, or comment box text running in the wrong direction, changing the language in your comment balloons. This article covers what to do to add comment balloon numbering back in Word 2013 and 2016. Incidentally, this also signposts you to how to change the style of your comment balloon in general.
Where have the comment balloon numbers gone in Word?
In Word 2013 and 2016, the default setting is for comment balloons not to have numbers. Why? I honestly don’t know. Microsoft does have a habit of “simplifying” its Office interfaces, and the numbers do change with context (if you remove Comment 2, Comment 3 will be labelled Comment 2, etc.) but I have always found it useful to have numbers in my comment balloons.
Here’s what the default looks like:

and this is what I’m aiming for:

How do I change the comment balloon style and numbering?
We need to change the style of the comment balloons in order to add a number.
Click inside a comment balloon and press Ctrl+Shift+S (all at the same time, in that order) to display the Apply Styles pane:

This should be context-specific, but just check the style name is “Comment Text”.
Click the Modify button to access the Modify Style pane:

Look at the bottom of the dialogue box and click the Format button, which will give you a dropdown menu:

Click Numbering, which will allow you to select a numbering scheme:

Click on the numbering scheme you want to use so that it’s highlighted with a line, and then click OK.
If you want to use a numbering scheme that’s not on this screen, click on Define New Number Format instead:

Once you’ve clicked this, you will see some new options:

Click on OK here, which will take you back to the previous screen, OR click OK on the number format screen, then choose if you want Word to update this document (Automatically update) and to apply this default to all new documents from now on (New documents based on this template):

Click OK and your comment boxes will have numbers!
This article has shown you how to add numbers to your comment balloons / boxes / text in MS Word 2013 and 2016 for PC. You can use it to modify this setting in earlier versions of Word, but they will default to having numbers.
If you have found this article helpful, please add a comment and/or share it using the buttons below. Thank you!
Other related posts on this blog
What to do if your comment boxes go tiny in Word
What to do if your comment boxes start running from right to left
Changing the language in your comment balloons
Customising your comment boxes – everything you need to know
Customising Track Changes

UPDATE: Find existing numbers and a better way to cross-reference comments!
Sometimes it’s nice to have comments numbered in a document. That lets you refer to comments by number, which is useful for cross referencing (e.g., “See comment 12 again.”) or for talking about the comments in a transmittal memo, for example. Word used to number comments automatically. It still does, but those numbers are usually hidden. You can see the numbers on comments if you print off the markup, or by looking in the Review Pane. Numbers on comments also reveal themselves when looking at a document in Draft mode.
Modify the style for Comment text, setting the text to automatic numbering:
- Open the Modify Styles dialogue (instructions are in last week’s post).
- At the bottom of the box, click the Format button to open a sub-menu.
- Select Numbering…
- Select one of the numbered styles (not bullets). Customize it if you like.
- Click OK. Then click OK again.


Troubleshooting
Windows users may find that comment text is styled as Normal instead of as Comment Text. Changing the Normal style will change all text in the document that is set to Normal, and you probably don’t want to do that.
There are two primary snafus to be aware of when using this numbering method:
- The numbering applies to all comments, not just your own. You’ll see that other reviewers’ comments are numbered sequentially along with your own.
- As with any numbered list, the numbering will update every time you add or delete a comment, and when you reply to a comment. Remember this if you are cross-referencing comments. Numbers can change; be sure to double check them.
If your comments contain paragraphs, each paragraph will get numbered. To avoid this, use a “soft return” instead of a paragraph break. On a Mac, do this by holding down shift when you hit return.
Got a gnarly Word problem? Submit your problem and we’ll try to answer it in the Q&A thread.

![]()


Learn with us! Join a course today.
© This blog and all materials in it are copyright Adrienne Montgomerie on the date of publication. All rights reserved. No portion may be stored or distributed without express written permission. Asking is easy!
How comments in Word work
Learn how to add comments in Word, how to remove comments in Word, print without comments, change font size of comments, etc.
In Word, you can use comments to add notes to the document content. Comments are saved with the document and travel with the document if you share it with others. Comments are especially useful in the editing and reviewing process of a Word document. Different people can add comments and reply to other people’s comments. When finished, all comments can easily be deleted.
Word has a number of built-in tools dedicated to comments. In this article, you will learn how comments in Word work and how to use the comment tools. The basic information about comments applies to both the built-in comment functionality and the functionality of the DocTools CommentManager add-in.
The information in this article applies to Word 2013, Word 2016, Word 2019, Word 2021, and Word for Microsoft 365 on PC/Windows. Part of the information in this article also applies to Word 2010 and earlier versions but the comment tools and the ways to access them differ. In case of Word for Microsoft 365, see the notes below about Modern Comments.
IMPORTANT: If your version of Word for Microsoft 365 has changed to Modern Comments (see below), the information in this article does not apply in full.
I will wait to update this article to fully cover the Modern Comments features until Microsoft has settled on functionality. So far, the functionality is changing too often.
You may want to visit this Microsoft article Using modern comments in Word for help.
About Microsoft’s change to Modern Comments in Microsoft 365
If you have been using comment in Word for years, and if you are using Word for Microsoft 365, you may have experienced that the comment features in Word have changed. Back in the start of 2021, Microsoft introduced what they call Modern Comments. Modern Comments work quite differently than comments in Word have been working for years. Microsoft now refers to the old comments as Classic Comments.
As of July 2022, Microsoft may still not have rolled out Modern Comments to all users. The rollout has been quite slow. Mid 2021, I had to install the Insider Beta version of Office on a computer to get access to Modern Comments so I could test it. I did not see Modern Comments in my version of Microsoft 365, Current Channel, until in the spring 2022.
The switch to Modern Comments has frustrated many users and made many users angry. I agree with those users. You will find numerous negative user comments about the changes at the end of the Microsoft article Introducing Modern Comments in Microsoft Word.
Microsoft has listened and some improvements have been made. However, I still find Modern Comments extremely inefficient to work with compared to Classic Comments. Also, Modern Comments still have lack of functionality compared to Classic Comments.
How to get the old comment features back
Many users have requested a way to revert to the old comment features, Classic Comments. Microsoft has introduced a temporary option in Word that lets you turn off Modern Comments and revert to Classic Comments. Unfortunately, we must expect that the option will disappear some day.
To get the old comment features back:
- Select File > Options > General > turn OFF the Enable modern comments check box. Click OK.
This will revert to the old comment features. The change of the setting does not take effect until you have restarted Word.
About the DocTools CommentManager add-in and Modern Comments
In this article, I link to my DocTools CommentManager add-in in relation to specific features. Unfortunately, I experienced that many features in the add-in didn’t work with Modern Comments. As of 20-Jun-2021, I released version 3.0 of DocTools CommentManager that works with both classic comments and Modern Comments.
The DocTools CommentManager add-in makes it faster and easier to manage comments in Word. In addition, the add-in lets you review comments in Word from one place, rank comments by importance, extract all comments to either Word or Excel, create inline comments for instructions and help, etc. DocTools CommentManager add-in is completely compatible with Word’s own comment features.
Where to find the comment tools in Word
You will find the dedicated comment tools on the Review tab in the Ribbon.
- The Comments group on the Review tab includes tools that are dedicated to comments.
- The Tracking group on the Review tab includes tools that are used both in relation to comments and tracked changed. In this group, you will find tools to use for changing how comments are displayed.

Figure 1. The built-in comment tools in Word are found on the Review tab.
Word lets you add two levels of comments. First-level comments and replies to first-level comments.
You can add first-level comments in Word either via commands in the Ribbon or by using a keyboard shortcut. To can add a reply to a comment directly from the comment. Read on below.
How to insert a comment in Word
Word lets you view documents in a number of ways. In relation to comments, Print Layout view gives you the best overview. You can, for example, switch view from View tab in the Ribbon > Views group. You can also press Alt+Ctrl+P to switch to Print Layout view.
The built-in functionality in Word lets you add/insert comments from two different places. To insert a comment in Word:
- Select the text you want to comment.
The selected text will be marked as the comment scope. If no text is selected, Word will mark the preceding word, if any, as the comment scope.
To make it as easy for other users to understand your comment, make sure to select precisely the text that the comment refers to instead of, for example, selecting entire paragraphs.
- Follow step 2a, 2b, or 2c:
a. Select the Review tab in the Ribbon > Comments group > New Comment
OR
b. Select the Insert tab in the Ribbon > Comments group > Comment
OR
c. Press the keyboard shortcut Alt+Ctrl+M.The inserted comment appears in the markup area (or balloon area) in the margin or in the Reviewing Pane depending on your settings for display of comments. See How to show comments in Word below. See Figure 2 below.
- In the inserted comment, type the comment text.
- When finished, press the Esc key to return to the document text or click in the document.
Note that pressing Esc will select the text you marked in step 1 above. If you have DocTools CommentManager, pressing Esc will position the insertion point after the scope you selected, ready for you to continue typing without first deselecting the comment scope.
If you are using the DocTools CommentManager add-in, you can insert comments via DocTools tab > CommentManager group > Insert Comment.
NOTE: Comments in Word are stored in the documents. A comment can be edited by anyone who has access to edit the document and not only by the original author who inserted the comment.
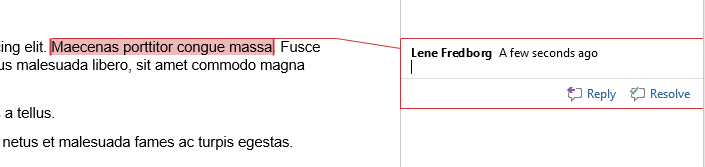
Figure 2. A new comment has just been added, ready for typing comment text. Note that if Simple Markup is selected in the Tracking group on the Review tab, the commented text (comment scope) will only be marked by a color when you have selected the comment in the markup area. If your document is in Draft view instead of Print Layout view, the comment will appear in the Reviewing Pane.
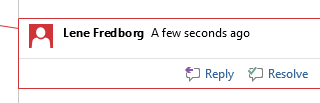
Figure 3. By default, Word shows pictures by comments. You can turn off the pictures.
NOTE: By default, Word shows pictures by comments in the balloon area. You can toggle off/on the pictures by right-clicking in a comment and selecting Hide Pictures by Comments (will change the label to Show Pictures by Comments).
Pictures are turned off in all the following illustrations in this article. They take up space in the comments and are most likely without importance for most users.
How to add a comment as a reply to another comment
Word lets you add two levels of comments. First-level comments and replies to first-level comments.
To add a reply to an existing comment:
- Click in the comment text of the comment you are going to reply to.
- Click the Reply icon below the comment text (See Figure 5 below).
OR
Right-click in the comment and select Reply to Comment. - In the inserted comment reply, type the comment text.
- When finished, press the Esc key to return to the document text or click in the document.
Replies to comments are indented below the comment to which they belong. You can add more replies to the same comment. All replies will appear on the same level – they will all be shown as replies to the first-level comment even if a reply is actually written as a reply to another reply.
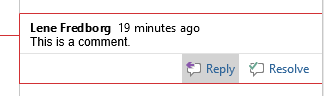
Figure 5A. Click the Reply icon to add a reply to an existing comment.
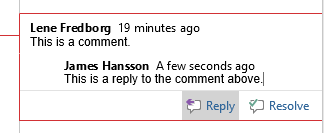
Figure 5B. A new comment has been added as a reply to an existing comment.
If a page has too many comments for Word to have room for all the comment text, the comments will be collapsed. A comment will expand when you click the comment.
Note that Word 2013 and later versions do not number comments when shown in the balloon area/Comments pane. Only if you view comments and revisions inline or in the Reviewing pane, or if you switch to Draft view or Outline view, numbers are shown together with the author initials. Syntax for comments numbers shown inline: NN#, where NN are the initials and # the index number of the comment, counted from the start of the document. Example: LF5. You will not be able to see on the number whether a comment is a first-level comment or a reply to another comment.
The DocTools CommentManager add-in shows the actual comment number and total number of comments in the Status Bar when you use the Previous Comment or Next Comment commands.
How to edit a comment in Word
To edit an existing comment in Word:
- Make sure the comment is shown. See How to show comments in Word.
- Click in the comment and add, delete, or modify the comment text.
How to resolve a comment in Word
Word lets you mark a comment as resolved. This will change the font color(s) of the comments to a pale look. Marking comments as resolved may help you keep track of which comments still need attention.
To mark a comment as resolved:
- Click in the comment text of the comment you are going to mark as resolved.
- Click the Resolve icon below the comment text (see Figure 5 above).
OR
Right-click in the comment and select Resolve Comment.
The Resolve icon changes to Reopen. If needed, you can turn off the resolved status again by clicking Reopen or by right-clicking in the comment and selecting Reopen Comment.
Why can’t I resolve comments in Word?
You may experience that the Resolve icon and the Resolve Comment command are grayed out, indicating that the commands are disabled and cannot be used. To find out why this happens and how to solve it, read on below.
What to do if the Resolve icon is grayed out – and what causes the problem?
The Resolve feature was introduced in Word 2013. The Resolve feature is grayed out under the following conditions:
- The document was created in or last saved in Word 2010 or an earlier version.
- The document is in compatibility mode.
If the document is in compatibility mode, newer Word features cannot be used. You will see the text (Compatibility Mode) after the file name in the Title bar of the Word window.
How to solve the problem
You can convert the document to allow all features in you Word version to be available. Use one of the following methods to update the document to your version of Word. This will enable the Resolve feature:
- METHOD 1: Select File > Info > click Convert. Save the document.
- METHOD 2: Select Save As (F12). In the Save As dialog box, turn off the option Maintain compatibility with previous versions of Word. Click Save. See the illustration below.
IMPORTANT: Conversion of a document may result in changes to the formatting of the document, depending how it was set up. For examples, the widths of tables created in Word 2010 and earlier may change when converted to Word 2013 format or later (due to changes of how cell margins are handled).

Bottom-left part of Save As dialog box — turn off Maintain compatibility with previous versions of Word to convert the document to your version of Word. This allows newer features to be used.
How to remove resolved comments in Word
Word does not have a built-in feature for removing all resolved comments in one operation. You need to go through all the resolved comments and delete them one by one.
Note that the DocTools CommentManager add-in lets you delete all resolved comments with the click of a button. For details, see How to delete resolved comments in Word.
Where does the name in an inserted Word comment come from?
The author name shown in an inserted comment is the name currently specified for the user in File > Options > General > User Name. See Figure 4B below.
If you have selected to show comments and revisions inline in the document, Word shows initials in the comment reference. The initials are the ones currently specified for the user in File > Options > General > Initials. See Figure 4B below.
You can also get access to the user name and initials via the Track Changes Options dialog box. To open that dialog box, click the small arrow (dialog box launcher) in the bottom-right corner of Review tab > Tracking group.

Figure 4A. You can get access to the user name and initials settings via the Change User Name button in the Track Changes Options dialog box. See the illustration below.
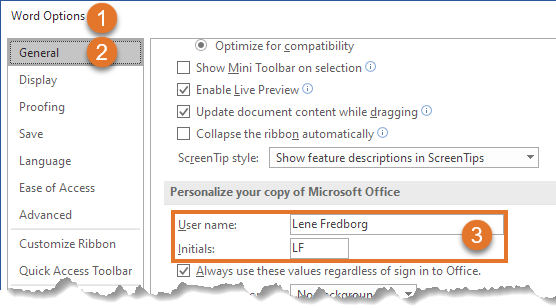
Figure 4B. The User Name and Initials settings in Word Options > General.
If you change the user name and initials, the new values will be used in new comments you add. It will not change the name and initials in existing comments.
The currently defined user name and initials are also used in insertions, deletions, and formatting changes made while track changes is turned on.
How to remove name from comments in word
Word’s comment functionality does not include functionality for changing the author name of existing comments. However, Word lets you remove personal information which will set the author name of all comments to «Author». See How to remove personal information from comments. See also the macro solution later in this article.
Note that the DocTools CommentManager add-in lets you easily change the user name and initials, also in existing comments. The command Change Author Names in Existing Comments lets you change all names or only a specific name of your choice. For example, this feature can be used to change author names to the company name before sharing a document with external people or to correct a misspelled or otherwise wrong user name. If you want to remove the name from comments, you can use the command to set the name to e.g. a non-breaking space (Ctrl+Shift+Spacebar), a hyphen or an En dash. See also the information below about a feature in the DocTools ExtractChanges Pro add-in that lets you do even more and that handles both tracked changes and comments.
The DocTools ExtractChanges Pro add-in (from version 6.0) includes a command, Change Author & Date, that lets you change the name in existing tracked changes and comments. In addition, the command lets you remove or change the date of the tracked changes and comments. You can select whether the name and/or date changes are to be applied to all tracked changes and comments or only tracked changes and comments added by a specific author. The changes are made in copy of the document so that the original document remains unchanged.
TIP: If you want to remove the name from tracked changes and comments, you can type e.g. a non-breaking space (Ctrl+Shift+Spacebar), a hyphen or an En dash as both the author name and initials in the Change Author & Date dialog box in DocTools ExtractChanges Pro.
How do dates in Word comments work?
Word shows date and time information on a comment in the following situations:
- When a comment is selected in the balloon area
- When you hover the mouse over a comment in the balloon area
- When you hover the mouse over a comment mark on a page if no balloons are shown
- Above each comment in the Reviewing Pane
The date and time tell when the comment was added.
Is it possible to change the date of a comment in Word?
The date assigned to a comment in Word cannot be changed. Also, you cannot change the way that date and time information is shown. See below for details.
Language of date and time information in comments
The language used for date and time information in balloons is determined by the current language of the user interface in Word, i.e. the language used in Ribbon, dialog boxes, etc. This also means that weekdays and month names are written in the language of the user interface. If you change that language, the date and time information will automatically change too.
The date format shown in balloons seems to always follow English (US) syntax no matter the language and even if it is not a normal date syntax in the actual language:
- [month name] [day], [year]
Example: March 21, 2018
About comment date and time information shown in the balloon area
The date and time information for comments in the balloons is not always given as date and time – you will see text descriptions instead. As time goes, the date and time information for a comment in the balloon area will change. The information shown follows the order described below – text shown as you will see it in English versions of Word:
First 24 hours
A few seconds ago
2 minutes ago
3 minutes ago
…
59 minutes ago
60 minutes ago
1 hour ago
2 hours ago
…
23 hours ago
24 hours ago
Next six days
Yesterday
The next days, until 1 week after adding the comment: the actual weekday, e.g. Wednesday, Thursday. Weekday names seem to be shown in the language set in the regional settings in Windows.
After a week
After a week, the information will change to showing date and time in the following format:
[month name] [day], [year] hh:mm:ss
where:
hh = hours
mm = minutes
ss = seconds
You may see time given with AM/PM values.
As explained above, the month name will be in the language of the user interface and the syntax follows English (US) rules even if not in English:
Examples:
- English user interface: March 21, 2019 14:55:35
- German user interface: März 21, 2019 14:55:35
- Danish user interface: marts 21, 2019 14:55:35
The CommentManager add-in makes it fast and easy to get an overview of all comments in a Word document, using the Review Comments command. This also includes date and time information.
How to show comments in Word
Comments in Word can be displayed in different ways:
- In balloons (see OPTION 1 below)
- In the Reviewing Pane (see OPTION 2 below)
- In screen tips only (see OPTION 3 below)
OPTION 1 – How to show comments in balloons
The document must be in Print Layout view (Alt+Ctrl+P) to show comments in balloons.
- Select the Review tab in the Ribbon.
- In the Tracking group, click Show Markup > Balloons and select Show Revisions in Balloons or Show Only Comments and Formatting in Balloons as desired. See Figure 6 below.
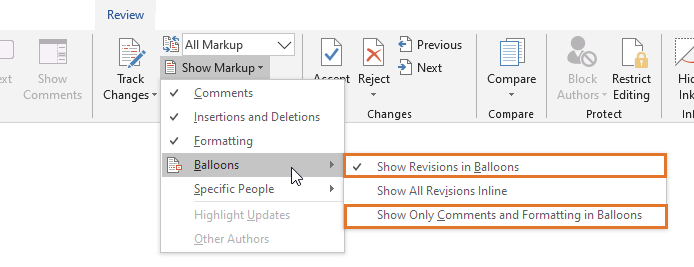
Figure 6. How to show comments in balloons in Word. Select one of the options marked by colored frame.
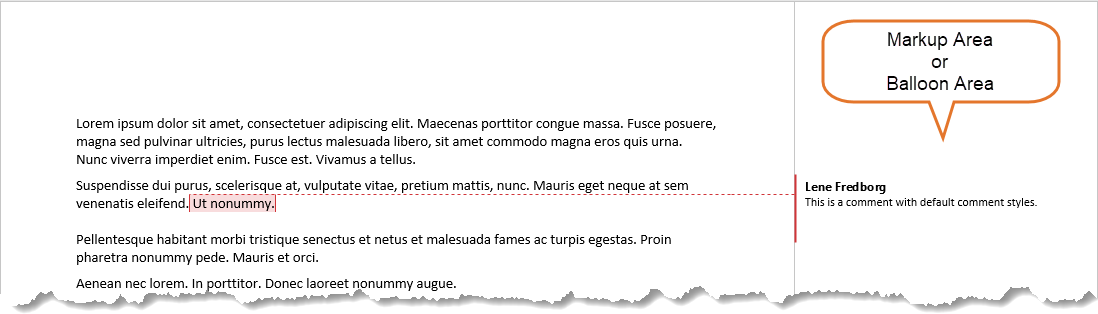
Figure 7. The Markup Area or Balloon Area is shown in the left or right margin depending on your settings. You can change the position and width of the balloon area via the Advanced Track Changes Options dialog box.
OPTION 2 – How to show comments in the Reviewing Pane
You can show the Reviewing Pane in any view except Read Mode.
- Select the Review tab in the Ribbon.
- In the Tracking group, click Reviewing Pane.
- From the menu, select Reviewing Pane Vertical or Reviewing Pane Horizontal depending on how you want the pane to be shown.
You can close the Reviewing Pane again by clicking the X in top-right corner of the pane.
OPTION 3 – How to show comments in screen tips
To use this method, all revisions must be shown inline. This means that the following option must be selected: Review tab > Tracking group > Show Markup > Balloons > Show All Revisions Inline. See the second option in Figure 6 above.
- Hover the mouse over a comment reference, i.e. the initials and number shown where a comment has been inserted.
- A screen tip will appear, showing the comment text. See Figure 8 below.
NOTE: If no screen tip appears when you hover the mouse over the comment reference, try to move the mouse a bit. If the screen tip does not appear, the problem is most likely that display of screen tips is turned off. To turn it on, select File > Options > Display > turn on Show document tooltips on hover.
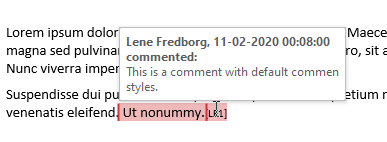
Figure 8. Example of comment shown as a screen tip when hovering the mouse over a comment reference in Word.
The DocTools CommentManager add-in includes special tools that make it faster to work with comments. For example, the Review Comments command opens a dialog box that works as a control center from where you can view, edit, delete, search comments and more.
How to show only specific comments in Word
Show comments by a specific author only
In Word documents with many comments, it may sometimes be helpful to see only a subset of the comments. Word lets you show/hide comments by author.
To show only comments added by a specific author:
- Select Review tab > Tracking group > Show Markup > Specific People: Deselect all authors except the author(s) whose comments you want to see.
This does not remove any comments – it only hides some comments temporarily.
How to hide resolved comments in Word
When you use Word’s Resolve feature in a comment, the comment is marked as resolved and shown dimmed. However, the comment remains in the document until you delete it.
You may be interested in keeping the resolved comments in the document until all comments have been handled. However, you may want to hide the resolved comments, so they do not distract you while resolving the rest of the comments.
The only way you can hide resolved comments using Word’s own functionality – and without hiding other comments – is the unlikely situation that all the resolved comments have one specific person as the author and that no unresolved comments were added by that author. In that situation, you could deselect that author in Review > Tracking group: Show Markup > Specific People. Except from that, you are out of luck.
If you are using Word for Microsoft 365 and if your version has switched to «modern comments» functionality instead of «classic comments», resolved comments will not appear in the margin but they are still shown in the Comments pane.
Note that the DocTools CommentManager add-in provides methods to quickly hide all resolved comments. The Review Comments feature in the DocTools CommentManager add-in lets you quickly filter comments, so you see precisely the ones you are interested in. This way, you can quickly hide all resolved comments. In addition, the add-in lets you export all comments to Excel where they will be listed with all metadata and with filter applied to every column, making it easy to filter so you see only unresolved comments.
What to do if you cannot see the comments
Comments can be set to not be displayed. The same is true for revisions made using track changes. If you know the document contains comments but you can’t see them, follow CHECK 1, CHECK 2, and CHECK 3 below.
CHECK 1 – Check that markup is selected to be shown
- Select the Review tab in the Ribbon.
- In the Tracking group, make sure that Display for Review has been set to All Markup or Simple Markup. See the illustration below.
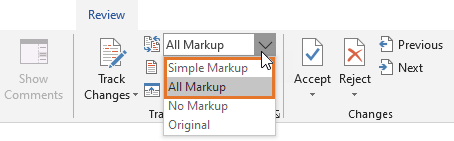
Figure 9. To see comments, make sure that All Markup or Simple Markup is selected.
CHECK 2 – Check that comments are selected to be shown
If comments are not shown after you followed CHECK 1:
- Select the Review tab in the Ribbon.
- In the Tracking group, make sure that Comments is checked in the Show Markup menu. See Figure 10 below.
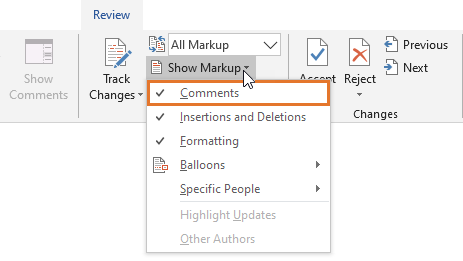
Figure 10. To see comments, make sure that Comments is checked in the Show Markup menu.
CHECK 3 – What to do if you only see comment icons in the balloon area – or how the Show Comments command works
Read on if you have followed CHECK 1 and CHECK 2 above and still can’t see comments, or if you only see small comment icons in the balloon area instead of the comment content.
You may have noticed that the Comments group in the Review tab includes a command named Show Comments. You may also have noticed that the command is not always enabled so you can use it – in some situations, the Show Comments is grayed out/disabled. Here is the reason why:
- The Show Comments command is only enabled when Simple Markup is selected. Also, Comments must be checked in the Show Markup menu. See Figures 11A and 11B below.
- If Display for Review is set to show Simple Markup, the Show Comments command toggles between two states:
State 1: Comment icons are shown in the margin (see Figure 12 below)
State 2: Full comments are shown in the balloon area
NOTE: If comments are not shown beforehand, the first click on Show Comments will switch to state 1, i.e. showing comment icons.
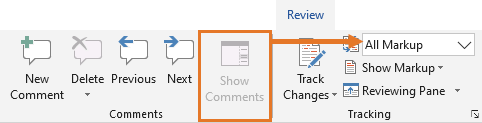
Figure 11A. The Show Comments command grayed out. To enable it, you must select Simple Markup instead of any other Display for Review option.
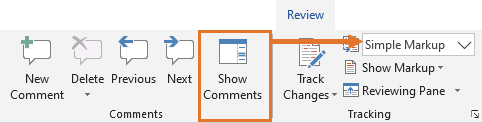
Figure 11B. The Show Comments command is only enabled when Simple Markup is selected.
![]()
Figure 12. Comment icons are shown in the margin if Simple Markup is selected.
![]()
Figure 13. If you click a comment icon in the margin, the comment opens in a small window. You can drag the comment window to the position you want. You can also resize the window by dragging an edge or corner. To close it, click the X or simply click anywhere outside the comment window.
TIP: If comment icons are shown as illustrated in Figure 12 above, the commented text in the document is not marked in any way. This means that you cannot see precisely what the comment refers to. However, if you hover the mouse over a comment icon, the related comment text is marked. If you happen to hover the mouse over commented text, that text will be colored and a screen tip with comment information is shown in the same way as illustrated in Figure 8 above.
A comment plus all replies to the comment, if any, will appear as only one comment icon in the margin. When you click a comment icon, the first-level comment and all replies to it, if any, will appear in the small comment window that opens.
What happens if you copy and paste content that contains comments?
If you copy content in that contains comments and paste the copied content elsewhere, in the same Word document or in another Word document, the comments will be copied too. The pasted comments will not be linked to the original comments – they keep the author names, time stamps and content from the original comments but they are independent comments.
If you paste the copied content as plain text, without formatting, the comments will not be included.
How to remove comments in Word
You can remove individual comments, one at a time, or remove all comments from a Word document in one operation. In Word, the term «delete» is used instead of «remove». Therefore, I have used «delete» in the following.
If you delete a comment that has replies, all replies to the comment will be deleted too.
If you delete a reply to a comment, only that reply will be deleted.
How to delete a single comment
- Make sure the comment is displayed. Click in the comment text of the comment to be deleted.
- On the Review tab in the Ribbon, in the Comments group, click Delete > Delete.
Note that the command is disabled if only comment icons are shown. - Repeat steps 1-2 to delete more comments, if relevant.
How to delete all comments from the document
- On the Review tab in the Ribbon, in the Comments group, click Delete > Delete all Comments in Document.
How to delete all comments that are currently visible
Via the Review tab > Tracking group > Show Markup > Specific People, you can turn off the display of comments and revisions made by specific people. Thereby, only comments and revisions made by the people checked in the list will be shown in the document.
To delete all comments added by the people currently checked in the Specific People list:
- On the Review tab in the Ribbon, in the Comments group, click Delete > Delete all Comments Shown.
When you delete comments in Word, the commented text (comment scope) is preserved. Only the comment(s) are removed. This means that the text in the document that the comment(s) referred to, i.e. the text that was selected when the comment(s) were inserted, is still in the document.
Note that the DocTools CommentManager add-in lets you move a comment, i.e. change which text the comment is related to. DocTools CommentManager also lets you select text in the document and convert it to a comment. This will remove the selection from the document and insert it in a new comment instead. This is practical in a number of situations. The feature is practical if some comments were originally written as part of the document text. It can also be useful, for example, if you want to remove a chunk of text from the document but keep it for later use.
How to delete resolved comments
As mentioned previously, Word doesn’t have a tool specifically for deleting resolved comments. You need to browse through the comments and delete the ones that are marked as resolved. Make sure comments are shown in balloons. You can use the Next or Previous commands on the Review tab to browse through the comments and delete individual comments as needed.
How to delete all resolved comments in Word
As opposed to Word’s own functionality, the DocTools CommentManager add-in lets you delete all resolved comments with the click of a button. You will find a command, Delete All Resolved Comments, for getting rid of all comments that have been marked as resolved.
If you want to review the resolved comments before deleting them, DocTools CommentManager offers another practical feature. You can use the filter feature in the Review Comments dialog box to show only resolved comments (type » yes » in the filter field). You can then quickly step through the resolved comments and use the Delete Comment button to remove the ones you want to get rid of.
How to hide comments in Word
There may be situations where you want comments to remain in a Word document but to be temporarily hidden. To hide comments (without deleting them), follow one of the methods below.
METHOD 1 – Hide comments only but keep any changes marked as tracked changes visible
- Select the Review tab in the Ribbon.
- In the Tracking group, remove the check mark from Show Markup > Comments.
METHOD 2 – Hide comments and any tracked changes
- Select the Review tab in the Ribbon.
- In the Tracking group, select Display for Review > No Markup.
This will show the document as if all comments have been deleted and all revisions accepted.
The comments and revisions are still in the document but hidden.
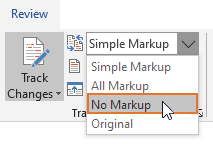
Figure 14. Select No Markup to show the document without comments and tracked changes.
Note that in relation to comments, you may select Original instead of No Markup since this will also hide comments. However, in relation to tracked changes, there is a big difference between the two options: No Markup will show the document as if all tracked changes have been accepted whereas Original will show the document as if all tracked changes have been rejected.
Note that hiding comments and tracked changes only determines how your document is shown right now. The display settings are not stored in the document. If you send the document to another user, it is that user’s settings that apply.
How to print without comments in Word
If you are going to print a document that has comments, you may want to leave out the comments in the print. To obtain this, you can follow METHOD 1 or METHOD 2 below.
METHOD 1
- Select the Review tab in the Ribbon.
- In the Tracking group > Show Markup, turn off
Comments.If the document also includes tracked changes and if you want to avoid printing those changes, turn off Insertions and Deletions and Formatting too.
- Select the desired printer and click Print.
- If you want, turn on Review tab > Tracking group > Show Markup > Comments again.
METHOD 2
- Select File > Print.
- Under Settings, click on the arrow next to Print All Pages (see (1) in Figure 15 below).
- Turn off Print Markup (see (2) in Figure 15 below).
- Click the Print button.
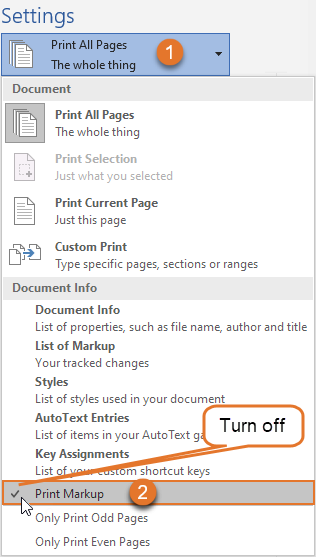
Figure 15. Part of the Print dialog box. To print without comments and other markup, turn off Print Markup.
How to print only the comments in Word
If you want to print comments only, without the content of the document, follow these steps:
- Select the Review tab in the Ribbon.
- In the Tracking group > Show Markup menu, turn on Comments.
If the document includes tracked changes, turn off Insertions and Deletions and Formatting unless you want to also print those changes. - Select File > Print.
- Under Settings, click the topmost menu (shows Print All Pages by default), select List of Markup.
- Select the desired printer and click Print.
Note that the DocTools CommentManager add-in lets you extract comments to either Word or Excel. A printout of an extract document will give you a far better overview of the comments.
How to browse comments in Word
You can step through the comments in a Word document.
- Select the Review tab in the Ribbon.
- To go to the next comment, click Next in the Comments group
To go to the previous comment, click Previous in the Comments group.
Alternative methods for browsing comments
- You can browse comments from the Navigation Pane (View tab > Navigation Pane > click the search icon > select Comments).
- You can browse comments using the Go To tab in the Find and Replace dialog box. Press Ctrl+G to open the dialog box. In the Go to what list, select Comment. Then use the buttons in the dialog box to browse comments.
How to get an overview of all comments in a Word document
Word does not include a tool that gives you a good overview of all comments. You can browse comments but you cannot see all comments at a time.
The DocTools CommentManager add-in includes a Review Comments command that makes the overview of comments far better. The command opens a dialog box from where you can manage all comments in the document. The dialog box also lets you rank comments by importance.
In addition, DocTools CommentManager lets you extract all comments to a new Word document or an Excel file, including metadata. You will also find tools to quickly find a specific comment in the original source document.
How to change the formatting of comments in Word?
In Word, styles are used to manage the formatting of text. A style in Word is a set of formatting characteristics that determine font and font size, color, alignment, spacing, etc. In relation to comments, Word uses a set of styles dedicated to comments. You can modify the comment styles to change the formatting of comments. Read on below to learn about the comment styles and how they work.
Comment styles in Word
When it comes to comments, Word uses a set of special styles to format different parts of comments. Word has four built-in styles related to comments:
- Comment Text
- Comment Reference
- Comment Subject
- Balloon Text
See how to find the comment styles names in your version of Word if it is not English.
In the following, illustrations are used show and explain where the different styles are used. Note that there are some oddities in relation to the comment styles – as you will see, not everything works as expected if modifying the comment styles.
Where are the different comment styles used?
Used for the comment text typed by users. The style is used both for comments shown in balloons and comments shown in the Reviewing Pane. See Figure 16 and Figure 17 below (red text).
Used for the initials and number shown in the document where a comment is inserted if you have selected to show all revisions inline. See Figure 16 and Figure 18 below (green text).
This style can be used for a heading in comments and may be intended for that. Note that the style is not automatically applied by Word anywhere.
Used for e.g. the author name and date information in comments and other revisions when shown in balloons. The style is also used for showing text like Deleted and Formatted + formatting info in relation to tracked changes.
This style is only used in balloons and not in the Revision Pane. See Figure 16 and Figure 17 below (red text).
How to find the names of comment styles in non-English versions of Word
The names of comment styles and other built-in styles in Word are language-specific. The styles are named in the language of the user-interface of your version of Word.
For help on finding the comment style names in the language of your version of Word, see my articles:
- Create List of Local Built-in Style Names
- Word Style Names in English, Danish, German, French
Below, you will find the four comment styles listed with names in English, Danish, German, and French.
|
English |
Danish |
German |
French |
|
Comment Text |
Kommentartekst |
Kommentartext |
Commentaire |
|
Comment Reference |
Kommentarhenvisning |
Kommentarzeichen |
Marque de commentaire |
|
Comment Subject |
Kommentaremne |
Kommentarthema |
Object du commentaire |
|
Balloon Text |
Markeringsbobletekst |
Sprechblasentext |
Texte de bulles |
To make it easy to see where the different comment styles are used by Word, I have modified the comment styles as follows before making the illustrations below:

Figure 16. Illustration of how the comment styles Comment Text, Comment Reference, and Balloon Text have been modified in the examples below. The style Comment Subject is not used by Word and therefore not included in the illustrations.
In Figure 17 below, comments and revisions have been added and re shown in the balloon area:

Figure 17. Balloon area with examples of comment and revisions. Note that the style Balloon Text is used for name, date/time info, and revision info. If you compare with Figure 16, you can see that name and revision info is bold even it the style Balloon Text is not defined as bold.
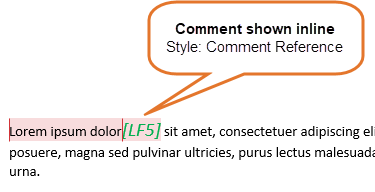
Figure 18. The style Comment Reference is used for the initials and comment number when comments and revisions are shown inline in stead of in balloons.
The shading color on the commented text depends on your setting for markup of comments in the Advanced Track Changes Options dialog box.
Learn more about the Advanced Track Changes Options dialog box.
Oddities in relation to comment styles in Word
Normally, you can modify styles in Word to make them look precisely as you want. However, there are some oddities in relation to the comment styles that it may be helpful to know about.
You may experience that some types of modifications you make to a comment style don’t have any effect when comments are shown in balloons. This is most likely a result of what Microsoft refers to as “by design”. The behavior isn’t always logical.
If you examine Figures 17-18 above and compare them with Figure 16, you will see that:
- If you apply another font or font color to the comment styles, the changes will take effect in comments (i.e. normal style behavior).
- The name and revision information (blue text in Figures 16-18 above) seem to always be bold even if the style Balloon Text is not defined as bold. On the other hand, time information and formatting information appear with the Balloon Text style in the way it is defined (see style information in Figure 16 above).
- As opposed to the Balloon Text style, adding bold to the Comment Text style works «normally», i.e. it the comment text appears bold or not bold according to the style definition.
- Adding italic or underline to the style definitions of Balloon Text and Comment Text also works «normally», i.e. it makes the corresponding text appear italic/not italic and underlined/not underlined.
- The comment text (red in Figures 16-18 above) appear with the font and color defined in the Comment Text style. However, the font size of the comment text is determined by the font size defined for the Balloon Text style. Changing the font size of the Comment Text style has no effect. You can see that the comment text in Figure 17 is larger than in Figure 16 – the font size is inherited from the Balloon Text style. This means that you must modify the style Balloon Text instead of the style Comment Text if you want to make the comment text larger or smaller.
- If you click in the comment text of a comment and check which font size is shown, e.g. in the Font group of the Home tab in the Ribbon, you will see that it shows the font size defined in the Comment Text style and not the actual font size.
- Most of the settings you can apply to styles via the Paragraph dialog box have no effect on the Balloon Text and Comment Text styles. Word does not prevent you from applying indentation, space before, space after, etc. However, it does not change the way the comments look. Note, however, that some paragraph settings applied to the style Comment Text will take effect if comments are shown in the Reviewing Pane and not in balloons.
- Adding bold, italic or underline to the style definition of Balloon Text and Comment Text does change the way the comments look.
How to change the font size of comments in Word by modifying the Balloon Text style
As already mentioned above, the steps to change the font size of comments in Word are not logical. Since it may be one of the changes most users want to make in relation to the display of comments, I have included the steps with some extra tips here.
As explained above, the style Comment Text is used for comment text entered by users. Normally, you can change the font size of text by modifying the font size of the style in use. However, this does not work for the Comment Text style.
- To change the font size of comments in Word via styles, you must change the font size in the style Balloon Text! Changing the font size of the style Comment Text has no effect.
I suggest the following steps as an easy way to get access to modify the Balloon Text style:
- Press Ctrl+Shift+S to open the Apply Styles window.
- In the Style Name field, type «Balloon Text» (without the quotation marks).
IMPORTANT: In case of a non-English version of Word, you must type the localized style name used in your version of Word instead of «Balloon Text». See the help above.
- Click Modify to open the Modify Style dialog box, showing the current definition of the Balloon Text style,
- Change the font size and make other modifications as desired. Click OK when finished.
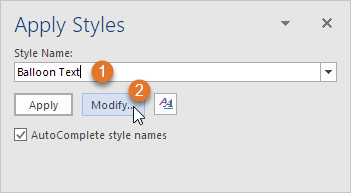
Figure 19. Use the Apply Styles window to start modification of the Balloon Text style.
The DocTools CommentManager add-in gives you easy access to modify any of the comment styles. DocTools CommentManager lets you do everything you can using Word’s own comment features plus a lot more.
How are the comment styles defined by default?

Figure 20. Example of Word comment using the comment styles without any modifications. For details about the default comment style settings, see below.
Style: Comment Text
Style type:
Style based on:
Font:
Font size:
Alignment:
Indentation:
Spacing:
Line Spacing:
Linked (paragraph and character)
Normal
Calibri
10 pt
Left
Left 0, Right 0
Before 0 pt, After 8 pt (NOTE: the spading has no effect)
Single
Style: Comment Reference
Style type:
Font:
Font size:
Character
Default Paragraph Font, i.e. the font in use where the reference is inserted
8 pt
Style: Comment Subject
Style type:
Style based on:
Font:
Font size:
Alignment:
Indentation:
Spacing:
Line Spacing:
Linked (paragraph and character)
Comment Text
Calibri, Bold
10 pt
Left
Left 0, Right 0
Before 0 pt, After 0 pt
Single
Style: Balloon Text
Style type:
Style based on:
Font:
Font size:
Alignment:
Indentation:
Spacing:
Line Spacing:
Linked (paragraph and character)
Normal
Segoe UI – the font used by default in the user interface of Word
9 pt
Left
Left 0, Right 0
Before 0 pt, After 0 pt
Single
How to remove personal information from comments
There may be situations where you want to remove personal information like author name(s) from comments in a Word document. For example, this may be the case if the Word document is to be shared with external people. Below, you will find two methods.
METHOD 1 – How to remove personal information using the Document Inspector
Word has a built-in feature you may use. However, the method may remove more information than you like. See the warning below before you use this method.
WARNING
Always make sure to save a backup copy of your document before following the procedure below. The procedure may remove data that cannot be restored.
The method removes all custom document properties and empties the built-in properties (Title, Author, Company, etc.). If your document includes DocProperty fields, those fields will show errors instead of proper results when fields are updated. However, if you lock or unlink the DocProperty fields beforehand, you can preserve the field results.
If you have the DocTools DocPropertyManager add-in, you can export custom document properties before removing personal information. You can re-import the properties again afterwards, if needed. You can also import the custom document properties directly from your backup copy of the original document. Learn more about DocTools DocPropertyManager.
To remove personal information from a document:
- Select File > Info.
- Click Check for Issues > Inspect Document. See Figure 21 below.
- In the Document Inspector dialog box, turn off all options except Document Properties and Personal Information. See Figure 22 below.
- Click Inspect.
- In the next dialog box that opens, click Remove All. See Figure 23 below.
- Click Close.
- Save the document.
Once the document has been saved, the author name in all comments will be changed to «Author» and the initials to «A» if comments are shown inline.
If you insert new comments, you will first see the actual user name but as soon as you save the document, it will be replaced by «Author». On the other hand, new property values or custom document properties you add will remain in the document unless you repeat the steps above.
Note that the terms used for author and initials are language-specific and will match the language of your Word. For example, «Forfatter» and «F» will be used in case of Danish.
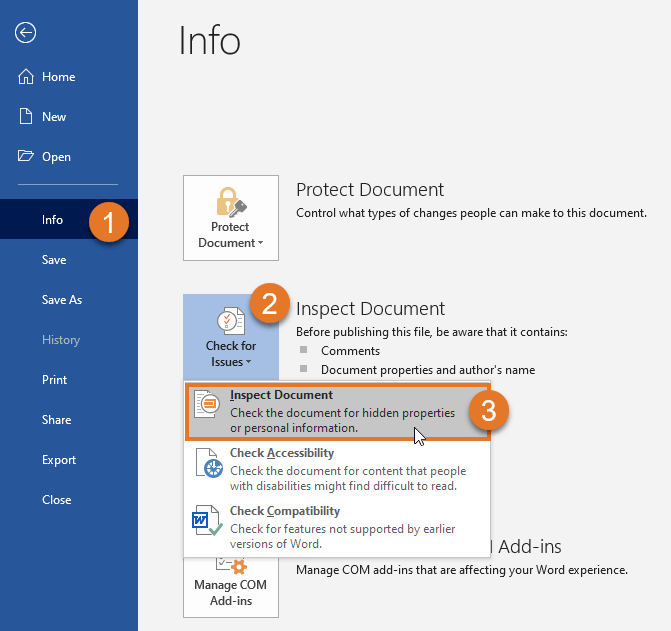
Figure 21. Select File > Info > Check for Issues > Select File > Info > Check for Issues > Inspect Document to open the Document Inspector dialog box.
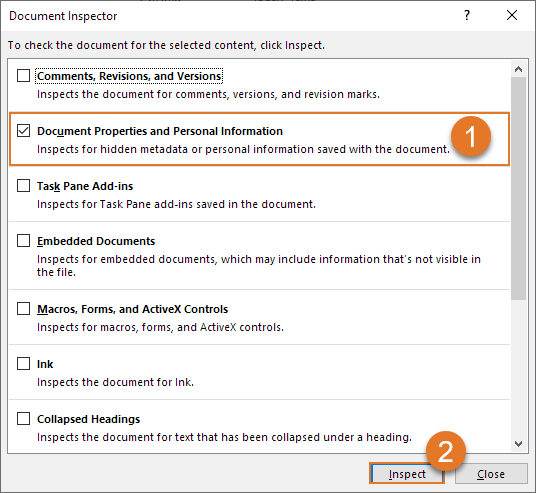
Figure 22. The Document Inspector dialog box. Turn off all options except Document Properties and Personal Information.
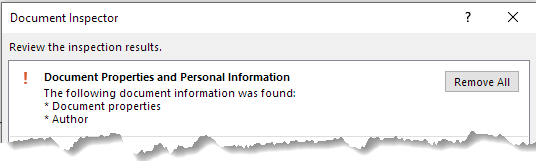
Figure 23. Click Remove All in the Document Inspector dialog box to remove the information. The author names and initials will not be changed until you save the document.
METHOD 2 – How to remove personal information from comments using a macro (VBA)
You can use a macro (VBA) to change the author name(s) and initials in comments to other values. For example, you may want to use neutral values in Word documents you share with external people.
The macro below will handle all comments in the active document. The macro:
- changes the author name in all comments to «Neutral Name»
- changes the initials in all comments to «NN»
Change the values in the macro as desired before running the macro.
If you add new comments, you will have to run the macro again to change them too.
Always make sure to save a backup copy of your document before you change the author names.
Sub WordComments_ChangeAuthorNames_AllComments()
    Dim oComment As Comment

    'Iterate through comments
    'Replace author name and initials with "Neutral Name" and "NN"
    '=========================
    'NOTE: Replace the names below with relevant values
    '=========================

    For Each oComment In ActiveDocument.Comments
        With oComment
            .Author = "Neutral Name"
            .Initial = "NN"
        End With
    Next oComment

    'Show message
    MsgBox "Finished changing author name and initials in " & _
        ActiveDocument.Comments.Count & " comments.", _
        vbOKOnly, "Change Author Names in All Comments"
End Sub
The DocTools CommentManager add-in lets you easily change author names and initials in all comments or in only comment by a specific author. For example, you can quickly change all author names to the company name if you are going to share a document with external people.
How to stop Word from changing the author of comments to «Author»
You may experience that the author name of comments in a specific document automatically changes to «Author».
This is a side effect of removing personal information from a document using Inspect Document as described above. Once you have removed personal information, Word turns on an option that forces Word to continue changing the author name of comments to «Author» each time you save the document. To stop Word from changing the author name to «Author», please refer to the detailed description about this issue in my article «Track Changes in Word – how it works».
Numbering of comments in Word
In Word 2010 and earlier versions, comments shown in the balloon area are numbered sequentially. It is practical to be able to refer to comment numbers, especially in documents with many comments.
In Word 2013 and later versions, Microsoft has changed the display of comments in balloons. The comments are no longer numbered when shown in balloons. As explained above, the style Comment Text is automatically applied to the comment text you enter. As a workaround, you may modify the style Comment Text to be numbered (for help on setting up numbering, see Shauna Kelly’s article). However, if you add numbers to the Comment Text and write comments with more than one paragraph, each paragraph will be numbered and thereby result is misleading numbering.
You can have sequential comment numbers displayed in the comment references if to display revisions inline in the document. Apply the following settings:
- Review tab > Tracking group > Display for Review: All Markup
- Review tab > Tracking group > Show Markup > Balloons > Show All Revisions Inline
More options for managing the display in balloons
In the Advanced Track Changes Options dialog box, you can make further settings for balloons. The dialog box has options for both comments and revisions, i.e. insertions, deletions and formatting changes marked as tracked changes.
How to open the Advanced Track Changes Options dialog box
To open the Advanced Track Changes Options dialog box:
- Select the Review tab in the Ribbon.
- Click the dialog box launcher in the Tracking group. See Figure 24 below.
This opens the Track Changes Options dialog box. - Click the Advanced Options button to open the Advanced
Track Changes Options dialog box. See Figure 25 below.
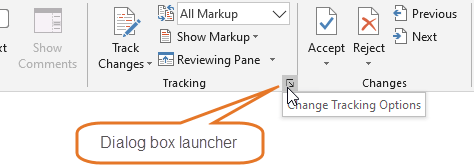
Figure 24. On the Review tab, click the dialog box launcher in the Tracking group to open the Track Changes Options dialog box.
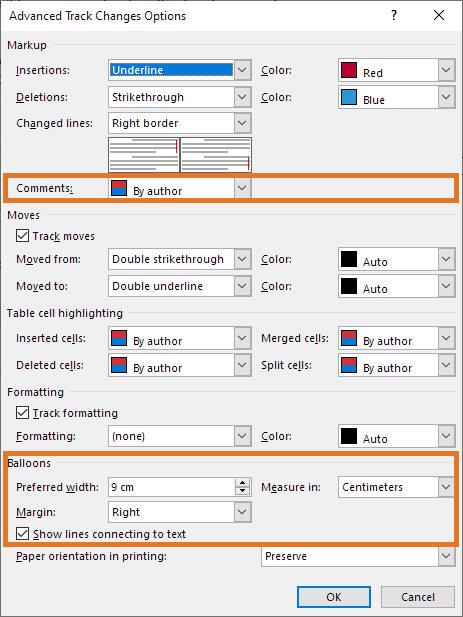
Figure 25. The Advanced Track Changes Options dialog box. The colored frames mark the options related to comments. See the descriptions below for details about how the options work.
The DocTools CommentManager add-in lets you opens the Advanced Track Changes Options more easily. In general, you can do everything in relation to comments faster and easier with DocTools CommentManager than you can using Word’s own comment tools. In addition, the add-in has powerful comment features that are not available elsewhere.
Comments and colors in balloons
See Figure 25 above, first colored frame.
In the Markup group, the Comments drop-down list lets you select the color to use for comments. Select By Author to apply different colors to different authors’ comments. The colors will be selected by Word and cannot be defined by you. Up to 20 different colors can be in use. Note that the same author may not always be applied the same color. Select a specific color to use that color for all comments regardless of the author.
Balloon area location and width
See Figure 25 above, second colored frame.
In the Balloons group, you can define the width of the balloon area in the Preferred width field and associated Measure in field. The width seems to be measured from the position of the vertical bars that are added and to the edge of the page. The vertical bars are shown in the left or right side of the page, next to lines that contain tracked changes.
The Margin option lets you position the balloons in the left or right side of pages.
The Show lines connecting to text check box lets you turn on/off lines that go from a comment to the commented text (comment scope) in the document. Comment lines are dotted but if the selection is in a comment, the related comment connection line will be a fully drawn line.
Related information
My Word add-in DocTools CommentManager provides a lot of tools that can help you work more efficiently with comments in Word.
This article has explained how add comments in Word, how to remove comments in Word, print without comments, change font size of comments and a lot more. I hope this article helps you in your future work with comments in Word.
Leave a comment
Enter your comment here…
Fill in your details below or click an icon to log in:
![]()
Email (required) (Address never made public)
Name (required)
Website
![]()
You are commenting using your WordPress.com account.
( Log Out /
Change )
![]()
You are commenting using your Twitter account.
( Log Out /
Change )
You are commenting using your Facebook account.
( Log Out /
Change )
Cancel
Connecting to %s
Notify me of new comments via email.
Notify me of new posts via email.
We’ve previously explained how to add captions to charts, tables and figures in Microsoft Word. But what should you do if the default caption style or numbering doesn’t suit your needs?
Maybe, for example, your college style guide recommends a different formatting for captions than the standard style in Word. Or maybe you want to use an alternative numbering system. Luckily, this is all easy to achieve via the “Style” options in Word.
Editing Caption Style
If you want to use a different font for captions, you could go through them all changing this manually. However, it’s much quicker to change the caption style instead (instructions apply for Word 2007 and later):
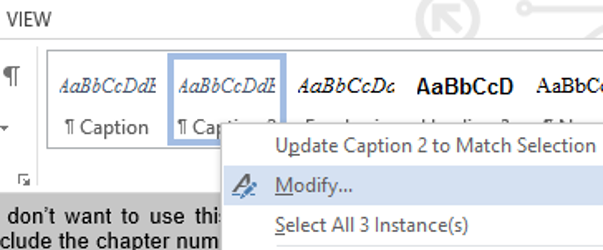
- Go to the “Styles” section of the “Home” tab and find “Caption.”
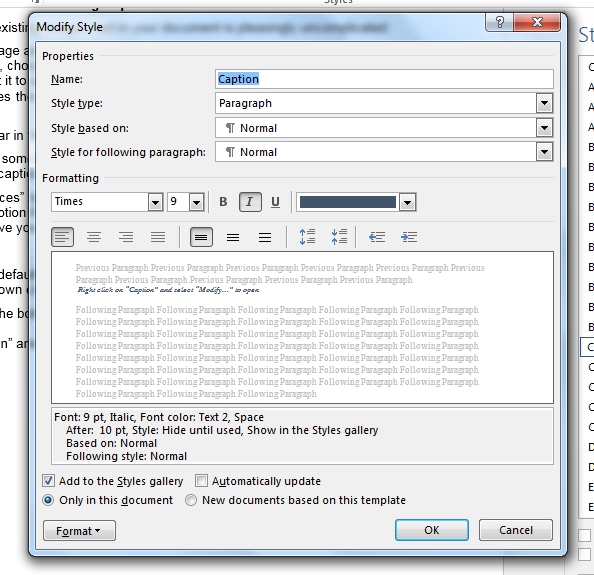
- Right click “Caption” and select “Modify” to open a new window.

The “Styles” menu. - Pick the font and formatting options required.
- Click “OK” to apply the new style.

Modifying the “Caption” style.
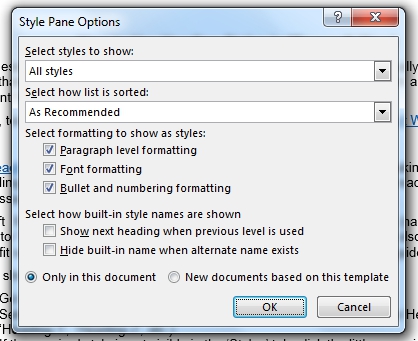
If the “Caption” style isn’t showing in the “Home” tab, you may have to click the little arrow in the bottom corner to open the “Styles” sidebar. If it still isn’t showing, click “Options” here and make sure that “All styles” is selected in the “Select styles to show” menu.
Creating a New Caption Style
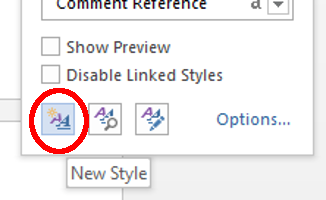
For even greater customization, you can even create a brand new caption style. To do this:
- Open the “Styles” sidebar and click the “New Style” button.

Creating a new style. - In the new window, select “Caption” in the “Style based on” menu.
- Select the font and formatting options required.
- Type a name for your new style in the “Name” box (e.g., “Caption 2” or “Custom Caption”).
- Click “OK” to create your style.
To ensure that the font changes back to the paragraph style once you’ve written a caption and hit “Enter,” you may also want to select “Normal” from the “Style for following paragraph” menu.
Find this useful?
Subscribe to our newsletter and get writing tips from our editors straight to your inbox.
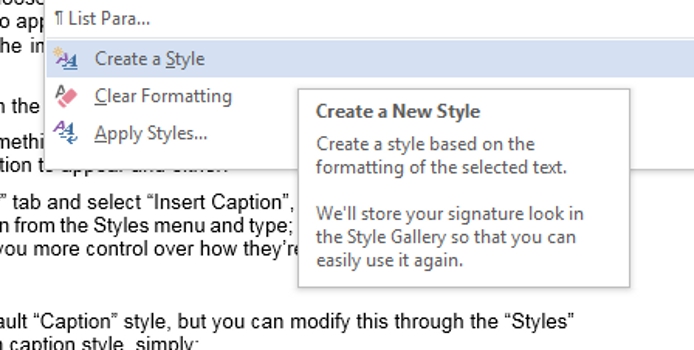
You can also create a new style via the style menu on the main ribbon by selecting “Create a Style” and clicking “Modify” to bring up the full set of style options.
Writing Custom Captions
When you add captions using “Insert Caption,” Microsoft Word numbers them automatically according to the label assigned (e.g., “Figure 1,” Figure 2,” “Figure 3,” and so on). You can also adjust the basic numbering style, including to add chapter numbers to captions (more information available here).
However, if you want to use a different numbering system, or even no numbering whatsoever, you’ll need to add captions manually. You can do this by selecting the relevant “Caption” style from the style menu, placing the cursor where you want the caption to appear in your document, and simply typing the caption desired.
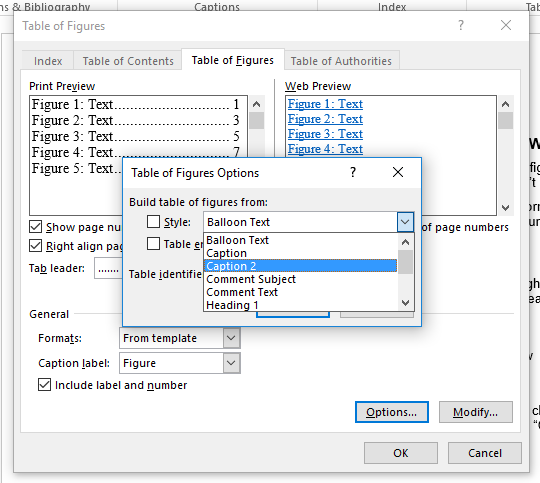
You can even use different caption styles for tables, charts and figures if you create a style for each! If you do, though, don’t forget that when adding a list of tables, charts or figures, you’ll need to select the relevant style when creating the list. To do this:
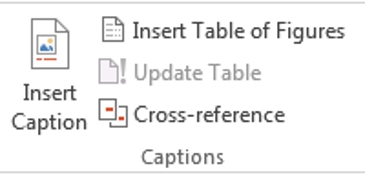
- Click “Insert Table of Figures” to open the menu.

Inserting a table of charts/figures. - Click “Options” to open a new window.
- Under the “Style” menu, pick the relevant caption style and click “OK.”

Custom caption options. - Click “OK” in the main “Insert Table of Figures” menu to create your list.
You can then list each of the different caption types separately, which is useful if you have large numbers of illustrations, charts and tables that you want to keep distinct from one another.

In addition to using “Track Changes” to log any and all revisions to a document (discussed in Lesson 2), you can also provide feedback in lieu of changing the actual text or layout.
Maybe you want to ask a question of another reviewer, or propose to add a section or move a section. Comments are the way to go. Comments are a very useful, non-destructive method – i.e. they don’t actually change a document’s content or structure to get a point across or ask a question.
While experienced Word collaborators will probably use comments in conjunction with the “Track Changes” feature, you don’t need to have “Track Changes” turned on to add comments to a document.
In this lesson, we’re going to fully cover commenting in Word. We will show you how to add comments, reply to comments, mark comments as done, quickly navigate through comments, and delete them.
We will also discuss a feature that allows you to directly communicate with other reviewers that have added comments. Let’s begin then by discussing how to actually create a new comment!
Create a New Comment
To create a new comment in a document, highlight or place the cursor in the text about which you want to comment or place. Then, click the “Review” tab and click “New Comment” in the “Comments” section.

A comment box is placed in the right margin, or “Markup Area.” Enter your comment in the comment box.
The markup views we talked about in Lesson 2 are also applicable for comments. If you are in “All Markup” view, there is always a line (dashed or solid) from the text to the comment, whether the comment or the text is selected or not, as shown above. However, if you are in the “Simple Markup” view, there is no line from the text to the comment unless you move the mouse over the comment or the cursor is in the comment.
Hide Comments in Markup Area
If you have a lot of comments in your document, it might be helpful to hide them and only show a marker in the text indicating a comment has been added. You can do this using the “No Markup” view or “Original” view in the “Tracking” section of the “Review” tab, as we talked about in Lesson 1.
However, you can also choose to only show revisions inline, which also hides comments. To do this, click “Show Markup” in the “Tracking” section of the “Review” tab and select “Balloons” and then “Show All Revisions Inline.”
A marker is placed at the end of the text that was highlighted or at the location of the cursor when the comment was entered, with the first initial of the reviewer and the number of the comment to indicate a comment has been entered. When you move your mouse over the comment marker (or the highlighted text), the associated comment pops up above the text.
When you add a new comment while the “Show All Revisions Inline” option is selected, the “Reviewing Pane” displays to the left of the text with the cursor under your name as the reviewer. Type your comment directly in the “Reviewing Pane.”
The “Reviewing Pane” is also used while showing all revisions inline to edit comments. Simply double-click the comment marker to display the corresponding comment in the “Reviewing Pane” and edit it.
You can also edit a comment while showing all revisions inline by right-clicking on the comment marker and selecting “Edit Comment” from the popup menu. You can also use this context menu to reply to a comment, delete a comment, or mark a comment as done, all of which will be discussed later in this lesson.
To view markup inline again, select Balloons from the “Show Markup” drop-down menu again and then select either “Show Revisions in Balloons” or “Show Only Comments and Formatting in Balloons.”
Reply to a Comment
In addition to adding your own comments, you may want to respond to comments from other reviewers. Replying to a comment is a simple process, especially if you have comments displaying in balloons in the “Markup Area.” Click the “Reply” button in the comment box.
The reply is indented below the comment to which you are replying.
You can also right-click on the comment and select “Reply To Comment” from the popup menu.
You can even click “New Comment” in the “Comments” section of the “Review” tab while the cursor is in the comment to which you want to reply.
NOTE: If the “Show All Revisions Inline” option is selected, you can reply to a comment by right-clicking the comment marker and selecting “Reply to Comment” from the popup menu.
Easily Communicate with Other Reviewers
Reviewing and collaborating on documents relies on good communication among the reviewers. For any new documents created in Word 2013, each comment has a picture of the reviewer, if available, and name. If no picture is available, a generic image is inserted.
Click on the picture to access the “Person Card” that allows you to contact the reviewer through email, instant messaging (IM), phone, or video, if they’re available. The information available for a reviewer depends on whether that reviewer is signed into a Microsoft account or Office 365, as it says on Microsoft’s Office site:
“If you sign in to Microsoft Office using a Microsoft account or a user ID for Office 365, Word adds a unique number to each document and comment you create. If someone who opens the document is able to view the name and email address associated with the ID you used (for example, a colleague in your organization who has permission to see your name and email address), Word shows that person the name and email address to identify you as the author and any comments you save. Otherwise, Word shows the person your name and initials from the registry to identify you as the author and any comments you save. The unique number isn’t visible to people who open the document and is only used to get the name and email address associated with the ID you used to sign into Office.”
In our example, the person is not immediately available, so we click the “Open Contact Card” down-arrow button to access the Contact Card.
Any contact information you have for the selected reviewer displays on the Contact Card. In our case, we have an email address under IM, so we can email the reviewer. However, we will have to email them manually, since they are not currently available.
Mark a Comment as Done
When you’re done with a comment, you may not want to delete it, as it may contain some useful content. However, it helps to keep track of what you’ve done and what you’re still working on. To that end, Word allows you to mark a comment as done, allowing you to fade the comment into the background. To do this, right-click on the comment and select “Mark Comment as Done” from the popup menu.
The comment shrinks and is grayed out so it stays out of your way. Now you can tell which comments have been addressed and which haven’t.
If you want to see the full text of a comment marked as done, move your mouse over the visible text of the comment. A popup with the full comment displays with the name of the reviewer and the date the comment was made.
You can also view the complete comment by clicking the down-arrow on the comment box. A “Comments” popup displays showing the comments and replies in grayed out text. Click the “X” to close the popup.
NOTE: If the “Show All Revisions Inline” option is selected, you can mark a comment as done by right-clicking the comment marker and selecting “Mark Comment Done” from the popup menu.
Navigate Through Comments
If you want to only read through all the comments in your document, use the “Previous” and “Next” buttons in the “Comments” section of the “Review” tab.
Open the Reviewing Pane
We’ve briefly mentioned the “Reviewing Pane” earlier in this section. This pane allows you to view all the revisions and comments in a document.
To open the “Reviewing Pane” manually, click the “Reviewing Pane” button in the “Tracking” section of the “Review” tab. Notice that there’s a down-arrow on the right side of the “Reviewing Pane” button. Clicking this allows you to specify to show the “Reviewing Pane” vertically or horizontally. The default, if you simply click the button, is “Vertical.”
The Reviewing Pane can also be “undocked.” This means that the pane can be removed from Word and “floated” over the program or outside the program window. To do this, move your mouse over the “Revisions” heading on the pane until a crosshairs icon displays. Click and drag the pane to the desired location.
When shown vertically, the “Reviewing Pane” displays to the left of the text.
Horizontally, it displays below the text.
To jump to a comment in your document, simply click on it in the “Reviewing Pane” and the cursor will jump to that location in your document.
Whether you’re viewing the “Reviewing Pane” vertically or horizontally, click the “X” button in the upper-right corner of the pane to close it.
Delete Comments
We showed you how to mark a comment as done if you have addressed it and want it out of the way. However, what if you don’t want the comment at all anymore? You can easily delete comments. To do so, select a comment by clicking in the text of the comment, then, click “Delete” in the “Comments” section of the “Review” tab.
To delete all the comments in your document, click the bottom half of the “Delete” button and select “Delete All Comments in Document” from the drop-down menu.
NOTE: If you have more than one comment showing on the screen at one time, you can select “Delete All Comments Shown” to delete all the comments you can currently see.
NOTE: If the “Show All Revisions Inline” option is selected, you can delete a comment by right-clicking the comment marker and selecting “Delete Comment” from the popup menu.
Check for Remaining Comments and Tracked Changes in a Document
Once you think you have addressed all the revisions and comments in a document, you may want to check to see if you missed anything. This can be accomplishing using the “Document Inspector” we discussed in Lesson 1.
Open the “Document Inspector” as we showed you in Lesson 1. Select the check box for “Comments, Revisions, Versions, and Annotations.”.Click “Inspect” at the bottom of the dialog box.
The inspection results tell you what was found. In our case, only revision marks were found because we deleted all the comments in the previous section. Click “Remove All” to remove all comments and revisions from your document.
We will be talking about versions in Lesson 5 and annotations are only available when using Word on a tablet PC.
You should see a message that all items were successfully removed. Click “Close” to close the dialog box when you are done removing items.
Coming Up Next…
This brings us to the end of Lesson 3. You should have a fairly firm understanding of how to use comments to ask questions of other reviewers, provide feedback, and explain your tracked changes.
In the next lesson, we’ll cover how to prevent other reviewers from making changes to formatting and how to limit the types of editing changes they can make. Then, we’ll close things out with a discussion of how to password protect your document to prevent unauthorized access.
READ NEXT
- › BLUETTI Slashed Hundreds off Its Best Power Stations for Easter Sale
- › The New NVIDIA GeForce RTX 4070 Is Like an RTX 3080 for $599
- › Google Chrome Is Getting Faster
- › This New Google TV Streaming Device Costs Just $20
- › HoloLens Now Has Windows 11 and Incredible 3D Ink Features
- › How to Adjust and Change Discord Fonts
![]()
Download Article
![]()
Download Article
Microsoft Word’s Comments feature lets multiple authors communicate with each other about the text in a Word document. Used in conjunction with the Track Changes feature, an editor can explain to the author his or her reasons for making changes to the text or ask for clarification of a particular passage, to which the author can respond with comments of his or her own. Versions of Word since Word 2002 display comments in balloons in the right margin of the document in Print Layout or Web Layout view, and comments can also be displayed in the Reviewing Pane. You can display or hide these comments and add, edit, and delete them; the steps below tell you how.
-

1
Turn on the markup feature. How you turn on the feature depends on the version of Word you’re using. Word 2003 and earlier versions use the older menu and toolbar interface, while Word 2007 and 2010 use the newer menu ribbon interface.
- In Word 2003, select «Markup» from the «View» menu.
- In Word 2007 and 2010, click the «Show Markup» drop-down in the Tracking group of the Review menu ribbon and make sure the Comments option is checked.
- Selecting Markup from the View menu again in Word 2003 or unchecking the Comments option in Word 2007 or 2010 will turn off the markup feature, hiding the comments.
-
2
Choose the correct display view if necessary. Comment balloons display only when your document is in either the Print Layout view, the Web Layout view, or the Full Screen Reading view in Word 2007 and 2010. To change the display, do the following:
- In Word 2003, click Print Layout or Web Layout on the View menu.
- In Word 2007 and 2010, select Print Layout or Web Layout from the Document Views group on the View menu ribbon.
- If you do not have the correct display view, your comments will not appear, but portions of the text that were highlighted to be commented upon will retain their highlighting and be followed by the comment number.


Advertisement
-
1
Choose the point in the text you wish to comment on. Drag your cursor over the words you wish to comment on, or place your cursor at the end of a piece of text.
-
2
Insert the comment. Once you select the option for inserting comments for your version of Word, a balloon will appear in the right margin with identifying initials and a sequence number if you are in Print Layout or Web Layout view. If you are in normal or Outline view, a number will appear in the Reviewing pane.
- In Word 2003, select Comment from the Insert menu.
- In Word 2007 and 2010, select New Comment from the Comments group in the Review menu ribbon.
- If your new comment falls between existing comments, the comments following it will be renumbered to reflect their new positions in the comment sequence.
-
3
Type your comment in the balloon. All text formatting features, such as bolding, italics, and underlining are available for comment text. You can also insert hyperlinks in comments.


Advertisement
-
1
Select the comment you wish to respond to.
-
2
Insert your response comment. Follow the same procedure as described for inserting comments under «Adding Comments.» Response comments display the identifier of the responder and a sequence number, followed by the identifier and sequence for the comment being responded to.
- You can respond to your own previous comments. This is a good way to clarify the wording of your previous comments if you think your original words may be misunderstood.


Advertisement
-
1
Turn on the comment display, if necessary. Follow the instructions under «Displaying Comments» for your version of Microsoft Word.
-
2
Click the balloon whose comment you wish to edit. If you cannot see the complete text of the comment in the comment balloon, you can turn on the Reviewing Pane to review the complete text of your comment there. See the instructions under «Displaying the Reviewing Pane.»
-
3
Make the text changes you want.


Advertisement
-
1
Right-click the comment you wish to delete. This displays a pop-up menu.
-
2
Select Delete Comment from the popup menu. The comment balloon disappears, and the sequence numbers of the comments following it are each decreased by 1.


Advertisement
-
1
Display your document in Print Layout view. See the step in «Displaying Your Comments» about choosing the correct display view for instructions on doing this.
-
2
Turn on the comment display, if it is not already turned on. Again, see «Displaying Your Comments» for instructions for your version of Word.
-
3
Determine which comments you wish to display and print. You can choose to display and print the comments made by all reviewers of the document or only comments made by a single reviewer. The method varies slightly according to your version of Microsoft Word.
- In Word 2003, select Show on the Reviewing toolbar, then select Reviewers and select either Show All Reviewers to display the comments of every reviewer or select the identifier for a specific reviewer to display only that reviewer’s comments.
- In Word 2007 and 2010, select Show Markup from the Tracking group in the Review menu ribbon and select either All Reviewers from the Reviewers submenu to display the comments of every reviewer or select the identifier for a specific reviewer to display only that reviewer’s comments.
-
4
Print your document. Display the Print dialog box in your version of Word and select «Document showing markup» to print the selected comments along with the document.
- To access the Print dialog box in Word 2003, select Print from the File menu.
- To access the Print dialog box in Word 2007, click the Microsoft Office button in the upper left and select «Print» from the menu.
- To access the Print dialog box in Word 2010, click the File tab and select «Print» from the File menu at the left edge of the page.
- To print the document without the comments, select «Document» from the Print dialog box.


Advertisement
-
1
Open the Reviewing Pane. The method for doing this depends on your version of Microsoft Word.
- In Word 2003, select Reviewing Pane on the Reviewing toolbar. (If the Reviewing toolbar is not already displayed, select Toolbars from the View menu and then select Reviewing.)
- In Word 2007 and 2010, select Reviewing Pane from the Tracking group in the Review menu ribbon and select Reviewing Pane Vertical to display the pane beside your document or Reviewing Pane Horizontal to display the pane beneath your document.
-
2
Close the Reviewing Pane when finished. Click the «X» in the upper right corner.


Advertisement
-
1
Display the Options or Word Options dialog. Microsoft Word uses the user name and initials that you were prompted to give when you installed Microsoft Office. (If you did not supply your own name and initials at this time, Word and other Office programs will use the name «Owner» and the initial «O.») You can change the name and initials after installing by using the Options dialog in Word 2003 or the Word Options dialog in Word 2007 and Word 2010.
- In Word 2003, choose Options from the Tools menu. Select the User Information tab.
- In Word 2007, click the Microsoft Office button and select Word Options. You can also select Change User Name from the Track Changes dropdown button in the Tracking group in the Review menu ribbon.
- In Word 2010, click the File tab and select Options from the File menu at the left edge. You can also select Change User Name from the Track Changes dropdown button in the Tracking group in the Review menu ribbon.
-
2
Enter your name and initials in the fields under «Personalize your copy of Microsoft Office.»
-
3
Click OK. This closes the Word Options dialog and changes the user name and initials to your entries.
- Although comments you make after changing your initials will reflect the new identifier, comments made prior to the change will still display the identifier you used previously.


Advertisement
Add New Question
-
Question
How do I select two texts at the same time in Word?

It is impossible to select two texts at the same time.
-
Question
Is there a program that saves Word comments to auto drop them into documents?
I have used the autocorrect feature for years to accomplish this. I save the comment in autocorrect and assign it some code letters. When I want to use the comment, I type in the code letters and voila! The saved comment appears. As an editor, this comes in very handy.
-
Question
How do I change the position of a comment box?
It’s not possible to change the position of a comment box. If you accidentally added the comment to the wrong place, remove the comment, and re-comment in the correct place.
Ask a Question
200 characters left
Include your email address to get a message when this question is answered.
Submit
Advertisement
Video
-
Comments are color-coded according to the identity of the reviewer and when they were created. Initial comments are typically displayed in red, while comments displayed by the most recent reviewer prior to the current reviewer typically appear in blue.
-
You can identify the full name of the commenter and the date the comment was made by resting your mouse cursor on the comment balloon. The information will appear in a ToolTip.
Thanks for submitting a tip for review!
Advertisement
-
You cannot insert a comment on text in the header or footer.
Advertisement
About This Article
Thanks to all authors for creating a page that has been read 249,679 times.