
Word for Microsoft 365 Word 2021 Word 2019 Word 2016 Word 2013 Word 2010 Word 2007 More…Less
You can use the numbered list feature in Word to add numbers to cells in a table.
Note: If a table cell contains multiple lines of text, Word numbers each line in the cell.
-
Select the table cells that you want to number.
To number the beginning of each row, select only the first column in the table by clicking the column’s top border.

-
On the Home tab, in the Paragraph group, click Numbering.
Note: To select a different number format, right-click a number in the list, point to Numbering, click Define New Number Format, and then select the options that you want.

See also
Automatically number rows in Excel
Need more help?
Want more options?
Explore subscription benefits, browse training courses, learn how to secure your device, and more.
Communities help you ask and answer questions, give feedback, and hear from experts with rich knowledge.
Word for Microsoft 365 Word 2021 Word 2019 Word 2016 Word 2013 Word 2010 Word 2007 More…Less
You can use the numbered list feature in Word to add numbers to cells in a table.
Note: If a table cell contains multiple lines of text, Word numbers each line in the cell.
-
Select the table cells that you want to number.
To number the beginning of each row, select only the first column in the table by clicking the column’s top border.
-
On the Home tab, in the Paragraph group, click Numbering.
Note: To select a different number format, right-click a number in the list, point to Numbering, click Define New Number Format, and then select the options that you want.
See also
Automatically number rows in Excel
Need more help?
Want more options?
Explore subscription benefits, browse training courses, learn how to secure your device, and more.
Communities help you ask and answer questions, give feedback, and hear from experts with rich knowledge.
Tables are visual displays of data arranged in rows and columns. Table cells contain numbers, text, or a combination of numbers and text. Some cells can include images, symbols, links, and other objects. See how to create and modify tables in Word.
Each table should be referenced in the document content. Typically, tables have a number and a title, which are referenced. Microsoft Word offers functionality to create automatically updated numbers for figures, tables, and equations. The numbers and titles, created using the Captions functionality, are used to cross-reference tables in a document and create a List of Tables.
The word Table and a number identify a table then follows the caption. A caption is a short block of text that explain table contents without referring to the document content:

See more about creating numbers and captions for figures: images, pictures, charts, etc., creating captions for equations, and creating captions for photographs.
Attention! We highly recommend checking the formatting requirements, accepted by your college, university, company, or established on the project, etc.
Insert a caption for tables
To add automatically updated numbers and a title (caption) for a table, select it by:
- Selecting all rows or columns of the table one by one, or
- Moving the mouse over the table until you see the table selection icons in the upper-left corner of the table and clicking it:

Note: You can also click on the table selection icon in the bottom-right corner for the same effect. See how to select table elements for more details.

After selecting a table, do one of the following:
- On the References tab, in the Captions group, click the Insert Caption button:

- Right-click on the selection and select the Insert Caption… in the popup menu:


In the Caption dialog box:

Select the label and its position
- Under Options:
- From the Label dropdown list, select the item type you need:

- Table,
- Equation – see how to create captions for equations,
- Figure (selected by default) — see how to create captions for figures,
- Another label (in this example, My Caption) was created using the New Label… button (see how to create a new label below).
Note: Remember that each type of object you labeled will be numbered sequentially within its group.
- From the Position dropdown list, select one of the options:
- Above selected item (selected by default for the Table label), or
- Below selected item (selected by default for the Figure label).
Note: The captions for tables are usually located above the tables.
- From the Label dropdown list, select the item type you need:


Exclude label from caption
- Select the Exclude label from caption check box if you don’t need to add the label to the caption:
Some requirements recommend using the lowercase word table instead of the automatically added Table in Word cross-references.
The option Exclude label from caption hides the label from being displayed in cross-references or a List of Tables.
For example:
- When you insert a cross-reference with the selected option Entire captions or Only label and number (see more details how to use cross-references in Word), Word adds the capitalized label and number, as you see in the Caption field of the Caption dialog box. E.g., “are listed in Table 3” or “are listed in Table 3 Number of articles by statuses and products”.
- All captions, created with selected option Exclude label from caption, Word adds in cross-references as their numbers without the labels. Type the word table (as required) and insert a reference to a caption (e.g., “are listed in table 3”).

Add a new label
- Click the New Label… button to create a new label:
In the New Label dialog box, type a new label name:


Note: See also how to delete a custom label.
Modify caption numbering
- Click the Numbering… button if you want to change any of the numbering options:
In the Caption Numbering dialog box:

- In the Format dropdown list, select the numbering format you need (some requirements recommend using Latin capital letters instead of numbers for tables):
- Select the Include chapter number check box to include the chapter number in the caption number. After selecting this option, two more options will be unlocked:
- From the Chapter starts with style dropdown list, select the heading level you need to include in the caption:
- In the Use separator dropdown list, select the punctuation you need to insert between the chapter number and the table number:
- At the bottom of the dialog box, see how your choices will look in the Examples section. E.g., Table 2.3” means the third table in chapter 2.
- Click the OK button.
- From the Chapter starts with style dropdown list, select the heading level you need to include in the caption:


Add a title
- To add the text of your caption, click after the table number and enter the text. E.g.:

Notes:
- There are several standard requirements for table titles:
- Chicago style recommends using the table title in line with the label and number. E.g.:

- In opposite, APA (American Psychological Association) and MLA (Modern Language Association) styles recommend using the table title with one double-spaced line below the table number (see how to adjust line spacing). E.g.:

To create such a title, don’t type any text in the Caption field, leave it, then do the following:
- Create a caption without a title.
- Position cursor after a caption number and add a new line (by pressing Shift+Enter) in which type of title you need.
Note: You can press Enter and create a new paragraph instead of a new line. See how to create a List of Tables (Table of Figures) for more details.
- Format the caption to adjust line spacing (see how to change caption line spacing).
- In addition, MLA style recommends using a hanging indent to the second line of long titles. E.g.:

- Chicago style recommends using the table title in line with the label and number. E.g.:
- Word offers very helpful functionality to create a text that can be displayed in a List of Tables instead of a caption text. See how to create a Table of Contents Entry.
- For most requirements, the number and the title should be without an ending period. If you need a period after a number, type it in the Caption field.
- If a table spans more than one page, the first page of that table should have a complete caption; the subsequent pages should have an abbreviated caption consisting of a label, a number, and the word Continued. E.g., “Table 3. Continued”.


Using an AutoCaption
See Adding captions with AutoCaption.
Group a table and its caption
According to all requirements, a table (or its part) with its caption should appear on the same page. Word adds captions for tables as a regular paragraph with selected Keep with next option. See how to keep lines and paragraphs together for more details.
See also how to keep a table row on one page and keep a table on one page of a Word document.
Edit or modify a caption
Microsoft Word adds numbers in captions as fields.
![]()
You can show all fields in a document with a gray background, see how to turn on or turn off highlighting of fields in a Word document.
- Labels:
If needed, you can change the label. Word for Microsoft 365 will update the reference if available. In this case, Word will not create a new label and a separate numbering. Be careful!
- Numbers:
DO NOT edit caption numbers! If you change a number:
- In some cases, Word will update it, and you will lose your changes,
- Otherwise, the caption number may stop updating automatically.
- Text:
To add or modify a caption text, click on it and change what you need, like in a regular paragraph.
Do not forget to format a caption according to the requirements you use!
Delete a caption and an unnecessary label
If you need to remove some caption, select the caption paragraph (full line or several lines) and press Delete. Do not forget to update fields in the document!
To remove the unnecessary label, do the following:
1. Open the Caption dialog box.
2. In the Label dropdown list, select the label you want to remove.
3. Click the Delete Label to remove a custom label:

Note: You can’t delete predefined labels: Equation, Figure, and Table.
Update caption numbering
Word automatically updates references and numbering if you insert a new text. However, copying, deleting, or moving context often leads to confusion in the document. After such operations, you have to update all dependencies manually.
To update fields in the document, select the entire document by clicking Ctrl+A, and do one of the following:
- Press F9,
- Right-click on any of the fields and select Update Field in the popup menu:


Word will update all fields. You can be sure that the numbering and references are correct.
We strongly recommend checking a document at least visually after changes!
![]()
Written by Allen Wyatt (last updated March 15, 2021)
This tip applies to Word 2007, 2010, 2013, and 2016
Denis frequently uses tables in his documents. In those tables, he has a need to add a series of sequential numbers to the cells in the first column. Denis wonders if there is a way to pick a starting number in a cell and then have Word add the sequential numbers for all the cells under that starting number.
There are a couple of ways you could go about this. One way is to use Word’s built-in numbering, in this manner:
- Insert your table as you normally would.
- Select the cells in the table that you want to have numbered.
- Display the Home tab of the ribbon.
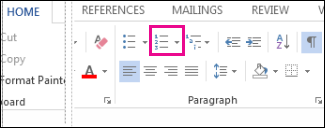
- Click the Numbering tab, in the Paragraph group. Word adds numbering, automatically, to the selected cells.
If you want to modify the starting number for the cells, right-click the number in the first cell and then choose Set Numbering Value from the resulting Context menu. Word displays the Set Numbering Value dialog box. (See Figure 1.)
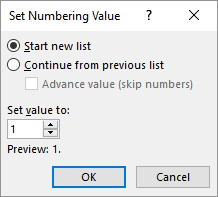
Figure 1. The Set Numbering Value dialog box.
Enter the value you want to start with, and when you click OK, Word updates the numbers in the cells. You’ll also note that if you insert any rows in the middle of your numbered sequence, Word automatically adds a number to that inserted row.
Noting this behavior, you might appreciate a simple variation on the above process that works well when you are inserting a brand new table:
- Insert a single-row table.
- Add the automatic number to the desired column and change its starting value, if desired. (In other words, follow the steps above for the single cell in the row.)
- When entering data in the table and you get to the last column, press Tab and Word inserts a new row that is automatically numbered.
Another powerful way to add your numbering is to use the SEQ field. Follow these general steps:
- Insert the insertion point at the place in the table where you want the first number.
- Press Ctrl+F9 to insert an empty set of field braces.
- Inside the field braces, type SEQ followed by a space, then a name you want used for this particular sequence, then another space, then r, then the number you want the sequence to start with. Here’s an example of how the field code would appear if you wanted to start counting with the number 4:
- With the insertion point still within field code, press Shift+F9. Your number should appear.
- Repeat steps 2 through 4 for each of the other cells where you want a number, but make sure you leave off the r switch in these others.
{ SEQ table1 r4 }
Finally, if you prefer to use a macro to insert numbers in a sequence of cells, you could use one similar to this:
Sub AddNumbersToTable()
    Dim RowNum As Long
    Dim ColNum As Long
    Dim iStartNum As Integer
    Dim J As Integer

    If Selection.Information(wdWithInTable) Then
        RowNum = Selection.Cells(1).RowIndex
        ColNum = Selection.Cells(1).ColumnIndex

        iStartNum = Val(Selection.Cells(1).Range.Text)
        If iStartNum <> 0 Then
            iStartNum = iStartNum + 1

            For J = RowNum + 1 To ActiveDocument.Tables(1).Rows.Count
                ActiveDocument.Tables(1).Cell(J, ColNum).Range.Text = iStartNum
                iStartNum = iStartNum + 1
            Next
        Else
            MsgBox "Cell doesn't contain a non-zero starting number."
            Exit Sub
        End If
    Else
        MsgBox "Not in table"
    End If
End Sub
To use the macro, just put a starting sequence value into a cell of the table and leave the insertion point in that cell. When you then run the macro, all the cells under that starting cell are filled with sequential values. (Anything previously in those cells is deleted.)
If you would like to know how to use the macros described on this page (or on any other page on the WordTips sites), I’ve prepared a special page that includes helpful information. Click here to open that special page in a new browser tab.
WordTips is your source for cost-effective Microsoft Word training.
(Microsoft Word is the most popular word processing software in the world.)
This tip (89) applies to Microsoft Word 2007, 2010, 2013, and 2016.
Author Bio
With more than 50 non-fiction books and numerous magazine articles to his credit, Allen Wyatt is an internationally recognized author. He is president of Sharon Parq Associates, a computer and publishing services company. Learn more about Allen…
MORE FROM ALLEN
Inserting a Watermark Behind Merged Cells
If you have a group of merged cells into which you want a user to enter information, you may want some sort of …
Discover More
Adding a Little Animation to Your Life
Tired of the same old boring Excel look? You can add some life to your worksheets by introducing some animation. Here’s …
Discover More
Managing Comments
If you frequently add comments to cells in a worksheet, Excel provides a variety of tools you can use to manage those …
Discover More
Multilevel numbering in Word is the #1 headache for many people working with large documents.
Believe it or not, it’s not complicated. It just takes somebody to lead the way and point out the pitfalls you need to avoid.
Today that pleasure falls to me!
Before I start, grab your free multilevel numbering troubleshooting guide that shows you the steps to get multilevel numbering working properly first time, every time, together with answers to over 20 FAQs and plenty of real client examples constructed step by step to help you fix what isn’t working with your numbering.

1. What Multi-level Numbering Looks Like
Often used in the legal profession or in large corporate documents, multilevel numbering creates a logical hierarchy and easy navigation within the document. The headings can also be summarised later on in a table of contents. Here is a simple example:

2. How to Set Up Multilevel Numbering
Here is the correct process:
1. Select the text that you want to number (this can be a section of text or the whole document).

2. Select the Home tab.
3. Click the multilevel numbering icon in the Paragraph group.
![]()
4. You can either select an existing layout from the list to use as a starting point, or you can create a new numbering system from scratch. As you hover over each thumbnail image, Word provides a larger image of the numbering system.
5. Choose Define New Multilevel List to display the control dialog.

The dialog box can be broken down as follows:
Step #1 Click level to modify
In the top left is a list of levels. As you select each level, the settings in the rest of the dialog box changes.
Level 1 is the highest level, i.e. the main headings such as chapter or section titles.
Level 2 is subordinate to level 1.
Level 3 is subordinate to level 2.

Step #2 Enter formatting for number
This is where the level number is constructed. If you include a previous level number, it will be displayed with a grey background, as will the number for the current level.
Type anything you wish to put in between the numbers such as dots, dashes, brackets etc.
Clear any text in the ‘Enter formatting for this number’ box.
Step #3 Include level number from
When creating a subordinate level (or child level), you can first specify the level number of the parent.
For example, for section 3.2
- ‘3’ is the parent level (level 1) and
- ‘2’ is the child level (level 2)

Step #4 Number style for this level
Each level can have its own number style. It may be a standalone style, e.g. 1, 2, 3 or a, b, c or continue on from a higher level, e.g. 1.1.1 or 1.a.i.
- When creating 1.1 numbering, this option is 1, 2, 3.
- When creating 1.a numbering, this option is a, b, c

Step #5 Font
Set the font formatting for the selected level, if you want.

Step #6 Position
What position from the left margin do you want items for each level of numbering. For example, level 1 items may be 0cm from the left margin, level 2, 1cm from the left margin and level 3, 2cm from the left margin.
Here’s what they mean:
- The Aligned At determines how far from the left margin the number appears.
- The Text indent at figure determines how far from the left margin the text following the number is.

6. Click OK to save all the settings and close the dialog box.
The text you selected in step 1 now looks like this.

The next part is where the magic happens …
3. How to Apply Multilevel Numbering
Once you have created your numbering system:
1. Position the cursor at the beginning of a line.

2. Press the TAB key to move the text down a level (demote).

3. Press the SHIFT and TAB keys together to move the text up a level (promote).

If you prefer, you can also click the indent icon to demote and the outdent icon to promote between levels.
![]()
4. How to Change Multilevel Settings
Once you have created your numbering system:
1. Reselect all text that is using the multilevel numbering.
2. Click the multilevel numbering icon and select Define New Multilevel List (yes, you choose this option even if you are modifying an existing multilevel list).

The original settings that you defined are redisplayed.
3. In the top-left box select the level that you wish to change, then change your settings.
4. Repeat for the other settings.
5. Click OK to save the settings. Your numbered list should now reflect your new settings.
5. Linking Multilevel Numbering to Styles
Each level of a multilevel numbering system can be linked to a style. This means that as you apply styles throughout the document, the numbering is applied appropriately and automatically. You can either use the built-in Heading 1, Heading 2, Heading 3 styles or use your own custom styles.
1. In the Numbering dialog box, click the MORE button in the bottom-left corner to expand the dialog box.
2. Select level to modify in the top-left box.
3. Open the Link level to style drop-down list and choose the style you wish to connect to the numbering level.

4. Click OK.
5. In the document, apply the Heading 1, Heading 2, Heading 3 styles where needed.
It’s a good idea to create a body text style and apply that where appropriate, so that the body text does not inadvertently get caught up in the multi-level numbering.
6. Select the whole document (or the portion of the document where you want to apply your numbered sections).
7. Click the icon in the Paragraph group (Home tab).
8. Select your custom numbering style from the gallery. The thumbnail image should show the linked styles.

6. How to Use Styles to Set Number Levels
1. Select all the text that you wish to apply the same number level to. Alternatively, if you wish to go line by line, you can place the cursor anywhere in a line of text.
2. In the Styles gallery, click the style that corresponds to the number level you wish to apply. For example, to apply the top level numbering click Heading 1 and for the third level numbering click Heading 3 (assuming those are the styles you assigned).
The numbering and all the numbering settings will be applied to the selected text or the paragraph in which the cursor was positioned.

And that, my friend, is how you do multilevel numbering in Word with no loose ends.
How to set up a dual-multilevel numbering system in Word
7. Two resources to help you
1. Grab your free multilevel numbering troubleshooting guide.

2. Watch over my shoulder as I set up multilevel numbering from scratch.

8. What next?
I hope you found plenty of value in this post. I’d love to hear your biggest takeaway in the comments below together with any questions you may have.
Have a fantastic day.


About the author
Jason Morrell
Jason loves to simplify the hard stuff, cut the fluff and share what actually works. Things that make a difference. Things that slash hours from your daily work tasks. He runs a software training business in Queensland, Australia, lives on the Gold Coast with his wife and 4 kids and often talks about himself in the third person!
SHARE
For large tables in Word, it would be more convenient if we can auto number their rows or columns. Follow this article to learn how.
Many of us may know how to use the AutoNumber feature in Excel worksheets. In fact, this feature can also be applied to Word tables. For complex documents that may contain large tables, you may want Word to number the rows automatically to save time. Besides, if you have inserted auto-number to the rows or columns of a table, then you will never need to adjust numbers when you insert or remove rows or columns from your table anymore, because Word will update them automatically. In this article, we will mainly introduce how to do so.
Method 1: Create a Normal Auto-numbered List
For better understanding, I will show you how to insert an auto-numbered list in the first left column of the table like this: 
- Select the column of your table where you want to insert a numbered list.
- Go to “Home” tab, and then click “Numbering” drop down list.
- Select a numbered list from “Numbering Library”.


Method 2: Apply Customized Number Format
In Word, you can also change the style and format of the numbered lists. For example, sometimes you may need to restart the sequence, or specify a new start number like this:
To do so, you can follow these steps:
- Select the column of your table where you want to insert a numbered list with other formatting.
- Switch to “Home” tab, and click “Numbering” drop down list. And then select “Define New Number Format”

- In the subsequent dialog box, enter your customized number format under “Number Format” box.
- Select the style of numbers from “Number Style” drop-down list. And then click “OK” to save it.

- In this way, we will be able to define new number format of our own. And if we delete or add an item into the table, the numbered list will update accordingly.


Take Assistance of a Specialized Repair Tool
All in all, we can quickly add row or column numbers to a large Word table automatically. And also, Word provides many other features to bring common users convenience. However, Word sometimes can be affected by malware intrusion or virus attacks. Thus, it is essential to keep a stellar repair tool nearby to recover word. This tool is capable of examining Word files and restoring them to their prior condition in a jiffy.
Author Introduction
Kelly Zhao is a data recovery expert in DataNumen, Inc., which is the world leader in data recovery technologies, including excel recovery and pdf repair software products. For more information visit www.datanumen.com

on
March 27, 2008, 5:00 PM PDT
How to number rows in a Word table
Number Word table rows and columns
I love discovering an easy trick, especially one I’ve never seen used before. Did you know that you can quickly add row and column numbers to a Word table? Simply use the Numbering tool on the Formatting toolbar (in version 2003 and earlier):
- To number rows, select the left most column in the table and click Numbering on the Formatting toolbar. To select a column, hover the mouse over the column until Word displays the selection arrow (see below) and click. In Word 2007, select the column and then click Numbering in the Paragraph group on the Home tab.
- To number columns, select the top row in the table and click Numbering on the Formatting toolbar. To select a row, hover the mouse in the left margin just next to the row you want to click. When Word displays the selection tool (see below) click to select the row. In Word 2007, select the row and then click Numbering in the Paragraph group on the Home tab.
Select a column
Select a row
In truth, you can number any row or column, but most likely, you’ll want to display numbers to the left or across the top of the table. I realize that you won’t want to number most tables and columns, but I still like knowing I can do it.
Number rows
Number columns
-
Software
This tutorial shows two ways to create numbered lists in Microsoft Word. We will also look at how to change list levels, start with a different list number, and change the font, size, and color of list numbers.
Do you want to create bulleted lists? Please see my previous tutorial “How to Create Bulleted Lists in Microsoft Word.”
What about Lists Ordered by Letters?
For simplicity, this tutorial refers to “numbered lists” because Word organizes all ordered (hierarchical) list options in the Numbering Library. However, all the steps shown here also apply to lists organized by letters.
If you would like to learn more about ordered and unordered lists, please see “How to Write Vertical Lists (Ordered and Unordered).”
Table of Contents
- How to Create a Numbered List — Basic Method 1
- How to Create a Numbered List — Basic Method 2
- How to Change Numbered List Levels
- How to Start a List with a Different Number
- How to Change the Font, Size, and Color of List Numbers
Watch all the steps shown here in real time!
Explore more than 200 other writing-related software tutorials on my YouTube channel.
The images below are from Word for Microsoft 365. These steps also apply to Word 2021, Word 2019, Word 2016, and Word 2013.
The basic steps are similar in Word for Mac. However, the more advanced steps, such as starting a list with a different number, are different on Mac. So, we will cover this topic for Word for Mac in a separate tutorial.
How to Create a Numbered List — Basic Method 1
This is the basic method to create a numbered list in Word. This method requires you to type each item as you create the list. If you have already typed your list items, see Method Two below.
- Place your cursor where you want to start your list.
- Select the Home tab in the ribbon.

- Select the menu arrow next to the Numbering button.
![]()
- Choose a number style from the Numbering Library.

The number one will appear in your document.

- Type your first list item after the number, and then press the Enter key on your keyboard. The next number will appear.

Continue typing your list items and pressing the Enter key until your list is complete.
- After typing the final item, press the Enter key twice to remove your cursor from the list.
How to Create a Numbered List — Basic Method 2
This method is for existing text formatted vertically as a list.
- Select the text.

- Select the Home tab in the ribbon (see figure 1).
- Select the menu arrow next to the Numbering button (see figure 2).
- Choose a style from the Numbering Library (see figure 3).
Your selected items should become a numbered list.

How to Change Numbered List Levels
Word lets you create numbered lists with up to nine nested levels. Here are two ways to change the level of list items.
Change List Levels — Method 1
Important note: This method won’t work for the first item in your list.
- Select one or more list items (other than the first item).

- Select the Home tab in the ribbon (see figure 1).
- Select the Increase Indent button in the Paragraph group.

Each time you select the Increase Indent button, the item(s) will move one level and take on the appropriate format for that level (e.g., lowercase letters, roman numerals, etc.).

Pro Tip: To return the selected text to a previous level, select the Decrease Indent button to the left of the Increase Indent button.
Change List Levels — Method 2
- Select one or more list items (see figure 8).
- Select the Home tab in the ribbon (see figure 1).
- Select the menu arrow next to the Numbering button (see figure 2).
- Select Change List Level from the drop-down menu.

- Select a list level from the list-level menu.

Your list item(s) should move to the next level.
How to Start a List with a Different Number
You can start a list with a number other than one or continue the numbering from the previous list.
- Select the first list number or place your cursor within the first list item. If you select the list number, all numbers on that level should also be selected.

- Select the Home tab in the ribbon (see figure 1).
- Select the menu arrow next to the Numbering button (see figure 2).
- Select Set Numbering Value from the drop-down menu.

5.a. Enter the number you want to start with in the Set value to text box in the Set Numbering Value dialog box.

5.b. (Alternative Option) Select Continue from previous list if you want to continue the numbering from a previous list in your document.

- Select the OK button.

Your list should be renumbered according to your selections in the Set Numbering Value dialog box.
How to Change the Font, Size, and Color of List Numbers
By default, the font, size, and color of your list numbers will be the same as your normal text style. However, you can manually change the appearance of list numbers by selecting them separately from the text.
- Select one list number. All numbers on that level should also be selected.

- Select the Home tab in the ribbon (see figure 1).
- Select a new font, size, or color from the Font group.

Your list numbers should change to the new formatting. Repeat these steps for each level in your list, as necessary.

Related Resources
How to Write Run-In Lists
How to Create and Update a List of Tables or Figures in Microsoft Word
How to Create Numbered Lists in PowerPoint (PC & Mac)
Updated February 12, 2023
Время на прочтение
11 мин
Количество просмотров 124K
– А ларчик просто открывался.
И.А. Крылов
О чём эта статья
В настоящей работе описываются способы автоматической организации нумерованных объектов при написании статей, рефератов, докладов, диссертаций и пр. При написании подобного рода материалов неизбежно возникает необходимость нумеровать те или иные объекты, например, формулы или пункты в списке используемой литературы. При этом многие авторы пользуются при написании текстовым редактором Microsoft Word.
В случае тривиальной «ручной» организации, при которой каждый номер прописывается непосредственно руками (обычно, в самом конце, когда текст полностью готов), автор работы может ошибиться в каком-либо номере, и все дальнейшие номера окажутся неверными. Более того, после рецензии те или иные части работы могут быть вставлены в текст или убраны из него. Последнее, зачастую, требует полной перенумерации объектов в документе. Таким образом, цель настоящей статьи состоит в доведении до читателя способов автоматической организации нумерации объектов, позволяющих избежать вышеописанные ситуации.
Предупреждение: в данную статью вошли лишь те приёмы, с которыми автор столкнулся при написании кандидатской диссертации. Описываемые способы организации нумерованных объектов не претендуют на единственность, полноту и оптимальность. Имеются другие интересные способы, например, в TeX. Несомненно, читатель сможет найти и иные способы достижения сформулированной цели. В любом случае, ознакомиться с подходами автора (хотя бы на досуге) следует любому заинтересованному читателю.
Основы работы с полями MS Word
В данном разделе описываются основные поля текстового редактора MS Word, необходимые для организации списков и ссылок на них, а также методы работы с ними.
Поле MS Word – это объект, принимающий то или иное значение в зависимости от ключевых слов и параметров этого поля. Для вставки поля в текст необходимо нажать сочетание клавиш Ctrl + F9 или выбрать соответствующее меню на ленте.
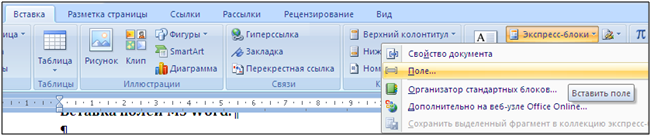
После вставки поля в тексте появятся серые фигурные скобки.

Отличить поля в тексте очень легко – достаточно выделить нужный блок текста. Все поля в выделенном фрагменте будут подсвечены серым цветом.

После того, как поле вставлено в текст, необходимо задать значение этого поля. Для задания значения тому или иному полю необходимо написать определённые ключевые слова, рассмотренные в разделе 2, внутри поля. После задания полю значения необходимо выделить блок текста, содержащий это поле, и нажать F9. Если в выделенном фрагменте окажутся несколько полей, то все они будут обновлены. Для обновления полей во всём документе необходимо выделить всё (Ctrl + a) и нажать F9. Обновить поле можно также с помощью нажатия на соответствующий пункт контекстного меню.
NB! Бывает, что все поля необходимо обновить два раза: первое обновление переупорядочит списки, а второе – расставит нужные значения ссылок.
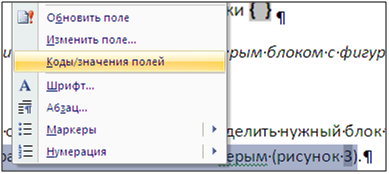
Значение того или иного поля может быть изменено в любой момент. Для этого необходимо лишь выделить поле (или фрагмент текста, содержащий поля) и выбрать пункт «Коды/значения полей» контекстного меню.
Основные поля MS Word, необходимые для автоматической организации нумерованных объектов
В данном разделе описываются основные поля и ключи, используемые с этими полями. Данные поля позволяют организовать автоматическую нумерацию, списки и ссылки.
Для организации автоматической нумерации необходимо использовать следующие поля:
SEQ
Поле SEQ используется для создания нумерованных списков. Каждое поле SEQ увеличивает на единицу уникальную переменную, указанную в данном поле. Если такая переменная ни разу не использовалась, то её значение становится равным 1. Если поле с данной переменной вставить в ту или иную часть текста и полностью обновить документ, то нумерация всех полей, идущих после вставленного, автоматически увеличится на единицу.
Пример задания поля SEQ
{ SEQ pic_chap1 }
NB! Желательно использовать осмысленные имена переменных, например: pic_chap1 – рисунки первой главы, fn_intro – формулы во введении и т.п. Авторы могут использовать любые имена переменных, но именно осмысленные имена позволят быстро сориентироваться в тексте и исправить его.
Важные ключи поля SEQ. Ключ «с» используется для вывода текущего значения переменной. В частности, с помощью закладки (SET) со значением поля с ключом «c» можно организовать автоматический вывод количества таблиц, рисунков, формул и других объектов, что будет показано ниже. Ключ «h» увеличивает значение переменной в том месте, где задано поле, не отображая само поле. Использование ключей «h» и «c» совместно, очевидно, допустимо, но не имеет смысла. Автор рекомендует воздержаться от подобного.
Примеры использования ключей поля SEQ
{ SEQ pic h }, { SEQ tables c }
SET
Поле SET устанавливает закладку в данном месте документа.
Пример использования поля SET
{ SET lit_Z2009 “1” }
Здесь lit_Z2009 – имя закладки, а «1» – текст закладки. Наиболее существенным является возможность использования вложенных полей, т.е. полей внутри полей. В частности, их можно использовать в качестве текста закладки. Для этого надо вставить поле вышеописанным способом, находясь внутри поля.
Пример
{ SET lit_Z2009 “{SEQ lit c}” }
REF
Поле REF используется для создания ссылок и гиперссылок на закладки. Если закладка была определена где-либо в тексте, то сослаться на неё можно, например, так:
После обновления данного поля на его место будет вставлен текст закладки. Ключ «h» используется для задания гиперссылки на закладку. При нажатии на гиперссылку пользователь будет перемещён в место, заданное ссылкой. Ключ «* MERGEFORMAT» сбрасывает формат текста исходной ссылки, преобразуя его в формат текущей части текста.
PAGEREF
Поле PAGEREF работает так же, как и поле REF, за тем исключением, что текстом ссылки является номер страницы, на котором находится соответствующий объект, а не номер объекта.
Организация автоматической нумерации в документах
Перед тем, как начать описание способов автоматической нумерации объектов в документах, необходимо предупредить читателя об очевидном минусе предлагаемого подхода: для каждого типа объектов и для каждого элемента списков со ссылками придётся создавать свой уникальный идентификатор. В данном случае автор рекомендует заранее продумать систему уникальных имён и записать её где-нибудь, дабы она всё время была перед глазами. Огромным плюсом будет являться то, что при переносах, вставках, добавлении и удалении объектов и ссылок все объекты гарантированно будут иметь верные номера, а ссылки гарантированно будут указывать на нужные объекты.
Нумерация в названиях глав и разделов
Для названия глав и разделов можно воспользоваться стилями MS Word, после чего вставить автооглавление. Тем не менее, если вторая глава вдруг станет третьей или раздел 2.2 станет разделом 2.3, то перенумерация большого числа формул, таблиц и рисунков окажется хлопотным делом. Особые трудности вызовет перенумерация списка литературы, организованного в порядке появления. Чтобы избежать вышеописанного, рекомендуется задать каждой главе уникальное имя (исходя, вероятно, из её смысла). Кроме того, для глав необходимо определить уникальную переменную – имя поля SEQ. Например, именем настоящей главы может быть CHAP_USING_FIELDS, а переменная-счётчик глав – CHAP.
После определения того, как именовать и нумеровать главы, в заголовке пишется следующая (одна из следующих) строка:
- { SEQ CHAP }. Организация автоматической нумерации в документах
- { SEQ CHAP h }{ SET CHAP_USING_FIELDS “{ SEQ CHAP c }”}{ SEQ CHAP c }. Организация автоматической нумерации в документах
Разберём эти строки подробнее. Первая строка приводит к тому, что значение переменной CHAP увеличивается на единицу. После обновления поля, на его месте появится текущий номер главы. Такой способ нумерации подходит для объектов, ссылка на которые не планируется в тексте (например, для промежуточных формул). Если же требуется ссылка на объект, то необходимо использовать вторую конструкцию. В ней первое поле увеличивает значение переменной CHAP без вывода на экран, второе поле устанавливает закладку с именем CHAP_USING_FIELDS, задавая ей текст третьего поля – текущего значения (уже увеличенной на 1) переменной CHAP, а четвёртое поле выводит в данном месте текущее значение (уже увеличенной на 1) переменной CHAP. Следует обратить внимание на то, что третье поле вложено во второе поле. Такая конструкция используется потому, что нет чёткого понимания, какое поле обновится раньше и в каком случае – вложенное или идущее после, если бы только у одного из них был ключ «c». Опыт показал, что увеличение переменной в фоновом режиме и использование текущего значения приводит к желаемому результату. На этом приёме и построены все дальнейшие рассуждения.
Для нумерации разделов внутри главы необходимо задать переменную (уникальную для каждой главы, иначе в следующей главе разделы начнутся с номера n+1), а для каждого раздела необходимо определить уникальное имя.
В качестве примера можно привести следующие строки
{ SEQ CHAP h } { SET CHAP_USING_FIELDS “{ SEQ CHAP c }”}{ SEQ CHAP c }. Организация автоматической нумерации в документах
{ SEQ SUBCHAP_FIELDS h }{ SET SUBCHAP_USING_REF “{ SEQ CHAP c }.{ SEQ SUBCHAP_FIELDS c }”}{ SEQ CHAP c }.{ SEQ SUBCHAP_FIELDS c }. Использование REF
После обновления ссылок этот фрагмент текста превратится в
3. Организация автоматической нумерации в документах
3.1. Использование REF
В данном примере используется второй приём, описанный в нумерации глав, только теперь вложенными и идущими после оказываются два поля. Первое поле { SEQ SUBCHAP_FIELDS h } в фоновом режиме обновляет соответствующую переменную, определённую под разделы данной главы, поля 2-4 { SET SUBCHAP_USING_REF “{ SEQ CHAP c }.{ SEQ SUBCHAP_FIELDS c }”} задают ссылку со значением «ТЕКУЩАЯ ГЛАВА.ТЕКУЩИЙ РАЗДЕЛ», а поля 5-6 { SEQ CHAP c }.{ SEQ SUBCHAP_FIELDS c } вставляют в данное место документа значение «ТЕКУЩАЯ ГЛАВА.ТЕКУЩИЙ РАЗДЕЛ».
Следует ещё раз повторить, что для каждой главы и раздела (подглавы, параграфа) необходимо определить свои уникальные имена для задания ссылок на них, если это необходимо.
Автосодержание
Средства MS Word позволяют организовать автосодержание, однако рекомендуется использовать поля REF для задания ссылок на номера глав и поля PAGEREF для ссылок на страницы. Располагать их лучше в таблицах со скрытыми границами размера Nx3, где N — число элементов в автосодержании: разделы, подразделы и пр. В первом столбце будут содержаться номера пунктов, получаемые из полей REF. Во втором столбце будут содержаться имена элементов. (Увы и ах! Их придётся записать руками). В третьем столбце будут содержаться номера страниц, на которых находится соответствующее поле SET. Получение значений производится через PAGEREF.
Нумерация формул
Для нумерации формул нужно использовать те же конструкции, что и для нумерации глав и подразделов. Автор рекомендует размещать формулы в таблицах Nx2, где N – число формул, следующих подряд, скрывая границы таблиц и выставляя нужное выравнивание.
Пример показан здесь
x = a + b (3.5)
Здесь (3.5) – это значение поля, которое в исходных кодах записывается следующим образом:
({ SEQ FN_CHAP_FIELDS h }{ SET FN_AX2_BX_C “{ SEQ CHAP c }.{ SEQ FN_CHAP_FIELDS c }”}{ SEQ CHAP c }.{ SEQ FN_CHAP_FIELDS c })
Здесь FN_CHAP_FIELDS – имя переменной для нумерации формул текущей главы, { SEQ CHAP c }.{ SEQ FN_CHAP_FIELDS c } – номер соответствующей формулы.
NB! При конвертации документа в pdf формулы часто отображаются неверно. В финальной версии диссертации автор заменил все формулы соответствующими рисунками через старый-добрый PrintScreen – MS Paint.
Нумерация таблиц и рисунков
Нумерация таблиц и рисунков делается так же, как и нумерация формул. Разница лишь в том, что соответствующим объектам лучше давать иные имена и придумывать для них другие переменные-счётчики, например, PIC_CHAP2, TABLE_BETTER_NPV и т.д.
Приведём пару примеров.
Пример 1, таблицы
Таблица { SEQ TAB_CH2 h }{ SET TAB_CH2_SHOPS “{ SEQ CHAP c }.{ SEQ TAB_CH2 c }”}{ SEQ CHAP c }.{ SEQ TAB_CH2 c }. Сравнение склад/рынок по магазинам.
Магазин 1 Магазин 2
Склад 100 180
Рынок 16 29
Здесь TAB_CH2 – переменная-счётчик таблиц второй главы, TAB_CH2_SHOPS – выбранное автором имя для данной таблицы. Пусть данная глава имеет номер 3, и в ней уже было 3 таблицы. Тогда данная формула, как несложно показать, будет преобразована в следующий текст:
Таблица 3.4. Сравнение склад/рынок по магазинам.
Магазин 1 Магазин 2
Склад 100 180
Рынок 16 29
Абсолютно аналогичным образом строится работа с изображениями. Необходимо задать свои переменные-счётчики, имена и пр. В целом, с точки зрения автонумерации, нет никакой разницы между таблицей и рисунком. Вся разница заключается лишь в форматировании частей текста: иные названия, подписи снизу/сверху и пр.
Пример 2, изображения
Рисунок { SEQ PIC_CH2 h }{ SET PIC_CH2_EXPONENT “{ SEQ CHAP c }.{ SEQ PIC_CH2 c }”}{ SEQ CHAP c }.{ SEQ PIC_CH2 c }. Экспонента, косинус и синус.
Аналогично таблицам, здесь PIC_CH2 – переменная-счётчик рисунков второй главы. Опять же, очевидно, что в результате будет получено нечто подобное:

Рисунок 3.10. Экспонента, косинус и синус.
Организация списка используемой литературы
Работа со списком литературы в целом похожа на работу с формулами, таблицами и рисунками, но всё же имеет одно существенное отличие. Из-за этого организация списка литературы была вынесена в отдельный раздел. В данном разделе детально описано построение списка используемой литературы в алфавитном порядке. Построение списка литературы в порядке появления в тексте описано не столь подробно, но может легко быть сделано по аналогии.
Оформление списка используемой литературы в алфавитном порядке в конце документа
Итак, в тексте возникла необходимость сделать ссылку на книгу, статью, журнал и т.п. Если они должны идти единым списком, оформление следует делать подряд по алфавиту. Если они должны идти по типам источников, то нужно записывать сперва книги по алфавиту, потом статьи по алфавиту и т.д. В смысле автонумерации это не имеет значения. Важен лишь порядок, в котором эти источники будут записаны, после чего им будут присвоены номера.
NB! Каждому источнику надо задать уникальное имя, которое будет использоваться для задания ссылок в тексте. Автор при написании диссертации пользовался форматом «lit_ИНИЦИАЛЫ_АВТОРОВ_ГОД» или «lit_ИНИЦИАЛЫ_АВТОРОВ_ПОСТФИКС_ГОД». Постфикс нужен для того, чтобы разделить те или иные работы, которые автор(ы) мог выпустить в течение одного года. Храните этот список уникальных имён перед глазами, т.к. к нему придётся часто обращаться.
При добавлении новых источников достаточно лишь вставить их в нужное место списка используемой литературы, сохраняя порядок, и дважды обновить документ. Обновление дважды требуется для обновления вложенных полей и внешних полей. Двойное обновление документа гарантирует как обновление списка литературы, так и обновление ссылок на него.
Пример части списка с развёрнутыми формулами указан ниже
{ SEQ LIT h }{ SET lit_CHR2011 “{ SEQ LIT c }”}{ SEQ LIT c }. Christofides N. Graph Theory: An Algorithmic Approach. Academic Press Inc., London, 1975. – 400 p.
{ SEQ LIT h }{ SET lit_CHVATAL1983 “{ SEQ LIT c }”}{ SEQ LIT c }. Chvatal V. Linear Programming. W. H. Freeman and Company, 1983. – 425 p.
{ SEQ LIT h }{ SET lit_ERL1978 “{ SEQ LIT c }”}{ SEQ LIT c }. Erlenkotter D. A Dual-Based Procedure for Uncapacitated Facility Location. J. Operations Research, 26, 1978. – pp. 992-1009.
Нетрудно показать, что данный список преобразуется в
15. Christofides N. Graph Theory: An Algorithmic Approach. Academic Press Inc., London, 1975. – 400 p.
16. Chvatal V. Linear Programming. W. H. Freeman and Company, 1983. – 425 p.
17. Erlenkotter D. A Dual-Based Procedure for Uncapacitated Facility Location. J. Operations Research, 26, 1978. – pp. 992-1009.
Если между авторами Chvatal [16] и Erlenkotter [17] нужно вставить какую-либо работу, то всё, что требуется сделать, это добавить пустую строку, скопировать в неё уже имеющийся пункт литературы (например, Chvatal [16]), заменить уникальное имя работы, заменить текстовое описание работы и дважды обновить весь документ.
Оформление ссылок на элементы списка используемой литературы в тексте
Теперь, пожалуй, очевидно, как сделать ссылки на литературу в тексте.
Зная уникальные имена, достаточно использовать поле REF
Из решения классической задачи транспортного типа [{ REF lit_MEELIT1972 h }] следует, что любой базис такой задачи содержит ровно m+s-1 элементов. Из теоремы Данцига [{ REF lit_CHVATAL1983 h }] следует, что все элементы базиса в сформулированной задаче будут являться либо нулями, либо натуральными числами.
После двукратного обновления документа, данный фрагмент текста примет следующий вид:
Из решения классической задачи транспортного типа [26] следует, что любой базис такой задачи содержит ровно m+s-1 элементов. Из теоремы Данцига [16] следует, что все элементы базиса в сформулированной задаче будут являться либо нулями, либо натуральными числами.
Оформление списка используемой литературы в порядке появления в тексте
Если предыдущий метод оказался понятен, то оформление списка литературы в порядке появления также не составит особого труда. Ссылки, задававшиеся в конце, теперь надо размещать непосредственно в тексте. Если данный источник встретился впервые, то указать конструкцию вида [{ SEQ LIT h }{ SET lit_ERL1978 “{ SEQ LIT c }”}{ SEQ LIT c }, стр. 18]. Если данный источник уже встречался ранее, то указать конструкцию вида [{ REF lit_ERL1978 h }, стр. 95]. В сам список, разумеется, нужно помещать поля { REF lit_ERL1978 h } – ссылки на появления источников в тексте. Вся трудность заключается в ручной расстановке полных названий источников. Однако если где-то в тексте произойдут изменения в порядке появления ссылок, то (после двукратного обновления) это сразу отразится на порядке в списке литературы, что может быть быстро исправлено вырезанием и вставкой. Дополнительный плюс: проверка порядка следования источников в данном случае является «контрольной суммой». Ошибки в порядке следования либо отсутствуют, либо, если таковые будут иметь место, очевидны.
Выгрузка документа в формат pdf с сохранением ссылок
Ну вот, пожалуй, и финал данной истории. Документ готов. Можно заняться его распространением, но не хочется отдавать оригинал. Имеются два способа. Первый состоит в замене ссылок их значениями средствами MS Office. Достигается это нажатием Ctrl+Shift+F9, однако автор крайне не рекомендует так делать.
Куда более интересной является выгрузка документа в формат pdf. При выгрузке можно заменить поля значениями, разбив тем самым ссылки на объекты, или оставить их. Преимущество второго случая (зачем всё это вообще делалось) состоит в том, что при чтении текста читатель может нажать на ту или иную ссылку для перемещения к нужной формуле, таблице, рисунку или элементу списка литературы. Включить или выключить данную опцию можно при сохранении в pdf: Create bookmarks using: Word bookmarks.
