
Word for Microsoft 365 Word 2021 Word 2019 Word 2016 Word 2013 Word 2010 Word 2007 More…Less
You can apply a numbering scheme to the headings in your document by using multilevel-list templates and built-in heading styles in Word (Heading 1, Heading 2, and so on).
Important: Make sure you’re using built-in heading styles in your document.
You can number headings so that top-level headings (Heading 1) are numbered 1, 2, 3, for example, and second-level headings (Heading 2) are numbered 1.1, 1.2, 1.3.
-
Open your document that uses built-in heading styles, and select the first Heading 1.
-
On the Home tab, in the Paragraph group, choose Multilevel List.

-
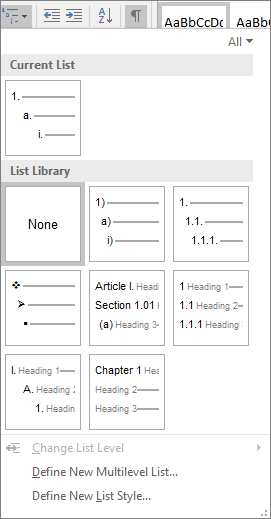
Under List Library, choose the numbering style you would like to use in your document.
Note: Depending on the type of documentation you’ve prepared, you might choose a template that includes the word «Heading» in the example.
Need more help?
Want more options?
Explore subscription benefits, browse training courses, learn how to secure your device, and more.
Communities help you ask and answer questions, give feedback, and hear from experts with rich knowledge.
This tutorial shows two ways to create numbered lists in Microsoft Word. We will also look at how to change list levels, start with a different list number, and change the font, size, and color of list numbers.
Do you want to create bulleted lists? Please see my previous tutorial “How to Create Bulleted Lists in Microsoft Word.”
What about Lists Ordered by Letters?
For simplicity, this tutorial refers to “numbered lists” because Word organizes all ordered (hierarchical) list options in the Numbering Library. However, all the steps shown here also apply to lists organized by letters.
If you would like to learn more about ordered and unordered lists, please see “How to Write Vertical Lists (Ordered and Unordered).”
Table of Contents
- How to Create a Numbered List — Basic Method 1
- How to Create a Numbered List — Basic Method 2
- How to Change Numbered List Levels
- How to Start a List with a Different Number
- How to Change the Font, Size, and Color of List Numbers
Watch all the steps shown here in real time!
Explore more than 200 other writing-related software tutorials on my YouTube channel.
The images below are from Word for Microsoft 365. These steps also apply to Word 2021, Word 2019, Word 2016, and Word 2013.
The basic steps are similar in Word for Mac. However, the more advanced steps, such as starting a list with a different number, are different on Mac. So, we will cover this topic for Word for Mac in a separate tutorial.
How to Create a Numbered List — Basic Method 1
This is the basic method to create a numbered list in Word. This method requires you to type each item as you create the list. If you have already typed your list items, see Method Two below.
- Place your cursor where you want to start your list.
- Select the Home tab in the ribbon.

- Select the menu arrow next to the Numbering button.
![]()
- Choose a number style from the Numbering Library.

The number one will appear in your document.

- Type your first list item after the number, and then press the Enter key on your keyboard. The next number will appear.

Continue typing your list items and pressing the Enter key until your list is complete.
- After typing the final item, press the Enter key twice to remove your cursor from the list.
How to Create a Numbered List — Basic Method 2
This method is for existing text formatted vertically as a list.
- Select the text.

- Select the Home tab in the ribbon (see figure 1).
- Select the menu arrow next to the Numbering button (see figure 2).
- Choose a style from the Numbering Library (see figure 3).
Your selected items should become a numbered list.

How to Change Numbered List Levels
Word lets you create numbered lists with up to nine nested levels. Here are two ways to change the level of list items.
Change List Levels — Method 1
Important note: This method won’t work for the first item in your list.
- Select one or more list items (other than the first item).

- Select the Home tab in the ribbon (see figure 1).
- Select the Increase Indent button in the Paragraph group.

Each time you select the Increase Indent button, the item(s) will move one level and take on the appropriate format for that level (e.g., lowercase letters, roman numerals, etc.).

Pro Tip: To return the selected text to a previous level, select the Decrease Indent button to the left of the Increase Indent button.
Change List Levels — Method 2
- Select one or more list items (see figure 8).
- Select the Home tab in the ribbon (see figure 1).
- Select the menu arrow next to the Numbering button (see figure 2).
- Select Change List Level from the drop-down menu.

- Select a list level from the list-level menu.

Your list item(s) should move to the next level.
How to Start a List with a Different Number
You can start a list with a number other than one or continue the numbering from the previous list.
- Select the first list number or place your cursor within the first list item. If you select the list number, all numbers on that level should also be selected.

- Select the Home tab in the ribbon (see figure 1).
- Select the menu arrow next to the Numbering button (see figure 2).
- Select Set Numbering Value from the drop-down menu.

5.a. Enter the number you want to start with in the Set value to text box in the Set Numbering Value dialog box.

5.b. (Alternative Option) Select Continue from previous list if you want to continue the numbering from a previous list in your document.

- Select the OK button.

Your list should be renumbered according to your selections in the Set Numbering Value dialog box.
How to Change the Font, Size, and Color of List Numbers
By default, the font, size, and color of your list numbers will be the same as your normal text style. However, you can manually change the appearance of list numbers by selecting them separately from the text.
- Select one list number. All numbers on that level should also be selected.

- Select the Home tab in the ribbon (see figure 1).
- Select a new font, size, or color from the Font group.

Your list numbers should change to the new formatting. Repeat these steps for each level in your list, as necessary.

Related Resources
How to Write Run-In Lists
How to Create and Update a List of Tables or Figures in Microsoft Word
How to Create Numbered Lists in PowerPoint (PC & Mac)
Updated February 12, 2023
Tables are visual displays of data arranged in rows and columns. Table cells contain numbers, text, or a combination of numbers and text. Some cells can include images, symbols, links, and other objects. See how to create and modify tables in Word.
Each table should be referenced in the document content. Typically, tables have a number and a title, which are referenced. Microsoft Word offers functionality to create automatically updated numbers for figures, tables, and equations. The numbers and titles, created using the Captions functionality, are used to cross-reference tables in a document and create a List of Tables.
The word Table and a number identify a table then follows the caption. A caption is a short block of text that explain table contents without referring to the document content:

See more about creating numbers and captions for figures: images, pictures, charts, etc., creating captions for equations, and creating captions for photographs.
Attention! We highly recommend checking the formatting requirements, accepted by your college, university, company, or established on the project, etc.
Insert a caption for tables
To add automatically updated numbers and a title (caption) for a table, select it by:
- Selecting all rows or columns of the table one by one, or
- Moving the mouse over the table until you see the table selection icons in the upper-left corner of the table and clicking it:

Note: You can also click on the table selection icon in the bottom-right corner for the same effect. See how to select table elements for more details.

After selecting a table, do one of the following:
- On the References tab, in the Captions group, click the Insert Caption button:

- Right-click on the selection and select the Insert Caption… in the popup menu:


In the Caption dialog box:

Select the label and its position
- Under Options:
- From the Label dropdown list, select the item type you need:

- Table,
- Equation – see how to create captions for equations,
- Figure (selected by default) — see how to create captions for figures,
- Another label (in this example, My Caption) was created using the New Label… button (see how to create a new label below).
Note: Remember that each type of object you labeled will be numbered sequentially within its group.
- From the Position dropdown list, select one of the options:
- Above selected item (selected by default for the Table label), or
- Below selected item (selected by default for the Figure label).
Note: The captions for tables are usually located above the tables.
- From the Label dropdown list, select the item type you need:


Exclude label from caption
- Select the Exclude label from caption check box if you don’t need to add the label to the caption:
Some requirements recommend using the lowercase word table instead of the automatically added Table in Word cross-references.
The option Exclude label from caption hides the label from being displayed in cross-references or a List of Tables.
For example:
- When you insert a cross-reference with the selected option Entire captions or Only label and number (see more details how to use cross-references in Word), Word adds the capitalized label and number, as you see in the Caption field of the Caption dialog box. E.g., “are listed in Table 3” or “are listed in Table 3 Number of articles by statuses and products”.
- All captions, created with selected option Exclude label from caption, Word adds in cross-references as their numbers without the labels. Type the word table (as required) and insert a reference to a caption (e.g., “are listed in table 3”).

Add a new label
- Click the New Label… button to create a new label:
In the New Label dialog box, type a new label name:


Note: See also how to delete a custom label.
Modify caption numbering
- Click the Numbering… button if you want to change any of the numbering options:
In the Caption Numbering dialog box:

- In the Format dropdown list, select the numbering format you need (some requirements recommend using Latin capital letters instead of numbers for tables):
- Select the Include chapter number check box to include the chapter number in the caption number. After selecting this option, two more options will be unlocked:
- From the Chapter starts with style dropdown list, select the heading level you need to include in the caption:
- In the Use separator dropdown list, select the punctuation you need to insert between the chapter number and the table number:
- At the bottom of the dialog box, see how your choices will look in the Examples section. E.g., Table 2.3” means the third table in chapter 2.
- Click the OK button.
- From the Chapter starts with style dropdown list, select the heading level you need to include in the caption:


Add a title
- To add the text of your caption, click after the table number and enter the text. E.g.:

Notes:
- There are several standard requirements for table titles:
- Chicago style recommends using the table title in line with the label and number. E.g.:

- In opposite, APA (American Psychological Association) and MLA (Modern Language Association) styles recommend using the table title with one double-spaced line below the table number (see how to adjust line spacing). E.g.:

To create such a title, don’t type any text in the Caption field, leave it, then do the following:
- Create a caption without a title.
- Position cursor after a caption number and add a new line (by pressing Shift+Enter) in which type of title you need.
Note: You can press Enter and create a new paragraph instead of a new line. See how to create a List of Tables (Table of Figures) for more details.
- Format the caption to adjust line spacing (see how to change caption line spacing).
- In addition, MLA style recommends using a hanging indent to the second line of long titles. E.g.:

- Chicago style recommends using the table title in line with the label and number. E.g.:
- Word offers very helpful functionality to create a text that can be displayed in a List of Tables instead of a caption text. See how to create a Table of Contents Entry.
- For most requirements, the number and the title should be without an ending period. If you need a period after a number, type it in the Caption field.
- If a table spans more than one page, the first page of that table should have a complete caption; the subsequent pages should have an abbreviated caption consisting of a label, a number, and the word Continued. E.g., “Table 3. Continued”.


Using an AutoCaption
See Adding captions with AutoCaption.
Group a table and its caption
According to all requirements, a table (or its part) with its caption should appear on the same page. Word adds captions for tables as a regular paragraph with selected Keep with next option. See how to keep lines and paragraphs together for more details.
See also how to keep a table row on one page and keep a table on one page of a Word document.
Edit or modify a caption
Microsoft Word adds numbers in captions as fields.
![]()
You can show all fields in a document with a gray background, see how to turn on or turn off highlighting of fields in a Word document.
- Labels:
If needed, you can change the label. Word for Microsoft 365 will update the reference if available. In this case, Word will not create a new label and a separate numbering. Be careful!
- Numbers:
DO NOT edit caption numbers! If you change a number:
- In some cases, Word will update it, and you will lose your changes,
- Otherwise, the caption number may stop updating automatically.
- Text:
To add or modify a caption text, click on it and change what you need, like in a regular paragraph.
Do not forget to format a caption according to the requirements you use!
Delete a caption and an unnecessary label
If you need to remove some caption, select the caption paragraph (full line or several lines) and press Delete. Do not forget to update fields in the document!
To remove the unnecessary label, do the following:
1. Open the Caption dialog box.
2. In the Label dropdown list, select the label you want to remove.
3. Click the Delete Label to remove a custom label:

Note: You can’t delete predefined labels: Equation, Figure, and Table.
Update caption numbering
Word automatically updates references and numbering if you insert a new text. However, copying, deleting, or moving context often leads to confusion in the document. After such operations, you have to update all dependencies manually.
To update fields in the document, select the entire document by clicking Ctrl+A, and do one of the following:
- Press F9,
- Right-click on any of the fields and select Update Field in the popup menu:


Word will update all fields. You can be sure that the numbering and references are correct.
We strongly recommend checking a document at least visually after changes!
Multilevel numbering in Word is the #1 headache for many people working with large documents.
Believe it or not, it’s not complicated. It just takes somebody to lead the way and point out the pitfalls you need to avoid.
Today that pleasure falls to me!
Before I start, grab your free multilevel numbering troubleshooting guide that shows you the steps to get multilevel numbering working properly first time, every time, together with answers to over 20 FAQs and plenty of real client examples constructed step by step to help you fix what isn’t working with your numbering.

1. What Multi-level Numbering Looks Like
Often used in the legal profession or in large corporate documents, multilevel numbering creates a logical hierarchy and easy navigation within the document. The headings can also be summarised later on in a table of contents. Here is a simple example:

2. How to Set Up Multilevel Numbering
Here is the correct process:
1. Select the text that you want to number (this can be a section of text or the whole document).

2. Select the Home tab.
3. Click the multilevel numbering icon in the Paragraph group.
![]()
4. You can either select an existing layout from the list to use as a starting point, or you can create a new numbering system from scratch. As you hover over each thumbnail image, Word provides a larger image of the numbering system.
5. Choose Define New Multilevel List to display the control dialog.

The dialog box can be broken down as follows:
Step #1 Click level to modify
In the top left is a list of levels. As you select each level, the settings in the rest of the dialog box changes.
Level 1 is the highest level, i.e. the main headings such as chapter or section titles.
Level 2 is subordinate to level 1.
Level 3 is subordinate to level 2.

Step #2 Enter formatting for number
This is where the level number is constructed. If you include a previous level number, it will be displayed with a grey background, as will the number for the current level.
Type anything you wish to put in between the numbers such as dots, dashes, brackets etc.
Clear any text in the ‘Enter formatting for this number’ box.
Step #3 Include level number from
When creating a subordinate level (or child level), you can first specify the level number of the parent.
For example, for section 3.2
- ‘3’ is the parent level (level 1) and
- ‘2’ is the child level (level 2)

Step #4 Number style for this level
Each level can have its own number style. It may be a standalone style, e.g. 1, 2, 3 or a, b, c or continue on from a higher level, e.g. 1.1.1 or 1.a.i.
- When creating 1.1 numbering, this option is 1, 2, 3.
- When creating 1.a numbering, this option is a, b, c

Step #5 Font
Set the font formatting for the selected level, if you want.

Step #6 Position
What position from the left margin do you want items for each level of numbering. For example, level 1 items may be 0cm from the left margin, level 2, 1cm from the left margin and level 3, 2cm from the left margin.
Here’s what they mean:
- The Aligned At determines how far from the left margin the number appears.
- The Text indent at figure determines how far from the left margin the text following the number is.

6. Click OK to save all the settings and close the dialog box.
The text you selected in step 1 now looks like this.

The next part is where the magic happens …
3. How to Apply Multilevel Numbering
Once you have created your numbering system:
1. Position the cursor at the beginning of a line.

2. Press the TAB key to move the text down a level (demote).

3. Press the SHIFT and TAB keys together to move the text up a level (promote).

If you prefer, you can also click the indent icon to demote and the outdent icon to promote between levels.
![]()
4. How to Change Multilevel Settings
Once you have created your numbering system:
1. Reselect all text that is using the multilevel numbering.
2. Click the multilevel numbering icon and select Define New Multilevel List (yes, you choose this option even if you are modifying an existing multilevel list).

The original settings that you defined are redisplayed.
3. In the top-left box select the level that you wish to change, then change your settings.
4. Repeat for the other settings.
5. Click OK to save the settings. Your numbered list should now reflect your new settings.
5. Linking Multilevel Numbering to Styles
Each level of a multilevel numbering system can be linked to a style. This means that as you apply styles throughout the document, the numbering is applied appropriately and automatically. You can either use the built-in Heading 1, Heading 2, Heading 3 styles or use your own custom styles.
1. In the Numbering dialog box, click the MORE button in the bottom-left corner to expand the dialog box.
2. Select level to modify in the top-left box.
3. Open the Link level to style drop-down list and choose the style you wish to connect to the numbering level.

4. Click OK.
5. In the document, apply the Heading 1, Heading 2, Heading 3 styles where needed.
It’s a good idea to create a body text style and apply that where appropriate, so that the body text does not inadvertently get caught up in the multi-level numbering.
6. Select the whole document (or the portion of the document where you want to apply your numbered sections).
7. Click the icon in the Paragraph group (Home tab).
8. Select your custom numbering style from the gallery. The thumbnail image should show the linked styles.

6. How to Use Styles to Set Number Levels
1. Select all the text that you wish to apply the same number level to. Alternatively, if you wish to go line by line, you can place the cursor anywhere in a line of text.
2. In the Styles gallery, click the style that corresponds to the number level you wish to apply. For example, to apply the top level numbering click Heading 1 and for the third level numbering click Heading 3 (assuming those are the styles you assigned).
The numbering and all the numbering settings will be applied to the selected text or the paragraph in which the cursor was positioned.

And that, my friend, is how you do multilevel numbering in Word with no loose ends.
How to set up a dual-multilevel numbering system in Word
7. Two resources to help you
1. Grab your free multilevel numbering troubleshooting guide.

2. Watch over my shoulder as I set up multilevel numbering from scratch.

8. What next?
I hope you found plenty of value in this post. I’d love to hear your biggest takeaway in the comments below together with any questions you may have.
Have a fantastic day.


About the author
Jason Morrell
Jason loves to simplify the hard stuff, cut the fluff and share what actually works. Things that make a difference. Things that slash hours from your daily work tasks. He runs a software training business in Queensland, Australia, lives on the Gold Coast with his wife and 4 kids and often talks about himself in the third person!
SHARE
The auto numbering in Word can help you to create a numbered list or add sequence to existing paragraphs automatically, which is very time-saving. But in practice, there’re some frequently happened problems can cause your inconvenience. Therefore, I’d like to share some useful tips to solve these problems in auto numbering.
1. How to Stop Auto Numbering
It the auto numbering has been activated, you can just click the flash icon before the number, choose Undo Automatic Numbering to stop it for this time, or choose Stop Automatically Creating Numbered Lists.

Alternately, you can toggle on/off the auto numbering by clicking File – Options – Proofing – AutoCorrect Options…

Then checking or unchecking Automatic numbered lists in the AutoFormat As You Type tab.

2. How to Use Numbering Manually
If you’ve stopped the auto numbering in your Word document and still want to add numbered list to paragraphs, you can active numbering manually.
Switch to Home tab in Word, find the Numbering button. You can either click it directly or click the small arrow to expand the menu, and choose a numbering format in the list. Then the button will turn grey.

After that, you can input the content in the document, and each paragraph will be added a sequence number automatically.

Or you can select existing paragraphs and hit Numbering button to add sequence numbers to them.

3. How to Change or Unify the Indents of the Number List
Sometimes the spaces between the sequence numbers and the text are various in different paragraphs. If you want to change or unify them, you can select the number list you want to adjust and right-click it, then choose Adjust List Indents… in the menu.

Make changes to the setting in the popping out window. For example, you can choose to Follow number with Nothing, or input/select a value of Text indent directly.

4. What if Number List becomes Discontinuous
You may also encounter a problem that the number list becomes discontinuous after deleting or modifying something.
For this situation, you just need to select these paragraphs with sequence numbers, and click the arrow beside Numbering to choose a template again.
5. How to Customize a Numbering Format
If you don’t want to choose any of the templates in the drop-down list or Numbering, you can definitely customize a new one.
Click the arrow beside Numbering to expand the menu and select Define New Number Format… at the bottom.

Then you can make your own choices in the popping out window, and hit OK to confirm it.

The customized numbered list will be added to your document directly.
6. How to Specify the Start Number of the List
If you don’t want a numbered list starts from 1, just click an existing list, and choose Set Numbering Value… in the drop-down menu of Numbering.

Enter a number under Set value to, and hit OK.

Then the numbered list will start from the specified number.

Copyright Statement: Regarding all of the posts by this website, any copy or use shall get the written permission or authorization from Myofficetricks.
![]()
Download Article
Easily add page numbers to the header or footer in your Microsoft Word document
![]()
Download Article
- Inserting (PC & Mac)
- Formatting (PC & Mac)
- Inserting (Mobile)
- Video
- Expert Q&A
- Tips
|
|
|
|
|
Adding page numbers in Microsoft Word is easy! Whether you’re writing a 10-page essay or a thesis paper, there are a variety of ways to customize the page numbers. Use the Insert tab to quickly add page numbers. From there, you can change the formatting and numbering options. This wikiHow guide will show you how to add page numbers to your Microsoft Word document on Windows and macOS, as well as in the Word mobile app on your Android, iPhone, or iPad.
Things You Should Know
- On desktop or mobile, go to the Insert tab, then select «Page Number» to add page numbers.
- Double-click the page number to make changes to the font, color, or style.
- Double-click the header or footer, then go to Page Number > Format Page Numbers for additional options.
-
1
Click Insert. This is in the tab menu bar at the top of Word. Alternatively, double-click the top or bottom of the page to open the Header or Footer editing menu.
- Don’t forget to save your work as you go!
-
2
Click Page Number. This opens a pop-up menu for choosing where to place the page numbers.[1]
- In the Insert menu, Page Number is near the center.
- In the Header & Footer design tab, Page Number is on the left.
Advertisement
-
3
Choose a page number position. This can be in the header or footer, and located left, center, or right.
- You can also toggle the option to include the page count in the page numbering (e.g. 1 of 3).
- Selecting a page number position will open the “Header & Footer” tab.


Advertisement
-
1
Double-click a page number. This will select it and show a pop-up menu with options for changing the font, color, and style. This change will edit every page number automatically.
- You could even cross out the page numbers if that’s your style.
-
2
Start numbering on the second page. If you want the first page to have no numbering, and start at 1 on the second page, follow these steps:
- Double-click the header or footer to open the Header & Footer design tab.
- Check the “Different First Page” checkbox.
- Click Page Number then Format Page Numbers.
- Select “Start at” and change it to 0.
-
3
Restart page numbers by using page breaks. If you want to start a new numbering later in the document, you’ll need to use a page break.
- Place your cursor at the beginning of the page you want to restart the numbering on.
- Go to the Layout tab, then click Breaks.
- Select Next Page in the Breaks options menu.
- Double-click the header or footer in the second section. This will open the Header & Footer design tab.
- Click Page Number then Format Page Numbers.
- Select the radio button labeled «Start At,» then select «1» to restart the page count at 1.
-
4
Use «Format Page Numbers» for additional changes. This can be located by going to Insert > Page Number > Format Page Numbers. You can change:
- The number format. You can change this to Roman numerals, letters, or another style.
- The chapter number.
- The starting number.
-
5
Click Close Header and Footer. This will return you to editing the body of the document. Alternatively, press Esc to close the header and footer editor.


Advertisement
-
1
Open your Word document on your Android, iPhone, or iPad. It’s easy to use Word on your phone or tablet to insert page numbers into your document.
-
2
Tap the more button. While in Edit mode in the Word mobile app, tap the more button (three horizontal dots).
-
3
Tap Home. Then, select Insert to switch to the Insert menu.
-
4
Choose Page Numbers. Then, select the placement location for the numbers.
-
5
Format the page number. After selecting the placement, double-click the page number. Then, tap the text edit button (the icon with the letter A and a pen). You can change the font, size, color, and more!
-
6
Go to Headers and Footers. This is in the Insert menu. You can set a different first page, change how odd and even pages look, or remove the page numbers entirely.
- When working in Online mode, any changes made in the app will appear on your desktop version of Word.


Advertisement
Add New Question
-
Question
In the insert box, the page number icon is grayed out and not available for use. How do I activate it?

Kyle Smith is a wikiHow Technology Writer, learning and sharing information about the latest technology. He has presented his research at multiple engineering conferences and is the writer and editor of hundreds of online electronics repair guides. Kyle received a BS in Industrial Engineering from Cal Poly, San Luis Obispo.
wikiHow Technology Writer
Expert Answer
The page numbering feature isn’t available in certain layouts. Go to View and select Print Layout. If this doesn’t resolve the issue, try restarting and/or updating Microsoft Word.

Ask a Question
200 characters left
Include your email address to get a message when this question is answered.
Submit
Advertisement
Video
-
If you plan on creating a complex header or footer (like your name, or a title), try and add the page numbers first. They will be much easier to work with.
-
Looking for money-saving deals on Microsoft Office products? Check out our coupon site for tons of coupons and promo codes on your next subscription.
Thanks for submitting a tip for review!
Advertisement
About This Article
Article SummaryX
1. Click Insert.
2. Click Page Number.
3. Select a position.
4. Choose a style.
Did this summary help you?
Thanks to all authors for creating a page that has been read 423,281 times.
Is this article up to date?
In this guide, you’ll learn everything you need to know about adding page numbers in Word.
When adding page numbers into your Word document, several methods are available.
However, this guide focuses only on the best approaches that give the most ease and flexibility.
I’ll show you all the secrets.
Let’s dive right in.
Introduction.
Page numbering in Word is very easy. In fact, I know a shortcut with which you can insert page numbers in under five seconds (will be discussed soon).
At the same time, numbering pages in Word can be very complicated, depending on what document you are working on.
- Are you starting the page numbering from page one, page two or page three?
- Do you want the page numbers to be Roman numerals, alphabets or ordinary numbers?
- Where do you want to insert the page numbers? – Is it in the footer? In the Header? Or in the side margin?
All these factors count when it comes to inserting page numbers into Word.
So, in order to not confuse you, I’ll begin from the basics with examples and screenshots on every step.
Without wasting much time, let’s get started.
The quickest way to add page numbers in Word – Shortcut
This is so far the quickest way you can use to number your pages in Word.
NOTE: With this method, I assume that you just want your pages to be numbered starting from the first page to the last page.
Below are the steps you can use to perform quick page numbering in Word:
- Identify where on the page you want to insert the page numbers. Whether in the footer (bottom of page) or in the header (top of page). In this example, we’ll insert the page numbers in the footer section.

- Now, go to any page of your choice. It could be page one or page 10, it doesn’t really matter.
- Double-click on the page’s Footer area to make it editable. Alternatively, right-click in the Footer area, then click on Edit Footer. The same thing applies if you are inserting the page number into the header section.
- Whilst in the Footer editing mode, press Shift+Alt+P on your keyboard.
- Now press the Escape (Esc) key to exit the Header & Footer.
After performing the above simple steps, Word will insert page numbers on all the pages in the document.
Below is a very short video illustration of the steps outlined above:
Option 2: Using the insert page numbers button
This is yet another way you can insert page numbers into your Word document.
It involved using the Page Number commands in the Insert tab, or Header & Footer tab when active.
Following the steps below, you can also add page numbers into your Word document.
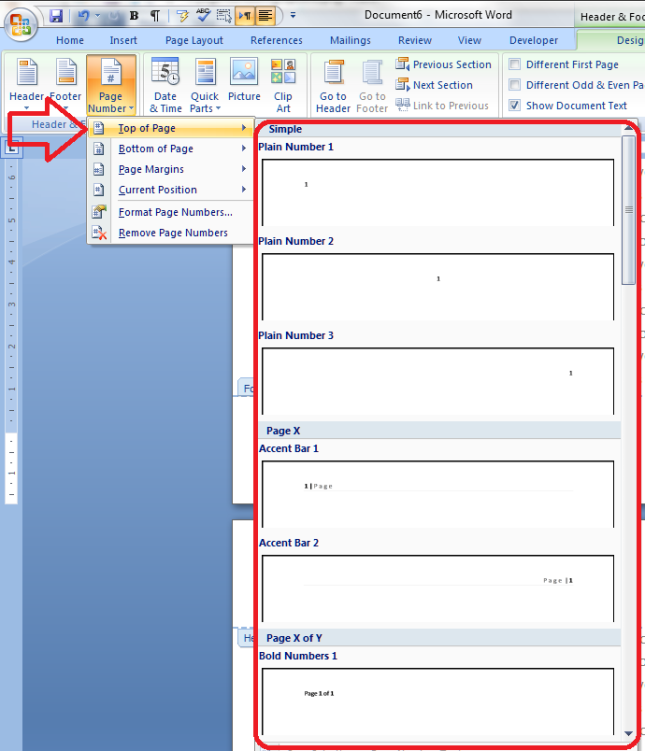
- Go to the Insert tab, in the ‘Header & Footer’ group, click on ‘Page Number’ to display the page numbering options.

You can also find the ‘Page Number’ command in the Header & Footer tab. However, the Header & Footer tab shows only when you are editing headers or footers. So you can double click either in the Footer or Header section to make it editable.
- From the ‘Page Number’ drop-down menu, choose your page numbering style to automatically insert the page numbers into your document.

Use the ‘Top of Page’ option if you want to insert page numbers on top of the pages. Or use ‘Bottom of Page’ option to add page numbers to the bottom of the pages.
This is how you can add page numbers to your word document.
The two approaches explained above are the basis for learning how to insert complex page numbers in Word.
Now let’s look at more advanced ways you can insert or tweak page numbers to suit your needs.
Numbering your pages with Roman numerals or alphabets
Word gives you the flexibility of choosing the page numbering style that works well for you.
You are not only limited to using the standard ordinary numbers when numbering your pages in Word. You can number pages with Roman numerals. You can also use alphabets.
Therefore, without further ado, below are the steps you can follow to change your page numbers to Roman numerals or other numbering styles.
- First, insert the page numbers.
To insert roman numerals as page numbers, you first have to insert the page numbers with the default ordinary numbers, and then format it to display the roman numerals.
In case you forget, to insert page numbers, go to the Insert tab, under the Header & Footer group, click Page Number and then specify the location and style you want for your page numbers.
- After successfully adding the page numbers, go to Page Number > Format Page Numbers in the Insert tab.

- From the ‘Page Number Format’ dialog, click the ‘Number format’ options and select the numbering style you want. You can select alphabets or roman numerals.

- Click on the OK button.
This few steps will change your page numbers to roman numerals.
NOTE: You can also include different page numbers in the same document. For instance, you can use Roman numerals for the introduction pages, and start page 1 on the main part of the content. This technique is discussed later in this article.
Removing page number from the first page
Perhaps you want to remove the first-page numbering since it serves as your cover page.
Or for any other reason, you can remove the page number from the first page of your Word document using the following editing steps:
- Double-click the Footer/Header section to activate the ‘Header & Footer’ tab. Alternatively, right-click the footer area and Click on Edit Footer.
- From the ‘Header & Footer’tab, select ‘Different First Page’.

As soon as you check the ‘Different First Page’ checkbox, the page number on the first page disappears.
NOTE: Even though there’s no page number on the first page anymore, it is still counted. This means that the second page will still display page number 2 instead of page number 1. To start numbering page 1 on the second page, keep reading below.
Numbering pages starting on page 2
After removing the page number on the first page, you realized that the second page still has page number 2 instead of 1.
This is because the first page is still counted, it’s just that the page number is not visible.
There are two ways you can number pages in Word starting on page 2:
- Start the page numbering at 0 (zero). This way, the first page will be page 0 (which is hidden anyway), and the second page will be numbered page 1.
- Use Section Breaks to separate the first page from the rest of the pages. This way, you can delete the page number on the first page and it will not affect the other page numbers on the rest of the pages.
In this section, I’ll show you how to number pages in Word starting at 0 (zero) instead of 1 (one).
- First, insert the page numbers into your document. If you don’t know how to insert page numbers, refer to the previous sections. If you already have your pages numbered, move to the next step.
- In the Insert tab, go to Page Number > Format Page Numbers.
- The ‘Page Number Format’ dialog appears. Under the page numbering section, type 0 (zero) in the Start at box.

- Click OK.
At this point, the page numbering will start with 0 (zero) on the first page which is not visible. Then the second page will be numbered N1, and so on.
TIP: Not every page needs to be on page 1. Therefore, just like starting to number at zero, you can also start your numbering at any number (except negatives) depending on the layout of your content.
As mentioned already, the second method to perform this task involve using section breaks to separate the first page from the rest of the pages. I’ll cover this approach in the next sections where you’ll learn how to insert page number in Word starting from a specific page.
Insert page number in word from specific page
Yes, it is possible to start page numbering from any page in your word document.
In the previous section, we already talked about how you can start numbering your pages from page two using the ‘Different First Page’ option.
With the ‘Different First Page’ method, you can only start numbering your pages on page 2. You cannot really insert the page numbers on other specific pages like page 3, page 4 or page 5.
To skirt this limitation, you need to use what is called Page Breaks to break your pages into sections. This way, each section can have independent headers and footers, which means that they can also be numbered independently.
To understand how this works, let’s demonstrate how to start page numbers on page 3.
Starting page numbers on page 3 or any other page
NOTE: The following steps will show you how to start numbering your pages from page 3. However, you can apply the same idea to add page numbers from any specific page you want, like page 5.
The diagram below illustrates the goal of this section:

In the diagram above, the first section (first and second pages), is the introduction – with no page numbers. And the second section (starting from the third page), is the main content – which contains page numbers, starting with number 1.
If you follow the steps below carefully, you will achieve awesome results.
Without further ado, let’s dive right into the action:
- Identify the page from where you want to start the numbering. In this example, it’s page 3.
- Place the insertion pointer at the start of the third page (main content page).

- Go to the Page Layout tab, in the page setup group, click on Breaks and then select Next Page from the extended list of commands.

At this point, the section break is inserted. It separates the document’s first two pages from the rest of the pages. Thus, starting from page 3 is a new section.
- Confirm the section break
After inserting the section break, Word doesn’t actually make the effects visible. Everything happens in the backend.
So, to be sure that the section break is really inserted, Press Ctrl+Shift+8 on PC or ⌘+8 on Mac. This will make all the paragraph marks visible including section breaks.

If you see the section break line just before the third page, it means that inserting the section break was successful. It tells Word that the next page (page 3) begins a different section which may have different header/footer.
- Unlink the header/footer for the second section from that of the previous.
To unlink these two sections:
Double-click to activate the Footer section on page three. This displays the Header & Footer tab, in the Navigation group, click on Link to Previous to deselect that command. Do the same for the Header.

When the “Link to Previous” item is selected for any given header or footer, it means that the header or footer is the same as that for the previous section. If you want to fix page numbers on specific pages, you don’t want that setting active.
Now follow the rest of the steps to insert the page numbers on page 3.
- Go to the Insert tab, in the ‘Header & Footer’ group, click on ‘Page Number’ to display the page numbering options.
- From the ‘Page Number’ drop-down menu, choose your page numbering style you want.
Use the ‘Top of Page’ option if you want to insert page numbers on top of the pages. Or use ‘Bottom of Page’ option to add page numbers to the bottom of the pages.
After adding the page numbers, you’ll notice that each section has its pages numbered separately. Section one, which has only two pages will be numbered from page 1 to 2. Then section two, which begins with page three will also be numbered starting from 1.
You can change the numbering styles of the introduction pages to say roman numerals.
We’ll talk about how to do that in the last section below.
How to insert different page numbers in word
You can use different page numbering styles within the same document.
Perhaps you want to use Roman numerals for numbering the introduction and then start over with page number 1 for the main content.
For instance, consider a document with two separate sections, as shown below:

Section 1 is the introduction which uses Roman numerals to number the pages. Section 2 contains the main content – which uses the standard ordinary numbers to number the pages, starting with page number 1.
This is entirely possible if you following the steps below very carefully.
- Open your document. If you haven’t written the content yet, you can finish writing it before you make the settings.
- Using the steps in the preceding section, insert a page break to separate the first section from the second.
- After dividing the document into sections, insert page numbers using the steps I showed you from the beginning.
- Change the page numbers in section one to Roman numerals. This is already covered in the previous sections.
- Format the page numbering in the new section too.
You can use the techniques discussed on this page to solve many page numbering problems in Word.
This is enough information to help you fix page numbers in Word.
Now it’s your turn to take action.
If you have any questions, suggestions or corrections, let me know in the comments section.
This article is going to teach you the basics of adding page numbers to a Word document, using Word 2007 or Word 2010. Later articles in the series will tackle more complicated topics such as mixing Roman and Arabic numerals and making sure your first page doesn’t have a number if you don’t want it to.
Why add page numbers to a Word document?
Good question? You might have a perfectly nice, short document, that looks a bit like this ..

And you don’t really need to add page numbers. But what if it’s going to be a book, or you’re going to introduce a contents page or index? What if people are going to want to quote from it, or refer back to a particular section? Even though if they read your document on their Kindle, they might not be able to see the page numbers, these are all good reasons why you might want to give your readers some page numbers to help them navigate their way through your text.
Where are the menus and buttons for adding page numbers?
As usual, there are a couple of ways to access the menus and buttons you need for adding page numbers. But, again, as usual, they lead to the same place in the end.
Method One involves choosing the Insert tab. Once you’re there, you’ll find a section called Header & Footer, and there’s your Page Numbers button:

Method Two involves clicking with your left mouse button in the blank space at the bottom (or top) of your page. Another way to do this is to select the Design tab, but sometimes that doesn’t show up by default. Clicking on the blank bit of the page will bring up the Headers and Footers and your Page Numbers button:

In Word 2003, you can find the page numbers options in the Header and Footer menu.
Now you’ve found the Page Numbers button, it all stays the same from now on, and its menu looks like this:

We’ll look at how to position your page numbers, and then how to format them (it’s best to do it this order).
How do I choose the position of my page numbers?
You will find two options for positioning your page numbers:
1. At the top or bottom of the page
2. Elsewhere in the page margins
To choose the position of the page numbers in the top or bottom areas of the page, choose Top of Page or Bottom of Page (the positions are identical for the two). Here we choose Top of Page:
You can see lots of options for positioning your page numbers, including that fancy “Page 3 of 12” you’ve seen on other people’s documents. To select the position, click on the example that suits you best (you can scroll down for even more choices).
If you try out Page Margins, you will be given another set of options allowing you to insert your page numbers all over the place:

Again, you can scroll down for even more options.
I find that people have one or two favoured number positions and ignore the others (in much the same way that we only use two programmes on our washing machines). But it’s useful to know how to find all those extra places, in case you’re working collaboratively or with a client who has particular preferences.
Now we’ll look at some basics of formatting your page numbers.
How do I format my page numbers?
This is best done once you’ve decided on the page number position, and you can come back and format them at any time, by finding and clicking on the Page Numbers button. We’re just going to look at the basics here, with more complex choices being discussed next time.
To format the page numbers, find the Page Numbers button and choose Format Page Numbers:

Select Format Page Numbers and you’ll find some more options for changing your page numbers from Arabic to Roman (or Roman capitals) and for where to start the numbering:

If you drop down the Number format list, you’ll find your choices laid out. You are not likely to want to use anything other than straight Arabic numerals (1, 2, 3 …) if you are just using one numbering style for the whole document; the others will come in handy when we learn how to apply different numeral styles to difference sections of the text. But the choices are there:

Again, Chapter numbering and Continue from previous section / Start at are mainly used when you’re applying different numbering styles to different parts of your document (Roman numerals for the contents page and foreword, Arabic for the main text, etc.) but it’s worth knowing where to find these choices for next time.
So, let’s summarise and look at how to apply standard, straightforward page numbering to a document.
How do I apply standard page numbering to my document?
If you just want simple numbers in Arabic numerals at, say, the bottom right hand corner of each page, here’s how you do it.
First, click on the Page Numbers button and choose Bottom of Page, then select the example that best fits where you want your page numbers to appear:

Then, choose Format Page Numbers and make sure your options are set to Arabic numerals 1, 2, 3 … and page numbering to start at 1:

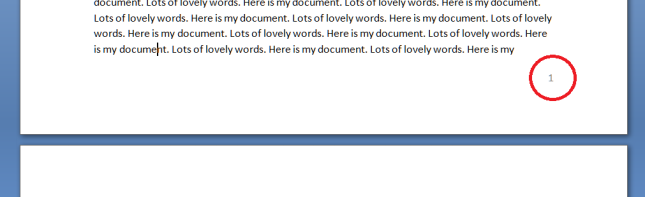
Once you’ve pressed OK, you will be back in the Footer of your document, with the main text still in grey and the page number in black, because you’re in the Footer, not the main text:

Left click on the body of the text, and the page will reverse – the Footer indicator will disappear, your text will be in black and your number will be in grey, because it’s part of the Footer, not of the text:
How do I insert different types of page number into one document?
In this article we’ve learned how to find the Page Numbers button and how to position the page numbers on the page and format them into different kinds of number. In Part 2 of this series, we look at adding different kinds of page number to different parts of the document, and more complicated formats for page numbers.
If you have found this article useful, please share it using the buttons below, and leave me a comment!
This is part of my series on how to avoid time-consuming “short cuts” and use Word in the right way to maximise your time and improve the look of your documents.
Please note, these hints work with versions of Microsoft Word currently in use – Word 2003, Word 2007 and Word 2010, all for PC. Mac compatible versions of Word should have similar options. Always save a copy of your document before manipulating it. I bear no responsibility for any pickles you might get yourself into!
Find all the short cuts here …