
Struggling to get Word to put numbers on raffle tickets? I’ve got your back. Follow these 7 simple steps to raffle ticket awesomeness.
How do I create numbered raffle tickets in Word?
First, create your ticket layout in Word. Then use Excel to make a list of ticket numbers. Use the Mail Merge function to pull these numbers into your Word ticket template. The clever bit: use the <<NextRecord>> tag to get a different number on each ticket. Then run your merge and print.
Read on for more detail!
Note: this takes quite a while. If you want a shorter way to do this, I recommend Raffle Ticket Creator. This website lets you design a ticket online and then download a PDF with all your numbered raffle tickets, ready to print at home. Try it now: https://app.raffleticketcreator.com
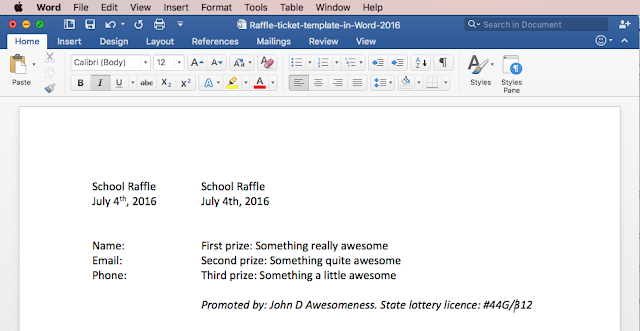
Step 1 — Create one basic ticket template
Create a new document in Word and type in the basic information that you need on your raffle tickets. The event you are raising money for, the price of the ticket, the date of the draw and the prizes that are on offer. Depending on your local laws, you might also need to include a licence number and contact name on each ticket.
Just use tabs and spaces to lay everything out, rather than tables. This will make it easier later on.
You might end up with something like this:
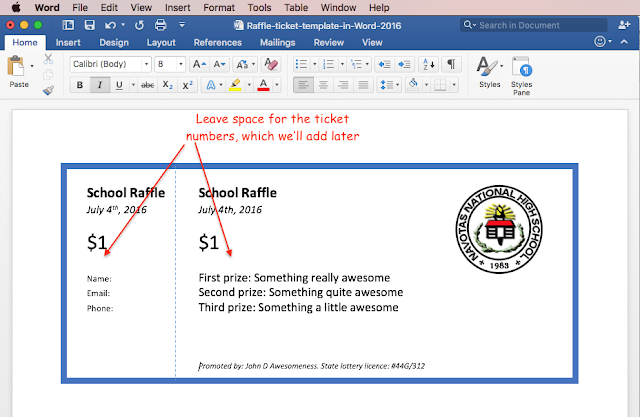
Step 2: Make your template prettier
Next, maybe add a logo and a border to brighten it up a bit. Remember to leave some space for the ticket numbers to go (we’ll add them in a moment).
Step 3: Create four tickets per page
Next, copy and paste the whole ticket so you have four tickets on a page. You might need to tinker with your layout a bit to get them all to fit neatly:
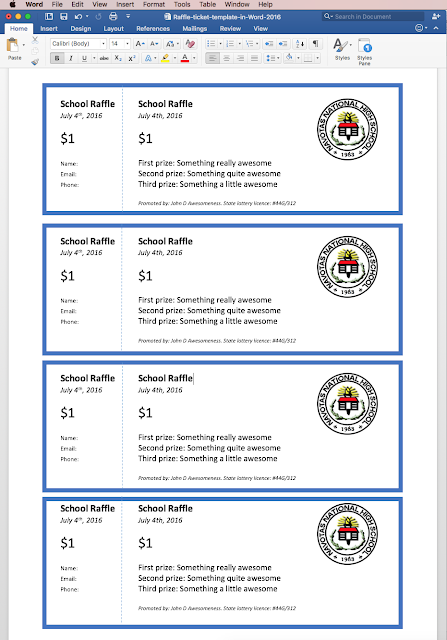
So, now you have a template ready with four raffle tickets per page. You just need to add numbers to each one.
Need help getting started? Here is the template I used in the screenshots above, feel free to download it and use it yourself:
Download Raffle Ticket Template for Word 2016 (A4 Paper)
Download Raffle Ticket Template for Word 2016 (US Letter Paper)
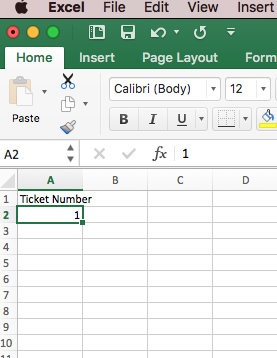
Step 4: Use Excel to generate your ticket numbers
Use Excel to generate your list of numbers, which you will then automagically pull into your Word raffle ticket template.
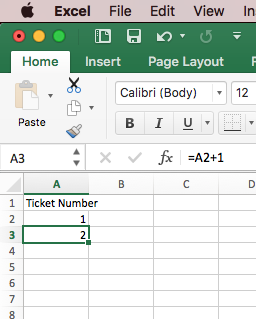
Open Excel and create a new workbook. In the top left cell (cell A1), type «Ticket Number» (without quotes), and in the cell below that type «1» (again, without quotes). Your sheet should look like this:
In the next row down, type «=A2+1» (without quotes) and hit enter / return:

That will put a «2» in that cell, like this:
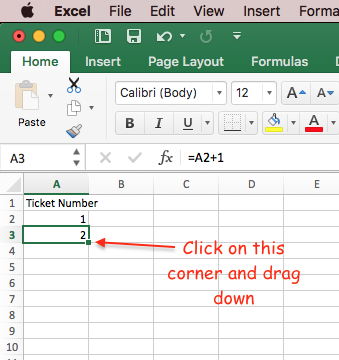
Now, pay attention to this bit if you are not a regular Excel user. Select the cell with the 2 in it, then carefully click the tiny square at the bottom right of that cell. Click that square and drag the mouse down the screen:
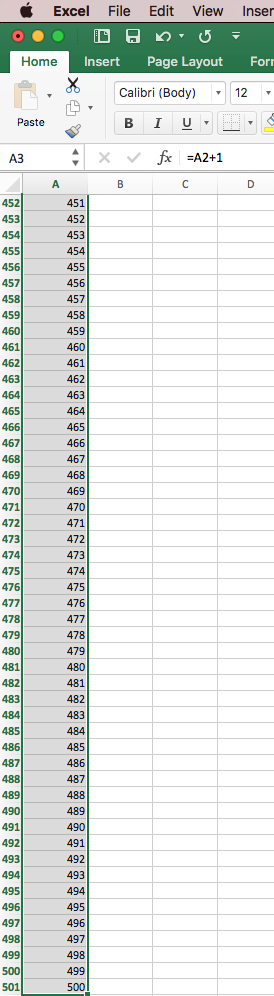
Keep dragging down and let the sheet scroll up until you get to, say, row 501. That will give you consecutive numbers up to 500. Go as far as you need for the number of raffle tickets you need, like this:
(If you prefer using the keyboard, rather than the mouse, then do this instead of dragging down: select cell A3, hit CTRL+C (or cmd+C on a Mac) to copy, then select cell A4 and use SHIFT+fn+down arrow to select all the way down to row 501. Then hit CTRL+V (or cmd+V on a Mac) to paste.)
Now save your spreadsheet somewhere that you can find it again, and close Excel.
Step 5: Pull your ticket numbers into your Word template
Go back to your raffle ticket template in Word 2016 and go to Mailings > Select Recipients > Use Existing List:

Navigate to the Excel spreadsheet which you created earlier with your raffle ticket numbers. Click ‘OK’ to the next two questions (and «Allow» if you also get some security questions):


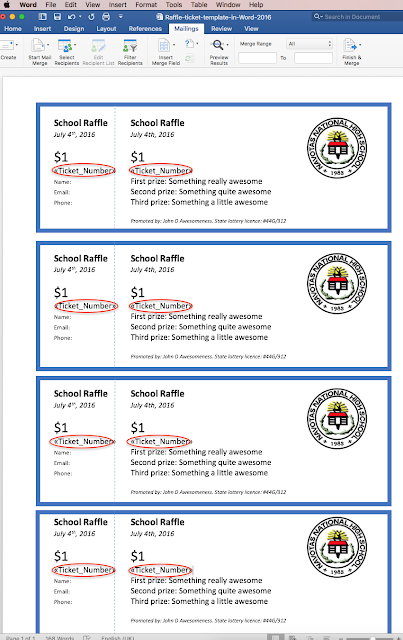
Now place your cursor where you want the ticket number to appear. Then in the menu ribbon, go to Mailings and click «Insert Merge Field». Select «Ticket_Number» (which should be the only option which appears):

That will insert a placeholder where your ticket number will appear:

(If that’s not in the correct place, just delete the placeholder, put your cursor in the correct spot, then hit «Insert Merge Field» again.)
Repeat this for each place where you need the ticket number to appear on your raffle ticket template. Most likely, you’ll need it on each counterfoil and each main ticket, so eight in total, like this:
Step 6: Tell Word to put a new number on each ticket
Now for the tricky bit. Pay attention, Bond. A Mail Merge normally has just one «recipient» per page. So Word won’t move on to the next number in your list until it gets on to the next page. But you need a new number for each ticket.
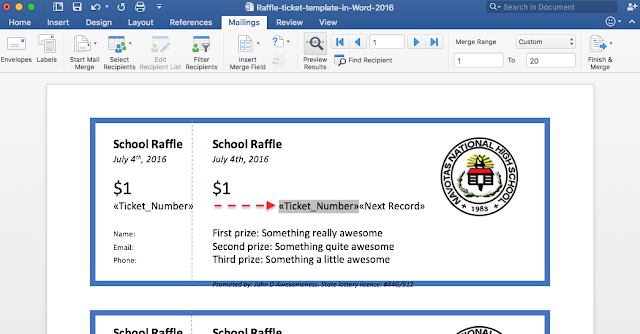
To tell Word to change the number for each ticket in your template, you need to insert a special «Next Record» marker on each ticket.
Put your cursor just after the second Ticket Number placeholder on the first ticket:

Then in the Mailings section of the ribbon click the little question mark button and select «Next Record»:
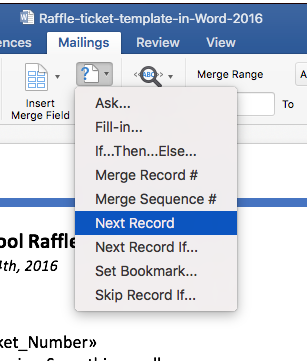
That will insert another placeholder called «Next Record». You’ll see it like this:
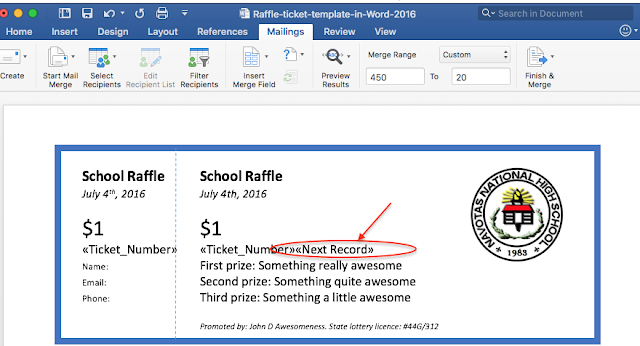
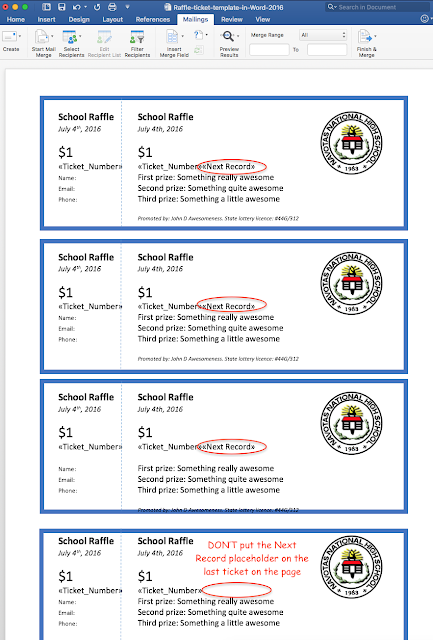
Repeat this for the second and third tickets on your template, but not for the last ticket on the page (because Word will move to the next number at the start of the next page anyway):
Nearly there now!
Step 7: Run the merge to create one printable document with all your raffle tickets
Now you can run your mail merge to generate one big document of tickets and every ticket will have a unique number.
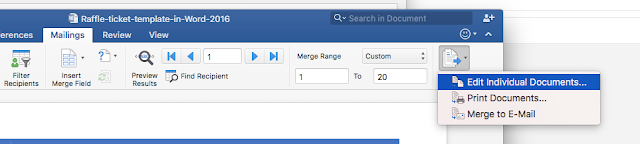
Click on ‘Finish & Merge’:
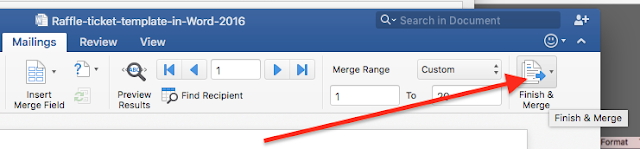
Then click ‘Edit individual documents’:
Word will whirr away and create a new document, with all your raffle tickets in it and each one will have a unique number:

That’s it! Print this document and you are done. Give yourself a big pat on the back!
Numbers not in the right place? Fear not.
You might find your numbers don’t quite appear in the correct place in your finished document:
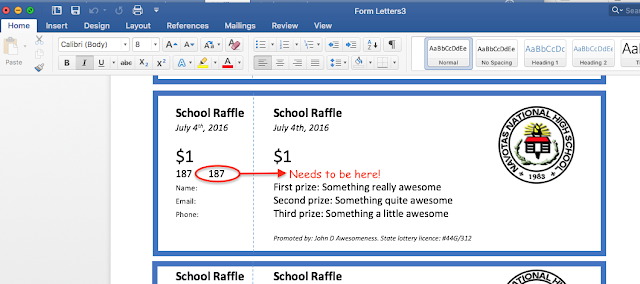
Easy to fix. Close the new document which Word just created (don’t bother to save it). Go back to your main template document and just move the placeholder further to the right. It’ll look odd, because the placeholders take up more space than the real numbers, so the layout looks messed up. Something like this:
Then click «Preview Results» in the Mailings Ribbon and check where your number is now. Adjust the spacing again if necessary until your number appears in the right place:
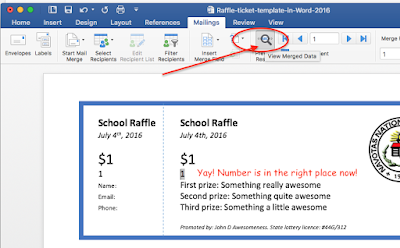
Then complete your merge as before (Finish & Merge > Edit Individual Documents) and print it out.
**************
Not got half a day to spend fiddling around with Word 2016 to print raffle tickets? Try Raffle Ticket Creator instead: just enter the details of your event into a web page and Raffle Ticket Creator will generate a PDF for you with all your tickets in it ready to print!
Microsoft Word is a writing program included in the Office suite. You can quickly generate resumes, brochures, instructional manuals, and other documents utilizing Word. They also have a large number of ticket templates that are updated regularly. Learning how to make tickets in Microsoft Word will enable you to design any sort of ticket for any occasion.
Process of Making Tickets on Word
Implementing Microsoft Word to create tickets is a simple process. In no time, you’ll be able to produce tickets exactly how you want them by executing the four simple steps below.
Step-1: Load Microsoft Word and Type “Tickets” Into the Search Box
Open Microsoft Word and put ‘tickets’ into the search field. After that, all of Word’s ticket templates will be loaded. You may refine your selection by being more precise, such as looking for ‘Event Tickets.’ Choose a template that you wish to utilize.

Step-2: Replace the Placeholder Text
On the ticket, you’ll notice that there are several placeholder text fields. Phrases such as ‘YOUR EVENT NAME HERE’ or ‘COMPANY NAME’ is commonly featured. Fill in the essential details for your occasion in these fields. The simplest approach to incorporate numbers into your tickets is to use a mail merge, which involves listing all of the numbers in an Excel file.

Step-3: Insert a photo
This might be the event banner or any other visual that attracts attention to the occasion. If the design you choose already contains a photo, you may change it by right-clicking on it and selecting Change Picture from the menu bar. After that, you choose the image you wish to utilize. If the design doesn’t contain an image, you may easily add one using the insert feature in the top menu of your display.

Step-4: Make a Copy of the Original Ticket to Create Duplicates
Finally, select the ticket you just generated and right-click to replicate it. Paste the information on the generic template by right-clicking again. Repeat the process for each ticket you’d like to make.

This completes all of the procedures for using Microsoft Word to produce any sort of ticket using Microsoft’s templates. If you don’t like the templates that Word currently offers, you may download them online and follow the procedures above.
How to Make Numbered Tickets in Word
If you are unfamiliar with all of Word’s features, making numbered tickets in Word may appear complex or even inconceivable. There is a simpler method if you have considered running to the Word template area and have failed or are annoyed with all the choices and questions. Finding available templates that can be modified and customized to meet your needs is the simplest method for producing numbered tickets.
From an open Word document, navigate to the Help menu. The Help menu is generally found at the very top of the tab, on the far-right side. A menu will appear when you left-click the Help symbol, allowing you to pick the type of assistance you desire.
Step-2: Find “Create numbered tickets.”
Select “Microsoft Office Word Help” from the menu. To the right of your document window, a help box will appear. Type “Create numbered tickets” in the box marked “Search for” and press the green arrow. Within that section, the Help feature will search and give a list of alternatives.
Step-3: Load Ticket Template
Pick the “Raffle tickets 6 per page” template. Word will show you a glimpse of the template before asking if you want to download it. When you select download, Word will update your current document with a raffle ticket template, which you may customize.
Step-4: Begin Editing Tickets
Put your pointer over “your organization name” on the template and start typing the name of the group or event for which the tickets are being offered.
Step-5: Make Necessary Adjustments
By highlighting the terms or otherwise changing or removing the current content, update all other original material to reflect the right date and awards. With the font panel above the document, you may alter the font size and layout. Pictures may be inserted by selecting them from the Insert option in the toolbar, then following similar steps as when inserting photos into a Word file.
Step-6: Replicate Tickets
Generate a range of tickets. Once all of the material has been changed, copy and paste the whole page as many times as necessary to make numerous tickets.
Step-7: Ensure Number Sequence
You can edit and modify the sequence of the rest of the tickets by marking the numbers and right-clicking on them. You may edit the field using a drop-down menu, and the program will update the numbers in order. Prior to printing, each ticket must be changed separately.
Your numbered tickets are prepared, and you may generate as many as you like by following the simple seven-step process shown above!
Read More :
- Word Document Won’t Open when Double Clicked- FIXED
- How to Indent Second Line in Word
- How to Print Multiple Pages on One Page
- Where Does Word Save Autorecover Files
- How to Recover Unsaved Word Document 2016?
- How to Remove Footer Sections in Word?
Frequently Ask Questions (FAQ):
Is there a ticket template available in Word?
Yes, Microsoft Word provides a variety of ticket templates that may be customized. Microsoft’s website also has templates available for download.
Is it necessary to number Raffle Tickets?
To make it easier to maintain track of the tickets, they should be numbered. Despite having the printer mark the tickets cost extra, it is well worth it.
What font should be used on tickets?
Ticketing is a usually prescribed font largely inspired by the pixel-style writing of e-ticketing, created for readability when printed in small sizes at a low cost. Averta is Ticketmaster’s primary font, combining elements from early European ghouls and American Gothics.
Conclusion
Microsoft Word provides a variety of templates that allow you to use your imagination to create nearly any sort of document. If you know how to make tickets in Microsoft Word, creating unique and innovative tickets will be a delight. The methods provided in this article will enable you to make one or as many as you desire!
Creating a ticket template in Microsoft Word is a relatively straightforward process. To make your own tickets, follow these steps:
1.Launch your word processing program and create a new document.
2. Once the document is open, enable the “Ticket” design style. You can enable this style by selecting the “Design” tab and then selecting the “Gallery” option. From here, scroll down to “Tickets” and select a suitable ticket style.
3. Once the “Ticket” design style has been selected, make changes to its markdowns and margins. To do this, select your ticket style and select the “Format” option. From here, select “Margins” and “Indents and Spacing”.
Adjust the margins and markdowns to your desired settings.
4. Copy and paste this ticket style to every page in your document. To do this, select the “Page Layout” tab and then select “Multiple Pages”. From here, select the “Mirror Margins” option and then select “Apply”.
5. Once the margins of each ticket have been properly mirrored, add text and images where necessary. To do this, select your ticket and select the “Insert” option. From here you can add text boxes, pictures, shapes and other elements.
6. Once your ticket has been properly formatted with images, text and other elements, save and print it. To save the document, select the “File” option and then select the “Save As” option. From here, you can select a suitable save location and file name.
To print, select the “File” option and then select the “Print” option. From here, adjust the print settings to your preferences and then select the “Print” button.
Following these steps, you should now have a ticket template in Microsoft Word.
How do I print tickets from word?
Printing tickets from Microsoft Word can be done in several ways. The simplest way to print tickets from Word is to use a template. Microsoft Word comes with several ticket templates that can be customized to fit your needs.
To use a ticket template, open Word and head to the “File” menu. Then select “New”, followed by “Templates on Office. com”. Scroll through the list of available templates until you find one that looks suitable for your tickets.
Select your template and edit the design in Word. You can also add images, logos, text, and colors to suit your taste.
Once you’re done with editing, go to “File” and click on “Print”. Select the number of copies you want to print and adjust other printing preferences such as the paper size. When the printing is completed, your tickets will be ready.
In addition to using templates, you can create and print tickets using Word’s design and text tools. Start by creating ticket-sized rectangles around the text “Ticket” and some placeholder information (e.
g. event name, date, venue, etc. ). You can then find suitable fonts and colors from Word’s Font and Color menus. Finally, adjust the layout and text sizes as well as the spacing between different sections of your ticket.
When you are satisfied with the design, go to the “File” menu and click “Print”.
You can also create and print tickets from Word by downloading a ticket template from the internet. Just search for “ticket templates for Word” in your favorite search engine and you’ll be presented with several websites that offer free and paid ticket templates for Microsoft Word.
After downloading a template to your computer, open it in Word and customize it to fit your needs. Finally, click “Print” and you’ll have your tickets ready.
What is ticket template?
A ticket template is a type of document used to issue tickets for an event or a service such as a theatre or concert performance. A ticket template will generally include information such as the name of the event, the venue, seating area, and ticket price.
Many ticket templates will also include the logo or artwork of the event. Some ticket templates may require the purchaser to sign or provide other identifying information to complete the purchase. Ticket templates can be printed and customized with additional features such as barcoding and ticket numbering.
They can also be used to create tickets with unique designs, allowing event venues to customize them to their needs. With the aid of software and technology, event organizers can quickly produce a large number of tickets.
Ticket templates are also helpful when it comes to handling the ticket sales process for an event, including bookings and payment. The use of ticket templates enables event organizers to more easily account for tickets and prevent fraudulent activities.
Ultimately, the use of ticket templates helps to improve the efficiency of the ticket sales process, which helps both event organizers and customers.
How do I make numbered tickets in Word?
Creating numbered tickets in Microsoft Word is quite straightforward. Here is a step-by-step guide to help you create your own numbered tickets:
1. Open up a new document in Microsoft Word.
2. Click on the ‘Insert’ tab and then in the ‘Text’ section click on ‘Text Box’.
3. Select the ‘Draw Text Box’ option and then draw a text box on your document.
4. In the ‘Home’ tab, click on the ‘Numbering’ icon.
5. Choose the numbered list option and select the format of the numbering style you want to use.
6. Enter the starting number for your ticket numbering and choose whether you’d like each ticket to increment by one or by another number.
7. Once you’re happy with the format and the starting number of your tickets, click ‘OK’.
8. Copy the text box and then paste it as many times as you need to create the desired number of tickets.
9. You can then add any additional content or text to each ticket, such as a name, guest name, or a special message.
10. Finally, save the document and then print it out to create your tickets.
Does Word have a citation generator?
Yes, Word does have a citation generator. In Word 2016 and Word 2019, Microsoft introduced an integrated citation generator that makes it simple to create citations in MLA style. It’s only available in Word Online; if you’re using the desktop version, you’ll need to resort to a third-party software or website.
To use the built-in generator, open your Word document and click on the References tab. You can then choose from several different citation styles, including APA, Chicago, Harvard, and MLA. When you select a style, a box will appear where you can enter your source information.
After entering this information, you can then insert the citation into your document.
Does Microsoft Word have a draw function?
Yes, Microsoft Word does have a draw function. This function is found in the “Insert” tab of the main toolbar and then “Shapes”. Upon clicking, a selection of shapes will appear, including line, rectangle, oval, and more.
The draw function also has a “Freeform” option, which allows you to draw in your own shapes using your mouse or track pad. Furthermore, other options enable you to choose from objects such as arrows, equations, and flowchart symbols.
You can also modify the look of your shapes by changing the fill color, line color, line width style and effects, and more. Text can be added to a shape, and rotating them is easy. To add more to the draw function, dropping a picture into a shape is possible, as well as 3D shapes.
You can also group shapes together and break them apart. This gives you the ability to draw and make diagrams to help visualize your work.
How do you make tickets on Google Docs?
Creating tickets on Google Docs is a relatively straightforward process. First, you will need to open a new document and click on the “File” menu. From there, select “Page Setup” and set the page type to “Tickets.
” In the ticket layout options, you can choose to use the predefined ticket size, or you can enter custom measurements. Once you have done that, you will need to add the elements of the ticket. This can include text, shapes, images, and lines.
Text: You can add text within the ticket area by clicking on the “Text” icon in the menu on the right. From there, you can start typing in the text field.
Images: To add images to the ticket, you must click the “Insert” option in the toolbar and select “Image” to select an image from your files.
Lines: By clicking the “Insert” option, you will also be able to insert vertical and horizontal lines, which will be useful for creating boxed out sections on the ticket.
Once you have added all of the necessary elements, you can adjust the size and formatting of the ticket by clicking on the “Format” menu. You can also add or delete elements as needed.
Finally, when you have completed the ticket layout, you can choose to duplicate it for multiple tickets by going to the “File” menu and clicking “Duplicate.”
Creating tickets on Google Docs is a straightforward and simple process. With the relatively easy layout tools, anyone can make custom tickets quickly and easily.
How does a dummy ticket work?
A dummy ticket is a type of ticket that can be used as a placeholder in a system or within an application. It acts as a “key” for a particular part of the system and it contains the minimum information necessary to identify that part or task.
It can also be used in processes where it is necessary to have a certain sequence of steps in order to get to a certain result. For example, a dummy ticket can be used to reserve a seat on a plane or book a hotel room when the actual process of booking the ticket doesn’t require entering any credentials.
In that case the dummy ticket acts as a placeholder in the system until the credentials are given. Another example is when a system allows users to select a given task, but there are multiple ways it can be achieved.
In this case the dummy ticket can be used as a placeholder until the user decides which process to follow. Dummy tickets have no actual value and can be discarded once the desired result has been achieved.
Therefore, they are helpful in scenarios where a certain order needs to be followed in order to achieve a result.
Can you print directly off of Canva?
Yes, you can print directly off of Canva. To do this, you first need to create your design in Canva. Once inside Canva, you can select the ‘Download’ option in either the top-right corner or the left-side menu.
You will then have the choice to download your design as an image, PDF, and PowerPoint, among other formats. Select the option which suits your needs and when prompted, choose the ‘Print’ option. This will open the design in your computer or laptops’ print dialog and settings.
Once your settings are correctly adjusted, you can then click on ‘OK’ to print off your design.
What is the way to print from Canva?
The easiest way to print from Canva is to use the print options that are available directly in the Canva editor. From the Canva editor, click on the “File” tab, then select “Print” from the drop-down menu.
This will open a pop-up window where you can select the paper size, orientation, and printing options for your design. You can also preview your design before printing by clicking on the “Preview” button.
Once you are ready to print, just click on the “Print” button and your design will be sent to your printer. If you have access to a professional printer, you can also use the Canva Print Service to have your design professionally printed.
To use this service, simply go to the “File” tab in the Canva editor and select either “Canva Print” or “Canva Print (Premium). ” From there, you can choose your paper size, orientation, and quantity of prints and then place your order.
Your design will be professionally printed and delivered to your doorstep.
Tutorials
Generating numbered tickets in Microsoft Word document might seem quite challenging and a taxing task if you are a novel user who is not adept in handling Word documents. You might have made numerous attempts in exploring Word templates and might have been fruitless, depressed and annoyed with all the alternatives and problems that you might have come across while trying to comprehend how to create tickets sample in Word.

Simple Movie Ticket Template

Details
File Format
- Illustrator
- MS Word
- Pages
- Photoshop
- Publisher
Size: 5.5×2 inches with Bleed
Download
Check out this simple movie ticket design that gives you complete freedom to personalize its content. It has an impressive design that is sure to go well with the moviegoers. You can edit and customize this ticket design template to suit the necessities of the upcoming movie. It is simple and hassle-free to use, so download now and take advantage of this minimal ticket template!
Vintage Expo Ticket Invitation Template

Details
File Format
- Illustrator
- Photoshop
- Word
- Publisher
- Pages
Size: 5.5×2 inches with Bleed
Download
Make use of this retro-themed ticket invitation look that is sure to keep the vintage lovers hooked for an upcoming event. This template is easy to use as it has customizable features and images that even beginners can take advantage of. This ticket design also comes with an attractive color scheme and well-written content that can be personalized to match your preference.
Blank Movie Ticket Template

Details
File Format
- Illustrator
- MS Word
- Pages
- Photoshop
- Publisher
Size: 5.5×2 inches with Bleed
Download
Here’s a ready-made movie ticket design that you can use to create movie tickets apart from also inviting people for a movie-themed party. This “Blank Movie Ticket” template comes with bright colors, striking designs, graphics, and layouts so that any user can customize this with ease. You can modify the content of this blank ticket template by using Adobe Photoshop, Illustrator, MS Word, Publisher, or Pages.
Why are Tickets Used?
These days, it is practically impossible to attend any event without a ticket! Yes, that is the level of prominence that a ticket holds. The ticketing system has been around for a really long time and if you are wondering why they are used in day-to-day life, it is to mainly show that an individual has paid for the services or event that he/she is about to attend. It basically acts as proof, which is why they are used everywhere! To name a few places where tickets are most commonly used, they would be transportation services, movies, exhibitions, sports events, entertainment shows, museums, and so on.
Simple Ticket Invitation Format

Details
File Format
- Illustrator
- Photoshop
- Word
- Publisher
- Pages
Size: 5.5×2 inches with Bleed
Download
Office Event Ticket Template

Details
File Format
- Illustrator
- Photoshop
- Word
- Publisher
- Pages
Size: 5.5×2 inches with Bleed
Download
Elegant Movie Ticket Template

Details
File Format
- Illustrator
- MS Word
- Pages
- Photoshop
- Publisher
Size: 5.5×2 inches with Bleed
Download
Blank Ticket Invitation Template

Details
File Format
- Illustrator
- Photoshop
- Word
- Publisher
- Pages
Size: 5.5×2 inches with Bleed
Download
Classic Movie Ticket Template

Details
File Format
- Illustrator
- MS Word
- Pages
- Photoshop
- Publisher
Size: 5.5×2 inches with Bleed
Download
Anniversary Event Ticket Template

Details
File Format
- Illustrator
- MS Word
- Pages
- Photoshop
- Publisher
Size: 5.5×2 inches with Bleed
Download
Date Night Movie Ticket Template

Details
File Format
- Illustrator
- MS Word
- Pages
- Photoshop
- Publisher
Size: 5.5×2 inches with Bleed
Download
Cartoon Movie Ticket Template

Details
File Format
- Illustrator
- MS Word
- Pages
- Photoshop
- Publisher
Size: 5.5×2 inches with Bleed
Download
Christmas Movie Ticket Template

Details
File Format
- Illustrator
- MS Word
- Pages
- Photoshop
- Publisher
Size: 5.5×2 inches with Bleed
Download
Vintage Movie Ticket Template

Details
File Format
- Illustrator
- MS Word
- Pages
- Photoshop
- Publisher
Size: 5.5×2 inches with Bleed
Download
Diamond Jubilee Event Ticket Template

Details
File Format
- Illustrator
- MS Word
- Pages
- Photoshop
- Publisher
Size: 5.5×2 inches with Bleed
Download
Old Time Movie Ticket Template

Details
File Format
- Illustrator
- MS Word
- Pages
- Photoshop
- Publisher
Size: 5.5×2 inches with Bleed
Download
Save The Date Movie Ticket Template

Details
File Format
- Illustrator
- MS Word
- Pages
- Photoshop
- Publisher
Size: 5.5×2 inches with Bleed
Download
Old School Movie Ticket Template

Details
File Format
- Illustrator
- MS Word
- Pages
- Photoshop
- Publisher
Size: 5.5×2 inches with Bleed
Download
Movie Theater Ticket Template

Details
File Format
- Illustrator
- MS Word
- Pages
- Photoshop
- Publisher
Size: 5.5×2 inches with Bleed
Download
The uncomplicated , straight forward and trouble free method for creating numbered tickets (movie ticket template) is to search for existing templates which can be modified and attuned to suit your requirements. Today umpteen numbers of Microsoft word files which provide a wide variety of ticket designs are available throughout the net space. You can either make use of them as they are or you are free to make them unique by making your own alterations. You can insert images or texts that you desire and make them your own!
Plane Boarding Ticket Template

Details
File Format
- Illustrator
- InDesign
- MS Word
- Photoshop
- Publisher
Size: A4
Download
Live Event Ticket Template

Details
File Format
- MS Word
- Photoshop
- Pages
- Publisher
Size: US
Download
Easy to Print Chalkboard Ticket Template

Details
File Format
- Illustrator
- InDesign
- MS Word
- Photoshop
- Publisher
Size: A4
Download
Multi-Purpose Show Ticket Template in PSD

Details
File Format
- Illustrator
- InDesign
- MS Word
- Photoshop
- Publisher
Size: A4
Download
Easy to Edit Event Ticket in Word

Details
File Format
- Photoshop
- Publisher
- MS Word
- Pages
Size: US
Download
Multipurpose Event Ticket

Details
File Format
- MS Word
- Pages
- Photoshop
- Publisher
Size: US
Download
Printable Music Concert Event Ticket

Details
File Format
- MS Word
- Publisher
- Pages
- Photoshop
Size: US
Download
Editable Rugby Tournament Ticket

Details
File Format
- MS Word
- Pages
- Photoshop
- Publisher
Size: US
Download
Subsequently you have to select the template named Raffle tickets 6 per page. Microsoft Word will make available a preview of the chosen template and then inquires whether you wish to download the particular template. Now choose the option to download. Consequently your current word document gets replaced with the template of raffle ticket which is ready to undergo editing in your hand.
Simple Festival Concert Ticket Template

Details
File Format
- MS Word
- Pages
- Photoshop
- Publisher
Size: US
Download
BBQ Event Ticket Template

Details
File Format
- Illustrator
- InDesign
- MS Word
- Pages
- Photoshop
- Publisher
Size: 2×5.5 inches + Bleed
Free Download
Birthday Admission Ticket PSD Template

Details
File Format
- Illustrator
- InDesign
- MS Word
- Pages
- Photoshop
- Publisher
Size: 2×5.5 inches + Bleed
Free Download
Simple Concert Admission Ticket Template

Details
File Format
- Illustrator
- InDesign
- MS Word
- Pages
- Photoshop
- Publisher
Size: 2×5.5 inches + Bleed
Free Download
Vintage Wedding Ticket Template

Details
File Format
- Illustrator
- InDesign
- MS Word
- Pages
- Photoshop
- Publisher
Size: 2×5.5 inches + Bleed
Free Download
Printable Fundraising Ticket Template

Details
File Format
- Illustrator
- InDesign
- MS Word
- Pages
- Photoshop
- Publisher
Size: 2×5.5 inches + Bleed
Free Download
Movie Admission Ticket Template to Edit

Details
File Format
- Illustrator
- InDesign
- MS Word
- Pages
- Photoshop
- Publisher
Size: 2×5.5 inches + Bleed
Free Download
If you are wondering how to create tickets in Word, Your burden will be lessened if you follow the below mentioned steps carefully:
The very first step you need to do is to drag your cursor towards the Help icon in the new word document. This icon usually appears in the right part of the top portion of the tool bar listing. It is depicted by a question mark symbol. You have to left click on this menu with your mouse and you need to opt from the type of help listed in the drop-down carte du jour. (Ticket Invitation Templates Download)
Now click on the Microsoft Office Word Help option. Consequently, to the right side of the word document, a support box will pop up. You can easily look for the option Search for and after you find this box, you need to type Create numbered tickets and hit on the green arrow. This Help feature will do all the work for you and it will enlist a number of relevant choices in the area of your search. (501 Microsoft Templates)

Currently, look for the option your organization name on the downloaded template and bring the cursor over it so as to type the name of your organization or charity concerns, for whichever purpose the ticket is intended for.

Now it’s time to edit all the text to check for the exact date, rewards, and prizes. You can modify or delete whatever is not applicable. Care has to taken to highlight significant words in the text of the template. There are even options to change the style and size of the font of your characters.
Drag your cursor on the Font toolbar on the top of the ms word document and formulate necessary alterations. If you are troubling to find ways to include images to make your ticket look appealing and rich, then you need not worry. Just put your cursor on the Insert option in the toolbar and hit on it to add appropriate images befitting the occasion.

Now, what if you want to create multiple tickets for your organization? It is a hassle-free and easy process. Once you have done with your editing and typing of the document, you just need to copy and paste the complete word template over and over again to generate multiple tickets.

At this point of time, do not forget to bring up to date the series of numbers of tickets already copied. This can be achieved by just highlighting the number and hitting on the right side of the mouse. The word document will let down a drop-down menu that will provide you all the necessary options to revise and keep up to date the field.
After facilitating appropriate modifications, the number in the ticket series will automatically get updated by the system. Another key factor that you have to bear in mind before clicking on the print option is to check whether the tickets are updated without any errors.
More in Tutorials
1. Open Microsoft Word, pull down the ‘File’ menu and click ‘New.’ When the ‘New Document’ pane appears, type ‘ticket’ into the ‘Search online for…’ box and click ‘Go.’
2. Scroll through the ticket templates, such as single-event tickets, raffle tickets and tour tickets. Click the ‘Download’ button for the ticket type you want. The template opens in the Word workspace.
3. Click with your cursor in the top left of the ticket on the template (if you have chosen a template with multiple tickets per page). Click inside one of the text boxes on the ticket and type a number, such as 0001.
4. Highlight the number text and use the text toolbar at the top of the page to increase its size, change its color and change its font, as you wish.
5. Make any other changes to the wording on the rest of the ticket, such as changing the preset placeholder template text to your own charity event’s name, date and location.
6. Highlight all of the new text, including the new number, on the top-left ticket. Press the ‘Ctrl’ and ‘C’ keys to copy the information. Click into the next ticket on the template and highlight the placeholder text. Press the ‘Ctrl’ and ‘V’ keys to paste your information directly over the template ticket and repeat for the rest of the tickets on the page. Click into each ticket separately and change the number on the ticket. This ensures that each ticket has the same basic text.
7. Pull down the ‘File’ menu, click ‘Save As,’ give the file a name and save it to your computer.
INTELLIGENT WORK FORUMS
FOR COMPUTER PROFESSIONALS
Contact US
Thanks. We have received your request and will respond promptly.
Log In
Come Join Us!
Are you a
Computer / IT professional?
Join Tek-Tips Forums!
- Talk With Other Members
- Be Notified Of Responses
To Your Posts - Keyword Search
- One-Click Access To Your
Favorite Forums - Automated Signatures
On Your Posts - Best Of All, It’s Free!
*Tek-Tips’s functionality depends on members receiving e-mail. By joining you are opting in to receive e-mail.
Posting Guidelines
Promoting, selling, recruiting, coursework and thesis posting is forbidden.
Students Click Here
Numbered tickets in WordNumbered tickets in Word(OP) 9 Sep 03 11:14 I am trying to use Word to create a repeating block of text, which recurs three times on each page — they’re actually tickets to a concert. However, I want to number each ticket individually. I’ve thought of using the Envelopes and Labels wizard to create the repeated text, but I can’t find a way of numbering labels. I also wondered about using a 1 x 3 table and numbering the cells somehow. Any ideas? Duncan Red Flag SubmittedThank you for helping keep Tek-Tips Forums free from inappropriate posts. |
Join Tek-Tips® Today!
Join your peers on the Internet’s largest technical computer professional community.
It’s easy to join and it’s free.
Here’s Why Members Love Tek-Tips Forums:
 Talk To Other Members
- Notification Of Responses To Questions
- Favorite Forums One Click Access
- Keyword Search Of All Posts, And More…
 Talk To Other Members
Register now while it’s still free!
Already a member? Close this window and log in.
Join Us Close
- May 12, 2011

Numbering Raffle Tickets in Microsoft Word (Video)
Video Tutorial Presented in Microsoft Word 2010
Want to Skip Manually Numbering Your Tickets?
Whether they’re getting ready to win or ready to enter your big event, your guests will love the thrill of entering with our raffle tickets. Each ticket comes with a twin ticket, which means you get to keep one while they keep the other – there’s no memorizing of entry numbers with these ticket! Also the number of the ticket remains with your patrons as long as the ticket does! Plus, with the great selection of colors we offer, the ticket isn’t going to get lost any time soon.
Numbering Raffle Tickets in Microsoft Word (Text Tutorial — Microsoft Word 2003)
This is a step-by-step tutorial of how to number your raffle tickets. It is also a great way to learn how to use Microsoft Word’s Mail Merge functionality. When you are going through, there are many times when dialog boxes or other pop-ups may occur. Scroll down and learn how to make event tickets on Microsoft Word.
- Download the Raffle Tickets template from our website – Raffle Ticket Template
- Click on the raffle_tickets-template.doc document to open in Microsoft Word. When you open the document, you will see the raffle ticket layout.
- To begin, navigate to Tools > Letters & Mailings > Mail Merge
- Next, a Mail Merge Wizard should have popped up. Sometimes the Mail Merge Wizard is displayed to the right of the screen.
- In the Mail Merge Dialog, you should select “Letters” if it is not already selected. Then, click “Next: Starting Document” to move on
- Now, in the Mail Merge Dialog, you should select “Use the current document” if it is not already selected. Then, click “Next: Select Recipients” to move on.
- Now, in the Mail Merge Dialog, you should select “Use an existing list” if it is not already selected. Then, click on Browse to locate your excel file. If you are looking for a number series file, you can download our version here – Number Series
- A Dialog will pop up displaying the Excel Sheet name of the data you are importing. Simply click OK.
- Next, another dialog will pop up displaying the data from the excel file. Simply click OK to move on.
- Now you are ready to begin inserting your data. To make everything easier, please be sure to have your Mail Merge Toolbar visible. You can enable it by going to Tools > Letters and Mailings > Show Mail Merge Toolbar (displayed in step 3 of this document)
- I recommend designing just your first raffle ticket. Then we will insert ticket numbers.
- To insert your ticket numbers, first click the area where you want the number to go. Then, click on Insert Merge Fields. A Dialog will pop up and “Numbers” should be selected. Click OK. You should see “<>” inserted into your document. You can insert the <> anywhere you want on the ticket and as many times as you wish.
- Now, I recommend copy & pasting your first ticket into the other 4 raffle ticket spots.
- Now, you need to make each row know to move to the next record. Basically, you on each ticket you want to first move to the next number before displaying any ticker numbers <>. To do this, select the space right before the first <> in your second raffle ticker. When you have that space selected, click on Insert Word Field > Next Record
- Now, on the second ticket, the first number spot should read <><>.
- Repeat step 14 once for each ticket on the sheet. Here is a sample screen shot below.

- Once the first 5 tickets are complete, you can test your first page out by clicking on the “View Merged Data” button. The icon looks like
- When you are ready to print, you will need to either merge the data to a new document or straight to your printer. I recommend merging to a new document so you can preview the entire thing before printing. The icons look like (Merge to Document, Merge to Printer)
- Once you click on this icon, a dialog will pop up asking you what data you wish to merge. You can either merge all the data (All numbers in the excel file), current record (just 1 sheet), or select a range. I recommend selecting a range, as the Excel file packs contains numbers up to 10,000.
- That’s it! You should be all set to print your raffle tickets!


 (Merge to Document, Merge to Printer)
Now that you’re an expert at numbering raffle tickets in Microsoft Word, try adding your own personal touch to your tickets.
More About 
Since 1995, we’ve hung our hats on delivering quality paper with an exceptional customer experience. When shopping with us, you’ll discover a wide range of blank business cards, cardstock, stationery, greeting cards, menus, and more! If you ever have any questions, please don’t hesitate to reach out.
Recent posts