
Create a bulleted or numbered list

Create a list
To start a numbered list, type 1, a period (.), a space, and some text. Word will automatically start a numbered list for you.
Type* and a space before your text, and Word will make a bulleted list.
To complete your list, press Enter until the bullets or numbering switch off.
Create a list from existing text
-
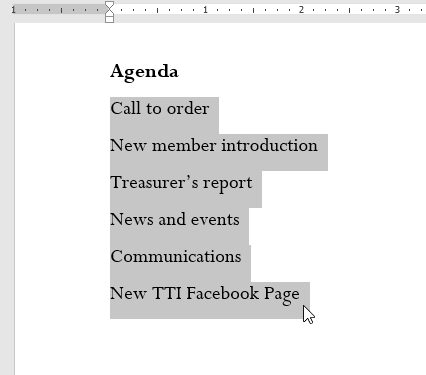
Select the text you want to change into a list.
-
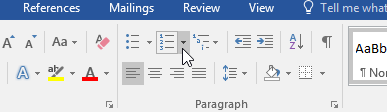
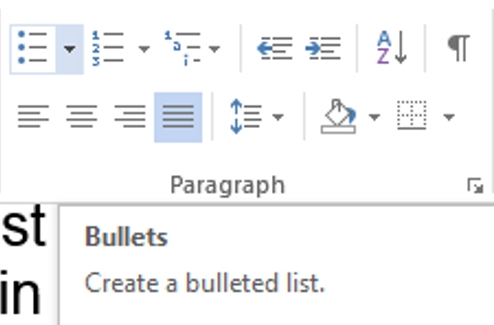
Go to Home> Bullets or Home> Numbering.

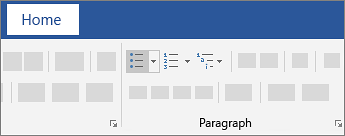
Note: Find different bullet styles and numbering formats by clicking the down arrow next to Bullets or Numbering.
See Also
Add and format text
Change the line spacing in Word
Apply styles
Apply themes
Need more help?
This tutorial shows two ways to create numbered lists in Microsoft Word. We will also look at how to change list levels, start with a different list number, and change the font, size, and color of list numbers.
Do you want to create bulleted lists? Please see my previous tutorial “How to Create Bulleted Lists in Microsoft Word.”
What about Lists Ordered by Letters?
For simplicity, this tutorial refers to “numbered lists” because Word organizes all ordered (hierarchical) list options in the Numbering Library. However, all the steps shown here also apply to lists organized by letters.
If you would like to learn more about ordered and unordered lists, please see “How to Write Vertical Lists (Ordered and Unordered).”
Table of Contents
- How to Create a Numbered List — Basic Method 1
- How to Create a Numbered List — Basic Method 2
- How to Change Numbered List Levels
- How to Start a List with a Different Number
- How to Change the Font, Size, and Color of List Numbers
Watch all the steps shown here in real time!
Explore more than 200 other writing-related software tutorials on my YouTube channel.
The images below are from Word for Microsoft 365. These steps also apply to Word 2021, Word 2019, Word 2016, and Word 2013.
The basic steps are similar in Word for Mac. However, the more advanced steps, such as starting a list with a different number, are different on Mac. So, we will cover this topic for Word for Mac in a separate tutorial.
How to Create a Numbered List — Basic Method 1
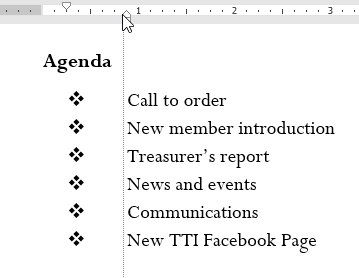
This is the basic method to create a numbered list in Word. This method requires you to type each item as you create the list. If you have already typed your list items, see Method Two below.
- Place your cursor where you want to start your list.
- Select the Home tab in the ribbon.

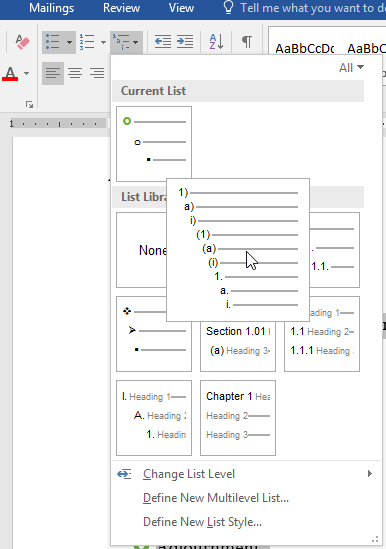
- Select the menu arrow next to the Numbering button.
![]()
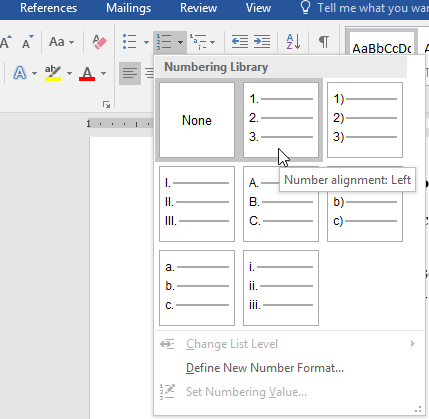
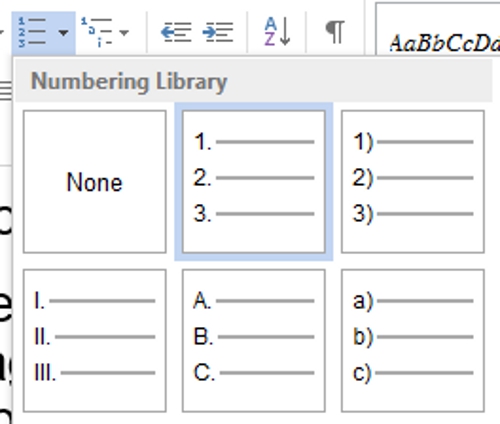
- Choose a number style from the Numbering Library.

The number one will appear in your document.

- Type your first list item after the number, and then press the Enter key on your keyboard. The next number will appear.

Continue typing your list items and pressing the Enter key until your list is complete.
- After typing the final item, press the Enter key twice to remove your cursor from the list.
How to Create a Numbered List — Basic Method 2
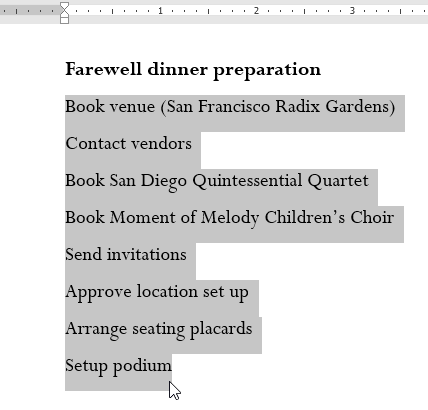
This method is for existing text formatted vertically as a list.
- Select the text.

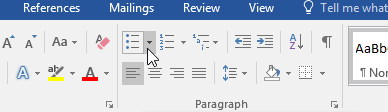
- Select the Home tab in the ribbon (see figure 1).
- Select the menu arrow next to the Numbering button (see figure 2).
- Choose a style from the Numbering Library (see figure 3).
Your selected items should become a numbered list.

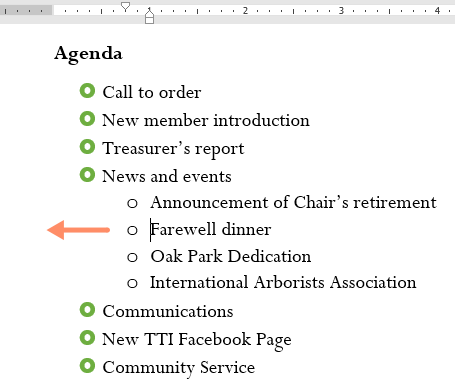
How to Change Numbered List Levels
Word lets you create numbered lists with up to nine nested levels. Here are two ways to change the level of list items.
Change List Levels — Method 1
Important note: This method won’t work for the first item in your list.
- Select one or more list items (other than the first item).

- Select the Home tab in the ribbon (see figure 1).
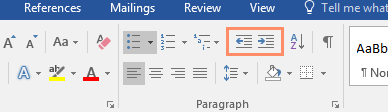
- Select the Increase Indent button in the Paragraph group.

Each time you select the Increase Indent button, the item(s) will move one level and take on the appropriate format for that level (e.g., lowercase letters, roman numerals, etc.).

Pro Tip: To return the selected text to a previous level, select the Decrease Indent button to the left of the Increase Indent button.
Change List Levels — Method 2
- Select one or more list items (see figure 8).
- Select the Home tab in the ribbon (see figure 1).
- Select the menu arrow next to the Numbering button (see figure 2).
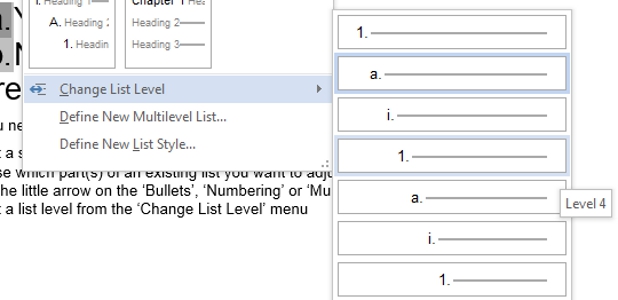
- Select Change List Level from the drop-down menu.

- Select a list level from the list-level menu.

Your list item(s) should move to the next level.
How to Start a List with a Different Number
You can start a list with a number other than one or continue the numbering from the previous list.
- Select the first list number or place your cursor within the first list item. If you select the list number, all numbers on that level should also be selected.

- Select the Home tab in the ribbon (see figure 1).
- Select the menu arrow next to the Numbering button (see figure 2).
- Select Set Numbering Value from the drop-down menu.

5.a. Enter the number you want to start with in the Set value to text box in the Set Numbering Value dialog box.

5.b. (Alternative Option) Select Continue from previous list if you want to continue the numbering from a previous list in your document.

- Select the OK button.

Your list should be renumbered according to your selections in the Set Numbering Value dialog box.
How to Change the Font, Size, and Color of List Numbers
By default, the font, size, and color of your list numbers will be the same as your normal text style. However, you can manually change the appearance of list numbers by selecting them separately from the text.
- Select one list number. All numbers on that level should also be selected.

- Select the Home tab in the ribbon (see figure 1).
- Select a new font, size, or color from the Font group.

Your list numbers should change to the new formatting. Repeat these steps for each level in your list, as necessary.

Related Resources
How to Write Run-In Lists
How to Create and Update a List of Tables or Figures in Microsoft Word
How to Create Numbered Lists in PowerPoint (PC & Mac)
Updated February 12, 2023
Numbered lists are similar to bulleted lists, except that instead of bullets, Word places sequential
numbers in the front of the first line. This feature is handy because if you add a paragraph in the middle
of a numbered list or rearrange the order of the paragraphs in a list, Word automatically renumbers the
paragraphs so that they retain their sequence.
Numbered lists, also named as ordered lists, are used to convey a sequential
process. An ordered list always uses numbers, letters, or roman numerals for each item.
Create a numbered list using the keyboard (using AutoCorrect)
Microsoft Word, by default, automatically changes some symbols with the followed point or closing
parenthesis and space, if you type them in the first position of the line, to the numbered lists. Some
examples:
To create a numbered list, just type the appropriate symbols with the following space:

Note: If Word doesn’t automatically change these symbols, check the AutoCorrect
setting for lists (see
how to
turn off the automatic creation of bulleted and numbered lists).
Create a numbered list using the mouse
To create a numbered list, follow the next steps:
1. Type your list, and then select it.
2. Do one of the following:
- On the Home tab, in the Paragraph group, click the Numbering button:

- Right-click on the selection and choose the Numbering button on the Mini toolbar:


Word creates the numbered list with the last used type of the numbering or with the digit 1 and
the point, used by default. You can find different numbering formats by clicking the arrow next to
Numbering:

3. To add additional numbered items to your list, move the insertion
point to the end of a line formatted with a number and press Enter:

4. Move the insertion point to the end of the last numbered item on your
list. Press Enter and then Del, or press Enter and click the Numbering
button again on the Home tab, in the Paragraph group, to turn off the number formatting:

Note: More details are available in the
Numbered lists
section in the
Work with bulleted, numbered and multi-level lists
lesson of the
Create basic documents
free course.
See also Customizing numbered lists.
See also this tip in French:
Comment créer des listes numérotées ou listes à puces.
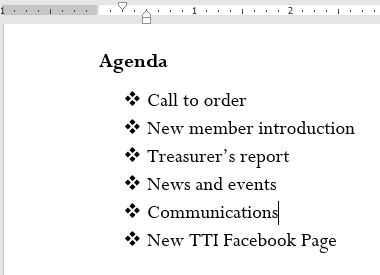
Simple bullet lists are easy to create. The standard black round bullets work well, but your document really comes to life when you create some custom bullets using different symbols and colour.
Likewise, single-level numbering is easy to set up.
Then there is multi-level numbering and that’s a whole different animal. It’s too big to cover here so I have created a separate post that shows you how to set up multilevel numbering properly.
Clickable Table of Contents
1. What is a numbered list?
Numbered lists are used to show the steps of a process or sequence. The order is important.

2. What is a bullet list (a.k.a. dot points)?
Bullet lists are used to show two or more points or items. The order is not important.

3. When to use numbered lists vs bullet lists
Think of a recipe.
First, you need a list of ingredients. The order in which you list the ingredients is irrelevant so bullet points, also called dot points are perfect.
However, when you are following the recipe, the order is important, so you would use a numbered list to show each step of the recipe.
4. One-click bullets
# Create a new bullet list
1. Select the items to which you want to add bullets.

2. Select the HOME tab.
3. Click the bullet icon in the Paragraph group.
![]()
Standard black round bullet symbols are added to each item.

# Delete a bullet item
If you delete a line (a bullet item), the rest of the list closes to fill the gap.

# Add a bullet item
If you place your cursor at the end of a bullet item and press ENTER, a new bullet item is added on the next line.

# End a bullet list
If you place your cursor at the end of the last bullet item and press ENTER twice, the bullet list is ended.

5. One-click numbers
To create a numbered list:
1. Select the items that you want to number.

2. Select the HOME tab.
3. Click the Numbering icon in the Paragraph group.
![]()
The items are now numbered sequentially.
# Delete a bullet item
If you delete a line (a numbered item), the numbering for the remaining list adapts so the numbering is always sequential.

# Add a bullet item
If you place your cursor at the end of a numbered item, then press Enter, a new blank numbered item is added to the next line (with the correct number), ready to be populated. The numbers in the rest of the list adapt so the numbers remain sequential

# End a bullet list
If you place your cursor at the end of the last numbered item and press ENTER twice, the numbered list is ended.

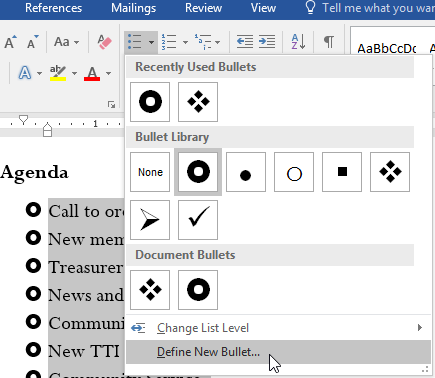
6. Custom symbol bullets
# Choose a different bullet symbol
1. Select your list of items
2. Select the HOME tab.
3. Click the drop-down arrow next to the bullet icon in the Paragraph group.
A gallery of default or previously-used bullet styles is displayed.
4. Click on any bullet style to use it.

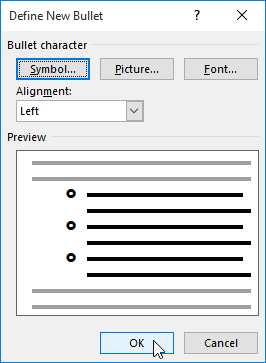
# Define a new symbol bullet
1. Click Define New Bullet.
2. Click the Symbol button to display the symbol gallery.

3. Choose a font from the drop-down list at the top.
Good symbol fonts are Wingdings, Wingdings2, Wingdings3 and Webdings
4. Select a symbol from the gallery.
5. Click OK

# Define a new picture bullet
1. Select your list of items
2. Select the Home tab.
3. Click the drop-down arrow next to the bullet icon in the Paragraph group.
4. Click Define New Bullet.
5. Click the Picture button to display the symbol gallery
You can use a picture from three different places

To select a picture that is already stored on your computer
1. Click FROM A FILE.
2. Locate the picture and select it.

To search for an image online:
1. Click BING IMAGE SEARCH.
2. Type a keyword or phrase that describes the kind of bullet picture you want.
3. Select one from the gallery.
4. Click Insert
You are responsible for respecting creators rights including copyright.

To use an image store on your OneDrive (cloud):
1. Click ONEDRIVE.
2. Sign in if necessary.
3. Locate and select the image file.
7. Adding symbols anywhere in your document
You may insert all kinds of symbols into your document such as copyright symbols, tick/check marks, crosses or phone/mobile/cell.
To insert a symbol anywhere in your document:
1. Select the INSERT tab.
2. Click Symbol (on the right-hand side)
3. Choose MORE SYMBOLS to display the symbol gallery.
4. Even standard fonts like Arial and Calibri contain many more characters that you can find on the keyboard. For example, ©, », and ¼.
5. There are lots of fonts and symbols to explore, but if you start experimenting with different fonts from the drop-down list, you’ll discover another whole world.
6. Select a symbol from the gallery.
7. Click Insert

8. Summary
- Single-level bullets or numbers can be applied to a list by clicking the bullet icon or the number icon in the Paragraph group on the Home tab.
- Bullet lists are used where the order is irrelevant (like a list of ingredients).
- Custom bullets can be created by selecting a symbol from the symbol library, an icon from the icon library or by selecting an image from your computer or a fresh Bing image search.
- Numbered lists are used where the order is important (like the instructions for a recipe).
I hope you found plenty of value in this post. I’d love to hear your biggest takeaway in the comments below together with any questions you may have.
Have a fantastic day.


About the author
Jason Morrell
Jason loves to simplify the hard stuff, cut the fluff and share what actually works. Things that make a difference. Things that slash hours from your daily work tasks. He runs a software training business in Queensland, Australia, lives on the Gold Coast with his wife and 4 kids and often talks about himself in the third person!
SHARE

Creating and removing numbered lists in Word is easy using the “Numbering” command on the ribbon. However, if you prefer using the keyboard, there is a way to quickly create a numbered list using a keyboard shortcut.
We will add a keyboard shortcut to the command for creating numbered lists. To do so, right click anywhere on the ribbon and select “Customize the Ribbon” from the popup menu.

The “Customize the Ribbon and keyboard shortcuts” screen displays on the “Word Options” dialog box.
On the “Customize Keyboard” dialog box, select “All Commands” in the “Categories” list.
Scroll down in the “Commands” list and select “FormatNumberDefault”.
Put the cursor in the “Press new shortcut key” edit box and press the shortcut key combination you want to use to create a numbered list. We used “Alt + N” because it’s not assigned to anything else in Word. Click “Assign”.
The new keyboard shortcut is added to the “Current keys” list.
If you made other changes on the “Word Options” dialog box (not a sub-dialog), click “OK” to accept your changes and close the dialog box. Otherwise, click “Cancel”.
To remove the number from a numbered list item, simply press the keyboard shortcut again. The number and the paragraph indent are removed. You can also press “Ctrl + Q” to remove paragraph numbering, but this leaves the paragraph indented.
Word can also automatically create a numbered list, however you can turn off this feature.
READ NEXT
- › How to Add Bullet Points in Word
- › How to Cross-Reference in Microsoft Word
- › How to Change the Alignment of the Numbers in a Numbered List in Microsoft Word
- › Google Chrome Is Getting Faster
- › BLUETTI Slashed Hundreds off Its Best Power Stations for Easter Sale
- › The New NVIDIA GeForce RTX 4070 Is Like an RTX 3080 for $599
- › This New Google TV Streaming Device Costs Just $20
- › HoloLens Now Has Windows 11 and Incredible 3D Ink Features
How-To Geek is where you turn when you want experts to explain technology. Since we launched in 2006, our articles have been read billions of times. Want to know more?
Lesson 10: Lists
/en/word/line-and-paragraph-spacing/content/
Introduction
Bulleted and numbered lists can be used in your documents to outline, arrange, and emphasize text. In this lesson, you will learn how to modify existing bullets, insert new bulleted and numbered lists, select symbols as bullets, and format multilevel lists.
Optional: Download our practice document.
Watch the video below to learn more about lists in Word.
To create a bulleted list:
- Select the text you want to format as a list.
- On the Home tab, click the drop-down arrow next to the Bullets command. A menu of bullet styles will appear.
- Move the mouse over the various bullet styles. A live preview of the bullet style will appear in the document. Select the bullet style you want to use.
- The text will be formatted as a bulleted list.

Options for working with lists
- To remove numbers or bullets from a list, select the list and click the Bulleted or Numbered list command.
- When you’re editing a list, you can press Enter to start a new line, and the new line will automatically have a bullet or number. When you’ve reached the end of your list, press Enter twice to return to normal formatting.
- By dragging the indent markers on the Ruler, you can customize the indenting of your list and the distance between the text and the bullet or number.
To create a numbered list:
When you need to organize text into a numbered list, Word offers several numbering options. You can format your list with numbers, letters, or Roman numerals.
- Select the text you want to format as a list.
- On the Home tab, click the drop-down arrow next to the Numbering command. A menu of numbering styles will appear.
- Move the mouse over the various numbering styles. A live preview of the numbering style will appear in the document. Select the numbering style you want to use.
- The text will format as a numbered list.
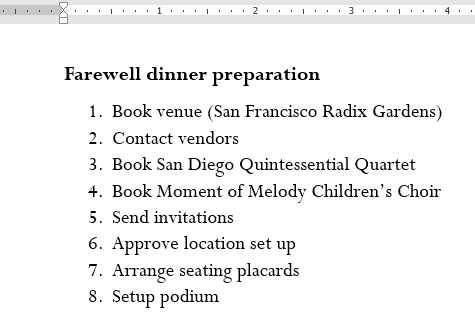
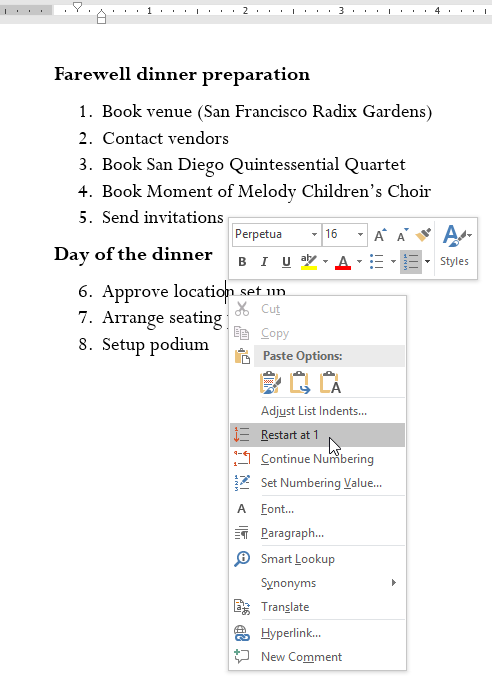
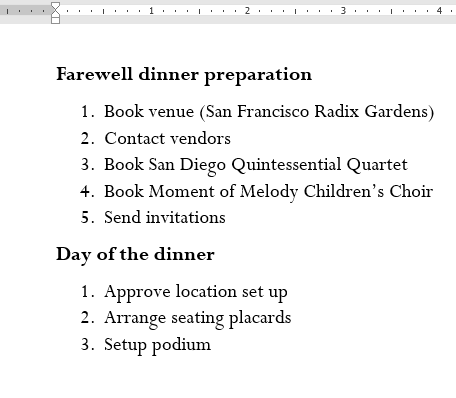
To restart a numbered list:
If you want to restart the numbering of a list, Word has a Restart at 1 option. It can be applied to numeric and alphabetical lists.
- Right-click the list item you want to restart the numbering for, then select Restart at 1 from the menu that appears.
- The list numbering will restart.
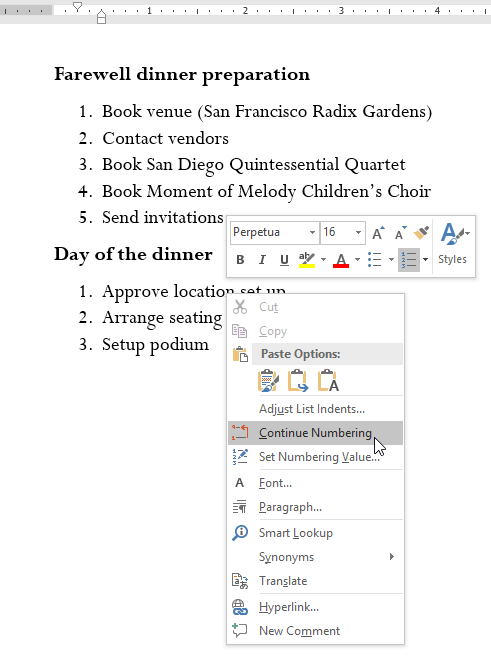
You can also set a list to continue numbering from the previous list. To do this, right-click and select Continue Numbering.
Customizing bullets
Customizing the look of the bullets in your list can help you emphasize certain list items and personalize the design of your list. Word allows you to format bullets in a variety of ways. You can use symbols and different colors, or even upload a picture as a bullet.
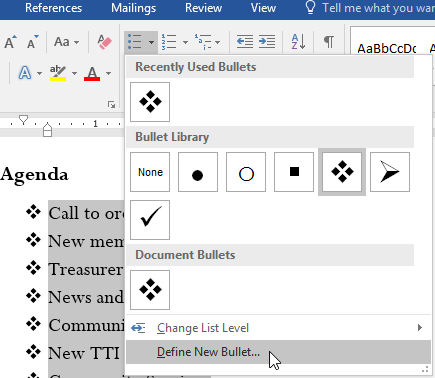
To use a symbol as a bullet:
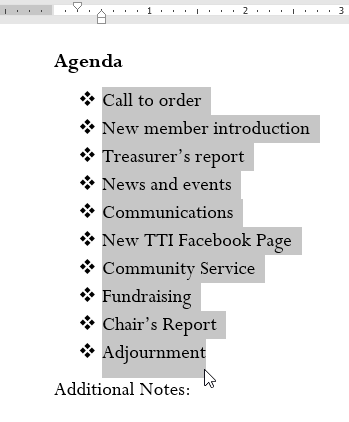
- Select an existing list you want to format.
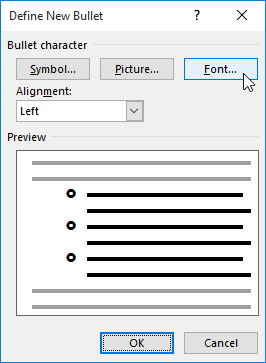
- On the Home tab, click the drop-down arrow next to the Bullets command. Select Define New Bullet from the drop-down menu.
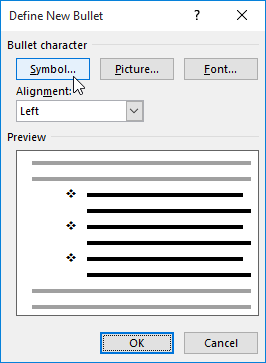
- The Define New Bullet dialog box will appear. Click the Symbol button.
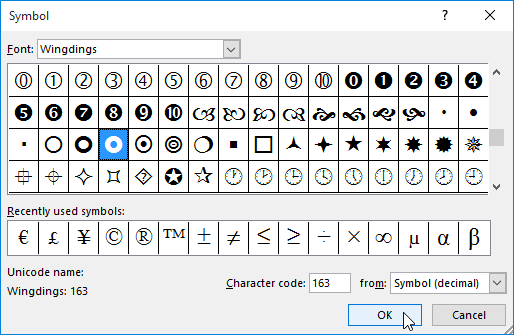
- The Symbol dialog box will appear.
- Click the Font drop-down box and select a font. The Wingdings and Symbol fonts are good choices because they have many useful symbols.
- Select the desired symbol, then click OK.
- The symbol will appear in the Preview section of the Define New Bullet dialog box. Click OK.
- The symbol will appear in the list.
To change the bullet color:
- Select an existing list you want to format.
- On the Home tab, click the drop-down arrow next to the Bullets command. Select Define New Bullet from the drop-down menu.
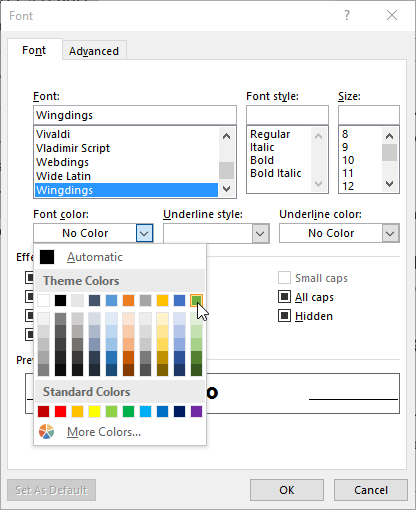
- The Define New Bullet dialog box will appear. Click the Font button.
- The Font dialog box will appear. Click the Font Color drop-down box. A menu of font colors will appear.
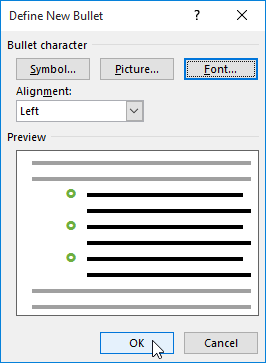
- Select the desired color, then click OK.
- The bullet color will appear in the Preview section of the Define New Bullet dialog box. Click OK.
- The bullet color will change in the list.
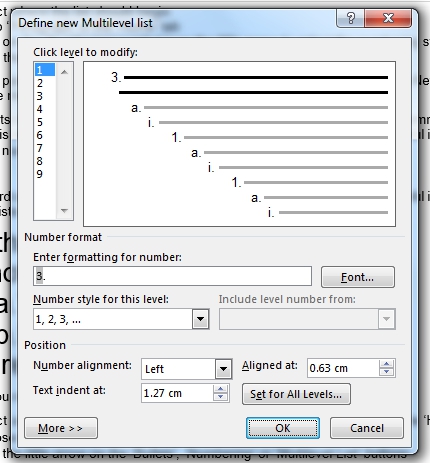
Multilevel lists
Multilevel lists allow you to create an outline with multiple levels. Any bulleted or numbered list can be turned into a multilevel list by using the Tab key.
To create a multilevel list:
- Place the insertion point at the beginning of the line you want to move.
- Press the Tab key to increase the indent level of the line. The line will move to the right.
To increase or decrease an indent level:
You can make adjustments to the organization of a multilevel list by increasing or decreasing the indent levels. There are several ways to change the indent level.
- To increase the indent by more than one level, place the insertion point at the beginning of the line, then press the Tab key until the desired level is reached.
- To decrease the indent level, place the insertion point at the beginning of the line, then hold the Shift key and press the Tab key.
- You can also increase or decrease the levels of text by placing the insertion point anywhere in the line and clicking the Increase Indent or Decrease Indent commands.
When formatting a multilevel list, Word will use the default bullet style. To change the style of a multilevel list, select the list, then click the Multilevel list command on the Home tab.
Challenge!
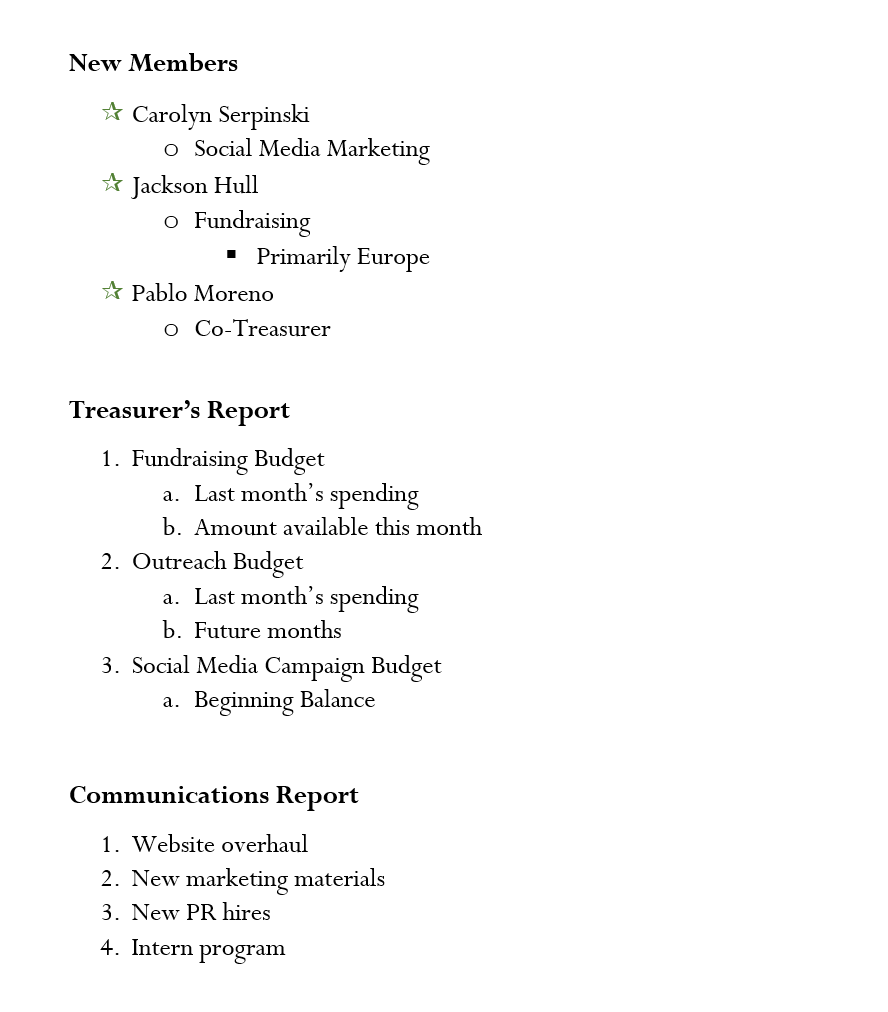
- Open our practice document.
- Scroll to page 3.
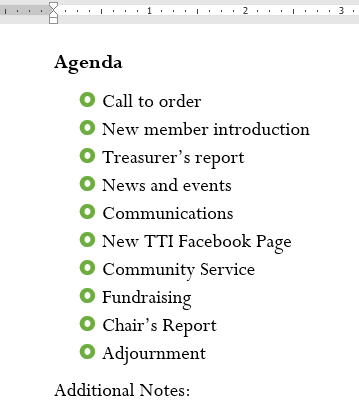
- Select the text under New Members starting with Carolyn and ending with Co-Treasurer, and format it as a bulleted list.
- With the text still selected, use the Define New Bullet dialog box to change the bullets to a green star. Hint: You can find a star in the Wingdings font.
- Increase the indent level by 1 for the lines Social Media Marketing, Fundraising, and Co-Treasurer.
- Increase the indent level by 2 for the line Primarily Europe.
- In the Treasurer’s Report list, decrease the indent level by 1 for the line Amount available this month.
- In the Communications Report list, restart the numbering at 1.
- When you’re finished, your page should look something like this:

/en/word/links/content/
Although most of an academic paper should be written with full sentences divided up into paragraphs, bullet points and numbered lists can be useful in some contexts. For instance, vertical lists are particularly useful when giving examples or reporting steps in a process.
Microsoft Word also makes adding lists to a document reassuringly simple. All you need to do is follow the instructions below.
Using Bullet Points in an Essay
Bullet points are useful when listing things non-sequentially (i.e., when there is no specific order in which the items involved should be listed). They should also be reserved for longer lists, as short lists of up to three or four items can be included in the main text.
To add a bullet pointed list to a document in Microsoft Word 2007 or later, simply:
- Place the cursor where you want the list to begin
- Go to “Paragraph” under the “Home” tab on the main ribbon

“Paragraph” options. - Click the “Bullets” button to begin a list (you can select the type of bullet point you want by using the arrow to open a new menu)
- Type the first entry in your list, hitting “Enter” to start the next one
To end your list, hit “Enter” twice after the final item. You can even customize your bullet points with an image of your choosing for a little extra color. We like using eagles, but we admit that this probably isn’t appropriate for most academic documents.

Using Numbered Lists
Numbered lists are appropriate when listing items sequentially or in order of importance. The process for adding a numbered list to a document is similar to adding a bulleted list:
Find this useful?
Subscribe to our newsletter and get writing tips from our editors straight to your inbox.
- Select where you want to begin your list
- Go to the “Paragraph” section of the “Home” tab
- Click the “Numbering” button (you can select a numbering style from the dropdown menu by clicking the arrow)

The “Numbering” options. - Type your first entry, then hit “Enter” to create the next one
As with bulleted lists, you end a numbered list by hitting “Enter” twice after the final item. For more control over the style, select “Define New Number Format” in the numbering menu.
Using Multilevel Lists
Finally, if you really want to push the boat out, you can use a “Multilevel” list. This is useful if you want to include sub-lists within a main list, like in the following:

To add a list like this to your document, you’ll have to:
- Select a list style under “Multilevel List” in the “Paragraph” section of the “Home” tab

Multilevel list options. - Write out your list as normal, beginning each item on a new line
- To adjust the “level” of any given point, simply open the “Multilevel List” menu and select the appropriate option from the “Change List Level” submenu

Changing list level.

As with the other lists discussed here, you can customize the style of multilevel lists by selecting “Define New Multilevel List” from the menu. This will open a new window where you can modify each level of your chosen list style as required.
Updated: 11/30/2020 by
This page should answer any of the questions you may have about creating different bulleted and numbered lists in Microsoft Word including any advanced lists. This page applies to Microsoft Word 2000, however, other versions of Microsoft Word should have similar steps.
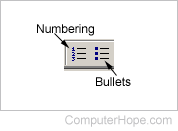
The numbering and bullets button on the formatting toolbar on the top-left of the screen is illustrated above.
How to create a bullet list in Microsoft Word
To create a bulleted list in Microsoft Word, follow the steps below.
- Position the cursor where you want to insert the bullet list.
- On the Home tab in the Ribbon, click the bullet list button, as shown at the top of the page.
- If successful, a bullet should appear. Type any text and press Enter to start the next bullet. To end the bullet list, press Enter twice.
Below is an example of a bullet list.
- One bullet
- Two bullet
How to create a numbered list in Microsoft Word
To create a numbered list in Microsoft Word, follow the steps below.
- Position the cursor where you want to insert the number list.
- On the Home tab in the Ribbon, click the number list button, as shown at the top of the page.
- If successful, a number one should appear. Type any text and press Enter to start the next number in the numbered list. To end the numbered list, press Enter twice.
Above is an example of a numbered list.
How to create a numbered list with letters
To create a numbered list that also contains a letter list in Microsoft Word, follow the steps below.
- Position the cursor where you want to insert the number list.
- On the Home tab in the Ribbon, click the down arrow next to the number list button.
![]()
- In drop-down window that appears, select one of the numbered list options with letters.
- Type the text for the first lettered bullet item.
- Press Enter to add additional lettered bullet items.
Below is an example of a numbered list using letters instead of numbers.
A. First bullet using letter
B. Second bullet using letter
C. Third bullet using letter
To create a numbered list that also contains a letter list in Microsoft Word, follow the steps below.
- Position the cursor where you want to add a bulleted item using a letter.
- Press Enter and then Tab.
- Press Enter again to add additional lettered bullet items.
Below is an example of a numbered list with letters in it.
- One numbered
- Two numbered
a. Two numbered again
b. Two numbered again - Final numbered
How to create multiple paragraphs without creating a new bullet or number
In some situations, you may need to have multiple paragraphs in a numbered or bulleted list. To do this, follow the steps below.
- Position the cursor where you want to insert the number list.
- Either click the number button or bullet button (as shown at the beginning of the document) or click Format and then Bullets and Numbering.
- When you’re ready to insert a new line without creating a new bullet or number, press Shift+Enter.
Below is an example.
- One numbered.
- Two numbered.
More text without a number.
- Final numbered.
How to create a bullet list with a numbered list
To create a numbered list that also contains a letter list in Microsoft Word, follow the steps below.
- Position the cursor where you want to insert the number list.
- Either click the bullets button (as shown at the beginning of the document) or click Format and then «Bullets and Numbering…»
- When ready to insert a numbered list in the bullets, press the bullets button or click Format and then «Bullets and Numbering…»
- When you need to switch back to bullets, click the numbering button again or click Format and then «Bullets and Numbering…»
How to create a numbered list with a bulleted list
To create a numbered list that also contains a letter list in Microsoft Word, follow the steps below.
- Position the cursor where you want to insert the number list.
- Either click the number button (as shown at the beginning of the document) or click Format and then «Bullets and Numbering…»
- When ready to insert a bullet list in the numbered list, press the numbering button or click Format and then «Bullets and Numbering…»
- When you need to switch back to the numbered list, click the bullets button again or click Format and then «Bullets and Numbering…»
How to change the bullets used or change the appearance of the numbers
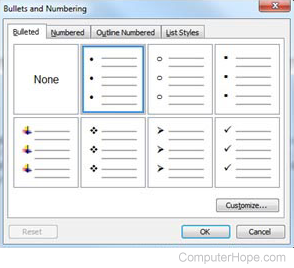
After creating the numbering list or the bullets list, if you need to change the appearance, click Format and then the «Bullets and Numbering…» option. You can adjust the format through the new Bullets and Numbering window. Below, is an example of what this window may look like in Microsoft Word.
In the article bellow, we will show you 4 ways to create a multi-column bulleted or numbered list in your Word document.
When we start a bulleted or numbered list, each list entry is considered as a paragraph. And there is no direct way to create 2 paragraphs side by side in Word document. This seems creating a multi-column list is not possible, either.
True. There is no direct way. But, you can always find effectual workarounds in our article.
Method 1: Format Lists as Multi-column Texts
- First and foremost, finish entering list items and select the list.
- Then click “Page Layout” tab.
- Next click “Columns” command in “Page Setup” group.
- On its drop-down menu, choose a column number.

- Now you see all list entries are in the first column.

- Put cursor at the start of a list entry which you want to place in another column. For example, in this case, we position insertion pointer before the texts of the third list entry. Then click “Breaks” under “Page Layout” tab.
- And click “Column” on the drop-down menu of “Breaks”.

- This inserts a column break and distributes list entries to the second column.

- Repeat step 6 and 7 in case you have more than 2 columns and need to distribute list entries evenly. You can get a possible result as follows:


Method 2: Arrange a List in a Multi-column Table
- Firstly, put cursor at place where the multi-column list should go.
- Secondly, click “Insert” tab and click “Table”.
- Thirdly, click “Insert Table”.

- In the box open, enter the number of rows and columns.
- Click “OK”.

- Then select the table and click either “Bullets” or “Numbering” under “Home” tab. Each single cell will contain a bullet or be numbered in sequence.

- You can then enter one entry in a cell.
- Finally, remove table borders by clicking “Design” tab. Click to open the drop-down menu of “Borders” and choose “No Border”.


Method 3: Insert Text Boxes
- To begin with, click “Insert” tab and “Text Box”.

- Next click “Draw Text Box”.
- Then enter list entries into text boxes.
- Insert another text box in the same line with the previous one, following the first 3 steps.

- Lastly, remove the outline of all text boxes by clicking text box. Then click “Format” and “Shape Outline”. Choose “No Outline”.


Method 4: Insert Bullet Symbols
If you don’t need a live bulleted list, you can just use bullet symbols to create a seemingly like one.
- Click “Insert” tab then “Symbol”.
- Next choose “More Symbols”.

- In the “Symbol” dialog box, choose “General Punctuation” in the drop list of “Subset”.
- Then find and click the bullet symbol.
- Lastly, click “Insert” and close the box.
- Or you can also choose to press “Alt+ 0149” to quickly insert a bullet symbol.


Word Errors Exist
If you are an experienced user of Word, you must have encountered with errors some time. Different errors cast different levels of impact on your documents. In some luck day, a simple reopen action will be enough to address an issue. But in the rest of days, you find yourself in desperate need of a tool to recover doc. Under such scenario, you need to take time evaluating various products on the market before testing them on your document.
Author Introduction:
Vera Chen is a data recovery expert in DataNumen, Inc., which is the world leader in data recovery technologies, including excel corruption and pdf repair software products. For more information visit https://www.datanumen.com/
In the previous post of mine, I mentioned on how to Create A Bullet List In A Microsoft Word Document. In this post I will mention how to Create A Number List in a Microsoft Word Document.
Many times we have a list that contains items that need to be referenced elsewhere in a document, or just to be numbered. We can number a list or even all the paragraphs that we have in a document. All we have to do is to follow the steps below.
In the image below I have created a List of the Days of the Week.

The next step is to select the list and then locate the area of the ribbon Paragraph of the Home tab as shown in the image below.

Once the list is selected, we select the arrow at the right of the Numbering icon, from the Paragraph area of the ribbon as shown in the image below. Once selected the drop down menu of the Numbering command appears, where we have a variety of predefined Numbering examples to choose from.

All we have to do is to select the Numbering that we want, and straight away the List or Paragraphs will numbered as shown in the image below.

At the bottom of the drop down menu of the Numbering command we have the following three options to choose from which are the following:
-
Change List Level
-
Define New Number Format
-
Set Numbering Value
In the image below, once our list is selected we can Change the List Level, just by selecting the command.

From the drop down menu of the Numbering command, if we select the Define New Number Format command, the corresponding window will appear where we can do the following:
-
Number Style: By selecting the arrow at the right of the command we can change the Number Style to some other predefined Numbering.
-
Font: By selecting the Font button, we can change the size, color and etc. of the Numbering that we have chosen.
-
Number Format: In this text area, we can interfere, with the actual Numbering Style, by creating a new one of ours.
-
Alignment: We can change the Numbering Alignment into Left, Centered or Right.
All, that is left, is for the arrangements to take place is to press the OK button which is located at the bottom of the Define New Number Format window, as shown in the image below.

In the image below, I have selected the Set Numbering Value command, from the Numbering drop down menu, and straight away the corresponding window appears where we can do the following:
-
Start New List: By selecting this command, we can interfere with the Numbering of the List by dividing the List and creating a New List.
-
Continue From Previous List: By selecting this command, we can choose to continue the Numbering from the Previous List.
-
Set Value To: We can choose to Set the Value of the Numbering List to the number that we want.
Again, whatever settings we do, at the end we press the OK button in order for them to take place.

In my next post, I will describe how to Create A Multilevel List in a Microsoft Word Document.
Below you can check out the video on How To Create A Numbering List in a Microsoft Word Document.