
Word for Microsoft 365 Word 2021 Word 2019 Word 2016 Word 2013 Word 2010 Word 2007 More…Less
Word can automatically count the lines in a document and display the appropriate number beside each line of text. This is useful when you need to refer to specific lines in a document, such as a script or a legal contract.
By default, Word numbers every line in a document (except those in tables, footnotes, endnotes, text boxes, and headers and footers). However, you can choose which line numbers to display. For example, you can display line numbers in all or part of the document. Or you can display line numbers at intervals, such as every tenth line (10, 20, 30, and so on).
What do you want to do?
-
Add line numbers
-
Remove line numbers
Add line numbers
You can add line numbers to all or part of a document. To view line numbers, you must be in Print Layout view (click the View tab to check).
Notes:
-
A table is counted as one line.
-
A figure is counted as one line.
-
A text box is counted as one line if it is positioned inline with the text on the page. If text on the page wraps around the text box, the lines of text on the page are counted. Lines of text inside a text box are not counted.
Add line numbers to an entire document
-
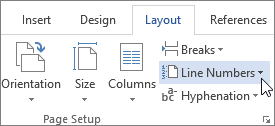
On the Layout tab, in the Page Setup group, click Line Numbers.

Note: If your document is divided into sections and you want to add line numbers to the entire document, you first need to select the document. Click Select in the Editing group on the Home tab, and then click Select All. Or press CTRL+A.
-
Do one of the following:
-
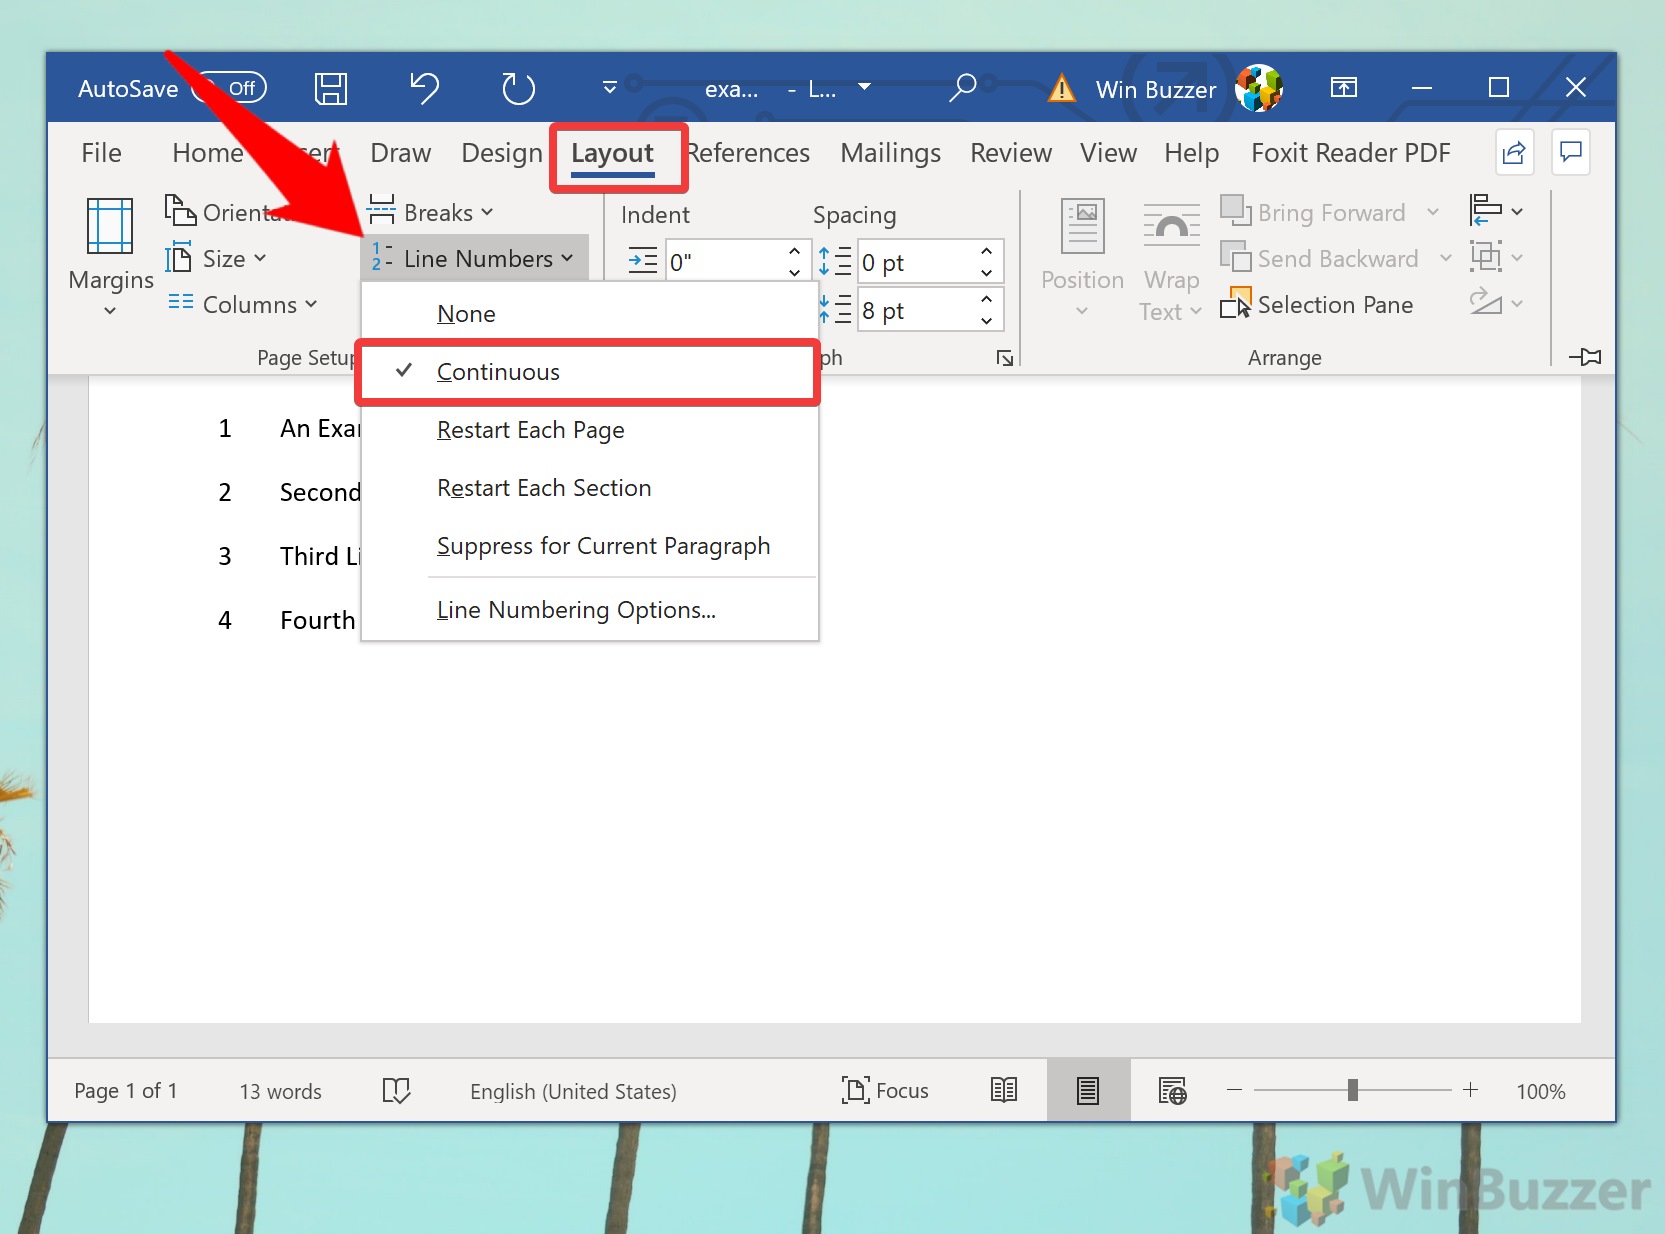
To number consecutively throughout the document, click Continuous.
-
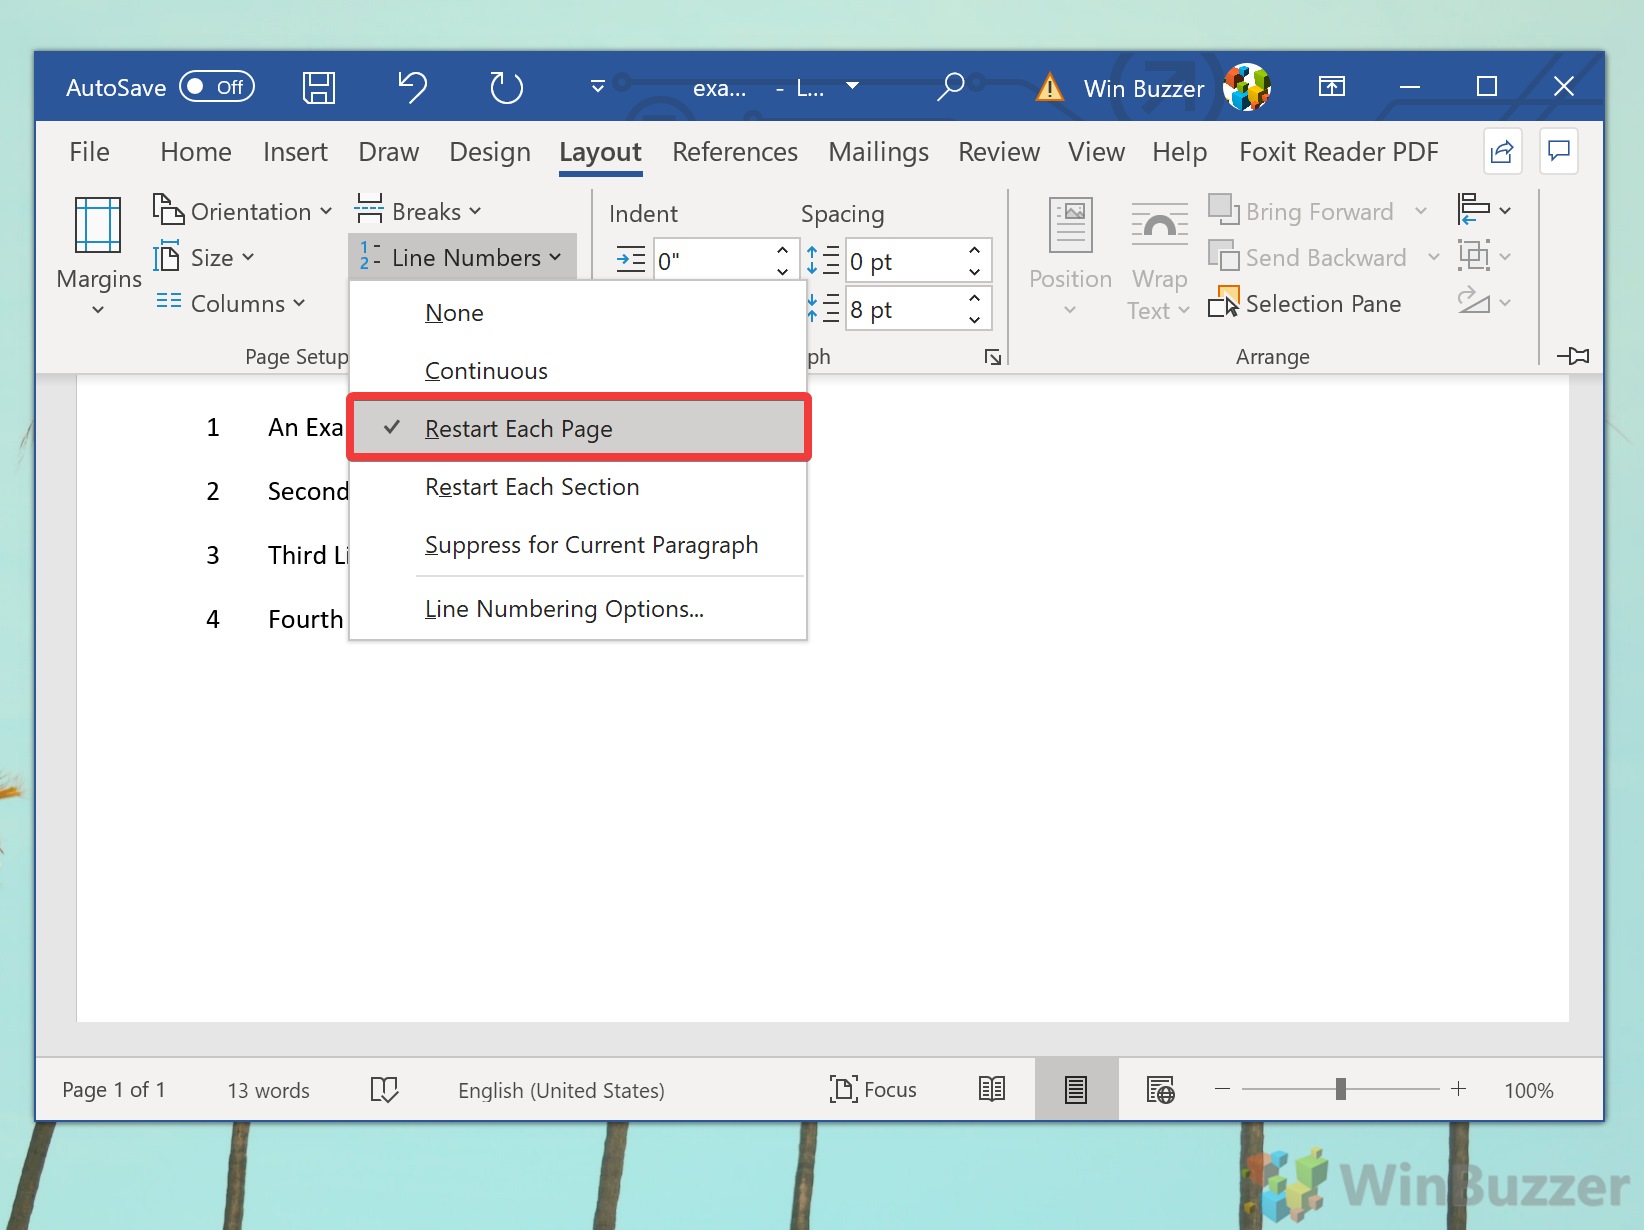
To start with number 1 on each page, click Restart Each Page.
-
To start with number 1 after each section break, click Restart Each Section.
-
For more advanced line numbering options, such as numbering at different intervals, click Line Numbering Options, and then click Line Numbers on the Layout tab.
-
Add line numbers to a section or to multiple sections
-
Click in a section or select multiple sections.
-
On the Layout tab, in the Page Setup group, click Line Numbers.
-
Click Line Numbering Options, and then click the Layout tab.
-
In the Apply to list, click Selected sections.
-
Click Line Numbers.
-
Select the Add line numbering check box, and then select the options that you want.
Top of Page
Remove line numbers
You can remove line numbers from the entire document, from a section, or from a paragraph.
-
Click in the document, or click in the section or paragraph from which you want to remove line numbers. If you want to remove line numbers from multiple sections, select the sections.
-
On the Layout tab, in the Page Setup group, click Line Numbers.
-
Do one of the following:
-
To remove line numbers from the entire document or section, click None.
-
To remove line numbers from a single paragraph, click Suppress for Current Paragraph.
-
Top of Page
What do you want to do?
-
Add line numbers
-
Remove line numbers
Add line numbers
You can add line numbers to all or part of a document. To view line numbers, you must be in Print Layout view (click the View tab to check).
Notes:
-
A table is counted as one line.
-
A figure is counted as one line.
-
A text box is counted as one line if it is positioned inline with the text on the page. If text on the page wraps around the text box, the lines of text on the page are counted. Lines of text inside a text box are not counted.
Add line numbers to an entire document
-
On the Page Layout tab, in the Page Setup group, click Line Numbers.
Note: If your document is divided into sections and you want to add line numbers to the entire document, you first need to select the document. Click Select in the Editing group on the Home tab, and then click Select All. Or press CTRL+A.
-
Do one of the following:
-
To number consecutively throughout the document, click Continuous.
-
To start with number 1 on each page, click Restart Each Page.
-
To start with number 1 after each section break, click Restart Each Section.
-
For more advanced line numbering options, such as numbering at different intervals, click Line Numbering Options, and then click Line Numbers on the Layout tab.
-

Add line numbers to a section or to multiple sections
-
Click in a section or select multiple sections.
-
On the Page Layout tab, in the Page Setup group, click Line Numbers.
-
Click Line Numbering Options, and then click the Layout tab.
-
In the Apply to list, click Selected sections.
-
Click Line Numbers.
-
Select the Add line numbering check box, and then select the options that you want.
Top of Page
Remove line numbers
You can remove line numbers from the entire document, from a section, or from a paragraph.
-
Click in the document, or click in the section or paragraph from which you want to remove line numbers. If you want to remove line numbers from multiple sections, select the sections.
-
On the Page Layout tab, in the Page Setup group, click Line Numbers.
-
Do one of the following:
-
To remove line numbers from the entire document or section, click None.
-
To remove line numbers from a single paragraph, click Suppress for Current Paragraph.
-
Top of Page
Need more help?
Organize your documents by numbering them
What to Know
- Select Layout > Page Setup > Line Numbers > choose option > select Apply to drop-down > Selected sections.
- Next, select Line Numbers > Add line numbering > OK.
This article explains how to add line numbers to documents in Word for Microsoft 365, Word 2019, 2016, 2013, 2010, and 2007.
How to Add Line Numbers to a Word Document
To include line numbers in a document:
-
Go to Layout > Page Setup > Line Numbers.
If the document is divided into sections and you want to add line numbers to the entire document, press Ctrl+A to select the entire document.
-
Choose one of the following options:
- Continuous: Allows consecutive numbering throughout the document.
- Restart Each Page: Starts each page with the number 1.
- Restart Each Section: Starts with number 1 after each section break.
- Line Numbering Options: Allows more advanced line numbering options, for example, to number at different intervals.
-
To add line numbers to a specific section or to multiple sections, choose Line Numbering Options to open the Page Setup dialog box, then select the Layout tab.
-
Select the Apply to drop-down arrow and choose Selected sections.
-
Select Line Numbers.
-
Select the Add line numbering check box.
-
Select any other options you want, then select OK to close the window.
-
Select OK to save your changes.
All About Line Numbers
Microsoft Word automatically numbers all lines except for a select few. It counts an entire table as one line. It also skips text boxes, headers and footers, and footnotes and endnotes.
Microsoft Word does count figures as one line, as well as a text box that has inline with text wrapping applied. However, the lines of text within the text box are not counted.
You decide how Word handles line numbers. For example, apply line numbers to specific sections, or number lines in increments such as every tenth line.
Then, when it’s time to finalize the document, remove the line numbers and you’re ready to go.
Thanks for letting us know!
Get the Latest Tech News Delivered Every Day
Subscribe
Add line numbers to a section or to multiple sections
- Click in a section or select multiple sections.
- On the Layout tab, in the Page Setup group, click Line Numbers.
- Click Line Numbering Options, and then click the Layout tab.
- In the Apply to list, click Selected sections.
- Click Line Numbers.
Contents
- 1 How do I add line numbers in Word for Mac?
- 2 How do I number every 5th line in Word?
- 3 How do you get line numbers on every 5 lines?
- 4 How do we show line numbers next to the code?
- 5 How many lines are in a Word document page?
- 6 How do I change line number in Word?
- 7 How do you display line numbers in VS?
- 8 How do I find line numbers?
- 9 How do I count the number of rows in word?
- 10 Does Word Count Count Lines?
- 11 How do you insert a line across the page in word?
- 12 Why can’t I see line numbers in Word?
- 13 How do I move line numbers to the right?
- 14 How do I change line number font?
- 15 How do I show line numbers in IntelliJ?
- 16 How do I show line numbers in vim?
- 17 How do you number lines in a text file?
- 18 How do I show line numbers in less command?
- 19 How do I show line numbers in nano?
- 20 How do I copy line numbers in Word?
How do I add line numbers in Word for Mac?
In your Word document, click the “Layout” tab in the ribbon bar and then click on the “Line Numbers” button. Select “Restart Each Section” from the drop-down menu. If you want to add a new section break, click the “Breaks” button. This is just above the “Line Numbers” button in the “Layout” tab.
How do I number every 5th line in Word?
How to number every nth line in Word 2013
- On Page Layout tab, click on Line Numbers and click Line Numbering Options…
- Page Setup opens.
- Line Numbers windows opens.
- You can start numbering at a specific number (Start at), control number position (From text) and number every nth line (Count by).
How do you get line numbers on every 5 lines?
Add line numbers to a section or to multiple sections
- Click in a section or select multiple sections.
- On the Page Layout tab, in the Page Setup group, click Line Numbers.
- Click Line Numbering Options, and then click the Layout tab.
- In the Apply to list, click Selected sections.
- Click Line Numbers.
How do we show line numbers next to the code?
Display line numbers in code
- On the menu bar, choose Tools > Options. Expand the Text Editor node, and then select either the language you’re using or All Languages to turn on line numbers in all languages.
- Select the Line numbers checkbox.
How many lines are in a Word document page?
The standard number of lines per page tends to be 46.
How do I change line number in Word?
Simply follow these steps:
- Display the Home tab of the ribbon.
- Click the small icon at the bottom-right of the Styles group.
- Hover the mouse pointer over the Line Number style.
- Click on the drop-down arrow and choose the Modify option from the resulting menu.
How do you display line numbers in VS?
1 Answer. On the menu bar, choose Tools, Options. Expand the Text Editor node, and then select either the node for the language you are using, or All Languages to turn on line numbers in all languages.
How do I find line numbers?
You can find out the phone number for your local phone company by looking at your monthly bill or dialing “411” from your phone line. Verify your identity.
How do I count the number of rows in word?
Right-click on the selected table and select Table Properties from the shortcut menu. Click on the Row tab — the number of rows selected is listed at the top of the dialog box.
Does Word Count Count Lines?
Word counts the number of words in a document while you type. Word also counts pages, paragraphs, lines, and characters.
How do you insert a line across the page in word?
Press Ctrl+A to select all the text in your document. Click Home > Shrink Font one or more times. As you click Shrink Font, Word decreases the size of every font in your document.
Why can’t I see line numbers in Word?
To use line numbers in Word, you must be in Print Layout view. Go to the View tab and click Print Layout in the Views section of the ribbon. Next, insert the numbers by heading to the Layout tab. Click the Line Numbers button in the Page Setup section of the ribbon.
How do I move line numbers to the right?
Remember though, it is not section alignment alone. For line numbers to appear in the right margin you must set the section alignment to right to left “and” have a right to left script language enabled.
How do I change line number font?
Process
- Go to the Home tab of the Ribbon after enabling line numbering.
- Under Styles, click the Dialog Box Launcher arrow to open the Styles pane.
- In the Styles pane, click Options.
- Under “Select styles to show” in the Options window, select “All styles”.
- Click OK to exit out of the Options window.
How do I show line numbers in IntelliJ?
IntelliJ IDEA 15
- File > Settings… > Editor > General > Appearance > Show line numbers.
- Hit Shift twice > write “line numbers” > Show Line Numbers (that one that has the toggle) > change the toggle to ON.
How do I show line numbers in vim?
How to display line number in vim
- Press the ESC key.
- At the : prompt type the following command to run on line numbers: set number.
- To turn off line numbering, type the following command at the : prompt again: set nonumber.
- One can set relative line numbers by typing: :set relativenumber.
How do you number lines in a text file?
4 Answers. In notepad , you can type Ctrl + g to view current line number. It also at bottom-right corner of status-bar.
How do I show line numbers in less command?
All you have to do is pass either -N or –LINE-NUMBERS option to the less command. This option forces less to show a line number at the beginning of each line in the screen.
How do I show line numbers in nano?
You can ask nano to temporarily turn on line numbers by pressing Alt-C (meaning “Hold down the Alt key and the C key simultaneously”). This will show line and column numbers near the bottom of nano’s window.
How do I copy line numbers in Word?
Assuming there is a consistent amount of space between the margin and the first desired word on each line, what you could do after pasting is to use a block cut (Shift-Alt and drag the cursor over the desired area, followed by Ctrl-X), then select all the lines, delete what’s left, then paste again – voila! the numbers

Contents
- 1 How to Add Line Numbers to an Entire Document in Word
- 2 How to Number Lines in Word for Individual Sections
- 3 How to Remove Word Line Numbers
- 4 How to Change Word Line Number Formatting
While some text editors come with line numbers, the same can’t be said about Microsoft Word. To reduce visual clutter, they aren’t present by default, despite being a useful visual aid.
As a result, this guide will show you how to add line numbers in Word with just a few clicks. We’ll also teach you how to change the formatting of your line numbers, so they aren’t so intrusive.
However, while Word has several different options when it comes to numbering, all of them treat tables and text boxes as a single line.
It’s also worth noting that the instructions will only work with Word 2010 and onwards. If you have an older version, we recommend an upgrade – you’ll be missing out on vital security updates at this point. Let’s get started:
How to Add Line Numbers to an Entire Document in Word
Most commonly, users want Word line numbers across their entire document so they can easily reference parts to colleagues or clients. This can be achieved easily through the ribbon.
- Insert continuous line numbers in Word
With your Word document open, click the “Layout” tab in the ribbon. On the right-hand side, you’ll see a “Line Numbers” button. Click it, then select “Continuous”.
Continuous lines will add numbers sequentially across your entire document. If a page has 44 lines, for example, the next page will start on 46. This is the most common use case.

- How to insert line numbers in Word and have them restart each page
Click the “Line Numbers” button, then select “Restart Each Page”. This will cause the first line on each page to start from 1.

- Make sure you’re on the ‘Print’ view
If you still don’t seer line numbers, it may be because you’re on the reading or browser layout view for word. Line numbers only show up on Print view. At the bottom of your document, press the page icon in the middle to switch the view.

How to Number Lines in Word for Individual Sections
So what if you want your numbers to restart in the middle of the page? You can just do it manually of course, but that takes time and may conflict with existing formatting. Instead, we can use the “Each Section” option under Line Numbers.
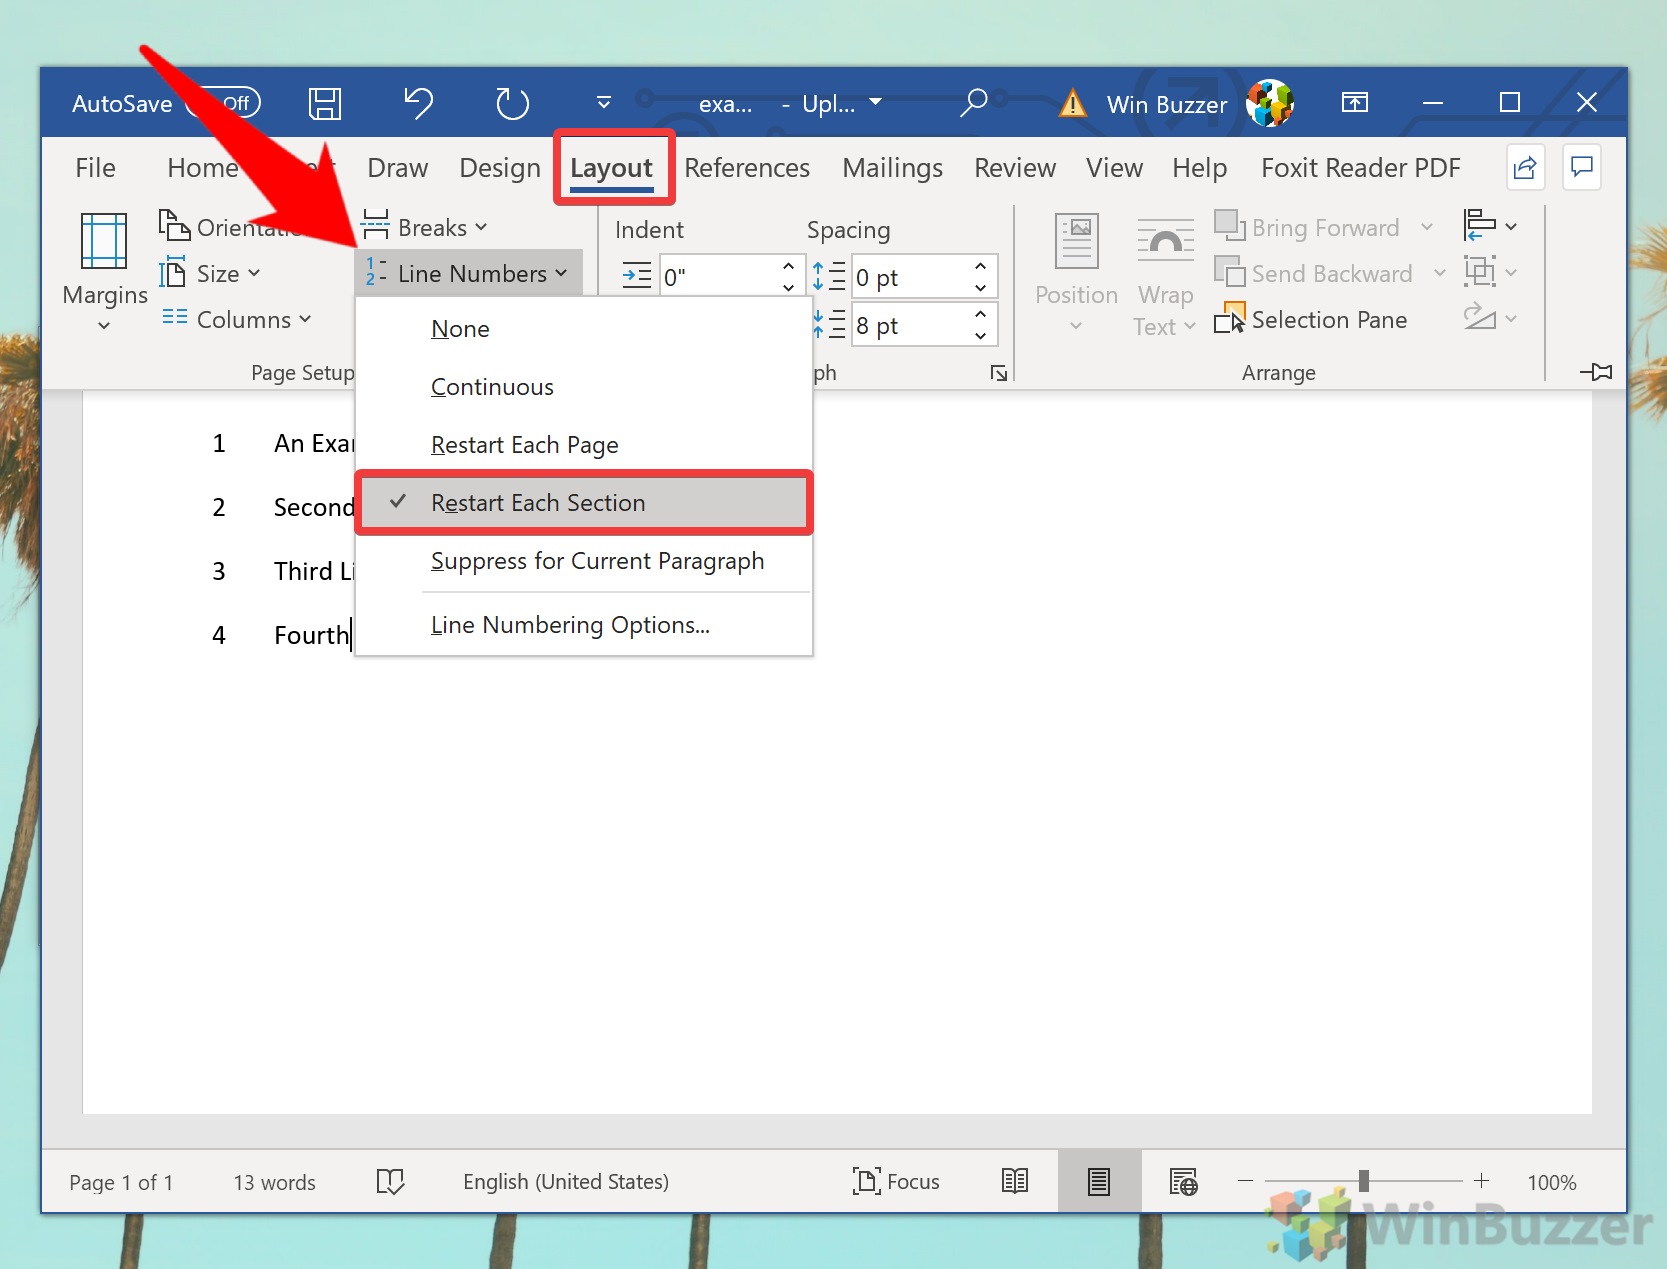
- Select the ‘Restart Each Section’ optionClick the “Layout” tab in your word Ribbon and then “Line Numbers” on the right-hand side. Click “Restart Each Section”.

- Add a section break
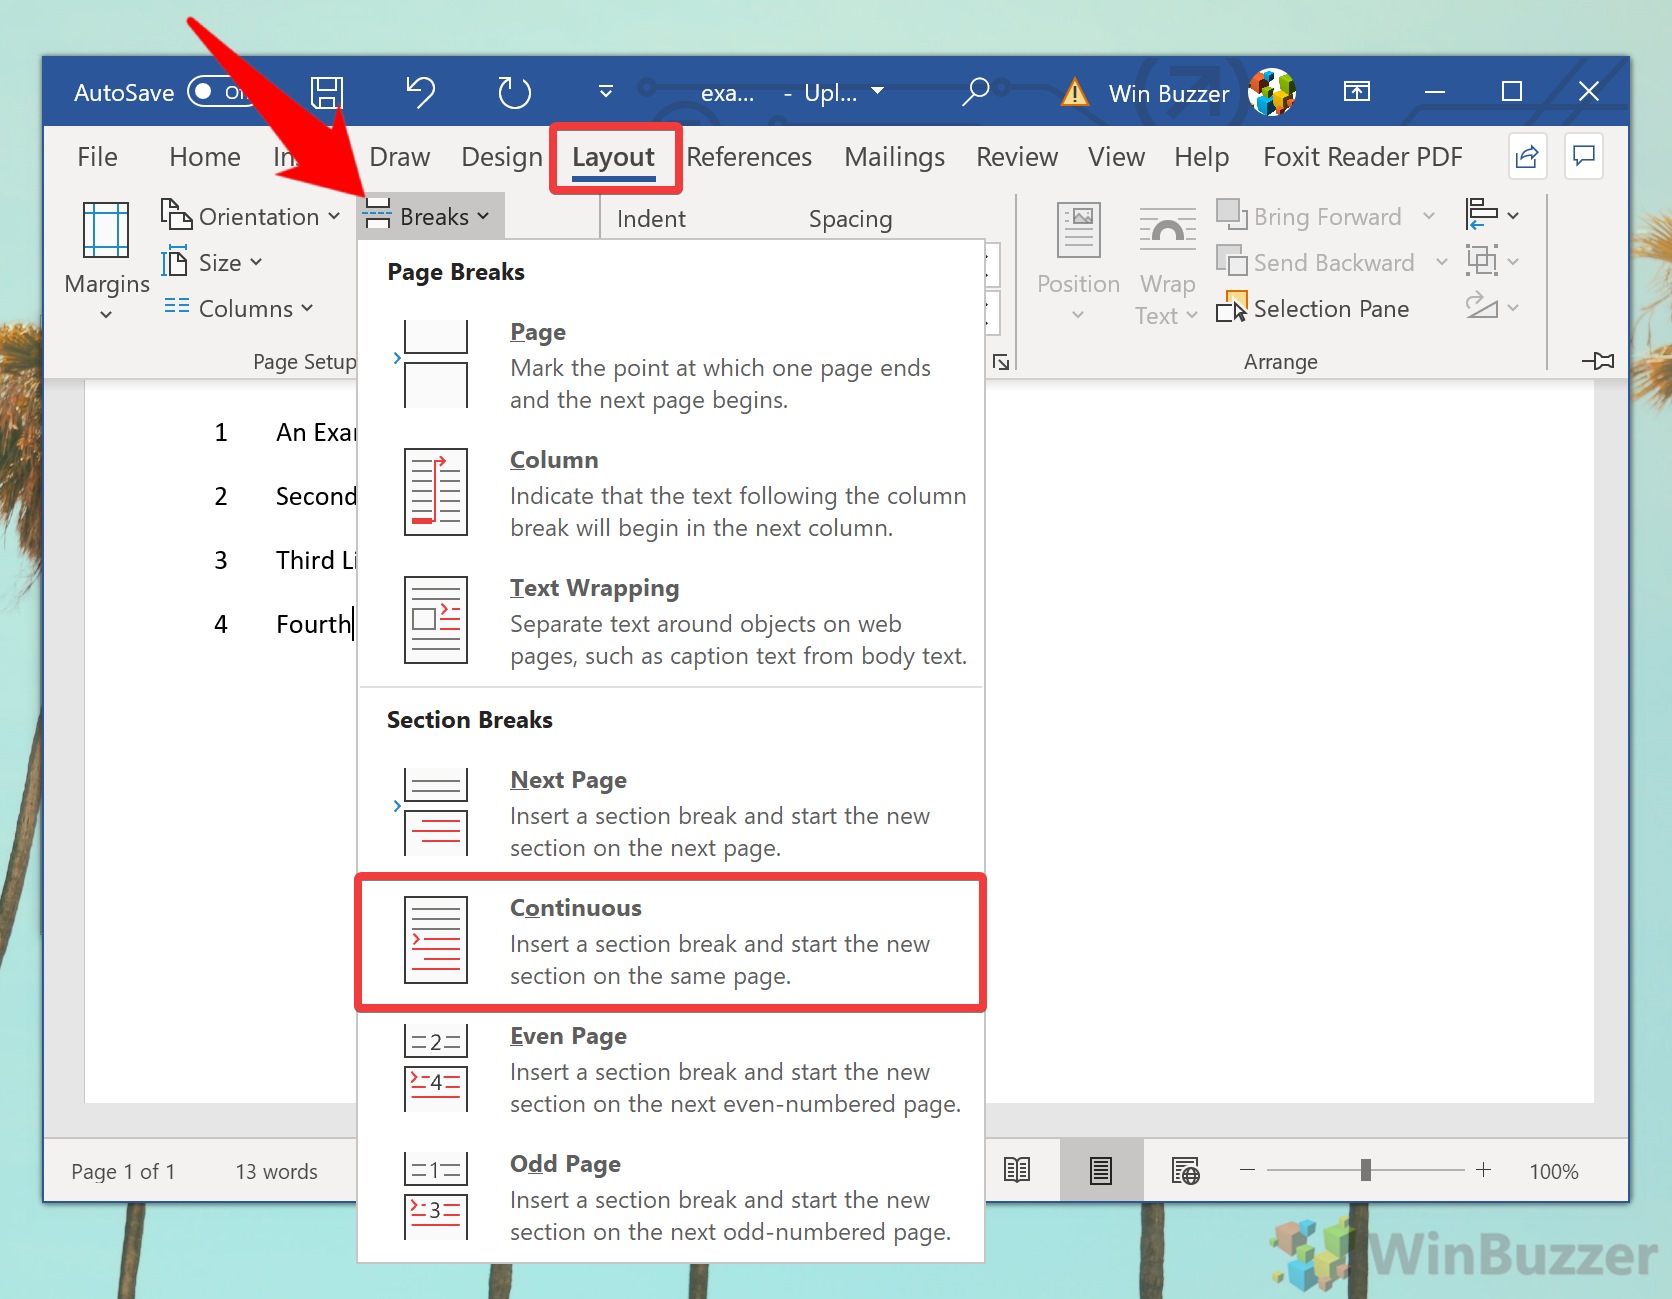
To restart your numbers anywhere on a page, select where you want the break to be. Then, click the “Layout” tab in your Ribbon, followed by “Breaks”, and “Continuous”.

- Make sure your numbers have changed
You should notice that your line numbers switch back to “1” wherever you put your section break.


If you’ve received a document that already has line numbers on, you can perform similar steps to remove them. Handily, you can also remove them for an individual paragraph.
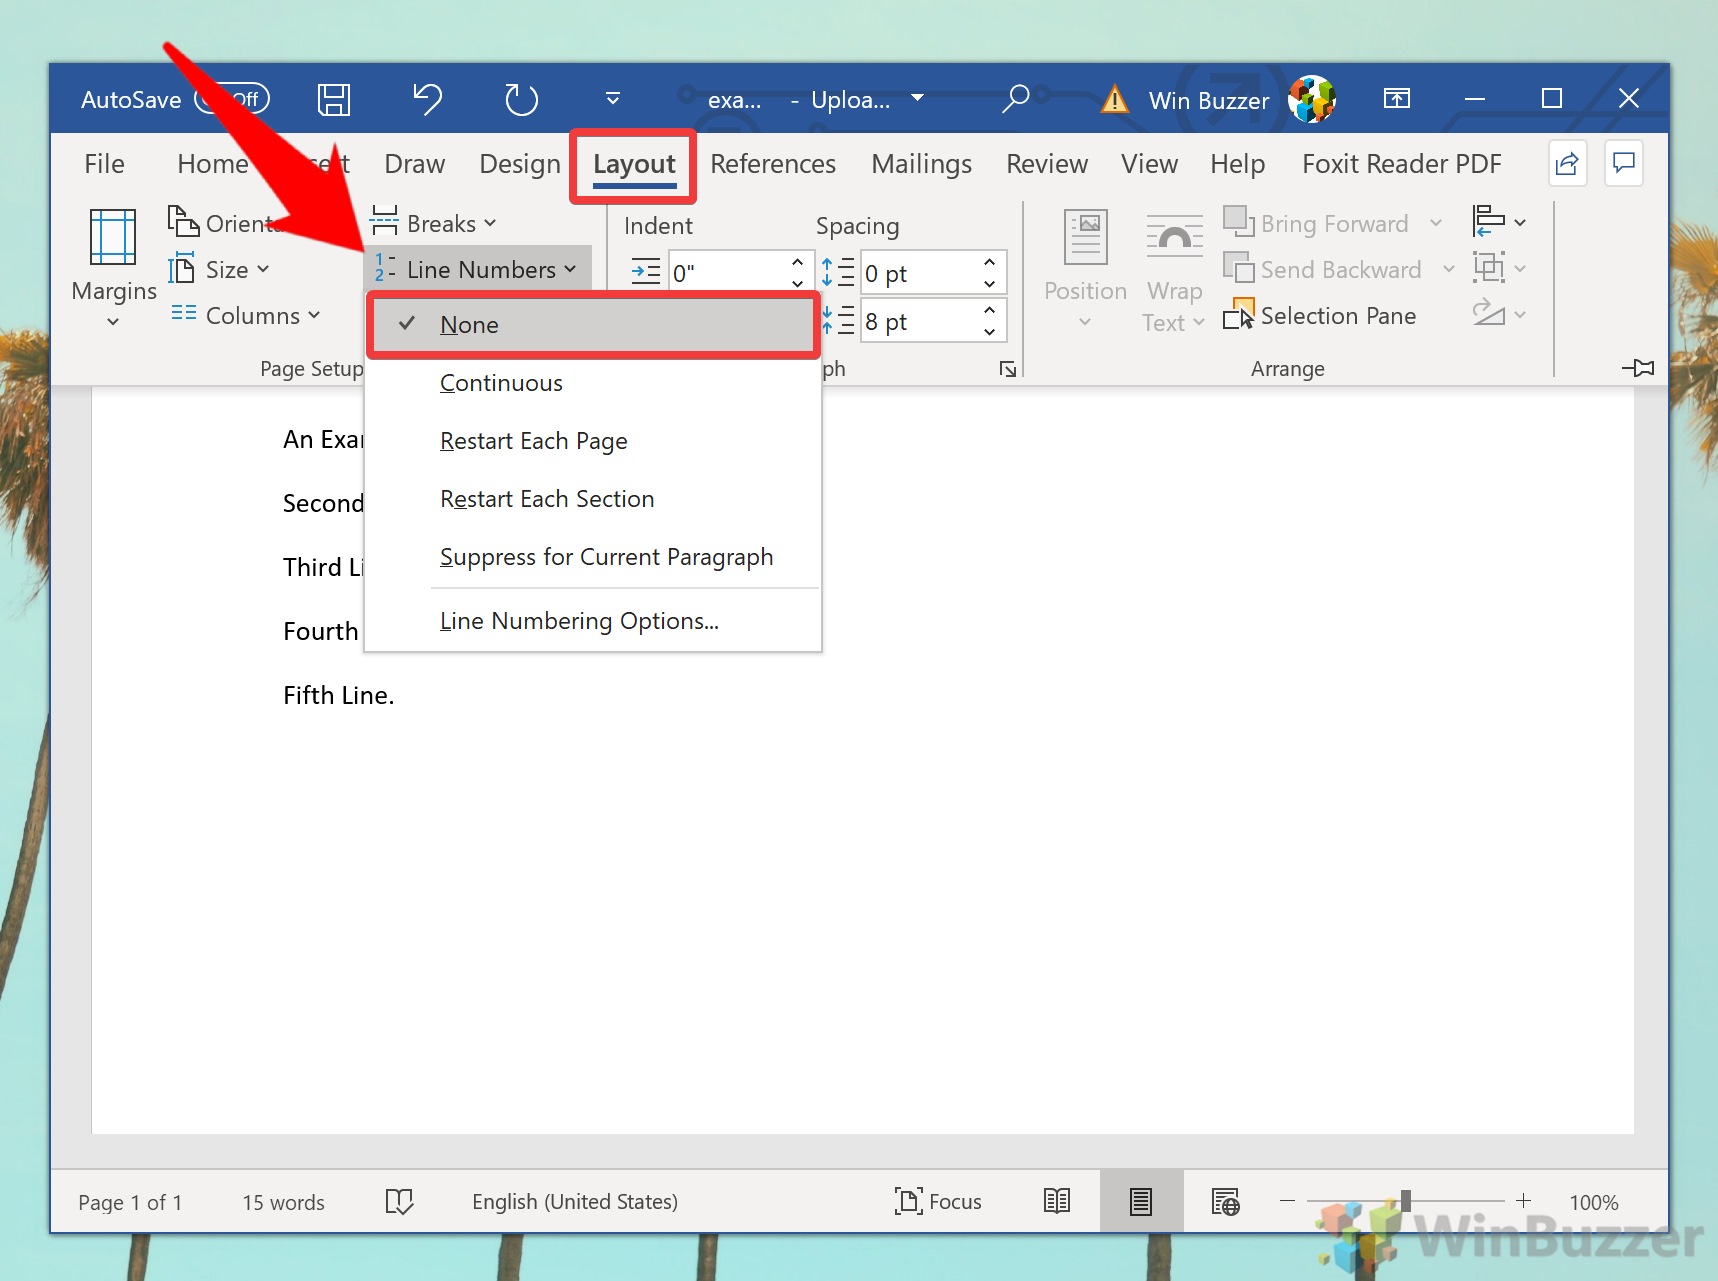
- How to remove all line numbers in WordTo get rid of all line numbers from a document, click the “Layout” tab, then “Line Numbers” and select “None”.

- How to remove Word line numbers from a single paragraph
Select the line you want to remove the line number from. Click the “Layout” tab, then “Line Numbers”, and tick “Suppress for Current Paragraph”. The lines underneath should continue the count as if that line doesn’t exist.


How to Change Word Line Number Formatting
You may have noticed that the line numbers in Word stand out quite a bit by default. If you don’t want them to distract from your text, you can change their style to suit your preferences. Alternatively, you can make them stand out more if you wish.
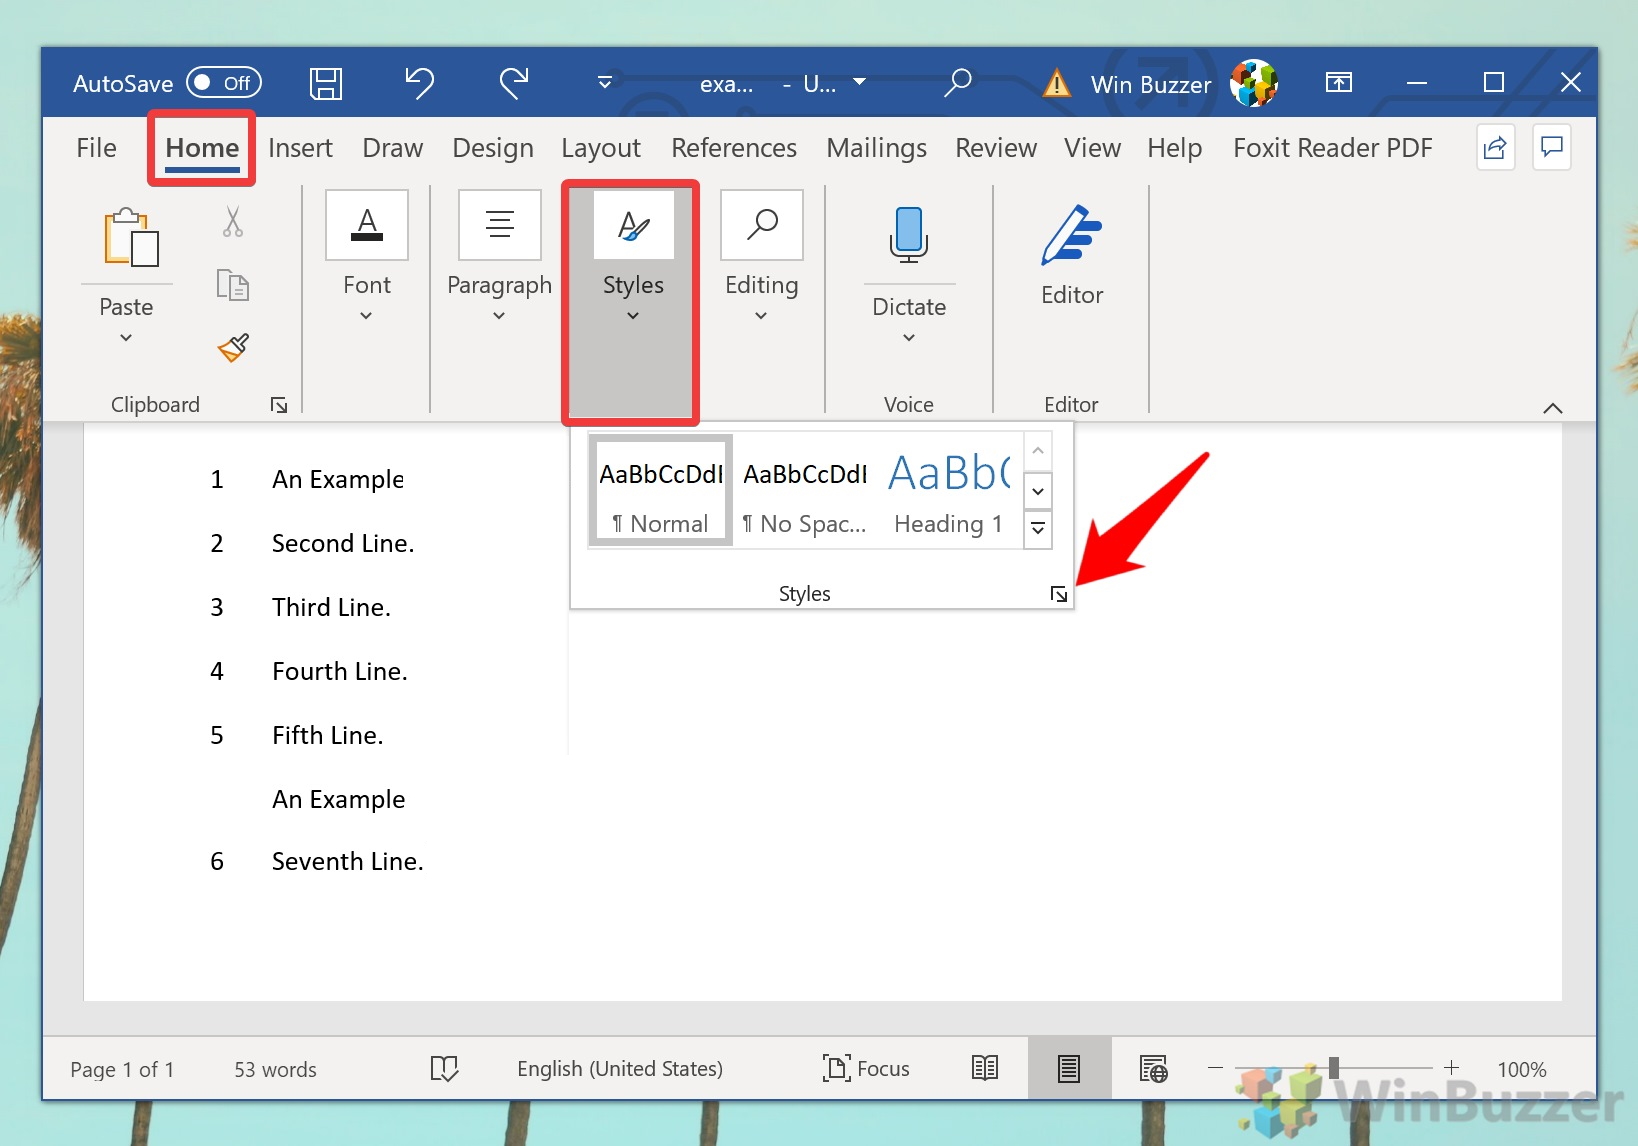
- Open the Styles panelIn the Word ribbon, select the “Home” tab, click the “Styles” button, then press the maximize icon in the bottom right corner of the pop-out.

- Open Styles options
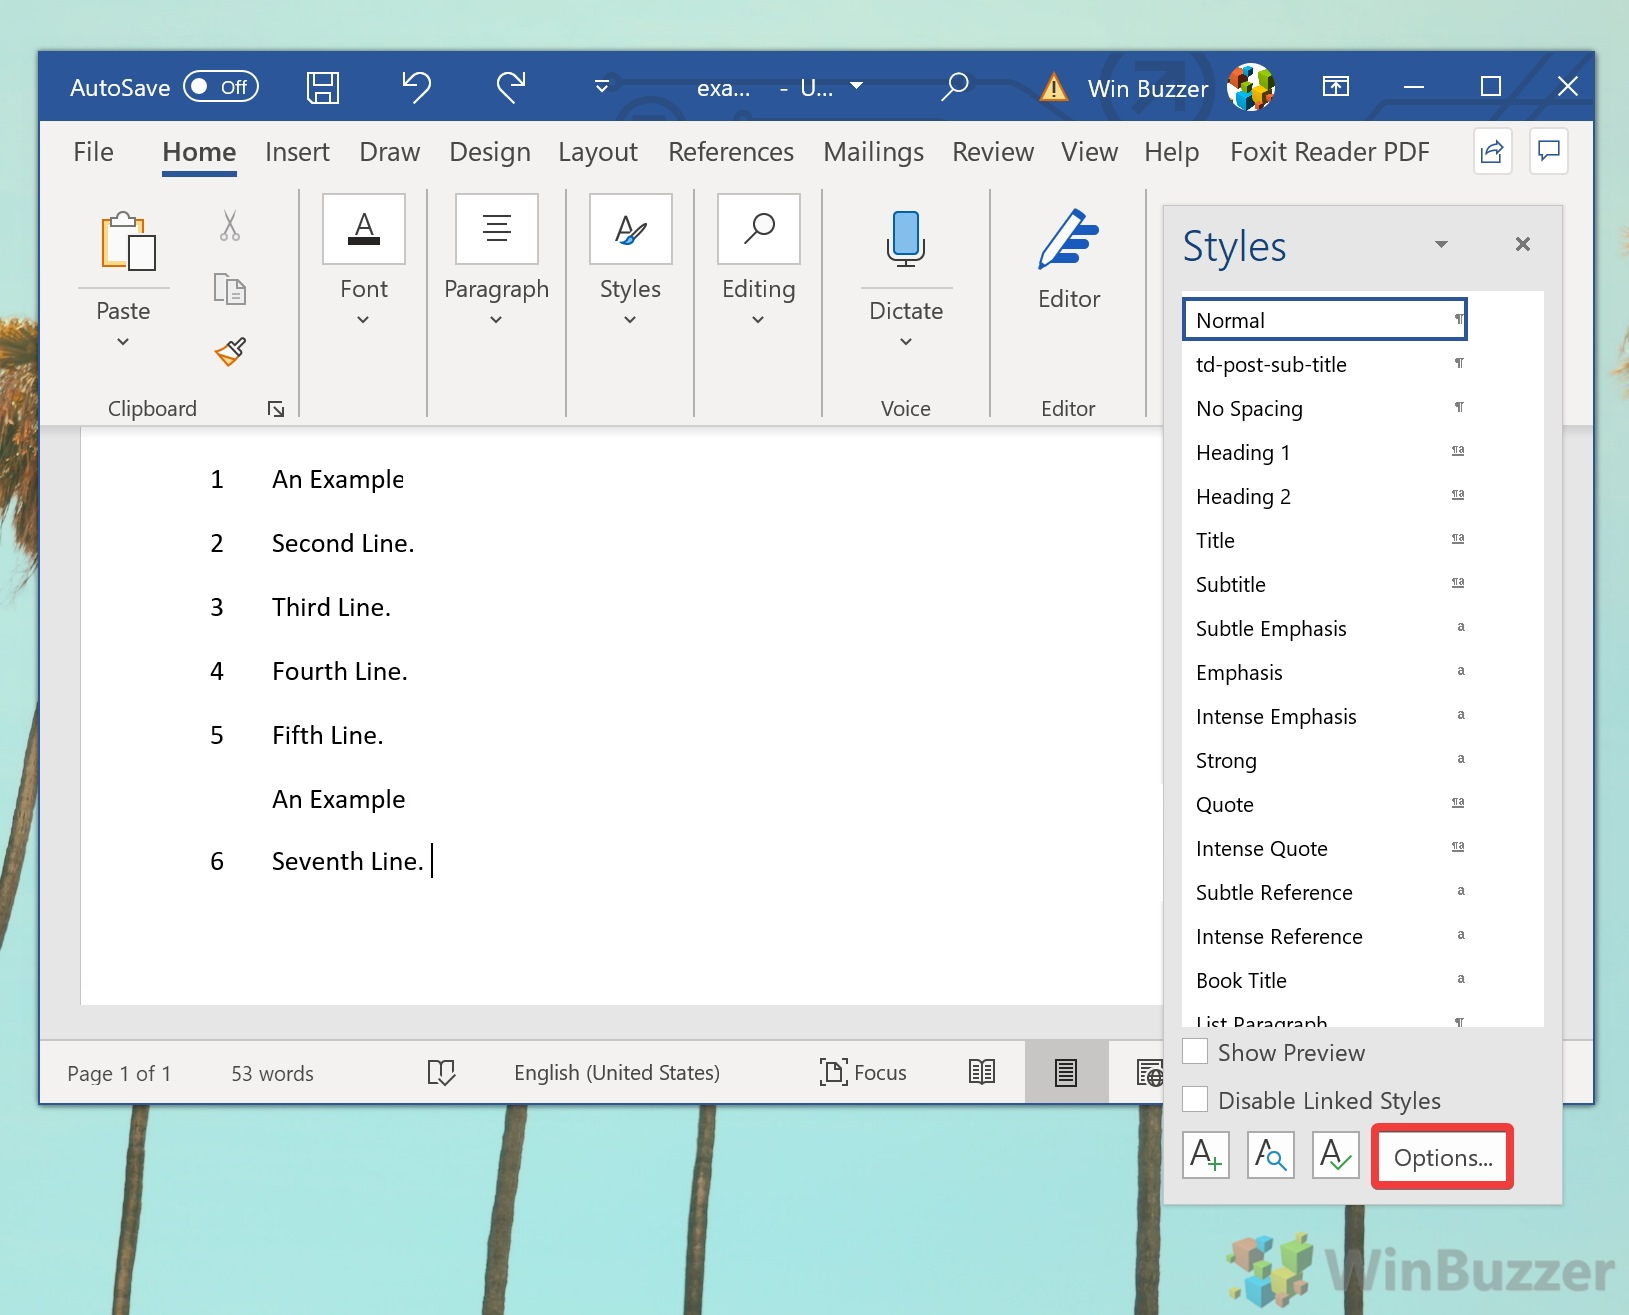
In the Styles panel, press the “Options…” button at the bottom of the screen.

- Select the option to show ‘All styles’
Under the “Select styles to show:” header, click the drop-down and click “All styles”. Click “OK”.

- Modify the Word’s Line Number style
Your styles list should now have an entry called “Line Number”. Find it, right-click it, and press “Modify…”.

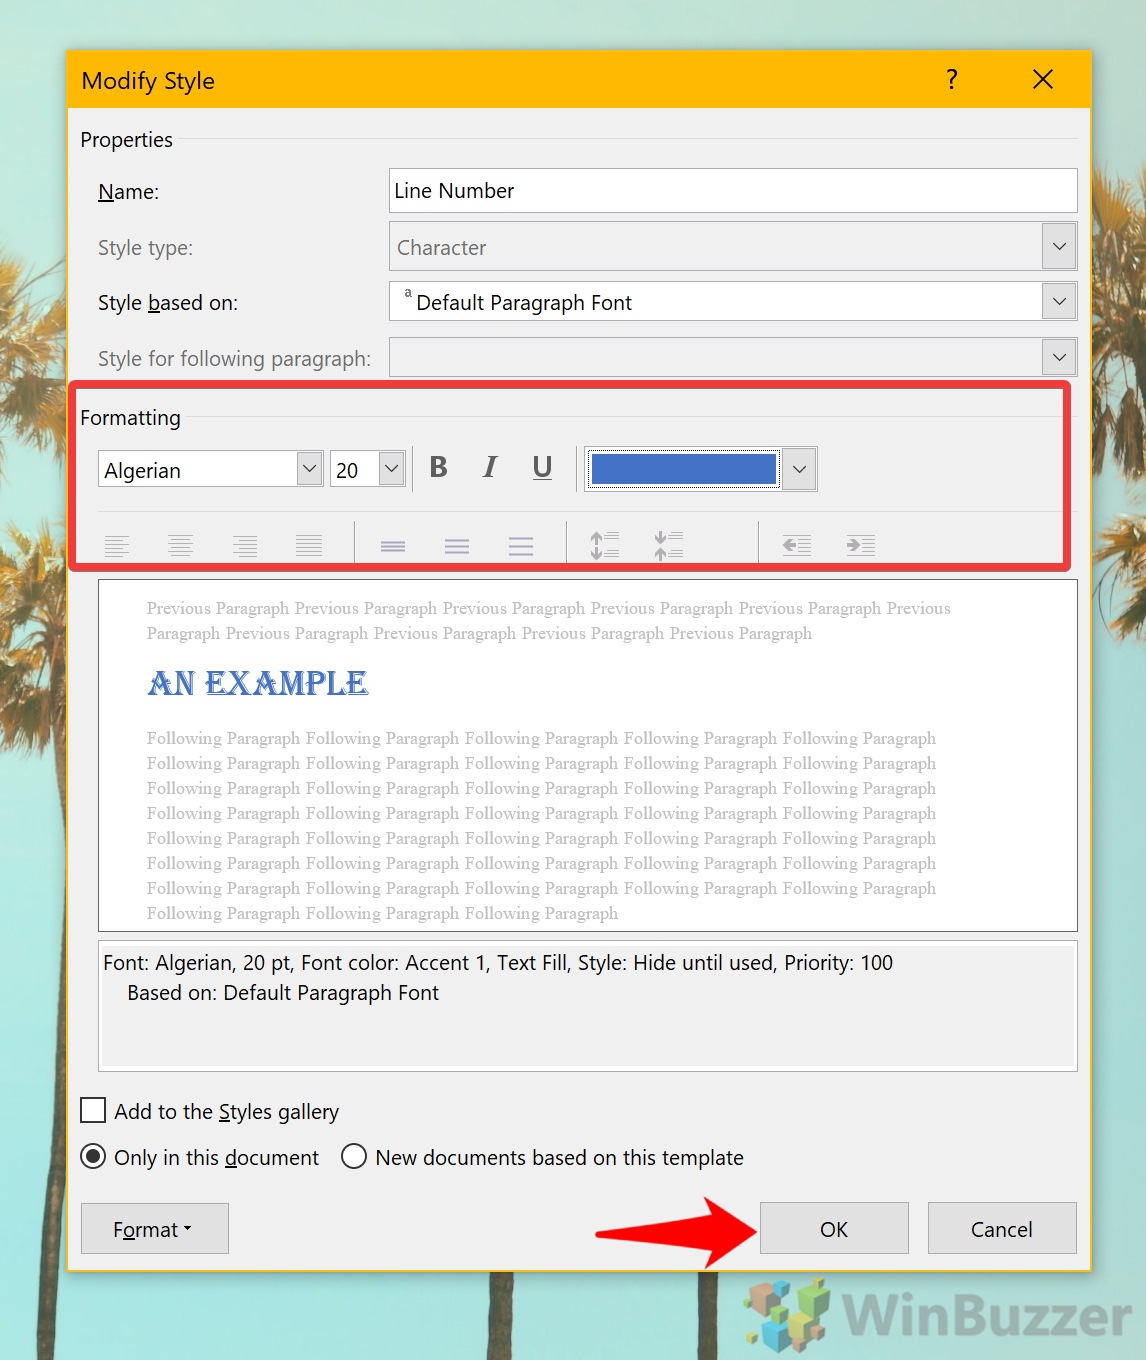
- Change font, color, and text size to your liking
Under the “Formatting” section, you’ll find several options for changing your text. If you’re looking for a more subdued look, try changing the color to light grey. For the sake of this tutorial, we’re going to change ours to a funky blue font so it stands out.
Once you’re done, press “OK”.

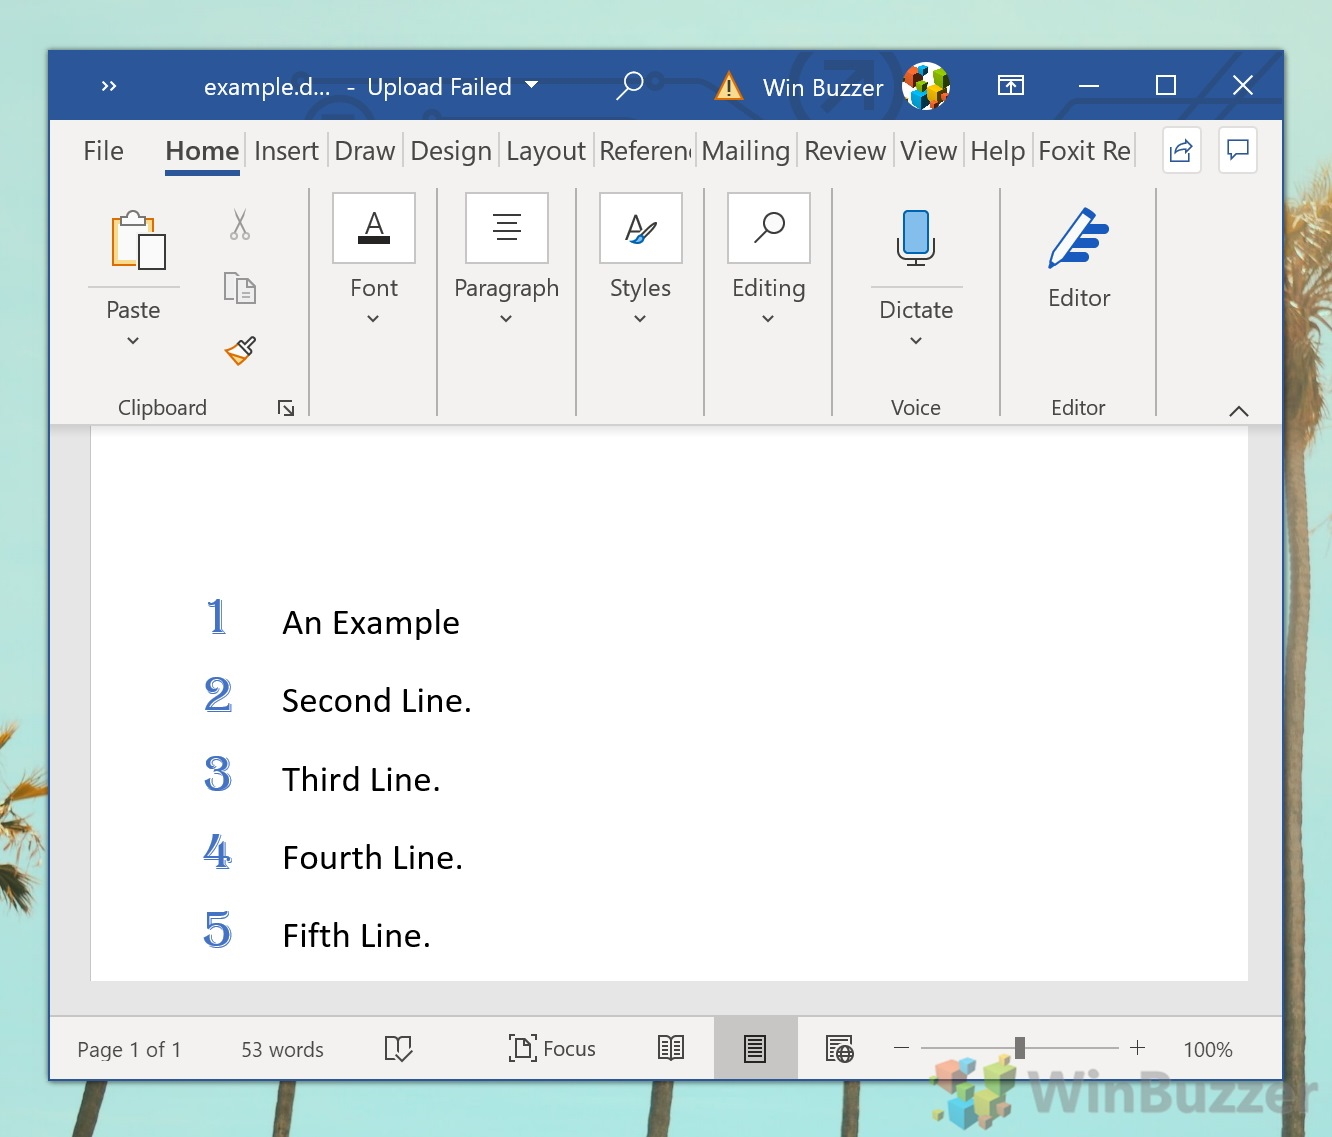
- View your modified line numbers in Word
Back in your main Word document, your line numbers should have automatically updated with the new style.


If you found this tutorial useful, you may also want to learn how to change background color in Word.
By default, Word keeps track of every line, word, and character in a document, and displays their numbers when the user demands.
Although Word normally does not display line numbers automatically, you can choose to do so.
For instance, you can ask Word to display line numbers in the entire document or only in some part.
You can also choose to display line numbers at certain intervals, say, at every tenth line as 10, 20, 30, 40, and so on.
Adding line numbers to a document has its advantages, especially for large documents with multiple pages.
This is useful when referring to a specific line or word in a document—like 254th line, or 4th word in the 50th line, and so on.
Just a note before we begin.
If you have tables, figures, or text boxes in your document, Word will count them as single line entities, regardless of how large they are.
Moreover, Word will display line numbers for documents only in the Print Layout, and not in Read Mode or Web Layout.
Let us start adding line numbers to our Word document.
Step #1: Open the Word document
Open the Word document where you want to add line numbers. On the top menu bar click on Layout to change the ribbon.

In the Page Setup section, click on Line numbers. Word opens a drop down menu with several choices:
- None
- Continuous
- Restart Each Page
- Restart Each Section
- Suppress for Current Paragraph
- Line Numbering Options
None—this is the default choice, where Word does not display any line numbering. This is also the choice if you want Word to stop displaying any line number.
Continuous—this choice allows Word to display a continuously incrementing line number on the left side of all lines throughout the document. Note that Word treats tables, images, and text boxes embedded in the document as a single line and numbers them as such.

Restart Each Page—as the choice suggests, Word restarts the numbering for each page.

Restart Each Section—If your document is divided into sections with a section break, Word will restart the numbering on each section, but you must turn on the numbering for each section separately. Additionally, as Word treats formatting of each section separately, you can have different numbering schemes for each of them. Note that Word attaches a line number to the blank line as well.

Suppress for Current Paragraph—If you have already adorned the document with line numbers regardless of page or section, this choice allows Word to remove line numbering from the paragraph immediately after the cursor, and arrange the line numbering for the following paragraphs accordingly.

Line Numbering Options—this option allows setting the defaults for line numbering options in a Word document. Clicking on this option opens a dialog box for Page Setup.

Click on the Layout tab. Click on the down arrow mark on the right of Apply to, to open the choices for where you would like to apply the selections. Word offers three options:
- This Section
- This Point Forward
- Whole Document

This section—the choices you make will apply only to the current section defined by the cursor location.
This point forward—the choices you make will apply to the section immediately following the cursor location.
Whole document—the choices you make will apply to the entire document.
Once you have made your selection, click on Line Numbers to open the next dialog box for Line Numbers. Word offers a number of choices here for adding line numbering and for placement of line numbers:

Add line numbering— Click on this option and ensure a tick-mark is present in the square on the left to allow making further choices.
Start at—this number tells Word how to start line numbering. For instance, setting Start at to 10, tells Word to start line numbering from 10, rather than from the customary 1.
From text—this setting defines the gap in inches or centimeters between the line number and the text in the line. Auto allows Word to make automatic adjustments.
Count by—this setting defines the increment Word uses when numbering lines. Default is 1, implying continuous numbering.
Restart each page—choosing this option sets the default for line numbering to restart on each page.
Restart each section—choosing this option sets the default for line numbering to restart on each section.
Continuous—Choosing this option sets the default for a continuously incrementing line numbering for the document.
Step #2: Close dialog box for line numbers
Once you have made your choices, click on Ok to close the dialog box and return to Page Setup dialog,

Step #3: Return to document
Close this by clicking on Ok to return to the document. By now, Word would have applied your choices of line numbering to your document.

Conclusion
It is easy to display line numbering in a Word document—once you know what type of line numbering you want. Just follow the simple three-step method we have outlined above.
Here is how you can add line number in a google doc.

When reviewing documents with others or creating a contract, you can enable line numbers in Word for handy reference points.
Using line numbers, you have handy reference points within your document. For things like contracts and scripts, or documents that you are reviewing with others, you can easily insert line numbers in Microsoft Word. And like many Office features, you have flexibility. You can decide how and where your line numbers appear.
To prepare you for using line numbers, we’ll show you how to insert them, your numbering options, and how to remove them if needed.
To use line numbers in Word, you must be in Print Layout view. Go to the View tab and click Print Layout in the Views section of the ribbon.
Next, insert the numbers by heading to the Layout tab. Click the Line Numbers button in the Page Setup section of the ribbon. Then, select the line numbering option you’d like to use from the following:
- Continuous: Numbers lines consecutively throughout the document.
- Restart Each Page: Begins with number 1 on each page.
- Restart Each Section: Begins with number 1 after each section break.

After making your selection, you’ll see the page numbers along the left side of your document.

Notes for Line Numbers
Here are a few notes for using line numbers in Word to keep in mind.
- A table counts as one line.
- A figure counts as one line.
- A text box counts as one line. If lines of text wrap around the box, those lines of text are counted. Lines of text inside the text box are not counted.
Customize Your Line Numbers
You have a few settings that you can adjust for your line numbers, such as spacing from text and the starting number.
To access these settings, click Line Numbers on the Layout tab and select Line Number Options. Click the Line Numbers button on the Layout tab of the pop-up window.

When the tiny Line Numbers window displays, start by checking the box at the top for Add line numbering. You cannot adjust the other options in the window if the box is unchecked.

Start at: Select a number if you want something other than number 1.
From text: The default setting is Auto, but you can use the arrows to select a specific spacing for the line numbers in relation to your text.
Count by: Rather than numbering each and every line, you can set a Count By number. For example, if you select 2, your line numbers will count by two, as in the screenshot below.

Numbering: Like the options in the Line Numbers drop-down box on the Layout tab, you can select Restart each page, Restart each section, or Continuous here as well.
After making your adjustments, click OK and then OK once more to apply them.
Remove Line Numbers in Word
If you want to turn off the line numbers, you can do this for the entire document or your current paragraph.
Click Line Numbers on the Layout tab. Then do one of the following:
- Select None to remove the line numbers from the entire document.
- Select Suppress for Current Paragraph to remove the numbering for a particular paragraph (where your cursor is located).

Get on the Same Page With Line Numbers in Word
Make sure everyone is on the same page, line, or paragraph with line numbers in Word. Whether you use them for a short time or keep them on the document forever, they come in handy!
For related how-tos, take a look at how to add page numbers to your documents and how to work with page and section breaks in Word.
Be sure to keep up with what’s new on groovyPost, follow us on Twitter!
![]()

Adding line numbers to a Microsoft Word document can help you point others to exact positions within it, especially in documents with multiple pages. Here’s how to quickly add line numbers in Word.
These instructions should work for recent Office versions (from 2010 onwards). Before you begin, note that Word will treat tables and text boxes as if they’re on a single line, regardless of how large they are.
Adding Line Numbers to an Entire Document
To start adding line numbers, you’ll need to open your Word document. In the ribbon bar at the top, click on the “Layout” tab. From here, click the “Line Numbers” button.
A drop-down menu offers several potential options. To have line numbers that run through your document continuously, rather than restarting on each new page, click on the “Continuous” option.

To have the line numbers restart on each new page, select “Restart Each Page” instead.
Once selected, the line numbers will appear on the left side of the document page.
Line numbers will appear only in the print view mode, so if you have another viewing mode selected, click on the “Print Layout” button in the bottom-right corner of your Word document window.
Adding Line Numbers to Individual Sections
It’s possible to separate pages of a Word document into individual sections using section breaks. You can set Word to restart the sequence of line numbers with each new section break.
RELATED: How to Find Section Breaks in a Word Document
In your Word document, click the “Layout” tab in the ribbon bar and then click on the “Line Numbers” button. Select “Restart Each Section” from the drop-down menu.
If you want to add a new section break, click the “Breaks” button. This is just above the “Line Numbers” button in the “Layout” tab.
From there, click “Continuous” to add a new section break without shifting the Word cursor to a new page.
A new set of line numbers will begin immediately underneath the newly-inserted section break.
Removing Line Numbers
If you’d prefer to remove line numbers from your document, in whole or in part, you can also do this from the “Line Numbers” menu (Layout > Line Numbers).
To remove them from your document entirely, click “None” in the “Line Numbers” drop-down menu.
If you want to hide them from a particular paragraph, click on the paragraph and then select “Suppress for Current Paragraph” from the “Line Numbers” drop-down menu instead.
This will completely remove the paragraph from the line numbers sequence. The sequence will restart with the following number on the next line immediately underneath the paragraph.
Line Number Formatting
By default, your line numbers will appear with the same font, size, and color as specified by the default “Line Number” style in Word. To modify the appearance of your line numbers, you’ll need to modify this text style, although Word hides it by default.
First, click on the “Home” tab in your ribbon bar. Click the vertical arrow menu button in the lower-right corner of the “Styles” section. This will bring up an extra pop-up “Styles” menu.
From there, click the “Options” button.
In the “Select Styles to Show” drop-down menu, select “All Styles” before clicking the “OK” button to save.
You’ll now be able to edit the “Line Number” font style.
In the pop-up “Styles” menu, find the “Line Number” option. Click on the side menu arrow next to the listing and then click on the “Modify” button.
In the “Modify Style” menu, edit the formatting options for your line number style, as appropriate.
Click “OK” to apply the new style to your line numbers.
Once applied, your new font style will be applied to all of the line numbers in your Word document.
READ NEXT
- › How to Number Paragraphs in Microsoft Word
- › HoloLens Now Has Windows 11 and Incredible 3D Ink Features
- › Google Chrome Is Getting Faster
- › BLUETTI Slashed Hundreds off Its Best Power Stations for Easter Sale
- › How to Adjust and Change Discord Fonts
- › The New NVIDIA GeForce RTX 4070 Is Like an RTX 3080 for $599
- › This New Google TV Streaming Device Costs Just $20
How to number lines and paragraphs in Microsoft Word and format the numbers with a different font, size or color.
When you’re discussing a speech or other document ‘in progress’ you might want to number the lines or paragraphs for easy reference “Please change paragraphs 6, 7, 21 and 27”. Sure, these days there’s a lot of linking and online collaboration but there’s still a place for line or paragraph numbering.
Line numbering will give you left hand line numbering like this:

Line numbering is simple. Paragraph numbering is done indirectly. As usual in Microsoft Office, there’s complications and surprising pitfalls. Office-Watch.com doesn’t just give you the simple ‘Microsoft approved’ answer but digs deeper.
Line Numbering
Line numbering is simple in Word. Go to Layout tab click on the small arrow at bottom right of the Page Setup section to reach the Page Setup dialog then Layout | Line Numbers. This dialog and option hasn’t changed for many versions of Word.

In Word the Layout tab has a Line Numbers pull down.

The full Line Numbering dialog has options for continuous line numbers or numbering for each page or section also the start number and increments. ‘From text’ controls the distance between the numbering and the document text.
Line numbering can be applied on a per-paragraph basis to selected paragraphs or the entire document. (Strictly speaking you can have line numbering for a single line but the results aren’t helpful – try for yourself).
Stop or Suspend Line Numbering
The line numbering can be stopped at any time or suspended for selected paragraphs via Line Numbering | Suppress for Current Paragraph or Paragraph dialog | Line and Page Breaks | Formatting exceptions | Suppress line numbers.
Change the look for line numbers
You can change the look of just the line numbers using the ‘Line Number’ style.

Line Number is one of those annoying hidden Word styles. It doesn’t show up in the ‘In use’ or ‘In current document’ style lists even when it’s being used in the document. You have to choose ‘All Styles’ to see the Line Number style and modify it.
Curiously, line numbering itself isn’t a formatting option in Paragraph styles. At least we can’t find it.
You can use a style to suppress line numbering at Format Paragraph | Line and Page Breaks | Formatting Exceptions | Suppress Line Numbers.
However styles can’t enable the line numbering in the first place. That’s a curious omission since Microsoft developers themselves should be aware of one common use for line numbering – in samples of computer code. These samples are usually formatted with a special style (fixed space font, indent and a special color) to which automatic line numbering would be very useful.
Paragraph numbering
Since there’s line numbering in Word, you’d expect to also find a paragraph numbering option. It’s common to find draft documents with paragraphs numbered so that people can refer to each by that number (“We mention government oversight in paragraphs 6, 7, 9 and 12”).
There’s no direct option for paragraph numbering in Word that works similarly to the line numbering feature.
The workaround is to use numbered lists instead. It’s not a good workaround but it’s what Microsoft leaves us with.
Select the paragraphs then choose Numbering to make a numbered list.

Unfortunately, the defaults for this also mess up the formatting of your document.

If the document already has numbers or lists, making this choice will override that formatting (we did say this is a workaround).
To fix the formatting, change the position of the numbers to put them in the margin as a hanging indent. You can do that by dragging the ruler markers to the left.

Or in the Format Paragraph dialog box, a Before Text indent plus a Hanging indent both of the same value.

You can create or modify a style to do this and turn on/off quickly.
Change look of Paragraph numbering
Paragraph numbering is formatted with the List Paragraph style. Or select one of the numbers so the whole column of numbers is selected, then change the formatting

Wish List
As usual, there’s features missing from Word’s numbering options that really should be present in such a long standing product. We mention these to save you the trouble of looking for options that Microsoft left out.
We’ve already mentioned there’s no real paragraph numbering option that numbers the paragraphs without changing the formatting of the document. This omission alone makes us wonder about Microsoft’s customer research and decision making process. There are plenty of ‘use cases’ for numbered paragraphs, especially in the legal profession.
Sometimes line/paragraph numbering should be on the right of the page. On the right it’s less obtrusive and would be more appropriate for ‘right-to-left’ languages.
For longer documents, it could be useful to show the line/paragraph number range in the header/footer for example “ Page 7 Paras 23-28 “ .
If you are looking for quick help to show or insert line numbers in Word:
- Go to the Page Layout Tab
- In the Page Setup category, click on the Line Numbering Button.
- A list of line numbering option will appear
- Select the Continuous option to number all lines consecutively
- Select the Restart Each Page option to restart line numbering on every new page.
These are the steps you may use to insert line numbers in
Word.
However, if you want more details, keep sliding down this page to learn everything about line numbering in MS Word.
This term can be a bit confusing for many.
A great number of MS Word users don’t even think that it is interesting to them, let alone relevant.
The case is different for others: attorneys to be specific. People
working with legal documents do in fact need to know the answer to “What
is the Line Number?”. I’m not an attorney though, but I do know that legal
documents do require line numbers running down the pages.
What are Line Numbers in Word?
Line numbers (not to be mistaken with numbered list) are numbers that count the number of lines in a Word document while showing the appropriate number beside each line of text.

By default, Word automatically counts and number every line in a document (except those in endnotes, footnotes, text boxes, tables, headers, and footers. However, you may not see these numbers because they are hidden. And until you take some steps to display it, you’ll never see it.
NOTE: Line numbers are different from a numbered list.
How to insert line numbers in word
Word automatically performs line numbering in your Word document; however, it doesn’t show the numbers. This means that if you want to see your document numbered line after line, then you need to take some action to display it.
Without further ado, below are the steps on how to insert
line numbers in Word:
- Click on the Layout tab.

- In the Page Setup category, click the Line
Numbering button
The Line numbering shortcut menu appears from which you can
select the numbering options. By default, the None option is selected in
all MS Word documents, which means “don’t show line numbers”.

- Choose the line numbering option you want.

- Continuous option will number all lines in the document consecutively from the first page to the last page.
- Restart Each Page option will restart the line numbering on every new page in the document.
- Restart Each Section (for multi-section document) will restart the line numbering on every new section in the document. If the document has only one section, then the Restart Each Section option will work just like the Continuous option.
PRO TIP: If you need only a portion of the document
numbered, use section breaks to set those portion or pages into their own
sections and apply the line numbering to that section only by using the Restart
Each Section option.
- Suppress for Current Paragraph can be used if you’ve inserted the line numbers already, but would like the current paragraph unnumbered.
How to remove line numbers in Word
To remove line numbering in Word:
- Go to the Page Layout Tab
- In the Page Setup category, click on the Line
Numbering Button. - A list of line numbering option appears
- Select None to remove the numbering completely
- Or select Suppress for Current Paragraph
to remove line numbers for the current paragraph only.
How to format line number in Word
If you desire to format line numbering in Word, you first need to display the line numbers dialog and then set some options, like how far away from the text the numbers should appear.
To format line numbers, obey the following steps:
- Click on the Layout tab
- In the Page Setup group, click the Line
Numbering button.
- A shortcut menu appears, click on the Line
Numbering Options.

The Page Setup dialog will appear.

- On the Page Setup dialog box, click on the
Layout Tab - Now click on the Line numbers… button.
The Line Numbers dialog appears.

Almost all the options on this dialog box are already in the Line Numbers shortcut menu. The only item that isn’t there, however, is the From Text option which can be used to adjust the distance between the text and the line numbers.
Basically, this is all about line numbers in Word you should
know.
If you have any questions, you can post them in the comment section below this article.
When submitting a manuscript to a journal, for example, it is often required to include line numbers within the document to make it easier when reviewing. In this walkthrough, I will explain how to insert line numbers to a document in Microsoft Word.
1. Open a document in Word
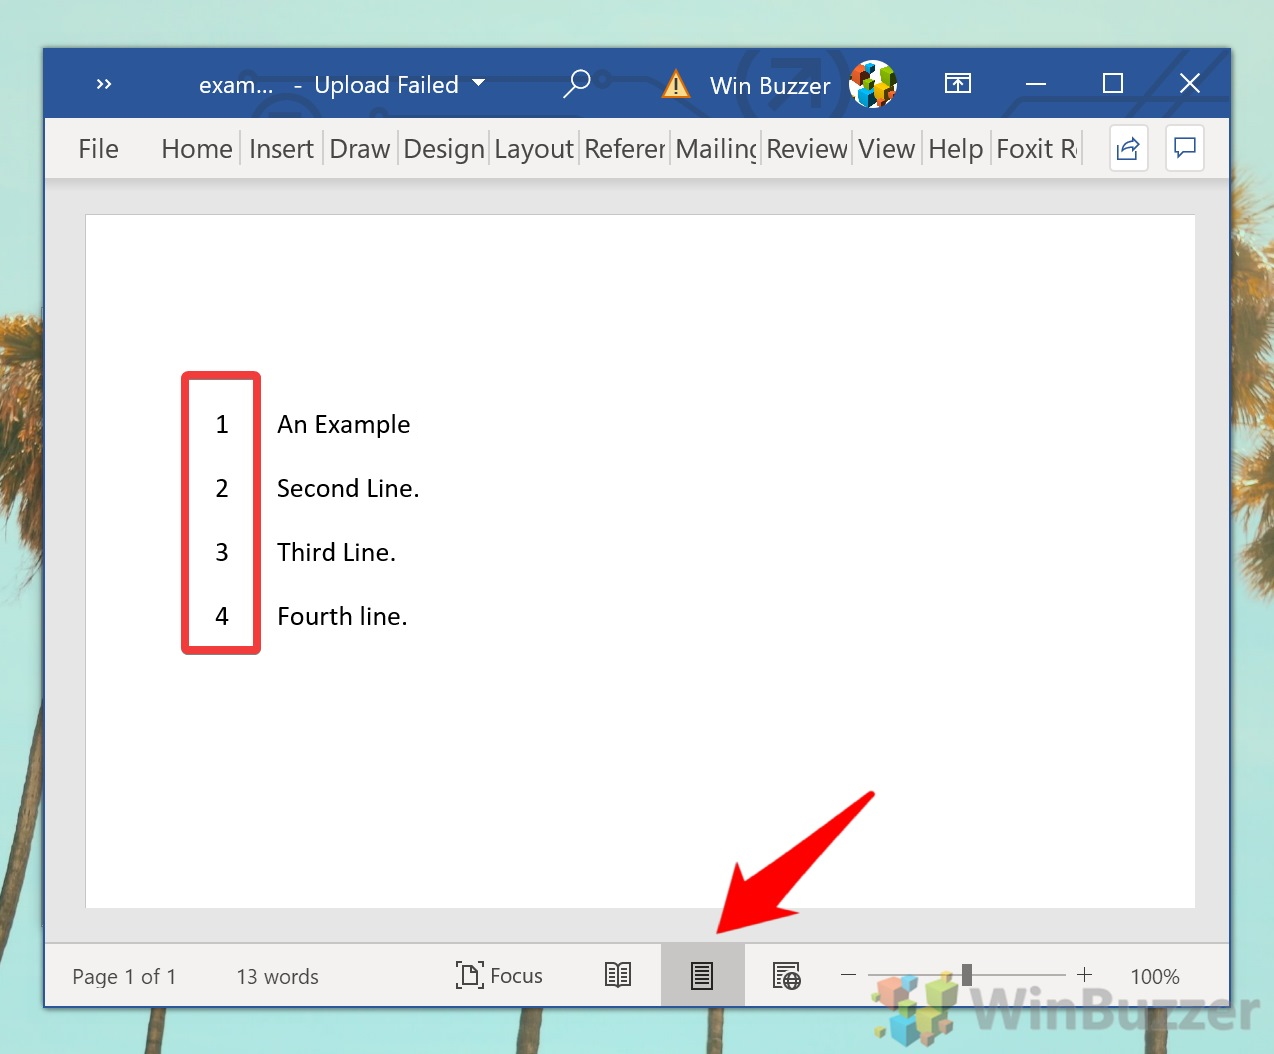
The first thing to do is to open a document in Microsoft Word, or create a new one for that matter. In the example below, I have created a one-page document with text denoting each line.
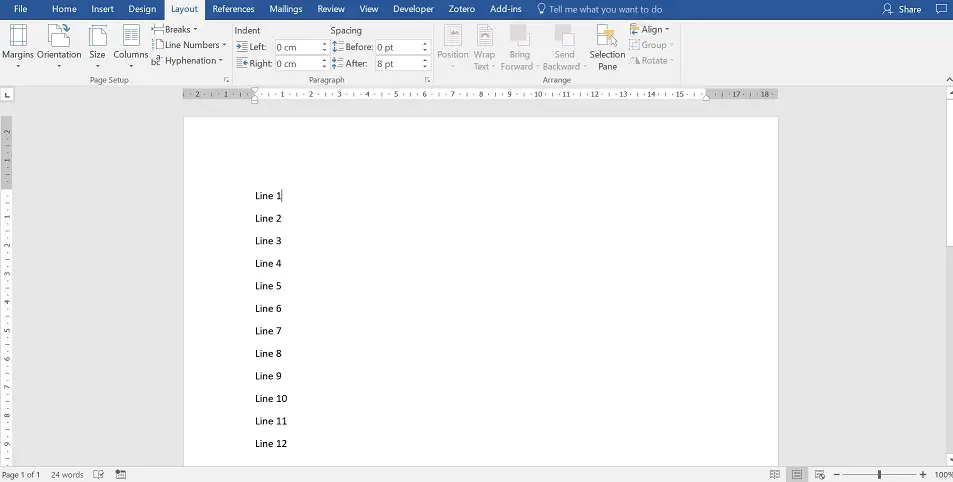 What I want to do here is to add line numbers, which will be placed along the left side of the document.
2. Find the ‘Line Numbers’ tab
To insert line numbers in Word, you must go to ‘Layout > Line Numbers‘ tab. You will notice a small arrow next to the button. Click the button to see the options.
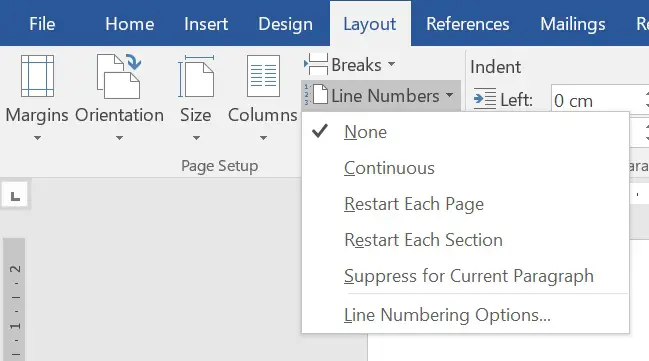 The option should be set to ‘None‘ as default. Below this, there are different options to choose from, each of which are summarised below.
- Continuous: By selecting ‘Continuous‘, line numbers will be added onto every page within the document. The line numbers will be in ascending order as you go down the document, and the sequence will continue into other pages.
- Restart Each Page: This option adds line numbers into each page, however, the numbering will start at 1 again on each new page.
- Restart Each Section: If you select ‘Restart Each Section‘ the line numbering will restart after each section break, if you have these in the document.
- Suppress for Current Paragraph: The ‘Suppress for Current Paragraph‘ option can be picked alongside any of the above. You can turn off line numbering for individual paragraphs if you so wish.
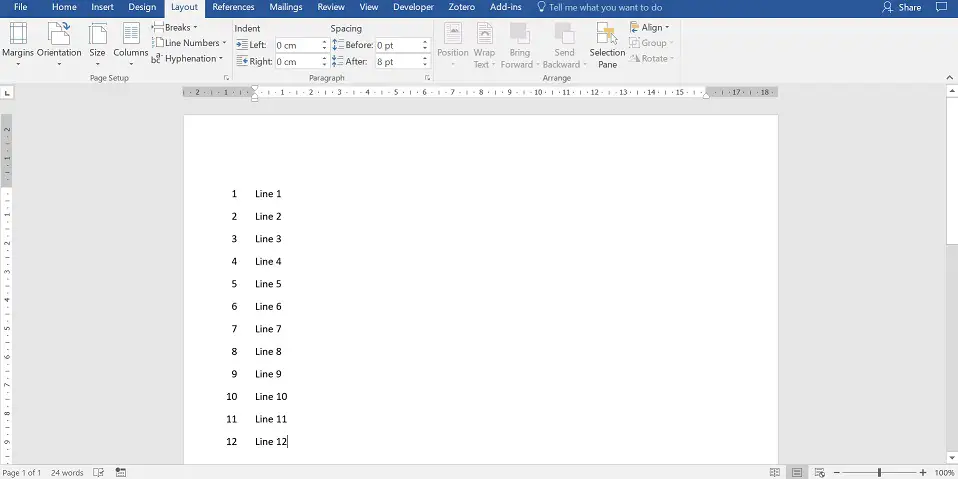
For our example, I will just select the ‘Continuous‘ option. Here is what it now looks like.
 3. Advanced line number settings
 3. Advanced line number settings
From the line numbering dropdown options, you will notice at the bottom it says ‘Line Numbering Options‘. If you select this, a new window will open called ‘Page Setup‘. From here, click the ‘Line Numbers…‘ button towards the bottom. A new small window will open called ‘Line Numbers‘.
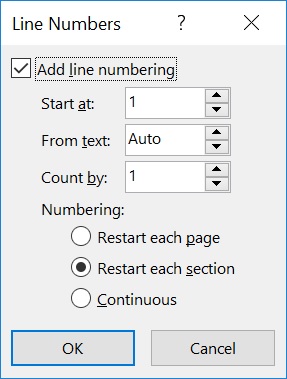 This window will enable further advanced settings, such as changing what number the numbering starts and by what count.
Once you have tweaked these, click the ‘OK‘ button and then the ‘OK‘ button in the ‘Page Setup‘ window to save the changes.
Microsoft Word version used: 2016