
Create and print labels

Create and print a page of identical labels
-
Go to Mailings > Labels.
-
Select Options and choose a label vendor and product to use. Select OK.
If you don’t see your product number, select New Label and configure a custom label.

-
Type an address or other information in the Address box (text only).
To use an address from your contacts list select Insert Address
. -
To change the formatting, select the text, right-click, and make changes with Font or Paragraph.
-
Select OK.
-
Select Full page of the same label.
-
Select Print, or New Document to edit, save and print later.
 .
.If you need just one label, select Single label from the Mailings > Labels menu and the position on the label sheet where you want it to appear. Select OK, the destination, and Save.
Create and print a page of the same label
-
Go to Mailings > Labels.
-
In the Address box, type the text that you want.
To use an address from your contacts list select Insert Address
. -
To change the formatting, select the text, right-click, and make changes with Home > Font or Paragraph.
-
In the Label Options dialog box, make your choices, and then select OK.
If you don’t see your product number, select New Label and configure a custom label.
-
Select OK.
-
Select Full page of the same label.
-
Select Print, or New Document to edit, save and print later.
 .
.Set up and print a page of the same label
-
Go to Mailings > Labels.
-
Select Options.
-
Choose Printer type, Label products, and Product number.
If you don’t see your product number, select New Label and configure a custom label.
-
Select OK.
-
Type an address or other information in the Delivery Address box.
To use an address from your contacts list select Insert Address
. -
To change the formatting, select the text and then select Font to make changes.
-
Select Full page of the same label.
-
Select OK.
-
Select Print, or New Document to edit, save and print later.
 .
.For info about merging data with labels, see Create mailing labels in Word by using mail merge or Mail merge in Word for Mac.
If you want to make return address labels, see Create return address labels.
Word for the web doesn’t support directly creating labels. However you can create labels from a template.
-
Open Word for the web.
-
Select a label template when you create a new document. Select More templates if you don’t see what you want.
You can also go to templates.office.com, and search for label.
-
For a sheet of identical labels, fill out one label, and then copy/paste for the rest.
Tip: Print your labels to a sheet of paper before loading labels into the printer to make sure the text aligns with the labels.
See also
To create a page of different labels, see Create a sheet of nametags or address labels
To create a page of labels with graphics, see Add graphics to labels
To print one label on a partially used sheet, see Print one label on a partially used sheet
To create labels with a mailing list, see Print labels for your mailing list
To create labels using a template, see Microsoft label templates
Need more help?
 Please Note:
This article is written for users of the following Microsoft Word versions: 97, 2000, 2002, and 2003. If you are using a later version (Word 2007 or later), this tip may not work for you. For a version of this tip written specifically for later versions of Word, click here: Sequentially Numbered Labels.
![]()
Written by Allen Wyatt (last updated July 31, 2021)
This tip applies to Word 97, 2000, 2002, and 2003
If you work in a business where you need to sequentially number items, you might be wondering if there is a way you can use Word to create the labels for you. Word has many ways you can implement some type of numbering in your documents. For instance, you can use different fields for numbering, or use numbered lists, the captioning feature, or you can use mail merging. While all of these features (and more) use some type of numbering in them, they are not all well suited to creating labels.
Perhaps the easiest way to set up labels that have sequential numbers is to use the Envelopes and Labels capability of Word in concert with the SEQ field. Simply follow these steps:
- Use the Envelopes and Labels option from the Tools menu to create a sheet of blank labels.
- In the top-left label, type the word Exhibit, followed by a space.
- Press Ctrl+F9. Word inserts a pair of field braces in the label.
- Type SEQ and a space.
- Type a name for this sequence of numbers, such as «exhibit» (without the quote marks).
- Press F9. The field is collapsed and a number appears in your label.
- Format the contents of this first label any way you desire.
- Copy the first label by selecting it and pressing Ctrl+C.
- Select each of the other labels in the first row in turn, and press Ctrl+V. You should now have a complete row of the labels.
- Select the other, blank rows of labels and delete them.
- Select the entire first row of labels and press Ctrl+C.
- Press the right arrow, which should place your insertion point immediately after (beneath) the first row of labels.
- Press Ctrl+V to paste a new row of labels. You should now have two rows of labels, correctly formatted. (Don’t worry yet that they have the same numbers on them.)
- Press Ctrl+V for each additional row of labels you want. You want enough rows of labels to meet your entire needs. Thus, if you need a total of 125 labels, and you can get 3 labels per line, you should end up with 42 rows of labels.
- Press Ctrl+A to select everything in the document.
- Press F9. This updates all the fields in what you selected. All your numbering should now be correct.
If you prefer to not use the SEQ field to create the labels, you can also create them doing a mail merge. Conceptually, you only need to do the following:
- Create an Excel worksheet that has as many numbers in it as you need. For instance, if you need 175 labels, you would place a title in cell A1 (such as «Number») and the 175 numbers you need in cells A2 through A176. Make sure you save the workbook.
- In Word, choose Mail Merge from the Tools menu. This displays the Mail Merge Helper dialog box.
- Go through the steps of creating a new document consisting of labels and specifying your data source (the worksheet you created in step 1).
- Create the sample label so that it has the word Exhibit followed by a merge field that represents the number being pulled from the Excel worksheet. Make sure the label contents are formatted the way you need them.
- Merge the information to a new document. You should now have a document that has all your labels in it, and you can print them as desired.
Of course, there are third-party solutions that are available for creating sequentially numbered labels. One that comes highly recommended by several WordTips subscribers is Bates Labels from Payne Consulting (http://www.payneconsulting.com). This free Word template allows you to easily create as many labels as you need for a specific purpose.
WordTips is your source for cost-effective Microsoft Word training.
(Microsoft Word is the most popular word processing software in the world.)
This tip (1492) applies to Microsoft Word 97, 2000, 2002, and 2003. You can find a version of this tip for the ribbon interface of Word (Word 2007 and later) here: Sequentially Numbered Labels.
Author Bio
With more than 50 non-fiction books and numerous magazine articles to his credit, Allen Wyatt is an internationally recognized author. He is president of Sharon Parq Associates, a computer and publishing services company. Learn more about Allen…
MORE FROM ALLEN
Speeding Up Mail Merges
The Mail Merge tool in Word is a great way to create new, customized documents. If you are doing a lot of merging, you …
Discover More
Inserting a Document’s Size
Want to insert the size of your document directly into the document body? You can do so by using one of the dynamic …
Discover More
Inserting from the Clip Art Gallery Doesn’t Work
Ever insert a picture and it won’t display in your document? It could be due to some of the display settings in Word. …
Discover More
Tables are visual displays of data arranged in rows and columns. Table cells contain numbers, text, or a combination of numbers and text. Some cells can include images, symbols, links, and other objects. See how to create and modify tables in Word.
Each table should be referenced in the document content. Typically, tables have a number and a title, which are referenced. Microsoft Word offers functionality to create automatically updated numbers for figures, tables, and equations. The numbers and titles, created using the Captions functionality, are used to cross-reference tables in a document and create a List of Tables.
The word Table and a number identify a table then follows the caption. A caption is a short block of text that explain table contents without referring to the document content:

See more about creating numbers and captions for figures: images, pictures, charts, etc., creating captions for equations, and creating captions for photographs.
Attention! We highly recommend checking the formatting requirements, accepted by your college, university, company, or established on the project, etc.
Insert a caption for tables
To add automatically updated numbers and a title (caption) for a table, select it by:
- Selecting all rows or columns of the table one by one, or
- Moving the mouse over the table until you see the table selection icons in the upper-left corner of the table and clicking it:

Note: You can also click on the table selection icon in the bottom-right corner for the same effect. See how to select table elements for more details.

After selecting a table, do one of the following:
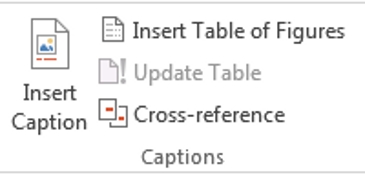
- On the References tab, in the Captions group, click the Insert Caption button:

- Right-click on the selection and select the Insert Caption… in the popup menu:


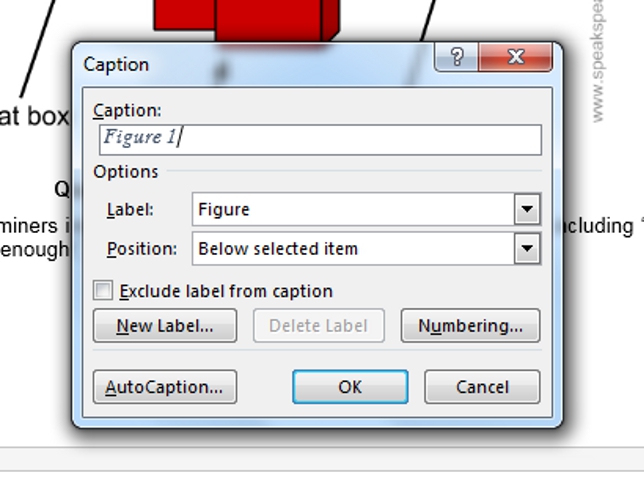
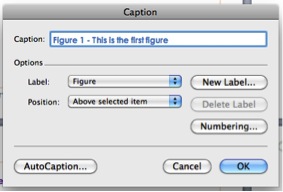
In the Caption dialog box:

Select the label and its position
- Under Options:
- From the Label dropdown list, select the item type you need:

- Table,
- Equation – see how to create captions for equations,
- Figure (selected by default) — see how to create captions for figures,
- Another label (in this example, My Caption) was created using the New Label… button (see how to create a new label below).
Note: Remember that each type of object you labeled will be numbered sequentially within its group.
- From the Position dropdown list, select one of the options:
- Above selected item (selected by default for the Table label), or
- Below selected item (selected by default for the Figure label).
Note: The captions for tables are usually located above the tables.
- From the Label dropdown list, select the item type you need:


Exclude label from caption
- Select the Exclude label from caption check box if you don’t need to add the label to the caption:
Some requirements recommend using the lowercase word table instead of the automatically added Table in Word cross-references.
The option Exclude label from caption hides the label from being displayed in cross-references or a List of Tables.
For example:
- When you insert a cross-reference with the selected option Entire captions or Only label and number (see more details how to use cross-references in Word), Word adds the capitalized label and number, as you see in the Caption field of the Caption dialog box. E.g., “are listed in Table 3” or “are listed in Table 3 Number of articles by statuses and products”.
- All captions, created with selected option Exclude label from caption, Word adds in cross-references as their numbers without the labels. Type the word table (as required) and insert a reference to a caption (e.g., “are listed in table 3”).

Add a new label
- Click the New Label… button to create a new label:
In the New Label dialog box, type a new label name:


Note: See also how to delete a custom label.
Modify caption numbering
- Click the Numbering… button if you want to change any of the numbering options:
In the Caption Numbering dialog box:

- In the Format dropdown list, select the numbering format you need (some requirements recommend using Latin capital letters instead of numbers for tables):
- Select the Include chapter number check box to include the chapter number in the caption number. After selecting this option, two more options will be unlocked:
- From the Chapter starts with style dropdown list, select the heading level you need to include in the caption:
- In the Use separator dropdown list, select the punctuation you need to insert between the chapter number and the table number:
- At the bottom of the dialog box, see how your choices will look in the Examples section. E.g., Table 2.3” means the third table in chapter 2.
- Click the OK button.
- From the Chapter starts with style dropdown list, select the heading level you need to include in the caption:


Add a title
- To add the text of your caption, click after the table number and enter the text. E.g.:

Notes:
- There are several standard requirements for table titles:
- Chicago style recommends using the table title in line with the label and number. E.g.:

- In opposite, APA (American Psychological Association) and MLA (Modern Language Association) styles recommend using the table title with one double-spaced line below the table number (see how to adjust line spacing). E.g.:

To create such a title, don’t type any text in the Caption field, leave it, then do the following:
- Create a caption without a title.
- Position cursor after a caption number and add a new line (by pressing Shift+Enter) in which type of title you need.
Note: You can press Enter and create a new paragraph instead of a new line. See how to create a List of Tables (Table of Figures) for more details.
- Format the caption to adjust line spacing (see how to change caption line spacing).
- In addition, MLA style recommends using a hanging indent to the second line of long titles. E.g.:

- Chicago style recommends using the table title in line with the label and number. E.g.:
- Word offers very helpful functionality to create a text that can be displayed in a List of Tables instead of a caption text. See how to create a Table of Contents Entry.
- For most requirements, the number and the title should be without an ending period. If you need a period after a number, type it in the Caption field.
- If a table spans more than one page, the first page of that table should have a complete caption; the subsequent pages should have an abbreviated caption consisting of a label, a number, and the word Continued. E.g., “Table 3. Continued”.


Using an AutoCaption
See Adding captions with AutoCaption.
Group a table and its caption
According to all requirements, a table (or its part) with its caption should appear on the same page. Word adds captions for tables as a regular paragraph with selected Keep with next option. See how to keep lines and paragraphs together for more details.
See also how to keep a table row on one page and keep a table on one page of a Word document.
Edit or modify a caption
Microsoft Word adds numbers in captions as fields.
![]()
You can show all fields in a document with a gray background, see how to turn on or turn off highlighting of fields in a Word document.
- Labels:
If needed, you can change the label. Word for Microsoft 365 will update the reference if available. In this case, Word will not create a new label and a separate numbering. Be careful!
- Numbers:
DO NOT edit caption numbers! If you change a number:
- In some cases, Word will update it, and you will lose your changes,
- Otherwise, the caption number may stop updating automatically.
- Text:
To add or modify a caption text, click on it and change what you need, like in a regular paragraph.
Do not forget to format a caption according to the requirements you use!
Delete a caption and an unnecessary label
If you need to remove some caption, select the caption paragraph (full line or several lines) and press Delete. Do not forget to update fields in the document!
To remove the unnecessary label, do the following:
1. Open the Caption dialog box.
2. In the Label dropdown list, select the label you want to remove.
3. Click the Delete Label to remove a custom label:

Note: You can’t delete predefined labels: Equation, Figure, and Table.
Update caption numbering
Word automatically updates references and numbering if you insert a new text. However, copying, deleting, or moving context often leads to confusion in the document. After such operations, you have to update all dependencies manually.
To update fields in the document, select the entire document by clicking Ctrl+A, and do one of the following:
- Press F9,
- Right-click on any of the fields and select Update Field in the popup menu:


Word will update all fields. You can be sure that the numbering and references are correct.
We strongly recommend checking a document at least visually after changes!

To number an equation in Word, select the equation and go to References > Insert Caption, then click «New Label» and choose your number format. To label the equation, change the «Label» option in the Caption dialog box to «Equation.»
If the document you’re creating includes equations, you might plan to number or label them. For both standard and nonstandard formatting, we’ll show you how to add numbers and labels to equations in Microsoft Word.
Whether you plan to use a table of figures or not, numbers allow you to reference your equations. And you might have a requirement to use customary numbering for the equations in your document. According to sources, including Purdue Online Writing Lab (OWL), the standard is Arabic numerals in parentheses and right-aligned.
You can accomplish all of this using the caption feature in Microsoft Word with a few tweaks. So, open your document and select your first equation. On the References tab, click “Insert Caption” from the Captions section of the ribbon.

While Word does offer a feature for labeling equations here, you’re only numbering them with parentheses in this instance. This means creating a new label. Click “New Label.”
In the New Label window, type your left parenthesis and hit “OK.”
If you want to select a different number format, click “Numbering,” choose what you’d like to use, and click “OK.”
You’ll see the starting parenthesis with the first number per the formatting that you selected. Type a space, and then your closing parenthesis. Optionally, select a Position for the caption and click “OK.”
Now that you have your equation number, select it and go to the Home tab. Click “Align Right” in the Paragraph section of the ribbon.
This scoots the number caption to the right where it belongs.
If you need to remove the default italics from the caption, select it, go to the Home tab, and deselect “Italics” in the Font section of the ribbon.
You can follow the same process to add numbers to your remaining equations. You already have the new label ready, so click “Insert Caption” from the ribbon. The sequential number is automatically inserted into your parenthesis caption. Just type your space and closing parenthesis and click “OK.”
Then, right-align the next caption in the document, and you’re set!
Label Equations in Microsoft Word
If the document you’re creating with your equations is for personal use or doesn’t need to follow a standard numbering convention, you can caption your equations with labels, if you like.
Open your document and select your first equation. On the References tab, click “Insert Caption” from the Captions section of the ribbon.
In the Caption pop-up window, select “Equation” next to Label. This sets both the word and the number as the caption. Optionally, select a Position for the caption and click “OK” to apply the caption.
Again, you can adjust the text for the caption or align it on the page using the Font and Paragraph sections on the Home tab.
Add any subsequent equation captions that you need the same way, and you’ll see each numbered sequentially next to your label.
If you need help writing your equations, take a look at our how-to for using the ink equation feature.
RELATED: How to Make a Fraction in Microsoft Word
READ NEXT
- › How to Type the X-Bar Symbol in Word
- › How to Cross-Reference in Microsoft Word
- › How to Make a Fraction in Microsoft Word
- › How to Use the Ink Features in Microsoft Office
- › Learn These Microsoft Word Features to Make College Easier
- › The New NVIDIA GeForce RTX 4070 Is Like an RTX 3080 for $599
- › BLUETTI Slashed Hundreds off Its Best Power Stations for Easter Sale
- › HoloLens Now Has Windows 11 and Incredible 3D Ink Features
-
1
Obtain the labels you need. Labels come in different sizes and for different purposes, for everything from regular, no. 10 envelopes to legal-sized mailings and CD covers. Get the labels that are best-suited for your project.
-
2
Create a new Microsoft Word document. Double-click the blue app that contains or is shaped like a «W«, then double-click Blank Document» in the upper-left part of the opening window.
Advertisement
-
3
Click the Mailings tab. It’s at the top of the window.
-
4
Click Labels under the «Create» menu. It’s at the far-left of the toolbar.
- If prompted, click OK to grant Word access to your contacts.
-
5
Add text to the label. Do so by typing a recipient’s address, name badge text, CD label, etc., in the Delivery Address field or by clicking the address book icon to the right of the field, selecting a recipient and clicking Insert.
-
6
Click Font…. This dialog box allows you to customize the look of the labels by selecting a font, text size, text color, and style.
-
7
Customize the label text and click OK.
-
8
Click Options…. It’s a button in the Label section of the dialog box.
-
9
Click the radio button next to your printer type.
-
10
Click the «Label products» drop-down menu.
-
11
Select your label manufacturer.
- If your manufacturer isn’t listed, examine the label packaging for the label dimensions and the number per sheet. With this information, you can select an equivalent product.
-
12
Click the «Product number» drop down.
-
13
Click the product number for your label. It should be clearly marked on the packaging.
-
14
Click OK.
-
15
Select the number of labels you’re printing.
- Click Full page of the same label to print a full sheet of the label
- Click Single label and then identify the row and the column on the label sheet where you’d like the label to be printed.
-
16
Insert the blank label sheet into your printer. Make sure you have them aligned correctly for your printer.
-
17
Click Print….
- Make sure the print preview of the labels looks the way you want it to.
-
18
Click Print. Your label(s) will print.
- Click File in the menu bar and Save if you want to save this label template for future use.


Advertisement
-
1
Obtain the labels you need. Labels come in different sizes and for different purposes, for everything from regular, no. 10 envelopes to legal-sized mailings. Get the labels that are best-suited for your project.
-
2
Prepare your mailing list. Word can pull names and addresses from an Excel spreadsheet, an Access database, your Outlook contacts, or on Mac, your Apple contacts or a FileMaker Pro database. You can also type a new mailing list during the merge, if you prefer.
-
3
Create a new Microsoft Word document. Double-click the blue app that contains or is shaped like a «W«, then double-click Blank Document» in the upper-left part of the opening window.
-
4
Click the Mailings tab. It’s at the top of the window.
-
5
Click Start Mail Merge and Labels…. It’s at the far-left of the toolbar.
- If prompted, click OK to grant Word access to your contacts.
-
6
Click the radio button next to your printer type.
-
7
Click the «Label products» drop-down menu.
-
8
Select your label manufacturer.
- If your manufacturer isn’t listed, examine the label packaging for the label dimensions and the number per sheet. With this information, you can select an equivalent product.
-
9
Click the «Product number» drop down.
-
10
Click the product number for your label. It should be clearly marked on the packaging.
-
11
Click OK.
-
12
Click Select Recipients…. It’s at the left of the toolbar.
-
13
Select your mailing list. Click on the source of the addresses you want to put on the labels.
- If you want to create a new list at this point, click Create a new List….
- If you don’t want to create labels for your entire mailing list, click Edit Recipient List and select the recipients you want to include.
-
14
Click Address Block.
- On Mac, click a line near the top of the first label, and click Insert Merge Field, then select a field you want to include, such as «First_Name.» Repeat this process for each field you want to include, adding the appropriate spacing and address formatting.
-
15
Select the elements you want to include on the labels. These include name format, business, name, etc.
-
16
Click OK.
-
17
Click Update Labels. It’s an icon in the toolbar with a green «refresh» symbol.
-
18
Click Preview Results in the toolbar. Make sure the labels look the way you want them to.
-
19
Insert the blank label sheets into your printer. Make sure you have them aligned correctly for your printer.
-
20
Click Finish & Merge and Print Documents…. It’s at the far right of the toolbar.
-
21
Click Print. Your label(s) will print.
- Click File in the menu bar and Save if you want to save this label template for future use.


Advertisement
Add New Question
-
Question
When I type a sheet of labels, sometimes a second blank page appears. How do I remove the second page?

Go to the bottom of the first page, and hit the ‘delete’ key — it should go away.
-
Question
How do I print labels that are all different addresses?
Use a mail merge. Add all of the different addresses, then print each one.
-
Question
How do I make a full page of address labels?
There should be an option called «mail merge.» You need a mailing list and your document; the list can be a spreadsheet, an Outlook directory etc.
See more answers
Ask a Question
200 characters left
Include your email address to get a message when this question is answered.
Submit
Advertisement
Thanks for submitting a tip for review!
About This Article
Article SummaryX
1. Create a new Word document.
2. Click Mailings.
3. Click Labels.
4. Add the label text.
5. Customize the printing layout.
6. Choose your label manufacturer.
7. Click OK.
8. Click Print.
Did this summary help you?
Thanks to all authors for creating a page that has been read 702,273 times.
Is this article up to date?
This tutorial shows how to add heading numbers in Microsoft Word. The heading numbers can include labels such as “Article,” “Section,” and “Chapter.”
We will also look at how to modify the numbers and labels attached to each heading level. For example, you may want to change “Article I” to “Proposal 1.”
Quick Links:
- How to Add Heading Numbers
- How to Modify Heading Numbers
This tutorial’s companion video shows all the steps in real time.
Watch more than 200 other writing-related software tutorials on my YouTube channel.
The images below are from Word for Microsoft 365. These steps also apply to Word for Microsoft 365 for Mac (a.k.a., Word for Mac), Word 2021, Word 2019, Word 2016, and Word 2013.
How to Add Numbers to Headings
Important Notes
- This process is for existing headings created with Word’s built-in heading styles.
- You don’t have to have every heading complete. However, the first Heading 1 level should already be inserted.
- If you are new to working with headings or need a refresher, please see “How to Create and Customize Headings in Microsoft Word.”
- Select the Heading 1 in your document.

- Select the Home tab in the ribbon.

- Select the Multilevel List button in the Paragraph group.

- Select a style from the List Library. Remember that you can modify these styles, so choose the one that is closest to the format you want.
Pro Tip: Hover over each option to see a larger example.

Your headings should now feature the multilevel list numbers.

These steps assume you have already added numbers to your headings, as shown in the section above.
Important Note: Word’s Multilevel List function includes many advanced options. This section features the options I believe are the most useful for the majority of people.
- Select the first numbered heading in your document.
- Select the Home tab in the ribbon (see figure 2).
- Select the Multilevel List button in the Paragraph group (see figure 3).
- Select Define New Multilevel List from the drop-down menu.

- Select a level in the Click level to modify menu in the Define new Multilevel List dialog box.

-
- Type the words, symbols, or punctuation before or after the number in the gray shading in the Enter formatting for number text box.
Important Note: Don’t delete or alter the number in the gray shading. If you delete or alter the number in the gray shading, the automatic numbering will stop functioning.
Pro Tip: If you add words, symbols, or punctuation after the number, also add a space after the final character so that a space appears before the heading text.

- (Optional) Choose a new number style from the Number style for this level menu.

- (Optional) Select the Font button to change the font, style, size, color, and other appearance options.

- (Optional) Adjust the number position as necessary.

- Select the More button.

- (Optional) Enter a different number in the Start at text box if you don’t want the level to start with the current number.

- (Optional) Select Space, Tab character, or Nothing from the Follow number with menu. For most users, Space will be the best option. (The Tab character can put too much space between the number and label and the heading text.)

- Select the next heading level that you want to modify in the Click level to modify text box (see figure 8).
- Repeat steps 6 through 13, as necessary.
- Select the OK button.

Your heading numbers should now be modified.

Related Resources
How to Add Heading Numbers to Table Titles and Figure Captions in Microsoft Word (PC & Mac)
How to Create Run-In Headings in Microsoft Word (Indented & Left-Aligned)
How to Create a Custom Heading Style in Microsoft Word
How to Create a Custom Heading Style in Microsoft Word for Mac
Updated March 18, 2023

When you are writing an academic document, make sure that you label tables and figures correctly. This is paramount; incorrectly labelled tables and figures can cost you vital marks!
If you can’t work out how to do this, or if you are worried about it, you can always get it checked by a professional. However, if you want to learn how to do it yourself, read on!
How to Label Tables
Tables usually need to have a label positioned above the table itself. Number tables sequentially (i.e. ‘Table 1’, ‘Table 2’, etc.) and make sure the label explains exactly what data the table presents.
For example, if the first table in your document contains information about commuting by bicycle in Melbourne during 2014, you might label it:
Table 1: Daily Commutes Made by Bicycle in Melbourne, 2014.
How to Label Figures
Figures and graphs usually need to have a label positioned below the figure or graph. As with tables, make sure to number the figures in your document sequentially and to use labels that explain the data clearly and accurately.
How to Insert a Label in Microsoft Word
Labels for tables and figures are known as ‘captions’ or ‘legends’. To insert a caption in Microsoft Word, here is what you need to do:
On a PC
Select the item that needs the caption and go to References > Insert Caption.
Find this useful?
Subscribe to our newsletter and get writing tips from our editors straight to your inbox.
Next, the caption menu will appear.
Here, the first part of the caption will be auto-filled. The default is set to ‘Figure’, which can be applied to images and graphs. You can also select a ‘Table’ label from the dropdown menu. These automatically update to the next number, so if two figures have already been captioned this way, the caption box will display ‘Figure 3’.
The rest of the settings can typically remain the same unless you are using a different numbering system.
On a Mac
Select the item that needs the caption and go to Insert > Caption. This will make the caption menu will appear.
The rest of the process is the same as with a PC.
Using the caption function rather than manually writing out labels will make it easier when you come to inserting a table of figures or tables. Good luck!
Multilevel numbering in Word is the #1 headache for many people working with large documents.
Believe it or not, it’s not complicated. It just takes somebody to lead the way and point out the pitfalls you need to avoid.
Today that pleasure falls to me!
Before I start, grab your free multilevel numbering troubleshooting guide that shows you the steps to get multilevel numbering working properly first time, every time, together with answers to over 20 FAQs and plenty of real client examples constructed step by step to help you fix what isn’t working with your numbering.

1. What Multi-level Numbering Looks Like
Often used in the legal profession or in large corporate documents, multilevel numbering creates a logical hierarchy and easy navigation within the document. The headings can also be summarised later on in a table of contents. Here is a simple example:

2. How to Set Up Multilevel Numbering
Here is the correct process:
1. Select the text that you want to number (this can be a section of text or the whole document).

2. Select the Home tab.
3. Click the multilevel numbering icon in the Paragraph group.
![]()
4. You can either select an existing layout from the list to use as a starting point, or you can create a new numbering system from scratch. As you hover over each thumbnail image, Word provides a larger image of the numbering system.
5. Choose Define New Multilevel List to display the control dialog.

The dialog box can be broken down as follows:
Step #1 Click level to modify
In the top left is a list of levels. As you select each level, the settings in the rest of the dialog box changes.
Level 1 is the highest level, i.e. the main headings such as chapter or section titles.
Level 2 is subordinate to level 1.
Level 3 is subordinate to level 2.

Step #2 Enter formatting for number
This is where the level number is constructed. If you include a previous level number, it will be displayed with a grey background, as will the number for the current level.
Type anything you wish to put in between the numbers such as dots, dashes, brackets etc.
Clear any text in the ‘Enter formatting for this number’ box.
Step #3 Include level number from
When creating a subordinate level (or child level), you can first specify the level number of the parent.
For example, for section 3.2
- ‘3’ is the parent level (level 1) and
- ‘2’ is the child level (level 2)

Step #4 Number style for this level
Each level can have its own number style. It may be a standalone style, e.g. 1, 2, 3 or a, b, c or continue on from a higher level, e.g. 1.1.1 or 1.a.i.
- When creating 1.1 numbering, this option is 1, 2, 3.
- When creating 1.a numbering, this option is a, b, c

Step #5 Font
Set the font formatting for the selected level, if you want.

Step #6 Position
What position from the left margin do you want items for each level of numbering. For example, level 1 items may be 0cm from the left margin, level 2, 1cm from the left margin and level 3, 2cm from the left margin.
Here’s what they mean:
- The Aligned At determines how far from the left margin the number appears.
- The Text indent at figure determines how far from the left margin the text following the number is.

6. Click OK to save all the settings and close the dialog box.
The text you selected in step 1 now looks like this.

The next part is where the magic happens …
3. How to Apply Multilevel Numbering
Once you have created your numbering system:
1. Position the cursor at the beginning of a line.

2. Press the TAB key to move the text down a level (demote).

3. Press the SHIFT and TAB keys together to move the text up a level (promote).

If you prefer, you can also click the indent icon to demote and the outdent icon to promote between levels.
![]()
4. How to Change Multilevel Settings
Once you have created your numbering system:
1. Reselect all text that is using the multilevel numbering.
2. Click the multilevel numbering icon and select Define New Multilevel List (yes, you choose this option even if you are modifying an existing multilevel list).

The original settings that you defined are redisplayed.
3. In the top-left box select the level that you wish to change, then change your settings.
4. Repeat for the other settings.
5. Click OK to save the settings. Your numbered list should now reflect your new settings.
5. Linking Multilevel Numbering to Styles
Each level of a multilevel numbering system can be linked to a style. This means that as you apply styles throughout the document, the numbering is applied appropriately and automatically. You can either use the built-in Heading 1, Heading 2, Heading 3 styles or use your own custom styles.
1. In the Numbering dialog box, click the MORE button in the bottom-left corner to expand the dialog box.
2. Select level to modify in the top-left box.
3. Open the Link level to style drop-down list and choose the style you wish to connect to the numbering level.

4. Click OK.
5. In the document, apply the Heading 1, Heading 2, Heading 3 styles where needed.
It’s a good idea to create a body text style and apply that where appropriate, so that the body text does not inadvertently get caught up in the multi-level numbering.
6. Select the whole document (or the portion of the document where you want to apply your numbered sections).
7. Click the icon in the Paragraph group (Home tab).
8. Select your custom numbering style from the gallery. The thumbnail image should show the linked styles.

6. How to Use Styles to Set Number Levels
1. Select all the text that you wish to apply the same number level to. Alternatively, if you wish to go line by line, you can place the cursor anywhere in a line of text.
2. In the Styles gallery, click the style that corresponds to the number level you wish to apply. For example, to apply the top level numbering click Heading 1 and for the third level numbering click Heading 3 (assuming those are the styles you assigned).
The numbering and all the numbering settings will be applied to the selected text or the paragraph in which the cursor was positioned.

And that, my friend, is how you do multilevel numbering in Word with no loose ends.
How to set up a dual-multilevel numbering system in Word
7. Two resources to help you
1. Grab your free multilevel numbering troubleshooting guide.

2. Watch over my shoulder as I set up multilevel numbering from scratch.

8. What next?
I hope you found plenty of value in this post. I’d love to hear your biggest takeaway in the comments below together with any questions you may have.
Have a fantastic day.


About the author
Jason Morrell
Jason loves to simplify the hard stuff, cut the fluff and share what actually works. Things that make a difference. Things that slash hours from your daily work tasks. He runs a software training business in Queensland, Australia, lives on the Gold Coast with his wife and 4 kids and often talks about himself in the third person!
SHARE
In general, a label is a sticker with something written on it. People place such stickers with printed information such as addresses on envelopes.
Your label may have one of two addresses—the recipient’s address or the sender’s address. Microsoft Word allows you to create and print such labels.
Here, we will explain the steps necessary for creating and printing labels in Word.
Step #1: Open a Blank Document in Word.
Open Word, and click on New on the left side. The right side shows the icon of a new blank document—click on it to open a new blank document.

Step #2: Open the Envelopes and Labels Dialog
Click on Mailings in the top menu bar, and the ribbon changes to show the mailing menus. Click on Labels to open the Envelopes and Labels dialog.

Step #3: Set Up Recipient/Sender Labels
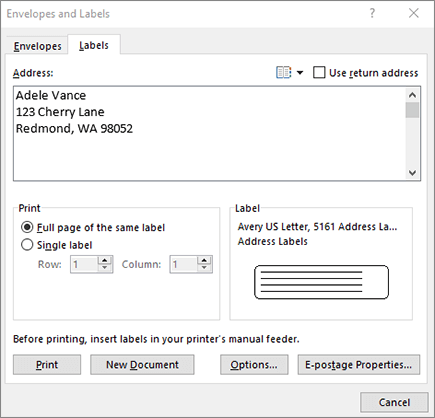
Within the Envelopes and Labels dialog, click on the Labels tab.
Under Address, you can type in either the recipient’s address or the sender’s address within the box.
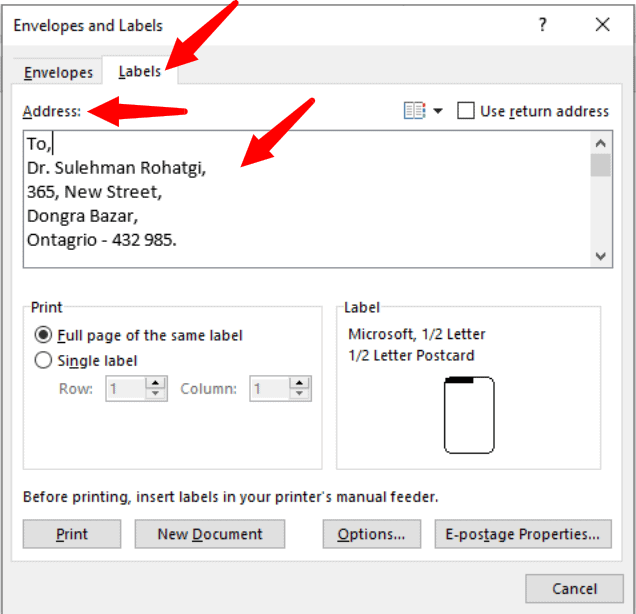
If you have created envelopes earlier, and would like to use the return address (sender’s address) already in your system, click on Use return address and ensure a tick-mark is present within the square box immediately on the left. Word will fill the return address in the Address box. If you do not have a return address in your system, type in the return address.

Step #4: Set Up Number of Prints
Once you are satisfied with the address entry, and want to print only one label on the entire page, click on Full page of the same label under the Print section.
If you want to print several labels on one page, click on Single label and select the number of rows and columns necessary.

Step #5: Set Up Paper Size
Here are some tips to customize and get maximum out of printing labels. :
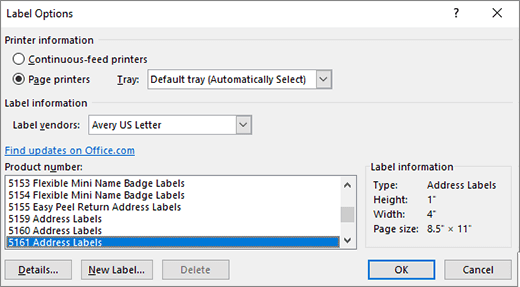
- Click on Options to open the Label Options dialog. Under Printer Information, you can select the type of printer—Continuous-feed or Page Printers—and the type of Tray for the Page printers.
- Several vendors supply sticky papers for printing labels on, and you may select from the Label vendors list—click on the down arrow on the right of Label vendors, and click on the vendor of your choice.
- Depending on the vendor you have selected, you can choose from their list of products under Product number.
- Here, you are selecting the size of the paper on which you want to print the labels. For a specific product number, its related information appears on the right side under Label information.
- For additional settings, click on the Details tab to display the various measurements for printing the label.
- You can adjust the settings to your preference. Word also allows you to define your own measurements, for which you must click on New Label.
- Once you are satisfied with the settings, click on OK to exit the dialog. Word will return you to the Envelopes and Labels dialog.

Step #6: Print the Label
Ensure label papers are in your printer and the printer is turned on. Click on Print to start printing your labels.

Conclusion
A neatly printed address label looks good on an envelope and helps prevent wrong delivery. With Word, you can create and print professional-looking labels. Follow our seven-step method to make your task easier.