
Node.js is an open-source and cross-platform JavaScript runtime environment that can also be used to read from a file and write to a file which can be in txt, ods, xlsx, docx, etc format.
The following example covers how an excel file(.xlsx) file is read from an excel file and then converted into JSON and also to write to it. It can be achieved using a package called xlsx to achieve our goal.
Module Installation: You can install xlsx module using the following command:
npm install xlsx
Note: For the following example, text.xlsx is a dummy data file that has been used.
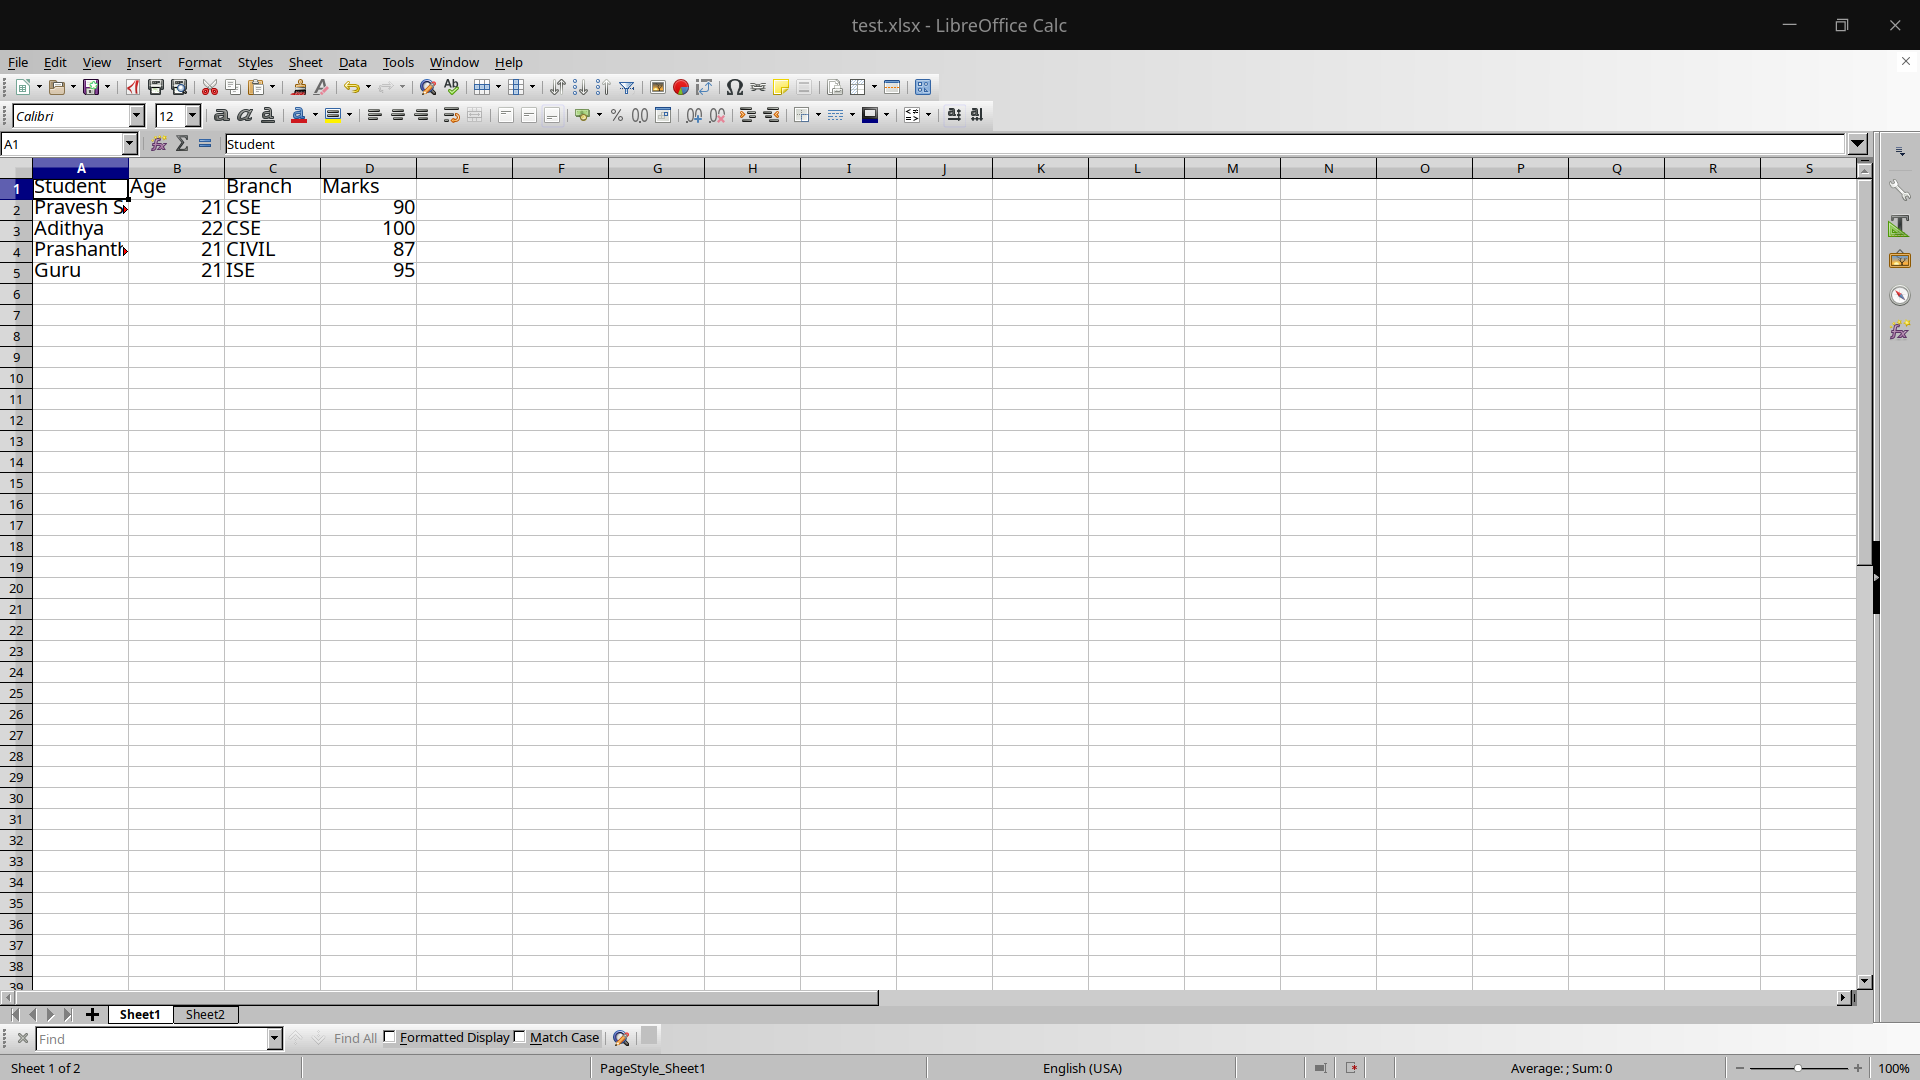
Filename: test.xlsx
Sheet 1:
Sheet 2:
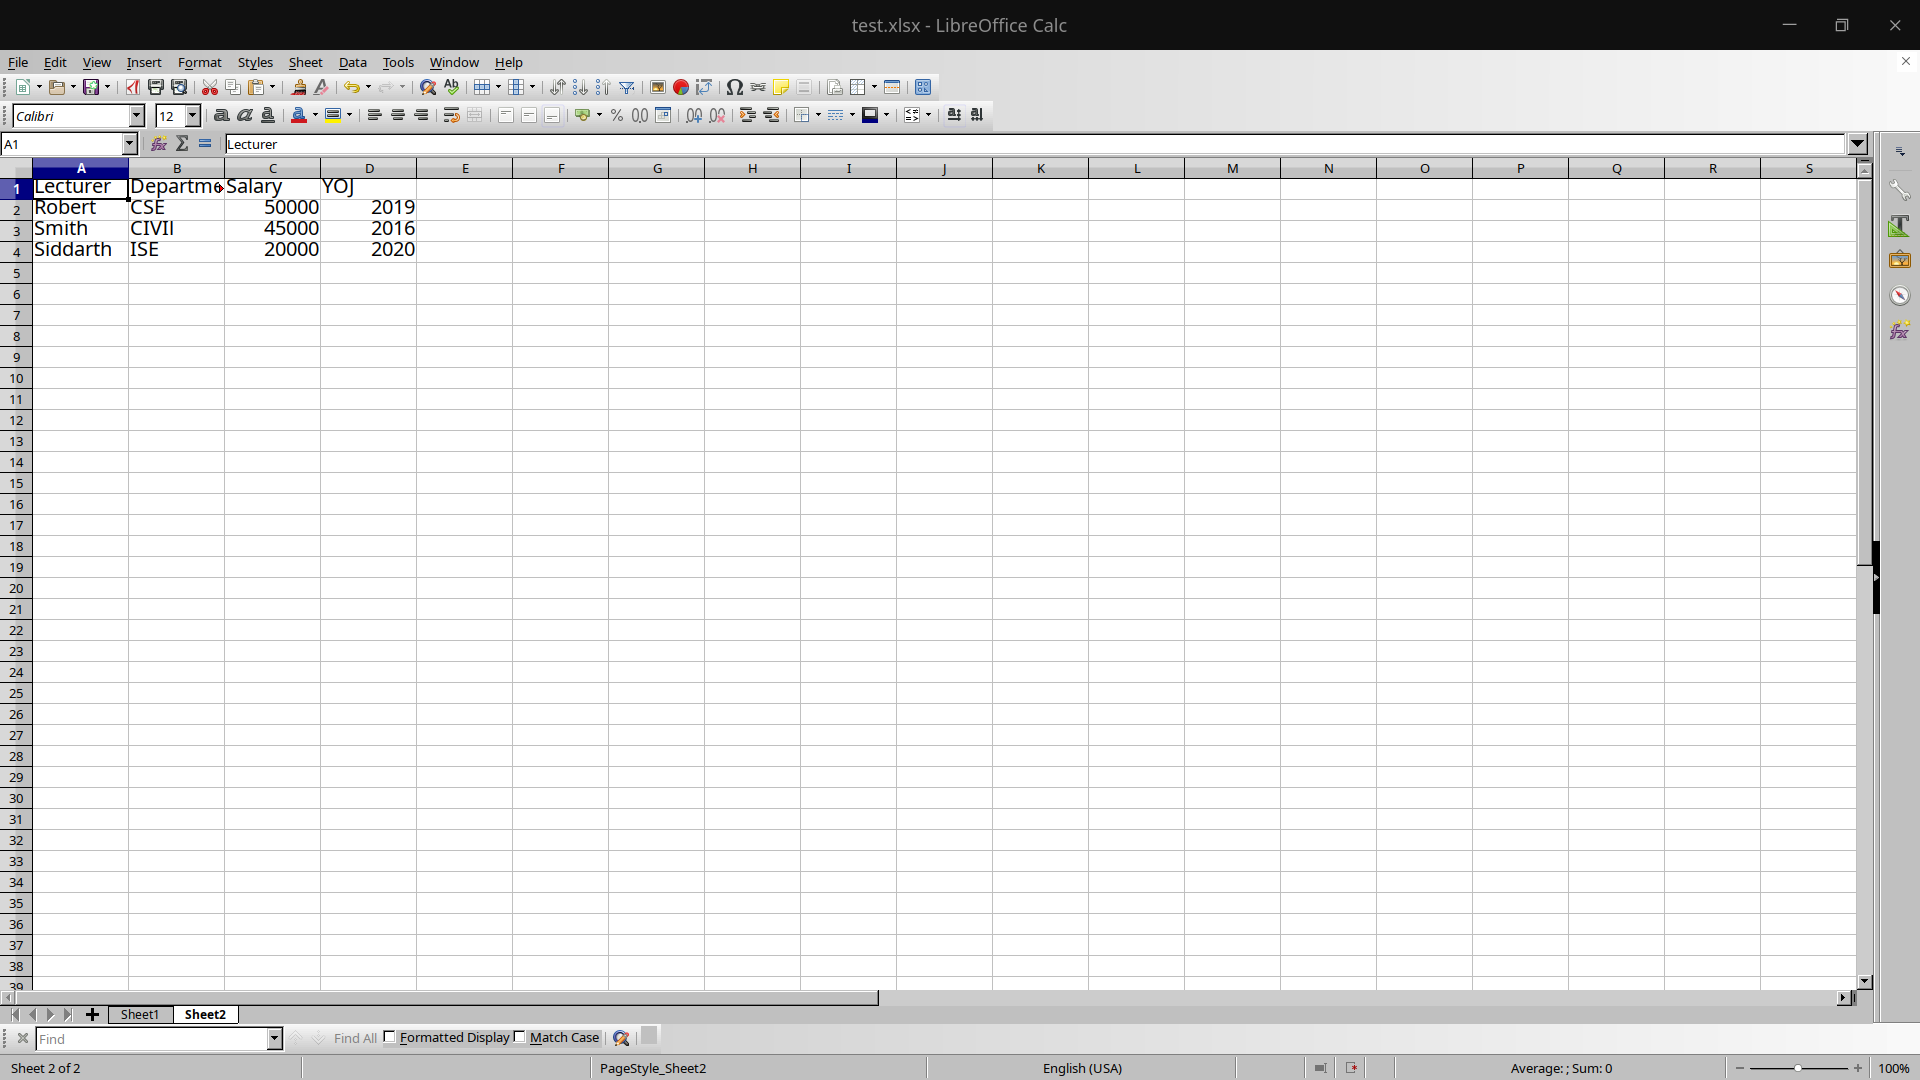
So the excel file test.xlsx has 2 sheets, one having Student details and another having lecturer details.
Read Operation Filename: read.js
Javascript
const reader = require('xlsx')
const file = reader.readFile('./test.xlsx')
let data = []
const sheets = file.SheetNames
for(let i = 0; i < sheets.length; i++)
{
const temp = reader.utils.sheet_to_json(
file.Sheets[file.SheetNames[i]])
temp.forEach((res) => {
data.push(res)
})
}
console.log(data)
Explanation: First, the npm module is included in the read.js file and then the excel file is read into a workbook i.e constant file in the above program.
The number of files in that particular excel file is available in the SheetNames property of the workbook. It can be accessed as follows:
const sheets = file.SheetNames // Here the value of the sheets will be 2
A for loop is run until the end of the excel file starting from the first page. One of the most important functions used in the code above is the sheet_to_json() function present in the utils module of the xlsx package. It accepts a worksheet object as a parameter and returns an array of JSON objects.
There is a forEach loop which iterates through every JSON object present in the array temp and pushes it into a variable data which would contain all the data in JSON format.
Finally, the data is printed or any other modification can be performed on the array of JSON objects.
Step to run the application:
Run the read.js file using the following command:
node read.js
Output:

Write Operation In the following example, we will convert an array of JSON objects into an excel sheet and append it to the file.
Filename: write.js
Javascript
const reader = require('xlsx')
const file = reader.readFile('./test.xlsx')
let student_data = [{
Student:'Nikhil',
Age:22,
Branch:'ISE',
Marks: 70
},
{
Student:'Amitha',
Age:21,
Branch:'EC',
Marks:80
}]
const ws = reader.utils.json_to_sheet(student_data)
reader.utils.book_append_sheet(file,ws,"Sheet3")
reader.writeFile(file,'./test.xlsx')
Explanation: Here we have an array of JSON objects called student_data. We use two main functions in this program i.e json_to_sheet() which accepts an array of objects and converts them into a worksheet and another function is the book_append_sheet() to append the worksheet into the workbook.
Finally, all the changes are written to the test.xlsx file using writeFile() function which takes a workbook and a excel file as input parameter.
Step to run the application:
Run the read.js file using the following command:
node write.js
Output: The final test.xlsx file would look something like this:
Sheet 1:

Sheet 2:

Sheet 3: We can see sheet 3 is appended into the test.xlsx as shown below:

install exceljs
npm i exceljs --save
import exceljs
var Excel = require('exceljs');
var workbook = new Excel.Workbook();
create workbook
var options = {
                filename: __dirname+'/Reports/'+reportName,
                useStyles: true,
                useSharedStrings: true
            };

            var workbook = new Excel.stream.xlsx.WorkbookWriter(options);
after create worksheet
var worksheet = workbook.addWorksheet('Rate Sheet',{properties:{tabColor:{argb:'FFC0000'}}});
in worksheet.column array you pass column name in header and array key
pass in key
worksheet.columns = [
            { header: 'column name', key: 'array key', width: 35},
            { header: 'column name', key: 'array key', width: 35},
            { header: 'column name', key: 'array key', width: 20},

            ];
after using forEach loop append row one by one in exel file
array.forEach(function(row){ worksheet.addRow(row); })
you can also perfome loop on each exel row and cell
worksheet.eachRow(function(row, rowNumber) {
    console.log('Row ' + rowNumber + ' = ' + JSON.stringify(row.values));
});
row.eachCell(function(cell, colNumber) {
    console.log('Cell ' + colNumber + ' = ' + cell.value);
});

This article shows you how to read and extract content from an Excel (.xlsx) file by using Node.js. Without any further ado, let’s get our hands dirty and start coding.
Getting Things Ready
We are going to work with a simple Excel file that contains some information as follows:
You can download the file from the link below to your computer:
https://www.kindacode.com/wp-content/uploads/2021/11/KindaCode.com-Example.xlsx.zipWriting Code
There are many great libraries that can help us easily read Excel files, such as xlsx (SheetJS), exceljs (ExcelJS), node-xlsx (Node XLSX). In the sample project below, we will use xlsx. It’s super popular and supports TypeScript out-of-the-box.
1. Create a new folder named example (the name doesn’t matter and is totally up to you), then initialize a new Node.js project by running:
npm init2. In your project directory, create a subfolder called src, then add an empty index.js file. Copy the Excel file you’ve downloaded before into the src folder.
Here’s the file structure:
.
├── node_modules
├── package-lock.json
├── package.json
└── src
    ├── KindaCode.com Example.xlsx
    └── index.js
3. Installing the xlsx package:
npm i xlsx4. Below are the code snippets for index.js. There are 2 different code snippets. The first one uses the CommonJS syntax (with require), while the second one uses the ES Modules syntax (with import). Choose the one that fits your need.
CommonJS:
const path = require("path");
const xlsx = require("xlsx");

const filePath = path.resolve(__dirname, "Kindacode.com Example.xlsx");

const workbook = xlsx.readFile(filePath);
const sheetNames = workbook.SheetNames;

// Get the data of "Sheet1"
const data = xlsx.utils.sheet_to_json(workbook.Sheets[sheetNames[0]])

/// Do what you need with the received data
data.map(person => {
  console.log(`${person.Name} is ${person.Age} years old`);
})
ES Modules:
// import with ES6 Modules syntax
import path from 'path';
import xlsx from 'xlsx';

import { fileURLToPath } from 'url'
import { dirname } from 'path'
const __filename = fileURLToPath(import.meta.url)
const __dirname = dirname(__filename)

const filePath = path.resolve(__dirname, "Kindacode.com Example.xlsx");

const workbook = xlsx.readFile(filePath);
const sheetNames = workbook.SheetNames;

// Get the data of "Sheet1"
const data = xlsx.utils.sheet_to_json(workbook.Sheets[sheetNames[0]])

/// Do what you need with the received data
data.map(person => {
  console.log(`${person.Name} is ${person.Age} years old`);
})
5. Test our project:
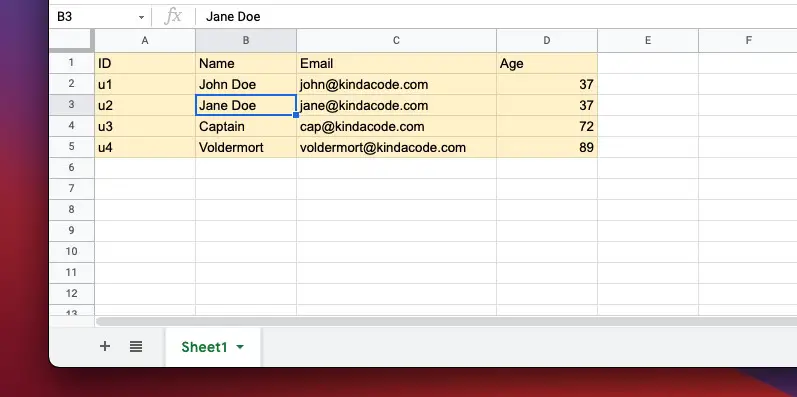
node src/index.jsOutput:
John Doe is 37 years old
Jane Doe is 37 years old
Captain is 72 years old
Voldermort is 89 years old
Conclusion
We’ve written a simple Node.js program to retrieve the data from a sheet of an Excel workbook. If you’d like to explore more new and interesting things about modern Node.js, take a look at the following articles:
- Node.js: How to Ping a Remote Server/ Website
- Best open-source ORM and ODM libraries for Node.js
- 7 Best Open-Source HTTP Request Libraries for Node.js
- Node.js: Executing a Piece of Code after a Delay
- Express + TypeScript: Extending Request and Response objects
You can also check out our Node.js category page for the latest tutorials and examples.
My favourite library for reading, writing, and manipulating Excel files in Node.JS is ExcelJS. In this tutorial, we’ll look at how to install the library and how to dynamically read an Excel file.
In the business world, there’s a joke that businesses run off Excel files. Sadly, this can be very true – I’ve received a lot of Excel files over the years and had to do data imports or build visualizations off of them. I’ve used code like we’ll look at today in a lot of applications.
Installing ExcelJS
Installing ExcelJS is pretty easy. In the root of your project, just simply run “npm i exceljs” from the terminal or command prompt.
Setting Up Our Code for ExcelJS
We can import or require ExcelJS by just requiring exceljs. If you need ES5 transpiled code, you’ll need to import ‘exceljs/dist/es5’ instead and add the core-js dependencies too.
In Microsoft Excel, a workbook is a collection of worksheets (or “spreadsheets”) in a single file. In the Microsoft Excel API, operations usually begin from the workbook object.
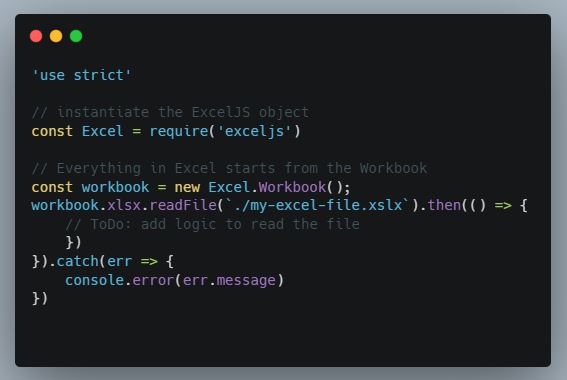
One thing to keep in mind whenever doing something with Excel, is that everything is one based.
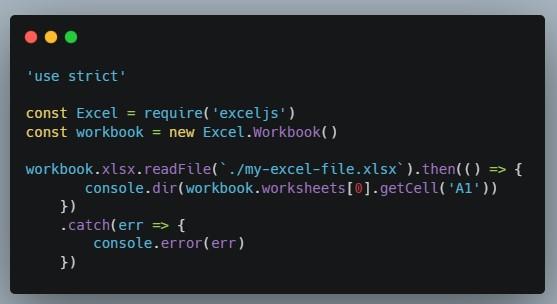
Reading a Particular Worksheet
There’s a few different ways that we can access worksheets. Worksheets can be accessed by iteration, through the Id, or by the worksheet tab name.
I prefer to access worksheets by iteration or by name because these methods are a lot more predictable. When doing By Id or by Number keep in mind that the numbers aren’t necessarily sequential because a worksheet may no longer exist.
Accessing Worksheets Through Iteration
As mentioned above, I find accessing worksheets through iteration to be the easiest and more predictable way of reading an Excel sheet.
With ExcelJS we have a few different ways we can iterate through through the worksheets. We can do it by a for loop, a .forEach off of workbook.worksheets.forEach, or doing workbook.eachSheet.
I find workbook.eachSheet to be the easiest to read.

Build In Metrics
Within ExcelJS, there are a few different variables that we can use to make life easier.
We can use worksheet.actualColumnCount to get the number of columns that potentially have any data in them.
We can use worksheet.actualRowCount to get the size of the rows that potentially have data in them.
As we’re iterating through rows, we can use row.cellCount to get the number of cells.
Reading a Particular Cell
In Excel, a cell is the boxes you see in the grid of an Excel worksheet. Cells are traditionally referenced by the column letter, and row number. For example “A1” is the first cell on an Excel worksheet.
Within ExcelJS, we can also use a number instead of a letter as the column reference. For example “1,1” could also be a reference to “A1”.
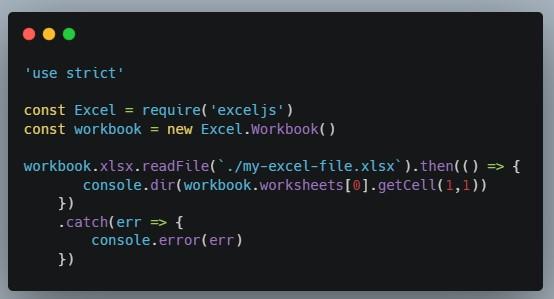
If we need the value of the cell, we need to use .getCell() and then use the .value property. Like this:

It’s much easier to use a number as a reference, although it can be confusing when you are comparing the code to a spreadsheet. And of course, when looping this is a lot easier than trying to translate a number to a letter.
Dynamically Reading an Entire Document
When I work with Excel documents in Node.js I like to convert them into a JavaScript array of objects so I can easily manipulate them. So, an Excel document that looks like this will end up looking like this JavaScript array of objects.
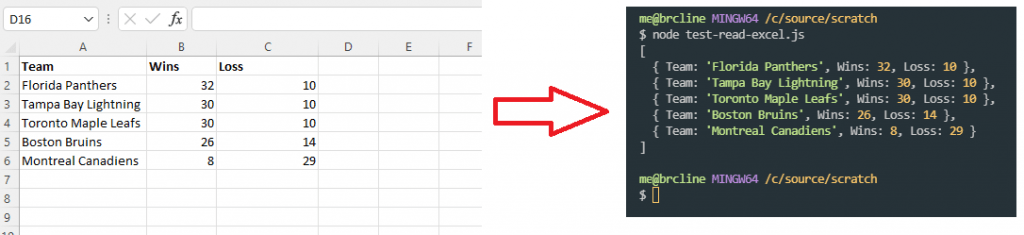
I usually start with a helper function that takes in the path to the Excel file, and then it reads it and loops through the various worksheets.
For each worksheet it assumes that the first row is a header row. In a lot of cases, this is a good assumption but it never hurts to check. 😊
For each worksheet, we loop through the rows and and the available columns building an object that we eventually add an object called “theRow” into the “theData” array.
At the end, we return theData which is our array of objects.

Wrapping It Up
As you can see, having a knowledge of loops and the ExcelJS library can allow us to do some pretty advanced things without necessarily having to have a human do a lot of data entry.
In this blog post on ExcelJS we covered how to read in an Excel file and convert it to a JavaScript array that contains objects based on headers built from the first row.

Таблицы Excel популярны в деловом мире как стандарт де-факто, нравится ли нам, как разработчикам, это. Иногда клиенты просят нас загрузить таблицу Excel, и все данные должны храниться в базе данных. XLSX — это пакет Node, который решает эту проблему. В этом посте мы собираемся использовать busboy для обработки данных формы.
Этот пост состоит из двух частей:
- Как разобрать лист Excel в формат JSON.
- Как создать таблицу Excel с использованием данных JSON.
Шаг 1. Установите пакет XLSX с помощью npm или bower.
npm i --save xlsx
//or
bower install js-xlsx
Шаг 2. Импортируйте Multer или busboy
npm install --save multer
Multer — это промежуточное программное обеспечение node.js для обработки multipart / form-data, которое в основном используется для загрузки файлов. Он написан поверх busboy для максимальной эффективности.
Busboy — это модуль Node.js для анализа входящих данных HTML-форм.
Шаг 2: импортируйте XLSX в index.js
const XLSX = require('xlsx')
Анализ данных Excel
req.busboy.on('file', (fieldname, file, fname) => {
 if (fieldname === 'file') {
  const buffers = []
  file.on('data', (data) => {
   buffers.push(data)
  })
  file.on('end', () => {
   buffer = Buffer.concat(buffers)
   workbook = XLSX.read(buffer, {
    type: 'buffer',
   })
  })
 }
})
req.busboy.on('finish', () => {
 try {
  const excelProducts =      XLSX.utils.sheet_to_json(workbook.Sheets[workbook.SheetNames[0]], {
   raw: false,
   header: 1,
   dateNF: 'yyyy-mm-dd',
   blankrows: false,
  })
 } catch (err) {
  console.log(err)
 }
})
req.pipe(req.busboy)
- Прочтите файл Excel с помощью буфера. Мы используем busboy, потому что этот файл загружен пользователем. Если файл уже загружен, вы можете использовать XLSX.readFile (filename: string, opts ?: ParsingOptions), указав имя файла.
- XLSX.utils.sheet_to_json () используется для чтения данных рабочего листа в массив объекта. Другие параметры передаются для указания различных параметров, таких как использовать необработанные значения (истина) или форматированные строки (ложь), включать пустые строки в вывод, формат даты по умолчанию, если указан заголовок, первая строка считается строкой данных, иначе первая row — это строка заголовка и не считается данными.
Некоторые вспомогательные функции в XLSX.utils, генерирующие разные виды листов:
XLSX.utils.sheet_to_csvсоздает CSVXLSX.utils.sheet_to_txtгенерирует текст в формате UTF16XLSX.utils.sheet_to_htmlгенерирует HTMLXLSX.utils.sheet_to_jsonгенерирует массив объектовXLSX.utils.sheet_to_formulaeсоздает список формул
Создание листа Excel
data = [{
 firstName: 'John',
 lastName: 'Doe'
}, {
 firstName: 'Smith',
 lastName: 'Peters'
}, {
 firstName: 'Alice',
 lastName: 'Lee'
}]
const ws = XLSX.utils.json_to_sheet(data)
const wb = XLSX.utils.book_new()
XLSX.utils.book_append_sheet(wb, ws, 'Responses')
XLSX.writeFile(wb, 'sampleData.export.xlsx')
- json_to_sheet преобразует массив объектов JavaScript в рабочий лист. Существуют и другие методы преобразования данных в рабочие листы, такие как aoa_to_sheet, table_to_sheet. sheet_add_json используется для добавления массива объектов JavaScript в существующий рабочий лист.
- book_new () создает новую книгу на листе.
- book_append_sheet добавляет лист к книге с названием «Ответы».
- XLSX.writeFile (wb, «sampleData.export.xlsx») пытается записать wb в «sampleData.export.xlsx».
Вы также можете указать ширину каждого столбца и объединить ячейки.
Некоторые вспомогательные функции XLSX.utils для импорта различных данных в листы:
XLSX.utils.aoa_to_sheetпреобразует массив массивов данных JavaScript в рабочий лист.XLSX.utils.json_to_sheetпреобразует массив объектов JavaScript в рабочий лист.XLSX.utils.table_to_sheetпреобразует элемент DOM TABLE в рабочий лист.XLSX.utils.sheet_add_aoaдобавляет на рабочий лист массив массивов данных JavaScript.XLSX.utils.sheet_add_jsonдобавляет на рабочий лист массив объектов JavaScript.
Заключение:
Используя пакет XLSX, вы можете читать любой файл Excel, а также создавать файл Excel.
Спасибо за внимание.
Больше контента на plainenglish.io
In this article, we gonna learn how to import and export excel and csv in node.js.
1. Let’s create a new express project using express generator.
npm i -g express-generator
express node-excel-csv --view=hbs
2. Create a folder config and inside this create a file database.js.
config/database.js
module.exports = {
    host: process.env.DB_HOST,
    database: process.env.DB_DATABASE,
    username: process.env.DB_USERNAME,
    password: process.env.DB_PASSWORD
}
3. Install dotenv npm package.
npm i dotenvAfter Installation import dotenv in app.js
require('dotenv').config();4. Create a .env file in the root and add these environment variables.
DB_HOST=localhost            // your database host
DB_DATABASE=node-excel-csv  // your database name
DB_USERNAME=root           // your database username
DB_PASSWORD=              // your database password
5. Install sequelize and mysql2 npm packages.
npm i sequelize mysql26. Create a models folder and inside this create a connection.js and movie.model.js
models/connection.js
const { Sequelize } = require('sequelize');
const config = require('../config/database');

const sequelize = new Sequelize(config.database, config.username, config.password, {
    host: config.host,
    dialect: 'mysql',
    operatorsAliases: 'false',
    logging: false
});

module.exports = sequelize
models/movie.model.js
const { DataTypes } = require('sequelize');
const sequelize = require('./connection');

const Movie = sequelize.define('Movie', {
    movie: {
        type: DataTypes.STRING
    },
    category: {
        type: DataTypes.STRING
    },
    director: {
        type: DataTypes.STRING
    },
    rating: {
        type: DataTypes.FLOAT(8, 1)
    }
}, {
    underscored: true
});
module.exports = Movie;
Note:- Don’t forget to create a movies table. https://github.com/ultimateakash/node-excel-csv/blob/master/node-excel-csv.sql
Above Schema Based on the import(excel or csv) file.
7. Install multer and uniqid npm packages.
npm i multer, uniqid8. create a folder helpers and inside this folder create a file uploader.js
const multer = require('multer');
const uniqid = require('uniqid');
const path = require('path');

const storage = multer.diskStorage({
    destination: function(req, file, cb) {
        cb(null, 'storage/uploads/')
    },
    filename: function(req, file, cb) {
        cb(null, Date.now() + uniqid() + path.extname(file.originalname))
    }
})
const upload = multer({ storage: storage });

exports.upload = (field) => upload.single(field);
9. Create a storage folder and inside this create uploads and outputs folder.
10. Install xlsx npm package.
npm i xlsxxlsx package provides a bunch of functions for reading and writing CSV/Excel files.
Parsing functions:-
XLSX.read(data, read_opts) attempts to parse data
XLSX.readFile(filename, read_opts) attempts to read filename and parse.
Note:- you can pass raw option to false if you want formatted data.(example — formatted date)
XLSX.read(data, { raw: false })
XLSX.readFile(filename, { raw: false })
Writing functions:-
XLSX.write(wb, write_opts) attempts to write the workbook
XLSX.writeFile(wb, filename, write_opts) attempts to write workbook
Utility Functions:-
Constructing:-
book_new creates an empty workbook
book_append_sheet adds a worksheet to a workbook
Importing:
aoa_to_sheet converts an array of arrays of JS data to a worksheet
json_to_sheet converts an array of JS objects to a worksheet
sheet_add_aoa adds an array of arrays of JS data to an existing worksheet.
sheet_add_json adds an array of JS objects to an existing worksheet.
Exporting:
sheet_to_json converts a worksheet object to an array of JSON objects.
sheet_to_csv generates delimiter-separated-values output.
Ref:- https://www.npmjs.com/package/xlsx
11. Create a folder controllers and inside this folder create movie.controller.js
controllers/movie.controller.js
const XLSX = require("xlsx");
const Movie = require("../models/movie.model")
const outputPath = 'storage/outputs'

exports.index = async (req, res) => {
    const movies = await Movie.findAll();
    return res.render('index', { movies });
}

exports.import = async (req, res) => {
    const wb = XLSX.readFile(req.file.path);
    const sheets = wb.SheetNames;

    if(sheets.length > 0) {
        const data = XLSX.utils.sheet_to_json(wb.Sheets[sheets[0]]);
        const movies = data.map(row => ({
            movie: row['Movie'],
            category: row['Category'],
            director: row['Director'],
            rating: row['Rating']
        }))
        await Movie.bulkCreate(movies);
    }
    return res.redirect('/');
}

exports.export = async (req, res) => {
    const movies = await Movie.findAll({
        attributes: [
            'id',
            'movie',
            'category',
            'director',
            'rating'
        ],
        raw: true
    });

    const headings = [
        ['Id', 'Movie', 'Category', 'Director', 'Rating']
    ];

    const wb = XLSX.utils.book_new();
    const ws = XLSX.utils.json_to_sheet(movies, {
        origin: 'A2',
        skipHeader: true
    });
    XLSX.utils.sheet_add_aoa(ws, headings);
    XLSX.utils.book_append_sheet(wb, ws, 'Movies');

    const buffer = XLSX.write(wb, { bookType: 'csv', type: 'buffer' });
    res.attachment('movies.csv');

    return res.send(buffer);
}
Note:- In this article, I am using import file headers if your file doesn’t have a headers row then you can use indexes.
You need to pass header option with sheet_to_json
const data = XLSX.utils.sheet_to_json(wb.Sheets[sheets[0]], { header: 1 });
const movies = data.map(row => ({
    movie: row[0],
    category: row[1],
    director: row[2],
    rating: row[3]
}))
In the above code you can change the extension based on the file you want to import or export. (.xlsx, .xls, .csv)
Note:- If want to store your exported file on the server you can use writeFile function.
const wb = XLSX.utils.book_new();
const ws = XLSX.utils.json_to_sheet(movies, {
    origin: 'A2',
    skipHeader: true
});
XLSX.utils.sheet_add_aoa(ws, headings);
XLSX.utils.book_append_sheet(wb, ws, 'Movies');

const filepath = `${outputPath}/movies.csv`;
XLSX.writeFile(wb, filepath);

return res.download(filepath)
12. Create routes.
routes/index.js
const express = require('express');
const router = express.Router();
const movieController = require('../controllers/movie.controller');
const { upload } = require('../helpers/uploader');

router.get('/',                        movieController.index);
router.post('/import', upload('file'), movieController.import);
router.get('/export',                  movieController.export);

module.exports = router;
13. Open views/index.hbs and add the following code.
<main>
    <div class="row mb-2">
        <div class="col-sm-8 offset-2">
            <div class="row">
                <div class="col-md-6">
                    <form method="POST" action="/import" enctype="multipart/form-data">
                        <div class="input-group">
                            <div class="custom-file">
                                <input type="file" name="file" class="custom-file-input" id="inputGroupFile" required accept=".csv, application/vnd.openxmlformats-officedocument.spreadsheetml.sheet, application/vnd.ms-excel">
                                <label class="custom-file-label" for="inputGroupFile">Choose file</label>
                            </div>
                            <div class="input-group-append">
                                <button type="submit" class="btn btn-primary float-right mr-2">Import <i class="fa fa-upload"></i></button>
                            </div>
                        </div>
                    </form>
                </div>
                <div class="col-md-6">
                    <a href="/export" class="btn btn-primary float-right {{#unless movies.length}} disabled {{/unless }}" role="button" aria-disabled="true">
                        Export <i class="fa fa-download"></i>
                    </a>
                </div>
            </div>
        </div>
    </div>
    <div class="row">
        <div class="col-sm-8 offset-2">
            <table class="table">
                <thead>
                    <tr>
                        <th scope="col">Id</th>
                        <th scope="col">Movie</th>
                        <th scope="col">Category</th>
                        <th scope="col">Director</th>
                        <th scope="col">Rating</th>
                    </tr>
                </thead>
                <tbody>
                    {{#each movies}}
                        <tr>
                            <th scope="row">{{ this.id }}</th>
                            <td>{{ this.movie }}</td>
                            <td>{{ this.category }}</td>
                            <td>{{ this.director }}</td>
                            <td><span class="badge bg-warning text-dark">{{ this.rating }}</span></td>
                        </tr>
                    {{else}}
                        <tr>
                            <td colspan="5" class="text-center">No Movies Found.</td>
                        </tr>
                    {{/each}}
                </tbody>
            </table>
        </div>
    </div>
</main>
Note:- please checkout github repo — https://github.com/ultimateakash/node-excel-csv
14. Finally start the project.
npm startOpen http://localhost:3000 and try import and export.
Extras:- if you want to read a file without uploading then you can use multer.memoryStorage()
const multer = require('multer');
const upload = multer({ storage: multer.memoryStorage() });
exports.upload = (field) => upload.single(field);
with memoryStorage() you can access the file buffer.
const wb = XLSX.read(req.file.buffer);
const sheets = wb.SheetNames;
Sample Excel CSV Files:- https://github.com/ultimateakash/node-excel-csv/tree/master/sample%20files
Checkout my full node-excel-csv example. https://github.com/ultimateakash/node-excel-csv
If you facing any issues. don’t hesitate to comment below. I will be happy to help you.
Thanks.
