
A simple node.js module for exporting data set to Excel xlsx file.
Setup configs object before passing it into the execute method. If generating multiple sheets, configs object can be an array of worksheet configuration. Or passing in a worksheet configuration to generate single worksheet xlsx file. Within a worksheet configuration uses name attribute to specify worksheet name. cols is an array for column definition. Column definition should have caption and type properties while width property is not required. The unit for width property is character. beforeCellWrite callback is optional. beforeCellWrite is invoked with row, cell data and option object (eOpt detail later) parameters. The return value from beforeCellWrite is what get written into the cell. Supported valid types are string, date, bool and number. rows is the data to be exported. It is an Array of Array (row). Each row should be the same length as cols. Styling is optional. However, if you want to style your spreadsheet, a valid excel styles xml file is needed. An easy way to get a styles xml file is to unzip an existing xlsx file which has the desired styles and copy out the styles.xml file. Use stylesXmlFile property of configuartion object to specify the relative path and file name of the xml file. Google for «spreadsheetml style» to learn more detail on styling spreadsheet. eOpt in beforeCellWrite callback contains rowNum for current row number. eOpt.styleIndex should be a valid zero based index from cellXfs tag of the selected styles xml file. eOpt.cellType is default to the type value specified in column definition. However, in some scenario you might want to change it for different format.
var express = require('express');
var nodeExcel = require('excel-export');
var app = express();

app.get('/Excel', function(req, res){
  	var conf ={};
	conf.stylesXmlFile = "styles.xml";
    conf.name = "mysheet";
  	conf.cols = [{
		caption:'string',
        type:'string',
        beforeCellWrite:function(row, cellData){
			 return cellData.toUpperCase();
		},
        width:28.7109375
	},{
		caption:'date',
		type:'date',
		beforeCellWrite:function(){
			var originDate = new Date(Date.UTC(1899,11,30));
			return function(row, cellData, eOpt){
          		if (eOpt.rowNum%2){
            		eOpt.styleIndex = 1;
          		}
          		else{
            		eOpt.styleIndex = 2;
          		}
                if (cellData === null){
                  eOpt.cellType = 'string';
                  return 'N/A';
                } else
                  return (cellData - originDate) / (24 * 60 * 60 * 1000);
			}
		}()
	},{
		caption:'bool',
		type:'bool'
	},{
		caption:'number',
		 type:'number'
  	}];
  	conf.rows = [
 		['pi', new Date(Date.UTC(2013, 4, 1)), true, 3.14],
 		["e", new Date(2012, 4, 1), false, 2.7182],
        ["M&M<>'", new Date(Date.UTC(2013, 6, 9)), false, 1.61803],
        ["null date", null, true, 1.414]
  	];
  	var result = nodeExcel.execute(conf);
  	res.setHeader('Content-Type', 'application/vnd.openxmlformats');
  	res.setHeader("Content-Disposition", "attachment; filename=" + "Report.xlsx");
  	res.end(result, 'binary');
});

app.listen(3000);
console.log('Listening on port 3000');
install exceljs
npm i exceljs --save
import exceljs
var Excel = require('exceljs');
var workbook = new Excel.Workbook();
create workbook
var options = {
                filename: __dirname+'/Reports/'+reportName,
                useStyles: true,
                useSharedStrings: true
            };

            var workbook = new Excel.stream.xlsx.WorkbookWriter(options);
after create worksheet
var worksheet = workbook.addWorksheet('Rate Sheet',{properties:{tabColor:{argb:'FFC0000'}}});
in worksheet.column array you pass column name in header and array key
pass in key
worksheet.columns = [
            { header: 'column name', key: 'array key', width: 35},
            { header: 'column name', key: 'array key', width: 35},
            { header: 'column name', key: 'array key', width: 20},

            ];
after using forEach loop append row one by one in exel file
array.forEach(function(row){ worksheet.addRow(row); })
you can also perfome loop on each exel row and cell
worksheet.eachRow(function(row, rowNumber) {
    console.log('Row ' + rowNumber + ' = ' + JSON.stringify(row.values));
});
row.eachCell(function(cell, colNumber) {
    console.log('Cell ' + colNumber + ' = ' + cell.value);
});
In this article, we gonna learn how to import and export excel and csv in node.js.
1. Let’s create a new express project using express generator.
npm i -g express-generator
express node-excel-csv --view=hbs
2. Create a folder config and inside this create a file database.js.
config/database.js
module.exports = {
    host: process.env.DB_HOST,
    database: process.env.DB_DATABASE,
    username: process.env.DB_USERNAME,
    password: process.env.DB_PASSWORD
}
3. Install dotenv npm package.
npm i dotenvAfter Installation import dotenv in app.js
require('dotenv').config();4. Create a .env file in the root and add these environment variables.
DB_HOST=localhost            // your database host
DB_DATABASE=node-excel-csv  // your database name
DB_USERNAME=root           // your database username
DB_PASSWORD=              // your database password
5. Install sequelize and mysql2 npm packages.
npm i sequelize mysql26. Create a models folder and inside this create a connection.js and movie.model.js
models/connection.js
const { Sequelize } = require('sequelize');
const config = require('../config/database');

const sequelize = new Sequelize(config.database, config.username, config.password, {
    host: config.host,
    dialect: 'mysql',
    operatorsAliases: 'false',
    logging: false
});

module.exports = sequelize
models/movie.model.js
const { DataTypes } = require('sequelize');
const sequelize = require('./connection');

const Movie = sequelize.define('Movie', {
    movie: {
        type: DataTypes.STRING
    },
    category: {
        type: DataTypes.STRING
    },
    director: {
        type: DataTypes.STRING
    },
    rating: {
        type: DataTypes.FLOAT(8, 1)
    }
}, {
    underscored: true
});
module.exports = Movie;
Note:- Don’t forget to create a movies table. https://github.com/ultimateakash/node-excel-csv/blob/master/node-excel-csv.sql
Above Schema Based on the import(excel or csv) file.
7. Install multer and uniqid npm packages.
npm i multer, uniqid8. create a folder helpers and inside this folder create a file uploader.js
const multer = require('multer');
const uniqid = require('uniqid');
const path = require('path');

const storage = multer.diskStorage({
    destination: function(req, file, cb) {
        cb(null, 'storage/uploads/')
    },
    filename: function(req, file, cb) {
        cb(null, Date.now() + uniqid() + path.extname(file.originalname))
    }
})
const upload = multer({ storage: storage });

exports.upload = (field) => upload.single(field);
9. Create a storage folder and inside this create uploads and outputs folder.
10. Install xlsx npm package.
npm i xlsxxlsx package provides a bunch of functions for reading and writing CSV/Excel files.
Parsing functions:-
XLSX.read(data, read_opts) attempts to parse data
XLSX.readFile(filename, read_opts) attempts to read filename and parse.
Note:- you can pass raw option to false if you want formatted data.(example — formatted date)
XLSX.read(data, { raw: false })
XLSX.readFile(filename, { raw: false })
Writing functions:-
XLSX.write(wb, write_opts) attempts to write the workbook
XLSX.writeFile(wb, filename, write_opts) attempts to write workbook
Utility Functions:-
Constructing:-
book_new creates an empty workbook
book_append_sheet adds a worksheet to a workbook
Importing:
aoa_to_sheet converts an array of arrays of JS data to a worksheet
json_to_sheet converts an array of JS objects to a worksheet
sheet_add_aoa adds an array of arrays of JS data to an existing worksheet.
sheet_add_json adds an array of JS objects to an existing worksheet.
Exporting:
sheet_to_json converts a worksheet object to an array of JSON objects.
sheet_to_csv generates delimiter-separated-values output.
Ref:- https://www.npmjs.com/package/xlsx
11. Create a folder controllers and inside this folder create movie.controller.js
controllers/movie.controller.js
const XLSX = require("xlsx");
const Movie = require("../models/movie.model")
const outputPath = 'storage/outputs'

exports.index = async (req, res) => {
    const movies = await Movie.findAll();
    return res.render('index', { movies });
}

exports.import = async (req, res) => {
    const wb = XLSX.readFile(req.file.path);
    const sheets = wb.SheetNames;

    if(sheets.length > 0) {
        const data = XLSX.utils.sheet_to_json(wb.Sheets[sheets[0]]);
        const movies = data.map(row => ({
            movie: row['Movie'],
            category: row['Category'],
            director: row['Director'],
            rating: row['Rating']
        }))
        await Movie.bulkCreate(movies);
    }
    return res.redirect('/');
}

exports.export = async (req, res) => {
    const movies = await Movie.findAll({
        attributes: [
            'id',
            'movie',
            'category',
            'director',
            'rating'
        ],
        raw: true
    });

    const headings = [
        ['Id', 'Movie', 'Category', 'Director', 'Rating']
    ];

    const wb = XLSX.utils.book_new();
    const ws = XLSX.utils.json_to_sheet(movies, {
        origin: 'A2',
        skipHeader: true
    });
    XLSX.utils.sheet_add_aoa(ws, headings);
    XLSX.utils.book_append_sheet(wb, ws, 'Movies');

    const buffer = XLSX.write(wb, { bookType: 'csv', type: 'buffer' });
    res.attachment('movies.csv');

    return res.send(buffer);
}
Note:- In this article, I am using import file headers if your file doesn’t have a headers row then you can use indexes.
You need to pass header option with sheet_to_json
const data = XLSX.utils.sheet_to_json(wb.Sheets[sheets[0]], { header: 1 });
const movies = data.map(row => ({
    movie: row[0],
    category: row[1],
    director: row[2],
    rating: row[3]
}))
In the above code you can change the extension based on the file you want to import or export. (.xlsx, .xls, .csv)
Note:- If want to store your exported file on the server you can use writeFile function.
const wb = XLSX.utils.book_new();
const ws = XLSX.utils.json_to_sheet(movies, {
    origin: 'A2',
    skipHeader: true
});
XLSX.utils.sheet_add_aoa(ws, headings);
XLSX.utils.book_append_sheet(wb, ws, 'Movies');

const filepath = `${outputPath}/movies.csv`;
XLSX.writeFile(wb, filepath);

return res.download(filepath)
12. Create routes.
routes/index.js
const express = require('express');
const router = express.Router();
const movieController = require('../controllers/movie.controller');
const { upload } = require('../helpers/uploader');

router.get('/',                        movieController.index);
router.post('/import', upload('file'), movieController.import);
router.get('/export',                  movieController.export);

module.exports = router;
13. Open views/index.hbs and add the following code.
<main>
    <div class="row mb-2">
        <div class="col-sm-8 offset-2">
            <div class="row">
                <div class="col-md-6">
                    <form method="POST" action="/import" enctype="multipart/form-data">
                        <div class="input-group">
                            <div class="custom-file">
                                <input type="file" name="file" class="custom-file-input" id="inputGroupFile" required accept=".csv, application/vnd.openxmlformats-officedocument.spreadsheetml.sheet, application/vnd.ms-excel">
                                <label class="custom-file-label" for="inputGroupFile">Choose file</label>
                            </div>
                            <div class="input-group-append">
                                <button type="submit" class="btn btn-primary float-right mr-2">Import <i class="fa fa-upload"></i></button>
                            </div>
                        </div>
                    </form>
                </div>
                <div class="col-md-6">
                    <a href="/export" class="btn btn-primary float-right {{#unless movies.length}} disabled {{/unless }}" role="button" aria-disabled="true">
                        Export <i class="fa fa-download"></i>
                    </a>
                </div>
            </div>
        </div>
    </div>
    <div class="row">
        <div class="col-sm-8 offset-2">
            <table class="table">
                <thead>
                    <tr>
                        <th scope="col">Id</th>
                        <th scope="col">Movie</th>
                        <th scope="col">Category</th>
                        <th scope="col">Director</th>
                        <th scope="col">Rating</th>
                    </tr>
                </thead>
                <tbody>
                    {{#each movies}}
                        <tr>
                            <th scope="row">{{ this.id }}</th>
                            <td>{{ this.movie }}</td>
                            <td>{{ this.category }}</td>
                            <td>{{ this.director }}</td>
                            <td><span class="badge bg-warning text-dark">{{ this.rating }}</span></td>
                        </tr>
                    {{else}}
                        <tr>
                            <td colspan="5" class="text-center">No Movies Found.</td>
                        </tr>
                    {{/each}}
                </tbody>
            </table>
        </div>
    </div>
</main>
Note:- please checkout github repo — https://github.com/ultimateakash/node-excel-csv
14. Finally start the project.
npm startOpen http://localhost:3000 and try import and export.
Extras:- if you want to read a file without uploading then you can use multer.memoryStorage()
const multer = require('multer');
const upload = multer({ storage: multer.memoryStorage() });
exports.upload = (field) => upload.single(field);
with memoryStorage() you can access the file buffer.
const wb = XLSX.read(req.file.buffer);
const sheets = wb.SheetNames;
Sample Excel CSV Files:- https://github.com/ultimateakash/node-excel-csv/tree/master/sample%20files
Checkout my full node-excel-csv example. https://github.com/ultimateakash/node-excel-csv
If you facing any issues. don’t hesitate to comment below. I will be happy to help you.
Thanks.

When we have some reporting or admin panel application, we often need to download data in Excel. In this article, we will learn how to export data in excel using node js. There are different packages available in the market to export the data in node js. We will be using exceljs package to export data in an excel file.
ExcelJS is a data manipulation package available in node js to read manipulate and write data and styles to XLSX. ExcelJS is one of the best packages for data manipulation freely available and frequently updated from time to time.
Prerequisites
- A basic understanding of Node js
How to export data in excel using node js?
Project Setup
Create a directory named node-export, and change it into that directory using the following command.
mkdir node-export
cd node-export
Inside the node-export directory, initialize a node js project using
npm initAfter the command, a new package.json file will be created in the node-export folder.
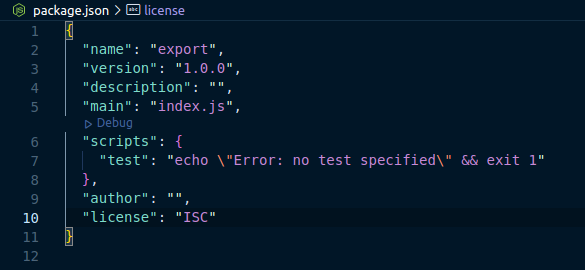
Now, let’s install the required dependencies required to export the data in an excel file.
npm install express exceljsThis will install express and exceljs modules which will be used for routing and exporting data to excel files respectively.
Next, let’s create a index.js file where we will create a route through which download will happen.
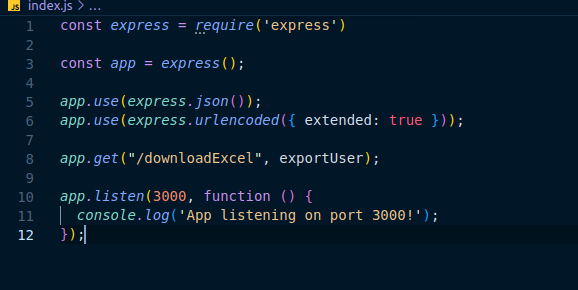
The above code will initialize the express framework, set up the server at port 3000, and create a route downloadExcel which is used to export data to an excel file.
Create sample data for exporting
Let’s create a model file named user.js inside the Model folder which contains the sample data for exporting to the excel file. Typically, we will connect to relational or non-relational databases and get data. You can follow this article to learn how to add, delete and fetch data from the database in node js.
// Sample data
const User = [
  {
   name: "John",
   email: "john@gmail.com",
   gender: "Male"
  },
  {
   name: "Harry",
   email: "harry@gmail.com",
   gender: "Male",
  },
  {
  name: "Olivia",
  email: "olivia@gmail.com",
  gender: "Female",
  },
  ];
  module.exports = User;
Export data to an excel file
In this step, let’s create a file where we will write a logic to store the sample data provided above to the excel file using the package exceljs. Let the name of the file be user.js which will be located inside Controller folder.
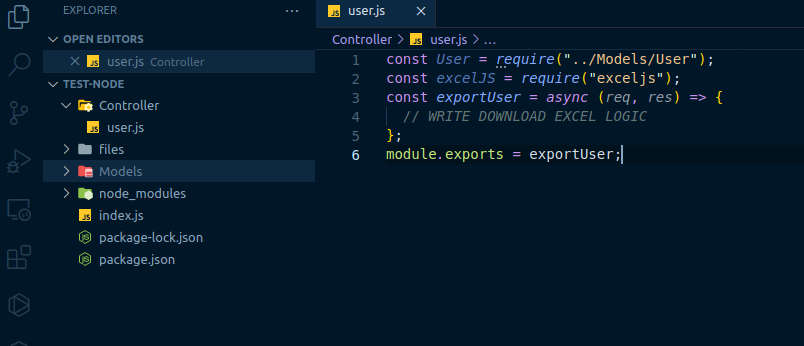
Now, let’s update our index.js file, so that when downloadExcel the route is called out controller logic will be called.
const express = require('express')
const exportUser = require('./Controller/user');

const app = express();

app.use(express.json());
app.use(express.urlencoded({ extended: true }));

app.get("/downloadExcel", exportUser);

app.listen(3000, function () {
  console.log('App listening on port 3000!');
});
Finally, let’s write a logic to export the sample data into the excel file in our user.js file inside the Controller folder.
Controller/user.js
const User = require("../Models/user"); // This has data to be used
const excelJS = require("exceljs");

const exportUser = async (req, res) => {
  const workbook = new excelJS.Workbook();  // Create a new workbook
  const worksheet = workbook.addWorksheet("My Users"); // New Worksheet
  const path = "./files";  // Path to download excel

  // Column for data in excel. key must match data key
  worksheet.columns = [
    { header: "S no.", key: "s_no", width: 10 },
    { header: "Name", key: "name", width: 10 },
    { header: "Email Id", key: "email", width: 10 },
    { header: "Gender", key: "gender", width: 10 },
  ];

  // Looping through User data
  let counter = 1;
  User.forEach((user) => {
    user.s_no = counter;
    worksheet.addRow(user); // Add data in worksheet
    counter++;
  });

  // Making first line in excel bold
  worksheet.getRow(1).eachCell((cell) => {
    cell.font = { bold: true };
  });

  try {
    const data = await workbook.xlsx.writeFile(`${path}/users.xlsx`)
      .then(() => {
        res.send({
          status: "success",
          message: "file successfully downloaded",
          path: `${path}/users.xlsx`,
        });
      });
  } catch (err) {
    console.log(err);
    res.send({
      status: "error",
      message: err,
    });
  }
};

module.exports = exportUser;
Here, we create an exceljs workbook object inside which we create a worksheet named My Users. In this object, we can create multiple worksheets but for this, we have only created a single sheet that will contain exported data. After that, we create a column to be displayed in the excel file. While defining the worksheet column, the key index should match with the data key returned from the Model/user.js file.
After, creating the columns we have looped through the model data and add it to the worksheet. Then, we modify the heading of the excel file so that we can distinguish between data and heading. This command cell.font = { bold: true } is used to make the heading bold. Then, the following command will export the model data into an excel file.
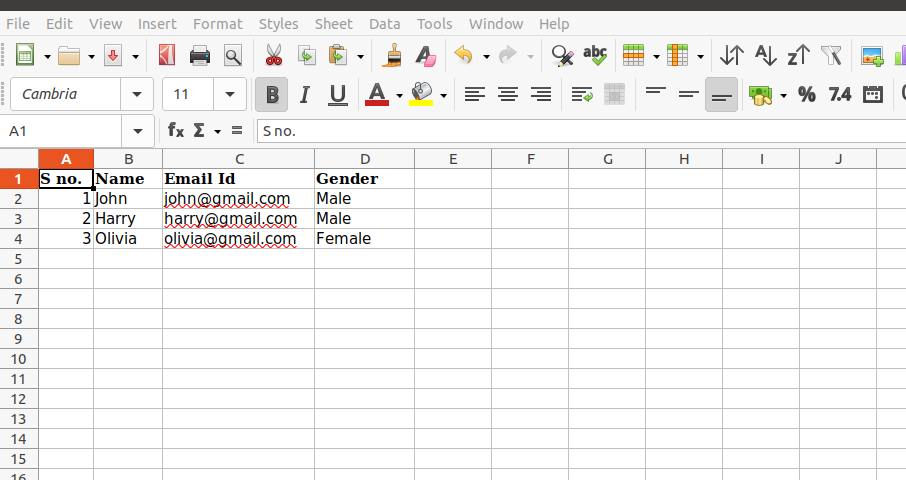
await workbook.xlsx.writeFile(`${path}/users.xlsx`)The exported excel file will be stored in the files/users.xlsx location. The exported file will look like the following:
Conclusion
By following the above process, we can export data in excel file in node js using the exceljs package. If you are searching for exporting files in other languages like Laravel you can follow this link.
There may be times when you need to generate an Excel file from your Node.js application. You may need to get data from a database or a web service, then output it to an Excel file for further reporting or analysis. SpreadJS makes this possible without any Excel requirements on the server.
Node.js is a popular event-driven JavaScript runtime that is typically used in creating network applications. It can handle multiple connections simultaneously and doesn’t depend on threads like most other models.
In this tutorial, learn how to use SpreadJS to gather information entered by the user and automatically export it to an Excel file—all in your Node.js application.
- Get Started with SpreadJS and Node.js
- Use the SpreadJS npm Package
- Read an Excel File In Your Node.js Application
- Gather User Input
- Fill Out Your Excel File
- Export Node.js Out to Excel
With the power of SpreadJS, performance is not affected whether using SpreadJS by itself or with Node.js.
Download the sample zip for this project.
Ready to get Started? Download SpreadJS Today!
Get Started with SpreadJS Spreadsheets and Node.js
To start, we’ll need to install Node.js and the Mock-Browser, BufferJS, and FileReader, each of which can be found at these links:
Installing Node.js via Package Manager
Mock-Browser
BufferJS
FileReader
While you can use most IDE to create this application, we’ll use Visual Studio 2019 in this blog. Once Visual Studio is open, create a new application using Create a new project, and then search for «Blank Node.js Console Application«. Please give it a name and specify a location to create the project.
This will automatically create the required files and open up the “app.js” file, which is the only file we’ll be changing.
To install the packages in the project, right-click the «npm» header in the Solution Explorer, click Install New npm Packages and search and install each package for «Mock-Browser», «BufferJS», and «FileReader».
Once you have that installed, the dependencies should update in the package.json file:
{
  "name": "spread-jsnode-js",
  "version": "0.0.1",
  "description": "SpreadJSNodeJS",
  "main": "app.js",
  "author": {
    "name": ""
  },
  "dependencies": {
    "@grapecity/spread-excelio": "^16.0.4",
    "@grapecity/spread-sheets": "^16.0.4",
    "bufferjs": "^3.0.1",
    "filereader": "^0.10.3",
    "mock-browser": "^0.92.14"
  }
}
In this sample, we’ll use the File System Module of Node.js. We can load that in:
var fs = require('fs');To use SpreadJS with Node.js, we can load the Mock-Browser that we installed:
var mockBrowser = require('mock-browser').mocks.MockBrowser;Before loading the SpreadJS script, we’ll need to initialize the mock-browser. Initialize the variables that we may need to use later in the application, particularly the «window» variable:
global.window = mockBrowser.createWindow();
global.document = window.document;
global.navigator = window.navigator;
global.HTMLCollection = window.HTMLCollection;
global.getComputedStyle = window.getComputedStyle;
Initialize the FileReader library:
var fileReader = require('filereader');
global.FileReader = fileReader;
Use the SpreadJS npm Package
The SpreadJS and ExcelIO packages will need to be added to the project. You can add these to your project by right-clicking the «npm» section of the Solution Explorer and selecting Install New npm Packages. You should be able to search for «GrapeCity» and install the following two packages:
@grapecity/spread-sheets
@grapectiy/spread-excelio
Once the SpreadJS npm packages have been added to the project, the package.json should be automatically uploaded with the correct dependencies:
{
  "name": "spread-jsnode-js",
  "version": "0.0.1",
  "description": "SpreadJSNodeJS",
  "main": "app.js",
  "author": {
    "name": ""
  },
  "dependencies": {
    "@grapecity/spread-excelio": "^16.0.4",
    "@grapecity/spread-sheets": "^16.0.4",
    "bufferjs": "^3.0.1",
    "filereader": "^0.10.3",
    "mock-browser": "^0.92.14"
  }
}
Now we’ll need to require that in the app.js file:
var GC = require('@grapecity/spread-sheets');
var SJSExcel = require('@grapecity/spread-excelio');
When using the npm package, the license key also needs to be set for both:
GC.Spread.Sheets.LicenseKey = "<YOUR KEY HERE>";
SJSExcel.LicenseKey = "<YOUR KEY HERE>";
In this particular application, we’ll show the user which version of SpreadJS they are using. To do this, we can require the package.json file and then reference the dependency to get the version number:
var packageJson = require('./package.json');
console.log('n** Using SpreadJS Version "' + packageJson.dependencies["@grapecity/spread-sheets"] + '" **');
Read the Excel File Into Your Node.js Application
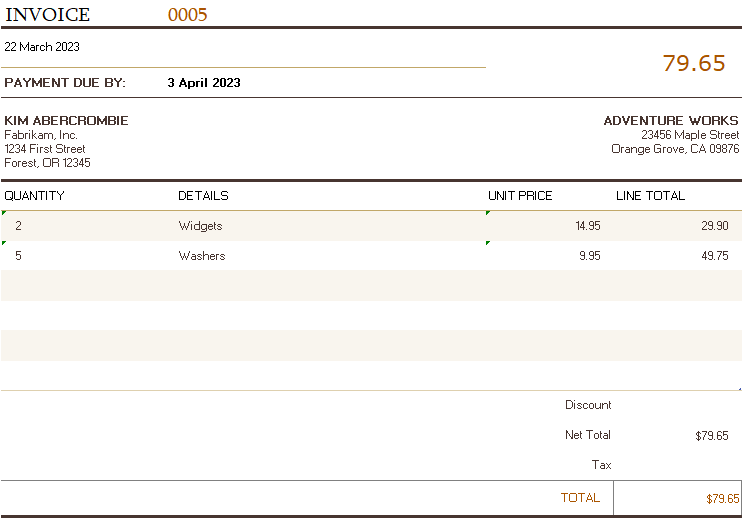
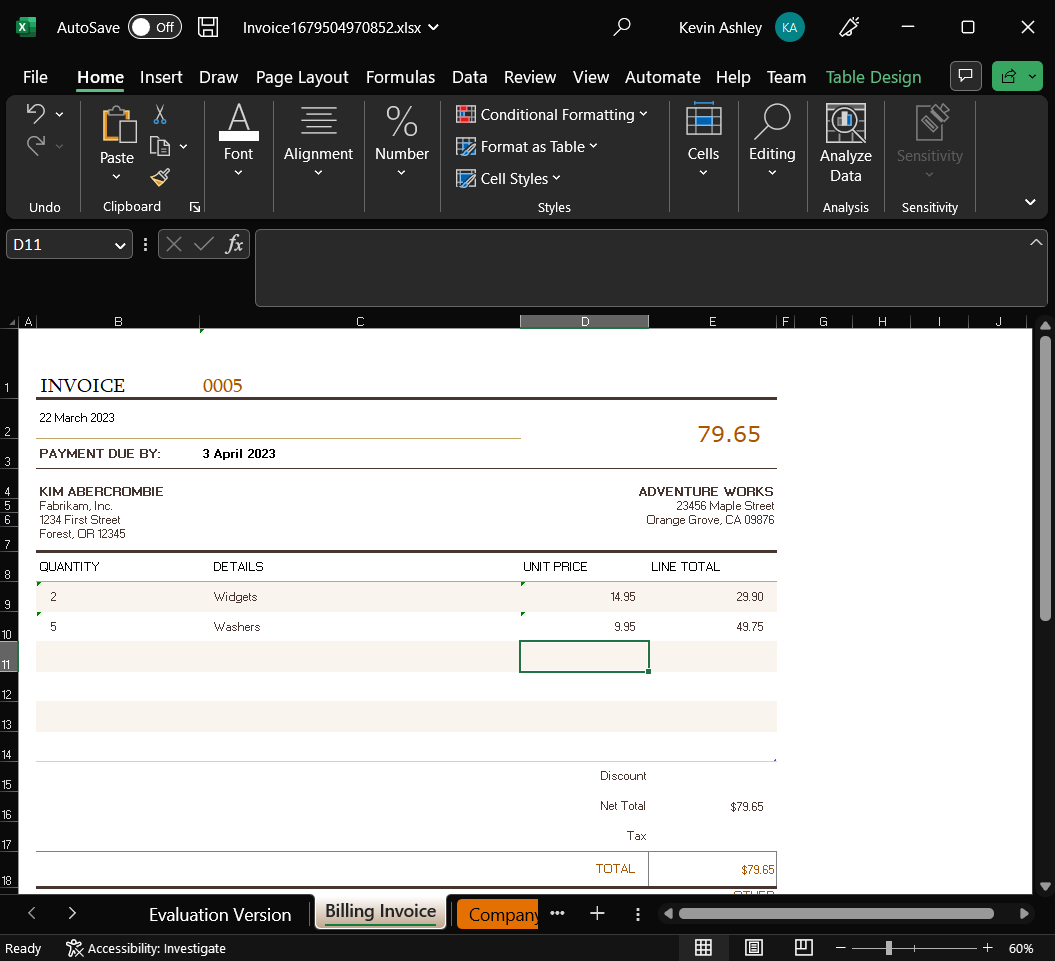
We’ll read in an existing Excel template file, getting data from the user. Next, place the data into the file and export it. In this case, the file is an invoice that the user can edit.
Start by initializing the workbook and Excel IO variables, as well as the variables for the sheet index:
var wb = new GC.Spread.Sheets.Workbook();

var billingInvoiceSheetIndex = 1;
var companySetupSheetIndex = 2;

var excelIO = new SJSExcel.IO();
Let’s wrap our code in a try/catch block as we read in the file. Then we can initialize the variable “readline” – which is essentially a library that allows you to read data that the user inputs into the console. Next, we’ll store it into a JavaScript array that we can use to fill out the Excel file easily:
// Instantiate the spreadsheet and modify it
console.log('nManipulating Spreadsheetn---');
try {
    var file = fs.readFileSync('./content/billingInvoiceTemplate.xlsx');
    excelIO.open(file.buffer, (data) => {
        wb.fromJSON(data);
        const readline = require('readline');

        var invoice = {
            generalInfo: [],
            invoiceItems: [],
            companyDetails: []
        };
    });
} catch (e) {
    console.error("** Error manipulating spreadsheet **");
    console.error(e);
}
Gather User Input
The above image shows the Excel file we are using. The first information we want to gather is the general invoice information. We can make a separate function within the excelio.open call to prompt the user in the console for each item that we’ll need.
We can create a separate array to save the data to after each input, then when we have all of the input for that section. Push it to the invoice.generalInfo array that we created:
function fillGeneralInformation() {
    console.log("-----------------------nFill in Invoice Detailsn-----------------------")
    const rl = readline.createInterface({
        input: process.stdin,
        output: process.stdout
    });
    var generalInfoArray = [];
    rl.question('Invoice Number: ', (answer) => {
        generalInfoArray.push(answer);
        rl.question('Invoice Date (dd Month Year): ', (answer) => {
            generalInfoArray.push(answer);
            rl.question('Payment Due Date (dd Month Year): ', (answer) => {
                generalInfoArray.push(answer);
                rl.question('Customer Name: ', (answer) => {
                    generalInfoArray.push(answer);
                    rl.question('Customer Company Name: ', (answer) => {
                        generalInfoArray.push(answer);
                        rl.question('Customer Street Address: ', (answer) => {
                            generalInfoArray.push(answer);
                            rl.question('Customer City, State, Zip (<City>, <State Abbr> <Zip>): ', (answer) => {
                                generalInfoArray.push(answer);
                                rl.question('Invoice Company Name: ', (answer) => {
                                    generalInfoArray.push(answer);
                                    rl.question('Invoice Street Address: ', (answer) => {
                                        generalInfoArray.push(answer);
                                        rl.question('Invoice City, State, Zip (<City>, <State Abbr> <Zip>): ', (answer) => {
                                            generalInfoArray.push(answer);
                                            rl.close();

                                            invoice.generalInfo.push({
                                                "invoiceNumber": generalInfoArray[0],
                                                "invoiceDate": generalInfoArray[1],
                                                "paymentDueDate": generalInfoArray[2],
                                                "customerName": generalInfoArray[3],
                                                "customerCompanyName": generalInfoArray[4],
                                                "customerStreetAddress": generalInfoArray[5],
                                                "customerCityStateZip": generalInfoArray[6],
                                                "invoiceCompanyName": generalInfoArray[7],
                                                "invoiceStreetAddress": generalInfoArray[8],
                                                "invoiceCityStateZip": generalInfoArray[9],
                                            });
                                            console.log("General Invoice Information Stored");
                                            fillCompanyDetails();
                                        });
                                    });
                                });
                            });
                        });
                    });
                });
            });
        });
    });
}
Within that function, we call «fillCompanyDetails,» we’ll gather information about the company to fill into the second sheet of the workbook. The function will be very similar to the previous function:
function fillCompanyDetails() {
    console.log("-----------------------nFill in Company Detailsn-----------------------");
    const rl = readline.createInterface({ input: process.stdin, output: process.stdout });
    var companyDetailsArray = []
    rl.question('Your Name: ', (answer) => {
        companyDetailsArray.push(answer);
        rl.question('Company Name: ', (answer) => {
            companyDetailsArray.push(answer);
            rl.question('Address Line 1: ', (answer) => {
                companyDetailsArray.push(answer);
                rl.question('Address Line 2: ', (answer) => {
                    companyDetailsArray.push(answer);
                    rl.question('Address Line 3: ', (answer) => {
                        companyDetailsArray.push(answer);
                        rl.question('Address Line 4: ', (answer) => {
                            companyDetailsArray.push(answer);
                            rl.question('Address Line 5: ', (answer) => {
                                companyDetailsArray.push(answer);
                                rl.question('Phone: ', (answer) => {
                                    companyDetailsArray.push(answer);
                                    rl.question('Facsimile: ', (answer) => {
                                        companyDetailsArray.push(answer);
                                        rl.question('Website: ', (answer) => {
                                            companyDetailsArray.push(answer);
                                            rl.question('Email: ', (answer) => {
                                                companyDetailsArray.push(answer);
                                                rl.question('Currency Abbreviation: ', (answer) => {
                                                    companyDetailsArray.push(answer);
                                                    rl.question('Beneficiary: ', (answer) => {
                                                        companyDetailsArray.push(answer);
                                                        rl.question('Bank: ', (answer) => {
                                                            companyDetailsArray.push(answer);
                                                            rl.question('Bank Address: ', (answer) => {
                                                                companyDetailsArray.push(answer);
                                                                rl.question('Account Number: ', (answer) => {
                                                                    companyDetailsArray.push(answer);
                                                                    rl.question('Routing Number: ', (answer) => {
                                                                        companyDetailsArray.push(answer);
                                                                        rl.question('Make Checks Payable To: ', (answer) => {
                                                                            companyDetailsArray.push(answer); rl.close();
                                                                            invoice.companyDetails.push({ "yourName": companyDetailsArray[0], "companyName": companyDetailsArray[1], "addressLine1": companyDetailsArray[2], "addressLine2": companyDetailsArray[3], "addressLine3": companyDetailsArray[4], "addressLine4": companyDetailsArray[5], "addressLine5": companyDetailsArray[6], "phone": companyDetailsArray[7], "facsimile": companyDetailsArray[8], "website": companyDetailsArray[9], "email": companyDetailsArray[10], "currencyAbbreviation": companyDetailsArray[11], "beneficiary": companyDetailsArray[12], "bank": companyDetailsArray[13], "bankAddress": companyDetailsArray[14], "accountNumber": companyDetailsArray[15], "routingNumber": companyDetailsArray[16], "payableTo": companyDetailsArray[17] });
                                                                            console.log("Invoice Company Information Stored");
                                                                            console.log("-----------------------nFill in Invoice Itemsn-----------------------");
                                                                            fillInvoiceItemsInformation();
                                                                        });
                                                                    });
                                                                });
                                                            });
                                                        });
                                                    });
                                                });
                                            });
                                        });
                                    });
                                });
                            });
                        });
                    });
                });
            });
        });
    });
}
Now that we have the basic information for the invoice, we can focus on gathering the individual invoice items, which we’ll do in another function called «fillInvoiceItemsInformation.» Before each item, we’ll ask the user if they would like to add an item. If they keep entering «y», then we’ll gather that item’s information, then ask again until they type «n»:
function fillInvoiceItemsInformation() {
    const rl = readline.createInterface({
        input: process.stdin, output: process.stdout
    });
    var invoiceItemArray = [];
    rl.question('Add item?(y/n): ', (answer) => {
        switch (answer) {
            case "y": console.log("-----------------------nEnter Item Informationn-----------------------");
                rl.question('Quantity: ', (answer) => {
                    invoiceItemArray.push(answer);
                    rl.question('Details: ', (answer) => {
                        invoiceItemArray.push(answer);
                        rl.question('Unit Price: ', (answer) => {
                            invoiceItemArray.push(answer);
                            invoice.invoiceItems.push({
                                "quantity": invoiceItemArray[0], "details": invoiceItemArray[1], "unitPrice": invoiceItemArray[2]
                            });
                            console.log("Item Information Added");
                            rl.close();
                            fillInvoiceItemsInformation();
                        });
                    });
                });
                break;
            case "n": rl.close();
                return fillExcelFile();
                break;
            default: console.log("Incorrect option, Please enter 'y' or 'n'.");
        }
    });
}
Add Data to the Excel Spreadsheet
After gathering all the required invoice information, we can fill out the Excel file. For the billing information and company setup, we can manually set each value in the cell from the JavaScript array:
function fillExcelFile() {
    console.log("-----------------------nFilling in Excel filen-----------------------");
    fillBillingInfo();
    fillCompanySetup();
}

function fillBillingInfo() {
    var sheet = wb.getSheet(billingInvoiceSheetIndex);
    sheet.getCell(0, 2).value(invoice.generalInfo[0].invoiceNumber);
    sheet.getCell(1, 1).value(invoice.generalInfo[0].invoiceDate);
    sheet.getCell(2, 2).value(invoice.generalInfo[0].paymentDueDate);
    sheet.getCell(3, 1).value(invoice.generalInfo[0].customerName);
    sheet.getCell(4, 1).value(invoice.generalInfo[0].customerCompanyName);
    sheet.getCell(5, 1).value(invoice.generalInfo[0].customerStreetAddress);
    sheet.getCell(6, 1).value(invoice.generalInfo[0].customerCityStateZip);
    sheet.getCell(3, 3).value(invoice.generalInfo[0].invoiceCompanyName);
    sheet.getCell(4, 3).value(invoice.generalInfo[0].invoiceStreetAddress);
    sheet.getCell(5, 3).value(invoice.generalInfo[0].invoiceCityStateZip);
}

function fillCompanySetup() {
    var sheet = wb.getSheet(companySetupSheetIndex);
    sheet.getCell(2, 2).value(invoice.companyDetails[0].yourName);
    sheet.getCell(3, 2).value(invoice.companyDetails[0].companyName);
    sheet.getCell(4, 2).value(invoice.companyDetails[0].addressLine1);
    sheet.getCell(5, 2).value(invoice.companyDetails[0].addressLine2);
    sheet.getCell(6, 2).value(invoice.companyDetails[0].addressLine3);
    sheet.getCell(7, 2).value(invoice.companyDetails[0].addressLine4);
    sheet.getCell(8, 2).value(invoice.companyDetails[0].addressLine5);
    sheet.getCell(9, 2).value(invoice.companyDetails[0].phone);
    sheet.getCell(10, 2).value(invoice.companyDetails[0].facsimile);
    sheet.getCell(11, 2).value(invoice.companyDetails[0].website);
    sheet.getCell(12, 2).value(invoice.companyDetails[0].email);
    sheet.getCell(13, 2).value(invoice.companyDetails[0].currencyAbbreviation);
    sheet.getCell(14, 2).value(invoice.companyDetails[0].beneficiary);
    sheet.getCell(15, 2).value(invoice.companyDetails[0].bank);
    sheet.getCell(16, 2).value(invoice.companyDetails[0].bankAddress);
    sheet.getCell(17, 2).value(invoice.companyDetails[0].accountNumber);
    sheet.getCell(18, 2).value(invoice.companyDetails[0].routingNumber);
    sheet.getCell(19, 2).value(invoice.companyDetails[0].payableTo);
}
The template we are using has a specific number of rows laid out for the items in the invoice. The user may add more than the max. In this case, we can simply add more rows to the sheet. We’ll add the rows before setting the items in the sheet from the array:
function fillInvoiceItems() {
    var sheet = wb.getSheet(billingInvoiceSheetIndex);
    var rowsToAdd = 0;
    if (invoice.invoiceItems.length > 15) {
        rowsToAdd = invoice.invoiceItems.length - 15;
        sheet.addRows(22, rowsToAdd);
    }
    var rowIndex = 8;
    if (invoice.invoiceItems.length >= 1) {
        for (var i = 0; i < invoice.invoiceItems.length; i++) {
            sheet.getCell(rowIndex, 1).value(invoice.invoiceItems[i].quantity);
            sheet.getCell(rowIndex, 2).value(invoice.invoiceItems[i].details);
            sheet.getCell(rowIndex, 3).value(invoice.invoiceItems[i].unitPrice);
            rowIndex++;
        }
    }
}
Export Node.js Out to an Excel XLSX Spreadsheet
After the information has been filled out in the workbook, we can export the workbook to an Excel file. To do this, we’ll use the excelio open function. In this case, just put the date in the filename:
function exportExcelFile() {
    excelIO.save(wb.toJSON(), (data) => {
        fs.appendFileSync('Invoice' + new Date().valueOf() + '.xlsx', new Buffer(data), function (err) {
            console.log(err);
        });
        console.log("Export success");
    }, (err) => {
        console.log(err);
    }, { useArrayBuffer: true });
}
You can export your workbook to an Excel file with the above code snippet. Your completed file will look like this:
Utilizing SpreadJS in conjunction with Node.js demonstrates another example of the versatility and extensibility of SpreadJS! Check out our blog page for more articles like this, demos, videos, and tutorials.
If you have any questions, feedback, or demo requests, please comment below!
Ready to get Started? Download SpreadJS Today!
The Excel file is a spreadsheet file format created by Microsoft for use with Microsoft Excel. You can use the file to create, view, edit, analyse data, charts, budgets and more. In this tutorial, I will show you how to use Node.js Express Rest API to download Excel file from a table in MySQL Database using exceljs.
Related Posts:
– Node.js: Upload/Import Excel file data into Database
– Export MySQL data to CSV file using Node.js
– Export PostgresSQL data to CSV file using Node.js
– Export MongoDB collection to CSV file using Node.js
Download CSV File instead:
Node.js Download CSV file example
Contents
- Node.js Download/Export Excel File overview
- exceljs to create Excel file
- Technology
- Project Structure
- Setup Node.js Excel File Download project
- Configure MySQL database & Sequelize
- Initialize Sequelize
- Define the Sequelize Model
- Create Controller for downloading Excel file
- Define Routes for downloading Excel File
- Create Express app server
- Run the Node.js Download Excel File App
- Conclusion
- Further Reading
- Source Code
Node.js Download/Export Excel File overview
Assume that we have a tutorials table in MySQL database like this:

We’re gonna create a Node.js Application that provides APIs for downloading MySQL database table data as Excel file with following content:

If you send request to /api/excel/download, the server will return a response with an Excel file tutorials.xlsx that contains data in MySQL table:

How to do this?
You need to set the HTTP header:
"Content-disposition" : "attachment; filename=[yourFileName]"
"Content-Type" : "application/vnd.openxmlformats-officedocument.spreadsheetml.sheet"
We’re gonna apply the information above later in this tutorial.
You can also find how to upload Excel File to the Node.js Express Server & store data in MySQL Database in the post:
Node.js: Upload/Import Excel file data into Database
exceljs to create Excel file
We’re gonna use exceljs to create and add data (tutorials array) into Excel file.
Let me summarize the steps for writing to Excel file:
- create a new
Workbook - add a new
WorkSheetusingWorkbook.addWorksheet() - configure
WorkSheetcolumns with header, key, width - use
WorkSheet.addRows()with array of objects you want to add as parameter - use Workbook.xlsx.write() to write out Stream as response
const excel = require("exceljs");

let workbook = new excel.Workbook();
let worksheet = workbook.addWorksheet("Tutorials");

worksheet.columns = [
  { header: "Id", key: "id", width: 5 },
  { header: "Title", key: "title", width: 25 },
  { header: "Description", key: "description", width: 25 },
  { header: "Published", key: "published", width: 10 },
];

// Add Array Rows
worksheet.addRows(tutorials);

// res is a Stream object
res.setHeader(
  "Content-Type",
  "application/vnd.openxmlformats-officedocument.spreadsheetml.sheet"
);
res.setHeader(
  "Content-Disposition",
  "attachment; filename=" + "tutorials.xlsx"
);

return workbook.xlsx.write(res).then(function () {
  res.status(200).end();
});
Technology
- express 4.17.1
- mysql2 2.1.0
- exceljs 4.0.1
- sequelize 5.21.13
Project Structure
This is the project directory that we’re gonna build:

– db.config.js exports configuring parameters for MySQL connection & Sequelize.
– models/index.js: uses configuration above to initialize Sequelize, models/tutorial.model.js for Sequelize Tutorial data model.
– excel.controllers.js: get data from database table, then uses exceljs to write out and return Excel file.
– routes/tutorial.routes.js: defines routes for endpoints that is called from HTTP Client, use controllers to handle requests.
– server.js: initializes routes, runs Express app.
Setup Node.js Excel File Download project
Open command prompt, change current directory to the root folder of our project.
Install Express, Multer, Sequelize, Mysql2 with the following command:
npm install express sequelize mysql2 exceljs
The package.json file will look like this:
{
  "name": "node-js-download-excel-files",
  "version": "1.0.0",
  "description": "Node.js Download/Export Excel file from MySQL database",
  "main": "src/server.js",
  "scripts": {
    "test": "echo "Error: no test specified" && exit 1"
  },
  "keywords": [
    "node js",
    "download",
    "export",
    "excel",
    "file",
    "database",
    "mysql"
  ],
  "author": "bezkoder",
  "license": "ISC",
  "dependencies": {
    "exceljs": "^4.1.0",
    "express": "^4.17.1",
    "mysql2": "^2.1.0",
    "sequelize": "^6.3.0"
  }
}
Configure MySQL database & Sequelize
In the src folder, we create a separate config folder for configuration with db.config.js file like this:
module.exports = {
  HOST: "localhost",
  USER: "root",
  PASSWORD: "123456",
  DB: "testdb",
  dialect: "mysql",
  pool: {
    max: 5,
    min: 0,
    acquire: 30000,
    idle: 10000
  }
};
First five parameters are for MySQL connection.
pool is optional, it will be used for Sequelize connection pool configuration:
max: maximum number of connection in poolmin: minimum number of connection in poolidle: maximum time, in milliseconds, that a connection can be idle before being releasedacquire: maximum time, in milliseconds, that pool will try to get connection before throwing error
For more details, please visit API Reference for the Sequelize constructor.
Initialize Sequelize
Now we initialize Sequelize in src/models folder.
Create src/models/index.js with the following code:
const dbConfig = require("../config/db.config.js");

const Sequelize = require("sequelize");
const sequelize = new Sequelize(dbConfig.DB, dbConfig.USER, dbConfig.PASSWORD, {
  host: dbConfig.HOST,
  dialect: dbConfig.dialect,
  operatorsAliases: false,

  pool: {
    max: dbConfig.pool.max,
    min: dbConfig.pool.min,
    acquire: dbConfig.pool.acquire,
    idle: dbConfig.pool.idle
  }
});

const db = {};

db.Sequelize = Sequelize;
db.sequelize = sequelize;

db.tutorials = require("./tutorial.model.js")(sequelize, Sequelize);

module.exports = db;
We’re gonna define Tutorial model in the next step.
Define the Sequelize Model
In models folder, create tutorial.model.js file like this:
module.exports = (sequelize, Sequelize) => {
  const Tutorial = sequelize.define("tutorial", {
    title: {
      type: Sequelize.STRING
    },
    description: {
      type: Sequelize.STRING
    },
    published: {
      type: Sequelize.BOOLEAN
    }
  });

  return Tutorial;
};
This Sequelize Model represents tutorials table in MySQL database with columns: id, title, description, published, createdAt, updatedAt.
After initializing Sequelize, we don’t need to write CRUD functions, Sequelize supports all of them, including retrieving all Tutorials with findAll() method that we’re gonna use in our Controller.
Create Controller for downloading Excel file
controllers/tutorial/excel.controller.js
const db = require("../../models");
const Tutorial = db.tutorials;

const excel = require("exceljs");

const download = (req, res) => {
  Tutorial.findAll().then((objs) => {
    let tutorials = [];

    objs.forEach((obj) => {
      tutorials.push({
        id: obj.id,
        title: obj.title,
        description: obj.description,
        published: obj.published,
      });
    });

    let workbook = new excel.Workbook();
    let worksheet = workbook.addWorksheet("Tutorials");

    worksheet.columns = [
      { header: "Id", key: "id", width: 5 },
      { header: "Title", key: "title", width: 25 },
      { header: "Description", key: "description", width: 25 },
      { header: "Published", key: "published", width: 10 },
    ];

    // Add Array Rows
    worksheet.addRows(tutorials);

    res.setHeader(
      "Content-Type",
      "application/vnd.openxmlformats-officedocument.spreadsheetml.sheet"
    );
    res.setHeader(
      "Content-Disposition",
      "attachment; filename=" + "tutorials.xlsx"
    );

    return workbook.xlsx.write(res).then(function () {
      res.status(200).end();
    });
  });
};

module.exports = {
  download,
};
Now look at the download function:
– First we use Sequelize Model findAll() method to return all Tutorials stored in the tutorials table.
– Then we use exceljs to write data to Excel file:
- create a new
Workbook - add a new
WorkSheetusingWorkbook.addWorksheet() - configure
WorkSheetcolumns with header, key, width - use
WorkSheet.addRows()with array of objects you want to add as parameter - use Workbook.xlsx.write() to write out Stream as response
Define Routes for downloading Excel File
When a client sends request for an endpoint using HTTP request (GET excel file), we need to determine how the server will response by setting up the routes.
This is the route we need to setup: GET /api/excel/download.
Create a tutorial.routes.js inside routes folder with content like this:
const express = require("express");
const router = express.Router();
const excelController = require("../controllers/tutorials/excel.controller");

let routes = (app) => {
  router.get("/download", excelController.download);

  app.use("/api/excel", router);
};

module.exports = routes;
You can see that we use a controller from excel.controller.js.
Create Express app server
Finally, we create an Express server.
server.js
const express = require("express");
const app = express();
const db = require("./models");
const initRoutes = require("./routes/tutorial.routes");

app.use(express.urlencoded({ extended: true }));
initRoutes(app);

db.sequelize.sync();

let port = 8080;
app.listen(port, () => {
  console.log(`Running at localhost:${port}`);
});
In the code above, we initialize Express Router and call Sequelize sync() method.
db.sequelize.sync();
Run the Node.js Download Excel File App
Run the Node.js App with command: node src/server.js.
Now you can use browser or a HTTP Client to send GET request to http://localhost:8080/api/excel/download.
Conclusion
Today we’ve built a Rest API using Node.js Express to download Excel file that contains table data in MySQL database.
We also see how to use exceljs to write data to Excel Sheet, Sequelize to retrieve items in database table without need of boilerplate code.
You can also find how to upload Excel File to the Node.js Server & store data in MySQL Database in the post:
Node.js: Upload/Import Excel file data into MySQL Database
Or Download CSV File instead:
Node.js Download CSV file example
Happy learning! See you again.
Further Reading
- https://www.npmjs.com/package/express
- https://sequelize.org/v3/api/model/
- exceljs
Source Code
You can find the complete source code for this example on Github.