
install exceljs
npm i exceljs --save
import exceljs
var Excel = require('exceljs');
var workbook = new Excel.Workbook();
create workbook
var options = {
                filename: __dirname+'/Reports/'+reportName,
                useStyles: true,
                useSharedStrings: true
            };

            var workbook = new Excel.stream.xlsx.WorkbookWriter(options);
after create worksheet
var worksheet = workbook.addWorksheet('Rate Sheet',{properties:{tabColor:{argb:'FFC0000'}}});
in worksheet.column array you pass column name in header and array key
pass in key
worksheet.columns = [
            { header: 'column name', key: 'array key', width: 35},
            { header: 'column name', key: 'array key', width: 35},
            { header: 'column name', key: 'array key', width: 20},

            ];
after using forEach loop append row one by one in exel file
array.forEach(function(row){ worksheet.addRow(row); })
you can also perfome loop on each exel row and cell
worksheet.eachRow(function(row, rowNumber) {
    console.log('Row ' + rowNumber + ' = ' + JSON.stringify(row.values));
});
row.eachCell(function(cell, colNumber) {
    console.log('Cell ' + colNumber + ' = ' + cell.value);
});
Recently, I was tasked with writing some code to generate Excel workbooks containing sales data. I implemented the code using a Node module called ExcelJS. I found that this module provides a simple interface to generating documents, and it also supports more advanced functions such as text formatting, borders, formulae, and more.
We’ll begin by defining a simple interface which contains our sales data.
interface WeeklySalesNumbers {
product: string;
week1: number;
week2: number;
week3: number;
}
const numbers: WeeklySalesNumbers[] = [
{ product: 'Product A', week1: 5, week2: 10, week3: 27 },
{ product: 'Product B', week1: 5, week2: 5, week3: 11 },
{ product: 'Product C', week1: 1, week2: 2, week3: 3 },
{ product: 'Product D', week1: 6, week2: 1, week3: 2 },
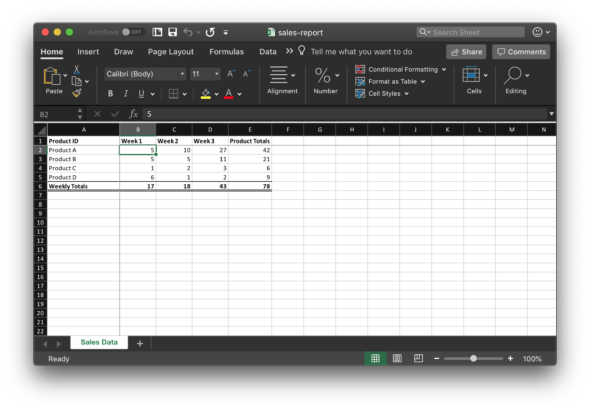
];Then, we’ll start on our function to generate the workbook. A function call creates the workbook, and then another adds a worksheet to our workbook. We’ll call this “Sales Data.”
async function generateSalesReport(weeklySalesNumbers: WeeklySalesNumbers[]) {
  const workbook = new Excel.Workbook();
  const worksheet = workbook.addWorksheet('Sales Data');
Next, we’ll define a list of columns that’ll be added to our worksheet. This is a feature provided by the ExcelJS module which allows us to assign values in the worksheet using a key-value pair.
    { header: 'Product ID', key: 'product', width: 20 },
    { header: 'Week 1', key: 'week1', width: 10 },
    { header: 'Week 2', key: 'week2', width: 10 },
    { header: 'Week 3', key: 'week3', width: 10 },
    { header: 'Product Totals', key: 'productTotals', width: 12 },
  ];
Then, we’ll add our sales numbers to the worksheet. For each row, we’ll use a formula function (defined later) to add a column that shows the total sales for each product.
  weeklySalesNumbers.forEach((data, index) => {
    worksheet.addRow({
      ...data,
      productTotals: generateProductTotalsCell(worksheet, index + 1),
    });
  });
Next, we’ll use a formula function (also defined later) to add a row that shows the total sales for all products each week.
  const totalsRow = worksheet.addRow([
  'Weekly Totals',
    generateWeeklyTotalsCell(worksheet, 'B', weeklySalesNumbers.length),
    generateWeeklyTotalsCell(worksheet, 'C', weeklySalesNumbers.length),
    generateWeeklyTotalsCell(worksheet, 'D', weeklySalesNumbers.length),
    generateWeeklyTotalsCell(worksheet, 'E', weeklySalesNumbers.length),
  ]);
Then, we’ll add some formatting. We can bold the first (heading) row and the totals row. In addition, we’ll add some borders on the totals row to indicate that it is a summation.
  worksheet.getRow(1).eachCell((cell) => {
    cell.font = { bold: true };
  });

  totalsRow.eachCell((cell) => {
    cell.font = { bold: true };
    cell.border = {
      top: { style: 'thin' }, bottom: { style: 'double' },
    };
  });
Next, we’ll freeze the panes so that the user of the spreadsheet can always have the product and columns in view when scrolling.
  worksheet.views = [
    { state: 'frozen', xSplit: 1, ySplit: 1, activeCell: 'B2' },
  ];
Then, we’ll write the workbook out to a file and finish up our function.
  await workbook.xlsx.writeFile('sales-report.xlsx');
}
Next, we’ll create our function to generate the product total cells that are to the right of each of the product sales data. This generates a cell formula using the SUM function provided by Excel.
function generateProductTotalsCell(worksheet: Excel.Worksheet, rowIndex: number) {
  const firstColumn = 'B';
  const lastColumn = 'D';

  const firstCellReference = `${firstColumn}${rowIndex + HeaderRowsCount}`;
  const lastCellReference = `${lastColumn}${rowIndex + HeaderRowsCount}`;

  const sumRange = `${firstCellReference}:${lastCellReference}`;

  return {
    formula: `SUM(${sumRange})`,
  };
}
Finally, we’ll create another function that generates the weekly totals that will be at the bottom of the sales data. This function is very similar to what we’ve discussed above, but it works on columns rather than rows.
function generateWeeklyTotalsCell(worksheet: Excel.Worksheet, columnLetter: string, totalDataRows: number) {
  const firstDataRow = HeaderRowsCount + 1;
  const lastDataRow = firstDataRow + totalDataRows - 1;

  const firstCellReference = `${columnLetter}${firstDataRow}`;
  const lastCellReference = `${columnLetter}${lastDataRow}`;
  const sumRange = `${firstCellReference}:${lastCellReference}`;

  return {
    formula: `SUM(${sumRange})`,
  };
}
When we open the file in Excel, we get a nice-looking spreadsheet.
Although this is a simple example, the ExcelJS module has allowed our project team to quickly and easily generate complex reports needed by our users.
ExcelJS is a JavaScript package that acts as an Excel workbook manager. exceljs can read, manipulate and write spreadsheet data and styles to XLSX and JSON, according to its official documentation. It’s reverse-engineered from Excel spreadsheet files as a project.
It’s an extremely useful package that allows you to do the following:
- Creating a workbook.
- Creating a worksheet.
- Handling headers and footers.
- Setting frozen or split views.
- Setting auto filters.
- Data manipulation on rows and columns.
- Adding data validation.
- Adding styles.
- Inserting images to a workbook.
In addition, exceljs is frequently updated and available for free. This tutorial covers the step-by-step installation process and a few examples of some of the most basic and commonly used features. Also, code snippets will be provided as reference to the readers.
What Is ExcelJS?
ExcelJS is a JavaScript package that works as an Excel workbook manager. It can read, manipulate and write spreadsheet data and styles to XLSX and JSON.
Let’s proceed to the next section and start installing exceljs.
How to Install ExcelJS
The recommended installation process is via npm, which mainly works for node.js projects. If you intend to use it directly within a browser for a project outside of node.js, you have to import the package using the official content delivery network (CDN) link. Let’s have a look at the installation process for both methods.
More on JavaScript8 Common JavasScript Data Structures
NPM
Run the following command to install npm in your project:
npm install exceljsThen, import it as follows:
const ExcelJS = require('exceljs');For a node.js that is more than 10 years old, you have to import using ES5 transpiled code. Also, you need to import a few polyfills, as well:
// polyfills required by exceljs
require('core-js/modules/es.promise');
require('core-js/modules/es.string.includes');
require('core-js/modules/es.object.assign');
require('core-js/modules/es.object.keys');
require('core-js/modules/es.symbol');
require('core-js/modules/es.symbol.async-iterator');
require('regenerator-runtime/runtime');

const ExcelJS = require('exceljs/dist/es5');
CDN
For using it directly on your browser, simply head over to the official CDN page for ExcelJS and copy the corresponding script tag based on your needs:
For example, you can use the following script tag inside your HTML file:
<script
src="https://cdnjs.cloudflare.com/ajax/libs/exceljs/4.3.0/exceljs.min.js" integrity="sha512-UnrKxsCMN9hFk7M56t4I4ckB4N/2HHi0w/7+B/1JsXIX3DmyBcsGpT3/BsuZMZf+6mAr0vP81syWtfynHJ69JA==" crossorigin="anonymous" referrerpolicy="no-referrer"></script>
FileSaver.js
Some of the features in exceljs are highly dependent on node.js built-in packages. For example, the save file functionality requires the fs module. This will throw an error when you call it within a non-node.js project.
Having said that, you can still utilize the file saving feature with just a few additional tricks. All you need to do is output the binary data as a buffer and save it using an external JavaScript library, such as FileSaver.js. Head over to the repository and copy the script tag based on your use cases.
Then, insert the script tag in your HTML as follows:
<script
src="https://cdnjs.cloudflare.com/ajax/libs/FileSaver.js/2.0.5/FileSaver.min.js" integrity="sha512-Qlv6VSKh1gDKGoJbnyA5RMXYcvnpIqhO++MhIM2fStMcGT9i2T//tSwYFlcyoRRDcDZ+TYHpH8azBBCyhpSeqw==" crossorigin="anonymous" referrerpolicy="no-referrer"></script>
How to Use ExcelJS
In this section, you will learn the fundamentals concepts and the basics behind exceljs.
Creating a New Workbook
Let’s start by creating a new workbook, as follows:
const workbook = new ExcelJS.Workbook();Workbook Properties
Once you have a workbook, you can play around with some of its properties:
workbook.creator = 'Ng Wai Foong';
workbook.lastModifiedBy = 'Bot';
workbook.created = new Date(2021, 8, 30);
workbook.modified = new Date();
workbook.lastPrinted = new Date(2021, 7, 27);
Adding a New Worksheet
Next, you can add a new worksheet to the workbook that you created earlier via the following code:
const worksheet = workbook.addWorksheet('New Sheet');Worksheet Settings
You can initialize some configurations for your sheet as well by passing in an object:
// red tab colour
const worksheet = workbook.addWorksheet('New Sheet', {properties:{tabColor:{argb:'FFC0000'}}});

// hide grid lines
const worksheet = workbook.addWorksheet('New Sheet', {views: [{showGridLines: false}]});

// freeze first row and column
const worksheet = workbook.addWorksheet('New Sheet', {views:[{state: 'frozen', xSplit: 1, ySplit:1}]});

// pageSetup settings for A4 - landscape
const worksheet =  workbook.addWorksheet('New Sheet', {
  pageSetup:{paperSize: 9, orientation:'landscape'}
});

// headers and footers
const worksheet = workbook.addWorksheet('New Sheet', {
  headerFooter: {oddFooter: "Page &P of &N";, oddHeader: 'Odd Page'}
});
You can also set the configurations manually after you have initialized the worksheet object. For example, you can set a footer for odd pages, as follows:
//Set footer (default centered), result: "Page 2 of 16"
worksheet.headerFooter.oddFooter = "Page &P of &N";
&P and &N are part of the script commands.
How to Set Auto Filters in ExcelJS
Moreover, there is support for auto filters as well. The following code snippet allows you to set an auto filter from A1 to C1:
worksheet.autoFilter = 'A1:C1';You can use the following code instead, which is a lot more explicit compared to the standard form:
worksheet.autoFilter = {
 from: 'A1',
 to: 'C1',
}
Creating Columns
It’s good practice to set the columns with the corresponding mapping header and key.
worksheet.columns = [
 { header: 'Id', key: 'id' },
 { header: 'Name', key: 'name' },
 { header: 'Age', key: 'age' }
];
Header represents the text that will be displayed, while key represents the property name mapping when you add a new row using an object. Please note that the order is important, as it will affect the final output when you save the workbook as an excel file.
Accessing a Column
You can access each column individually via:
key: The mapping key declared when creating the column (ID, name, age, etc.).letter: The corresponding letter for the column (A, B, C, etc.).column number: Index number (starts from one).
const idCol = worksheet.getColumn('id');
const nameCol = worksheet.getColumn('B');
const ageCol = worksheet.getColumn(3);
Iterating Each Cell
You can easily iterate all current cells in the column that is not empty:
ageCol.eachCell(function(cell, rowNumber) {

});
If you want to iterate over empty cells, simply set the includeEmpty property to true as follows:
dobCol.eachCell({ includeEmpty: true }, function(cell, rowNumber) {
});
How to Add a Row in ExcelJS
Once you have declared the corresponding columns, you can start to add data to it by calling the addRow function. There are multiple ways to add a row to the worksheet.
Adding a New Row Using Key-Value Object
For example, you can pass in key-value object that matched the header columns:
const row = worksheet.addRow({id: 1, name: 'John Doe', age: 35});Adding a New Row Using Array
You can use an array as well to add new data. It will assign to the columns in order (A, B, C):
const row = worksheet.addRow([2, 'Mary Sue', 22]);Adding Rows of Data
In addition, you can call addRows function and pass in an array of row objects instead. This allows you to add rows of data with just a single line of code:
const rows = [
 [3,'Alex','44'],
 {id:4, name: 'Margaret', age: 32}
];
worksheet.addRows(rows);
Adding Page Break
There is also a function called addPageBreak that adds a new page break below the row. You can call it as follows:
row.addPageBreak();Iterating Each Row
You can easily go through each row by utilizing eachRow function on your worksheet:
worksheet.eachRow(function(row, rowNumber) {
});
Iterating Each Cell
Similar to column, you can iterate over each cell of the row via the following
row.eachCell(function(cell, colNumber) {
});
Metrics
There are a few built-in metrics for getting the number of rows and total number of cells:
const rowSize = row.cellCount;
const numValues = row.actualCellCount;
Data Validation
You can easily incorporate data validation to your worksheet programmatically via dataValidation. For example, you can set a dropdown with a list of values via the following code:
worksheet.getCell('A1').dataValidation = {
 type: 'list',
 allowBlank: true,
 formulae: ['"One,Two,Three,Four"']
};
Here’s another example that limits the input to be in between 2.5 and seven. You can add a tooltip message to guide the users by setting the prompt property.
worksheet.getCell('A1').dataValidation = {
 type: 'decimal',
 operator: 'between',
 allowBlank: true,
 showInputMessage: true,
 formulae: [2.5, 7],
 promptTitle: 'Decimal',
 prompt: 'The value must between 2.5 and 7'
};
Styling in ExcelJS
exceljs supports a rich set of styling and formatting for cells, rows and columns. It comes with the following properties:
numFmtfontalignmentborderfill
Formatting
You can easily format the number, as follows:
// display value as '1 3/5'
worksheet.getCell('A1').value = 1.6;
worksheet.getCell('A1').numFmt = '# ?/?';
// display value as '1.60%'
worksheet.getCell('B1').value = 0.016;
worksheet.getCell('B1').numFmt = '0.00%';
With the exception of numFmt, which accepts a string, the rest of the style takes in a JavaScript object.
Font
For example, you can set the font via the following code snippet:
worksheet.getCell('A1').font = {
 name: 'Arial Black',
 color: { argb: 'FF00FF00' },
 family: 2,
 size: 14,
 italic: true
};
Alignment
On the other hand, you can easily set the alignment to top right, as follows:
worksheet.getCell('A1').alignment = { vertical: 'top', horizontal: 'left' };
You can also set alignment for text wrapping and indentation via the following code:
// set cell wrap-text
worksheet.getCell('A1').alignment = { wrapText: true };
// set cell indent to 1
worksheet.getCell('A1').alignment = { indent: 1 };
Border
To style the border of a cell based on your desired color, use the following code instead:
worksheet.getCell('A1').border = {
 top: {style:'double', color: {argb:'FF00FF00'}},
 left: {style:'double', color: {argb:'FF00FF00'}},
 bottom: {style:'double', color: {argb:'FF00FF00'}},
 right: {style:'double', color: {argb:'FF00FF00'}}
};
The underlying style property accepts the following:
thindotteddashDothairdashDotDotslantDashDotmediumDashedmediumDashDotDotmediumDashDotmediumdoublethick
Fills
For filling a particular cell, simply pass in an object with the following property:
worksheet.getCell('A1').fill = {
 type: 'pattern',
 pattern:'darkTrellis',
 fgColor:{argb:'FFFFFF00'},
 bgColor:{argb:'FF0000FF'
};
fgColor refers to the foreground color, while bgColor refers to the back end color.
The complete list for pattern types is as follows:
nonesoliddarkGraymediumGraylightGraygray125gray0625darkHorizontaldarkVerticaldarkDowndarkUpdarkGriddarkTrellislightHorizontallightVerticallightDownlightUplightGridlightTrellis
Inheritance
Please note that when you set a specific style to a row or column, exceljs will internally apply the same style to all existing cells in that row or column. Newly created cells will inherit the style as well.
As a result,it’s recommended to add cells before you set the style. The following code snippet illustrates an example of setting all the headers to bold after cells creation:
// arrayObj is an array of objects
worksheet.addRows(arrayObj);
worksheet.getRow(1).font = { bold: true };
File I/O
exceljs provides a few helper functions for reading and loading a file depending on the use cases. Generally, it’s categorized into:
filestreambuffer
Please note that File I/O related operations return a Promise and have to be called together with the await keyword. If you are using it inside a function, make sure to set the function to async.
File
Assuming that you have a local excel file, you can perform reading and writing as follows:
// file reading
await workbook.xlsx.readFile(filename);
// file writing
await workbook.xlsx.writeFile(filename);
Stream
If you have a stream of data, use the following code snippet:
// stream reading
await workbook.xlsx.read(stream);
// stream writing
await workbook.xlsx.write(stream);
Buffer
When dealing with buffer, you should call load and writeBuffer function instead:
// buffer reading
await workbook.xlsx.load(data);
// buffer writing
const buffer = await workbook.xlsx.writeBuffer();
Here’s an example of reading an uploaded excel file. fileList is a FileList object obtained from input tag. Simply instantiate a new binary large object (BLOB) and get the underlying buffer. Then, pass it to the load function as follows:
const blob = new Blob([fileList[0]], { type: 'application/vnd.openxmlformats-officedocument.spreadsheetml.sheet;charset=utf-8' });
const buffer = await blob.arrayBuffer();

const workbook = new ExcelJS.Workbook();
await workbook.xlsx.load(buffer);
More on JavaScriptJavaScript Call Stacks: An Introduction
File I/O for a Non-Node.js Project
As mentioned earlier, the read and write file functions rely on the fs module, which will throw an error if you’re using it on a browser. In order to resolve this, simply call the writeBuffer function and save the output buffer data into a BLOB. Then, save it using FileSaver.js.
const blob = new Blob([fileList[0]], { type: 'application/vnd.openxmlformats-officedocument.spreadsheetml.sheet;charset=utf-8' });
const buffer = await blob.arrayBuffer();

const workbook = new ExcelJS.Workbook();
await workbook.xlsx.load(buffer);
Make sure you import the appropriate script tag for FileSaver.js. Check the installation section for more information on this.
There may be times when you need to generate an Excel file from your Node.js application. You may need to get data from a database or a web service, then output it to an Excel file for further reporting or analysis. SpreadJS makes this possible without any Excel requirements on the server.
Node.js is a popular event-driven JavaScript runtime that is typically used in creating network applications. It can handle multiple connections simultaneously and doesn’t depend on threads like most other models.
In this tutorial, learn how to use SpreadJS to gather information entered by the user and automatically export it to an Excel file—all in your Node.js application.
- Get Started with SpreadJS and Node.js
- Use the SpreadJS npm Package
- Read an Excel File In Your Node.js Application
- Gather User Input
- Fill Out Your Excel File
- Export Node.js Out to Excel
With the power of SpreadJS, performance is not affected whether using SpreadJS by itself or with Node.js.
Download the sample zip for this project.
Ready to get Started? Download SpreadJS Today!
Get Started with SpreadJS Spreadsheets and Node.js
To start, we’ll need to install Node.js and the Mock-Browser, BufferJS, and FileReader, each of which can be found at these links:
Installing Node.js via Package Manager
Mock-Browser
BufferJS
FileReader
While you can use most IDE to create this application, we’ll use Visual Studio 2019 in this blog. Once Visual Studio is open, create a new application using Create a new project, and then search for «Blank Node.js Console Application«. Please give it a name and specify a location to create the project.
This will automatically create the required files and open up the “app.js” file, which is the only file we’ll be changing.
To install the packages in the project, right-click the «npm» header in the Solution Explorer, click Install New npm Packages and search and install each package for «Mock-Browser», «BufferJS», and «FileReader».
Once you have that installed, the dependencies should update in the package.json file:
{
  "name": "spread-jsnode-js",
  "version": "0.0.1",
  "description": "SpreadJSNodeJS",
  "main": "app.js",
  "author": {
    "name": ""
  },
  "dependencies": {
    "@grapecity/spread-excelio": "^16.0.4",
    "@grapecity/spread-sheets": "^16.0.4",
    "bufferjs": "^3.0.1",
    "filereader": "^0.10.3",
    "mock-browser": "^0.92.14"
  }
}
In this sample, we’ll use the File System Module of Node.js. We can load that in:
var fs = require('fs');To use SpreadJS with Node.js, we can load the Mock-Browser that we installed:
var mockBrowser = require('mock-browser').mocks.MockBrowser;Before loading the SpreadJS script, we’ll need to initialize the mock-browser. Initialize the variables that we may need to use later in the application, particularly the «window» variable:
global.window = mockBrowser.createWindow();
global.document = window.document;
global.navigator = window.navigator;
global.HTMLCollection = window.HTMLCollection;
global.getComputedStyle = window.getComputedStyle;
Initialize the FileReader library:
var fileReader = require('filereader');
global.FileReader = fileReader;
Use the SpreadJS npm Package
The SpreadJS and ExcelIO packages will need to be added to the project. You can add these to your project by right-clicking the «npm» section of the Solution Explorer and selecting Install New npm Packages. You should be able to search for «GrapeCity» and install the following two packages:
@grapecity/spread-sheets
@grapectiy/spread-excelio
Once the SpreadJS npm packages have been added to the project, the package.json should be automatically uploaded with the correct dependencies:
{
  "name": "spread-jsnode-js",
  "version": "0.0.1",
  "description": "SpreadJSNodeJS",
  "main": "app.js",
  "author": {
    "name": ""
  },
  "dependencies": {
    "@grapecity/spread-excelio": "^16.0.4",
    "@grapecity/spread-sheets": "^16.0.4",
    "bufferjs": "^3.0.1",
    "filereader": "^0.10.3",
    "mock-browser": "^0.92.14"
  }
}
Now we’ll need to require that in the app.js file:
var GC = require('@grapecity/spread-sheets');
var SJSExcel = require('@grapecity/spread-excelio');
When using the npm package, the license key also needs to be set for both:
GC.Spread.Sheets.LicenseKey = "<YOUR KEY HERE>";
SJSExcel.LicenseKey = "<YOUR KEY HERE>";
In this particular application, we’ll show the user which version of SpreadJS they are using. To do this, we can require the package.json file and then reference the dependency to get the version number:
var packageJson = require('./package.json');
console.log('n** Using SpreadJS Version "' + packageJson.dependencies["@grapecity/spread-sheets"] + '" **');
Read the Excel File Into Your Node.js Application
We’ll read in an existing Excel template file, getting data from the user. Next, place the data into the file and export it. In this case, the file is an invoice that the user can edit.
Start by initializing the workbook and Excel IO variables, as well as the variables for the sheet index:
var wb = new GC.Spread.Sheets.Workbook();

var billingInvoiceSheetIndex = 1;
var companySetupSheetIndex = 2;

var excelIO = new SJSExcel.IO();
Let’s wrap our code in a try/catch block as we read in the file. Then we can initialize the variable “readline” – which is essentially a library that allows you to read data that the user inputs into the console. Next, we’ll store it into a JavaScript array that we can use to fill out the Excel file easily:
// Instantiate the spreadsheet and modify it
console.log('nManipulating Spreadsheetn---');
try {
    var file = fs.readFileSync('./content/billingInvoiceTemplate.xlsx');
    excelIO.open(file.buffer, (data) => {
        wb.fromJSON(data);
        const readline = require('readline');

        var invoice = {
            generalInfo: [],
            invoiceItems: [],
            companyDetails: []
        };
    });
} catch (e) {
    console.error("** Error manipulating spreadsheet **");
    console.error(e);
}
Gather User Input
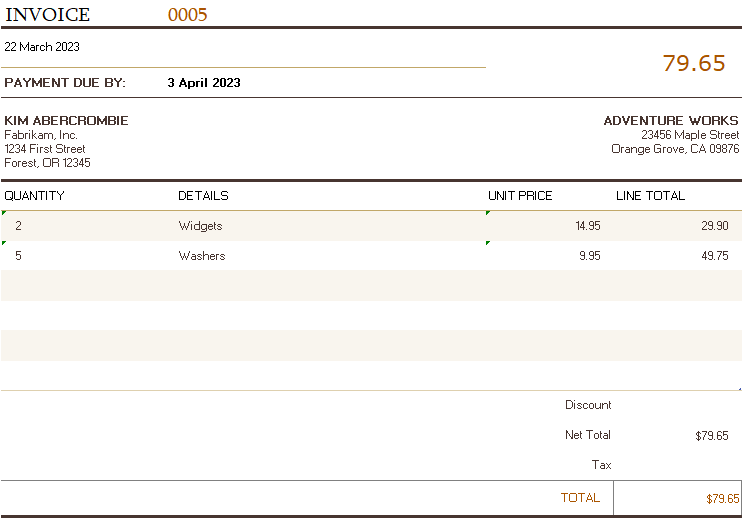
The above image shows the Excel file we are using. The first information we want to gather is the general invoice information. We can make a separate function within the excelio.open call to prompt the user in the console for each item that we’ll need.
We can create a separate array to save the data to after each input, then when we have all of the input for that section. Push it to the invoice.generalInfo array that we created:
function fillGeneralInformation() {
    console.log("-----------------------nFill in Invoice Detailsn-----------------------")
    const rl = readline.createInterface({
        input: process.stdin,
        output: process.stdout
    });
    var generalInfoArray = [];
    rl.question('Invoice Number: ', (answer) => {
        generalInfoArray.push(answer);
        rl.question('Invoice Date (dd Month Year): ', (answer) => {
            generalInfoArray.push(answer);
            rl.question('Payment Due Date (dd Month Year): ', (answer) => {
                generalInfoArray.push(answer);
                rl.question('Customer Name: ', (answer) => {
                    generalInfoArray.push(answer);
                    rl.question('Customer Company Name: ', (answer) => {
                        generalInfoArray.push(answer);
                        rl.question('Customer Street Address: ', (answer) => {
                            generalInfoArray.push(answer);
                            rl.question('Customer City, State, Zip (<City>, <State Abbr> <Zip>): ', (answer) => {
                                generalInfoArray.push(answer);
                                rl.question('Invoice Company Name: ', (answer) => {
                                    generalInfoArray.push(answer);
                                    rl.question('Invoice Street Address: ', (answer) => {
                                        generalInfoArray.push(answer);
                                        rl.question('Invoice City, State, Zip (<City>, <State Abbr> <Zip>): ', (answer) => {
                                            generalInfoArray.push(answer);
                                            rl.close();

                                            invoice.generalInfo.push({
                                                "invoiceNumber": generalInfoArray[0],
                                                "invoiceDate": generalInfoArray[1],
                                                "paymentDueDate": generalInfoArray[2],
                                                "customerName": generalInfoArray[3],
                                                "customerCompanyName": generalInfoArray[4],
                                                "customerStreetAddress": generalInfoArray[5],
                                                "customerCityStateZip": generalInfoArray[6],
                                                "invoiceCompanyName": generalInfoArray[7],
                                                "invoiceStreetAddress": generalInfoArray[8],
                                                "invoiceCityStateZip": generalInfoArray[9],
                                            });
                                            console.log("General Invoice Information Stored");
                                            fillCompanyDetails();
                                        });
                                    });
                                });
                            });
                        });
                    });
                });
            });
        });
    });
}
Within that function, we call «fillCompanyDetails,» we’ll gather information about the company to fill into the second sheet of the workbook. The function will be very similar to the previous function:
function fillCompanyDetails() {
    console.log("-----------------------nFill in Company Detailsn-----------------------");
    const rl = readline.createInterface({ input: process.stdin, output: process.stdout });
    var companyDetailsArray = []
    rl.question('Your Name: ', (answer) => {
        companyDetailsArray.push(answer);
        rl.question('Company Name: ', (answer) => {
            companyDetailsArray.push(answer);
            rl.question('Address Line 1: ', (answer) => {
                companyDetailsArray.push(answer);
                rl.question('Address Line 2: ', (answer) => {
                    companyDetailsArray.push(answer);
                    rl.question('Address Line 3: ', (answer) => {
                        companyDetailsArray.push(answer);
                        rl.question('Address Line 4: ', (answer) => {
                            companyDetailsArray.push(answer);
                            rl.question('Address Line 5: ', (answer) => {
                                companyDetailsArray.push(answer);
                                rl.question('Phone: ', (answer) => {
                                    companyDetailsArray.push(answer);
                                    rl.question('Facsimile: ', (answer) => {
                                        companyDetailsArray.push(answer);
                                        rl.question('Website: ', (answer) => {
                                            companyDetailsArray.push(answer);
                                            rl.question('Email: ', (answer) => {
                                                companyDetailsArray.push(answer);
                                                rl.question('Currency Abbreviation: ', (answer) => {
                                                    companyDetailsArray.push(answer);
                                                    rl.question('Beneficiary: ', (answer) => {
                                                        companyDetailsArray.push(answer);
                                                        rl.question('Bank: ', (answer) => {
                                                            companyDetailsArray.push(answer);
                                                            rl.question('Bank Address: ', (answer) => {
                                                                companyDetailsArray.push(answer);
                                                                rl.question('Account Number: ', (answer) => {
                                                                    companyDetailsArray.push(answer);
                                                                    rl.question('Routing Number: ', (answer) => {
                                                                        companyDetailsArray.push(answer);
                                                                        rl.question('Make Checks Payable To: ', (answer) => {
                                                                            companyDetailsArray.push(answer); rl.close();
                                                                            invoice.companyDetails.push({ "yourName": companyDetailsArray[0], "companyName": companyDetailsArray[1], "addressLine1": companyDetailsArray[2], "addressLine2": companyDetailsArray[3], "addressLine3": companyDetailsArray[4], "addressLine4": companyDetailsArray[5], "addressLine5": companyDetailsArray[6], "phone": companyDetailsArray[7], "facsimile": companyDetailsArray[8], "website": companyDetailsArray[9], "email": companyDetailsArray[10], "currencyAbbreviation": companyDetailsArray[11], "beneficiary": companyDetailsArray[12], "bank": companyDetailsArray[13], "bankAddress": companyDetailsArray[14], "accountNumber": companyDetailsArray[15], "routingNumber": companyDetailsArray[16], "payableTo": companyDetailsArray[17] });
                                                                            console.log("Invoice Company Information Stored");
                                                                            console.log("-----------------------nFill in Invoice Itemsn-----------------------");
                                                                            fillInvoiceItemsInformation();
                                                                        });
                                                                    });
                                                                });
                                                            });
                                                        });
                                                    });
                                                });
                                            });
                                        });
                                    });
                                });
                            });
                        });
                    });
                });
            });
        });
    });
}
Now that we have the basic information for the invoice, we can focus on gathering the individual invoice items, which we’ll do in another function called «fillInvoiceItemsInformation.» Before each item, we’ll ask the user if they would like to add an item. If they keep entering «y», then we’ll gather that item’s information, then ask again until they type «n»:
function fillInvoiceItemsInformation() {
    const rl = readline.createInterface({
        input: process.stdin, output: process.stdout
    });
    var invoiceItemArray = [];
    rl.question('Add item?(y/n): ', (answer) => {
        switch (answer) {
            case "y": console.log("-----------------------nEnter Item Informationn-----------------------");
                rl.question('Quantity: ', (answer) => {
                    invoiceItemArray.push(answer);
                    rl.question('Details: ', (answer) => {
                        invoiceItemArray.push(answer);
                        rl.question('Unit Price: ', (answer) => {
                            invoiceItemArray.push(answer);
                            invoice.invoiceItems.push({
                                "quantity": invoiceItemArray[0], "details": invoiceItemArray[1], "unitPrice": invoiceItemArray[2]
                            });
                            console.log("Item Information Added");
                            rl.close();
                            fillInvoiceItemsInformation();
                        });
                    });
                });
                break;
            case "n": rl.close();
                return fillExcelFile();
                break;
            default: console.log("Incorrect option, Please enter 'y' or 'n'.");
        }
    });
}
Add Data to the Excel Spreadsheet
After gathering all the required invoice information, we can fill out the Excel file. For the billing information and company setup, we can manually set each value in the cell from the JavaScript array:
function fillExcelFile() {
    console.log("-----------------------nFilling in Excel filen-----------------------");
    fillBillingInfo();
    fillCompanySetup();
}

function fillBillingInfo() {
    var sheet = wb.getSheet(billingInvoiceSheetIndex);
    sheet.getCell(0, 2).value(invoice.generalInfo[0].invoiceNumber);
    sheet.getCell(1, 1).value(invoice.generalInfo[0].invoiceDate);
    sheet.getCell(2, 2).value(invoice.generalInfo[0].paymentDueDate);
    sheet.getCell(3, 1).value(invoice.generalInfo[0].customerName);
    sheet.getCell(4, 1).value(invoice.generalInfo[0].customerCompanyName);
    sheet.getCell(5, 1).value(invoice.generalInfo[0].customerStreetAddress);
    sheet.getCell(6, 1).value(invoice.generalInfo[0].customerCityStateZip);
    sheet.getCell(3, 3).value(invoice.generalInfo[0].invoiceCompanyName);
    sheet.getCell(4, 3).value(invoice.generalInfo[0].invoiceStreetAddress);
    sheet.getCell(5, 3).value(invoice.generalInfo[0].invoiceCityStateZip);
}

function fillCompanySetup() {
    var sheet = wb.getSheet(companySetupSheetIndex);
    sheet.getCell(2, 2).value(invoice.companyDetails[0].yourName);
    sheet.getCell(3, 2).value(invoice.companyDetails[0].companyName);
    sheet.getCell(4, 2).value(invoice.companyDetails[0].addressLine1);
    sheet.getCell(5, 2).value(invoice.companyDetails[0].addressLine2);
    sheet.getCell(6, 2).value(invoice.companyDetails[0].addressLine3);
    sheet.getCell(7, 2).value(invoice.companyDetails[0].addressLine4);
    sheet.getCell(8, 2).value(invoice.companyDetails[0].addressLine5);
    sheet.getCell(9, 2).value(invoice.companyDetails[0].phone);
    sheet.getCell(10, 2).value(invoice.companyDetails[0].facsimile);
    sheet.getCell(11, 2).value(invoice.companyDetails[0].website);
    sheet.getCell(12, 2).value(invoice.companyDetails[0].email);
    sheet.getCell(13, 2).value(invoice.companyDetails[0].currencyAbbreviation);
    sheet.getCell(14, 2).value(invoice.companyDetails[0].beneficiary);
    sheet.getCell(15, 2).value(invoice.companyDetails[0].bank);
    sheet.getCell(16, 2).value(invoice.companyDetails[0].bankAddress);
    sheet.getCell(17, 2).value(invoice.companyDetails[0].accountNumber);
    sheet.getCell(18, 2).value(invoice.companyDetails[0].routingNumber);
    sheet.getCell(19, 2).value(invoice.companyDetails[0].payableTo);
}
The template we are using has a specific number of rows laid out for the items in the invoice. The user may add more than the max. In this case, we can simply add more rows to the sheet. We’ll add the rows before setting the items in the sheet from the array:
function fillInvoiceItems() {
    var sheet = wb.getSheet(billingInvoiceSheetIndex);
    var rowsToAdd = 0;
    if (invoice.invoiceItems.length > 15) {
        rowsToAdd = invoice.invoiceItems.length - 15;
        sheet.addRows(22, rowsToAdd);
    }
    var rowIndex = 8;
    if (invoice.invoiceItems.length >= 1) {
        for (var i = 0; i < invoice.invoiceItems.length; i++) {
            sheet.getCell(rowIndex, 1).value(invoice.invoiceItems[i].quantity);
            sheet.getCell(rowIndex, 2).value(invoice.invoiceItems[i].details);
            sheet.getCell(rowIndex, 3).value(invoice.invoiceItems[i].unitPrice);
            rowIndex++;
        }
    }
}
Export Node.js Out to an Excel XLSX Spreadsheet
After the information has been filled out in the workbook, we can export the workbook to an Excel file. To do this, we’ll use the excelio open function. In this case, just put the date in the filename:
function exportExcelFile() {
excelIO.save(wb.toJSON(), (data) => {
fs.appendFileSync('Invoice' + new Date().valueOf() + '.xlsx', new Buffer(data), function (err) {
console.log(err);
});
console.log("Export success");
}, (err) => {
console.log(err);
}, { useArrayBuffer: true });
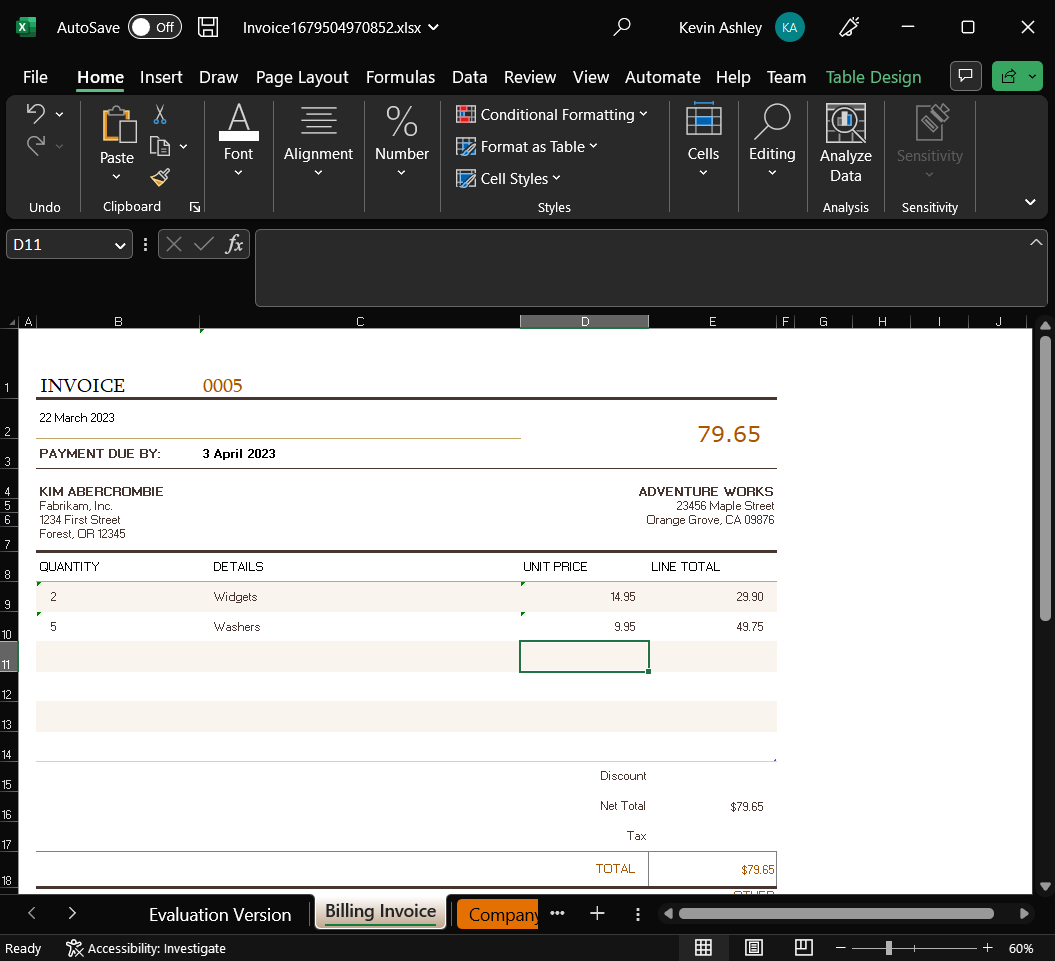
}You can export your workbook to an Excel file with the above code snippet. Your completed file will look like this:
Utilizing SpreadJS in conjunction with Node.js demonstrates another example of the versatility and extensibility of SpreadJS! Check out our blog page for more articles like this, demos, videos, and tutorials.
If you have any questions, feedback, or demo requests, please comment below!
Ready to get Started? Download SpreadJS Today!

Sometimes, we want to create an Excel File with Node.js.
In this article, we’ll look at how to create an Excel File with Node.js.
How to create an Excel File with Node.js?
To create an Excel File with Node.js, we can use the excel4node package.
To install it, we run
npm i excel4node
Then we use it by writing
const excel = require('excel4node');

const workbook = new excel.Workbook();
const worksheet = workbook.addWorksheet('Sheet 1');
const worksheet2 = workbook.addWorksheet('Sheet 2');

const style = workbook.createStyle({
  font: {
    color: '#FF0800',
    size: 12
  },
  numberFormat: '$#,##0.00; ($#,##0.00); -'
});

worksheet.cell(1, 1).number(100).style(style);
worksheet.cell(1, 2).number(200).style(style);
worksheet.cell(1, 3).formula('A1 + B1').style(style);
worksheet.cell(2, 1).string('string').style(style);
worksheet.cell(3, 1).bool(true).style(style).style({
  font: {
    size: 14
  }
});
workbook.write('Excel.xlsx');
to create a new workbook with
const workbook = new excel.Workbook();
Then we create 2 worksheets with
const worksheet = workbook.addWorksheet('Sheet 1');
const worksheet2 = workbook.addWorksheet('Sheet 2');
Then we set the font styles of the cells with
const style = workbook.createStyle({
  font: {
    color: '#FF0800',
    size: 12
  },
  numberFormat: '$#,##0.00; ($#,##0.00); -'
});
Next, we add some content to the cells with
worksheet.cell(1, 1).number(100).style(style);
worksheet.cell(1, 2).number(200).style(style);
worksheet.cell(1, 3).formula('A1 + B1').style(style);
worksheet.cell(2, 1).string('string').style(style);
worksheet.cell(3, 1).bool(true).style(style).style({
  font: {
    size: 14
  }
});
Cell A1 is 1, 1.
And then we save the spreadsheet with
workbook.write('Excel.xlsx');
Conclusion
To create an Excel File with Node.js, we can use the excel4node package.
Web developer specializing in React, Vue, and front end development.
View Archive