
Node.js is an open-source and cross-platform JavaScript runtime environment that can also be used to read from a file and write to a file which can be in txt, ods, xlsx, docx, etc format.
The following example covers how an excel file(.xlsx) file is read from an excel file and then converted into JSON and also to write to it. It can be achieved using a package called xlsx to achieve our goal.
Module Installation: You can install xlsx module using the following command:
npm install xlsx
Note: For the following example, text.xlsx is a dummy data file that has been used.
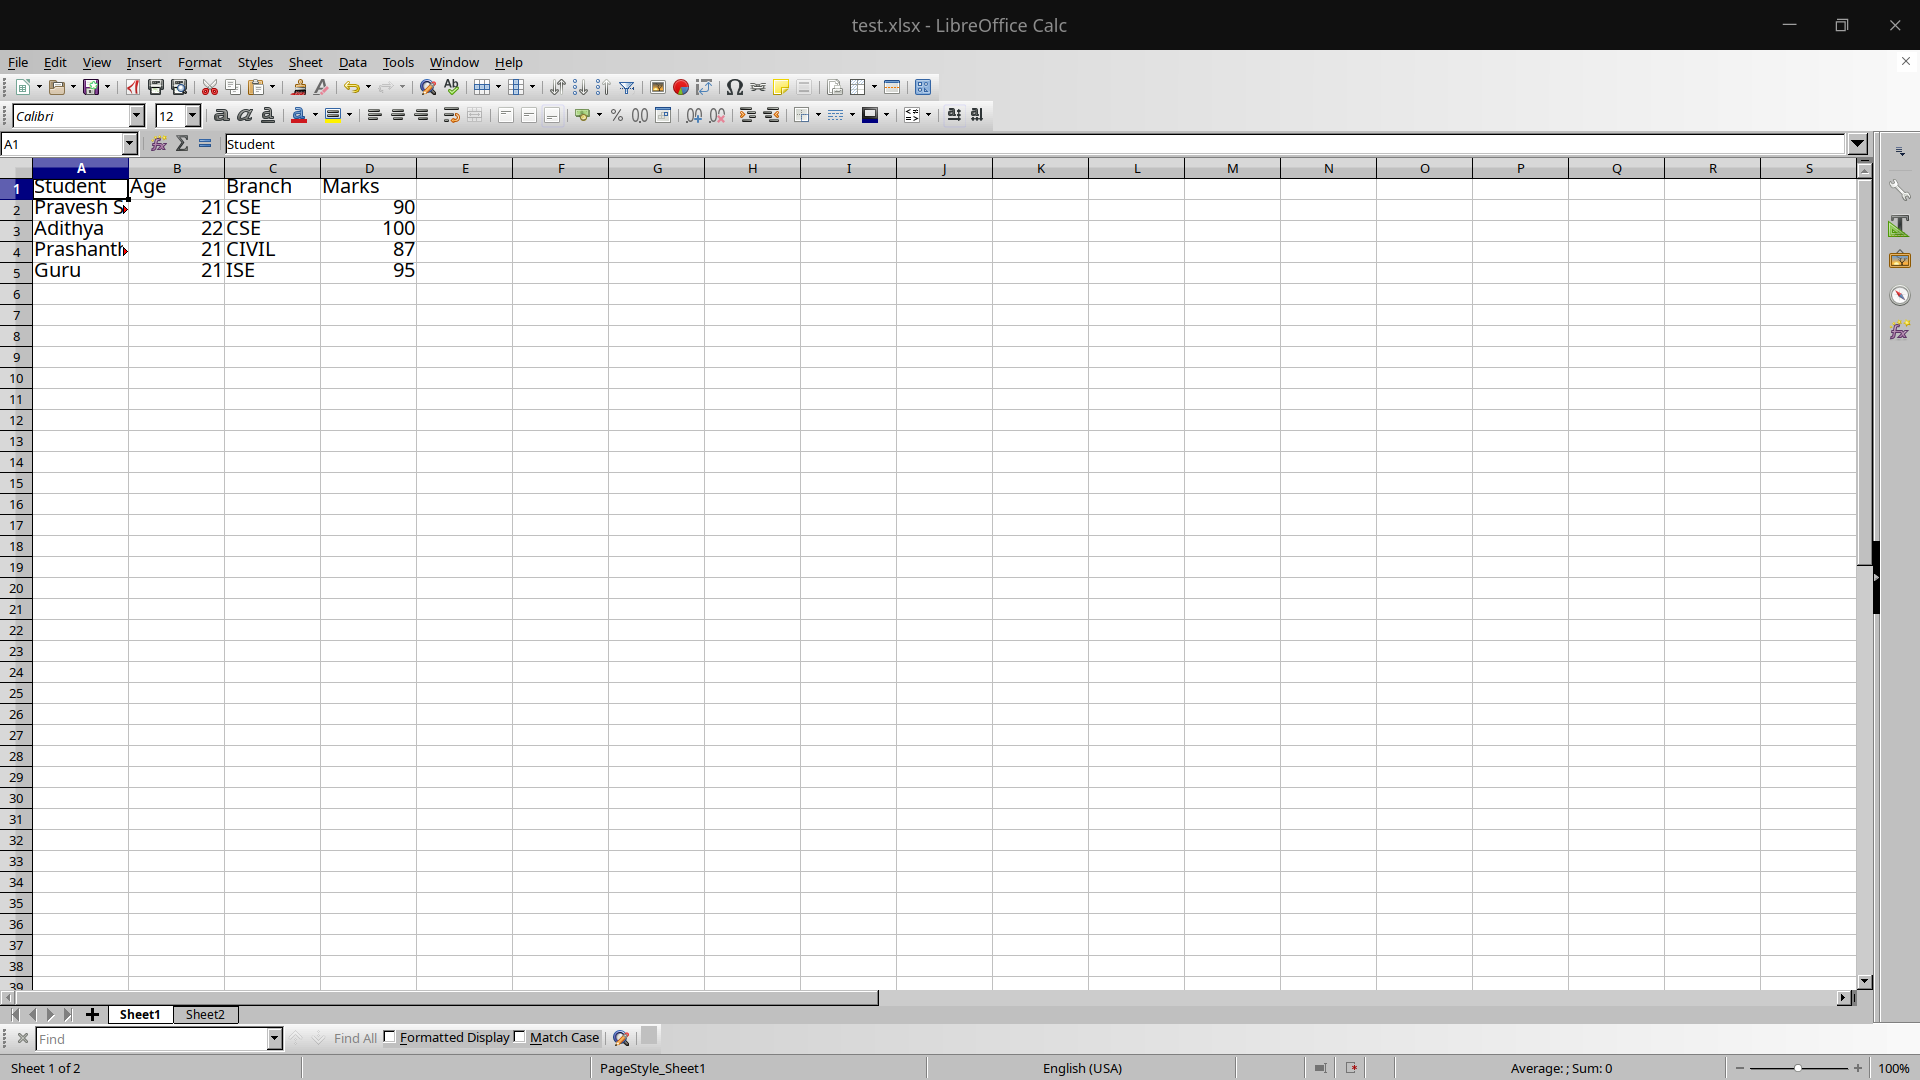
Filename: test.xlsx
Sheet 1:
Sheet 2:
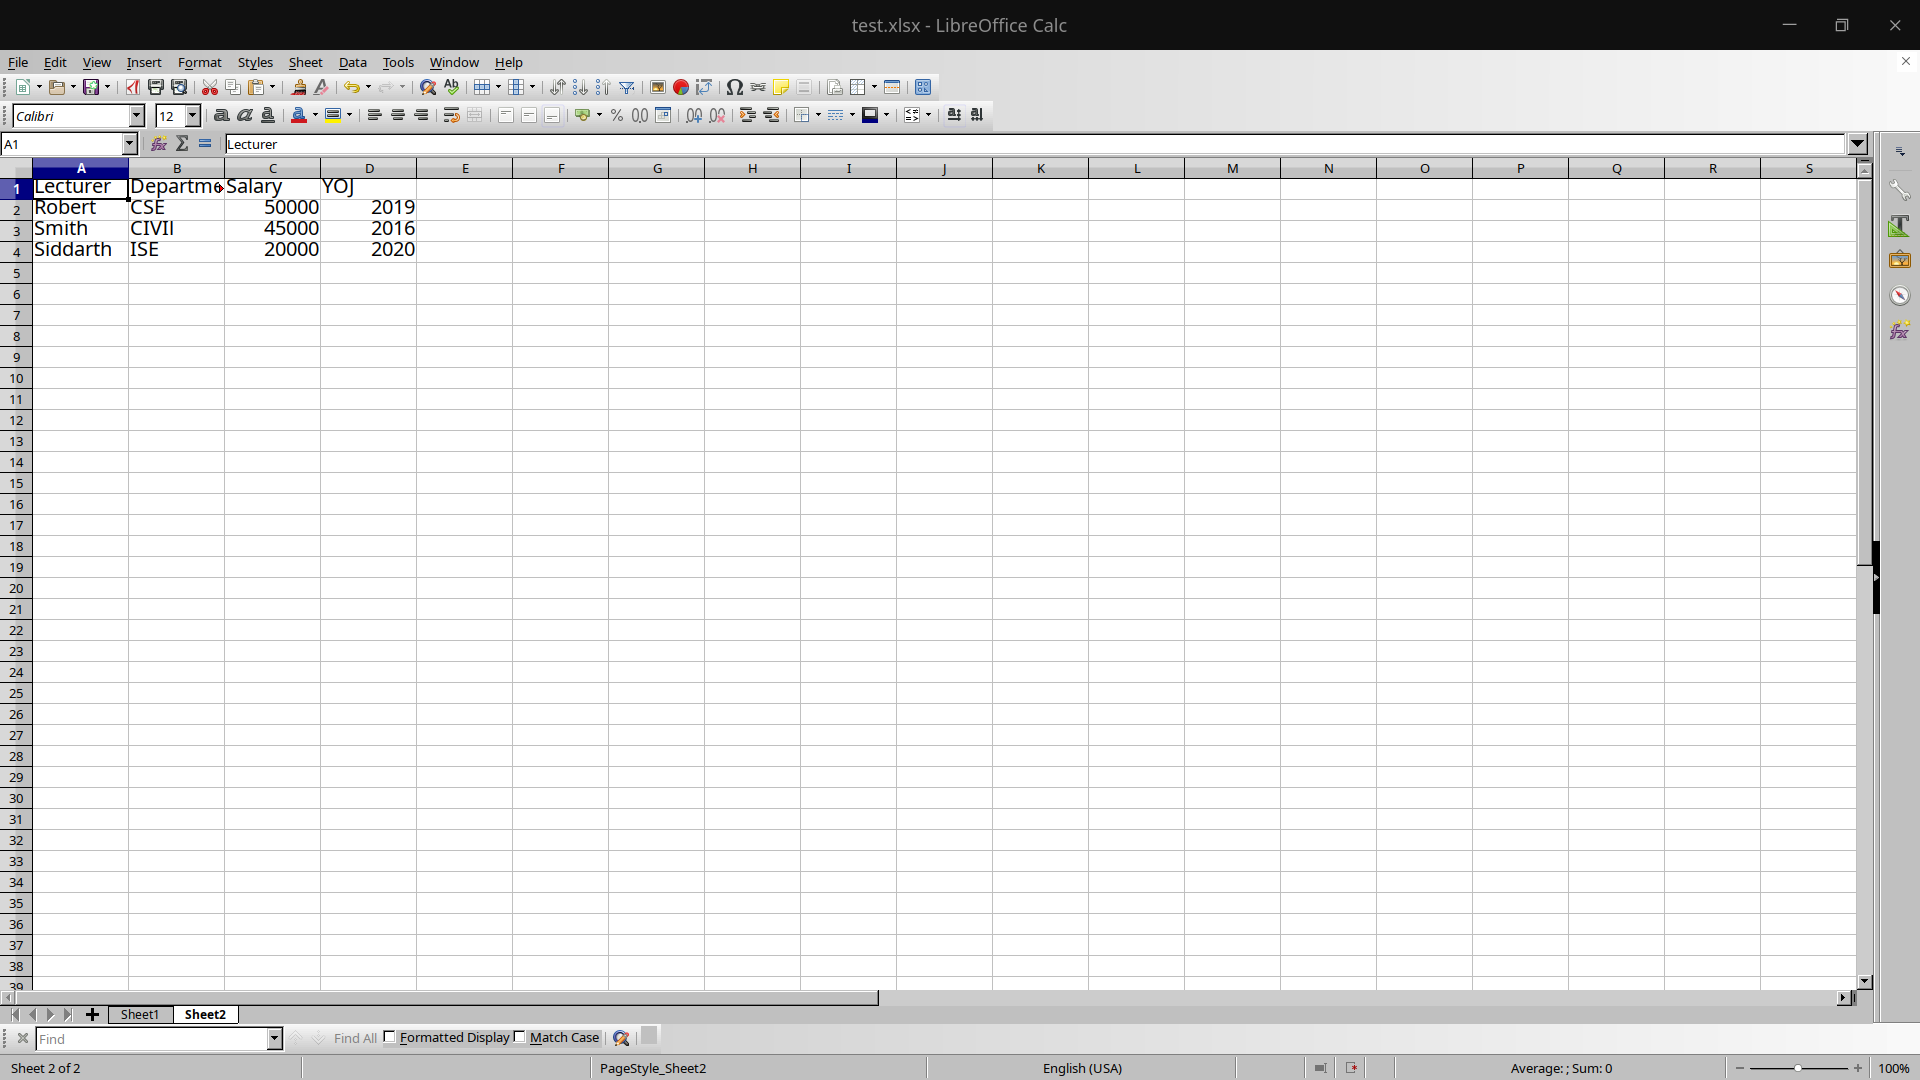
So the excel file test.xlsx has 2 sheets, one having Student details and another having lecturer details.
Read Operation Filename: read.js
Javascript
const reader = require('xlsx')
const file = reader.readFile('./test.xlsx')
let data = []
const sheets = file.SheetNames
for(let i = 0; i < sheets.length; i++)
{
const temp = reader.utils.sheet_to_json(
file.Sheets[file.SheetNames[i]])
temp.forEach((res) => {
data.push(res)
})
}
console.log(data)
Explanation: First, the npm module is included in the read.js file and then the excel file is read into a workbook i.e constant file in the above program.
The number of files in that particular excel file is available in the SheetNames property of the workbook. It can be accessed as follows:
const sheets = file.SheetNames // Here the value of the sheets will be 2
A for loop is run until the end of the excel file starting from the first page. One of the most important functions used in the code above is the sheet_to_json() function present in the utils module of the xlsx package. It accepts a worksheet object as a parameter and returns an array of JSON objects.
There is a forEach loop which iterates through every JSON object present in the array temp and pushes it into a variable data which would contain all the data in JSON format.
Finally, the data is printed or any other modification can be performed on the array of JSON objects.
Step to run the application:
Run the read.js file using the following command:
node read.js
Output:

Write Operation In the following example, we will convert an array of JSON objects into an excel sheet and append it to the file.
Filename: write.js
Javascript
const reader = require('xlsx')
const file = reader.readFile('./test.xlsx')
let student_data = [{
Student:'Nikhil',
Age:22,
Branch:'ISE',
Marks: 70
},
{
Student:'Amitha',
Age:21,
Branch:'EC',
Marks:80
}]
const ws = reader.utils.json_to_sheet(student_data)
reader.utils.book_append_sheet(file,ws,"Sheet3")
reader.writeFile(file,'./test.xlsx')
Explanation: Here we have an array of JSON objects called student_data. We use two main functions in this program i.e json_to_sheet() which accepts an array of objects and converts them into a worksheet and another function is the book_append_sheet() to append the worksheet into the workbook.
Finally, all the changes are written to the test.xlsx file using writeFile() function which takes a workbook and a excel file as input parameter.
Step to run the application:
Run the read.js file using the following command:
node write.js
Output: The final test.xlsx file would look something like this:
Sheet 1:

Sheet 2:

Sheet 3: We can see sheet 3 is appended into the test.xlsx as shown below:

install exceljs
npm i exceljs --save
import exceljs
var Excel = require('exceljs');
var workbook = new Excel.Workbook();
create workbook
var options = {
                filename: __dirname+'/Reports/'+reportName,
                useStyles: true,
                useSharedStrings: true
            };

            var workbook = new Excel.stream.xlsx.WorkbookWriter(options);
after create worksheet
var worksheet = workbook.addWorksheet('Rate Sheet',{properties:{tabColor:{argb:'FFC0000'}}});
in worksheet.column array you pass column name in header and array key
pass in key
worksheet.columns = [
            { header: 'column name', key: 'array key', width: 35},
            { header: 'column name', key: 'array key', width: 35},
            { header: 'column name', key: 'array key', width: 20},

            ];
after using forEach loop append row one by one in exel file
array.forEach(function(row){ worksheet.addRow(row); })
you can also perfome loop on each exel row and cell
worksheet.eachRow(function(row, rowNumber) {
    console.log('Row ' + rowNumber + ' = ' + JSON.stringify(row.values));
});
row.eachCell(function(cell, colNumber) {
    console.log('Cell ' + colNumber + ' = ' + cell.value);
});

This article shows you how to read and extract content from an Excel (.xlsx) file by using Node.js. Without any further ado, let’s get our hands dirty and start coding.
Getting Things Ready
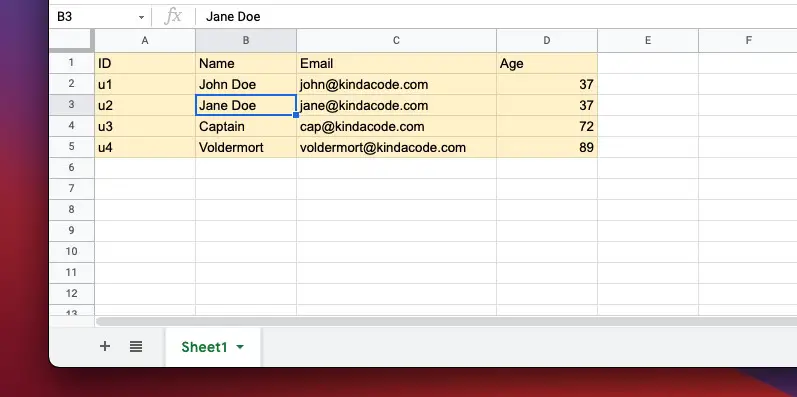
We are going to work with a simple Excel file that contains some information as follows:
You can download the file from the link below to your computer:
https://www.kindacode.com/wp-content/uploads/2021/11/KindaCode.com-Example.xlsx.zipWriting Code
There are many great libraries that can help us easily read Excel files, such as xlsx (SheetJS), exceljs (ExcelJS), node-xlsx (Node XLSX). In the sample project below, we will use xlsx. It’s super popular and supports TypeScript out-of-the-box.
1. Create a new folder named example (the name doesn’t matter and is totally up to you), then initialize a new Node.js project by running:
npm init2. In your project directory, create a subfolder called src, then add an empty index.js file. Copy the Excel file you’ve downloaded before into the src folder.
Here’s the file structure:
.
├── node_modules
├── package-lock.json
├── package.json
└── src
    ├── KindaCode.com Example.xlsx
    └── index.js
3. Installing the xlsx package:
npm i xlsx4. Below are the code snippets for index.js. There are 2 different code snippets. The first one uses the CommonJS syntax (with require), while the second one uses the ES Modules syntax (with import). Choose the one that fits your need.
CommonJS:
const path = require("path");
const xlsx = require("xlsx");

const filePath = path.resolve(__dirname, "Kindacode.com Example.xlsx");

const workbook = xlsx.readFile(filePath);
const sheetNames = workbook.SheetNames;

// Get the data of "Sheet1"
const data = xlsx.utils.sheet_to_json(workbook.Sheets[sheetNames[0]])

/// Do what you need with the received data
data.map(person => {
  console.log(`${person.Name} is ${person.Age} years old`);
})
ES Modules:
// import with ES6 Modules syntax
import path from 'path';
import xlsx from 'xlsx';

import { fileURLToPath } from 'url'
import { dirname } from 'path'
const __filename = fileURLToPath(import.meta.url)
const __dirname = dirname(__filename)

const filePath = path.resolve(__dirname, "Kindacode.com Example.xlsx");

const workbook = xlsx.readFile(filePath);
const sheetNames = workbook.SheetNames;

// Get the data of "Sheet1"
const data = xlsx.utils.sheet_to_json(workbook.Sheets[sheetNames[0]])

/// Do what you need with the received data
data.map(person => {
  console.log(`${person.Name} is ${person.Age} years old`);
})
5. Test our project:
node src/index.jsOutput:
John Doe is 37 years old
Jane Doe is 37 years old
Captain is 72 years old
Voldermort is 89 years old
Conclusion
We’ve written a simple Node.js program to retrieve the data from a sheet of an Excel workbook. If you’d like to explore more new and interesting things about modern Node.js, take a look at the following articles:
- Node.js: How to Ping a Remote Server/ Website
- Best open-source ORM and ODM libraries for Node.js
- 7 Best Open-Source HTTP Request Libraries for Node.js
- Node.js: Executing a Piece of Code after a Delay
- Express + TypeScript: Extending Request and Response objects
You can also check out our Node.js category page for the latest tutorials and examples.
In this article, we gonna learn how to import and export excel and csv in node.js.
1. Let’s create a new express project using express generator.
npm i -g express-generator
express node-excel-csv --view=hbs
2. Create a folder config and inside this create a file database.js.
config/database.js
module.exports = {
    host: process.env.DB_HOST,
    database: process.env.DB_DATABASE,
    username: process.env.DB_USERNAME,
    password: process.env.DB_PASSWORD
}
3. Install dotenv npm package.
npm i dotenvAfter Installation import dotenv in app.js
require('dotenv').config();4. Create a .env file in the root and add these environment variables.
DB_HOST=localhost            // your database host
DB_DATABASE=node-excel-csv  // your database name
DB_USERNAME=root           // your database username
DB_PASSWORD=              // your database password
5. Install sequelize and mysql2 npm packages.
npm i sequelize mysql26. Create a models folder and inside this create a connection.js and movie.model.js
models/connection.js
const { Sequelize } = require('sequelize');
const config = require('../config/database');

const sequelize = new Sequelize(config.database, config.username, config.password, {
    host: config.host,
    dialect: 'mysql',
    operatorsAliases: 'false',
    logging: false
});

module.exports = sequelize
models/movie.model.js
const { DataTypes } = require('sequelize');
const sequelize = require('./connection');

const Movie = sequelize.define('Movie', {
    movie: {
        type: DataTypes.STRING
    },
    category: {
        type: DataTypes.STRING
    },
    director: {
        type: DataTypes.STRING
    },
    rating: {
        type: DataTypes.FLOAT(8, 1)
    }
}, {
    underscored: true
});
module.exports = Movie;
Note:- Don’t forget to create a movies table. https://github.com/ultimateakash/node-excel-csv/blob/master/node-excel-csv.sql
Above Schema Based on the import(excel or csv) file.
7. Install multer and uniqid npm packages.
npm i multer, uniqid8. create a folder helpers and inside this folder create a file uploader.js
const multer = require('multer');
const uniqid = require('uniqid');
const path = require('path');

const storage = multer.diskStorage({
    destination: function(req, file, cb) {
        cb(null, 'storage/uploads/')
    },
    filename: function(req, file, cb) {
        cb(null, Date.now() + uniqid() + path.extname(file.originalname))
    }
})
const upload = multer({ storage: storage });

exports.upload = (field) => upload.single(field);
9. Create a storage folder and inside this create uploads and outputs folder.
10. Install xlsx npm package.
npm i xlsxxlsx package provides a bunch of functions for reading and writing CSV/Excel files.
Parsing functions:-
XLSX.read(data, read_opts) attempts to parse data
XLSX.readFile(filename, read_opts) attempts to read filename and parse.
Note:- you can pass raw option to false if you want formatted data.(example — formatted date)
XLSX.read(data, { raw: false })
XLSX.readFile(filename, { raw: false })
Writing functions:-
XLSX.write(wb, write_opts) attempts to write the workbook
XLSX.writeFile(wb, filename, write_opts) attempts to write workbook
Utility Functions:-
Constructing:-
book_new creates an empty workbook
book_append_sheet adds a worksheet to a workbook
Importing:
aoa_to_sheet converts an array of arrays of JS data to a worksheet
json_to_sheet converts an array of JS objects to a worksheet
sheet_add_aoa adds an array of arrays of JS data to an existing worksheet.
sheet_add_json adds an array of JS objects to an existing worksheet.
Exporting:
sheet_to_json converts a worksheet object to an array of JSON objects.
sheet_to_csv generates delimiter-separated-values output.
Ref:- https://www.npmjs.com/package/xlsx
11. Create a folder controllers and inside this folder create movie.controller.js
controllers/movie.controller.js
const XLSX = require("xlsx");
const Movie = require("../models/movie.model")
const outputPath = 'storage/outputs'

exports.index = async (req, res) => {
    const movies = await Movie.findAll();
    return res.render('index', { movies });
}

exports.import = async (req, res) => {
    const wb = XLSX.readFile(req.file.path);
    const sheets = wb.SheetNames;

    if(sheets.length > 0) {
        const data = XLSX.utils.sheet_to_json(wb.Sheets[sheets[0]]);
        const movies = data.map(row => ({
            movie: row['Movie'],
            category: row['Category'],
            director: row['Director'],
            rating: row['Rating']
        }))
        await Movie.bulkCreate(movies);
    }
    return res.redirect('/');
}

exports.export = async (req, res) => {
    const movies = await Movie.findAll({
        attributes: [
            'id',
            'movie',
            'category',
            'director',
            'rating'
        ],
        raw: true
    });

    const headings = [
        ['Id', 'Movie', 'Category', 'Director', 'Rating']
    ];

    const wb = XLSX.utils.book_new();
    const ws = XLSX.utils.json_to_sheet(movies, {
        origin: 'A2',
        skipHeader: true
    });
    XLSX.utils.sheet_add_aoa(ws, headings);
    XLSX.utils.book_append_sheet(wb, ws, 'Movies');

    const buffer = XLSX.write(wb, { bookType: 'csv', type: 'buffer' });
    res.attachment('movies.csv');

    return res.send(buffer);
}
Note:- In this article, I am using import file headers if your file doesn’t have a headers row then you can use indexes.
You need to pass header option with sheet_to_json
const data = XLSX.utils.sheet_to_json(wb.Sheets[sheets[0]], { header: 1 });
const movies = data.map(row => ({
    movie: row[0],
    category: row[1],
    director: row[2],
    rating: row[3]
}))
In the above code you can change the extension based on the file you want to import or export. (.xlsx, .xls, .csv)
Note:- If want to store your exported file on the server you can use writeFile function.
const wb = XLSX.utils.book_new();
const ws = XLSX.utils.json_to_sheet(movies, {
    origin: 'A2',
    skipHeader: true
});
XLSX.utils.sheet_add_aoa(ws, headings);
XLSX.utils.book_append_sheet(wb, ws, 'Movies');

const filepath = `${outputPath}/movies.csv`;
XLSX.writeFile(wb, filepath);

return res.download(filepath)
12. Create routes.
routes/index.js
const express = require('express');
const router = express.Router();
const movieController = require('../controllers/movie.controller');
const { upload } = require('../helpers/uploader');

router.get('/',                        movieController.index);
router.post('/import', upload('file'), movieController.import);
router.get('/export',                  movieController.export);

module.exports = router;
13. Open views/index.hbs and add the following code.
<main>
    <div class="row mb-2">
        <div class="col-sm-8 offset-2">
            <div class="row">
                <div class="col-md-6">
                    <form method="POST" action="/import" enctype="multipart/form-data">
                        <div class="input-group">
                            <div class="custom-file">
                                <input type="file" name="file" class="custom-file-input" id="inputGroupFile" required accept=".csv, application/vnd.openxmlformats-officedocument.spreadsheetml.sheet, application/vnd.ms-excel">
                                <label class="custom-file-label" for="inputGroupFile">Choose file</label>
                            </div>
                            <div class="input-group-append">
                                <button type="submit" class="btn btn-primary float-right mr-2">Import <i class="fa fa-upload"></i></button>
                            </div>
                        </div>
                    </form>
                </div>
                <div class="col-md-6">
                    <a href="/export" class="btn btn-primary float-right {{#unless movies.length}} disabled {{/unless }}" role="button" aria-disabled="true">
                        Export <i class="fa fa-download"></i>
                    </a>
                </div>
            </div>
        </div>
    </div>
    <div class="row">
        <div class="col-sm-8 offset-2">
            <table class="table">
                <thead>
                    <tr>
                        <th scope="col">Id</th>
                        <th scope="col">Movie</th>
                        <th scope="col">Category</th>
                        <th scope="col">Director</th>
                        <th scope="col">Rating</th>
                    </tr>
                </thead>
                <tbody>
                    {{#each movies}}
                        <tr>
                            <th scope="row">{{ this.id }}</th>
                            <td>{{ this.movie }}</td>
                            <td>{{ this.category }}</td>
                            <td>{{ this.director }}</td>
                            <td><span class="badge bg-warning text-dark">{{ this.rating }}</span></td>
                        </tr>
                    {{else}}
                        <tr>
                            <td colspan="5" class="text-center">No Movies Found.</td>
                        </tr>
                    {{/each}}
                </tbody>
            </table>
        </div>
    </div>
</main>
Note:- please checkout github repo — https://github.com/ultimateakash/node-excel-csv
14. Finally start the project.
npm startOpen http://localhost:3000 and try import and export.
Extras:- if you want to read a file without uploading then you can use multer.memoryStorage()
const multer = require('multer');
const upload = multer({ storage: multer.memoryStorage() });
exports.upload = (field) => upload.single(field);
with memoryStorage() you can access the file buffer.
const wb = XLSX.read(req.file.buffer);
const sheets = wb.SheetNames;
Sample Excel CSV Files:- https://github.com/ultimateakash/node-excel-csv/tree/master/sample%20files
Checkout my full node-excel-csv example. https://github.com/ultimateakash/node-excel-csv
If you facing any issues. don’t hesitate to comment below. I will be happy to help you.
Thanks.


Photo by Mika Baumeister / Unsplash
Excel files are increasingly used to export data from a Web application to share with other applications or just for reporting and business decision-making. In Node.js, you can export data as PDF or CSV, but Excel can also be the preferred output format. We will see how to write data in an Excel file in this post.
If you are interested in how to generate a CSV file with Node.js, check out this article:
Generate a CSV file from data using Node.js
In this post, we will see how to write data coming from a database in a CSV file using Node.js and Typescript. We will a package called csv-writer.
 Teco TutorialsEric Cabrel TIOGO

Set up the project
Make sure you have Node.js installed on your computer before continuing. I prepared a project starter to quickly start a Node.js project with Typescript. Let’s clone it and make it works locally.
git clone https://github.com/tericcabrel/node-ts-starter node-excel-write

cd node-excel-write

yarn install # or npm install

yarn start # or npm run start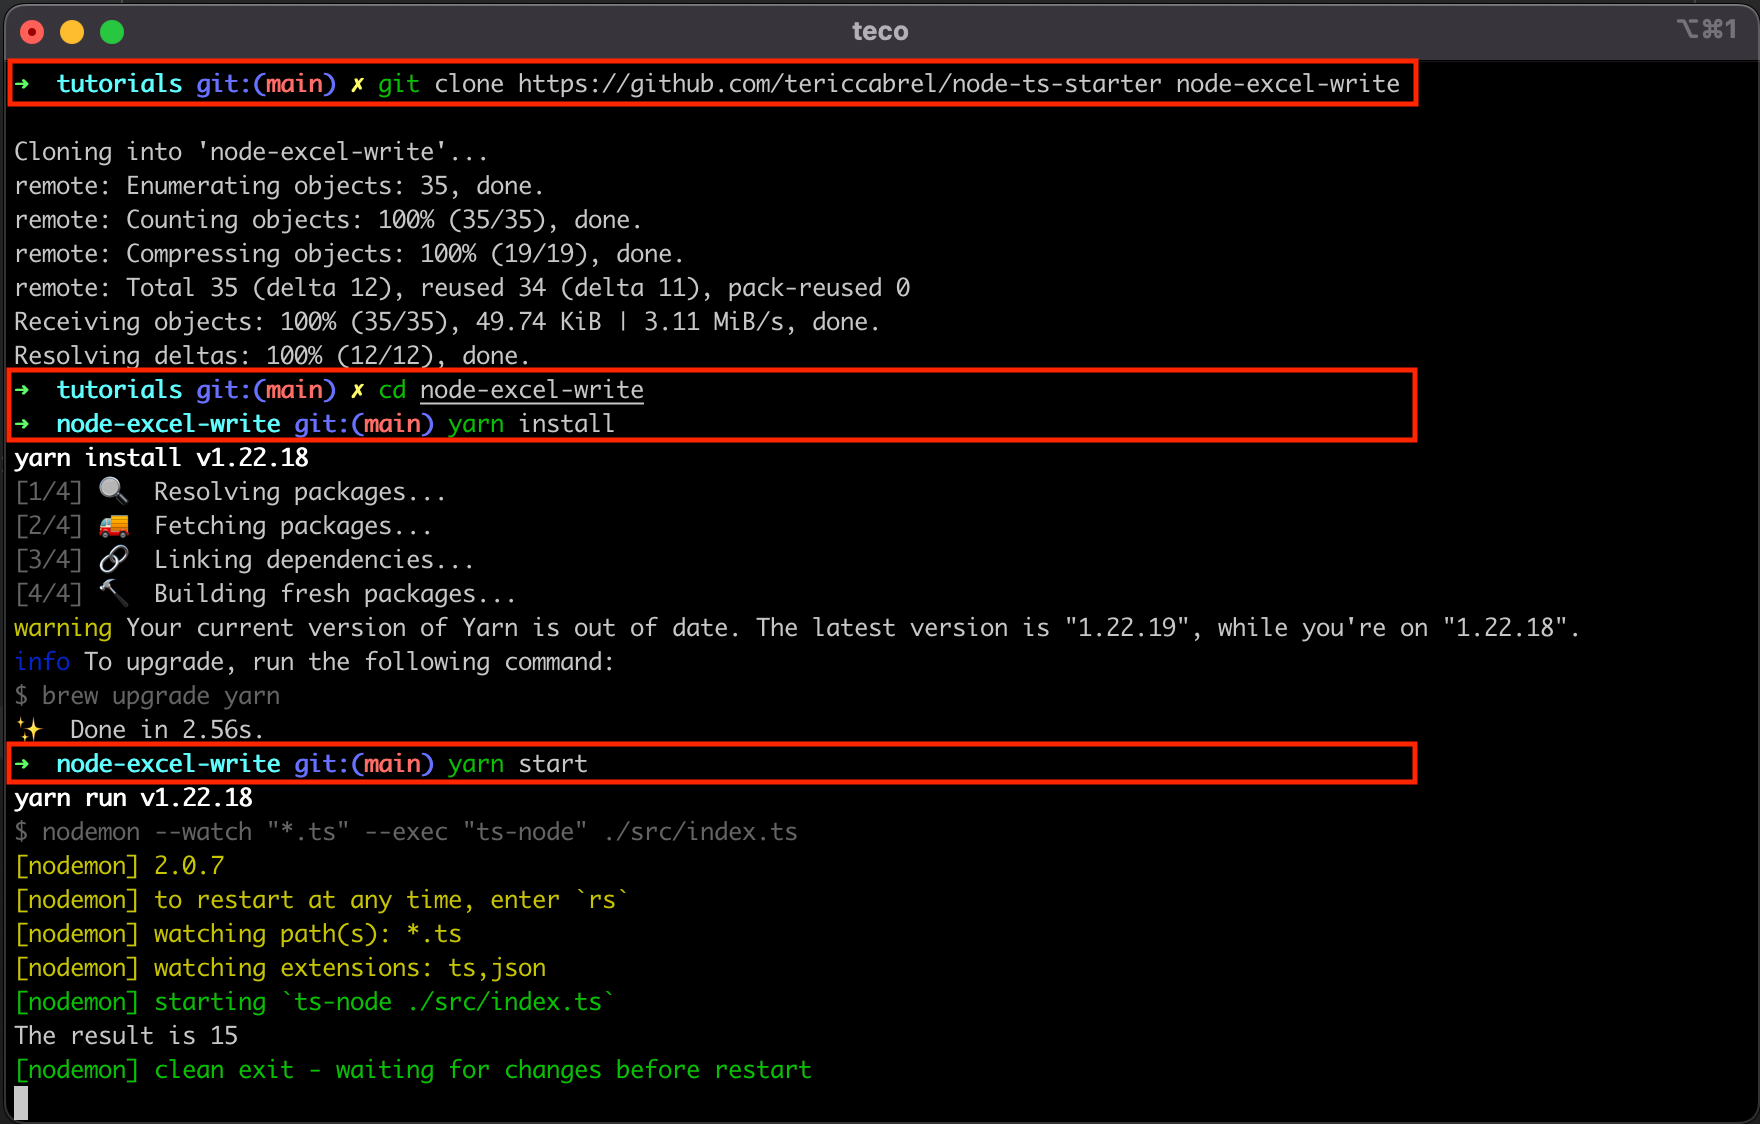
Define the data to write
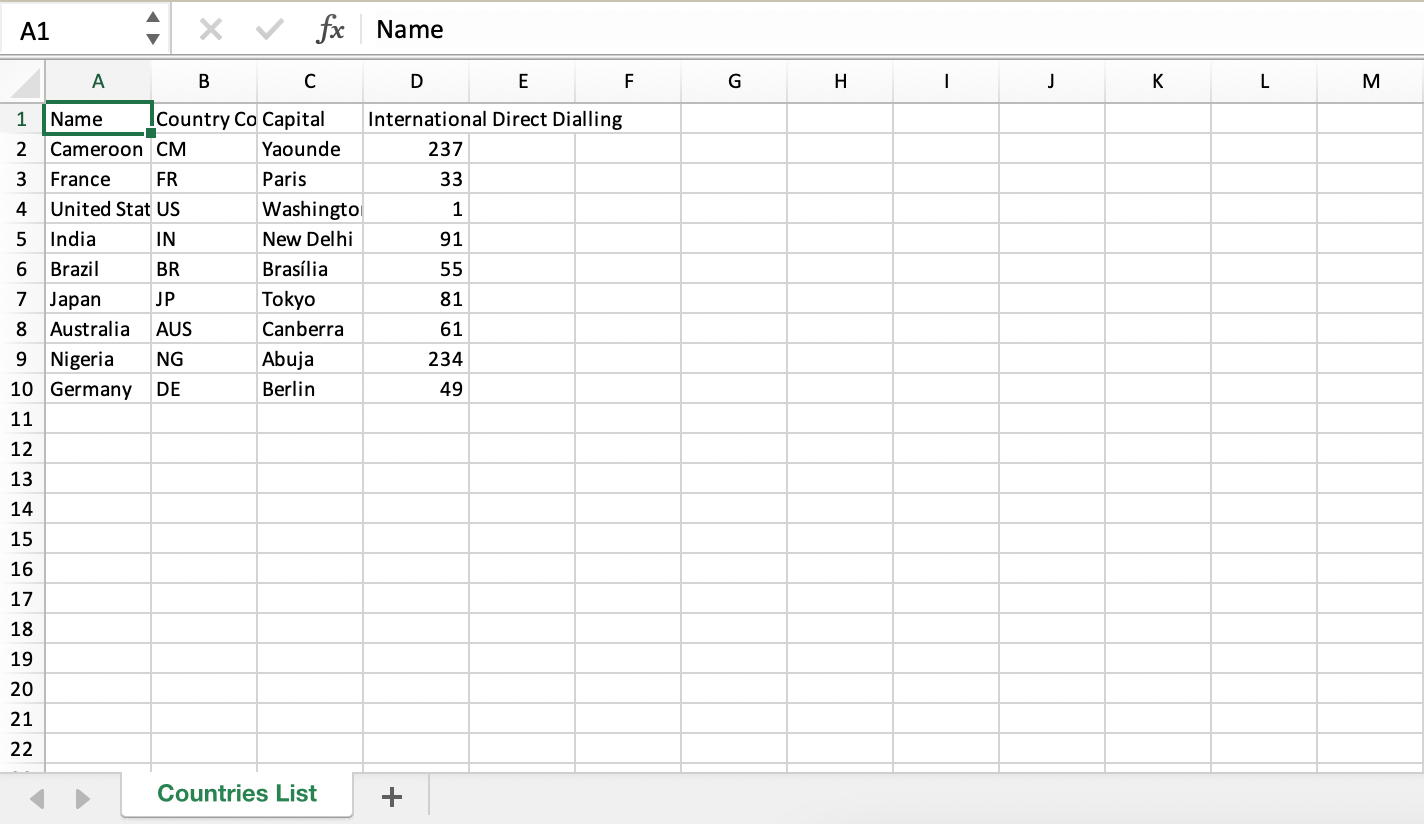
Let’s say we retrieve a list of countries from the database, and we want to write them in an Excel file. The first is to define the sample of data we want to write.
Replace the content of the file src/index.ts with the code below:
type Country = {
  name: string;
  countryCode: string;
  capital: string;
  phoneIndicator: number;
};

const countries: Country[] = [
  { name: 'Cameroon', capital: 'Yaounde', countryCode: 'CM', phoneIndicator: 237 },
  { name: 'France', capital: 'Paris', countryCode: 'FR', phoneIndicator: 33 },
  { name: 'United States', capital: 'Washington, D.C.', countryCode: 'US', phoneIndicator: 1 },
  { name: 'India', capital: 'New Delhi', countryCode: 'IN', phoneIndicator: 91 },
  { name: 'Brazil', capital: 'Brasília', countryCode: 'BR', phoneIndicator: 55 },
  { name: 'Japan', capital: 'Tokyo', countryCode: 'JP', phoneIndicator: 81 },
  { name: 'Australia', capital: 'Canberra', countryCode: 'AUS', phoneIndicator: 61 },
  { name: 'Nigeria', capital: 'Abuja', countryCode: 'NG', phoneIndicator: 234 },
  { name: 'Germany', capital: 'Berlin', countryCode: 'DE', phoneIndicator: 49 },
];
Note: I get the information about countries here: https://restcountries.com
Install the package ExcelJS
ExcelJS is an excellent library for manipulating an Excel file from Node.js. We will use it in this post, so let’s install it:
npm install exceljsCreate a sheet
With Excel, you can create many sheets where everything sheet contains different kinds of data.
The first to do with ExcelJS is to create the sheet that will hold the countries list. In the file, index.ts add the code below:
import Excel from 'exceljs';

const workbook = new Excel.Workbook();
const worksheet = workbook.addWorksheet('Countries List');
You can use as many sheets as you want; just give a proper variable name for each sheet.
const worksheetCountries = workbook.addWorksheet('Countries List');
const worksheetContinents = workbook.addWorksheet('Continents List');
const worksheetCities = workbook.addWorksheet('Cities List');
For this post, we only need one sheet.
Define the columns’ header
To create the table header, we need to map each column of the header to a property of the Country object.
Update the file src/index.ts, to add the code below:
const countriesColumns = [
  { key: 'name', header: 'Name' },
  { key: 'countryCode', header: 'Country Code' },
  { key: 'capital', header: 'Capital' },
  { key: 'phoneIndicator', header: 'International Direct Dialling' },
];

worksheet.columns = countriesColumns;
The value of the property key must be a key of the object Country (name, countryCode, capital and phoneIndicator).
The property header can be anything, and it will be displayed as the header in the CSV file.
Write the data to the file
It is straightforward to write the file in the sheet.
countries.forEach((country) => {
  worksheet.addRow(country);
});
That’s it.
The remaining part is to generate the Excel file by providing the path to write the file. The code below does that:
import * as path from 'path';

const exportPath = path.resolve(__dirname, 'countries.xlsx');

await workbook.xlsx.writeFile(exportPath);
If you work with Excel and want to level up your skill, I recommend the guide below, containing 36 tutorials covering Excel basics, functions, and advanced formulas.
36 Excel Tutorials To Help You Master Spreadsheets — Digital.com
Excel spreadsheets are essentially databases. Here are 36 Excel tutorials you can use to master Excel and help your career or business grow.
 Digital.comAkshat Biyani

Wrap up
Here is what the index.ts the file looks like this:
import Excel from 'exceljs';
import path from 'path';

type Country = {
  name: string;
  countryCode: string;
  capital: string;
  phoneIndicator: number;
};

const countries: Country[] = [
  { name: 'Cameroon', capital: 'Yaounde', countryCode: 'CM', phoneIndicator: 237 },
  { name: 'France', capital: 'Paris', countryCode: 'FR', phoneIndicator: 33 },
  { name: 'United States', capital: 'Washington, D.C.', countryCode: 'US', phoneIndicator: 1 },
  { name: 'India', capital: 'New Delhi', countryCode: 'IN', phoneIndicator: 91 },
  { name: 'Brazil', capital: 'Brasília', countryCode: 'BR', phoneIndicator: 55 },
  { name: 'Japan', capital: 'Tokyo', countryCode: 'JP', phoneIndicator: 81 },
  { name: 'Australia', capital: 'Canberra', countryCode: 'AUS', phoneIndicator: 61 },
  { name: 'Nigeria', capital: 'Abuja', countryCode: 'NG', phoneIndicator: 234 },
  { name: 'Germany', capital: 'Berlin', countryCode: 'DE', phoneIndicator: 49 },
];

const exportCountriesFile = async () => {
  const workbook = new Excel.Workbook();
  const worksheet = workbook.addWorksheet('Countries List');

  worksheet.columns = [
    { key: 'name', header: 'Name' },
    { key: 'countryCode', header: 'Country Code' },
    { key: 'capital', header: 'Capital' },
    { key: 'phoneIndicator', header: 'International Direct Dialling' },
  ];

  countries.forEach((item) => {
    worksheet.addRow(item);
  });

  const exportPath = path.resolve(__dirname, 'countries.xlsx');

  await workbook.xlsx.writeFile(exportPath);
};

exportCountriesFile();
Execute the file with the command: yarn start.
A file named countries.xlsx will be generated in the same folder containing the file index.ts. Open the file with an Excel file visualizer.
Yeah! it works
Styling the sheet
There is no distinction between the header and other rows on the spreadsheet, and the text’s header overlaps the column width.
We can apply styling on the header to customize the text and increase the column width.
Update the index.ts file with the code below:
worksheet.columns.forEach((sheetColumn) => {
    sheetColumn.font = {
      size: 12,
    };
    sheetColumn.width = 30;
});

worksheet.getRow(1).font = {
    bold: true,
    size: 13,
};
The forEach() on the worksheet columns will apply the styling, so we first want the font size for all the columns to be 12px and the column width to be 30px.
We want to make the header’s text bold and increase the font size to 13px. We know it is the first line of the sheet. Yeah, the index doesn’t start at 0 but at 1 ?.
Rerun the code to generate a new file, open the generated file again, and tadaaa!

Wrap up
ExcelJS helps you with creating Excel file and writing data inside, but it also allows styling the spreadsheet columns. The support for TypeScript makes the experience of working with great.
Check out the package documentation to learn about other options.
You can find the code source on the GitHub repository.
Follow me on Twitter or subscribe to my newsletter to avoid missing the upcoming posts and the tips and tricks I occasionally share.
Node is an open source server platform that runs on top of Google Chrome’s JavaScript engine called V8. Node includes basically everything needed to execute a program written in JavaScript. Ryan Dahl developed it in 2009. My blog post Why JavaScript is a pretty good overview of why I like and use JavaScript for many things.
Excel is a really commonly used spreadsheet program that lots of companies use to transmit data. While working at multiple market research companies, I’ve used it lots of times for final client deliverables. Excel has gotten very powerful over the last ten years and now includes a lot of machine learning like functionality.
Over the years, I’ve probably used dozens of Excel file creators and parsers. In pretty much every application or web service there becomes a need to output a file to Excel or csv. Finding a really good library that doesn’t require Excel to exist on the server can be really hard.
ExcelJS is a pretty good package for reading and manipulating Excel files. Prior to using ExcelJS I had spent a lot of time trying to get excel4node to work and it just never really things that I needed or wanted.
ExcelJS provides a pretty simple interface to generate pretty advanced Excel documents that can include things like formatting, borders, formulas, pivot tables and even some graphs. The big thing I like about ExcelJS is that I can update existing files and use them like a template, and it actually works with pivot tables. A lot of the open source Excel writers don’t work with pivot tables.
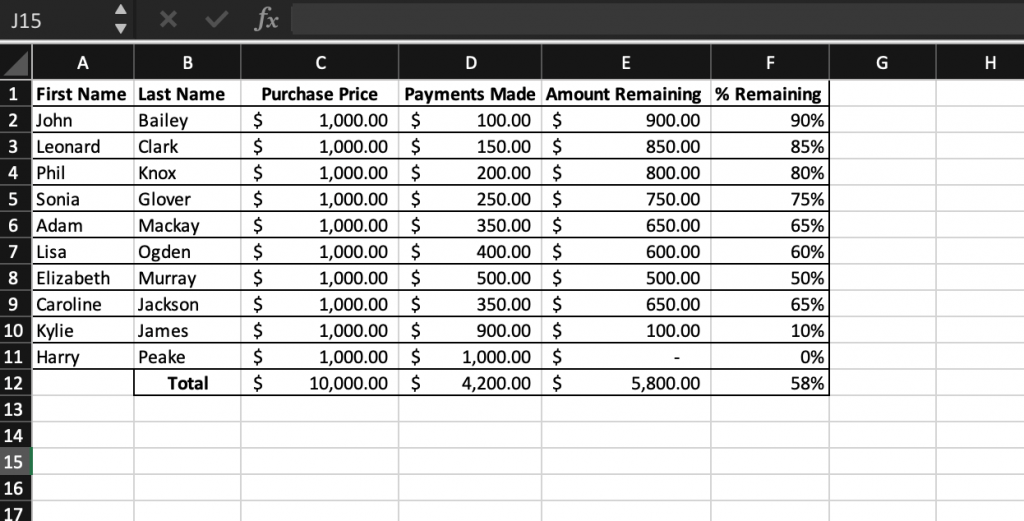
Let’s pretend we were working for the accounting department and needed to work on a way to report on the number of people that owe money. We cobble together some sort of query and get our data to look something like this:
[{
  firstName: 'John',
  lastName: 'Bailey',
  purchasePrice: 1000,
  paymentsMade: 100
}, {
  firstName: 'Leonard',
  lastName: 'Clark',
  purchasePrice: 1000,
  paymentsMade: 150
}, {
  firstName: 'Phil',
  lastName: 'Knox',
  purchasePrice: 1000,
  paymentsMade: 200
}, {
  firstName: 'Sonia',
  lastName: 'Glover',
  purchasePrice: 1000,
  paymentsMade: 250
}, {
  firstName: 'Adam',
  lastName: 'Mackay',
  purchasePrice: 1000,
  paymentsMade: 350
}, {
  firstName: 'Lisa',
  lastName: 'Ogden',
  purchasePrice: 1000,
  paymentsMade: 400
}, {
  firstName: 'Elizabeth',
  lastName: 'Murray',
  purchasePrice: 1000,
  paymentsMade: 500
}, {
  firstName: 'Caroline',
  lastName: 'Jackson',
  purchasePrice: 1000,
  paymentsMade: 350
}, {
  firstName: 'Kylie',
  lastName: 'James',
  purchasePrice: 1000,
  paymentsMade: 900
}, {
  firstName: 'Harry',
  lastName: 'Peake',
  purchasePrice: 1000,
  paymentsMade: 1000
}]
Ok, it’s pretty simple sample data but it’s good enough to provide how easy it is to create a simple Excel based report. Let’s begin by getting the packages we need.
Getting Started – Installation
From the root of your project you can simply open a new terminal window and run “npm install exceljs”. After the installation is complete, we should see that our package.json file is updated. (If you don’t have a package.json file you can create one by running “npm init”)
It should include changes like:
"dependencies": {
    "exceljs": "^3.9.0"
  }
In index.js or whatever file you’re using, it’s pretty easy to declare and begin using the file. You’ll need to include it at the top of the file like so
'use strict'

const Excel = require('exceljs')
A workbook is an Excel file that contains many worksheets. You need to declare a new Workbook so that you have something to work in.
// need to create a workbook object. Almost everything in ExcelJS is based off of the workbook object.
let workbook = new Excel.Workbook()
Note: I like to use Standard Style, so I don’t generally use semicolons and I let Prettier worry about silly things like tabs vs spaces. 🙂
Everything in Excel works off of the concept of a worksheet. A worksheet is a single page in the file. A really simple way of thinking of them is to think about the tabs at the bottom.
let worksheet = workbook.addWorksheet('Debtors')A second parameter can be optionally provided when creating the worksheet that can specify things like the tab colour to use, whether to show gridlines or other things.
Let’s say we wanted to create an Excel file that looked like the following, the code to do this isn’t really all that complex.
Excel works off of concepts called rows and cells. A row would be 1,2, 3,4, 5, etc. Anything horizontal is a row.
Looking vertically (or up and down) is a column. For example, “B” is a row.
A cell is a particular spot, it’s address is made up of a column and then a row number. For example “A1” is the first cell in a spreadsheet.
Worksheet Columns
ExcelJS has created a pretty helpful concept called columns off of the worksheet object. By using it we can easily dump an array into Excel without really having to do much manipulation.
worksheet.columns = [
  {header: 'First Name', key: 'firstName'},
  {header: 'Last Name', key: 'lastName'},
  {header: 'Purchase Price', key: 'purchasePrice'},
  {header: 'Payments Made', key: 'paymentsMade'},
  {header: 'Amount Remaining', key: 'amountRemaining'},
  {header: '% Remaining', key: 'percentRemaining'}
]
Formatting the Header
The header in our example doesn’t really have too much formatting other than being bold and about as wide as the titles. Doing this is with a loop and taking advantage of the row functionality is pretty easy.
// force the columns to be at least as long as their header row.
// Have to take this approach because ExcelJS doesn't have an autofit property.
worksheet.columns.forEach(column => {
  column.width = column.header.length < 12 ? 12 : column.header.length
})

// Make the header bold.
// Note: in Excel the rows are 1 based, meaning the first row is 1 instead of 0.
worksheet.getRow(1).font = {bold: true}
Inserting The Data Into Excel
To do this, I’m doing a for each on the data array and immediately putting the values into Excel.
One thing I can’t emphasize enough is that in Excel everything is 1 based, meaning that you must start with 1 instead of 0 when looping through arrays.
I’ve seen a lot of Excel newbies that spend a lot of time trying to debug why their sheet isn’t working because they forgot Excel is 1 based instead of 0 based.
You can see that I’m using destructuring (“…”) to put all of the existing values in and then I’m adding some custom formulas for each row.
// Dump all the data into Excel
data.forEach((e, index) => {
  // row 1 is the header.
  const rowIndex = index + 2

  // By using destructuring we can easily dump all of the data into the row without doing much
  // We can add formulas pretty easily by providing the formula property.
  worksheet.addRow({
    ...e,
    amountRemaining: {
      formula: `=C${rowIndex}-D${rowIndex}`
    },
    percentRemaining: {
      formula: `=E${rowIndex}/C${rowIndex}`
    }
  })
})
Formatting Data
Formatting data is one of the most important parts of setting up an Excel sheet so that your users can easily grasp what they’re looking at and make wise decisions off of it. Formatting data means we’re adding the $, a percentage sign or maybe we’re switching it accounting style which
Data can be formatted at the column, row or cell levels. I generally try to keep formatting at the column level which means I try to keep the same data type in every column.
Columns need to use a number, which is also 1 based. To do this we basically convert the letter to a a number by its index in the English alphabet. So column A is 1, column B is 2, and so on.
// Set the way columns C - F are formatted
const figureColumns = [3, 4, 5, 6]
figureColumns.forEach((i) => {
  worksheet.getColumn(i).numFmt = '$0.00'
  worksheet.getColumn(i).alignment = {horizontal: 'center'}
})

// Column F needs to be formatted as a percentage.
worksheet.getColumn(6).numFmt = '0.00%'
Formatting Borders
Formatting cells in Excel with borders is a great way of drawing attention to things. Lots of companies have been using this for a long time, ie: newspapers, magazines, and web pages.
I like to start every project with outlining the rows, and table outline. ExcelJS has a number of border properties that it supports. The styles it supports are as follows:
- thin
- dotted
- dashDot
- hair
- dashDotDot
- slantDashDot
- mediumDashed
- mediumDashDotDot
- mediumDashDot
- medium
- double
- thick
I generally only use “thin” or “none”. Thin is the standard border that you normally see in Excel.
In the example, we set the top, bottom, left, and right border styles for each cell individually. I haven’t found a way to do this with a range and haven’t had a big enough file to need to do this more efficiently.
// loop through all of the rows and set the outline style.
worksheet.eachRow({ includeEmpty: false }, function (row, rowNumber) {
  worksheet.getCell(`A${rowNumber}`).border = {
    top: {style: 'thin'},
    left: {style: 'thin'},
    bottom: {style: 'thin'},
    right: {style: 'none'}
  }

  const insideColumns = ['B', 'C', 'D', 'E']
  insideColumns.forEach((v) => {
    worksheet.getCell(`${v}${rowNumber}`).border = {
      top: {style: 'thin'},
      bottom: {style: 'thin'},
      left: {style: 'none'},
      right: {style: 'none'}
    }
  })

  worksheet.getCell(`F${rowNumber}`).border = {
    top: {style: 'thin'},
    left: {style: 'none'},
    bottom: {style: 'thin'},
    right: {style: 'thin'}
  }
})
Saving the Excel File
Saving the Excel file is pretty easy , it just requires specifying a file name and a file path if needed.
// Keep in mind that reading and writing is promise based.
workbook.xlsx.writeFile('Debtors.xlsx')
Wrapping Things Up
I’ve created a git repo with all of the code for creating an Excel File with NodeJS and quite a few comments. You can see the repo on github: https://github.com/brcline/getting-started-with-exceljs
ExcelJS has some really great documentation and a really active community of supporters. For the most part, the API is very similar to the way things were done in VB6 / VBA so you should be able to steal ideas and examples from the past and be able to do some pretty sophisticated things.