
Word for Microsoft 365 Word for Microsoft 365 for Mac Word 2019 Word 2019 for Mac Word 2016 Word 2016 for Mac Word 2013 Word 2010 Word 2007 More…Less
If your document is in Print Layout view and the top and bottom margins appear to be cut off, the option for hiding margins has been switched on. Here’s how to switch it off:
-
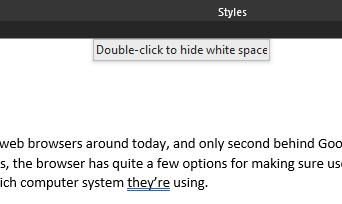
Point to the top or bottom of a page until the pointer becomes a double-pointed arrow, and then double-click.

-
To hide the margins again, repeat step 1.
See also
Set page margins in Word
Need more help?
Want more options?
Explore subscription benefits, browse training courses, learn how to secure your device, and more.
Communities help you ask and answer questions, give feedback, and hear from experts with rich knowledge.
Download PC Repair Tool to quickly find & fix Windows errors automatically
The Margin section on Microsoft Word is very important, but it can also be quite confusing when things change out of the blue. Not too long ago, some users have been complaining about the top margin in Word defaulting to 0 instead of 1-inch. The layout tab is showing it should be 1-inch, but for some reason, the vertical ruler is showing 0. That’s quite confusing if you have no idea what’s going on. Worry not, however, because we know whats going on here, and how to solve it.
Heres the thing, the problem you are facing with the margins in Microsoft Word, from our point of view, could have much to do with the White Space, which removes the display of the Header/Footer areas & separates the pages by a black line rather than a visual break.
It’s annoying for users who are used to visual breaks, especially when they have no idea how to fix it.
If you’re having layout issues with Microsoft Word where the top and bottom margins are missing, then try these suggestions to easily fix the problem.
- Double-click the top of the writing area
- Change White space between pages in Print Layout View setting.
1] Double-click the top of the writing area
Your margin is there, most likely, it’s just hidden. One way to show it is to simply place your mouse cursor at the top of the writing area, or page, and double click. Doing this should allow you to reclaim the margin, and performing the same task again should hide it.
2] White space between pages in Print Layout View

Another way to do it, which requires more steps, is to visit the section that says White space between pages in Print Layout View.
To get this done, then, please click on File, and from there, navigate to Option. When the new window appears, select Display, then make sure to tick the box that says Show White space between pages in Print Layout View.
That alone should fix your problem.
Now, if for some reason you’re still being affected by the margin issue, please leave us a comment.

Vamien has studied Computer Information Services and Web Design. He has over 10 years of experience in building desktop computers, fixing problems relating to Windows, and Python coding.
 Please Note:
This article is written for users of the following Microsoft Word versions: 2007, 2010, 2013, 2016, 2019, and Word in Microsoft 365. If you are using an earlier version (Word 2003 or earlier), this tip may not work for you. For a version of this tip written specifically for earlier versions of Word, click here: Missing Top and Bottom Margins.
![]()
Written by Allen Wyatt (last updated December 5, 2020)
This tip applies to Word 2007, 2010, 2013, 2016, 2019, and Word in Microsoft 365
Rodney notes that when he opens a new document in Word the on-screen display of the pages shows the correct left and right margins, but not the correct top and bottom margins. The «pages» of paper shown on-screen in Print Layout view show no top and bottom margin at all. Rodney is wondering why this is happening.
What Rodney is seeing is actually a feature of Word that hides white space (including headers and footers) at the top and bottom of a page. This feature provides a way to display more real information on the screen and is particularly useful if you have a document that uses a lot of white space at the top and bottom of the page.
If you move the mouse pointer to the top or bottom border of the on-screen page representation, you’ll notice that it changes to a small icon that has two arrows facing each other vertically. If you double-click on the mouse when the pointer is in this condition, Word toggles the display of the top and bottom white space.
If you prefer, you can also change the settings by using Word’s dialog boxes:
- Display the Word Options dialog box. (In Word 2007 click the Office button and then click Word Options. In Word 2010 or later versions, display the File tab of the ribbon and then click Options.)
- At the left side of the dialog box, click Display. (See Figure 1.)
- Set or clear the Show White Space between Pages in Print Layout View checkbox, as desired.
- Click OK
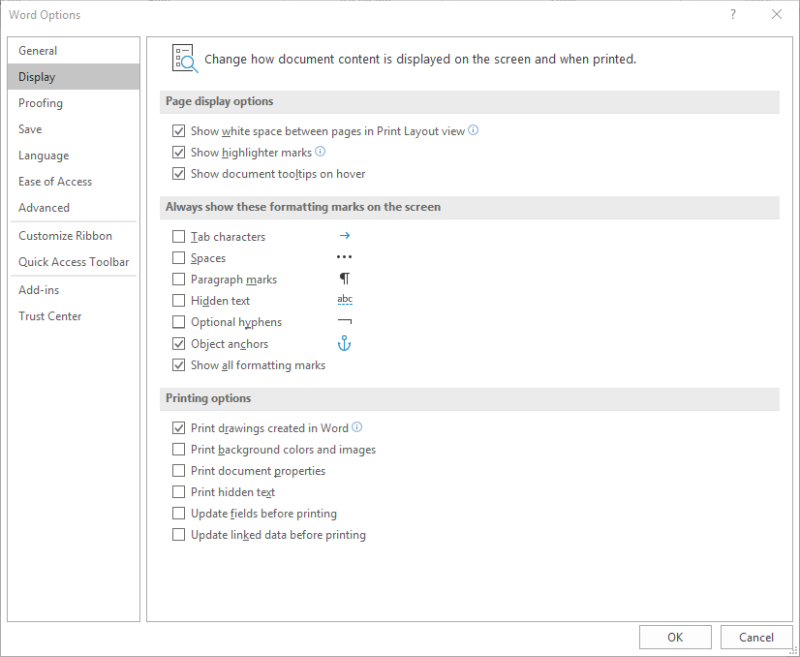
Figure 1. The Display options of the Word Options dialog box.
WordTips is your source for cost-effective Microsoft Word training.
(Microsoft Word is the most popular word processing software in the world.)
This tip (13149) applies to Microsoft Word 2007, 2010, 2013, 2016, 2019, and Word in Microsoft 365. You can find a version of this tip for the older menu interface of Word here: Missing Top and Bottom Margins.
Author Bio
With more than 50 non-fiction books and numerous magazine articles to his credit, Allen Wyatt is an internationally recognized author. He is president of Sharon Parq Associates, a computer and publishing services company. Learn more about Allen…
MORE FROM ALLEN
Turning Track Changes Off for Selected Areas
Track Changes is a great tool to use so that you can, well, «track» what changes are made during the development of a …
Discover More
Converting Tables to Text
Need to convert all the tables in your document into plain text? This tip provides a macro that can make quick work of a …
Discover More
Quickly Entering Dates and Times
Excel provides keyboard shortcuts for a variety of purposes. This tip examines two such shortcuts, designed to allow …
Discover More
More WordTips (ribbon)
Understanding Views
Want to see how your document will look before it’s printed? Or, do you want to see what things will look like if you put …
Discover More
Understanding the Normalize Text Command
Word includes tons of internal commands that you can access as you customize your system. One of these is the Normalize …
Discover More
Changing the Document Window Background Color
Word’s default black text and a white background may not appeal to everyone. There are a couple of ways to change the …
Discover More
![]()
Download Article
A user-friendly guide to changing a Word document’s margins to wide, narrow, and more
![]()
Download Article
- Applying Preset Margins (Desktop)
- Creating Custom Margins (Desktop)
- Using the Mobile App
- Q&A
- Warnings
|
|
|
|
Are you trying to adjust your margins in Microsoft Word? The margins are the empty space between the edge of the page and the contents of the document. Depending on your needs, you can change the margins to become wider, narrower, or a mix of both. You’ll be able to select from a few preset options or customize your own. This wikiHow will show you how to fix and change the default 1-inch margins in Microsoft Word using your iPhone, Android, or Windows or Mac computer.
Things You Should Know
- On desktop, click «Layout» → «Margins» → select a margin preset.
- For custom margins, click «Custom Margins…» and enter the values for Top, Left, Bottom, and Right.
- On mobile, tap «•••» → «Home» → «Layout» → «Margins» → select a preset or «Custom Margins». Enter a new value and tap «Done».
-
1
-
2
Click Layout. This will be in the top toolbar, between Design and References.
Advertisement
-
3
Click Margins. You can find this in the upper-left corner of the Layout tab. This looks like a rectangle with blue lining the margins.
- A pop-up menu will open.
-
4
Select a margin type. You’ll see a list of preset margins: Normal, Narrow, Moderate, Wide, Mirrored, and Office 2003 Default. Click a preset margin to apply it to your document. It should be applied immediately.
- If you don’t like how it looks, you can select Normal again, or press CTRL + Z (Windows) or CMD + Z (Mac) to undo the change.
Advertisement
-
1
Click Layout. This will be in the top toolbar, between Design and References.
-
2
Click Margins. You can find this in the upper-left corner of the Layout tab. This looks like a rectangle with blue lining the margins.
- A menu will open.
-
3
Click Custom Margins…. This will be at the bottom of the drop-down menu.
- A new window will open.
-
4
Set your new margins. On the desktop application, you’ll be able to edit the margin sizes for: Top, Left, Bottom, Right, Gutter, and Gutter Positions. On the web version, you’ll only be able to edit the margin sizes for: Top, Left, Bottom, and Right. You’ll see a preview of the document layout at the bottom of the window.
- Click the field and enter your new margin size, or use the up/down arrow to adjust the current margins.
- For Gutter Positions, select Left or Top.
- Only adjust the Gutter margin if you intend to use the document in a bound format, like a book or report, and you need space for the binding. In this case, type a number in Gutter that will allow enough room for the binding and use the drop-down to indicate whether the binding will be on the top or on the left.
- Make sure Apply to is set to Whole document, unless you only want to change the margins from This point forward.
-
5
Set new default margins (optional). If you want to use this margin for all new documents in Microsoft Word, click Set as default in the bottom-left corner. Click Yes to confirm.
- When you create a new document, the margins will reflect the change.
-
6
Click OK when finished. The changes will be applied immediately.
Advertisement
-
1
Open the Microsoft Word app. Microsoft Word is available for iOS in the App Store and for Android in the Google Play Store.
- If you aren’t already logged in to your Microsoft account, enter your email address and password to do so now.
-
2
Open a new or existing project. Tap a recent project on your homepage, or tap the + tab to create a new one.
-
3
Tap ••• . This is the «•••» located at the top of your on-screen keyboard. If you don’t see your keyboard, tap the document to open it.
- A new menu will open at the bottom.
-
4
Tap Home. This is located at the top of the new menu.
- A pop-up menu will open.
-
5
Tap Layout. You can find this between Draw and Review.
-
6
Tap Margins. This is the first listing in the Layout tab.
-
7
Select a margin type. You’ll see a list of preset margins: Normal, Narrow, Moderate, Wide, and Mirrored. Tap a preset margin to apply it to your document. It should be applied immediately.
- If you don’t like how it looks, you can select Normal again, or pick a new preset.
- Be sure to save your document when you’re finished.
-
8
Create a custom margin (optional). Tap Custom Margins at the bottom of the Margins menu. You’ll be able to edit the margin sizes for: Top, Left, Bottom, and Right.
- Tap a margin to edit it.
- Tap the backspace button to erase the existing margin.
- Enter a new margin value.
- Tap Done in the top-right corner.
- Tap Margins → Custom Margins to edit another margin.
- The changes will be applied immediately.
Advertisement
Add New Question
-
Question
I want the page ruler. What can I do?

To get the ruler, go into the View tab (Word 2010 and newer) and select the Ruler checkbox.
-
Question
Can I ever allow one more letter on a line to finish a long word rather than wrap to the next line?
No. The only thing you could possibly do would be to make all the margins wider. Making only one word go to the next line is impossible unless you do the same for all words.
Ask a Question
200 characters left
Include your email address to get a message when this question is answered.
Submit
Advertisement
Thanks for submitting a tip for review!
-
Leaving the margin under .25″ may lead to text being cut off when printed.
Advertisement
About This Article
Article SummaryX
1. Open a Microsoft Word document.
2. Click the Layout tab.
3. Click Margins.
4. Click Custom Margins….
5. Set the margins.
6. Click the Apply to drop-down.
7. Select how to apply the margins.
8. Click OK.
Did this summary help you?
Thanks to all authors for creating a page that has been read 493,209 times.
Is this article up to date?
Select Layout > Margins. Select Custom Margins. In Margins, use the Up and Down arrows to enter the values you want. Select OK when done.
Change default margins
- Select Layout > Margins > Custom Margins.
- Set your margins.
- Select Set As Default.
- Confirm your selection.
Contents
- 1 How do you create margins in Word?
- 2 How do you do 2.54 Margins in Word?
- 3 How do I make 1.0 Margins in Word?
- 4 How do I drag margins in Word?
- 5 How do you scale a Word document?
- 6 What is computer line spacing?
- 7 How do I set 25mm Margins in Word?
- 8 What does 2.54 cm Margins mean?
- 9 What are 2.54 cm Margins?
- 10 What is 1.5 spacing word?
- 11 How do you make a 0.5 inch border in Word?
- 12 What should margins be set at?
- 13 How do you align paragraphs in Word?
- 14 How do I set margins in Word 2010?
- 15 Where do I find page layout in Word?
- 16 How do you change page width in Word?
- 17 How do you scale a document to size?
- 18 How do I make no space between lines in Word?
- 19 What is Page margin?
- 20 What is the command for adjusting paper size?
How do you create margins in Word?
Creating a 4 inch margin in Word
- Place the cursor at the top of the first page (Ctrl+Home)
- Click Page Layout > Margins > Custom Margins.
- In the Page Setup Window, type “4” into the Top Margin input box.
- Click OK.
Change inches to centimeters and vice versa
- On the File tab, click Options:
- In the Word Options dialog box, on the Advanced tab, under Display, in the Show measurements in units of drop-down list, choose the measurement units you need:
- Click OK.
- Note: Be careful, 1 cm = 0.3937 inch and 1 inch = 2.54 cm.
How do I make 1.0 Margins in Word?
Click the Page Layout tab. Click Margins, then click Custom Margins. Enter your desired default margins into the Top, Left, Bottom, and Right fields, then click Set as Default. Click Yes to confirm the new default margins.
How do I drag margins in Word?
Move the mouse pointer over the Left Indent icon on the Ruler (the top icon), hold down the left mouse button, and drag (move) the mouse to the right to adjust the left paragraph margin. Word displays a dotted vertical line to show you where the paragraph’s new left margin will be.
How do you scale a Word document?
Here’s how:
- Open the document containing the announcement.
- Press [Ctrl]P.
- In the Zoom section, click the Scale To Paper Size drop-down arrow.
- Scroll to and select the desired sheet size.
- Enter how many copies you want and then click OK.
What is computer line spacing?
Line spacing determines the amount of vertical space between lines of text in a paragraph. By default, lines are single-spaced, meaning that the spacing accommodates the largest font in that line, plus a small amount of extra space.
How do I set 25mm Margins in Word?
To set margins in Word, first click the “Layout” tab in the Ribbon. Then click the “Margins” drop-down button in the “Page Setup” button group. In this drop-down is a “Last Custom Setting” option, six preset margin choices, and a “Custom Margins” command.
What does 2.54 cm Margins mean?
Page Margins are the space between the edge of the paper and where your text is printed. They allow you to control where your text is printed on a page.When your document is set to A4 paper, Microsoft Word sets the TOP and BOTTOM margins to 2.54 cm (1 inch) and the LEFT and RIGHT margins to 3.17 cm (1.25 inches).
What are 2.54 cm Margins?
1 inch = 2.54 centimeters. . 75 inches = 1.905 centimeters.
What is 1.5 spacing word?
Press Ctrl+1 for single-spacing, Ctrl+5 for 1.5 spacing, or Ctrl+2 for double-spacing. Click to view larger image.
How do you make a 0.5 inch border in Word?
Add a border
Click the Page Layout tab. In Word 2013 and 2016, click the Design tab instead. In the Page Background group, click the Page Borders option. In the Borders and Shading window (shown below), if not already selected, click the Page Border tab.
What should margins be set at?
The top, bottom, and right margins are required to be 1 inch, but the left margin can either be 1 inch or 1.25 inches. All body text, tables, figures, appendices content, and any copies of published chapters must fit within the required 1-inch margins on all sides.
How do you align paragraphs in Word?
Change text alignment
- Place the insertion point anywhere in the paragraph, document, or table that you want to align.
- Do one of the following: To align the text left, press Ctrl+L. To align the text right, press Ctrl+R. To center the text, press Ctrl+E.
How do I set margins in Word 2010?
How to Change Page Margins in Microsoft Word 2010
- Open your document in Word 2010.
- Select the Page Layout tab.
- Click the Margins button.
- Choose the desired page margin setting.
Where do I find page layout in Word?
Click Page Layout tab
- Click Page Layout tab.
- Move to Page Setup group.
- Click the little square with an arrow in the right bottom of the group.
- The Page Setup window pops up.
How do you change page width in Word?
Change the paper size for all pages
- On the Format menu, click Document.
- Click Page Setup.
- On the Paper Size pop-up menu, select a paper size.
- Click OK.
- On the Apply to pop-up menu, click Whole document, and then click OK.
How do you scale a document to size?
Scaling Your Output
- Load the document you want to print.
- Press Ctrl+P. Word displays the Print dialog box.
- Use the Scale to Paper Size drop-down list (lower-right corner) to specify the paper on which your document will be printed.
- Specify any other printing options, as desired.
- Click on OK to print your document.
How do I make no space between lines in Word?
Change the line spacing in Word
- Select Design > Paragraph Spacing.
- Hover the cursor over each option to see a preview, and then select the option you want. For single spacing, select No Paragraph Space.
What is Page margin?
In typography, a margin is the area between the main content of a page and the page edges. The margin helps to define where a line of text begins and ends.(Any space between columns of text is a gutter.) The top and bottom margins of a page are also called “head” and “foot”, respectively.
What is the command for adjusting paper size?
To do this, go to Layout > Size > More Paper Sizes. In the “Page Setup” dialog box, click “Paper,” and then click the drop-down arrow next to “Paper Size.” Select the paper size you want to make the default for all future documents.