
Is there one space or two between sentences? Word lets you check the sentence spacing or ignore it completely.
It’s a useful option for those of us who learnt on manual typewriters where double sentence spacing was standard. Switching to single spacing is hard for your fingers to remember.
One Space or Two
People can get very exercised about sentence spacing. Maybe it depends on what you were taught at school?
The trend has been towards single spacing but many of us were double spacing when we were taught to type.
Most style guides including the Chicago Manual of Style and Oxford Style Manual recommend single spacing.
Whichever you choose, Word can check for you.
Global Setting
The setting for sentence spacing is a Word global setting. It applies to all documents opened in Word.
There’s no way to change the sentence spacing check at the document, style or paragraph level.
For most people that’s not a problem. However, some might have clients or specifications for different documents. Anyone in that situation has to change the Word setting manually each time.
Microsoft 365 / Office 365
In Word 365 if the spacing setting isn’t correct, there’s a brown dotted line.

Right-click on the dotted line to see the options under ‘Punctuation Conventions’.

Click on the fullstop/period, question mark or exclamation to change the spacing.
Ignore Once – will leave this spacing unchanged.
Don’t check for this issue – changes the sentence spacing for ALL documents, not just the current document. The global Word setting is returned to ‘Don’t Check’. This isn’t made clear at all.
Options for ‘Punctuation Conventions’ – takes you to the Grammar & more settings.
Settings
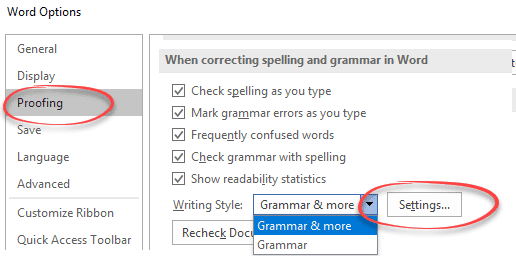
Go to Options | Proofing | Writing Styles. Select ‘Grammar & more’ then Settings.
Word for Mac: Preferences | Spelling & Grammar | Writing Style | Grammar and More | Setting.
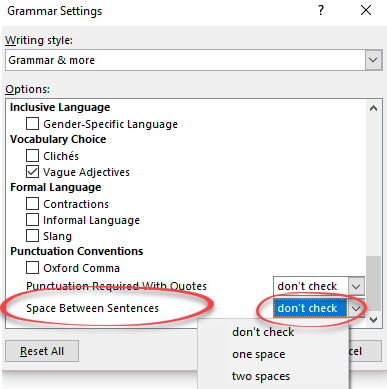
Scroll down to the bottom of the settings to see ‘Space between sentences’.
Don’t Check – the default.
One space – a single space between sentences.
Two spaces – two spaces
Before you ask … we don’t know why the most commonly changed grammar settings (Oxford Comma, Punctuation Required with Quotes and Space Between Sentences) are at the very bottom of the list. They were at the top of the list in past versions of Word, so this must be a deliberate, though mysterious decision.
Word 2019, 2016, 2013, Word 2010 and before …
In earlier versions of Word the look is a little different but the result is the same.
The blue squiggly line marks an incorrect sentence spacing.

Right-click on the blue line to see the options which aren’t very clear.

You’re forgiven for wondering what caused the blue squiggly line.
Click on the period/fullstop, question mark, exclamation to change the sentence spacing.
Ignore Once – will leave this spacing unchanged.
Grammar … – opens the Grammar settings
The settings are the same but a little more accessible.
Go to Options | Proofing | Writing Styles. Select ‘Grammar & Style’ then Settings.

1 – a single space between sentences.
2 – two spaces
don’t check – the default.
Change single space after sentence to double space in Word
Change sentence space after fullstop/period in Word
Now Word wants to Rewrite your sentences
Word for Microsoft 365 Outlook for Microsoft 365 Word 2021 Outlook 2021 Word 2019 Outlook 2019 Word 2016 Outlook 2016 Word 2013 Outlook 2013 Word 2010 Outlook 2010 Word 2007 Outlook 2007 More…Less
You can change the spacing between characters of text for selected text or for particular characters. In addition, you can stretch or compress an entire paragraph to make it fit and look the way that you want it to.
Change the spacing between characters
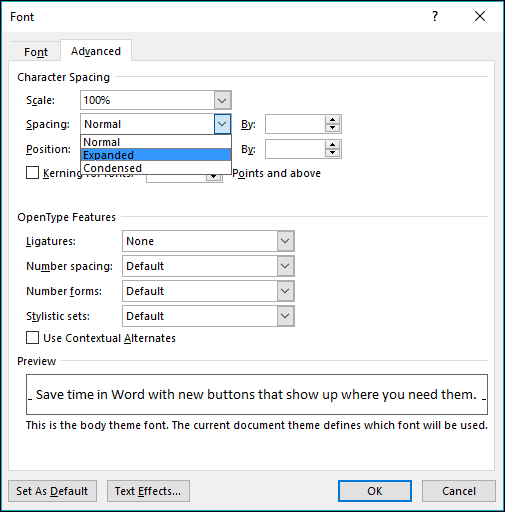
Selecting Expanded or Condensed alters the spacing between all selected letters by the same amount. Kerning alters the spacing between particular pairs of letters — in some cases reducing and in other cases expanding the space depending upon the letters.
Expand or condense the space evenly between all the selected characters
-
Select the text that you want to change.
-
On the Home tab, click the Font Dialog Box Launcher, and then click the Advanced tab.

Note: If you’re using Word 2007 the tab is called Character Spacing.
-
In the Spacing box, click Expanded or Condensed, and then specify how much space you want in the By box.
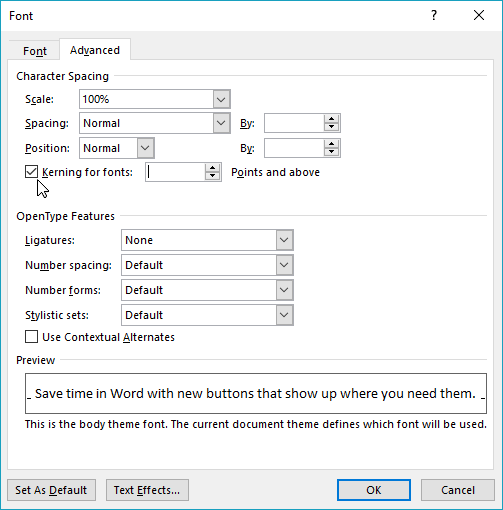
Kern the characters that are above a particular size
Kerning refers to the way spacing between two specific characters is adjusted. The idea is to give a better looking result by reducing the spacing between characters that fit together nicely (such as «A» and «V») and increasing the spacing between characters that don’t.
-
Select the text that you want to change.
-
On the Home tab, click the Font Dialog Box Launcher, and then click the Advanced tab.
Note: If you’re using Word 2007 the tab is called Character Spacing.
-
Select the Kerning for fonts check box, and then enter the point size in the Points and above box.
Stretch or scale the text horizontally
When you scale the text, you change the shapes of the characters by percentages. You can scale text by stretching it or by compressing it.
-
Select the text that you want to stretch or compress.
-
On the Home tab, click the Font Dialog Box Launcher, and then click the Advanced tab.
Note: If you’re using Word 2007 the tab is called Character Spacing.
-
In the Scale box, enter the percentage that you want.
Percentages above 100 percent stretch the text. Percentages below 100 percent compress the text.
Change the line spacing
To increase or decrease the amount of vertical space between lines of text within a paragraph, the best method is to modify the style the paragraph uses.
-
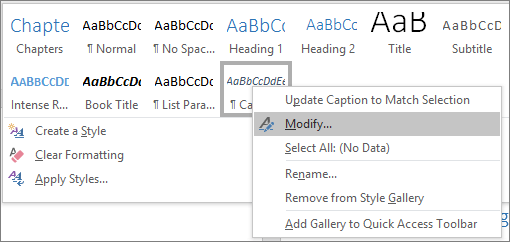
Find the style you’re using in the Styles gallery on the Home tab.
-
Right-click the style you want to change and select Modify.
-
Near the center of the dialog box you’ll find the line spacing buttons that let you select single, 1.5x or double spaced. Choose the spacing you want to apply and click OK.
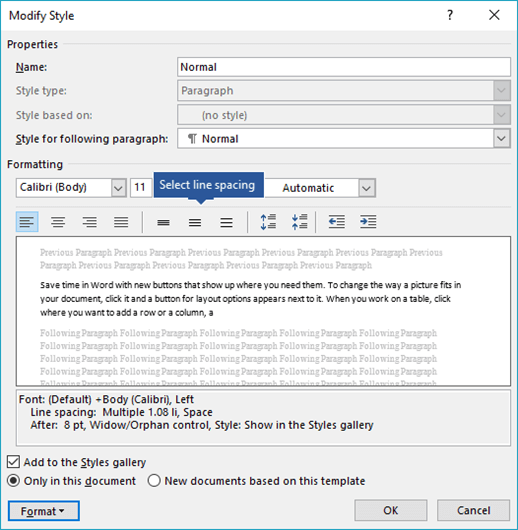
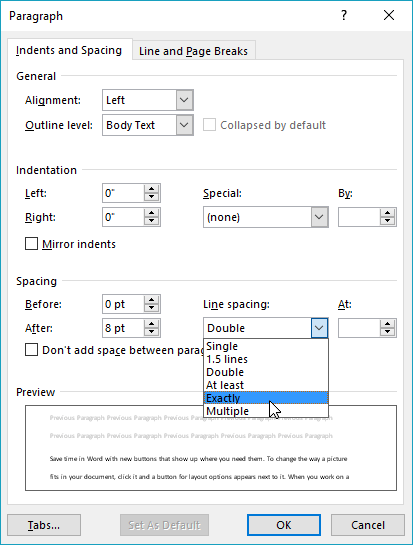
If you’d like to apply more specific line spacing to the style, clickthe Format button at the bottom left corner of the Modify Style dialog box and select Paragraph. The Line spacing drop-down lets you select or set more specific line spacing.
For more information on modifying styles in Word, see: Customize styles in Word.
See also
-
Using Styles in Word — a free, 10-minute video training course.
-
Change the font size
-
Set page margins
-
Align text left or right, center text, or justify text on a page
-
Change the line spacing in Word
Do you have a question about Word that we didn’t answer here?
Post a question in the Word Answers Community.
Help us improve Word
Do you have suggestions about how we can improve Word? Let us know by providing us feedback. See How do I give feedback on Microsoft 365? for more information.
Need more help?
Want more options?
Explore subscription benefits, browse training courses, learn how to secure your device, and more.
Communities help you ask and answer questions, give feedback, and hear from experts with rich knowledge.
Spruce up the formatting in your Word docs
What to Know
- To fix spacing between words, go to Find and Replace. Enter a space in both fields, then go to More > Format > Font and choose a font size.
- To adjust spacing between characters, go to Home, select Expand (the down-arrow) next to Font, and select the Advanced tab.
- To change spacing between lines, go to Home and select Expand (the down-arrow) next to Paragraph and adjust the Spacing options.
This article explains how to fix spacing in Word 2021, 2019, 2016, and Word for Microsoft 365.
How to Fix Spacing Between Words in Word
Using different fonts or font sizes in your document can lead to inconsistent spacing between words. Follow these steps to adjust the spacing between words without affecting the space between letters:
To show paragraph breaks and spaces, go to the Home tab and select the Show/Hide icon (¶) in the Paragraph group.
-
Highlight the text you want to change and select the Home tab. Press Ctrl+A (Windows) or Cmd+A (Mac) to highlight the entire document.
-
Select Replace in the Editing group.
On Mac, go to Edit > Find > Advanced Find and Replace, then select the Replace tab.
-
Click in the Find what text field and press your spacebar to create a space.
-
Click in the Replace with field and press your spacebar to create a space.
-
Select More to expand the window.
-
Select Format and choose Font.
-
Under Size, choose the font size you use most consistently throughout the document, then select OK.
-
Select Replace All.
-
In a new window, Word will report the number of replacements. Select Yes to apply changes to the entire document, or select No to change only the highlighted text.
The spacing between words should now be consistent. You can now close the Find and Replace window.
Don’t add multiple spaces between words because it makes formatting the entire document more difficult.
You can justify text in Word if you want to expand word spacing so the right margin is always straight (like a newspaper column).
How Do I Fix Spacing Between Characters?
To adjust the spacing between characters (letters, numbers, symbols, etc.), follow these steps:
-
Highlight the text you want to change and select the Home tab.
-
Next to Font, select Expand (the down-arrow).
-
Go to the Advanced tab. To stretch or compress the text, increase or decrease Scaling. For Spacing, choose Expanded or Condensed to adjust the spacing between all characters.
Select Kerning for fonts to enable text kerning. This feature automatically adjusts the spacing between characters to be more aesthetically pleasing. You can choose to kern characters above a certain size.
How to Fix Line Spacing in Word
Follow these steps to change the amount of space between lines within a paragraph:
To adjust the spacing between paragraphs, go to the Design tab, select Paragraph Spacing and choose from the options. For single spacing, choose No Paragraph Space.
-
Highlight the text you want to change and select the Home tab.
-
Next to Paragraph, select Expand (the down-arrow).
-
In the Spacing section, manually set the amount of space before and after line breaks, or choose one of the options under Line spacing. Select the Line and Page Breaks tab for more advanced options like text wrapping and pagination settings.
When you’re done, select OK to save changes.
FAQ
-
How do I change the tab spacing in Word?
The quickest way to set tab stops is to click the ruler where you want a tab. Alternatively, go to the Home tab and select Paragraph Settings in the Paragraph group. Next, select the Tabs button. Finally, set the desired Tab stop position, click Set, and click OK.
-
How do I fix the spacing between bullet points in Word?
To change line spacing between bullets in a list, select the list and then click the Paragraph Dialog Box Launcher. On the Indents and Spacing tab, under Spacing, clear the Don’t add space between paragraphs of the same style check box.
Thanks for letting us know!
Get the Latest Tech News Delivered Every Day
Subscribe
i Image courtesy of Microsoft
By default, the spelling and grammar check in Microsoft Word 2010 and 2013 does not check for sentence spacing, allowing you to use either one or two spaces after a period without prompting a warning. To ensure your documents have a consistent spacing, set the number of spaces required in the grammar check settings and then run a full check or watch for blue underlines, which indicate formatting inconsistencies.
Step 1
i Image courtesy of Microsoft
Open the File menu in Word and click «Options.»
Step 2
i Image courtesy of Microsoft
Switch to the «Proofing» tab and click «Settings» on the Writing Style line. It doesn’t matter whether the adjacent option reads «Grammar Only» or «Grammar & Style» — these options come with a default package of settings, but you can enable the sentence spacing check with either.
Step 3
i Image courtesy of Microsoft
Click the drop-down menu for «Spaces Required Between Sentences.» Pick either «1» or «2,» or choose «Don’t Check» to disable the sentence spacing check. This setting applies to all documents you open, so when reading files written by other people, you might want to disable the check to avoid seeing excessive grammar errors. After selecting a number of spaces, press «OK» on close both open windows.
Step 4
i Image courtesy of Microsoft
Click «Spelling & Grammar» on the Review tab to check for all errors in the document, including incorrect sentence spacing. As you type, Word also marks mismatched spacing with a blue underline that you can right-click to fix the problem.
References
Tips
- To change all double spaces to single spaces at once, press «Ctrl-H» to open Find and Replace. Type two spaces in the Find box, one space in the Replace box and click «Replace All.»
- Change the vertical spacing between lines in Word by clicking the «Line and Paragraph Spacing» icon, which looks like a set of lines next to up and down arrows, in the Paragraph section of the Home tab. To change the spacing on all document, pick «Line Spacing Options» in the menu, choose a new spacing and press «Set as Default.»
Writer Bio
Aaron Parson has been writing about electronics, software and games since 2006, contributing to several technology websites and working with NewsHour Productions. Parson holds a Bachelor of Arts from The Evergreen State College in Olympia, Wash.
You can use Microsoft Word’s Find and Replace tool to delete extra spaces all at once. Or, you can find extra spaces in Word by customizing your proofing options and then deleting them individually as you type or during a Spelling & Grammar check. These three tasks are explained in this tutorial:
Customize Word’s Proofing Options to Find Extra Spaces
Delete Extra Spaces as You Type
Delete Extra Spaces during a Spelling & Grammar Check
This tutorial is also available as a YouTube video, which you can watch on my YouTube channel or in the video player at the bottom of this page.
The images below are from Word for Microsoft 365. The steps are the same for Word 2021, Word 2019, Word 2016, Word 2013, and Word 2010. However, your interface may look slightly different in those older versions of the software.
1. Select the File tab.

2. Select Options in the Backstage view.

3. Select Proofing in the Word Options dialog box.

4. Ensure that Mark grammar errors as you type and Check grammar with spelling are selected in the spelling and grammar section. (Note that Word for Office 365 no longer includes the “Check grammar with spelling” option and instead includes grammar by default.)

5. Select the Settings button in the spelling and grammar section.

6. Select Spacing in the Grammar section of the Options menu in the Grammar Settings dialog box. (This option flags extra spaces between words, not between sentences.)

7. Select one space in the Space Between Sentences drop-down menu in the Punctuation Conventions section.

8. Select the OK button to close the Grammar Settings dialog box.

9. Select the OK button to close the Word Options dialog box.

Once you have customized your proofing options, Word will flag extra spaces as you type.
Extra spaces between sentences will be marked with a red dotted line. Extra spaces between words will be marked with blue double lines.
1. Right-click on the extra space mark (the red dotted line or blue double lines).

2. Select the correction from the pop-up menu.

Pro Tip: Select See More to open the Editor pane. Or, select Options for “Grammar” or Options for “Punctuation Conventions” to reopen the Grammar Settings dialog box.
Note that the Spelling & Grammar check won’t find extra spaces until you customize your proofing options.
1. Select the Review tab.

2. Select Spelling & Grammar in the Proofing group.

3. Select each spacing correction in the Suggestions section of the Editor pane.

Pro Tip: If Word finds an extra space that you want to keep, select Ignore Once at the bottom of the Editor pane.
Further Reading: How to Find and Replace Formatting in Microsoft Word
Updated November 09, 2021