
Last Update: Jan 03, 2023
This is a question our experts keep getting from time to time. Now, we have got the complete detailed explanation and answer for everyone, who is interested!
Asked by: Shanon Feil
Score: 4.4/5
(4 votes)
Step 1: Go to the ‘Review’ tab and select ‘All Markup‘ in the drop down menu (Word 2019). Step 2: Click on ‘Show markup’ below ‘All Markup’ (Word 2019) and make sure all options are ticked.
How do I see redlines in Word?
Use Show Markup
Select Review > Display for Review. Select the option you want: Simple Markup points out where changes are made with a red line in the margin. All Markup shows all edits with different colors of text and lines.
Why can’t I see the tracked changes in Word?
Note: If the Track Changes feature is unavailable, you might need to turn off document protection. Go to Review > Restrict Editing, and then select Stop Protection. (You might need to provide the document password.)
How do I make comments visible in Word?
You can easily view inline comments by resting your pointer on the comments indicator.
- Find the «Review» tab, select the «Tracking» group, and click on «Show Markup».
- Rest your pointer on Balloons, and then select «Show All Revisions inline» to display comments inline and deletions with strikethroughs.
Why can’t I see images in my Word document?
Click File, and then click Options. Click Advanced. Under Show document content, clear the Show Picture Placeholders check box. Click OK.
19 related questions found
Where is the Protect option in Microsoft Word 2010?
1From the File tab menu, choose Info.
Click the Protect Document button to open the Protect Document menu. You have several choices, including Mark As Final, Encrypt with Password, and Restrict Editing.
How do I reset Microsoft Word to default settings?
Unfortunately, there is no button in Word to reset the program to its default settings. However, you can rename Word’s global template to see if that fixes its problems. If Word continues to have issues or it runs very slow, another option is to delete Word’s registry key.
How do you expand all comments in Word?
So, to see all the lines to the comments, you can switch to the All Markup view. Here’s how. Start by clicking the “Review” tab. In the Tracking section of the Review tab, click the Display for Review drop-down list at the top of the section and select the “All Markup” option.
How do I set no markup as default in Word?
Follow these steps:
- Display the Word Options dialog box. …
- Click the Trust Center option at the left of the dialog box.
- Click the Trust Center Settings button. …
- Click Privacy Options at the left of the dialog box. …
- Clear the Make Hidden Markup Visible when Opening or Saving check box.
How do I show comments as bubbles in Word?
Click the Review tab on the Ribbon, then click the Balloons command. In the drop down list, click on Show Revisions in Balloons or Show Only Comments and Formatting in Balloons.
Why can’t I accept track changes?
In order to preserve the tracked changes log in a less than full control permissions scenario, the Track Changes and Accept Changes features are disabled for users who do not have «Full control» in the My Permission dialog for the RMS protected document.
Can you see edit history on Word?
Open the file you want to view. Go to File > Info > Version History. Select a version to open it. If you want to restore a previous version you’ve opened, select Restore.
Why are my track changes not showing up in red?
The Track Changes tab of the Options dialog box. Make sure that all the Color settings (with the exception of the color setting for the change bars) are set to «By Author.» If these settings are for a specific color, then it can affect how changes are displayed in the document.
What is redlined document?
Redlining is done on documents such as contracts. It involves marking texts in documents to indicate that there have been some additions, changes, rejections, approvals and deletions. These markings are usually in the red color and that is where the term redlining.
How do I print without track changes?
Printing without Track Changes Marks
- Press Ctrl+P. Word displays the File tab of the ribbon with the print options visible.
- Click the drop-down list directly under the Settings label. …
- In the options that appear, you’ll see a check mark next to Print Markup. …
- Click Print.
What is the red line in Microsoft Word?
When Word inserts a vertical red line into your margins when you create a new paragraph, it means someone has enabled change tracking in the document. Change tracking is often used with shared documents so that each user’s changes can be tracked and even undone if necessary.
How do I accept all changes in Word?
Accept or reject all changes
- On the Review tab, go to Changes.
- Do one of the following: In the Accept drop-down list, select Accept All Changes. In the Reject drop-down list, select Reject All Changes.
How do I get rid of markup permanently in Word?
In order to remove the markup, you have to click the bottom of the Accept split button and choose Accept All Changes in Document. If there are comments, click the bottom of the Delete split button and choose Delete All Comments in Document. Turn off tracking and save the document. Was this reply helpful?
How do I save a document without track changes?
While it used to be complicated to save a Word document without markup, the 2016 Microsoft Office suite makes the process simple. Click the “Review” tab in the menu above the document to begin the process and select the “Track Changes” button in the Review mode menu to turn off tracking.
How do I change Comment settings in Word?
Go to find “Comment Text” and move cursor over it. When you see the upside-down triangle button on the style name, click it. And choose “Modify”. Now in “Modify Style” box, change the style formatting and click “OK” to save the change.
How do I expand the comment bubble in Word?
Select the text that you want to change. On the Home tab, click the Font Dialog Box Launcher, and then click the Advanced tab. In the Spacing box, click Expanded or Condensed, and then specify how much space you want in the By box.
Is there a way to export comments from Word?
Export selected comments In the comments list, select the comments you want to export. Note: To open the comments list, choose Tools > Comments. From the options menu in the comments list, choose Export Selected To Data File.
What is the default layout in Word?
In Microsoft Word, switches to normal view, which is the default document view for most word-processing tasks, such as typing, editing, and formatting.
How do you fix Microsoft Word?
Obey these steps:
- Close Word and any other Office programs. …
- Press the Win+X keyboard shortcut. …
- Choose Control Panel.
- Below the Programs heading, click the Uninstall a Program link. …
- Select Microsoft Office from the list of programs. …
- Click the Change button. …
- Choose Quick Repair. …
- Click the Repair button.
How do you reset margins in Word?
Change default margins
- Select Layout > Margins > Custom Margins.
- Set your margins.
- Select Set As Default.
- Confirm your selection.
Using Microsoft Word, you’ve created a professional high quality report at work, or a resume if you are looking for a job. It’s ready to be published to the target reader. The only problem is, it’s full of red (potential spelling mistakes) and green (potential grammar mistakes) squiggly underlines.
Adding all the words that are underlined in red to your dictionary will only affect your own computer. When the document is opened on someone else’s computer, those lines will be back and you won’t even know it.
Is it possible to get rid of not only the red but also the green squiggly underlines for good? Absolutely. Just follow the simple instructions below.
Maximize the quality of your writing by always turning spell checking and grammar checking back on when you go to make changes to the document.
Did You Know? Canadian English is not the same as U.S. English and is different from U.K. English. Always select the correct language to ensure Word is using the correct spelling and grammar rules in your document.
The first step should always be to spell check and grammar check your document. Make sure Word isn’t actually right. Poor spelling (red squiggly underlines) and grammar (green squiggly underlines) can often remove all the credibility you built up in an otherwise very professional looking and sounding documents.
The next steps to follow will depend on the version of Microsoft Word that you are using.
Word 2010 | Word 2007 | Word 2003
Word 2010
 Start by pressing CTRL-A to select your whole document.
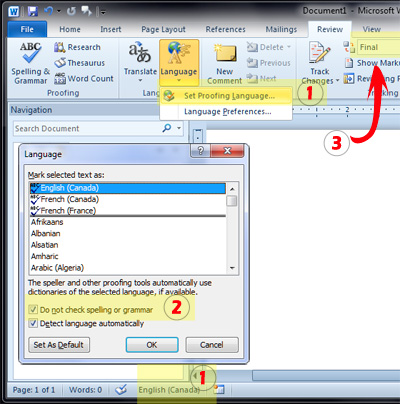
1. Click on the Review tab at the top of the window and then on the Language button. Click on Set Proofing Language…
OR
Click on the name of the language in the status bar at the bottom of the screen.
2. Add a check mark in the Do not check spelling or grammar option and click OK.
All the red and green squiggly underlines should be gone.
3. While you are there, to ensure that the recipient sees things exactly as you do, make sure that you set the document display to Final.
Word 2007
 Start by pressing CTRL-A to select your whole document.
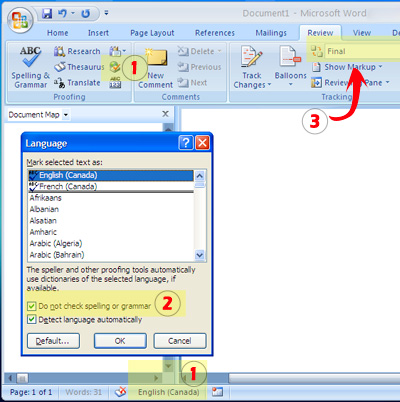
1. Click on the Review tab at the top of the window and then on the Language button. It’s the one with a globe and a checkmark in the proofing section.
OR
Click on the name of the language in the status bar at the bottom of the screen.
2. Add a check mark in the Do not check spelling or grammar option and click OK.
That’s it. The red and green squiggly underlines should have vanished.
3. While you are there, to ensure that the recipient sees things exactly as you do, make sure that you set the document display to Final.
Word 2003
 Start by pressing CTRL-A to select your whole document.
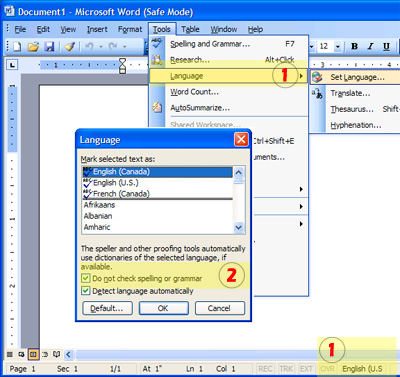
1. Click on the Tools menu at the top of the window, then on Language and then on Set Language…. If you don’t see Language in the menu, double-click on the Tools menu to expand the list.
OR
Click on the name of the language in the status bar at the bottom of the screen.
2. Add a check mark in the Do not check spelling or grammar option and click OK.
There shouln’t be any red or green squiggly underlines left.
Microsoft Word offers certain features to improve your writing experience and ensure you make the least number of mistakes while typing. Spell check is one such major feature that it has to offer. You may have noticed some red wavy lines beneath certain words in your Word document. This is the spell check feature in action. Many new Word users may not know what these lines mean, but that’s exactly what we’ll be talking about here. Not just that, we’ll be helping you remove red lines in Microsoft Word documents permanently if they bother you too much.
Word files working incorrectly might be the result of the document being damaged or corrupted. Word Repair tool is able to fix most existing issues and ensure correct function of the document.
Part 1. What Do the Red Lines in Word Mean?
Usually, when you see a red line under a word, it means that there’s a spelling mistake that you need to correct. However, this isn’t entirely accurate all the time. Any word that’s not in Word’s spell-check dictionary will be marked with a red wavy underline.
Although these red lines can be helpful in correcting your mistakes, they can also be quite annoying at times. Several technical terms and slang words aren’t present in this dictionary, and if you use them while you’re working on your Word document, it will end up having red lines even if you’re spelling it correctly. Hence, people who’re confident with their spelling may want to remove these unnecessary red lines in Word.
Part 2. How to Remove Red Underlines in Word
Typically, users would have to right-click on an underlined word and choose the ‘Ignore All’ option to remove it, but this is not ideal if there are too many red lines in your document. Rather than taking this time-consuming route, you can get rid of red lines altogether in Microsoft Word.
Depending on whether you want to remove the red lines for just the current document or for all the documents you’ll be working on, the steps you need to follow will vary. Here, we’ll be covering two different methods to remove red lines in Microsoft Word documents.
2.1. Remove Red Lines in All Word Documents
If you no longer wish to bother with these red lines whenever you’re working on Word documents, you can remove them permanently. This can be done by changing Microsoft Word’s Proofing settings. Here’s what you need to do:
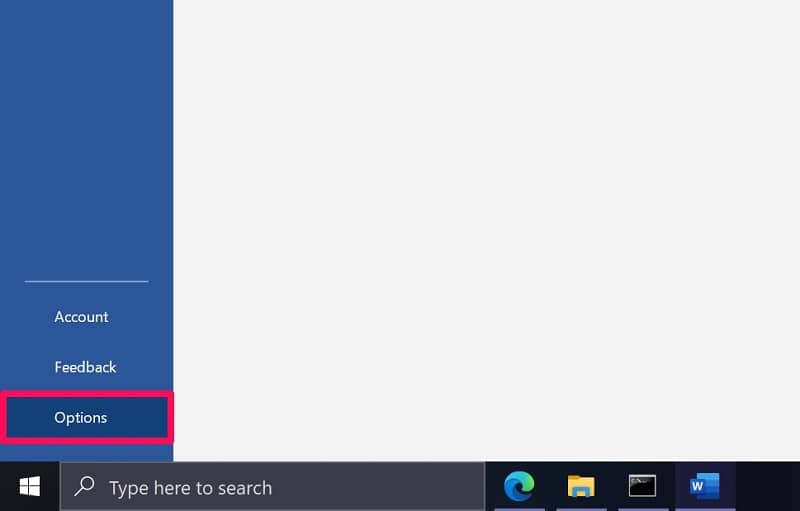
Step 1. Assuming you have Microsoft Word open on your computer, click on ‘File’ from the menu bar.

Step 2. This will take you to the File menu, where you’ll see all the Word documents you’ve worked on. Here, click on ‘Options’ located at the bottom-left corner of the Word window.
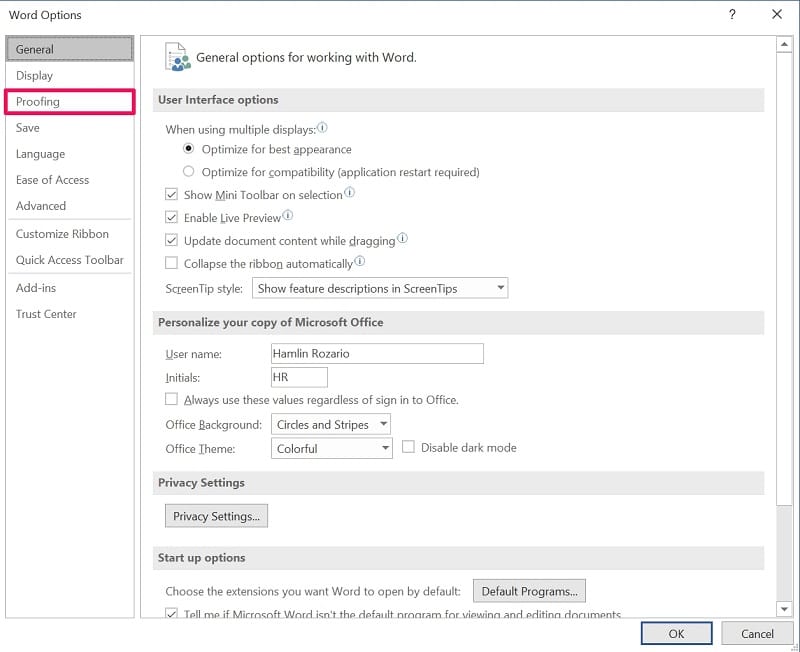
Step 3. A new ‘Word Options’ window will launch within Microsoft Word. You may be in the General section of Word Options. Click on ‘Proofing’ from the left pane to make changes for spell check.
Step 4. Here, you’ll find a bunch of check boxes under the ‘When correcting spelling and grammar in Word’ section. Uncheck the boxes next to ‘Check spelling as you type’ and ‘Frequently confused words.’ Make sure to click ‘OK’ to save your changes.
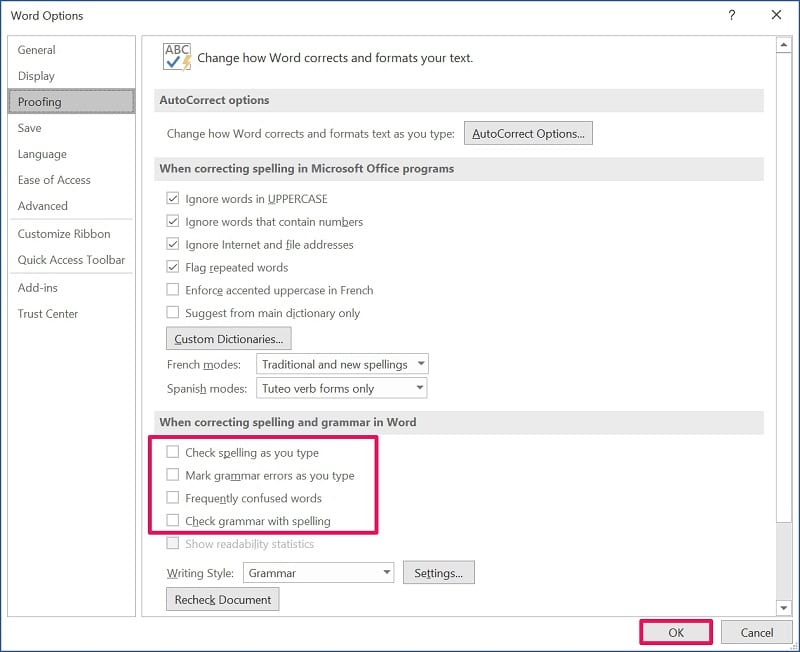
There you go. Unchecking the boxes for grammar will remove green underlines from your Word document too. Either way, you will no longer find any red underlines in any of your Word documents.
2.2. Remove Red Lines in the Current Word Document Only
This method might be useful for those working on Word documents containing a lot of technical terms that aren’t available in the spell check dictionary. Follow the steps below to remove all the red lines from your current Word document:
Step 1. Just like the above method, head over to the ‘File’ section from the menu bar once you’ve opened up Microsoft Word.
Step 2. Next, click on ‘Options’ from the bottom-left corner of the window to access the Word Options menu.
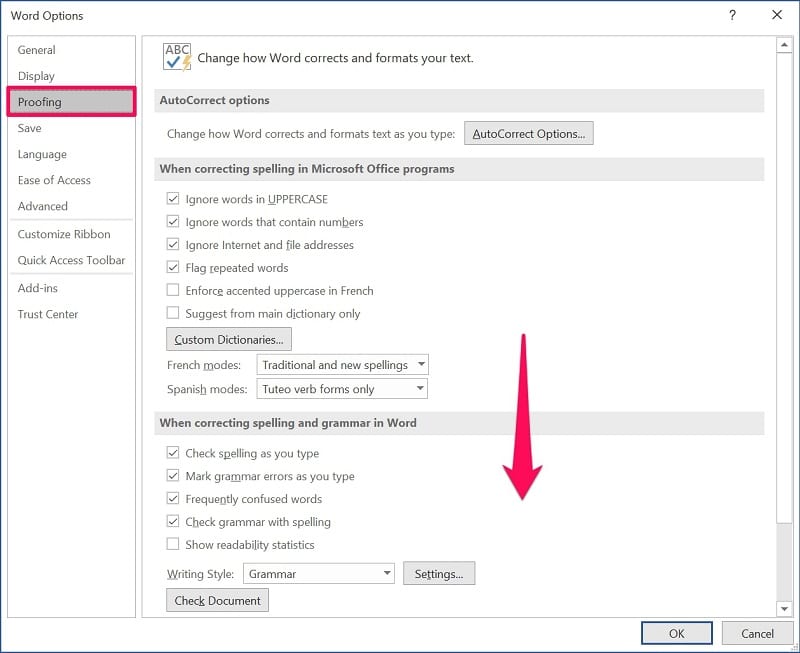
Step 3. Now, click on ‘Proofing’ from the left pane and scroll down to the bottom to make spell check exceptions for your current document.
Step 4. Here, check the box next to ‘Hide spelling errors in this document only’ as shown in the screenshot below, and click on ‘OK’ to save your changes.
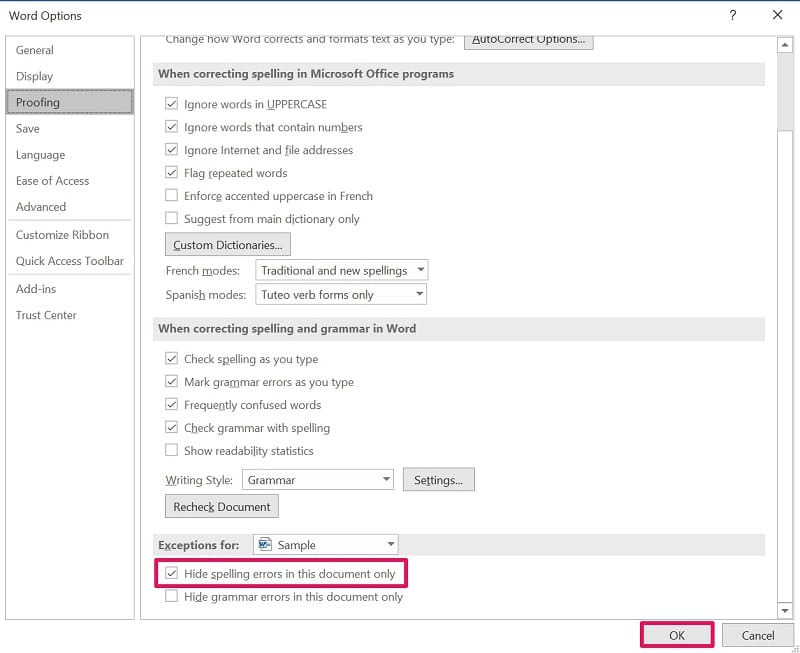
You can make exceptions for other documents here too. Here, the current document is selected by default, but you can click on it and select a different Word file instead. Also, if you want to get rid of green lines, you can check the box for hiding grammar errors.
Conclusion
As you can probably see, it’s not hard to turn off all the red lines in Word whenever it bothers you. For a handful of people who’re on point with their spelling in general, the feature does more harm than help. However, if you change your mind, you can always head back to the Proofing settings and toggle the feature on or off.
We hope you could finally learn multiple ways to get rid of red lines in Microsoft Word. Did you remove red lines from just your current document, or did you turn them off permanently? Do you know any additional ways to deal with red underlines in Word? Feel free to share your ideas, and don’t forget to leave your opinions in the comments section down below.
MS Word
How to Make Letterhead in Microsoft Word
![]()
Published
1 year ago
on
November 18, 2021
How to make a letterhead in Word correctly and neatly is actually easy, but surely there are still many of you who don’t know how to make it.
In an official letter, of course, there is a letterhead and there is always a line at the bottom right. Well, it turned out to be quite easy to make you know.
Apart from being the introduction to a letter, letterhead is also commonly used as a place to write the identity of the letter, such as the identity of the sender and recipient.
For those of you who want to know how to make it, here we explain in full the steps to make a letterhead in Word for you.
HOW TO MAKE LETTERHEAD IN WORD
You should know how to make a letterhead in Word this time, guys, especially when you want to send letters between agencies.
Although not all agencies use it, it doesn’t hurt you to try and find out how to make this letterhead, here are the steps!
- First, open your Word.
- Place the cursor at the back of the last word of the letterhead
- Then select the menu Borders – Borders and Shading.
- After the border menu appears, all you have to do is select the line you want on the menu with a sign like this.
Don’t rush to click Ok, because there’s one more thing you have to do to make it, guys. In the section below, remove it or set it like this to make the line only exist at the bottom, and then Ok.
Yeah, you have successfully drawn the line, Guys, it’s easy and fast, right, how to make a letterhead in Word?
You don’t need to be confused anymore about how to make it. For beginners, making letterhead or letterhead does sound quite difficult.
In fact, how to make a letterhead in Word is fairly easy as long as you already know the procedure. After all, the letterhead cannot be made casually because it is an official identity.
The letterhead contains the official identity of an institution, agency, or company. Well, you can create an official identity on the letterhead in Microsoft Word.
MS Word
How to Create a Background in Microsoft Word
![]()
Published
1 year ago
on
November 18, 2021

This way of making a background in Word aims to beautify the appearance of the document and make it more attractive Guys.
Usually, this is often found in the use of proposals, certificates, covers, and not infrequently in job applications.
With this function, how do you make it? It’s so easy. Yes, although there are several ways you can do this, you can follow this tutorial in full.
HOW TO MAKE A BACKGROUND IN WORD
This background function is very useful if you want to create a document that upholds the originality of Guys, for example, a thesis.
In addition to having to know how to create a table of contents in Microsoft Word, you may also need to know how to create a background in your thesis document, especially in showing the results of the tests you did.
How to make this background is also needed if you want to make an official letter from the agency. Besides needing to know how to make letterhead lines in Word, you also need to know how to add a background to the letter. Here’s how:
- The first thing you can do is change the color.
- Go to Design – Page Color – and immediately choose a color like this.
That is the easiest way and you can change the color according to your needs or tastes, guys. In addition to this method, you can also replace it with an image that you have.
The method is almost the same, guys, pay attention to the following rare:
- Go to the Design menu.
- Click Page Color.
- Select Fill Effects.
- Next, select the tab Picture – Select Picture – From a File.
- Then find the image you have and press Ok
- Finished! The background will change.
But, you also need to remember that both methods will not appear when you print either color or image.
To make it appear when printing, then you need to go to the File menu – Options – Display – and check the Print background colors and Image.
Well, after you go through these few steps, the background will change and also enter when you print, GRATZ!!! It’s easy to make a background in Word.
MS Word
How to Create a Signature in Word
![]()
Published
1 year ago
on
November 11, 2021

There are several ways to make a signature in Microsoft Word. And the method is really easy, just follow the steps below, guys!
Making a signature is really needed, especially in the digital era like now, right? Of course, you need a signature in your Word file, so from that our Team will provide this tutorial in detail.
Actually, you can also use a third application or additional devices such as pens that support your PC or laptop. But this is the easiest way without using other devices and applications Guys.
HOW TO CREATE A SIGNATURE IN WORD
You need to sign first, Guys on a piece of white paper. Make sure the paper is really white and the pen has colour ink that you can really see clearly.
This function is for later photos or files the resolution will be smaller Guys. Not only that, but the customized color saturation will also reduce the thickness of the pen color, you know.
So make sure you give a signature with a clear enough emphasis. Here’s how to create a signature in Word:
- Prepare a white paper with a signature on it. Photos using a smartphone or you can directly scan the signature through a scanner.

- You can reduce the resolution and crop it so that the photo focuses on the signature. For convenience, click the image file > Edit.
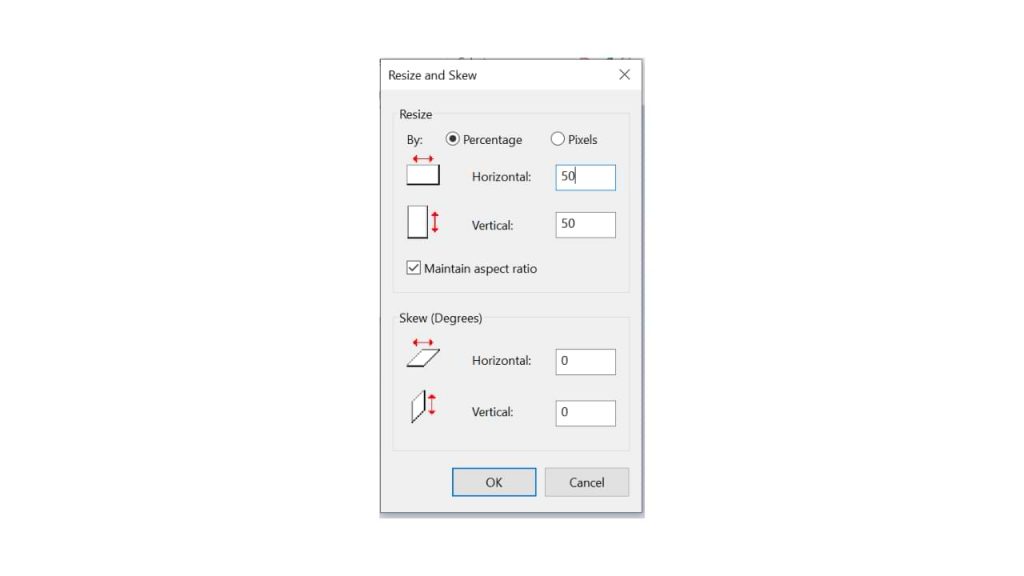
- On the Paint menu, you can resize to reduce the resolution. Choose 50 per cent resolution, fill Horizontal 50 and Vertical 50
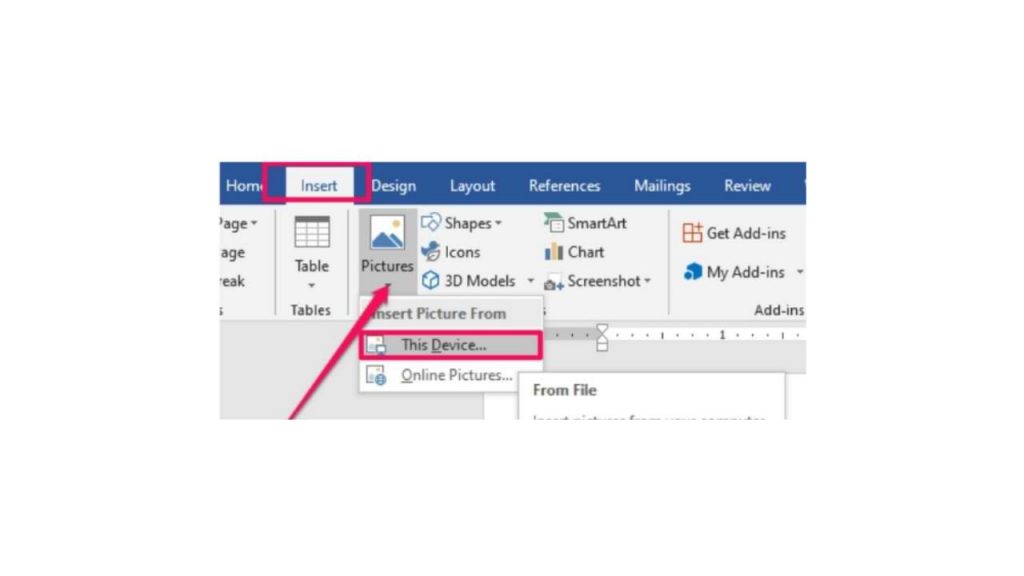
- Hover over the exact position of the word you want to add a signature to. Click Insert > Picture > insert the previous signature image file.
- After you insert the image, reduce the size again using the cursor for more precision.
- Double click on the image.
- On the Format menu, select the Color > Recolor > Black and White 50 per cent submenu.
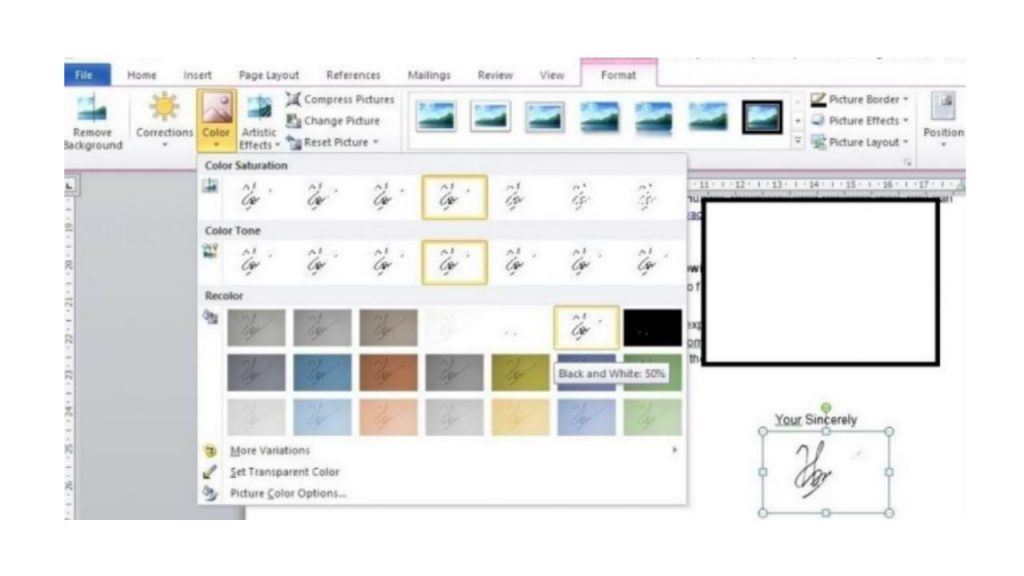
- if your signature is not clear, double click on the image, select menu Correction > Brightness 0 per cent (Normal) Contrast 40 per cent.
You can change the last two steps depending on the contrast and color saturation you want, guys. So you can at the same time adjust the thickness of your signature that has entered the word, so guys.
I also said what Guys, how easy it is to make a signature in Microsoft Word! The most important thing is to make sure your signature is clear enough, and the photos are of high enough quality. Obviously, so that later your signature looks good, it doesn’t break.
The new year is just around the corner and we all want to be as productive as possible. One way to do this is by eliminating unnecessary red lines in your work. Here are 3 ways you can remove those pesky red lines from your word document.
The how to remove red underline in word 2016 is a problem that has been present for a while. There are 3 ways to eliminate the red lines with Word 2023.
3 Methods to Remove Red Lines in Word 2023 – When doing college projects or other tasks with Microsoft Word.
Complete Instructions on How to Remove Red Lines in Word
How to Restore the Red Line Feature in Microsoft Word
A wavy red line emerges on each word as you write it.
Isn’t it true that those red lines irritate you? Yes, I agree with you as well. We are unable to concentrate while doing the red line job.
Continue reading:
There’s no need to be concerned at first, since there are still numerous options for removing red lines from text. This is something I’m talking about since it’s a feature that makes me uncomfortable.
In Microsoft Word, use the Red Line Feature.
Before we eliminate this feature, it’s important to understand why Microsoft developed it. There are not just red lines in words, but also green lines that have their own purpose.
So, if you’re not sure what the red and green line feature in Microsoft Word does, I’ll quickly explain how to utilize it.
For some individuals, the red line in Microsoft Word is also extremely helpful. This function is usually extremely useful for foreigners that utilize English.
This tool acts as a Check Spelling, allowing you to fix each flawless spelling of a word based on the language you’re using.
In general, Word will always correct English users, so if you are one of those individuals who often types errors, this feature will help you notice problems.
The green line is distinct from the red line in that it does not show often in Microsoft Word. The green line’s function is more detailed than the red line’s.
If your typing grammar is incorrect, a green line will show. If you utilize English, it will appear more often.
One of the benefits of Microsoft Word is the green line, which is also extremely irritating. Green lines may be deleted in the same way as red lines can.
Isn’t it intriguing? How can you get rid of the word’s red line? Continue to listen to our conversation to the end to ensure that you fully get everything.
On this time, I’ll show you two methods for removing the red line from the word. The technique I’ll show you is the simplest, and you can put it into practice right now.
1. Using MS Settings to Get Rid of Red Lines in Word
In Word, you may manually remove the red line from the options menu. This technique may be used to permanently remove red or green lines.
So, without further ado, please immediately begin implementing some of the procedures I tell you below.
- Step 1: On your laptop or computer, open the Microsoft Word Office program.
- Step 2 – Once it’s open, go to the File menu on the top menu bar.
 Select File.
- Step 3 – At the bottom of the File menu, click the Options menu.
 Select Options.
- Step 4 – After that, go to the Options menu page and choose the Proofing sub-menu.
 Proofing may be found by clicking here.
- Step 5 – There are many options in the Proofing sub-menu; pay special attention to When Correcting and Grammar in Word.
- Step 6 – To remove the red line, delete the Check Spelling as you enter the checklist column.
- Step 7 – To remove the green line, also delete the checkbox from the Mark grammatical mistakes as you write column.
 Pictures to Follow
Well done, sir! You may now examine the outcomes of your typing; there are no longer any red or green lines. Best of luck!
You may utilize the Language option in Word in addition to the Microsoft Word settings menu. This technique is less complicated than the previous one.
This technique, however, has a disadvantage in that it only deletes the file you are now working on. A red line will show again whenever you open a new file, for example.
Regardless, I will continue to educate you. Simply follow the instructions below to get rid of the red line in the word using the language menu!
- Step 1: Open the file you wish to remove the red lines from.
- Step 2 – After you’ve blocked all of the posts, use the Ctrl + A keyboard shortcut.
- Step 3 – At the bottom of the page, click Language once you’ve completed all of the writing blocks. Check that the Language menu is selected! If this option is selected, the menu will appear as shown below.
- Step 4 – Next, click the Language menu again, and the Language menu page will display, which you should review. Do not use a spell checker or grammar checker.
 Pictures to Follow
Well done, sir! Please double-check your typing to see whether the red line has vanished. If this is the case, your writing will seem cleaner and more organized.
Isn’t it simple to Get Rid of Red Lines in Word? Please put it into practice in Microsoft Word.
Continue reading:
Conclusion:
Thank you for taking the time to read our post; if there is a mistake in the information delivery, please let us know in the comments area below.
Don’t forget to bookmark and return to.com every day because you’ll discover the most up-to-date Technology information here, including How-to Guide Tips & Tricks. Blogging, digital marketing, Android rooting, social media games, and so on. Best wishes
One of the most common problems with Microsoft Word is a red line that appears on a document. This can be caused by a number of different things, but there are many ways to fix it. Reference: how to remove red lines in word 2010.
Frequently Asked Questions
How do I get rid of red lines in Word?
The best way to get rid of red lines in Word is to use the Remove button on the ribbon.
How do you get rid of 3 lines in Word?
To remove the 3 lines in Word, you can use the Remove Line option.
- remove red lines in word track changes
- how to remove red line in word android
- how to remove automatic underline in word
- how to remove red lines in word 2013
- how to remove red lines in word mac