
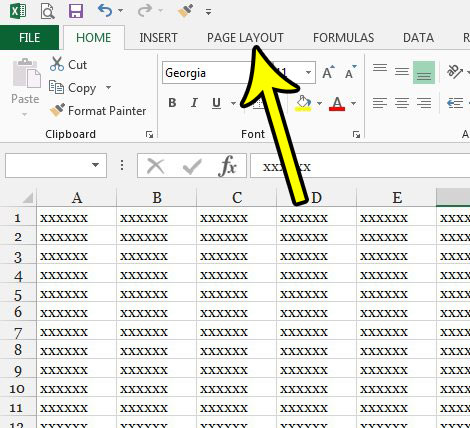
Disabling the reliability options should fix this issue quickly
by Matthew Adams
Matthew is a freelancer who has produced a variety of articles on various topics related to technology. His main focus is the Windows OS and all the things… read more
Updated on December 15, 2022
Reviewed by
Alex Serban

After moving away from the corporate work-style, Alex has found rewards in a lifestyle of constant analysis, team coordination and pestering his colleagues. Holding an MCSA Windows Server… read more
- If Excel is not printing your documents, it might be because of the file type or outdated drivers.
- You can fix this issue by disabling the reliability options that are protecting some file types.
- Another excellent fix to this problem is to repair your Office installation online.
XINSTALL BY CLICKING THE DOWNLOAD FILE
This software will repair common computer errors, protect you from file loss, malware, hardware failure and optimize your PC for maximum performance. Fix PC issues and remove viruses now in 3 easy steps:
- Download Restoro PC Repair Tool that comes with Patented Technologies (patent available here).
- Click Start Scan to find Windows issues that could be causing PC problems.
- Click Repair All to fix issues affecting your computer’s security and performance
- Restoro has been downloaded by 0 readers this month.
Some users have stated in forum posts that Excel is not printing their spreadsheets. In some cases, they can print documents on Word and other apps, but only Excel cannot print.
While this problem can be pretty frustrating, it is easy to fix, as we will show in this guide.
Why is my Excel File not printing?
There are a few reasons Excel might not be printing your documents. This can be due to your configuration or issues with the app. Below are some of the known causes in detail:
- Outdated printer driver: If Excel is not printing all your document’s rows, columns, and images, it might due to issues with your printer driver. The solution to this is to update the driver to the latest version.
- Issues with the file format: For some reason, Excel might have problems printing your spreadsheets in their normal format. You need to change the format to XPS before printing.
- Problems with Excel: In some cases, it might be hard to pinpoint the cause of this issue, especially if the printer prints with other apps but Excel. You need to repair or uninstall the app using an uninstaller program and reinstall it later.
What can I do if Excel is not printing?
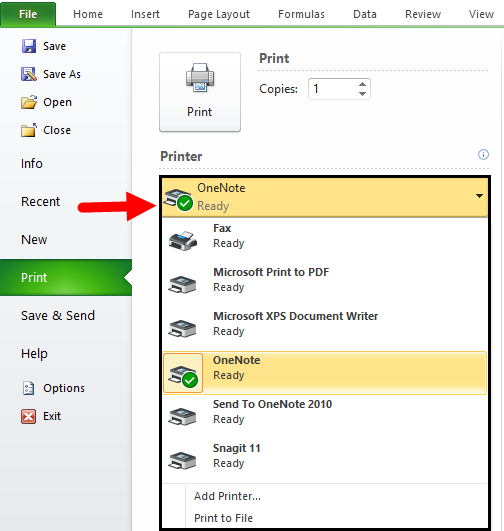
1. Check the Printer Selection
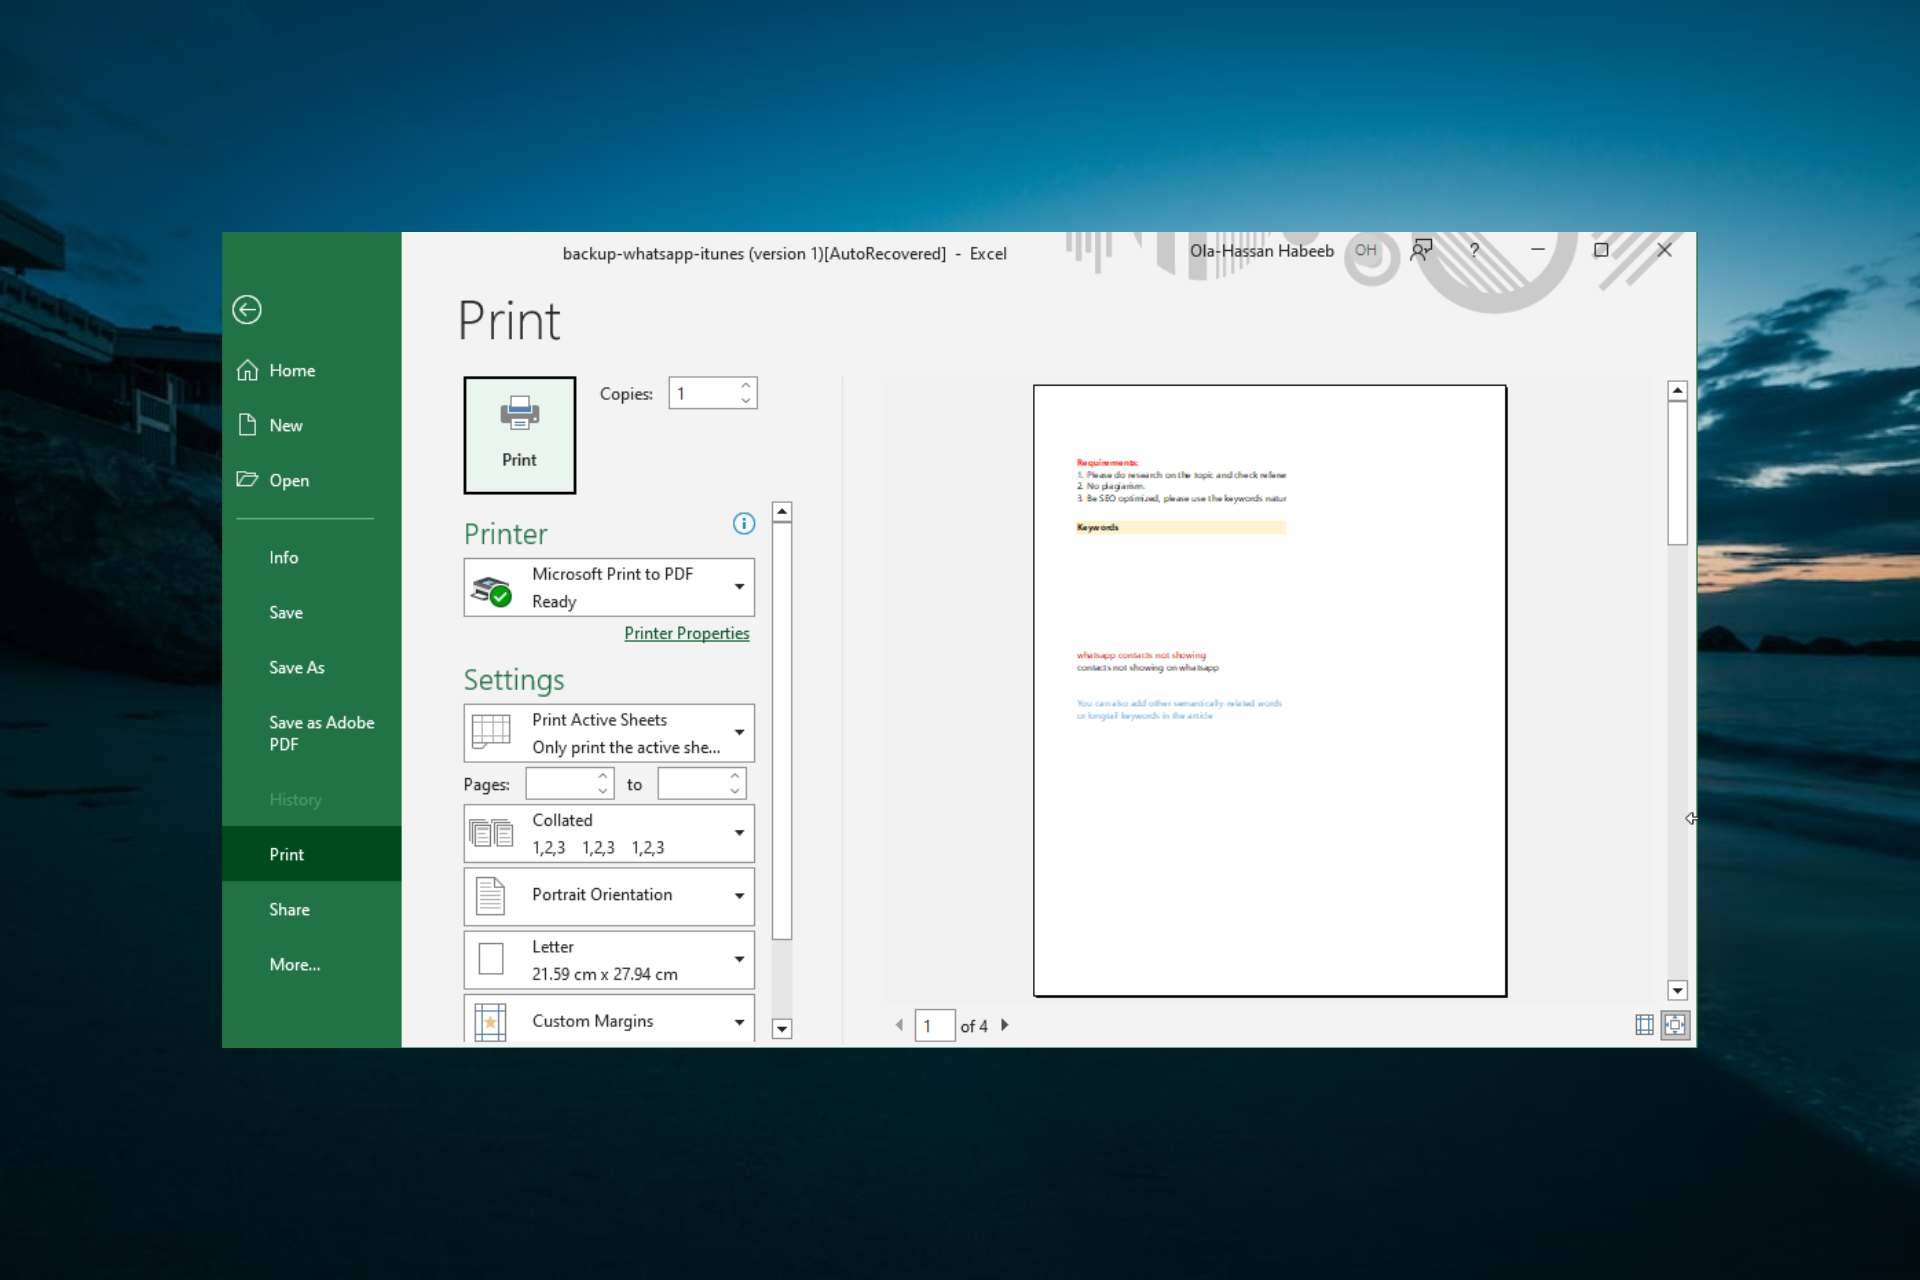
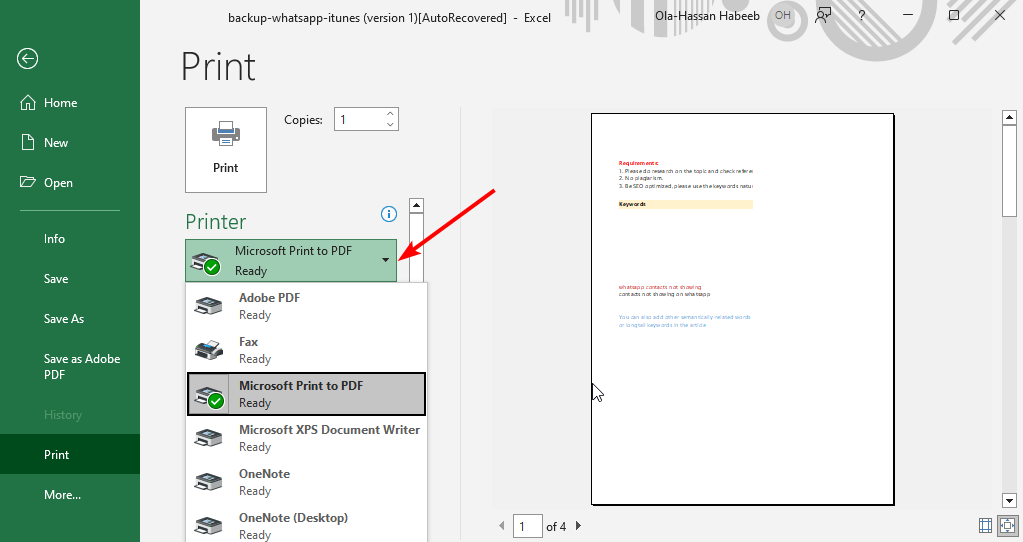
- Press the Ctrl key + P to open the print menu on Excel.
- Select the dropdown under Printer on Excel’s print tab.

- Now, select the default printer from there before printing.
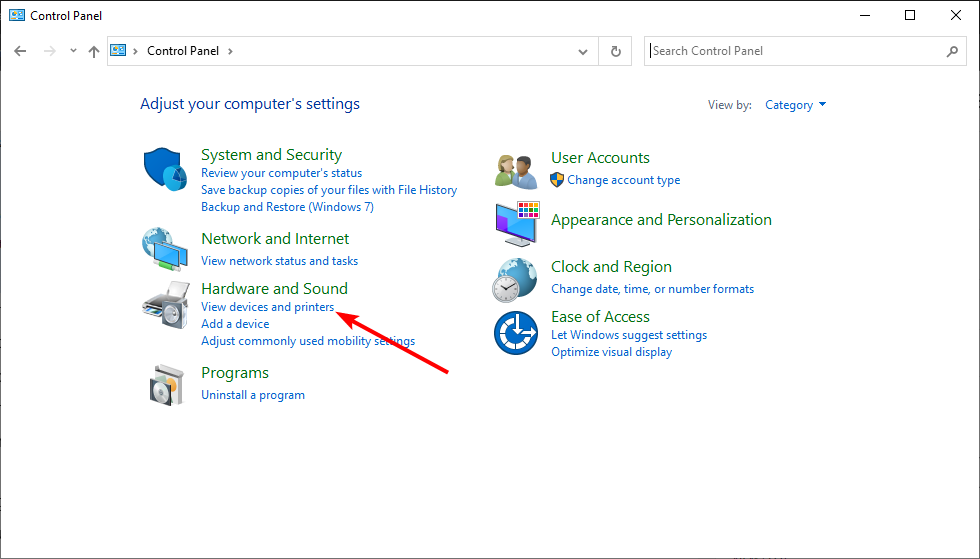
- If unsure of your default printer, press the Windows key, type control, and select Control Panel.

- Select View devices and printers under the Hardware and Sound option.

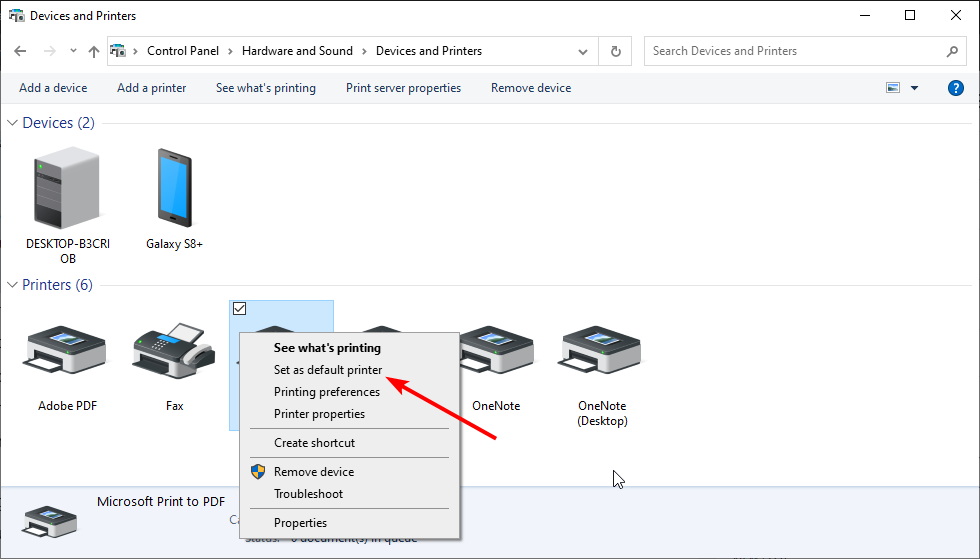
- Now, right-click your printer and select Set as default printer.
- Finally, go back to the print page and try to print again.

Sometimes, Excel is not printing texts and your files because you are not printing with the default printer. Following the steps above should rectify that quickly.
Also, if you already have your printer as the default, some users have found a way around this issue by setting other printers as the default. Now, they use their printer, a normal printer, to print on Excel with great success. So, you can try the reverse process too.
2. Save the Spreadsheet as an XPS File
- Click the File tab at the top and select the Save as option.
- Choose your preferred location.

- Click the Save as type dropdown.
- Now, select XPS Document from the options and click Save.
- Finally, press the Ctrl key + P to open the print menu and try to print the document again.
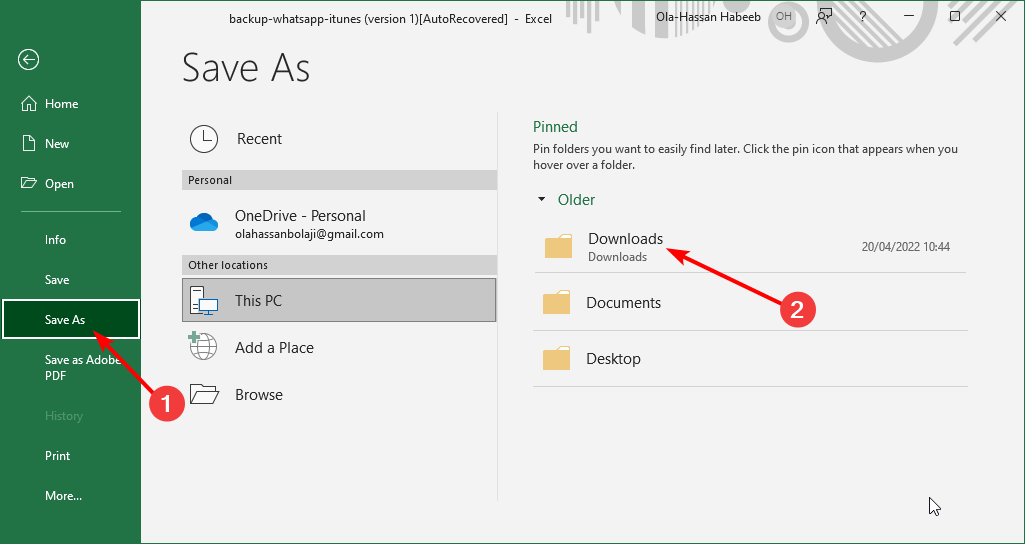
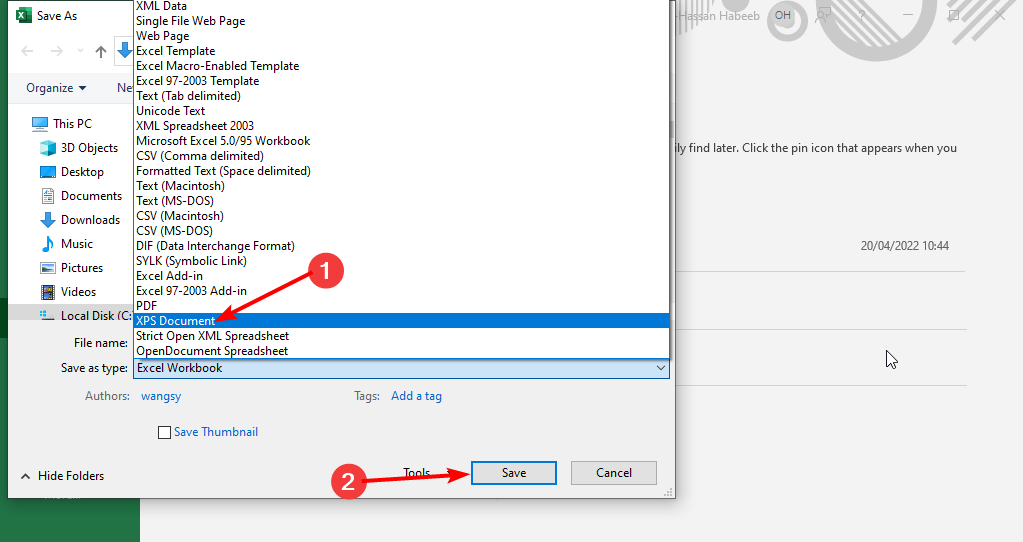
Some users have reported that Excel is not printing their files because of the file type. Changing to the XPS file seems to do the trick here.
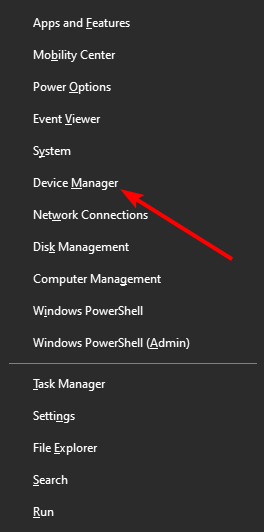
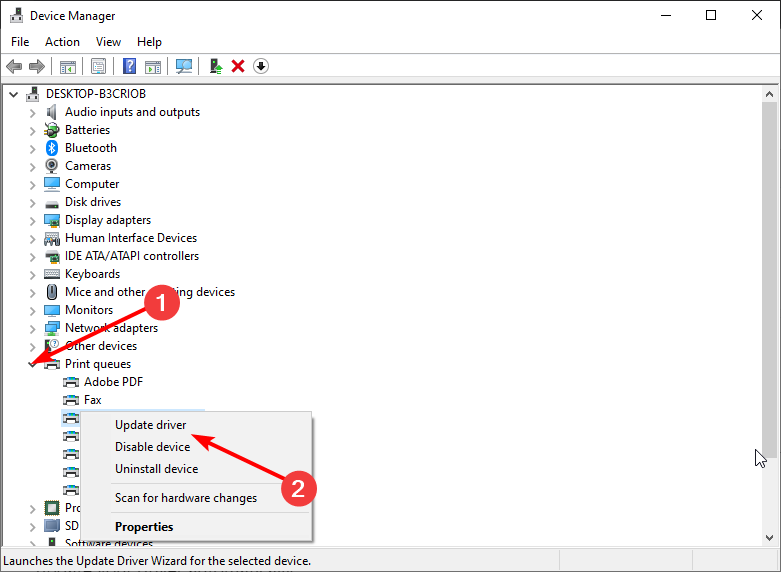
3. Update the printer driver
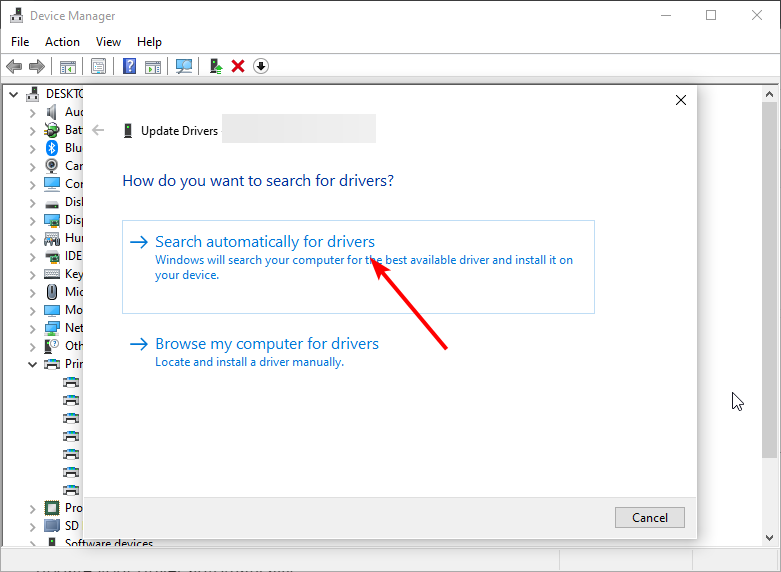
- Press the Windows key + X and select Device Manager.

- Double-click the Print queues option to expand it, and right-click your printer driver.
- Now, select the Update driver option.

- Finally, select the Search automatically for drivers option and install any available updates.
Drivers are important for the smooth communication between your hardware and software components. So, if Excel, Word, and PDF files are not printing on your PC, it might be because your driver is outdated.
Some PC issues are hard to tackle, especially when it comes to corrupted repositories or missing Windows files. If you are having troubles fixing an error, your system may be partially broken.
We recommend installing Restoro, a tool that will scan your machine and identify what the fault is.
Click here to download and start repairing.
If you can’t find the updated driver using the method above, you can go to the printer’s manufacturer’s website to download the latest version.
Alternatively, you can save yourself the stress by updating the driver using a reliable tool in DriverFix to update your driver automatically.

DriverFix
Try using DriverFix to locate the right driver versions for your computer in a matter of seconds.
4. Disable reliability options
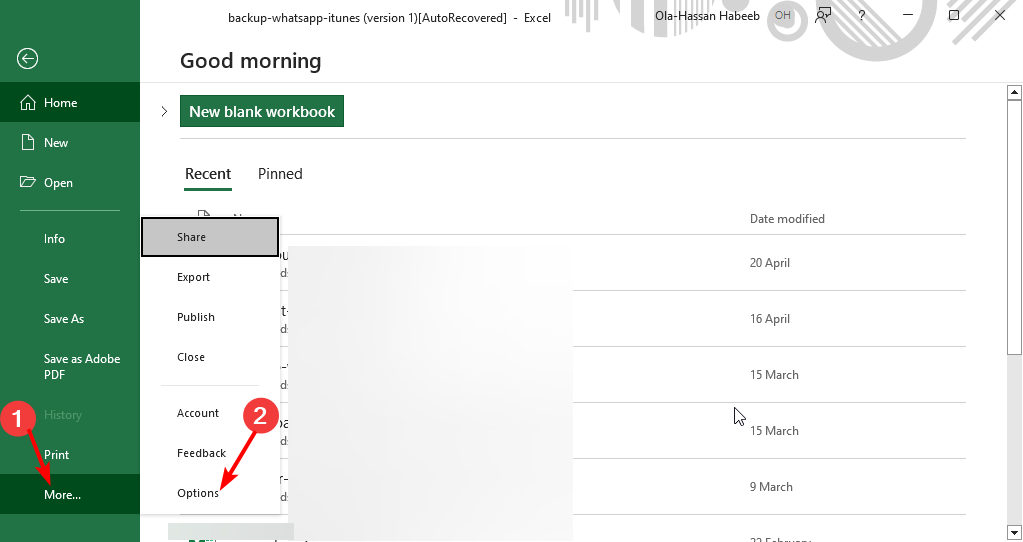
- Launch Excel and click the File tab at the top.
- Select More in the left pane, followed by Options.
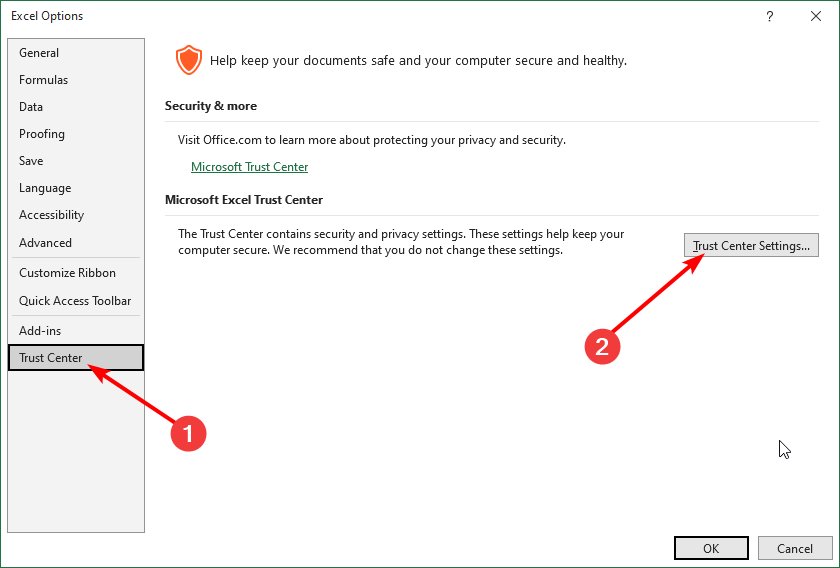
- Now, choose Trust Center.
- From here, click on the Trust Center Settings button.

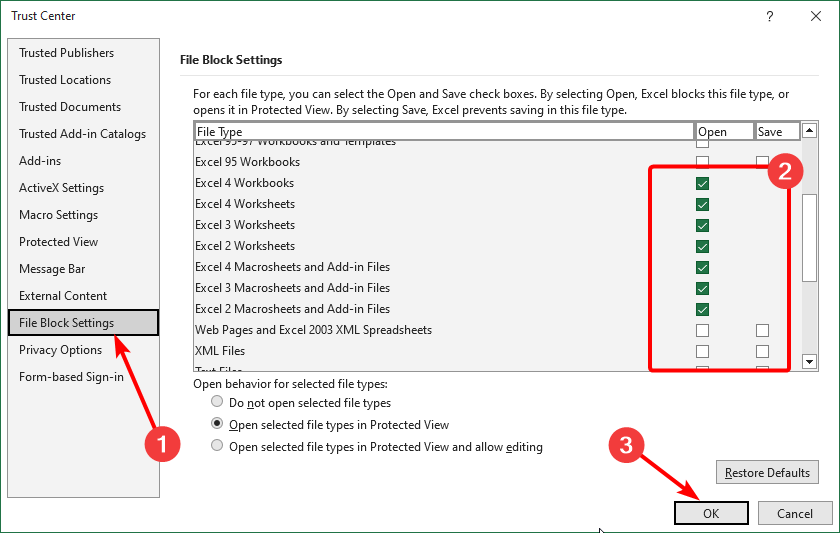
- Select File Block Settings in the left pane.
- Now, uncheck all the boxes for the options provided for different file types and click OK.

- Choose the Protected View option in the left pane.
- Uncheck the boxes for all the options there.
- Finally, click the OK button and close Excel.

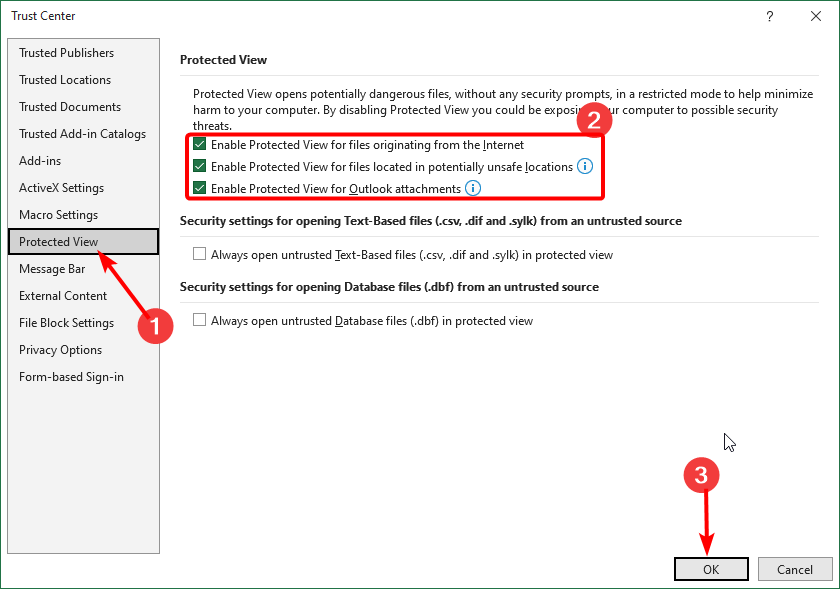
At times, Excel is not printing your document because the file type is protected. You need to undo this setting and relaunch Excel to be able to print.
5. Repair Office
- Press the Windows key + S, type control, and choose Control Panel.
- Click Uninstall a program under Programs.
- Now, right-click the Office program and select Change.
- From here, select Online Repair and click the Repair button.
- Wait for the process to finish and relaunch Excel.
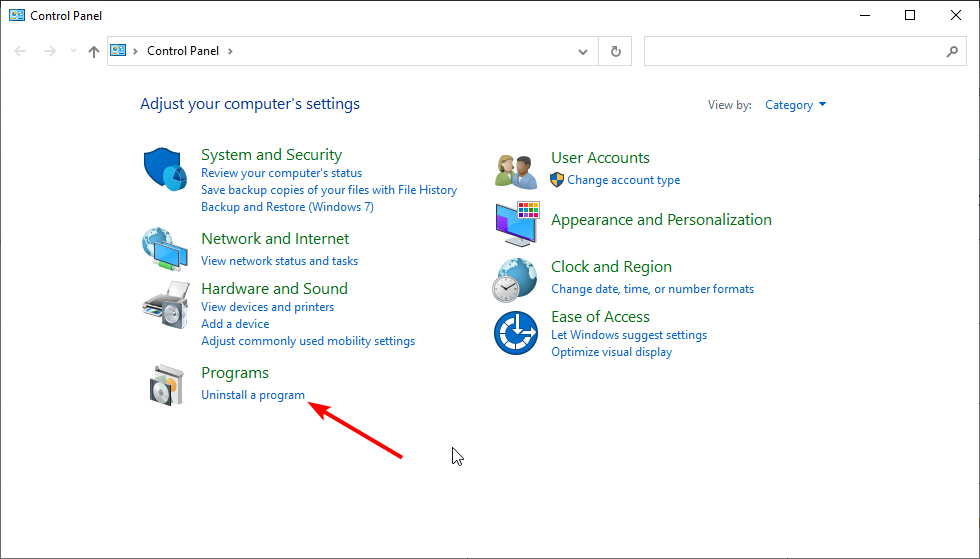
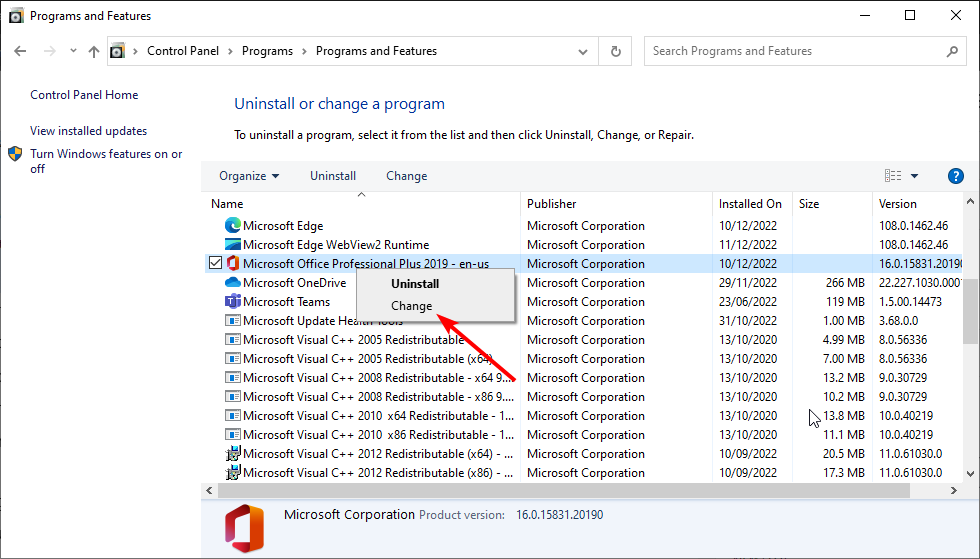
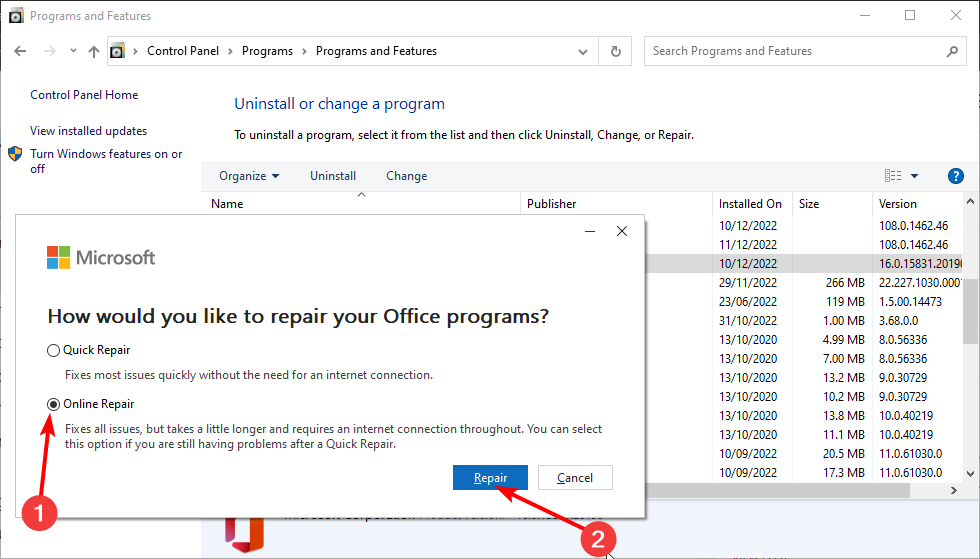
If the above fixes prove abortive and Excel is still not printing your documents, you might need to repair your Microsoft Office installation. This will detect any glitch causing this issue and fix it.
Printing problems on Excel can be annoying, especially if your printer works on other apps. However, it is an issue that has proven solutions, as shown in this guide.
If you still can’t print after applying the fixes above and still have the installation disk, you might need to uninstall Office and reinstall it. Hopefully, it does not come to that.
Feel free to let us know the solution that worked for you in the comments below.
![]()
Newsletter
Some users are experiencing issues with Microsoft Excel. When they try to print from Excel, nothing happens. Whereas, some users have reported that a small window appears and disappears immediately after giving the print command to Excel. If you cannot print from Excel, the suggestions provided in this post may help you fix printing problems in Microsoft Excel.

Fix Excel printing problems of Windows 11/10
If you cannot print from Excel but Word can or maybe you see a Not enough memory error message then here are some suggestions to help you fix Excel printing problems. Before you proceed, make sure that you are using the latest version of Microsoft Office. You can also try to update Office manually and see if it fixes the problem. If the problem persists, try the solutions provided below.
- Try to print via Microsoft XPS Document writer
- Update your printer driver
- Edit permissions in the Registry Editor
- Troubleshoot Excel in Safe Mode
- Remove and add your printer again
- Repair Office
Let’s see all these solutions in detail.
1] Try to print via Microsoft XPS Document Writer
Before printing a spreadsheet, Excel shows us an option to select the printer. If you are unable to print from Excel via your default printer, try to print via Microsoft XPS Document Writer. The steps to do this are as follows:
- Launch Microsoft Excel and open your spreadsheet.
- Go to “File > Print.”
- Click on the Printer drop-down and select Microsoft XPS Document Writer.
- This will save your Excel spreadsheet in the XPS format.
Now, open the saved file. You should be able to print it.
2] Update your printer driver
You might be experiencing printing issues with Excel due to the corrupted or outdated printer driver. We suggest you update your printer driver and see what happens.

You have the following choices when it comes to updating the printer driver.
- Open the Windows Optional Update page and update your printer driver from there (if any update is available).
- Visit the official website of your printer manufacturer and download the latest version of your Printer driver. Now, double-click on the installer file to install the printer driver manually.
3] Edit permissions in the Registry Editor
Windows Registry is a hierarchical database that stores the Windows settings and configurations. Any mistake while modifying the Windows Registry can lead to serious damage to the system. Therefore, before you proceed, we recommend you create a System Restore Point and backup Windows Registry.
Follow the instructions carefully.
Press the Win + R keys. This will open the Run command box. Type regedit and click OK. Click Yes in the UAC prompt.

When the Registry Editor appears on your screen, go to the following path. Simply copy the path given below and paste it into the address bar of the Registry Editor. After that, press Enter.
ComputerHKEY_CURRENT_USERSoftwareMicrosoftWindows NTCurrentVersionWindows
Right-click on the Windows key and select Permissions. The Permissions dialog box will appear. Now, click on the Allow checkbox next to the Full Control option. Click Apply and then click OK.
4] Troubleshoot Excel in Safe Mode
If the problem still persists, there might be a problematic add-in. To confirm this, launch Excel in Safe Mode and print your spreadsheet. If you are able to print your spreadsheet in the Safe Mode, an add-in is causing the problem.
Now, close Excel and open it again in the normal mode. Start disabling all the COM add-ins one by one and print your spreadsheet every time you disable an add-in. This will let you know which add-in is causing the problem. According to the feedback of affected users, the Acrobat PDFMaker Office Com add-in was causing the problem. If you have installed such an add-in, disable it and then see if you can print the spreadsheet. If yes, remove that add-in.

The following steps will help you disable COM Add-ins in Excel:
- Open your spreadsheet in Excel.
- Go to “File > Options > Add-Ins.”
- Select COM Add-ins in the drop-down at the bottom and click GO.
- The COM Add-ins dialog box will appear. Now, simply uncheck the checkbox to disable a particular add-in.
- Click OK.
Read: Fix Excel keeps flickering on Windows 11/10.
5] Remove and add your printer again
Sometimes, removing and adding the printer again fixes the printer-related issues. Completely remove or uninstall your printer and then add it again. Check if this helps. You can completely remove a printer from your Windows 11/10 machine via:
- Settings
- The Control Panel
- Print Server Properties
- The Command Prompt
- The Registry Editor
6] Repair Office
If nothing helps you, repair Microsoft Office. Sometimes, the problem occurs due to corrupted Office files. If this is the case with you, repairing Microsoft Office will fix the problem. First, run a Quick Repair. If this does not fix the problem, run an Online Office Repair.
Read: Microsoft Excel displays High CPU usage.
Fix Excel printing problems in Windows 11/10
Above, we have seen the solutions to fix the problem when Excel does not print on receiving the print command from the user. Now, let’s see some common printing problems that you may experience in Microsoft Excel. Sometimes, when we print a spreadsheet from Excel, we do not get the desired printout. Some of you might have experienced such a problem. Such types of problems occur when the print settings are incorrectly configured before printing a spreadsheet.
Here are some tweaks that you can do to avoid some common printing problems in Microsoft Excel.
- Fit your spreadsheet on one page
- Set the print area in Excel
- Configure print settings before printing the spreadsheet
1] Fit your spreadsheet on one page

Some of you might have experienced that despite configuring the correct page settings, Excel prints a spreadsheet on more than one page. This problem can be fixed by changing the scaling in Excel. If you want to print all the rows or columns on one page in Excel, you have to change the No Scaling option in Excel to Fit all rows on one page and Fit all columns on one page option respectively.
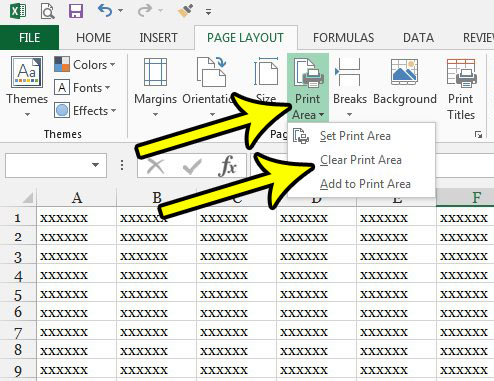
2] Set the print area in Excel
If you want to print selected cells in your spreadsheet, you can set the print area for the same. The steps to set the print area are as follows:

- Open Excel.
- Open your worksheet in Excel.
- Select the range of cells that you want to print.
- Go to “Print Layout > Print Area > Set Print Area.”
Now, when you give the print command to Excel, it will print only the selected cells on a page. You can extend the print area by adding more cells to it. If the cells that you want to add are adjacent to the existing print area, Excel will print them on the same page (if space is available). If the selected cells that you want to add are not adjacent to the existing print area, Excel will print them on another page, no matter whether the space is available on the existing print area or not.
To add cells to the existing print area, follow the steps below:

- Select the range of cells that you want to add to the existing print area.
- Go to “Page Layout > Print Area > Add to Print Area.”
To clear the print area, go to “Page Layout > Print Area > Clear Print Area.”
3] Configure print settings before printing the spreadsheet
You can configure the print settings before printing your spreadsheet. To do so, go to “File > Print” or simply press the Ctrl + P keys. There you will see different print settings. You can change the page orientation (landscape or portrait), select your paper size such as Letter, Legal, A4, A3, etc., change page margins, etc. Every time you make a change to the print settings, Excel will show you the print preview in the preview window.
Why can I print from Word but not from Excel?
If you are able to print from Word but not from Excel, there might be a problematic add-in in Excel. You can confirm this by opening Excel in the Safe Mode. If you will be able to print in the Safe Mode, one of the add-ins is the culprit. Now, disable add-ins installed in Excel one by one. Print your spreadsheet every time you disable an add-in. This will help you identify the problematic add-in.
Other solutions that you can try are removing and adding the printer again, updating your printer driver, etc.
Why won’t Excel print all the columns?
To print all the columns on one page in Excel, you have to configure the page settings before printing your spreadsheet. The steps for the same are as follows:

- Open your spreadsheet in Excel.
- Go to “File > Print.”
- By default, the page setup is set to No Scaling. You have to change this option. Click on it and select Fit all columns on one page.
After that, you will be able to print all the columns on one page in Excel.
Print preview is not available because Microsoft Excel could not connect to the selected printer
If you see the “Print preview is not available because Microsoft Excel could not connect to the selected printer” error message while printing a spreadsheet from Excel, make sure that your computer is running on the latest version of the Windows operating system. Open Windows 11/10 Settings and check for updates. If updates are available, download and install them.
We also suggest you update Microsoft Office manually and see if it helps. If the problem persists, repair Microsoft Office.
Cannot print from Excel, Not enough memory
Some of you might have seen the “Not enough memory” error message while printing a spreadsheet in Microsoft Excel. The error message is self-explanatory. When the printer from which you are printing the jobs does not have enough memory, you will see this error. However, there are other causes too that trigger this error. To fix this issue, you can try the following fixes.
- Copy the data from your spreadsheet to a new spreadsheet
- Change your default printer
- Update your printer driver
- Print in Draft Mode
- Save your Excel file in ODS format
- Reset your printer memory
- Clear print spooler
- Repair Office
Let’s see all these fixes in detail.
1] Copy the data from your spreadsheet to a new spreadsheet
This method has fixed the issue of some users. You can also try this. Copy the data from your spreadsheet to a new spreadsheet and see if it helps.
2] Change your default printer
If the problem still persists, change your default printer. You can set any virtual printer as a default printer, such as Microsoft Print to PDF, Microsoft XPS Document Writer, etc.
3] Update your printer driver
Sometimes the problem persists due to the outdated or malfunctioned printer driver. If this is the case with you, updating the printer driver will solve your problem. To do so, follow the steps written below:
- Open the Device Manager.
- Expand the Print queues node.
- Right-click on your printer driver and select Update driver.
- Select the “Search automatically for drivers” option. Let Windows install the latest version of your printer driver.
If this does not work, visit the official website of your printer manufacturer and download the latest version of your printer driver from there. Now, run the installer file to install the latest version of your printer driver manually.
4] Print in Draft Mode
For some users, printing the spreadsheet in the Draft mode fixed their problem. You can also try this and see if it helps. To do so, you have to change the Fast mode to Draft mode. By default, the print quality is set to Fast mode. Open your print quality settings and change the Fast mode to Draft mode.
5] Save your Excel file in ODS format
Another effective solution to fix this problem is to save the Excel spreadsheet in ODS (OpenDocument Spreadsheet) format. The steps to do this are as follows:

- Launch Microsoft Excel and open your spreadsheet.
- Go to “File > Save As.”
- Click on the Save as type drop-down menu and select OpenDocument Spreadsheet.
- Click Save.
Now, open the ODS file and print it. The problem should not appear this time.
6] Reset your printer memory
If your printer is running low on memory, resetting its memory will help fix the issue. Resetting the printer memory will clear the print jobs in the queue. To do so, follow the steps given below:
- Disconnect your printer from your computer.
- Turn off your printer.
- Disconnect the power cable of your printer and wait for a few minutes.
- Connect the power cables again and turn on your printer.
- Connect your printer to your computer.
If the above method did not help, cold reset your printer. The method to cold reset printers is different for the printers of different brands. Therefore, you have to refer to the user manual of your printer to know the correct way to cold reset your printer.
7] Clear the Print Spooler
In Windows, Print Spooler is a service that stores the printing jobs temporarily. If Excel is showing the “Not enough memory” message while printing a spreadsheet, clearing the Print Spooler may fix the problem. The steps to clear the Print Spooler are as follows:
- Press the Win + R keys to launch the Run command box.
- Type services.msc and click OK. This will launch the Services Management window.
- Scroll down and locate the Print Spooler service.
- Once you find it, right-click on it and select Stop.
- Open the File Explorer and go to the “C:WindowsSystem32spool” path. Simply copy this path and paste it into the address bar of the File Explorer. After that, hit Enter.
- Open the PRINTERS folder and delete all the files inside it. Do not delete the PRINTERS folder.
- Return to the Services Management window and right-click on the Print Spooler service.
- Select Start.
8] Repair Office
Check if you are getting the same error message in other Office apps, like Word. If not, some of the Excel files may be corrupted. To fix this problem, run an online repair for Microsoft Office.
Hope this helps.
Read next: Excel freezing, crashing, or not responding.
It can be a lot of work to get your Excel spreadsheet finalized, and the data looking good, in a presentable format. You may have even already changed some print settings in anticipation of the worksheet not printing right.
But when you go to print that spreadsheet and not all of it is there, then you might be wondering why is Excel cutting off text when printing.
How to Fix Only Part of My Spreadsheet Printing in Excel 2013
- Open your spreadsheet.
- Click Page Layout.
- Select Print Area.
- Choose Clear Print Area.
Our article continues below with additional information on removing a print area in Microsoft Excel, including pictures for these steps.
Have you been working on a spreadsheet, editing and adding data, only to print it and find that it isn’t including all of your data?
This can be a confusing issue to encounter, as it is typically caused by a setting that was applied to that spreadsheet by someone else that was working on it.
Fortunately, you can fix Excel cutting off text when printing by changing a specific setting.
The reason that only part of your spreadsheet is printing in Excel 2013 is due to something called a Print Area. This is a setting for a spreadsheet where you can choose to only print part of the data that is included in the sheet. But if this setting is preventing you from printing a sheet correctly after a bit of editing, then our guide below will show you how to clear that Print Area and print the entire sheet instead.
How to Clear a Print Area in Excel 2013 (Guide with Pictures)
The steps in this article assume that you have a large spreadsheet with cells that contain data, but some of those cells aren’t printing. This is more common with spreadsheets that you receive from other people. Setting a print area is a helpful way to ensure that only specific information prints but if you edit a spreadsheet with a set print area, you can experience some odd results. Following the steps below to clear that print area will typically resolve issues where only part of a spreadsheet is printing.
Step 1: Open your spreadsheet in Excel 2013.
Step 2: Click the Page Layout tab at the top of the window.
Step 3: Click the Print Area button in the Page Setup section of the ribbon, then click the Clear Print Area option.
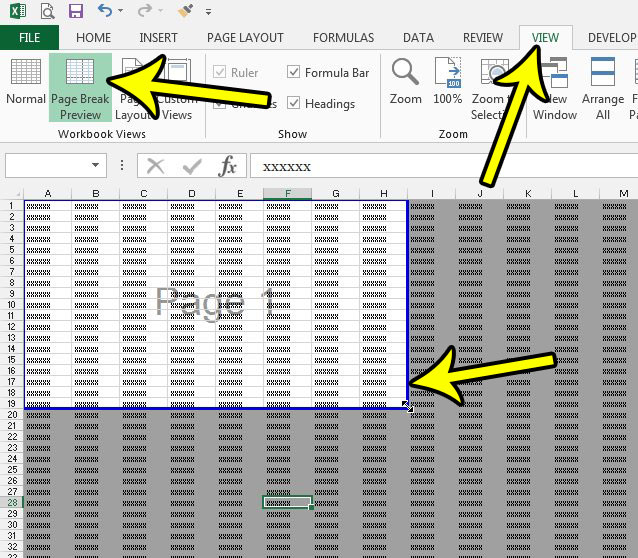
Note that you can also choose to adjust the print area by clicking the View tab at the top of the window, selecting the Page Break Preview option, then dragging the blue box borders to include all of the spreadsheet.
Now that you know how to fix Excel cutting off text when printing by using one of our two methods for adjusting the print area, you will be able to resolve that issue should it happen again in the future.
You can use the print area to your advantage, however, too. If you are the creator and editor of the spreadsheet, it’s a lot easier to remember what you’ve done. That means you can set your own print areas and not be confused when Excel starts printing only some of the spreadsheet.
You can also use print areas when you want to print an empty spreadsheet. Excel won’t print cells that don’t contain data. But if you have defined a print area you can print the cells from that print area even if they’re empty.
If you are experiencing other issues printing in Excel, then there are many things that you might be able to do which can resolve those issues. Check our Excel printing guide for some tips and settings that can make Excel printing a little easier.
If the text being cut off in Excel isn’t caused by the print area, then it can be a little tougher to pinpoint the problem. If text is being cut off inside cells, then the problem may be with the text wrap setting. You can turn text wrapping on or off by selecting the Home tab, then clicking the Wrap Text button in the Alignment section of the ribbon.

Kermit Matthews is a freelance writer based in Philadelphia, Pennsylvania with more than a decade of experience writing technology guides. He has a Bachelor’s and Master’s degree in Computer Science and has spent much of his professional career in IT management.
He specializes in writing content about iPhones, Android devices, Microsoft Office, and many other popular applications and devices.
Read his full bio here.
Excel Print (Table of Contents)
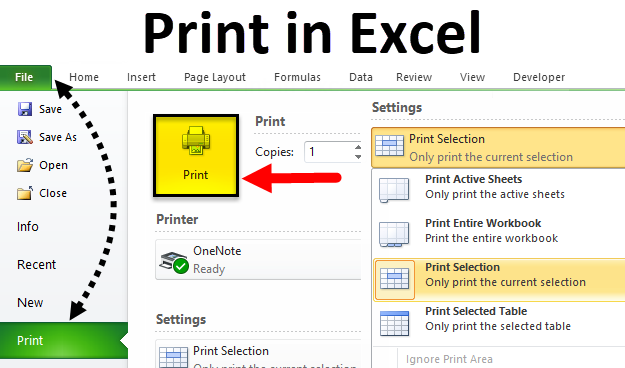
- Introduction to Print in Excel
- How to Set Printing Properties in Excel?
- Print Settings
Introduction to Print in Excel
Print in Excel is used to print out the data therein spreadsheet but to the width that is allowed for selected and available pages in printer setting. We can print the current sheet, active sheet, entire workbook, any selected table, or any customized range of worksheets. When we are about to print, we should have all the necessary columns under the print preview section. We can even give the border using print gridlines without actually bordering the data in the worksheet.
Print Command (Keyboard shortcut):
Press Ctrl+P and then click the Print button (or press Enter) to print the workbook.
How to Set Printing Properties in Excel?
To set printing properties in excel is very easy. Let us understand this by looking at the following examples.
You can download this Print Excel Template here – Print Excel Template
Example #1
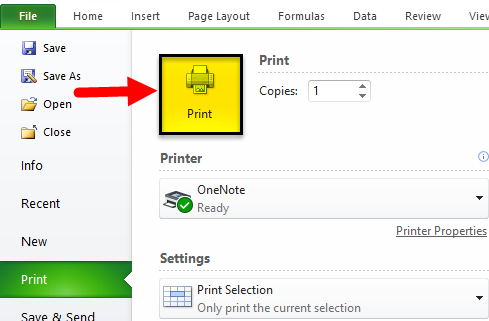
How to Print entire workbook with N number of copies in MS Excel
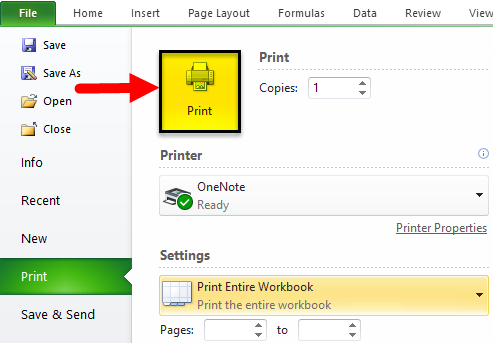
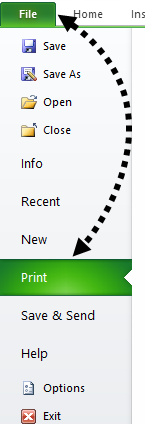
Step 1: Go to Excel Sheet, which a user wants to print. Open the File menu bar and click on print

Step 2: Now Print setting will open, then under the Setting section, select ‘Print Entire workbook’

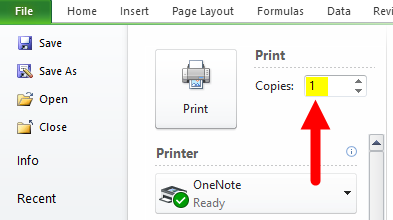
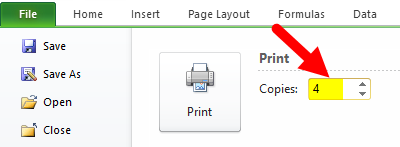
Step 3: Now click on the number of copies needed by the user
Step 4: To print the workbook, click on the print button.
Summary: As the user has given instruction in print command, it will print that no of pages with an entire workbook.
Example #2
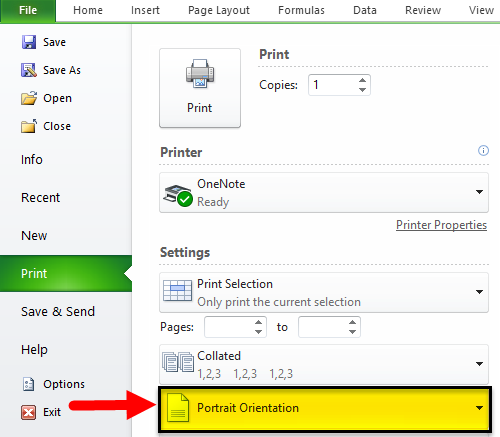
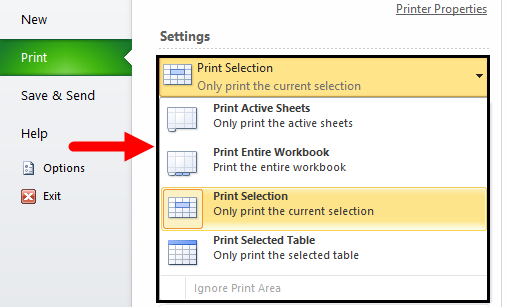
How to Print selected area workbook with the page orientation in MS Excel
Step 1: Go to Excel Sheet, which a user wants to print, and select the area that needs to be printed.
Step 2: Open the File menu bar and click on the Print tab.
Step 3: Now Print setting will open, then under the Setting section, select ‘Print selection’
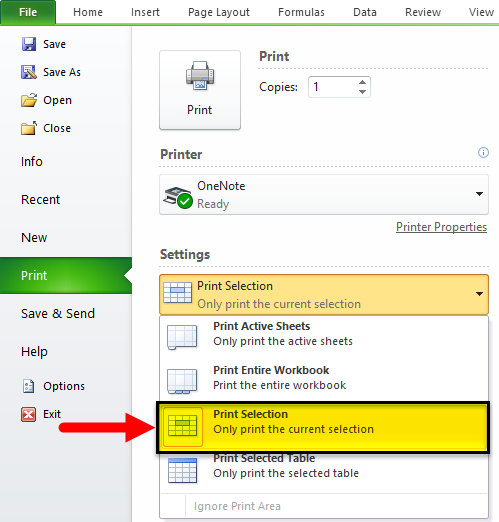
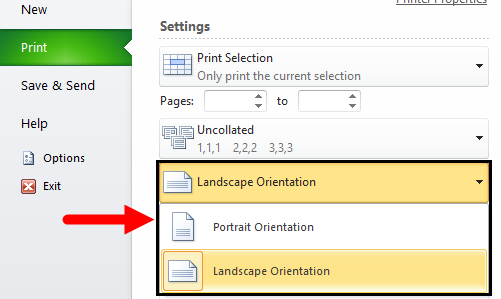
Step 4: Now click on the orientation of the page needed by the user.
Step 5: Click on the print button to print the workbook as per the setting.
Summary: As per the given instruction in the print command, it will print with the selected area only in landscape orientation.

Print Settings
Multiple Copies: If a user wants to print more than one copy, he just needs to count how many copies he wants to print in the Copies section.
Select Printer: There are multiple options to save the workbook; as per the users need; he can select options in the added printer, save as PDF, OneNote, XPS document writer, send FAX or add any new printer.
Print selection: This option will print only the current selection in the print command.
Print Active sheets: This option will print only the active sheet in the workbook.
Print Entire Workbook: This option will print all the workbook pages.
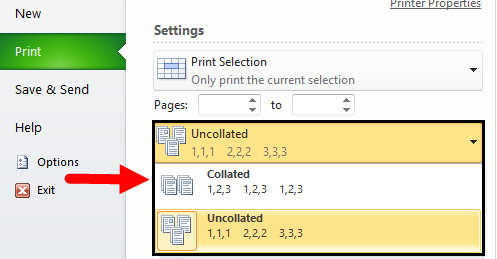
Collated: If a user’s workbook contains multiple pages, then there is an option to switch between Collated and Uncollated for a print command.
For example, if the user wants to print 10 copies from a workbook, Collated prints the entire first copy and then the entire second copy.
Or if the user is selecting Uncollated prints 10 copies of page 1, 10 copies of page 2, etc.
Orientation: A user can switch between Portrait Orientation (best when more rows but fewer columns on a page) and Landscape Orientation (best when more columns but fewer rows on a page).
Page Margins: If a user wants to adjust the page margins, he can do so by following the below steps.
Step 1 – By selecting one of the pre-defined margins (Normal, Wide, or Narrow) from the Margins drop-down list.
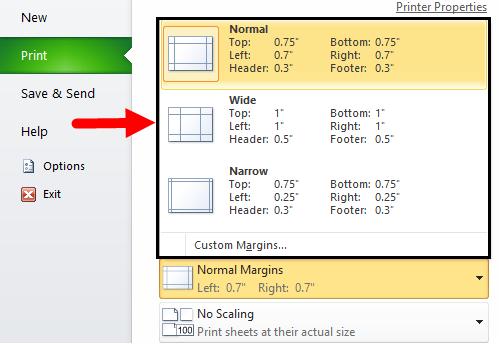
Step 2 – Or click the ‘Show Margins’ icon at the bottom right of the window. Now a user can drag the lines to change the page margins manually.
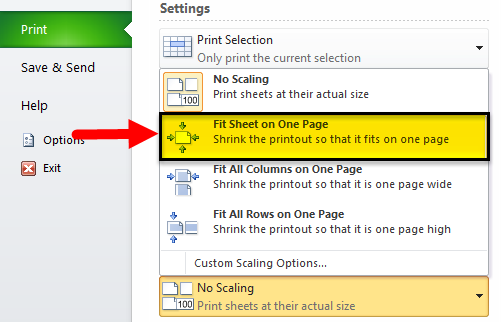
Scaling: If a user wants to fit more and more data on a single page, then he can fit the sheet on one page. To get these settings, he needs to follow the below process.
- Select ‘Fit Sheet on One Page’ from the Scaling drop-down list.
Limitation of Excel Print
- Excel doesn’t warn a user when your printout becomes unreadable.
- It is very challenging to adjust the margins from the Preview Pane.
- When a user prints a worksheet or a table without gridlines, it will be very difficult to distinguish cell boundaries.
Things to Remember About Excel Print
- If a user does not want to print some page, then he can do from settings where he will get an option of the page, and he can give. Ex- 2 to 10 (Here home page will not be printed)
- In the Print setting, a user can ignore the print area selection as per his requirement.
- If a user sets any print area in excel, then only that area will be printed, which the user has selected, and a print area will be saved when a user will save the workbook.
- A user can also shrink the printout to one page wide or one page high. He just needs to select Custom Scaling Options and need to manually enter a scaling percentage or fit the printout to a specific number of pages wide and tall. Be careful.
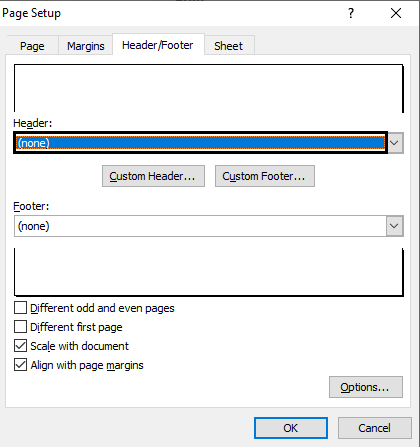
- Under the Header/Footer tab, a user can determine what will be in the header part and what will be in the footer of each of the pages of the printout.
- Suppose a user doesn’t want a header or a footer. Select the first option, “none”, from the list of the predetermined options.
Recommended Articles
This has been a guide to Print in excel. Here we have discussed how to Print the entire excel workbook with N number of copies and print a selected area workbook with the page orientation with printing settings and properties along with practical examples. You can also go through our other suggested articles –
- Print Gridlines in Excel
- Excel Print Area
- Print Comments in Excel
- VBA Print
-
08-08-2013, 10:17 AM
#1

Registered User
«Microsoft Office Excel did not find anything to print» — printing error
I am getting the «Microsoft Office Excel did not find anything to print» error on my attached spreadsheet and I am stumped about what could be causing this. This is an actual work document that I am trying to use to create reports and I have had the same issue with 2 other similar spreadsheets that I have created.
On the first tab titled «LobbyTimeDetail», I am not able to print any pages past page 46. This first tab is a pivot table. I have checked the print range but pages 47-83 are in the print range. These pages also do not show up under print preview. I can print when I highlight a single page and «print selection» but I am not able to print the specific page using print range from the print prompt without getting the error. Has anyone encountered this issue? Any ideas on how to fix?
-Matt
Last edited by mattgentz; 08-08-2013 at 03:58 PM.
Reason: Issue Resolved
-
08-08-2013, 01:35 PM
#2
Re: «Microsoft Office Excel did not find anything to print» — printing error
Welcome to the Forum mattgentz!
I downloaded your file and was able to see all 83 pages on Print Preview, and was able to print all 83 pages without changing any settings (to a PDF file).
I do not know what could cause your problem, other than something about your printer setup. What type of printer are you trying to print to? Do you have any other printers/devices you can try?
Last edited by 6StringJazzer; 08-08-2013 at 01:37 PM.
Reason: clarified reference to «preview»
Jeff
| | |?| |?| |?| |?| | |:| | |?| |?|
Read the rules
Use code tags to [code]enclose your code![/code]
-
08-08-2013, 02:17 PM
#3
Registered User
Re: «Microsoft Office Excel did not find anything to print» — printing error
This error does not occur on Excel 2010. It only occurs on Excel 2007. Can somebody using 2007 give this a try?
-
08-08-2013, 02:23 PM
#4
Re: «Microsoft Office Excel did not find anything to print» — printing error
i confirm i see all 83 in the workbook but print preview only shows 46 in 2007
-
08-08-2013, 02:55 PM
#5
Re: «Microsoft Office Excel did not find anything to print» — printing error
but if i change from letter to 55% size i see all of them in print preview
-
08-08-2013, 03:57 PM
#6
Registered User
Re: «Microsoft Office Excel did not find anything to print» — printing error
Awesome. That does solve my issue. Thanks a ton for your help.
-
01-10-2014, 05:13 AM
#7
Registered User
Re: «Microsoft Office Excel did not find anything to print» — printing error
I have the same message and find a solution:
Just right-click on the worksheet tab.
Then click «Move or Copy…»
On the next window click «Cancel»
That’s all !
When go to «Print preview» you can see worksheet data and print normally.
-
02-17-2014, 09:14 PM
#8
Registered User
Re: «Microsoft Office Excel did not find anything to print» — printing error
I couldn’t make the % change work, but greenn’s trick solved the puzzle with two easy clicks. Thanks!
-
05-11-2020, 10:19 AM
#9
Registered User
Re: «Microsoft Office Excel did not find anything to print» — printing error
Error Message: Microsoft didn�t find anything to print.
When you click on �Print� in Excel you will get the print dialog window.
Make sure that the page selection (i.e., 2-2 or 3-5) numbers are cleared.
If it is not cleared and you want to print a highlighted selection at the same time that you have page numbers in place you will get the error message shown above.
The printer does not know what you want; specific page numbers or the selection.You can�t have it both ways. It is one or the other, printing specific page(s); or printing a selection.
Microsoft should have detected this conflict and made the error message more meaningful.
-
05-11-2020, 11:05 AM
#10
Re: «Microsoft Office Excel did not find anything to print» — printing error
Originally Posted by MaskedLoneRanger02
Error Message: Microsoft didn�t find anything to print.
When you click on �Print� in Excel you will get the print dialog window.
Make sure that the page selection (i.e., 2-2 or 3-5) numbers are cleared.
If it is not cleared and you want to print a highlighted selection at the same time that you have page numbers in place you will get the error message shown above.
The printer does not know what you want; specific page numbers or the selection.You can�t have it both ways. It is one or the other, printing specific page(s); or printing a selection.
Microsoft should have detected this conflict and made the error message more meaningful.
You have responded to a question that is 7 years old and has been solved. Please have a look at some of our new posts to see where folks need help.
Given that we have had three members post their first (and so far, only) posts here after the thread was marked SOLVED, I am going to close this.


